Table of Contents
Advertisement
Quick Links
im Vertrieb von
Extron Electronics, USA
Extron Electronics, Europe
1230 South Lewis Street
Beeldschermweg 6C
Anaheim, CA 92805
3821 AH Amersfoort
USA
The Netherlands
714.491.1500
+31.33.453.4040
www.extron.com
Fax 714.491.1517
Fax +31.33.453.4050
www.camboard.de
© 2003 Extron Electronics. All rights reserved.
CAMBOARD Electronics
Extron Electronics, Asia
Extron Electronics, Japan
135 Joo Seng Road, #04-01
Daisan DMJ Building 6F
PM Industrial Building
3-9-1 Kudan Minami
Singapore 368363
Chiyoda-ku, Tokyo 102-0074 Japan
+65.6383.4400
+81.3.3511.7655
Fax +65.6383.4664
Fax +81.3.3511.7656
Tel. 07131 911201
Fax 07131 911203
Installation Guide
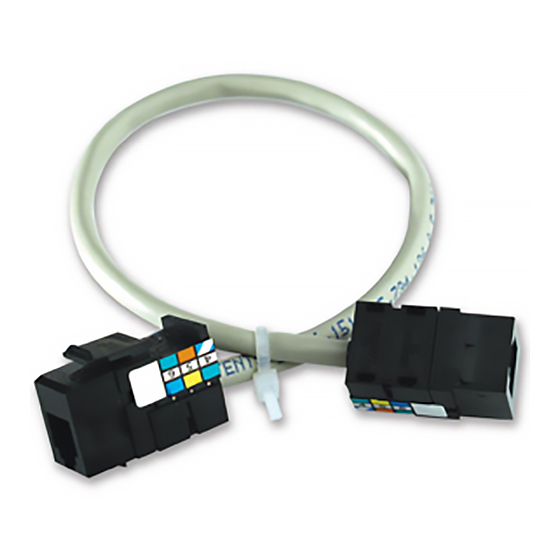
RJ-45 to RJ-11 Conversion Kit
Installation Instructions for HSA 400 Series
ce-info@camboard.de
and HSA 800 Series Enclosures
68-699-02 Rev. B
Printed in the USA
02 03
Advertisement
Table of Contents

Summary of Contents for Extron electronics HSA 400 Series
- Page 1 Vertrieb von CAMBOARD Electronics Installation Guide RJ-45 to RJ-11 Conversion Kit Installation Instructions for HSA 400 Series and HSA 800 Series Enclosures Extron Electronics, USA Extron Electronics, Europe Extron Electronics, Asia Extron Electronics, Japan 1230 South Lewis Street Beeldschermweg 6C...
- Page 2 Sie verbrauchte Batterien bitte gemäß den Herstelleranweisungen. Keine Zusatzgeräte • Verwenden Sie keine Werkzeuge oder Zusatzgeräte, particular use. In no event will Extron Electronics be liable for direct, indirect, or die nicht ausdrücklich vom Hersteller empfohlen wurden, da diese eine Gefahrenquelle darstellen können.
-
Page 3: Table Of Contents
im Vertrieb von CAMBOARD Electronics Table of Contents Chapter 1 • HSA 400, 402 Installation ......1-1 Introduction ................1-2 Removing the HSA from the Table ....... 1-4 Removing the Front Panel Connector ......1-6 Replacing the Lower Enclosure Connector .... -
Page 4: Chapter 1 • Hsa 400, 402 Installation
im Vertrieb von CAMBOARD Electronics Table of Contents, cont’d RJ-45 to RJ-11 Conversion Kit This page intentionally left blank Chapter One HSA 400, 402 Installation Introduction Removing the HSA from the Table Removing the Front Panel Connector Replacing the Lower Enclosure Connector Replacing the Front Panel Connector and Reassembling the HSA Routing the AAP Cables www.camboard.de... -
Page 5: Introduction
im Vertrieb von CAMBOARD Electronics HSA 400, 402, Installation, cont’d Introduction HSA 402 120-240 50/60 Hz 5A 120-240 50/60 Hz 5A The Extron HSA 400 and HSA 402 ship with Category (CAT) 6 cables terminated with RJ-45 connectors between the front panel AUDIO INPUT COMPUTER... -
Page 6: Removing The Hsa From The Table
im Vertrieb von CAMBOARD Electronics HSA 400, 402, Installation, cont’d Removing the HSA from the Table Ensure that AC power is disconnected before servicing the HSA unit. On the underside of the clamshell and in the enclosure, cut the tie wraps that route the AAP cables out of the way. HSA 402 Disconnect the IEC power cord and the RJ-45 connectors from the underside of the surface mount enclosure. -
Page 7: Removing The Front Panel Connector
im Vertrieb von CAMBOARD Electronics HSA 400, 402, Installation, cont’d Removing the Front Panel Connector With a tweeker, push down on and gently twist on the front of each RJ-45 Through the access hole in the rear of the enclosure, cut connector detent to disconnect the the tie wraps that bundle the power and CAT 6 cables. -
Page 8: Replacing The Front Panel Connector And Reassembling The Hsa
im Vertrieb von CAMBOARD Electronics HSA 400, 402, Installation, cont’d Note how the disconnected CAT 6 cable is routed inside Replacing the Front Panel Connector and the HSA and then gently pull the cable free. Reassembling the HSA Route the conversion kit telephone cable in the same Snap the interior RJ-45 and RJ-11 connectors onto the rear fashion as the removed CAT 6 cable. -
Page 9: Routing The Aap Cables
im Vertrieb von CAMBOARD Electronics HSA 400, 402, Installation, cont’d Routing the AAP Cables RJ-45 to RJ-11 Conversion Kit Open the top panel to extend the AAP cables to their maximum pull. Experiment with AAP cable positioning to ensure that the cables do not rub against the edges of the AAP cable hole and to ensure that the cable pull does not restrict the movement of the top panel. -
Page 10: Introduction
im Vertrieb von CAMBOARD Electronics HSA 800, 802, 822 Installation Introduction Removing the HSA from the Table The Extron HSA 800, HSA 802, and HSA 822 ship with Ensure that AC power is disconnected before Category (CAT) 6 cables terminated with RJ-45 connectors servicing the HSA unit. -
Page 11: Replacing The Connectors
im Vertrieb von CAMBOARD Electronics HSA 800, 802, 822 Installation, cont’d On the underside of the table, remove the two bolts that On all AAP panels, remove the four screws on the right secure the clamshell to the surface mount enclosure and left sides of the AAP panel (figure 2-3). -
Page 12: Reassembling The Hsa
im Vertrieb von CAMBOARD Electronics HSA 800, 802, 822 Installation, cont’d Inside the bottom frame, identify the RJ-45 connector to be Open and close the top panel while you experiment with replaced. With a tweeker, push down on and gently twist the routing of the cable bundle. -
Page 13: Routing The Aap Cables
im Vertrieb von CAMBOARD Electronics HSA 800, 802, 822 Installation, cont’d Routing the AAP Cables Open the top panel to extend the AAP cables to their maximum pull. Experiment with AAP cable positioning to ensure that the cables do not rub against the edges of the AAP cable hole and to ensure that the cable pull does not restrict the movement of the top panel.


Need help?
Do you have a question about the HSA 400 Series and is the answer not in the manual?
Questions and answers