Table of Contents
Advertisement
Available languages
Available languages
Quick Links
Audio-Matrixrouter-System
Audio Matrix Router System
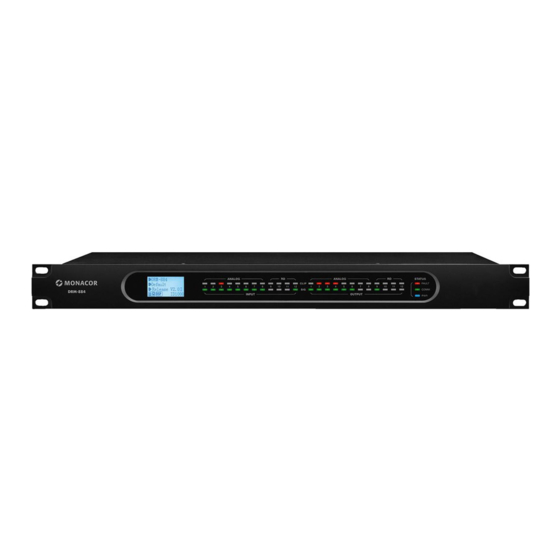
DRM-884
DRM-884DTM
DRM-884IOP
DRM-884VAP
DRM-884VP
DRM-884RC
BEDIENUNGSANLEITUNG
INSTRUCTION MANUAL
ELECTRONICS FOR SPECIALISTS ELECTRONICS FOR SPECIALISTS ELECTRONICS FOR SPECIALISTS ELECTRONICS FOR SPECIALISTS
Bestellnummer • Order Number 17.6940
Bestellnummer • Order Number 17.6950
Bestellnummer • Order Number 17.6960
Bestellnummer • Order Number 17.6970
Bestellnummer • Order Number 17.6980
Bestellnummer • Order Number 17.6990
Advertisement
Chapters
Table of Contents

Related Manuals for Monacor DRM-884DTM


Summary of Contents for Monacor DRM-884DTM
- Page 1 Audio-Matrixrouter-System Audio Matrix Router System DRM-884 Bestellnummer • Order Number 17.6940 DRM-884DTM Bestellnummer • Order Number 17.6950 DRM-884IOP Bestellnummer • Order Number 17.6960 DRM-884VAP Bestellnummer • Order Number 17.6970 DRM-884VP Bestellnummer • Order Number 17.6980 DRM-884RC Bestellnummer • Order Number 17.6990...
- Page 2 O 12 Signal processing Signal processing NO 1 *Dante-Eingänge und -Ausgänge nur mit DRM-884DTM vorhanden NET IN* Dante Dante NET OUT* Dante inputs and outputs only available with DRM-884DTM NO 8 DUCKER Input signal processing MUTE GAIN GAIN EXPANDER DELAY...
- Page 3 Deutsch . . . . . . . . . . . Seite English . . . . . . . . . . . . Page ELECTRONICS FOR SPECIALISTS ELECTRONICS FOR SPECIALISTS ELECTRONICS FOR SPECIALISTS ELECTRONICS FOR SPECIALISTS...
-
Page 4: Table Of Contents
11 .6 DRM-884DTM . . . . . . . . . . . . . . . . . . . -
Page 5: Übersicht
Mikrofone oder Tonquellen mit Line-Pegel; Anschluss über ² Bei Problemen des Signalprozessors wird „DSP!“ angezeigt . beiliegende Steckschraubklemmen ³ „DANTE“ signalisiert die installierte Erweiterung DRM-884DTM . 2 LEDs zur Anzeige des Signalpegels der analogen Eingänge und 2 Sicherheitshinweise der RD-Eingänge für die Erweiterungsmodule Die grüne LED SIG leuchtet, wenn ein Signal vorhanden ist (abhän-... -
Page 6: Einsatzmöglichkeiten
3.1.5 Dante-Schnittstellenmodul DRM-884DTM 12 erweitern . Bei einer Kopplung mehrerer DRM-884 lässt sich so die Das Modul DRM-884DTM enthält eine Dante-Schnittstelle, wodurch Anzahl der Anschlüsse auf bis zu 192 Eingänge und 192 Ausgänge dem DRM-884 zusätzlich je acht digitale Ein- und Ausgänge zur Ver- erhöhen . -
Page 7: Schaltausgänge
klemmen an die Stiftleiste OUTPUT (14) anschließen . Die Ausgänge 4) Das Modul in das Gehäuse einsetzen und mit den beiden Schrau- liefern symmetrische Signale . ben befestigen . 5) Den Abdeckrahmen so auf das Modul setzen, dass es einrastet . 4.3 Schaltausgänge 4.6.2 Lautstärkeregler DRM-884VP Zum Schalten externer Geräte über das Steuerprogramm stehen zwei... -
Page 8: Kommandomikrofon Drm-884Rc
OUTPUT A = Ausgangskanal OUT 9/11 = Anschlussklemme (f) 4.6.7 Dante-Schnittstellenmodul DRM-884DTM OUTPUT B = Ausgangskanal OUT 10/12 = Anschlussklemme (g) 1) Vor dem Einbau des Dante-Moduls DRM-884DTM sicherstellen, dass der DRM-884 vom Stromnetz getrennt ist! Die Ausgänge liefern symmetrische Ausgangssignale . Ihr Pegel wird mit den LEDs OUTPUT (n) auf der Vorderseite angezeigt . -
Page 9: Gerätekonfiguration Mit Dem Dante-Controller
Input1– 8“ und Sendekanälen „Broadcast Out 1– 8“ handelt es sich um Hilfs- kanäle für die Option der Signalweiterleitung zwischen mehreren Dante-Modulen Abb. 10 Device-View vom DRM-884 DRM-884DTM . Ein Beispiel zur Verbindung dieser Kanäle ist in Kapitel 6 gezeigt . -
Page 10: Geräteübergreifende Durchsagen Mit Dem Drm-884Rc
6 Geräteübergreifende Durchsagen das Dante-Netzwerk . Deshalb ist es erforderlich, die beteiligten Ma- trixrouter mit der Erweiterung DRM-884DTM auszustatten und, wie mit dem DRM-884RC in der Abbildung 12 gezeigt, zu verbinden . Im folgenden Beispiel wird gezeigt, welche Maßnahmen erforderlich sind, um mit den Kommandomikrofonen DRM-884RC Durchsagen über die Ausgänge anderer DRM-884 zu ermöglichen . -
Page 11: Dante-Routing Der Broadcast-Hilfskanäle
6.1 Dante-Routing der Broadcast-Hilfskanäle Für die Audioverbindungen auf der Dante-Ebene sind für das Routing ☞ Kapitel 5 .3) der Hilfskanäle „Broadcast Input1– 8“ und „Broadcast ☞ Out 1– 8“ die folgenden Verbindungen herzustellen ( Abb . 13): 1) Die Kanäle „Broadcast Out 1– 8“ des ersten Geräts (A) mit den Kanälen „Broadcast Input1–... -
Page 12: Bedienung Des Drm-884
DRM-884VP in Reihe geschaltet, erhalten diese fortlaufende IDs . 7.1 Steuerprogramm Die Bedienung des DRM-884 erfolgt vom Computer über das Steuer- programm unter dem Betriebssystem Windows 7 oder einer neueren Version . Ein Software-Paket kann im Internet von der Monacor-Website ☞ (www .monacor .de Service Downloads) heruntergeladen werden . -
Page 13: Geräteliste
7.3 Geräteliste (Star Network) Diese sollten gegen einen unbefugten Zugang später geändert wer- den . Es erscheint folgende Menüansicht: Im „Star Network Mode“ erscheint sofort das Konfigurationsfenster ☞ für die Eingänge ( Kap . 7 .6) und links daneben die Liste der im Netzwerk gefundenen DRM-884-Geräte „Device List“... -
Page 14: Ansicht „Input Dsp Channel
➾ Verstärkung (GAIN) 7.6.1 Expander/Gate ➾ Signalverzögerung (DELAY) Ein Expander erweitert die Dynamik eines Signals, indem er den Signal- pegel unterhalb einer einstellbaren Pegelschwelle abschwächt . Da- ➾ Dynamikkompressor (COMPRESSOR) durch lassen sich Störgeräusche abschwächen, die einen niedrigeren ➾ Hoch- und Tief passfilter (HPF + LPF) Pegel als das Nutzsignal haben . -
Page 15: Phantomspeisung
7.6.2 Phantomspeisung 7.6.6 Dynamikkompressor Ein Kompressor reduziert die Dynamik und schwächt den Signalpegel [10] nur IN1– 8: Phantomspeisung, 48 V oberhalb einer einstellbaren Pegelschwelle ab . Dies ist erforderlich, Vorsicht: Die Phantomspeisung nur einschalten, wenn die angeschlossene wenn die Dynamik des Audiosignals größer ist als das Verstärkersys- Tonquelle ausdrücklich Phantomspeisung benötigt . -
Page 16: Ansicht „Matrix
„Network Input“ sind die Eingänge der Dante- Schnittstelle Schnittstelle (Dante-Transmitter) und sind nur verfügbar, wenn (Dante-Receiver) und nur verfügbar, wenn das Erweiterungs modul das Erweiterungs modul DRM-884DTM eingebaut ist . DRM-884DTM eingebaut ist . [49] Für die Zuweisung eines Ausgangskanals zu einem Eingangskanal [52] Schwellwert „Threshold“... - Page 17 Abb. 22 Ansicht „Output DSP Channel“ [54] Ansprechzeit „Attack“, nach der bei Überschreiten des Schwell- [56] Deaktivierung „Bypass“ des Duckers werts die anderen Signale abgeschwächt werden [57] Funktion „Default“ zum Zurücksetzen aller Duckereinstellungen [55] Rückstellzeit „Release“ legt fest, wie lange es dauert bis die abgeschwächten Kanäle nach dem Ende der Durchsage wieder ihre ursprüngliche Verstärkung erreichen [50]...
-
Page 18: Ansicht „Fbc
(Dante-Transmitter) und nur verfügbar, wenn das Erweiterungs- Filter wird automatisch gesetzt und die Rückkopplung damit be- modul DRM-884DTM eingebaut ist . seitigt . Das Filter wird in der Filteranzeige [67] rot markiert und in [60] Art des Signals „FBC Mode“: der Frequenzkurve [62] dargestellt . -
Page 19: Ansicht „Auto Mixer
7.12.1 Konfiguration speichern Die vorgenommenen Einstellungen lassen sich als Presets im DRM-884 und auf dem Computer speichern . Zum Speichern im DRM-884: 1) Das Speicherziel „Device“ wählen . 2) In der „Preset List“ die gewünschte Speicherplatznummer aus- Abb. 25 FBC „Static Filter Setup“ wählen . -
Page 20: Sichern / Zurückladen Aller Presets
7.12.4 Sichern / Zurückladen aller Presets 7.13.2 Konfiguration zurücksetzen Zum Sichern aller Presets des Geräts in einer Datei auf dem Computer: Über „Restore Default Setting“ lassen sich alle Parameter auf die Standardwerte zurücksetzen . Das Display (1) zeigt anstelle eines Pre- 1) Auf „Import All Presets“... -
Page 21: Gerät Umbenennen
Display des Mikrofons ausgeblendet und die Auswahl wird über- sichtlicher . Hinweis für die Verwendung der Dante-Erweiterung DRM-884DTM: Die Ausgänge zum Dante- Netzwerk können nicht direkt für die Zonen gewählt werden . Jedoch liegt das Signal eines DRM-884RC grundsätzlich auf dem Dante-... -
Page 22: Durchsagen Durchführen
9 Bedienung der Lautstärkeregler 8.2 Durchsagen durchführen DRM-884VP und DRM-884VAP 9.1 Voreinstellungen Zum Einrichten eines der Wandmodule DRM-884VP oder DRM-884VAP dieses mit dem Hauptgerät DRM-884 verbinden . Das Steuerprogramm im „Daisy Chain Network Mode“ starten, in der Gerätekonstellation DRM-884RC einen Block für das Modul platzieren, die zugewiesene Device-ID ☞... -
Page 23: Lautstärke Einstellen
10 Bedienung der Anschlusserweiterung 9.2 Lautstärke einstellen DRM-884IOP 10.1 Gerät umbenennen DRM-884VAP Zum Ändern des Namens eines Wandmoduls DRM-884IOP dieses mit dem Hauptgerät DRM-884 verbinden . Das Steuerprogramm im VOLUME „Daisy Chain Network Mode“ starten, in der Gerätekonstellation einen Block für das Modul platzieren, die zugewiesene Device-ID eingeben ☞... -
Page 24: Technische Daten
Parameter: . . . . . . . . . . . . . . . . . wie Eingangskanal 11.6 DRM-884DTM Anschluss: . . . . . . . . . . . . . . . . . . . . 2 × RJ45-Buchse Delay: . -
Page 25: Protokoll Für Die Rs-232-Fernsteuerung
1 = relay 1, 2 = relay 2 0 = OFF, 1 = ON 0x40 Relay status (output from device) Diese Bedienungsanleitung ist urheberrechtlich für MONACOR ® INTERNATIONAL GmbH & Co. KG geschützt. Eine Reproduktion für eigene kommerzielle Zwecke – auch auszugsweise – ist untersagt. - Page 26 11 .6 DRM-884DTM . . . . . . . . . . . . . . . . . . .
-
Page 27: Overview
² “DSP!” will be displayed when there is a problem with the signal processor . terminals provided ³ “DANTE” will show that the extension DRM-884DTM has been installed . 2 LEDs to indicate the signal level of the analog inputs and of the... -
Page 28: Applications
3 Applications 3.1.5 Dante interface module DRM-884DTM The module DRM-884DTM includes a Dante interface . Thus, eight The audio matrix router DRM-884 is designed for fixed installation of digital inputs and outputs each are additionally made available to PA systems . It is suited for versatile applications . DRM-884 is equipped DRM-884 . -
Page 29: Remote Control Via Rs-232
4.4 Remote control via RS-232 4.6.2 Volume control DRM-884VP Various functions of DRM-884 can be remote-controlled via the RS- Use a CAT-5e network cable (or a cable of higher category) to con- 232 interface . Connect the controller to the pin connector RS232 nect the input jack (a) on the rear of DRM-884VP to one of the two (12) via the plug-in screw terminals provided . -
Page 30: Zone Paging Microphone Drm-884Rc
DRM-884 in the “Daisy Chain Mode” . In addition, a 2) Select the operating system . Dante connection of the DRM-884 devices via the extensions DRM-884DTM is 3) Click the button with the version of the Dante controller . -
Page 31: Device Configuration With The Dante Controller
“Broadcast Out 1 – 8” shown additionally are auxiliary channels for the signal Fig. 10 Device View of DRM-884 forwarding option between multiple Dante modules DRM-884DTM . An example for connection of these channels can be found in chapter 6 . -
Page 32: Announcements Across Devices With Drm-884Rc
DRM-884DTM and to connect them as shown in figure12 . The example below shows the requirements for making announce- ments with the microphones DRM-884RC via the outputs of other DRM-884 devices . -
Page 33: Dante Routing Of Auxiliary Broadcast Channels
6.1 Dante routing of auxiliary broadcast channels For audio connections on the Dante level, make the following connec- ☞ tions for routing ( chapter 5 .3) the auxiliary channels “Broadcast ☞ Input 1 – 8” and “Broadcast Out 1 – 8” ( fig . -
Page 34: Operation Of Drm-884
7.1 Control program DRM-884 is operated via the computer by means of the control program under the operating system Windows 7 or a later version . A software package can be downloaded from the Monacor web- ☞ site (www .monacor .com Support / Download Service) . -
Page 35: Device List
7.3 Device list (Star Network) It is recommended to change the password later to prevent unauthor- ized access . The following menu will appear: In the “Star Network Mode”, the configuration window for the inputs ☞ chapter 7 .6) and on the left of it the list of DRM-884 devices “De- vice List”... -
Page 36: View "Input Dsp Channel
FBC channel to automatically suppress feedback noise . The output 7.6.1 Expander/ Gate signals can be processed at the following stations: An expander is used to expand the dynamics of a signal by attenuating ➾ gain (GAIN) the signal level below an adjustable level threshold . This will attenuate ➾... -
Page 37: Phantom Power
7.6.2 Phantom power 7.6.6 Dynamic compressor A compressor is used to reduce the dynamics and to attenuate the [10] IN1 – 8 only: phantom power, 48 V signal level above an adjustable level threshold . This is necessary when Caution: Only activate the phantom power when the audio sources con- the dynamics of the audio signal is higher than permitted by the am- nected expressly require phantom power . -
Page 38: View "Matrix
(Dante transmitter) . They are only available when the 9 – 12 are inputs of extension modules extension module DRM-884DTM has been installed . “Network Input” are the inputs of the Dante interface (Dante [49] To assign an output channel to an input channel, click the field receiver) and only available when the extension module DRM- at the intersection of both channels . - Page 39 Fig. 22 View “Output DSP Channel” [54] “Attack” to define the time after which the other signals will [56] “Bypass” to deactivate the ducker be attenuated once the sound level has exceeded the threshold [57] “Default” function to reset all ducker parameters [55] “Release”...
-
Page 40: View "Fbc
7.10 View “FBC” (fig . 24) [62] curve representation of the filters in amplitude frequency response The FBC function is used to automatically suppress feedback noise . ☞ [63] “Static Filter Setup” to set up static filters ( chapter 7 .10 .1) Feedback noise may occur when a speaker signal is picked up by a [64] “Clear Dynamic Filters”... -
Page 41: View "Auto Mixer
7.12.1 Saving the configuration The settings made can be saved as presets to DRM-884 or to the computer . To save the settings to DRM-884: 1) Select the target “Device” . 2) Select the desired storage location number from the “Preset List” . Fig. -
Page 42: Saving / Reloading All Presets
7.12.4 Saving / Reloading all presets 7.13.2 Resetting a configuration To save all presets of the device to a file on the computer: “Restore Default Setting” is used to reset all parameters to the default settings . The display (1) will show “Default” instead of a preset . The 1) Click “Import All Presets”... -
Page 43: Renaming The Device
Thus, the zones not required will not appear on the display, making the selection of zones clearer . Note on using the Dante extension DRM-884DTM: It is not possible to directly select the outputs to the Dante network for the zones, but the signal of a DRM-884RC is generally available at the auxiliary Dante channel “Broadcast Out 1”... -
Page 44: Making Announcements
9 Operation of the Volume Controls 8.2 Making announcements DRM-884VP and DRM-884VAP 9.1 Presettings To set up one of the wall modules DRM-884VP or DRM-884VAP, connect the module to the master device DRM-884 . Start the control program in the “Daisy Chain Network Mode”, place a block for the module in the device configuration, enter the device ID assigned and DRM-884RC ☞... -
Page 45: Setting The Volume
10 Operation of the Connection Extension 9.2 Setting the volume DRM-884IOP 10.1 Renaming a module DRM-884VAP To change the name of a wall module DRM-884IOP, connect the module to the master device DRM-884 . Start the control program in VOLUME the “Daisy Chain Network Mode”, place a block for the module in the device configuration, enter the device ID assigned and connect ☞... -
Page 46: Specifications
Number of filters: . . . . . . . . . . . . 8 11.6 DRM-884DTM Parameters: . . . . . . . . . . . . . . . . like input channel Connection: . -
Page 47: Protocol For Rs-232 Remote Control
0 = OFF, 1 = ON 0x40 Relay status (output from device) All rights reserved by MONACOR ® INTERNATIONAL GmbH & Co. KG. No part of this instruction manual may be reproduced in any form or by any means for any commercial use. - Page 48 MONACOR INTERNATIONAL GmbH & Co. KG • Zum Falsch 36 • 28307 Bremen • Germany A-1986 .99 .01 .03 .2019 Copyright by MONACOR INTERNATIONAL. All rights reserved. ©...
Need help?
Do you have a question about the DRM-884DTM and is the answer not in the manual?
Questions and answers