Table of Contents
Advertisement
Quick Links
Advertisement
Table of Contents

Related Manuals for Sagitter QUIVER


Summary of Contents for Sagitter QUIVER
-
Page 1: User Manual
User Manual English Software Release 1.10... -
Page 2: Table Of Contents
INDEX WARNINGS ............................5 DISPOSAL OF OLD ELECTRICAL & ELECTRONIC EQUIPMENT ............5 GENERAL SAFETY INSTRUCTIONS..................... 5 IN CASE OF FAULT ..........................5 PACKAGING, SHIPPING AND COMPLAINT ..................6 WARRANTY AND PRODUCTS RETURN ..................... 6 MAINTENANCE AND DISCLAIMER ....................6 POWER SUPPLY .......................... - Page 3 Save a Cue/Group/Palette/Snapshot ..................... 22 Modify a cue........................... 22 Palette ............................22 Playing – cue execution ........................23 REFERENCE MANUAL ......................... 24 EDITOR ............................... 24 Fixture mode ..........................24 Fixture Mode Contextual Menu ..................... 26 Group Mode ........................... 27 Create or modify a group ....................... 27 Palette ..............................
- Page 4 SETUP ..............................41 Address Patch ............................. 43 Fixture browser ..........................43 Add Fixtures ........................... 44 General options ..........................45 Fixture configuration .......................... 46 Controller configuration ........................48 Pan Tilt options ..........................48 Backup/Restore ..........................49 Backup/Restore contextual menu ....................49 Library manager ..........................
-
Page 5: Warnings
WARNINGS Thank You for choosing one of Our products! Please refer to the instructions and warnings contained in this user manual, please retain it for future reference. This manual contains information about the installation and use of the device. The information contained in this publication has been carefully prepared and checked. However, it is not assumed any responsibility for any inaccuracies. -
Page 6: Packaging, Shipping And Complaint
• Do not operate on the product. Refer servicing to an authorized maintenance center. PACKAGING, SHIPPING AND COMPLAINT • This unit package has been submitted to ISTA 1A integrity tests. We suggest you control the unit conditions immediately after unpacking it. •... -
Page 7: Ce Conformity
USB memory key with the following files: user manual, fixture editor program for Windows PC, fixture files. N. 1 Nylon cover. QUIVERX N. 1 QUIVERX. N. 1 CAT5 UTP cable (1mt). N. 1 QUIVER-QUIVERX link plate. N. 4 MA 3x 12mm screws. -
Page 8: Glossary
GLOSSARY Many technical terms, which are familiar to lighting programmers, could be unknown for new users, while other terms used in this manual are referred specifically to the use of this console. We suggest you to read the glossary that follows, in order to introduce you to the technical terms and to the fundamental concepts used in the manual. - Page 9 HTP (highest take precedence) Method to assign the DMX channel priority: in this case when two cues attempt to control the same attribute/parameter the cue with higher value has the priority, typically assigned to the dimmer channel of a fixture. LTP (latest take precedence) Method to assign the DMX channel priority: in this case when two cues attempt to control the same attribute/parameter the value of the latest cue has the priority, typically all parameter of a...
- Page 10 Switch True physical interface button, see further EDIT, REGISTERS, CONTROLLER chapters. Trigger Event which determines the activation of a cue, typically the pressing of a register switch but also can be the pressing of pedal 1.
-
Page 11: Introduction
INTRODUCTION This manual is organized in 4 sections: the “QUICK GUIDE”, the “REFERENCE MANUAL”, the “QUIVERX MANUAL” and a brief explanation about the Fixture Editor for Windows. In the “QUICK GUIDE” there is a product’s overview that allows the user to be immediately operative and to use the console’s basic features. -
Page 12: Quick Guide
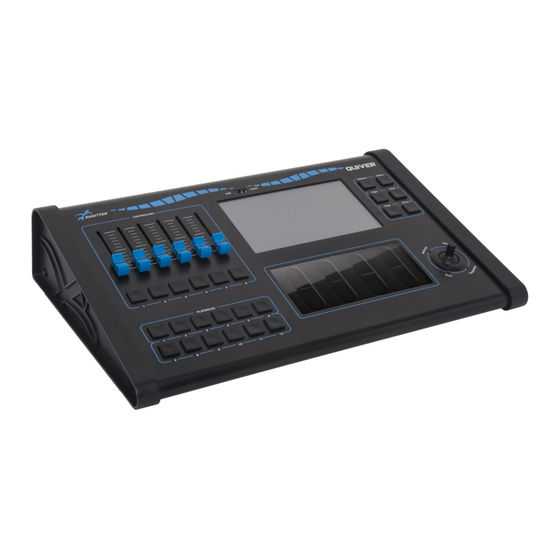
QUICK GUIDE Console Overview Front Panel Rear Panel Description 1. USB port to exchange data through USB memory and/or port for USB light. 2. Color LCD with touch screen: graphic interface of the console. 3. Programmable Controller Sliders. 4. Programmable Controller Switches. 5. -
Page 13: Dimensions
9. ‘Store’ edit switch. 10. ‘Page’ edit switch. 11. ‘Select’ edit switch. 12. ‘Release’ edit switch. 13. Joystick for pan & tilt. 14. ‘Fine’ joystick indicator. 15. ‘Superfine’ joystick indicator. 16. Pan joystick locked indicator. 17. Tilt joystick locked indicator. 18. -
Page 14: Technical Specifications
Technical Specifications Hardware: DMX universes 1 (max 3 with two expansions) DMX max channel number 512 (max 1536 with two expansions) Display type Color 7” LCD-TFT Touch screen type Resistive Display Resolution 800x480 pixel EDIT control 6: Menu, Clear, Store, Page, Select, Release Joystick control Joystick mode 4: Fine, SuperFine, PanLock, TiltLock... -
Page 15: The Edit Keys
The Edit Keys Release Allows to stop the playback of a register: ‐ to stop only one register press Release key + Register switch; ‐ to stop all registers quickly press two times the Release Key. Select Allows to select or to scroll between the registers of the current page: ‐... -
Page 16: Register Keys
Register keys When you press a Register key, it activates the first cue on the cue-list contained in the playback. Each following pressure activates the next cue. If the cue list was already active, when you press the register key it becomes the current register playback. It can be used in conjunction with the Release, Select, Page and Bank keys (see Edit Keys section). -
Page 17: Console Setup
Console Setup Before starting to operate the console, you must: ‐ Connect the supply adaptor at the mains outlet. ‐ Connect the expansions if available (they can be connected or disconnected also with the console switched on) ‐ Connect the DMX cable to the fixtures. ‐... -
Page 18: Produce A Show
Each brand’s folder must contain the library files in .pf or .fxr format. For example, a file named ‘Club Spot 150 ch14.pf’ for the Sagitter fixture must be saved in the USB memory with the following path (presuming that the computer sees the USB memory as drive G):... -
Page 19: Address Patch: Fixture Assignment
Address Patch: fixture assignment Before starting to program the cues, it is essential to provide to the console the list of the connected fixtures and their DMX address (also called start address). This information is managed through the “Address patch list” window from the ‘Setup’ menu. Press the ‘Menu’ switch, press the ‘Setup’... -
Page 20: Editor
Fixture Browser window: Pressing the button of the desired fixture the “Add fixture” window appears, that allows to set up the number of fixtures of the selected type to be added at the show. Using the lower buttons, it’s possible to specify the number of fixtures, the ID, the universe and the start address of the first fixture. - Page 21 The fixtures’ parameters are set by means of the Touch Sliders and the joystick (the joystick always controls the pan and tilt of the selected fixtures). Editor in fixture view: Editor in Group view: The fixture can be selected one by one using of the correspondent buttons or together using the ‘Group’...
-
Page 22: Save A Cue/Group/Palette/Snapshot
The LED on the right show the selection state: ‐ Off: the fixture or the group is not selected. ‐ Red: the fixture or the group is selected. ‐ Yellow: some fixtures belonging the groups are selected (valid only for the groups). The ‘Locate’... -
Page 23: Playing - Cue Execution
To apply a palette to the selected fixtures you must press the ‘Palette’ button to show the palette window and select the desired palette. The user palettes are organized in six different sets: Intensity, Pan/tilt, Colors, Gobos, Prism, and Blade buttons allow to show the corresponding palette set. To create a new palette, you must set up the fixture in the show at the desired values, then save it pressing one of the Intensity, Pan/tilt, Colors, Gobos, Prism, and Blade buttons in the ‘Store’... -
Page 24: Reference Manual
REFERENCE MANUAL This section of the manual describes in detail all the console’s operative environments. EDITOR EDITOR is the main environment for starting to program the show. Fixture mode The editor allows to set and edit the values of all the fixtures’ parameters and to save them as cues or palettes. - Page 25 ‐ Hilite: when ‘Hilite’ is active, the ‘Hilite’ palette is applied to the selected fixture, which temporarily opens the shutter and sets the dimmer at 100% without inserting the correspondent values in the EDITOR. It is a useful function to create cues or palettes leaving the shutter and dimmer values as ‘Empty’, for example for aiming the pan and tilt.
-
Page 26: Fixture Mode Contextual Menu
‐ Red: the fixture is selected. d) Name of the fixture: name assigned to the fixture by the user. e) Button background color: it can be changed as you wish for an immediate identification of fixture types and groups. f) If a fixture is disabled from the ‘Address Patch’ window it is shown in dark grey color. 6. -
Page 27: Group Mode
‐ Rename: allows to change the fixture’s name. ‐ Change ID: allows to change the fixture’s ID number. ‐ Pan lock: locks or unlocks the pan control of the joystick for the moving fixtures. ‐ Tilt lock: locks or unlocks the tilt control of the joystick for the moving fixtures Group Mode The groups window is identical, in both form and features, to the fixtures window, except for the fact that the selection is made by groups. -
Page 28: Palette Mode Contextual Menu
User palette window: Palette mode contextual Menu This menu, in addition to all command of the fixture contextual menu, contains the following buttons: ‐ Load Palette: this button loads in the editor the last palette played from the palette window, for checking or modifying it. Any change of a palette will have effect on all cues that refer to it. -
Page 29: Color Palette
Saving with the ‘Store’ key a palette with the same name of an already existing one results in the generation of a new palette with the same name. Although it’s allowed, you are advised that this can generate confusion. Color Palette The console is provided with four colors’... - Page 30 Effect window for pan and tilt: To apply an effect to an attribute of the previously selected fixtures, proceed as follows: 1) In the editor select the desired fixtures. 2) Press ‘Effects’ button in the upper toolbar. 3) Select the parameter where the effect as to be applied, pressing one of the buttons on the toolbars 1 and 3.
-
Page 31: Effects Mode Contextual Menu
Effects Mode Contextual Menu Effects Contextual Menu Window: The Effect contextual menu has the following buttons: ‐ EXIT: closes the contextual menu. ‐ Setup: opens the setup menu. ‐ Editor: opens the editor’s window. ‐ Pan lock: locks or unlocks the pan control of the joystick for the moving fixtures. ‐... -
Page 32: Fan
Selector window: Legend: The second of 2 Intensity effects is selected. Two effects of Pan and Tilt are present. The fan feature assigns a sequence of values to the same attribute of the selected fixtures. The sequence of values can follow the trend of a ramp or of a semicircle. ‘Fan’... -
Page 33: Color Picker
Linear and Arc fan: Once having selected all the fixtures involved in the editor, press the Fan button from the contextual menu and the corresponding window will appear. The two series of buttons at the top allow you to select the parameter you wish to edit. The ‘Linear’... -
Page 34: Playback
Color picker: Colors can be selected directly from the color bitmap and luminosity slider on the display or using the first three Touch Slider. The RGB/CMY/HSB button selects the input mode scrolling through the three available color modes (Red / Green / Blue, Cyan / Magenta / Yellow and Hue / Saturation / Brightness). - Page 35 Cue-list in Qlist mode: Legend: Buttons for the selection of the cue-list mode Activity status LED: yellow=previous active cue; red=currently active cue Selection status LED: red=selected cue Bar timeline Delay/Fade-in Bar timeline wait/fade-out Delay time in seconds Fade-in time in seconds Wait time in seconds Fade-out time in seconds The cue buttons have a status LED:...
-
Page 36: Cue-List In Qlist Mode
Cue‐list in Qlist mode The progression over time of a cue is marked by the trigger and develops on inserted time base: Delay, Fade-in, Wait and Fade-out. The trigger of a cue is typically the pressure of the register key or another type of event on an input port: ‐... -
Page 37: Cue-List In Sequence Mode
Cue-list in Chase Mode: Touch Slider in Chase Mode: ‐ Fade: time to fade expressed in percentage of the cue total time. ‐ Speed: speed of the cue expressed in beats per minute. ‐ Master: submaster of intensity. Cue‐list in Sequence Mode In Sequence mode, the cues are automatically activated upon fade-in completion of the previous cue. -
Page 38: Cue-List In Live Mode
Cue‐list in Live mode A cue list in Live mode allows you to activate single cues directly from the touchscreen. Pressing a button the corresponding cue is played with the pre-programmed times, allowing to execute the various cues without a prearranged order, but based on the circumstances. To insert the time values in the cues you must switch to Qlist mode, insert or modify the values then go back to Live mode. -
Page 39: Register Slider: Playback Master
Cue-list contextual menu window: The QLIST contextual menu has the following buttons: ‐ EXIT: closes the contextual menu. ‐ Setup: opens the setup menu. ‐ Editor: goes directly to the editor window. ‐ Slider config: opens the slider configuration window (Qlist mode only), see below. ‐... -
Page 40: Cue Priority (Ltp/Htp)
If the Register Slider is set as Playback master (‘Controller Config.’ window that can be recalled from Setup menu), it can be set independently for each cue-list. From the contextual menu press the ‘Slider config.’ button to show the slider setup window: ‐... -
Page 41: Grand Master And Group Submaster
Grand master and group submaster The Controller Sliders can be configured as ‘Grand master’ or group submaster, allowing to control manually the intensity of the fixtures in real time. The ‘Grand master’ and the group submaster influence the HTP channel only, usually the dimmers of the fixture. If a fixture belongs to two or more groups, the submaster assumes the lower value. - Page 42 ‐ Clear Show: it erases all the data of the current show (including the patch configuration and cue programming) and resets the system for a new show. It does not influence the fixture library and previously show backups. ‐ Touch Calibration: this serves for the calibration of the touch screen. The console is delivered with the touch screen calibrated: if, for any reason, a lack of feeling is noted try to re-calibrate the touch screen.
-
Page 43: Address Patch
Address Patch The first operation that must be done to use the console is the patch of the show, which consists to assign to each fixture a number and the DMX starting address. The number of the occupied DMX channels depends from the fixture type: the assignment is necessary for all the fixtures present in the show to be programmed. -
Page 44: Add Fixtures
Each brand’s folder must contain the library files in .pf or .fxr format. For example, a file named ‘Club Spot 150 ch14.pf’ for the Sagitter fixture must be saved in the USB memory with the following path (presuming that the computer sees the USB memory as drive G): ‘G:\LIB\Sagitter\Club Spot 150 ch14.pf’. -
Page 45: General Options
Add Fixture window: Buttons and Touch Slider in the ‘Add Fixture’ window: ‐ Edit name: allows to change the “Fixture name”, which is copied from the library as default, but may be changed to easily identify the fixtures. ‐ Fixture to Add: allows to change the number of fixtures to add to the patch. ‐... -
Page 46: Fixture Configuration
General options window: ‐ Default delay time: it’s the default value of the ‘Delay’, when a new cue is created its delay time is set at this value. ‐ Default fade in time: it’s the default value of the ‘Fade-in’, when a new cue is created its fade-in time is set at this value. - Page 47 changes applied through this function only affect the current show, leaving the fixture library unchanged. To edit a value, you must select it by pressing the corresponding button and use the fourth Touch Slider to set the new value. Fixture configuration window: Buttons and Touch Slider in the ‘Fixture configuration’...
-
Page 48: Controller Configuration
Controller configuration This window, recalled by pressing the button in the Setup menu, allows to customize the 6 sliders and the correspondent buttons of the console. The Controller Sliders can be configured as ‘Grand master’, ‘Group submaster’ or as ‘Playback master’. -
Page 49: Backup/Restore
Buttons in the ‘Pan Tilt options’ window: Press the button of the fixture you require to modify: for example, for symmetrical light effects between right/left or top/bottom fixtures. Save the setting using the Save and Exit button. Backup/Restore The Backup/Restore window allows to access several functions for saving and restoring a show. The console has a working area called current show. - Page 50 Backup/Restore contextual menu: ‐ Exit: closes the contextual menu. ‐ Setup: closes the Backup/restore window and goes back to the Setup menu. ‐ Editor: closes the Backup/restore window and opens the editor window. ‐ Internal disk: selects the SD internal memory. ‐...
-
Page 51: Library Manager
Each brand’s folder must contain the library files in .pf or .fxr format. For example, a file named ‘Club Spot 150 ch14.pf’ for the Sagitter fixture must be saved in the USB memory with the following path (presuming that the computer sees the USB memory as drive G): ‘G:\LIB\Sagitter\Club Spot 150 ch14.pf’. -
Page 52: Diagnostic
‐ Paste file: this button is used, together with the Copy file buttons, to perform “Copy and Paste” operations. If the LED indicator is turned off, the Paste buffer is empty and therefore it cannot be used. “Copy and Paste” operations are primarily used to copy a file from one folder to another or from one disk to another. -
Page 53: Wireless Configuration
‘Diagnostic’ window: When any console’s command is activated (keys, slider potentiometers, Touch Slider, joystick), the action is shown on the screen, allowing to check whether the command is working properly. Buttons in the ‘Diagnostic’ window: ‐ Internal, Expansion 1, Expansion 2: for testing the sliders and keys included in the console or in the expansions 1 or 2. - Page 54 ‐ Dmx1, Dmx2, Dmx3: it allows to choose which DMX universe is transmitted through the wireless among Dmx1, Dmx2 or Dmx3. Note that it’s possible to select Dmx2 or Dmx3 also without any expansion installed. ‐ Pairing receivers: it’s used to pair the receivers to the console. The receivers must not be associated to any other transmitter (see also the manual of the receiver).
-
Page 55: Quiverx Expansion
QUIVERX EXPANSION The QUIVER console allows to link one or two units of QUIVERX expansion. Each connected unit makes available 12 extra registers and adds 12 playable cue-list and 1 DMX universe. The connection between the console and the expansions must be done through a single CAT5 UTP (1mt) cable that is supplied with the equipment. -
Page 56: Dimensions
Description 25. Programmable Controller Sliders, usually set for registers 13 to 18 or 25 to 30. 26. Programmable Controller Switches, usually set for registers 13 to 18 or 25 to 30. 27. Register Switches. 28. RJ45 socket for console connection. 29. -
Page 57: Fixture Editor For Windows
In the following two figures, you can see the editing of some parameters for the Sagitter fixture ‘Club Spot 150 ch14.pf’: in this specific case the control has been implemented through 14 DMX... - Page 58 Fixture Editor ‘Parameters’: From user manual of the fixture, choose the 14 DMX channel mode indicate by the arrow: Once all DMX channels have been set, it’s also possible to edit some palette (usually for the classic color and most used Gobo) and some special command (usually the global Reset).
- Page 59 DMX channel. If the ‘Check’ result is positive, you can proceed to save the fixture in the proprietary format of the QUIVER console, which is a file type ‘.pf’. At this point, we recommend to test the new fixture file the with some cue from the console,...
-
Page 60: Software Version History
Software Version History Release 1.10 New features: 1) Added ‘Footswitch cfg.’ option in the ‘Setup’ menu (page 42). 2) Added the keypad for value inputs on effects window (page 30). 3) Added a contextual menu for effects window (page 31). 4) Now the fixtures disabled from “Address patch”... - Page 62 PROEL S.p.A. (World Headquarters - Factory) Via alla Ruenia 37/43 64027 Sant’Omero (Te) – Italy Tel: +39 0861 81241 Fax: +39 0861 887862 www.proel.com...
Need help?
Do you have a question about the QUIVER and is the answer not in the manual?
Questions and answers