Table of Contents
Advertisement
Quick Links
Advertisement
Table of Contents

Related Manuals for Rain Bird ESP-SMT


Summary of Contents for Rain Bird ESP-SMT
- Page 1 ESP-SMT Smart Modular Control System Installation & Operation Guide...
- Page 2 For technical assistance contact Rain Bird at 1-800-247-3782 IMPORTANT This Installation and Operation Guide supports ESP-SMT control panels with a date code later than March 31, 2011.
-
Page 3: Table Of Contents
Method 1: Zone Setup Wizard ........19 The Intelligent Use of Water ..........1 Select Specific Zone Number ..........19 ESP-SMT Smart Modular Control System ....1 Turn Zone to ENABLE status ..........19 Features and Benefits ............2 Enter Soil Type ...............20 Select Sprinkler Type Method ..........21... - Page 4 Manually Water All Active Zones (Test Program) ..52 Simple Test To Determine The Soil Type ......75 Soil Classification Triangle ..........76 Off Position or Adjust Display How the ESP-SMT Smart Control System Works ... 77 Contrast Function ..........53 Evapotranspiration ...............77 Auto Position or Suspend Watering Function ..54 Effective Rainfall..............78...
- Page 5 Mounting Template (controller models only) ESP-SMT Installation & Operation Guide ESP-SMT Site Profile Chart ESP-SMT Installation & Quick Setup Poster SMT Weather Sensor Weather Sensor Debris Screen Weather Sensor Mounting Bracket Mounting Bracket Hardware (Four Phillips head screws +...
-
Page 6: Introduction
Introduction Welcome to Rain Bird AUTO The Intelligent Use of Water At Rain Bird, we believe it is our responsibility to develop products and technologies that use water efficiently. Our commitment also extends to education, training and ENGLISH ENGLISH ESPAÑOL ESPAÑOL... -
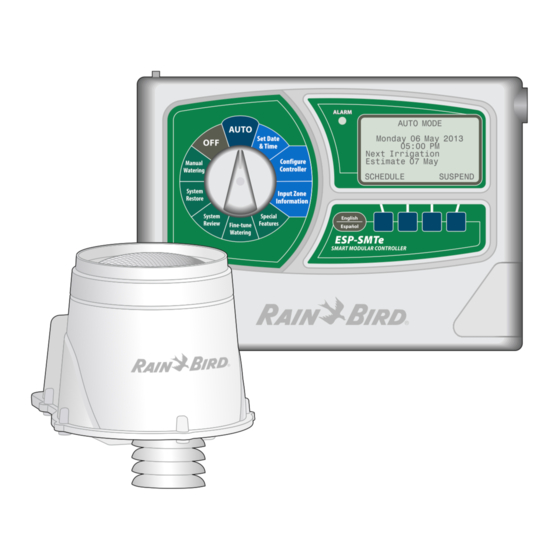
Page 7: Esp-Smt Smart Modular Control System
Meet Water Restrictions Features and Benefits Set user-defined watering days and watering times to The ESP-SMT Controller automatically optimizes the daily meet local water restrictions. irrigation schedule based on weather data collected by Block Day a Week the on-site weather sensor. - Page 8 30% to a decrease of 30% zones on the system. without changing any of the other pre-set programming information that was entered in the initial controller and zone set-up. ESP-SMT Smart Modular Control System...
- Page 9 Removable “Tipping” Rain Bucket” The Tipping Rain Bucket can be easily removed from the sensor housing to clean out debris that may have made it past the debris screen into the mechanism. ESP-SMT Smart Modular Control System...
-
Page 10: Controls, Switches And Indicators
BUTTONS WITH DURING REMOTE ACCELERATOR PROGRAMMING ENGLISH/SPANISH REMOTELY BUTTON FOR PROGRAMMABLE EASY SWITCHING USING 9V BATTERY OF DISPLAY LANGUAGE The ESP-SMT Smart Modular controller panel is designed to upgrade previously installed ESP-Modular controllers (ESP-SMT-UPG Kit). ESP-SMT Smart Modular Control System... -
Page 11: Weather Sensor Features
Weather Sensor Features The durable Weather Sensor provides high and low temperature and rainfall data to the ESP-SMT Controller for daily irrigation schedule adjustments. REMOVABLE DEBRIS SCREEN SENSOR HOUSING ADJUSTABLE MOUNTING BRACKET HOLES IN BRACKET ARMS (3) TO ROUTE WIRING... -
Page 12: Set Current Date & Time
Set Current Date & Time SET CURRENT DATE AND TIME 2007 This section shows you how to set the current date & time on the ESP-SMT Controller. 10:16 AM Rotate the dial to the SET DATE & TIME position... BACK NEXT The SET CURRENT DATE &... -
Page 13: Set Minutes
TIME dial position will be saved steps to set the current date and time on the in the controller memory. The controller. internal lithium battery will save the current date and time during power outages. ESP-SMT Smart Modular Control System... -
Page 14: Configure Controller
Configure Controller CONFIGURE CONTROLLER Enter Site Zip Code This section shows you how to configure the ESP-SMT controller for your site - OR - Enter Custom Data for conditions using one of the following Two methods: Location SELECT 1) Select Location by Zip Code; 2) Enter Custom Site Data relative to site location Method 1: Select Location by Zip Code Rotate the dial to the CONFIGURE CONTROLLER position... - Page 15 Even Days: 2,4,6,… 30 will appear. Odd Days: 1,3,5,…no31 Cyclical:Every _ Days Use the UP or DOWN arrow BACK SELECT button(s) to navigate to enter the desired Allowed Water Days and Time (see page 13 for details). ESP-SMT Smart Modular Control System...
-
Page 16: Method 2: Enter Custom Data For Location
NEXT FINE-TUNE the NEXT button. WATERING b. The value for Elevation will begin to blink. Press the - or + button(s) until the correct value (100 foot increments) is entered; then press the NEXT button. ESP-SMT Smart Modular Control System... - Page 17 NEXT button. BACK BACK ACCEPT ACCEPT b. The value for February will begin to blink. Press the - or + button(s) until the correct value is entered; then press the NEXT button. ESP-SMT Smart Modular Control System...
-
Page 18: Enter Allowed Water Days
By Days of the Week button(s) until By Days of the Even Days: 2,4,6,… 30 Block Watering: Odd Days: 1,3,5,…no31 Week is blinking; then press the Cyclical:Every _ Days SELECT button. BACK SELECT BACK BLOCK ALLOW NEXT ESP-SMT Smart Modular Control System... -
Page 19: By Even Days Of The Month
Cyclical:Every _ Days button(s) until Odd Days: 1,3,5, BACK SELECT …no31 is blinking; then press the SELECT button; the BLOCK ON SPECIFIC DAY OF WEEK screen will appear (see step 8 on page 15 for details). ESP-SMT Smart Modular Control System... -
Page 20: Cyclical
NEXT button. day the gardener normally comes. b. The date to Begin Watering dd The ESP-SMT controller will always mmm will begin to blink. Press the block irrigation on the specific day CYCLICAL WATERING... -
Page 21: Set Allowed Watering Windows
NEXT SET ALLOWED WATER TIME SET ALLOWED WATER TIME 1st Watering Window 1st Watering Window button. 05:00 To 06:00 05:00 To 09:00 2nd Watering Window 2nd Watering Window 06:00 To 11:45 BACK NEXT BACK NEXT ESP-SMT Smart Modular Control System... - Page 22 2nd Watering Window Even Days: 2,4,6,… 30 the Grow-In Watering Time must Odd Days: 1,3,5,…no31 08:00 11:45 Cyclical:Every _ Days BACK NEXT end. Once the desired end time is BACK SELECT reached, press the NEXT button. ESP-SMT Smart Modular Control System...
- Page 23 14 calendar days for 3 minutes per cycle 8 times evenly Set Grow-in Watering Window divided by the Grow-In Watering Time (In this example 8 cycles in 8 hours = 1 cycle every hour) ESP-SMT Smart Modular Control System...
-
Page 24: Input Zone Information
1) Zone Setup Wizard; 2) Advanced User Entry; 3) Copy Zone to Zone(s) SELECT Method 1: Zone Setup Wizard This method is recommended for new users of the ESP-SMT Controller. Rotate the dial to INPUT ZONE INFORMATION position... SELECT ZONE... -
Page 25: Enter Soil Type
73 of the Loam 0.17” 0.35” not break with user manual. careful handling. Clay Loam 0.18” 0.20” See Manual For Details Silty Clay 0.17” 0.15” BACK NEXT Clay 0.17” 0.30” ESP-SMT Smart Modular Control System... -
Page 26: Select Sprinkler Type Method
SPRINKLER TYPE Zone 2 DRIP Zone 2 Sprays Rotors Sprays 1.60 Bubblers Rotary Nozzle Point Source Rotors 0.45 Drip Inline Grid - OR - Rotary Nozzle 0.50 Time-Based BACK SELECT BACK SELECT Bubblers 2.50 Point Source Drip 0.80 ESP-SMT Smart Modular Control System... - Page 27 POINT SOURCE EMITTERS DRIP Zone 10 Application Rate is calculated by first Net Application Rate: calcuting the Total 0.60 in/hr Zone GPM and Estimated Wetted Area in Sq Ft. BACK 1 of 3 NEXT BACK NEXT ESP-SMT Smart Modular Control System...
- Page 28 Factor blinking. Use the - or + Flow Rate 0.90 button(s) to change to the desired Emitter Spacing Adjust Factor value. Press the NEXT Row Spacing button. BACK NEXT e. The CYCLE/SOAK screen will appear. ESP-SMT Smart Modular Control System...
-
Page 29: Select Time-Based Method
Press the NEXT button. NOTE: A typical application for using the time-based method is for 1) zones that irrigate potted plants and 2) a zone that may be used to fill a pool. ESP-SMT Smart Modular Control System... -
Page 30: Cycle/Soak
Zone xx Select Slope in Deg. Slope in Deg. 8°-up 0-2° 3-4° 5-7° 8°-up Cycle/Soak Mode Cycle/Soak Automatic Custom Max Cycle Max Cycle Min Soak (40) Min Soak (32) (50) Min BACK NEXT BACK NEXT ESP-SMT Smart Modular Control System... -
Page 31: Select Plant Type Method - Grass Lawns
Cool Season varieties usually horizontally from the established lawn or have individual blades that grow in a vertical from planted stolons. In general, Warm Season orientation. grasses go dormant in the winter. Cool Season Variety Warm Season Variety ESP-SMT Smart Modular Control System... -
Page 32: Select Plant Type Method - Non-Grass Lawns
Mixed Plants and root depth values used 3” High Grass – Cool Season to calculate the irrigation ESP-SMT uses monthly Kc values, Average published in the Irrigation Assoc. schedule. If you do not want Grass – Warm Season 3” SWAT Testing Protocol - 8th Draft. -
Page 33: Custom Plant Factor Method
Classifications of Landscape Species (WU- COLS) Guide developed by the University of California. This guide is available through the PLANT DENSITY Zone 1 California Department of Water Resources at: Mixed Plants Dense http://ucce.ucdavis.edu/files/ Medium Sparse filelibrary/1726/15359.pdf BACK SELECT ESP-SMT Smart Modular Control System... -
Page 34: Enter Shade Factor
Cycles Per Day 50% Shade blinking on the display; then press Minutes Per Cycle 75% Shade 09:00 AM to 04:00 PM Full Shade the SELECT button and the ZONE BACK NEXT BACK SELECT REVIEW screen will appear. ESP-SMT Smart Modular Control System... -
Page 35: Review Zone Information
REVIEW screen then press the ACCEPT button. The SELECT ZONE screen will appear. Select the next zone and repeat steps starting on page 19 for all zones that will be enabled either now or in the future. ESP-SMT Smart Modular Control System... - Page 36 Change Data - Go to Rotary Noz Bubblers step 5 on page 20 to Drip Enter Plant Density change the information as required Enter Slope in XX Degrees Dense 0-2° 3-4° Medium 5-7° 8° - up Sparse ESP-SMT Smart Modular Control System...
-
Page 37: Method 2: Copy Zone To Zone(S)
Copy From Zone until the destination Zone number To Zone And To Zone is displayed; then press the NEXT And To Zone button. Repeat this process to add a BACK NEXT third destination zone if needed. ESP-SMT Smart Modular Control System... - Page 38 To Zone And To Zone Press the NEXT button. Press NEXT To Continue And To Zone NEXT NEXT original INPUT ZONE INFORMATION screen will appear. INPUT ZONE INFORMATION Zone Setup Wizard Copy Zone to Zone SELECT ESP-SMT Smart Modular Control System...
-
Page 39: Special Features
Short Circuit Test This section shows you how to customize the irrigation schedule for your site to Adv. Controller Setup Advanced Zone Setup meet your specific needs by utilizing the ESP-SMT controller’s Special Features. Save Contractor Dflts Set Units SELECT Rotate the dial to SPECIAL FEATURES position... -
Page 40: Short Circuit Test
NOTE: Do not press the - button 10-N 11-N when the current date appears S-Shorted G-No Short N-Not Present on the screen as this date will BACK RETEST be canceled and dashes will re- appear on the screen. ESP-SMT Smart Modular Control System... -
Page 41: Advanced Controller Setup
Suspend Watering When screen will appear with the value Rain Reaches 0.04 much rainfall is required before -OR- Temp Below 35°F for the ET Adjustment factor BACK NEXT suspension of the irrigation blinking; system will occur. ESP-SMT Smart Modular Control System... -
Page 42: Advanced Zone Setup
• Use/Not Use a Master Valve / Pump be displayed; then press the NEXT Start Relay. button. ADVANCED SETUP Zone • Use/Not Use the ESP-SMT Rain Gauge information. Use Master Valve If you would like to set a specific zone Use Rain Gauge... -
Page 43: Save Settings To "Contractor Default" Program
Contractor Default, press the SAVE button. A WARNING screen will appear. If you want to continue to save your current settings press the CONTINUE button. The CURRENT SETTINGS SAVED screen will appear. Press the CONTINUE button. ESP-SMT Smart Modular Control System... -
Page 44: Set Units
The SET TIME FORMAT screen will BACK SELECT to “AM/PM” and the Unit format appear and the current time to “English” when the ESP-SMT format will blink. If you wish to controller is connected to a 60Hz change the time format to an power source. -
Page 45: Fine Tune Watering By Zone
Tune By Zone adjustments, move the 1 +12 dial into the AUTO position. These adjustments will occur indefinitely BACK NEXT until you rotate the dial into the FINE TUNE WATERING position and make additional adjustments. ESP-SMT Smart Modular Control System... -
Page 46: System Review
Lat 41° N Elev 1200ft Even Days: 2,4,6,.. .30 will appear displaying the Zip Except Tuesday Water Windows Code, Allowed Irrigation Days and 06:00 AM To 10:00 AM 06:00 PM To 11:00 PM Allowed Irrigation Time (Watering BACK Window). ESP-SMT Smart Modular Control System... -
Page 47: Zone Settings Review
Zone Settings to review Zone Information for a Next Irrigation Est. Weather Data different Zone (Example – Zone 3); Weather Log Event Log press the - or + button(s) until the SELECT desired zone is displayed. ESP-SMT Smart Modular Control System... -
Page 48: Weather Data Review
DONE button to return to the of rainfall measured in the last 24 Weather Log Event Log CONTROLLER REVIEW screen. hours (- or + 1 hour) by the ESP-SMT SELECT sensor. NOTE: If the measured rainfall appears to be significantly less... -
Page 49: Weather Log Review
30 days BACK PgDn PgUp based on the information communicated The EVENT LOG screen will appear to the ESP-SMT controller from the SMT and Alarms and Notes will begin to Weather Sensor. blink; press the SELECT button. CONTROLLER REVIEW... - Page 50 08:12 64 Mi Events by Date 06 May 08:20 72 Mi Events by Zone 10 May 08:25 85 Mi 15 May 08:12 53 Mi 18 May 08:15 Short Z02 BACK PgDn PgUp BACK SELECT NEXT ESP-SMT Smart Modular Control System...
- Page 51 Events that will appear in the Event Logs Screen Text Event Description ESP-SMT Smart Modular Control System...
-
Page 52: Restore Settings
This section shows you how save the program information you have entered Factory Defaults into the ESP-SMT controller in memory and then how to retrieve the saved information when necessary. This dial position also allows you to clear all SELECT information stored in the controller and reset the controller to its original Factory Settings. -
Page 53: Restore "Factory Default" Program Settings
Please Wait While Unit Reconfigures. Smart Modular QUIT RESTORE Controller While the ESP-SMT is restoring the Factory Default settings, the screen as shown will appear until all information has been programmed WARNING into the ESP-SMT controller. Restoring Factory Defaults Will Delete ALL Current Settings. -
Page 54: Manual Watering
Zone 1 will begin to blink. If you want to apply water on zone 1 BACK NEXT manually, press the - or + button(s) to set the desired amount of manual irrigation for zone 1; then press the NEXT button. ESP-SMT Smart Modular Control System... - Page 55 The Minutes Remaining will count generated. ADV. CANCEL ZONE down to 0 and then the next Zone that you set to manually operate will be displayed with the Minutes Remaining displayed. WATERING-MANUAL Watering Zone Minutes Remaining ADV. CANCEL ZONE ESP-SMT Smart Modular Control System...
-
Page 56: Manually Water All Active Zones (Test Program)
If you desire to stop the manual Minutes Each watering for the current zone and ADV. CANCEL START CANCEL ZONE want to advance to the next zone. Press the ADV. ZONE button and the next valve will begin to manually operate. ESP-SMT Smart Modular Control System... -
Page 57: Off Position Or Adjust Display Contrast Function
AUTO SET DATE light condition. Press the - or + & TIME button(s) until the desired contrast is achieved. CONFIGURE MANUAL CONTROLLER WATERING RESTORE INPUT ZONE SETTINGS INFORMATION SYSTEM SPECIAL FEATURES REVIEW FINE-TUNE WATERING ESP-SMT Smart Modular Control System... -
Page 58: Auto Position Or Suspend Watering Function
Minutes Remaining on this zone. NOTE: When the dial is left in the AUTO position, any required irrigation will automatically begin at the start of the Allowed Watering Time on Allowed Watering Days. ESP-SMT Smart Modular Control System... - Page 59 Press the UP or DOWN button(s) until the desired amount of suspension time is displayed. If you want to stop the suspension of irrigation and resume automatic irrigation, press RESUME button and the AUTO WATERING screen will appear. ESP-SMT Smart Modular Control System...
-
Page 60: Installation
Installation This section provides information on how to install the ESP-SMT Controller. Installing The Controller Select Location 11" Select a location that has a flat, stable surface in an area protected from vandalism. ALARM AUTO Using the mounting template, mount the controller at SET DATE &... -
Page 61: Installation Tools Required
• Ladder to reach sensor mounting location Valve (Zone) and Communication Wire Entrances The ESP-SMT controller has three “knockouts” available for routing valve & sensor communication wires, two on the underside of the cabinet, and one on the back. The underside of the cabinet has two knockouts sized for either a 1”... -
Page 62: Mounting The Controller
RISK OF FIRE, EXPLOSION AND ELECTRICAL SHOCK. THIS CONTROLLER USES A NON-REPLACEABLE LITHIUM BATTERY. DISPOSE OF ALL ELECTRONIC PRODUCTS IN ACCESSORY ACCORDANCE WITH LOCAL LAWS AND FEDERAL REGULATIONS. RESET IF DISPLAY IS SCRAMBLED OR BLANK, PUSH THE RESET BUTTON ESP-SMT Smart Modular Control System... - Page 63 The ESP-SMT Smart Modular controller has a single keyhole slot at the rear top of the cabinet. At the bottom of the cabinet are three circular mounting holes. Mount the controller so that at least one of the bottom holes lines up with a wall stud or other solid #8 SCREW surface.
-
Page 64: Connect Field Wiring
The controller does not provide main power for a pump. Connect the master valve or pump start relay wiring to the controller as shown in the illustration. ESP-SMT Smart Modular Control System... -
Page 65: Jumper Setting For Unused Stations
LAWN SPRINKLER CONTROL Operation is subjected to the following two conditions: -DOMESTIC- the back of the ESP-SMT controller panel (polarity is This device may not cause harmful interference and INPUT: 120 VAC, 0.3 AMPS, 60Hz This device must accept any interference received, OUTPUT: 25.5 VAC, 1.0 AMPS, 60Hz... -
Page 66: Connect Transformer
Connect Transformer ESP-SMT Indoor Controller The ESP-SMT indoor controller has an external transformer that reduces standard supply voltage to 24 VAC to operate the sprinkler valves. You will need to connect this transformer to terminals within the controller cabinet. CAUTION: To prevent electrical shock and potential... - Page 67 ESP-SMT Outdoor Controller The ESP-SMT outdoor controller has an internal transformer that reduces standard supply voltage (120 VAC) to 24 VAC to operate the valves connected to the controller. You will need to connect power supply wires to the transformer’s three wires.
- Page 68 Verify that all connections are secure. Then close the cover of the high-voltage compartment and secure it with the screw. NOTE: All electrical connections and wiring runs must be made according to local building codes. CONNECT 120 VAC ESP-SMT Smart Modular Control System...
-
Page 69: Remote Panel Programming
Remote Panel Programming Installing a 9-Volt alkaline battery in the ESP-SMT Smart Modular controller will allow you to program the controller panel while disconnected from the cabinet. The battery is NOT required to maintain program information. After you pre-program the ESP-SMT controller, remove the 9-Volt battery. -
Page 70: Installing Station Expansion Modules
Installing Station Expansion Modules Optional modules for the ESP-SMT Smart Modular controller provide terminals for up to nine additional valves (zones) for a total of 13 separate zones. You can install optional 3 station expansion modules in any open position in the cabinet. The valve numbers associated with each terminal (e.g., 5, 6, and 7) are molded... -
Page 71: Installing Esp-Smt Upgrade Panel
Slip the front panel hinge pins out of the cabinet exigences du Règlement sur le matériel brouilleur du Canada. sockets. Re-connect the ribbon cable to the ESP-SMT Controller panel, then slip the hinge pins back into the cabinet sockets. This device complies with Part 15 of the FCC Rules. -
Page 72: Installing The Weather Sensor
4 screws are tightened to the mounting surface to Select a convenient outdoor location in close proximity secure the mounting base. (wire-run distance is 200 feet maximum) to the ESP-SMT controller. Place in an unobstructed area away from reflective heat so that the unit can provide accurate on- site temperature and rainfall measurements. - Page 73 Strip the two communication wire leads 1/4” and insert into the connectors (polarity is not important). If the wires are attached to the ESP-SMT controller and AC power is available, a green LED will blink. Once communication has been established between the sensor and the controller, the LED will illuminate.
-
Page 74: Trouble-Shooting
Trouble-shooting This section shows you how to trouble-shoot problems with the ESP-SMT Controller or Sensor Pod. Symptom Possible Cause Correction Automatic Dial is set to OFF Position. Set the dial to the AUTO position. irrigation is not The unit is in a SUSPEND Mode due to user entry. - Page 75 30% in 1% increments. Run off is occurring on a regular basis. Zone input information may not match active site conditions. Rotate the dial to the INPUT ZONE INFORMATION position and change the soil type and/or degree slope. ESP-SMT Smart Modular Control System...
- Page 76 NOTE 8 on Display Screen. Unit is Re initializing, Please WAIT. Unit has encountered a small problem. The controller will correct itself – no action is necessary. For technical assistance contact Rain Bird at 1-800-247-3782 ESP-SMT Smart Modular Control System...
-
Page 77: Appendix
Irrigation System Overview Basic Valve (Zone) Operation The ESP-SMT Smart Modular controls when your sprinkler system turns on, and how long the sprinklers run. The controller has several valves connected to it, as shown in the illustration on the following page. -
Page 78: Description Of Each Soil Type
• Medium textured soil. Mixture of sand, silt and clay with none dominant. • When dry, soil can form a cast that can be handled freely. • Squeezed moist, soil is fairly smooth and plastic with a gritty feel. ESP-SMT Smart Modular Control System... -
Page 79: Simple Test To Determine The Soil Type
• Sand; ½ inch (0.5/3.0) = 17% Triangle on the adjacent page to identify the Soil Apply these values to the Soil Classification Triangle on the Type description. next page to determine the soil type description. ESP-SMT Smart Modular Control System... -
Page 80: Soil Classification Triangle
Classification Triangle, draw a parallel line for the value example intersect in the LOAM soil classification area. of each soil particle type. The Soil Type is identified by where the three lines intersect in the Soil Classification Triangle. ESP-SMT Smart Modular Control System... -
Page 81: How The Esp-Smt Smart Control System Works
Evapotranspiration days manually set by the user, the Rain Bird ESP-SMT Smart Control System irrigation schedule automatically changes The Evapotranspiration (ET) rate is usually expressed daily based on specific weather conditions at the site. -
Page 82: Effective Rainfall
Loamy Sand 0.08 In this example the daily water losses due to ET are as follows: Sand 0.06 Total Rain Effective Rain 0.00” 0.00” 0.00” 0.00” 0.46” 0.16” 0.00” 0.00” 0.00” 0.00” Total 0.46 0.16 ESP-SMT Smart Modular Control System... -
Page 83: Management Allowed Depletion (Mad)
Requirement reaches the MAD threshold value, irrigation AWR, the zone would need to have a total run time of 1 will begin if it is on an Allowed Watering Day. An analogy hour on Day 4. ESP-SMT Smart Modular Control System... -
Page 84: Applying The "Cycle And Soak" Principle
Accumula- Based on the soil type and degree of slope information Effective Net Water Irrigation ET/Day ted Water entered into the controller for the zone, the ESP-SMT Rain Req’t Event Req’t controller will determine the maximum “cycle” time and 0.18”... -
Page 85: Determine Zone Application Rate
This is how we can make the claim that the ESP-SMT “smart” Control System can promote healthier plants with Sprinkler Type Default Method (least accurate) -
Page 86: Total Area Covered Method To Determine Precipitation Rate And Efficiency (Moderate Accuracy)
5,400 Sprinkler Nozzle. Example = Water Pressure = 45 psi. 3. Obtain Catalog Information for Sprinkler (This 7. Enter 0.58 inches per hour into the ESP-SMT information is usually found on the Manufacturer controller based on information contained on page web site). -
Page 87: Zone System Audit Method (Most Accurate)
Application Rate for the zone in which you entered the Precipitation Rate and Efficiency. Example: Precipitation Rate = 0.44 inches per hour Efficiency = 70% Net Application Rate for Zone 1 is 0.31 inch/hour (0.44 X 70%) = 0.31 inches per hour ESP-SMT Smart Modular Control System... - Page 88 However, there is no guarantee that interference will not occur in a particular Changes or modifications not expressly approved by Rain Bird Sales, installation. Inc., could void the user’s authority to operate the equipment.
Need help?
Do you have a question about the ESP-SMT and is the answer not in the manual?
Questions and answers