
Related Manuals for Rain Bird ESP


Summary of Contents for Rain Bird ESP
- Page 1 ESP Modular Controller Controlador Modular ESP Programmateur ESP Modulaire Installation, Programming & Operation Guide Guia de Instalación, Programación y Operación Manuel d’Installation, de Programmation et de Fonctionnement...
-
Page 2: Table Of Contents
Réinitialisation du programmateur ....27 Reconfiguración del controlador ....27 Installation, Programming and Operation Guide Rain Bird ESP Modular Controller ®... - Page 3 Declaration of Conformity ......69 Declaration of Conformity ......69 Rain Bird ESP Modular Controller Installation, Programming and Operation Guide ®...
-
Page 4: Introduction
/ relais de arranque de bomba. Con la instalación de ESP Modular can support up to 13 valves démarrage de pompe. Grâce à l’ajout de módulos de estaciones internos, el ESP (including an auxiliary valve), and a modules internes optionnels, l’ESP... -
Page 5: Commandes Et Clavier
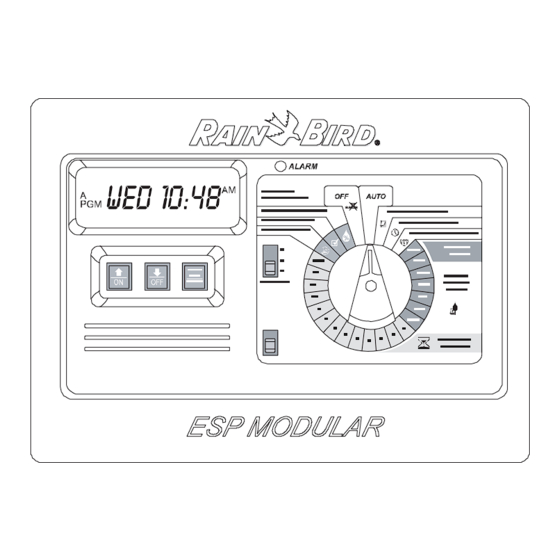
The illustration to the right shows the différentes commandes et indicateurs de controles, interruptores e indicadores del controls, switches, and indicators on the la face avant du programmateur ESP controlador Modular ESP, incluyendo: ESP Modular controller, including: modulaire: 1. Pantalla de cristal líquido (LCD) –... - Page 6 / arrêter le programmateur et choisir d’autres 7. Disco selector de programación fonctions de programmation. (dial) - se usa para encender y apagar el controlador y para programar. Installation, Programming and Operation Guide Rain Bird ESP Modular Controller ®...
-
Page 7: Principe De Fonctionnement Des Électrovannes
Español English Principe de fonctionnement Estaciones de las válvulas Valve Stations des électrovannes El controlador modular ESP ( The ESP Modular controller ( ) normally generalmente tiene varias válvulas has several valves connected to it with L’illustration montre le programmateur conectadas a él mediante cables... -
Page 8: La Programmation
LA PROGRAMMATION PROGRAMACIÓN DEL PROGRAMMING THE CONTROLADOR CONTROLLER Pour vous aider à programmer votre ESP modulaire pour la première fois, nous Para programar el controlador modular To program the ESP Modular controller vous recommandons de suivre les étapes ESP por primera vez, se deberán for the first time, you should complete the ci-dessous. -
Page 9: Réglage De La Date
4. Oprima “ARRANQUE MANUAL / display. START/ADVANCE ) AVANZAR” (MANUAL START / ADVANCE). 5. Le jour du mois clignote sur l’écran. 5. El día del mes aparece en la pantalla en forma intermitente. Rain Bird ESP Modular Controller Installation, Programming and Operation Guide ®... -
Page 10: Réglage De L'heure
1. Gire el disco selector hasta CURRENT TIME ). “CONFIGURAR HORA ACTUAL” (SET CURRENT TIME). 2. L’heure clignote à l’écran. 2. La pantalla muestra la hora del día. La hora aparece en forma intermitente. Installation, Programming and Operation Guide Rain Bird ESP Modular Controller ®... -
Page 11: Choix Du Programme
7. Positionnez la roue de programmation Select Program sur « AUTO ». 7. Gire el disco selector hasta “AUTO”. The ESP Modular controller has three separate programs, A, B, and C. Each Choix du programme Selección del programa program can have different watering days L’ESP modulaire dispose de trois... -
Page 12: Heure(S) De Démarrage De L'arrosage
« REGLAGE HEURE(S) 1. Seleccione el programa que desea. DEMARRAGE » (SET WATERING START TIMES). 2. Gire el disco selector hasta “CONFIGURAR HORAS DE ARRANQUE DEL RIEGO” (SET WATERING START TIMES). Installation, Programming and Operation Guide Rain Bird ESP Modular Controller ®... - Page 13 Répétez ensuite les A continuación, repita los pasos 4 a étapes 4 à 6. 7. Positionnez la roue de programmation 7. Gire el disco selector a “AUTO”. sur « AUTO ». Rain Bird ESP Modular Controller Installation, Programming and Operation Guide ®...
-
Page 14: Choix Du Cycle D'arrosage
3. La palabra “PERSONALIZADO” pas, appuyez sur jusqu’à ce (CUSTOM) debería aparecer en la que « PERSONNALISE » (CUSTOM) pantalla. Si esto no ocurre, oprima apparaisse. hasta que aparezca. Installation, Programming and Operation Guide Rain Bird ESP Modular Controller ®... - Page 15 2. Positionnez la roue de programmation 1. Seleccione el programa que desea. sur « AUTRES CYCLES » (ADVANCED CYCLES). 2. Gire el disco selector hasta “CICLOS AVANZADOS” (ADVANCED CYCLES). Rain Bird ESP Modular Controller Installation, Programming and Operation Guide ®...
- Page 16 AVANZADOS” (ADVANCED CYCLES). selected for the program. CYCLES). 3. La pantalla muestra el ciclo 3. A l’écran apparaît le cycle sélectionné actualmente seleccionado para el pour ce programme. programa. Installation, Programming and Operation Guide Rain Bird ESP Modular Controller ®...
- Page 17 / AVANCER » (MANUAL ADVANCE). START/ADVANCE). 9. En la pantalla aparece el dígito de 9. L’indication « JOURS RESTANTS » DÍAS RESTANTES (DAYS REMAINING) (DAYS REMAINING) clignote. en forma intermitente. Rain Bird ESP Modular Controller Installation, Programming and Operation Guide ®...
-
Page 18: Réglage De La Durée D'arrosage Par Vanne
2. Gire el disco selector hasta la válvula 3. A l’écran apparaissent la vanne número 1. sélectionnée ainsi que sa durée d’arrosage. 3. La pantalla muestra la válvula seleccionada y los minutos del riego. Installation, Programming and Operation Guide Rain Bird ESP Modular Controller ®... - Page 19 Este mensaje indica que no hay ningún vanne. módulo instalado en la posición de esa válvula. 6. Positionnez la roue de programmation sur AUTO. 6. Gire el disco selector hasta AUTO. Rain Bird ESP Modular Controller Installation, Programming and Operation Guide ®...
-
Page 20: Fonctionnement Du Programmateur
2. Para apagar el controlador, de modo que no haya riego alguno, gire el disco selector a “APAGADO” (OFF). La pantalla muestra “APAGADO” (OFF) y la hora del día. Installation, Programming and Operation Guide Rain Bird ESP Modular Controller ®... -
Page 21: Ajustement Saisonnier
8 minutos. Si configuró el ajuste (SEASONAL ADJUST). en 120%, la misma válvula funcionará durante 12 minutos. 1. Gire el disco selector hasta “% DE AJUSTE POR TEMPORADA (SEASONAL ADJUST %). Rain Bird ESP Modular Controller Installation, Programming and Operation Guide ®... - Page 22 “SEASONAL ADJ.” 100 %, l’indication « AJ SAISONNIER por debajo del 100 por ciento, la » (SEASONAL ADJ) apparaît à l’écran. pantalla muestra “AJUSTE POR TEMPORADA” (SEASONAL ADJ.). Installation, Programming and Operation Guide Rain Bird ESP Modular Controller ®...
-
Page 23: Démarrage Manuel
(Run Time) restante. A medida d’arrosage restante. Les vannes vont que cada válvula finaliza, comenzará fonctionner en séquence, l’une après a funcionar la siguiente en la l’autre. secuencia. Rain Bird ESP Modular Controller Installation, Programming and Operation Guide ®... - Page 24 Este tiempo de riego se temps d’arrosage supérieur à 0. transformará entonces en parte del programa. Installation, Programming and Operation Guide Rain Bird ESP Modular Controller ®...
- Page 25 Replacez ensuite la roue funcionar, coloque el disco selector de programmation sur AUTO. en APAGADO (OFF) durante tres segundos. Luego, vuelva a colocar el disco selector en AUTO. Rain Bird ESP Modular Controller Installation, Programming and Operation Guide ®...
-
Page 26: Test Des Vannes
Probar todas las válvulas Test All Valves Le programmateur ESP modulaire El controlador modular ESP tiene un The ESP Modular controller has a built-in dispose d’un programme de test. Ce programa de prueba incorporado. Este test program. This program automatically... -
Page 27: Réinitialisation Du Programmateur
Rain Bird ESP Modular Controller Installation, Programming and Operation Guide ®... - Page 28 AUTO. back to the right. Turn the dial to pantalla estará en blanco. AUTO. 4. Cierre el panel frontal volviéndolo hacia la derecha. Gire el disco selector hasta “AUTO”. Installation, Programming and Operation Guide Rain Bird ESP Modular Controller ®...
-
Page 29: Utilisation Des Fonctions « Cachées
Utilisation des fonctions Uso de las funciones “ocultas” Use “Hidden” Functions « cachées » El controlador modular ESP incluye varias The ESP Modular controller includes funciones adicionales que no corresponden several additional functions that do not Le programmateur ESP modulaire dispose de... -
Page 30: Configuration Du Mode De Fonctionnement De La Pompe/Vanne Maîtresse
(ADVANCE) pour passer du numéro de B. Presione el botón “ADVANCE” station aux paramètres MV et (avanzar). Esto alterna entre la selección inversement. del número de estación y los parámetros de la válvula maestra. Installation, Programming and Operation Guide Rain Bird ESP Modular Controller ®... - Page 31 « AUTO » pour finaliser la para finalizar la programación de master valve program by station. programmation de la vanne maîtresse válvula maestra por estación. pour chaque station. Rain Bird ESP Modular Controller Installation, Programming and Operation Guide ®...
-
Page 32: Délai Programmable Entre Les Stations
3. El visor mostrará la demora actual 3. Le délai actuel entre les stations entre estaciones. El valor apparaît (la valeur par défaut est 0). predeterminado es 0. Installation, Programming and Operation Guide Rain Bird ESP Modular Controller ®... - Page 33 17 seconds. 5. Repositionnez la roue de 5. Gire el disco nuevamente hasta la 5. Turn the dial back to AUTO. programmation sur « AUTO ». posición AUTO. Rain Bird ESP Modular Controller Installation, Programming and Operation Guide ®...
-
Page 34: Utilisation De La Station Auxiliaire
Operación de la válvula Auxiliary Valve Operation auxiliar auxiliaire The auxiliary valve terminal on the ESP La terminal de la válvula auxiliar en el Modular controller can operate in one of La 13ème borne de connexion du controlador modular ESP puede operar en two ways. - Page 35 6. Turn the dial to AUTO. que la válvula ESTÁ afectada por el 6. Tournez la roue sur AUTO. sensor de lluvia. 6. Gire el disco selector hasta “AUTO”. Rain Bird ESP Modular Controller Installation, Programming and Operation Guide ®...
-
Page 36: Effacement De La Mémoire
CLEARED ». Relâchez les boutons. pantalla muestre “BORRADO” “CLEARED.” Release (CLEARED). Suelte 4. Tournez la roue sur AUTO. 4. Turn the dial to AUTO. 4. Gire el disco selector hasta “AUTO”. Installation, Programming and Operation Guide Rain Bird ESP Modular Controller ®... -
Page 37: Installation
English INSTALLATION INSTALACIÓN INSTALLATION NOTE: Le programmateur ESP modulaire NOTA: El controlador modular ESP debe NOTE: The ESP Modular controller must doit être installé conformément aux instalarse de acuerdo con los códigos be installed in compliance with local normes électriques en vigueur. Les eléctricos locales. - Page 38 4. Deje un espacio horizontal de por lo gauche pour permettre d’ouvrir menos 11”, de modo que la puerta complètement la porte du con bisagras del gabinete pueda programmateur. abrirse por completo hacia la izquierda. Installation, Programming and Operation Guide Rain Bird ESP Modular Controller ®...
-
Page 39: Montage Du Programmateur
The ESP Modular has three “knockouts” available for routing valve wires, two on L’ESP modulaire dispose de trois orifices El modular ESP cuenta con tres discos the underside of the cabinet, and one on pour le passage des câbles qui vont des removibles (o puntos de perforación),... - Page 40 (A). Si se conectó correctamente, la marca roja (B) del cable estará orientada hacia arriba. Installation, Programming and Operation Guide Rain Bird ESP Modular Controller ®...
- Page 41 Français Español English 6. Derrière le programmateur se 6. El controlador modular ESP tiene una 6. The ESP Modular controller has a trouvent un trou de fixation en forme ranura con forma de ojo de cerradura single keyhole slot at the rear top of...
-
Page 42: Connexion Des Câbles
Conecte el otro extremo del cable común al terminal COM. Los cables usados para conectar las válvulas deben estar aprobados para el uso en instalaciones subterráneas. Installation, Programming and Operation Guide Rain Bird ESP Modular Controller ®... - Page 43 1. Connectez la vanne maîtresse ou le muestra en la ilustración. relais de démarrage de pompe au programmateur – voir illustration. Rain Bird ESP Modular Controller Installation, Programming and Operation Guide ®...
- Page 44 Ceci peut surchauffer la pompe alguno (“dead-head”). Esto podría ou la griller. provocar que la bomba se recaliente o se queme. Installation, Programming and Operation Guide Rain Bird ESP Modular Controller ®...
-
Page 45: Connexion Du Transformateur
Controlador ESP-4Mi sólo para ESP-4Mi Indoor-Only Controller uniquement uso en interiores NOTE: To connect main power wires on the ESP-4M outdoor controller, see the NOTE: Pour connecter les câbles NOTA: Para conectar los cables de instructions on page 47. principaux au programmateur ESP-4M electricidad al controlador ESP-4M para destiné... - Page 46 24V n’ont pas cualquiera de los cables a cualquiera d’importance. La polarité de ces de los terminales 24 VCA; la câbles n’a pas d’incidence. polaridad de estos cables no es importante. Installation, Programming and Operation Guide Rain Bird ESP Modular Controller ®...
- Page 47 45. d’alimentation du programmateur ESP- 4Mi destiné à un montage intérieur NOTA: Para conectar los cables de The ESP-4M controller has an internal uniquement, reportez-vous aux electricidad al controlador ESP-4Mi sólo transformer that reduces standard supply instructions de la page 45.
- Page 48 1 cm de câble nu. compartimiento de alto voltaje. Pele el aislamiento de los cables que ingresan, dejando al descubierto alrededor de 1,3 cm ( ”) de la parte metálica. Installation, Programming and Operation Guide Rain Bird ESP Modular Controller ®...
- Page 49 (« neutre») au câble bleu du En los modelos de 230 VCA transformateur. (internacional), conecte el cable azul (“neutral”) al cable azul del transformador. Rain Bird ESP Modular Controller Installation, Programming and Operation Guide ®...
- Page 50 à la sean seguras. Luego cierre la with the screw. vis. cubierta del compartimiento de alto voltaje y asegúrela con el tornillo. Installation, Programming and Operation Guide Rain Bird ESP Modular Controller ®...
-
Page 51: Démontage De La Face Avant
Installing a 9-Volt alkaline battery in the le programmateur ESP Modulaire vous El instalar una batería alcalina de 9 ESP Modular controller will allow you to voltios en el controlador modular ESP le permettra de programmer le program the controller with the faceplate permitirá... - Page 52 Installation, Programming and Operation Guide Rain Bird ESP Modular Controller ®...
-
Page 53: Installation D'un Module
Instalación de módulos Installing Modules Los módulos opcionales para el Les modules optionnels pour le Optional modules for the ESP Modular controlador modular ESP brindan a los programmateur ESP modulaire controller provide terminals for up to terminales hasta nueve válvulas fournissent des bornes pour arriver nine additional valves. - Page 54 NOTE: vous pouvez installer ou enlever modules with or without AC voltage les modules que le programmateur soit connected. The modules are “hot sous tension ou pas. Les modules sont swappable.” isolés. Installation, Programming and Operation Guide Rain Bird ESP Modular Controller ®...
-
Page 55: Connexion D'une Sonde Pluie
MUST be designed for normally closed (NC) regleta de terminales del controlador. operation. Normally open (NO) rain sensors ATTENTION: La sonde pluie que vous will prevent the ESP-Modular controller from connectez DOIT être conçue pour un PRECAUCIÓN: El sensor de lluvia que functioning properly. - Page 56 SENS du the “SENS” terminals on the ESP “SENS” ubicados en el controlador programmateur ESP Modulaire. Modular controller. modular ESP .
-
Page 57: Troubleshooting
8. Rain sensor is the normally open (NO) type. Replace with a normally closed (NC) rain sensor. Normally open rain sensors are not compatible with the ESP-Modular controller and will prevent the controller from functioning properly. Valve does not come on. - Page 58 If the electrical surge did no permanent damage, the controller will accept programming commands and function normally. If the controller does not operate properly, contact Rain Bird Technical Assistance at 800-247-3782. Watering starts when it should 15.MANUAL START / ADVANCE key has been To cancel a program that has been manually started, set the dial to OFF for three not.
- Page 59 AUTO. The LED will turn off. 21.Shorted station. A short circuit in the solenoid or valve wiring has disabled the station. See correction for Cause #10. Rain Bird ESP Modular Controller Installation, Programming and Operation Guide ®...
-
Page 60: Resolución De Problemas
8. El sensor de lluvia es de tipo normalmente abierto (NA). Reemplace con un sensor de lluvia normalmente cerrado (NC). Los sensores de lluvia normalmente abiertos no son compatibles con el controlador modular ESP e impedirán que el controlador funcione correctamente. - Page 61 Si el controlador no funciona adecuadamente, póngase en contacto con el Servicio técnico de Rain Bird a través del 1-800-247-3782. El riego comienza cuando no 15.Se oprimió la tecla “ARRANQUE MANUAL / AVANZAR”...
- Page 62 (LED) se apagará 21.Estación en cortocircuito. Un cortocircuito en el cableado del solenoide o de la válvula ha inutilizado la estación. Consulte la corrección para la Causa #10. Installation, Programming and Operation Guide Rain Bird ESP Modular Controller ®...
-
Page 63: Depannage
La sonde pluie est généralement de type Remplacez-la par une sonde NC (normalement fermé). Les sondes pluie NO ne sont pas NO (normalement ouvert). compatibles avec le programmateur ESP Modulaire et empêchent son fonctionnement normal. Rain Bird ESP Modular Controller Installation, Programming and Operation Guide ®... - Page 64 Si la surtension électrique n’a pas provoqué de dommages permanent, le programmateur acceptera normalement une programmation. Si le programmateur ne fonctionne pas correctement, contactez l’Assistance Technique de RAIN BIRD au 800-247-3782 L’arrosage démarre quand il 15.Le bouton DEMARRAGE MANUEL/ AVANCE a été...
- Page 65 # ERR, où # est le numéro de la station. Identifiez et réparez la panne sur le circuit. Si "MV Err" apparaît, réparer le problème. Pour effacer l'alarme LED, positionner le cadran à AUTO, ensuite appuyer sur le bouton ADVANCE. Rain Bird ESP Modular Controller Installation, Programming and Operation Guide ®...
- Page 66 37 délai programmable entre les stations, 32 operación de la válvula auxiliar, 34 module, 53 effacement de la mémoire, 36 rain sensor, 55 utilisation des stations auxiliaires, 34 Installation, Programming and Operation Guide Rain Bird ESP Modular Controller ®...
- Page 67 Réinitialisation du programmateur, 27 Reconfiguración del controlador, 27 SENS terminals, 55 Sonde pluie, 10 Resolución de problemas, 58 Setting the Pump/Master Valve Operation, 30 Sensor de lluvia, 55 Test valves, 26 Rain Bird ESP Modular Controller Installation, Programming and Operation Guide ®...
- Page 68 34, 43, 53 module d’extension, 53 WARNING The ESP Modular controller has an internal, non-replaceable lithium battery that has a shelf life of ten years. Discard the used controller in compliance with local laws as you would any electronic component or battery.
-
Page 69: Declaration Of Conformity
Rain Bird ESP Modular Controller Installation, Programming and Operation Guide ®... - Page 70 NOTES / NOTAS Installation, Programming and Operation Guide Rain Bird ESP Modular Controller ®...
- Page 71 NOTES / NOTAS Rain Bird ESP Modular Controller Installation, Programming and Operation Guide ®...
- Page 72 FCC Rules. These limits are designed to provide reasonable equipment off and on, the user is encouraged to try to correct Changes or modifications not expressly approved by Rain Bird protection against harmful interference in a residential the interference by the following measures: Corporation, could void the user’s authority to operate the...
Need help?
Do you have a question about the ESP and is the answer not in the manual?
Questions and answers
Message states no modular for stations 5 and 6 just started displaying that rest of system runs great
Model: ESP Modular
The message "no modular for stations 5 and 6" on the Rain Bird ESP system means that the controller is trying to access station numbers 5 and 6, but there is no station module installed to support those stations. This typically happens if the expected module is missing, not inserted correctly, or damaged.
This answer is automatically generated
programed to come on at 0600 and run thru all stations. Has also been coming on at about 2300 hrs. don't have a second run time programed that I can tell. Help