Table of Contents
Advertisement
ESP-SMTe Controller User Manual
Introduction
Welcome to Rain Bird
Thank you for choosing the ESP-SMTe Smart Modular Con-
trol System from Rain Bird. The ESP-SMTe is an indoor or
outdoor weather-based irrigation controller. Two ESP-SMTe
models are available that can be expanded up to 22 sta-
tions by adding optional station modules:
• 4 Station Indoor Controller (ESP4SMTei)
• 4 Station Outdoor Controller (ESP4SMTe)
The Intelligent Use of Water®
We believe it is our responsibility to develop products that
use water efficiently.
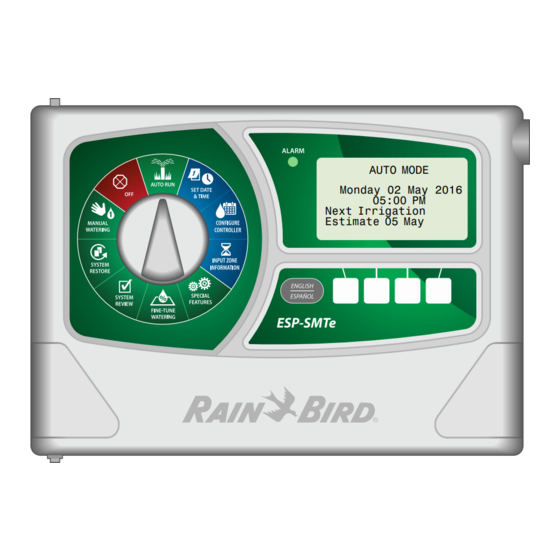
ESP-SMTe Controller Features
The ESP-SMTe has two programming mode options that
make watering adjustments based on inputs from the
weather sensor.
Rain+Birdt
Now with both
Simple Smart Programming
Advanced ET Watering Features
and
AUTO MODE
Monday 02 May 2016
05:00 PM
Next Irrigation
Estimate 05 May
Simple Smart Mode
In Simple Smart mode, the ESP-SMTe acts like a tradi-
tional time-based controller. Watering is scheduled on
specific days, with fixed start times and run times. Auto-
matic adjustments are made to run times based on current
weather conditions.
Advanced ET Mode
In Advanced ET mode, the ESP-SMTe uses state of the
art technology to determine water needs for each zone
to ensure optimal landscape health with minimal water
usage. Advanced mode will change the irrigation schedule
daily based on water needs.
Time-Based Controller Water Use
Water
Savings
Winter
ESP-SMTe Controller Water Use
Spring
Summer
Fall
Advertisement
Table of Contents

Related Manuals for Rain Bird ESP-SMTe


Summary of Contents for Rain Bird ESP-SMTe
-
Page 1: Welcome To Rain Bird
Auto- Thank you for choosing the ESP-SMTe Smart Modular Con- matic adjustments are made to run times based on current trol System from Rain Bird. The ESP-SMTe is an indoor or weather conditions. outdoor weather-based irrigation controller. Two ESP-SMTe... -
Page 2: Table Of Contents
Advanced Zone Setup ........... 16 • Foreign Language Support Save Contractor Defaults ..........16 Set Units ................16 To learn more about Rain Bird irrigation systems and our- Fine-Tune Watering ............ 17 Rain Bird Academy training programs, visit: System Review ............17 www.rainbirdservices.com/training... -
Page 3: Installation
5 6 7 11 12 13 17 18 19 1 2 3 4 8 9 10 14 15 16 20 21 22 VT MV COM 1 2 3 4 VT = VALVE TEST CONNECT 120 VAC MASTER VALVE ESP-SMTe Controller... -
Page 4: Connect Pump Start Relay (Optional)
Connect Pump Start Relay (optional) Connect Power The ESP-SMTe can control a pump start relay, to turn the WARNING: DO NOT plug in the transformer or con- pump on and off as needed. nect external power until you have completed and checked all wiring connections. -
Page 5: Station Expansion Modules
Slide the securing lever to the locked position (slide VT MV COM to the right). 1 2 3 4 REPEAT for additional modules. VT = VALVE TEST NOTE: Modules can be installed or removed with OR without AC power connected. They are considered “hot-swappable”. ESP-SMTe Controller... -
Page 6: Station Numbering
Zone 14. NOTE: Station numbering gaps will not prevent the controller from operating properly. It only affects station numbering. During programming when connected to AC power, the controller will skip any unused stations where a module is not installed. ESP-SMTe Controller... -
Page 7: Weather Sensor Installation
• Do NOT install the sensor where it will be impractical to service – the rain sensor may require cleaning depending on the amount of leaves, dust, etc that may collect in the debris screen, funnel, or tipping bucket rain sensor. ESP-SMTe Controller... -
Page 8: Mount Weather Sensor
If AC power is available, the green LED will blink. Once communication is established between the sensor and controller, the LED will light solid. Re-attach the wiring compartment cover and route the wire through the two openings. Then re-tighten the captured screw to secure the cover. ESP-SMTe Controller... -
Page 9: Normal Operation
Normal Operation Controls and Indicators Key operational features of the ESP-SMTe Controller: Initial Controller & Zone AUTO RUN: Watering Programming Dial Set-Up Dial Positions occurs automatically Alarm Light: Illuminates OFF: Cancels all irrigation when conditions prevent Manual Watering: Start watering... -
Page 10: Operating Modes
Operating Modes Cancel all active watering immediately and stop When the ESP-SMTe Controller is powered on for the first automatic irrigation. time, the option to select a programming mode is dis- played. Turn the dial to OFF. This screen is also available under the Advanced Control- ler Setup dial position (see page 15) or after a Factory –... -
Page 11: Simple Smart Programming
Turn the dial to Set Date & Time. parameters for rain sensor shutoff. Select Set Site Info. Set the current month, day and year. Select Set Zip Code. Set the current time. Enter the zip code for your site. ESP-SMTe Controller... -
Page 12: Set Schedule
Press UP or DOWN until PROGRAM is blinking; then Water only on even calendar days. press PGM SELECT to choose A or B. Odd Days: Select Set Days to Water. Water only on odd calendar days (except 31st). ESP-SMTe Controller... -
Page 13: Review Settings
Times for Program B, then press MORE. Set the first Start Time; then press NEXT START to enter additional times (up to 6 total), or, press DONE to finish. REPEAT Steps 2 - 7 for Program B if necessary. ESP-SMTe Controller... -
Page 14: Input Zone Information
The SMTe will make adjustments to the Run Times in Simple Smart mode based on local weather conditions. Select the desired zone. Select Program A or Program B. Set the Run Time; then press NEXT. ESP-SMTe Controller... -
Page 15: Special Features
Verify the integrity of the wires between the controller and specified amount. the valves. • Suspend Watering When Temp Below value suspends Select Short Circuit Test. irrigation when the temperature falls below a specific value. ESP-SMTe Controller... -
Page 16: Select Programming Mode
(English or Metric) that is displayed by the controller. Select Set Units. Set each zone to use (or not to use) an installed master valve, pump start relay, or the ESP-SMTe Rain Gauge. Select Advanced Zone Setup. Select the desired Time Format. -
Page 17: Fine-Tune Watering
NOTE: The information under System Review is for review purposes only. This allows the review of pro- gramming settings without accidentally making unwanted changes. Zone Settings Review Input Zone Information and Advanced Zone Setup Turn the dial to System Review. settings. Select Zone Settings. ESP-SMTe Controller... -
Page 18: Weather Data
Events and alarms can be viewed by date or by zone. NOTE: A table in the Contractor’s Manual on the web- site (www.rainbird.com/esp-smte) lists all the mes- sages that can appear in the Event Logs. Review Weather Data; then press BACK. -
Page 19: System Restore
• When the restore is complete, the display returns to the RESTORE SETTINGS menu. Select the desired programming mode and begin programming the controller per the mode selected. >> For Simple Smart mode, go to page 11. >> For Advanced ET mode, go to page 21. ESP-SMTe Controller... -
Page 20: Manual Watering
To cancel watering, press CANCEL or turn the dial to Set the run time for all zones; then press START. OFF for three seconds and then return the dial to the AUTO RUN position. ESP-SMTe Controller... -
Page 21: Advanced Et Programming
Different soil types vary greatly in the ability to hold water and the rate that water filters down through the soil. The The ESP-SMTe in Advanced ET mode will use 30% to 50% Soil Type in each zone helps determine when plants need less water than a traditional time-based watering schedule. -
Page 22: Evapotranspiration (Et)
Configure Controller Evapotranspiration (ET) The ESP-SMTe calculates water needs based on water lost Enter site location info and basic irrigation schedules. from the soil surface (evaporation) and water used by the To program in Advanced ET mode, select Advanced ET on plants (transpiration). -
Page 23: Step 2. Set Allowed Watering Days
Allowed Watering day or a non-watering day. When each day is set, press NEXT. Enter Custom Data for Location Refer to the Contractor’s Manual on the Rain Bird website to enter Custom Data. >> Go To Step 4, Set Allowed Watering Windows... -
Page 24: Step 4. Set Allowed Watering Windows
NOTE: Once the desired amount of rain has been exceeded, the controller will stop watering time based and grow-in zones for the number of Full Days speci- fied. Full Days begin at midnight so 1 Full Day is the rest of today and all of tomorrow. ESP-SMTe Controller... -
Page 25: Input Zone Information
Help for a brief soil description. Zone Setup Wizard NOTE: You can also refer to the Soil Type section in the Appendix of the Contractors Manual on the Rain Bird • Select Zone Setup Wizard. website. • Select the soil type for your site. - Page 26 >> Go To Step 5, Cycle+Soak tions entered during Controller Configuration will be applied. If Daily Water Window is selected, the pro- grammed Daily Water Window will be used and zones will be allowed to water only if required. ESP-SMTe Controller...
- Page 27 Application Rate if desired; then press NEXT. NOTE: For detailed information on setting up Point Source Drip and Inline Grid Drip systems, see the Con- tractor’s Manual on the Rain Bird website. >> Go To Step 5, Cycle+Soak >> Go To Step 6, Select Plant Type.
- Page 28 NOTE: To use Custom Plant Factors, refer to the Con- NOTE: Increasing the root depth will decrease irriga- tractor’s Manual on the Rain Bird website. tion frequency (water less often) and increase water- • Select the plant type for the zone.
- Page 29 New plants are watered every day during the daily Grow-in Period, then are considered Estab- lished when the Grow-in Period ends. For Established Plants: • Select Established. >> Go to Step 11, Select Next Action. ESP-SMTe Controller...
-
Page 30: Copy Zone To Zone
Select up to three destination zones (To Zone); then press NEXT. Remote Accessories Select COPY if the selections are correct. NOTE: Use only Rain Bird approved devices with 5 pin Select QUIT to re-enter selections. accessory port. Unapproved devices may damage controller and void warranty. -
Page 31: Troubleshooting
If you have hired someone to install the unit contact them and find out when they plan to program the controller. If you plan to program the controller yourself go the www. rainbird.com/esp-smte and download the Contractor’s Manual. NOTE – All Zones Are Off This condition exists when the controller’s program has been erased. - Page 32 “Adv. Controller Setup” and change the user set value (When Rain Reaches) to a higher rainfall threshold. NOTE on Display Screen. Unit is re-initializing, Please WAIT. Unit has encountered a small problem. The controller will normally correct itself. However, it the NOTE doesn’t go away after a couple minutes press the Reset button. ESP-SMTe Controller...
-
Page 33: Alarms And Notes
• Consult the dealer or an experienced radio/TV technician for help. ply with local building codes. Some local codes require that only a • Changes or modifications not expressly approved by Rain Bird Corporation licensed or certified electrician can install power. Only professional could void the user’s authority to operate the equipment. - Page 34 1000 West Sierra Madre Avenue Tucson, AZ 85756 Azusa, CA 91702 Azusa, CA 91702 Tel: (520) 741-6100 Tel.: (626) 812-3400 Tel: +1 (626) 963-9311 www.rainbird.com 1-800-724-6247 2016 Rain Bird Corporation Registered trademark of Rain Bird Corporation P/N: 639341-01 Rev.11/16 EN 20NO16...
Need help?
Do you have a question about the ESP-SMTe and is the answer not in the manual?
Questions and answers