QSC TouchMix-30 Pro User Manual
Hide thumbs
Also See for TouchMix-30 Pro:
- User manual (146 pages) ,
- Windows driver manual (2 pages) ,
- Technical notes (2 pages)

Related Manuals for QSC TouchMix-30 Pro


Summary of Contents for QSC TouchMix-30 Pro
- Page 1 TouchMix™ ® User Manual TouchMix-30 Pro Firmware Version 1.2 TouchMix-16 Firmware Version 3.0 TouchMix-8 Firmware Version 3.0 1001108-01-C...
-
Page 2: Important Safety Instructions
QSC authorized service station or QSC International Distributor. Failure to perform necessary repairs could lead to additional damage or to safety hazards. Failure to perform necessary repairs voids the limited warranty and QSC is not responsible for any injury, harm or related damages arising from any failure to perform those repairs. -
Page 3: Maintenance And Repair
To avoid a danger of subsequent damage to the apparatus, injuries to persons and/or the creation of additional safety hazards, all maintenance or repair work on the apparatus should be performed only by a QSC authorized service station or an authorized QSC International Distributor. -
Page 4: Table Of Contents
TouchMix-30 Pro Package Contents . . . . . . . . . . . . . . . . . . - Page 5 Using TouchMix with QSC Amplifiers and Loudspeakers . . . . . . . . . . . . . . . . .
- Page 6 Top Panel and Remote-Device Controls (TouchMix-30 Pro) . . . . . . . . . . . . . . . . .
- Page 7 Sub Group – Compressor / Limiter (TouchMix-30 Pro only) . . . . . . . . . . . . . . . .
- Page 8 DAW – Record / Playback (TouchMix-30 Pro only) . . . . . . . . . . . . . . . .
- Page 9 TouchMix-16 . . . . . . . . . . . . . . . . . . . . . . . . . . . . . . . . . . . . . . . . . . . . . . . . . . . . . . . . . . . . . . . . . . . . . . . . . . . 122 TouchMix-30 Pro Block Diagram .
-
Page 10: Touchmix™ How To
Register and Update STOP We know you want to get right to using your TouchMix mixer, but before you do please stop and take a moment to visit www.qsc.com and register your TouchMix. By registering you can… • Download the latest firmware so that your mixer has all the latest features, refinements and performance enhancements. -
Page 11: Recall A Factory Scene
User scenes may be stored to internal memory and to an external USB storage device. There are circumstances when it’s useful to recall a scene but omit certain settings from being changed. The TouchMix-30 Pro offers these Recall Options: •... -
Page 12: Auxiliary Outputs
Aux 1 TouchMix-30 Pro – A pair of TRS headphone outputs labelled Aux 11/12 and Aux 13/14 may be found on the mixer’s rear panel. These outputs receive their signal from the corresponding Auxiliary Mixes and are intended to drive wired, In Ear Monitors (IEM). If using these outputs, it’s recommended that the Auxiliary mixes driving these headphone outputs be linked for stereo operation. -
Page 13: Using The Fx Wizard
Using the FX izard Less experienced users will find that the FX Wizard simplifies what can be a confusing process while skilled operators will find it to be incredibly fast. With the FX Wizard you can quickly… • Select an effect that’s right for the instruments or voices you want to enhance. •... -
Page 14: Using Pitch Correct
1. Input channels are arranged in columns. Use the Nav Strip to select a group of Input channels. Each Input channel sends for FX Sends 1–4 (TouchMix-8 and TouchMix-16) and 1 – 6 (TouchMix-30 Pro). 2. Individual FX Mixes are arranged in horizontal rows. -
Page 15: Mute Groups
Mute Nroups There are many times when it is useful to mute some of the inputs and outputs. For example, you might want to mute everything but a stereo input for break music. Or there may be a part of your show when the band leaves the stage while one member does a solo number. Mute groups let you mute multiple inputs and outputs from a single button. -
Page 16: Sub Groups (Touchmix-30 Pro Only)
Sub Nroups (TouchMix-30 Pro only) Like DCA Groups, Sub Groups are used to control the volume of multiple channels at once. However, DCA Groups simply add or subtract gain for the channels they control. No signal is routed through a DCA. Unlike DCA Groups, signal is routed through Sub Groups. This means that Sub Groups can apply processing including EQ, Limiting and even Effects to multiple channels. -
Page 17: Using Auxiliaries As Subgroups (Touchmix-8 And 16 Only)
In 11 – Backing 2 Main Out Now that we’ve got the stems, what do we do with them? On the TouchMix-30 Pro, Auxiliaries Sub Groups’ Aux 1 Sends 9 – 14 also function as mix matrices. In addition Aux Out to all the input channels, these signals may be sent to Auxiliaries 9 –... -
Page 18: Sound Check
Setup Loudspeaker Gain and Preset Pop-up Select QSC Speaker Model and Preset Name to display Gain Settings or Recall a Preset In addition to displaying the recommended input gain setting (1) for the selected loudspeaker (2), the pop-up displays a choice of presets (3) for the loudspeaker. For... -
Page 19: Select A Qsc Loudspeaker Preset
These settings give you the optimum signal to noise performance and get the most from your QSC loudspeakers or amplifier. The mixer’s output meters will reflect when you’re “running out of speaker”. Note that you will see the “Limit” light on your speakers illuminate as the mixer drives them harder during louder portions. -
Page 20: Simple And Advanced Mode
Simple and Advanced Mode TouchMix mixers offer two modes of operation: • Simple Mode – Presents the user with a reduced set of controls. It’s important to know that switching into Simple mode does not alter the values of any Advanced-mode controls. •... -
Page 21: Overview Tab
Overview Tab Overview Displays an overview of the output channel settings including Delay, DCA and Mute Group Assigns, Pre/Post pick-off points (auxiliaries only), Aux Send Levels (see Matrix Mixing). PEQ Tab Six-band parametric EQ with High / Low-Cut filters and a Real Time Analyzer (RTA) This tab displays the six-band, parametric equalizer plus the Low and High-Cut Filters. -
Page 22: Anti-Feedback Tab
(USB) memory. The Preset Tab also includes factory voicings for QSC E-Series and K.2 Series loudspeakers. These settings are also available for QSC PLD and GXD amplifiers. The E-Series voicings are intended for use with other amplifiers that lack DSP. An “X” suffix after the preset name indicates the preset is intended for use with a sub-woofer. -
Page 23: Recording
KW Series Refer to "Using TouchMix with QSC Amplifiers and Loudspeakers" on page 9 and "QSC GXD Amplifier Settings" on page 10. Also see "What is a Channel Preset?" on page 2 for information on preset voices for QSC E-Series loudspeakers. - Page 24 Transferring tracks between TouchMix and DAW A utility application – TouchMix DAW Utility - that facilitates transferring tracks between TouchMix mixers and Digital Audio Workstations is available for download at www.qsc.com. The application runs on Mac or Windows computers. Sample Rate In general, use 44.1 kHz for CD projects, and 48 kHz for video projects.
-
Page 25: Multi-Track Playback & Mix Down
• Export to a DAW for further processing and to be edited into individual songs. The wave files may be found in the last two folders of the directory containing the session. • TouchMix-30 Pro only – Create an MP3 version from the mixer. The TouchMix-30 Pro has the capability of rendering the 2-track mix as an MP3 file. -
Page 26: Anti-Feedback System
Menu Your DAW software will also likely require some configuration to connect with the TouchMix-30 Pro. See your DAW software documentation for information on this topic. There is also a guide to configuration of some common DAW software at www.qsc.com. -
Page 27: More About The Anti-Feedback System
frequencies will emerge. The Feedback Wizard will identify the frequency and automatically apply a notch filter. You may continue the process until the Feedback Wizard has used up all Anti-Feedback Filters or you may touch “Done” or “Anti-Feedback Wizard” at any point. Typically, eliminating five or six feedback frequencies should be sufficient. -
Page 28: Mutes
The second RTA (the Independent RTA) can be displayed by pushing the RTA button on the mixer or touching the RTA button on the remote control app. This RTA offers options for source selection. The user may select… • The Main L/R signal •... -
Page 29: Copy & Paste
Copy & Paste The TouchMix-30 Pro has a powerful but simple copy and paste function that is operated by the U7 (copy) and U8 (paste) buttons (U2 and U3 on the TouchMix-8 and TouchMix-16). Copy and Paste is context sensitive so that what you are looking at is what will be copied. Only like things may be copied and pasted from and to each other. -
Page 30: Patch Matrix (Touchmix-30 Pro Only)
The TouchMix-30 Pro has audio inputs plus a set of graphical controls and processing for each audio channel. Let’s call these “Inputs” and “Channels”. By default, the audio for Input 1 is controlled and processed by Channel 1, Input 2 is controlled and processed by Channel 2 and…, well you get the idea. -
Page 31: Touchmix-30 Pro
Before proceeding with the Tuning Wizard, listen to your system in the room using material with which you are familiar. Many contemporary loudspeaker systems – especially powered loudspeakers such as the QSC K.2, K, KW and KLA series – have been carefully tuned by design and will sound very good with little or no additional equalization. - Page 32 9. Touch Measure . The mixer produces the test signal and captures the measurement data. NOTE!: Each output of a TouchMix mixer actually has two graphic equalizers. One is used by the Tuning Wizard to apply corrections based on the measurement data. Settings for this equalizer are indicated by the outlined or “ghost” fader caps on the GEQ screen. The other equalizer may be adjusted by the user.
-
Page 33: User Buttons
12 Overview tab and hold a User Button for two seconds. Touch “Yes” and the User Button will now take you to the Channel 12 Overview screen no matter where you are. MIDI Control A USB-over-MIDI device such as a foot switch may be used to control some TouchMix-30 Pro functions. MIDI Control is similar in function to User Buttons. MIDI 1 MIDI Setup 1. -
Page 34: Security
Security The TouchMix mixers have multi-level security that allows you to assign passwords to various levels of functionality. You can give users access to only the functions they are authorized to use. To set up Security: Security Settings Security Menu IMPORTANT!: Leaving a password field empty allows anyone to access the associated functions without any log-in. -
Page 35: Monitor (Touchmix-30 Pro Only)
Monitor Solo In Place (SIP) (TouchMix-30 Pro only) When setting up a sound system, it can be very useful to mute all the inputs except for the one being worked on. This could be accomplished by manually muting all the other channels but there’s a more convenient way. -
Page 36: Reference
The information provided in this section gives you a detailed description of the screens and controls for the TouchMix-30 Pro and the TouchMix-30 Pro remote apps. The screen shots provided are taken from the TouchMix-30 Pro iPad App, and because of a different screen size, may appear slightly different than the TouchMix-30 Pro screens. -
Page 37: Rear Panel (Touchmix-30 Pro)
1 Drives must be formatted using the FAT32 fi le system. A FAT32 format utility is accessible from the Recording Setup screen. For best results use 7200 RPM, USB 3 hard drives or high-speed SSD. Drive performance is critical for recording. For more information and to see a list of qualifi ed drives, visit qsc.com. At this time, the TouchMix-30 Pro-30 supports playback of MP3 digital audio fi... -
Page 38: Left Side Of The Touchmix-16 Mixing Surface
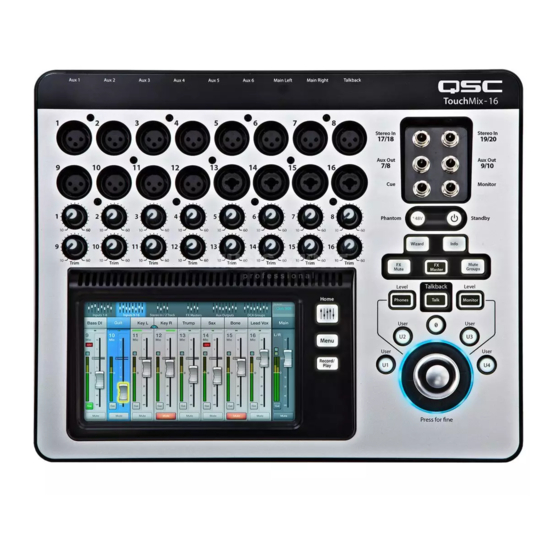
Left Side of the TouchMix-16 Mixing Surface Left Side of the TouchMix-16 Mixing Surface Left Side of the TouchMix-8 Mixing Surface Aux 1 Aux 2 Aux 3 Aux 4 Aux 5 Aux 6 Main Left Main Right Talkback 1. Rear Panel labels 2. -
Page 39: Right Side Of The Touchmix-16 Mixing Surface
Right Side of the TouchMix-16 Mixing Surface Right Side of the TouchMix-16 TouchMix-16 Mixing Surface My Network Stereo In Stereo In 1. ¼” TRS inputs (17/18 and 19/20) – Line level, 17/18 19/20 stereo. 2. ¼” TRS outputs Aux (7/8 & 9/10) – For line- Aux Out Aux Out 9/10... -
Page 40: Right Side Of The Touchmix-8 Mixing Surface
Right Side of the TouchMix-8 Mixing Surface Right Side of the TouchMix-8 TouchMix-8 Mixing Surface My Network Stereo In Stereo In 1. ¼” TRS inputs (9/10 and 11/12) – Line level, stereo. 9/10 11/12 2. Phantom +48V – Displays input channel Phantom Power buttons. Menu + 48V Phantom... -
Page 41: Rear Panel (Touchmix-16)
1 Drives must be formatted using the FAT32 fi le system. For best results use 7200 RPM, USB 3 hard drives or high-speed SSD. Drive performance is critical for recording. For more information and to see a list of qualifi ed drives, visit qsc.com. At this time, the TouchMix does not support importing or re-importing digital audio fi les that have been created or edited on another device. -
Page 42: Touchmix-30 Pro Specifications
TouchMix-30 Pro Specifications TouchMix-30 Pro Specifi cations Parameter Specifi cation Display 10” (254mm) diagonal, 1024 x 600 pixel, color TFT, capacitive multi-touch sensing Inputs Total 32 20 Mic/Line, XLR, 48V Phantom Power 4 Mic/Line, XLR/TRS combo, 48V Phantom Power 6 Line (1/4” TRS + 1/8” (3.5 mm) TRS top panel) - Page 43 (iOS 6 or later) / Android device (5.0 or later) Wi-Fi Requires: External ethernet Wi-Fi router (recommended) USB Wi-Fi adapter (QSC Part# CP-000033-00) Sampling Frequency Selectable 44.1 kHz or 48 kHz <0.005%, +4 dBu; 20 Hz-20 kHz, unity gain, any input to any output Frequency Response 20 Hz-20 kHz +/-0.5 dB, any input to any output...
-
Page 44: Touchmix-8 And Touchmix-16 Specifications
TouchMix-8 and TouchMix-16 Specifications TouchMix-8 and TouchMix-16 Specifi cations TouchMix-8 TouchMix-16 Display 6.1” x 3.5” (156mm x 90mm) color TFT, touch sensing. Inputs (Mic/Line) Total 12 Total 18 4 XLR / TRS combo (48V Phantom Pwr) 4 XLR / TRS combo (48V Phantom Pwr) 4 XLR (48V Phantom Pwr) 12 XLR (48V Phantom Pwr) 2 Stereo, TRS... - Page 45 1 All TRS connectors are 1/4 inch. 2 A list of drives that have been validated by QSC may be found at qsc.com. The hard-drive market is huge and continuously changing so there are many drives QSC has not validated that will work.
-
Page 46: Touchmix Feature List
TouchMix Feature List TouchMix™ Feature List Alphabetical list of some of the main features on the TouchMix-30 Pro, TouchMix-8, and TouchMix-16. Feature Navigation Info System Topic 2-Track Playback Home > Stereo In/2-Trk Two Track Playback, 2-Track Playback 2-Track Record Home > Stereo In/2-Trk Rec... - Page 47 Home > Select a bank > Select an Output > Presets Output Channels, Presets Patch Matrix Menu > Patch Matrix Misc. Features, Patch Matrix (TouchMix-30 Pro only) Phantom Power Mic. 48V Misc. Features, Phantom Pick-off point, dynamics Menu > Mixer Setup Misc.
-
Page 48: Nav Strip
Aux Outputs 1–8, 9–14 – Displays the level of the auxiliary outputs. Sub Nroups 1–8 – Displays the level of the eight Sub Groups (TouchMix-30 Pro only). DCA Nroups – Displays the level of the eight DCA master faders. Refer to the DCA Group Assignments topic. -
Page 49: Channel Controls
16. Assignments – Indicates to which mixes the channel is assigned: Main (L/R) – all models, Subgroups (1 – 8) – TouchMix-30 Pro only. 17. Scene – Displays the name of the active Scene. Touch to access Scenes. 18. L – Indicates the Limiter is engaged 19. -
Page 50: Input Channels
Aux 8 the factory default position. Aux 7 Aux 9 Comp Gate FX Sends Aux 9 8. L/R Subs – (TouchMix-30 Pro only) Indicates Aux 8 Threshold Threshold Mono Delay Aux 10 the output assignments channel (L/R Main, -12.0 -60.0... - Page 51 20. Nate – To adjust the following parameters, select the fi eld then use the Master encoder or the up/down nudge buttons on a mobile device. • Nate – Engages or disengages the Gate. • Threshold – Displays and sets the signal level at which the Gate allows audio to pass. •...
-
Page 52: Input Channel - Analog Trim
Input Channel – Analog Trim Input Channel – Analog Trim Select Home an Input Trim The Trim (gain) control sets the level of the analog input Bank signal just before conversion to digital. The Trim controls Trim are not available on the remote devices. Only Mic/Line Input Channels have Trim controls. -
Page 53: Input Channel
14. Q knob – Adjusts the bandwidth of the associated EQ band. When the Shelf Filter is selected, the Bandwidth control is hidden. In addition, Q can be adjusted by “pinching” (TouchMix-30 Pro and tablet apps only). 15. Freq control knob (Low and High Cut) – Sets the frequency of the low and/or high cut fi lter as measured from a point 3 dB below 0 or unity. -
Page 54: Input Channel - Compressor
Input Channel – Compressor Input Channel − Compressor Touch Touch Touch Home an Input Comp The Compressor controls the dynamic range of a signal Channel Bank above a set Threshold. Inputs 1-8 1. Comp tab – Selects the Compressor screen. In 1 Comp Inputs 1-8 2. - Page 55 Input Channel – Nate Input Channel − Nate Touch Select Touch a Home an Input Gate The Gate passes audio above a set Threshold, and Channel Bank attenuates audio below the Threshold. Inputs 1-8 1. Nate tab – Selects the Gate Screen. In 1 Gate Inputs 1-8...
-
Page 56: Input Channel - Fx Sends
Input Channel – FX Sends FX Signal Flow Input Channel − FX Sends Touch Touch a Touch the Home an Input Channel FX Tab Controls how much of the Input channel’s audio is sent Bank to the FX devices. Input 1-8 In 1 1. -
Page 57: Input Channel - Aux Sends
Input Channel – Aux Sends Auxiliary Channel Flow Diagram Input Channel − Aux Sends Touch Touch an Touch a Home Auxes Input Bank Channel Auxiliary outputs are used to create a mix for stage monitors, in ear monitors, remote speakers or Inputs 1-8 In 1 Auxes... -
Page 58: Input Channel - Presets
Assorted Acoustic Guitar Ele Gtr Dyn Blues Aux 4 Aux 4 Bass Banjo Ele Gtr Dyn Clean • Factory Presets – A library of QSC designed Drums Electric Guitar Ele Gtr Dyn Metal Main Aux 5 Frets Mandolin Ele Gtr Dyn Rock 1 Aux 5 input-channel presets. -
Page 59: Input Channel - Setup
12. Main L/R – Assigns the channel’s output to the Main Left / Right mix. The factory default is on – assigned to Main L/R. 13. Subgroups – (1 through 8 – TouchMix-30 Pro only) – Assigns the output of the channel to one or more of the eight Sub Groups. User-assigned names display on the buttons. -
Page 60: Output Channels
12. EQ Handles – Touch, hold, and drag to change the Frequency and Gain of the associated EQ band. The frequency band button must be engaged to see the EQ Handles. 13. Aux Sends – (TouchMix-30 Pro only) • Aux sends 9 – 14 are available for Aux Outputs 1 – 8 only, •... - Page 61 Output Channel – NEQ Output Channel − NEQ Touch an Touch an Touch Home Controls and displays the settings for Main or Auxiliary Aux Bank Aux Channel GEQ Tab output graphic equalization. Aux Outputs1-8 1. NEQ tab – Selects the GEQ screen. Aux 1 Inputs 1-8 2.
-
Page 62: Output Channel - Peq
14. Q knob – Adjusts the bandwidth of the associated EQ band. When the Shelf Filter is selected, the Bandwidth control is hidden. Q may also be adjusted by “pinching” (TouchMix-30 Pro and tablet apps only). 15. Freq knob (Low and High Cut) – Sets the knee frequency of the low and/or high cut fi lter as measured from a point 3 dB below 0 or unity. -
Page 63: Output Channel - Compressor / Limiter
Output Channel – Compressor / Limiter Output Channel − Compressor / Limiter Touch Aux Touch Touch the Home an Aux Limiter Tab When set as a Limiter, prevents the audio level from 1–8 or 9–14 Channel exceeding a preset threshold. 1. -
Page 64: Output Channel - Anti-Feedback
Horizontal position indicates frequency. The amount of cut is indicated by a descending vertical line. Twelve fi lters - TouchMix-30 Pro, eight fi lters - TouchMix-8 and -16. NOTE!: Markers and their associated frequency controls are not tied to a specifi c frequency band. Marker 1 may attenuate a high frequency, while Marker 12 may attenuate a low frequency. -
Page 65: Output Channel - Auxes (Touchmix-30 Pro Only)
Output Channel – Auxes (TouchMix-30 Pro only) Output Channel − Auxes Touch Touch Touch Home Aux Out 1-8 Output Auxes (TouchMix-30 Pro only) Bank Channel Auxiliary outputs 1 through 8 may be mixed to Aux Aux Out 1-8 Aux 1 Auxes Mixes (buses) 9 through 14. -
Page 66: Output Channel - Presets
Aux 1 Main storage destination. 4. Factory presets list – Displays a list of factory programmed presets. Voicings for QSC passive loudspeakers are provided. Reset sets all output Main channel’s parameters to their factory default state. The Reset preset is at the bottom of the list, scroll down to see. -
Page 67: Output Channel - Setup / Delay
Aux 5 Stereo Mono (Bal) 12.0 Recallable Aux 6 6. QSC Amplifi er and Speaker Settings – Displays Aux 6 meters tools to assist in optimizing gain structure and other Aux 7 Aux 7 parameters for selected QSC amplifi ers and loudspeakers. -
Page 68: Output Channel - Speaker Settings
Note that these presets are not available for all QSC loudspeakers. Select QSC Speaker Model and Preset Name to display Gain Settings or Recall a Preset 1. Select Speaker – Touch to select the QSC loudspeaker connected to the output. -
Page 69: Aux Overview
Sub Groups DCA Groups Main Mix Scene: tablet device. Default (TouchMix-30 Pro only) When the Aux Overview is Joe’s Monitor displayed, the Nav Strip display “grays out” the Aux Aux 1 Aux 2 Out 9-14 and DCA Groups miniature fader banks. This... -
Page 70: Sub Groups (Touchmix-30 Pro Only)
Sub Nroups (TouchMix-30 Pro only) Sub Nroup − Overview Sub Nroup – Overview Press Touch Sub Touch a Sub Touch Provides a single-screen view of frequently used Home Group Bank Group Overview Tab controls and indicators for the Sub Groups. -
Page 71: Sub Group - Peq (Touchmix-30 Pro Only)
Sub Nroup – PEQ (TouchMix-30 Pro only) Sub Nroup − PEQ Press Touch a Sub Touch a Touch the (TouchMix-30 Pro only) Home Group Bank Sub Group EQ Tab Controls and displays the settings for the Sub Group Sub Groups Sub 1 parametric equalization. -
Page 72: Sub Group - Compressor / Limiter (Touchmix-30 Pro Only)
Sub Nroup – Compressor / Limiter (TouchMix-30 Pro only) Sub Nroup − Compressor / Limiter Touch Touch a Touch the Home an Input (TouchMix-30 Pro only) Channel Comp Tab Bank The Compressor reduces the dynamic range of a signal Sub Groups... - Page 73 Sub Nroup – FX Sends (TouchMix-30 Pro only) Sub Nroups − FX Sends Touch Sub Touch Touch Home Groups (TouchMix-30 Pro only) Channel FX Tab Bank Controls how much of the Sub Group audio is sent to Sub Groups Sub 1 the FX devices.
- Page 74 Sub Nroup – Auxes (TouchMix-30 Pro only) Sub Nroup − Auxes Touch the Touch a Touch the Home Sub Groups Sub Group Auxes (TouchMix-30 Pro only) Bank Channel Sub Groups may be sent to Auxiliary Mixes. An Aux may Sub Groups...
-
Page 75: Sub Group - Presets (Touchmix-30 Pro Only)
Sub Nroup – Presets (TouchMix-30 Pro only) Sub Nroup − Presets Touch a Press Touch Sub Touch (TouchMix-30 Pro only) Sub Group Home Groups Presets Channel Recall presets for the selected Sub Group channel. Sub Groups Sub 1 Presets 1. Presets tab – Selects the Presets screen. -
Page 76: Sub Group - Setup (Touchmix-30 Pro Only)
Sub Nroup – Setup (TouchMix-30 Pro only) Sub Nroup − Setup Touch FX Touch an Touch (TouchMix-30 Pro only) Press Menu Masters FX Channel Setup Rename the Sub Channel, assign Input channels to the Sub Groups Setup Sub 1 group, and assign/unassign the group to the Main L/R. -
Page 77: 2-Trk Playback
2- Track playback controls a digital, stereo audio input signal. Depending on the Recording Mode selected, this signal may be from a USB multi- track session, a DAW (TouchMix-30 Pro only) or from MP3 fi les stored on the root directory of a USB drive. -
Page 78: Trk Playback – Eq 6
Rec/ Play Mode USB Drive Playback 3. RTA On – Enables / disables the Real Time Analyzer. NOTE!: A maximum of two RTA displays Stereo In/2-Trk for TouchMix-30 Pro, and one RTA display Recording Multitrack Multitrack Rec/ 2-Trk PB Play... -
Page 79: 2-Trk Playback - Audio Player
2-Trk Playback – Audio Player 2-Trk Playback – Audio Player Touch Touch Touch Press Rec/ Recording Stereo Audio Play Plays MP3 audio fi les from a USB memory device. Mode Player Recording Audio NOTE!: Make sure the Sample Rate set in Rec/ Stereo MP3 Play... -
Page 80: 2-Trk Playback - Auxes
2-Trk Playback – Auxes 2-Trk Playback − Auxes Touch Press Rec/ Touch Touch Recording Play Stereo MP3 Auxes Auxiliary outputs are used to create a mix for stage Mode monitors, in ear monitors, remote speakers or video / broadcast. Touch Touch Touch Touch 1. -
Page 81: 2-Trk Playback - Presets
2-Trk Playback – Presets 2-Trk Playback − Presets Touch Press Rec/ Touch Touch Recording Play Stereo MP3 Presets Recall presets for the MP3 Stereo and the 2-Trk Playback. Mode 1. Presets tab – Selects the Presets screen. 2. Current Preset – Displays the name of the Touch Touch Touch... -
Page 82: 2-Trk Playback - Setup
2-Trk Playback – Setup 2-Trk Playback − Setup Touch Press Rec/ Touch Touch Recording Play Stereo MP3 Setup Rename the 2-Trk PB channel, set Channel Safe, and Mode assign the channel to Mute and DCA Groups 1. Setup tab – Selects the Setup screen. Touch Touch Touch... -
Page 83: 2-Trk / Multitrack Playback
Recording Multitrack Multitrack Home Rec/Play Multitrack mode plays back audio recorded on the 2-Trk Mode USB Drive USB drive. Multitrack DAW mode (TouchMix-30 Pro Stereo In/2-Trk Recording Rec/ Multitrack Multitrack Play Mode USB Drive only) plays back tracks from a Core Audio compliant Inputs 1-8 computer. -
Page 84: Fx Masters
FX Masters FX Master − Overview FX Master – Overview Touch the Touch the Touch an Home FX Masters Overview Provides a single-screen view of frequently used FX Channel Bank controls and indicators for the FX channel. FX Masters Overview 1. -
Page 85: Fx Masters
FX Masters – EQ FX Masters − EQ Touch an Touch FX Touch the Home Masters EQ Tab Controls and displays the settings for the FX Master Channel channel equalization. FX Masters FX 1 1. EQ Tab – Selects the FX Master EQ screen. Inputs 1-8 Main Mix 2. -
Page 86: Fx Masters - Presets
FX Masters – Presets FX Masters − Presets Press Touch Select an Touch Recall presets for the selected FX channel based on the Home FX Masters FX Channel Presets current FX device. FX Masters 1. Presets tab – Selects the Presets screen. FX 1 Presets Inputs 1-8... -
Page 87: Fx Masters - Setup
FX Masters – Setup FX Master − Setup Touch an Press Touch FX Touch Rename the FX Master channel, and assign the channel Menu Masters Setup Channel to Mute and DCA Groups FX Masters 1. Setup tab – Selects the Setup screen. FX 1 Setup Inputs 1-8... -
Page 88: Fx Masters - Auxes
FX Masters – Auxes FX Master − Auxes Touch the Touch Touch an Home FX Masters Auxes FX Channel These sends allow the effect to be returned to mixes Bank for stage monitors, in ear monitors, remote speakers or FX Masters FX 1 Auxes video / broadcast. -
Page 89: Fx Overview
FX Overview FX Overview Touch FX Press Menu Provides an overview of the channel FX Send and Overview Return levels. Menu FX sends and FX Master levels may be adjusted by Overview touching (selecting) the control then using the Master Encoder or the Nudge buttons on a tablet device. FX Overview Screen NOTE!: Only Input and Sub Nroup banks are selectable on the Nav Strip. -
Page 90: Wizards
izards FX Wizard izard Press Touch The FX Wizard aids in selecting and routing effects. Wizard FX Wizard 1. FX1 - 6 tabs – Selects one of six FX processors. Wizard FX Wizard (Four on TouchMix-8 and TouchMix-16) NOTE!: The Source, Type, and FX Preset windows provide a means of selecting an Effect based on what the source is. -
Page 91: Gain Wizard
Nain izard Nain izard Press Touch The Gain Wizard monitors input clipping and provides an Wizard Gain Wizard indication of how much input gain reduction is needed. Wizard Gain Wizard NOTE!: The Gain Wizard provides an indication of the frequency and intensity of clipping to aid in proper adjustment of input sensitivity. -
Page 92: Room Tuning Wizard 8
Room Tuning izard Room Tuning izard Touch Touch Touch an Press Home Touch GEQ Tuning Tuning The Room Tuning Wizard assists in adjusting output Output Wizard Wizard Wizard equalization 1. Tuning Output – Displays the system and friendly Aux 1 Main Tuning Wizard name of the output being tuned. - Page 93 — Step 3 — — Step 1 — — Step 4 — — Step 2 — — Step 5 — 1001108-01-C...
-
Page 94: Fx Processor
FX Processor FX Processor – Basic Chorus FX Processor – Basic Chorus Touch the Touch Touch an Touch the Touch Home FX Masters Effect Pull- FX Channel Effect Tab Chorus The Chorus FX Varies the pitch of a signal at a steady Bank Down rate to “thicken”... -
Page 95: Fx Processor - Dense Reverb
FX Processor – Dense Reverb FX Processor – Dense Reverb Touch the Touch Touch an Touch the Touch Effect Home FX Masters Dense FX Channel Effect Tab Pull-Down The Dense Reverb (presets with a “D” suffi x) is a model Bank Reverb of a DSP reverb with more dense refl ections that some... -
Page 96: Fx Processor - Lush Reverb
FX Processor – Lush Reverb FX Processor – Lush Reverb Touch the Touch an Touch the Touch Effect Touch Home FX Masters FX Channel Effect Tab Pull-Down Lush Reverb Reverb presets with an “L” suffi x use a DSP reverb Bank model with a more “lush”... -
Page 97: Fx Processor - Mono And Stereo Delay
FX Processor – Mono and Stereo Delay FX Processor – Mono and Stereo Delay Touch the Touch Touch an Touch the Touch Effect Home FX Masters Stereo or FX Channel Effect Tab Pull-Down These effects delay the audio signal to create echo and Bank Mono Delay similar effects. -
Page 98: Fx Processor - Pitch Shift
FX Processor – Pitch Shift FX Processor – Pitch Shift Touch the Touch an Touch the Touch Effect Touch Home FX Masters FX Channel Effect Tab Pull-Down Pitch Shift The Pitch Shift raises or lowers the pitch of an audio Bank signal by a fi xed interval. - Page 99 FX Processor – Pitch Shift FX Processor – Pitch Correct Touch Touch an Touch Home an Input In Channel the FX Tab Corrects intonation of the audio signal. Bank IMPORTANT!: Pitch-Correct may be Input 1-8 In 1 Inputs 1-8 enabled/disabled by User Buttons without regards to the position of the Enable Main Mix Scene:...
-
Page 100: Remote Connections
Remote Connections Remote Connections Touch Press Menu Network NOTE!: For remote devices only. Lists any Menu Network TouchMix mixers found on the network to which your device is connected. Found Mixers on Network: Found Mixers on Network: When multiple TouchMix mixers are connected to a single network, this page is used to select a single Found Mixers Found Mixers... -
Page 101: Security
Aux 13 Aux 14 NOTE!: Forgotten Administrator Password? Mute Aux 14 Contact QSC Technical Support. Press Touch Touch Security 1. Current Login – The level of the person currently logged in. Menu... -
Page 102: Miscellaneous Features
Copy/Paste Aux 7 on the device on which the clear Clip button was Aux 7 Aux 8 pressed. By default, User Button 2 (TouchMix-30 Pro Aux 8 only) also performs this function. Aux 9 Aux 9 8. Clear Mute – Unmutes all Mutes except Mute Aux 10 Groups, and DCA Mutes. -
Page 103: Remote Control Settings
Remote Control Settings Remote Control Settings Touch Press Remote Menu Allows or restricts access to mixer functionality Control by device. Remote Control Menu NOTE!: When a remote device is set to Main Mix Scene: Remote Control Settings Default Personal Monitor Mix, the Cue and Mute buttons are not available on the Aux-Mix- Joe’s Monitor Main... -
Page 104: User Buttons
Refer to the Pitch Correction topic for information about assigning or enabling Pitch Correct for a channel. User button defaults: TouchMix-30 Pro TouchMix-8 / TouchMix-16 – Navigate Left (moves the selection left) –... -
Page 105: Mixer Setup
13. Check and Download Upgrade – This function is available on TouchMix-30 Pro with version 1.1 or higher and TouchMix-8 and TouchMix-16 with version 3.0 or higher. You must have an Internet connection and a USB drive (with about 250 MB free) to download the upgrade fi les. When you use this method, follow the instructions on the screen. -
Page 106: Phantom Power
Phantom Power Phantom Power Press Mic 48V Supplies +48 VDC to XLR Inputs including Talkback. 1. Reset – Returns all settings to factory default (all phantom power off). 2. Input Channel buttons – Touch to enable or disable phantom power for the channel. 3. -
Page 107: Mute Groups
Mute Nroups Mute Nroups Press Mute About Mute Nroups Groups Mute Groups provide a means of muting multiple inputs and outputs from a single control. Mute Groups About Mute Groups Mute Nroups Screen Main Mix Scene: Mute Groups Default When a channel is in one or more Mute Groups, all Mute Groups containing the same channel and the Mute Nroup Edit Screen Joe’s Monitor... -
Page 108: Record / Playback (Multitrack Usb Drive)
FAT32. Drive performance is critical for recording. For more information and to see a list of qualifi ed drives, visit qsc. com. NOTE!: At the end of a session, the recording must be stopped using the Stop/ Pause control. -
Page 109: 2-Trk - Recording
This button is also available on the Record/Play screen. 5. Export 2-Trk – (TouchMix-30 Pro only) Converts 2-track wave recording to MP3. Note that this operation is processor intensive and will take some time. - Page 110 DA – Record / Playback (TouchMix-30 Pro only) DA – Record / Playback (TouchMix-30 Pro only) Touch Touch Press Recording Multitrack Rec / Play Record to and Playback from a Digital Audio Mode Workstation. Recording Multitrack Rec/ Play Mode IMPORTANT!: The TouchMix-30 Pro DAW interface is compatible with Core-Audio compliant computers only.
-
Page 111: Real-Time Analyzer (Rta)
Real-time Analyzer (RTA) Press Displays a real-time analyzer (RTA) for the selected source. • TouchMix-30 Pro – Up to two RTA displays are available at a time on any combination of mixer and tablet devices. • TouchMix-8 and TouchMix-16 have one RTA. -
Page 112: Scenes
Omit Routing – Sub Group and Main L/R assignments are uneffected. IMPORTANT!: It is possible to recall TouchMix-8 and TouchMix-16 scenes on a TouchMix-30 Pro. Of course the TouchMix-30 Pro has far more inputs and outputs. These excess inputs and outputs will be set to factory default values. -
Page 113: Channel Safe
Channel Safe Channel Safe Press Touch Channel Channel Safe prevents channel settings from being Menu Safe changed when a Scene is recalled. You can set the Channel Safe property for inputs on an Input Channel’s Channel Menu Safe Setup screen, and for outputs on an Output Channel’s Setup screen. -
Page 114: About Dca Groups
DCA Nroup Assignments About DCA Groups DCA Nroup Assignments Touch Press Touch a DCA Groups are used to vary the gain of several Home Groups channels at once from a single fader without changing the position of the channel faders. DCA groups also DCA Groups DCA 1 Inputs 1-8... -
Page 115: Midi
MIDI 2 MIDI 3 MIDI 4 MIDI 5 MIDI 6 MIDI 7 MIDI 8 QSC has verifi ed proper operation with these USB MIDI Default Drums Not in use Not in use Not in use Not in use Not in use... -
Page 116: Talkback / Noise
Talkback / Noise Talkback / Noise Press Touch This screen controls the routing and level of Talkback Menu Talkback and Noise. Talkback 1. Reset button – Restores factory defaults for the Menu Talkback / Noise Generator. Main Mix Scene: Talkback / Noise Generator 2. -
Page 117: Before You Begin
In a larger space with more potential interference and more mission-critical remote control requirements it’s better to have a higher- powered device with more effi cient antennas. That’s why there is no USB Wi-Fi Adapter included with the TouchMix-30 Pro – it’s likely to be used in more demanding applications and an external Wi-Fi router is the best solution. -
Page 118: Wireless Network Setup: Create New Network
Wireless Network Setup: Create New Network Wireless Network Setup: Create New Network Press Touch Touch Menu Network Wireless IMPORTANT!: USB Wi-Fi adapter (QSC Part # cp-000033-00) Menu Network Wireless Create New Network using a USB Wi-Fi dongle Main Mix provides short range wireless communication between... -
Page 119: Wireless Network Setup: Connect To Existing Network
Network Wireless IMPORTANT!: Requires an Ethernet Wi-Fi router and the USB Wi-Fi adapter Menu Network Wireless (QSC Part # cp-000033-00). Main Mix Scene: Network Setup Default Connecting to an Existing Network using a USB Wi-Fi dongle provides short range wireless Joe’s Monitor... -
Page 120: Wired Network Setup: Static Ip Address
USB port. (for compatible Joe’s Monitor Mixer Name: My TM-30 Network Type: Wireless Wired Main Aux 1 adapters, visit qsc.com and search for Aux 2 “Ethernet”. Aux 2 Wired Network Settings Aux 3 Aux 3 Static IP Address Auto IP Address (DHCP) -
Page 121: Wired Network Setup: Auto Ip Address (Dhcp)
Menu Network Wired a compatible USB to Ethernet adapter to the mixer’s USB port. (for compatible Main Mix Scene: Network Setup Default adapters, visit qsc.com and search for “Ethernet”. Joe’s Monitor Mixer Name: My TM-30 Network Type: Wireless Wired Main... -
Page 122: Phones And Monitor Touchmix-30 Pro
Phones and Monitor TouchMix-30 Pro TouchMix-30 Pro Phones and Monitor TouchMix-8 and TouchMix-16 Phones and TouchMix-16 Monitor Press Press Press Press Phones Phones Monitor Monitor Phones and Monitor Level Control and Monitor settings. NOTE!: By default, no audio signal is sent to the Phones / Monitor... -
Page 123: Recording Setup - Multitrack Usb
Recording Setup - Multitrack USB Recording Setup – Multitrack USB Press Touch Touch Touch Touch New Touch Rec / Recording Multitrack Recording Recall, initiate, and manage Multitrack recording Session Rename Play Mode USB Drive Setup sessions. Scroll down for Recalling a session. Rec / Recording Multitrack... -
Page 124: Recall Session - Multitrack Usb
Recall Session - Multitrack USB Recall Session – Multitrack USB Press Touch Touch Touch Rec / Recording Multitrack Recording Recalls multi-track sessions from a USB drive. Play Mode USB Drive Setup Recalling a Multitrack USB session tells the mixer to record in an existing recording fi le structure on Rec / Recording Multitrack... -
Page 125: Aux Mix On Faders
Mixes 1–8) to one or more of the Aux Mixes 9–14. TouchMix-30 Pro Auxes are doing double duty as Mix Matrices. A Mix Matrix lets the operator take existing main, auxiliary and sub group mixes and create a new mix from them. -
Page 126: Patch Matrix (Touchmix-30 Pro Only)
Patch Matrix (TouchMix-30 Pro only) Patch Matrix (TouchMix-30 Pro only) Touch Patch Press Menu Manages connections between physical inputs and on- Matrix screen channels. Patch Menu 1. Preset – Displays the name of the current preset. Matrix ”Default routing” is the Reset or factory default... -
Page 127: Copy And Paste
Copy and Paste The TouchMix-30 Pro has a powerful but simple copy and paste function that is operated by the U7 (copy) and U8 (paste) buttons. Copy and Paste is context sensitive so that what you are looking at is what will be copied. Only like things may be copied and pasted from and to each other. For example, a PEQ cannot be pasted to a GEQ. - Page 128 hat is Displayed hat is Copied and Pasted Output Channel Limiter Tab All channel Limiter parameters Output Channel FX Tab All channel FX send levels Output Channel Aux Tab All channel Auxiliary Send levels and Pan positions Output Channel Setup Tab Recording Arm, Polarity, Delay, Digital Gain, Group assignments FX Channel Overview Tab Current Preset, EQ, Pick-Off Point, Group Assigns, Polarity...
-
Page 129: Touchmix-30 Pro
TouchMix Dimensions TouchMix-30 Pro 435 mm 17.1 in 428 mm 16.9 in 191 mm 7.5 in 191 mm 7.5 in 459 mm 18.1 in 1001108-01-C... - Page 130 TouchMix-8 13.1 in (333 mm) Power Phones Cue / Monitor Aux 3/4 ® Right Left Aux 1 Aux 2 Aux 3 Aux 4 Main Left Main Right Phones TouchMix-8 Stereo In Stereo In 9/10 11/12 Instrument Phantom Standby Trim Trim Trim Trim Trim...
- Page 131 TouchMix-16 14.2 in (360 mm) Power Talkback Main Right Main Left Aux 6 Aux 5 Aux 4 Aux 3 Aux 2 Aux 1 ® Aux 1 Aux 2 Aux 3 Aux 4 Aux 5 Aux 6 Main Left Main Right Talkback TouchMix-16 Stereo In...
- Page 132 TouchMix-30 Pro Block Diagram ® © 2016-2017 QSC, LLC Mic/Line Main L/R Output Low Cut High Cut Meter From DCA Masters Main Left Meter 18 dB/Oct 18 dB/Oct Notch Filters 1/3 Oct GEQ Comp 1/3 Oct GEQ Delay Over Ch Fader...
-
Page 133: Block Diagram
TouchMix-16 TouchMix-8 Block Diagram © 2015 - 2017 QSC Audio, Ltd Revised 3/30/2015 Main L/R Output Main Left Mic/Line From DCA Masters Meter Meter Over Ch Fader From DCA Masters Mute Trim 1/3 Oct GEQ Low Cut High Cut Notch Filters... - Page 134 © 2019 – 2017 QSC, LLC. All rights reserved. QSC, the QSC logo, and TouchMix are registered trademarks of QSC, LLC in the U.S. Patent and Trademark office and other countries. iPad, iPhone and iOS are trademarks of Apple Inc., registered in the U.S. and other countries. Android is a trademark of Google Inc. Realtek is a trademark of Realtek Semiconductor Corporation All other trademarks are the property of their respective owners.