Sign In
Upload
Manuals
Brands
JUKI Manuals
Sewing Machine Accessories
IP-420
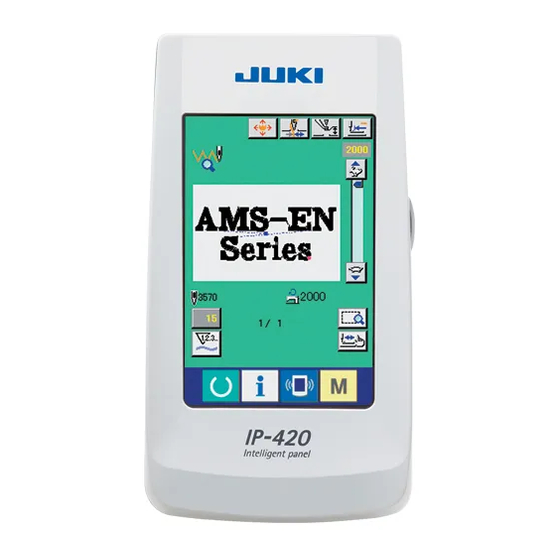
JUKI IP-420 Intelligent Panel Operation Manuals
Manuals and User Guides for JUKI IP-420 Intelligent Panel Operation. We have
7
JUKI IP-420 Intelligent Panel Operation manuals available for free PDF download: Instruction Manual, Instruction Manuals
JUKI IP-420 Instruction Manual (133 pages)
Brand:
JUKI
| Category:
Sewing Machine
| Size: 6 MB
Table of Contents
Instruction Manual
1
Table of Contents
2
Mechanical Section (with Regard to the Sewing Machine)
5
Specifications
5
Configuration
6
Installation
7
Installing the Electrical Box
7
Installing and Connecting the Power Switch
7
Installation of the Sewing Machine Head
9
Installing the Drain Receiver and the Head Support Rubber
9
Safety Switch
10
Installing the Throat Plate Auxiliary Cover
10
Installing the Panel
12
Attaching the Pedal Chain (for S Specification Only)
12
Installing the Thread Stand
12
Raising the Machine Head
13
Connecting the Cord
14
Installing the Motor Cover
17
Managing the Cord
17
Connecting the Pneumatic Components (Pneumatic Type Only)
18
Installing the Air Hose (Pneumatic Type Only)
20
Cautions for the Compressed Air Supply (Source of Supply Air) Facility
21
Installing the Eye Protection Cover
22
Preparation of the Sewing Machine
22
Lubrication
22
Attaching the Needle
22
Needle Size and Gauge
23
Adjustment
23
Gauge
23
Threading the Machine Head
24
Installing and Removing the Bobbin Case
24
Installing the Bobbin
25
Adjusting the Thread Tension
25
Intermediate Presser Height
26
Adjusting the Thread Take-Up Spring
26
Operation of the Sewing Machine
27
Sewing
27
Needle Thread Clamp Device
28
Operation Section (with Regard to the Panel)
30
Preface
30
When Using Ip-420
34
Name of each Section of IP-420
34
Buttons to be Used in Common
35
Basic Operation of IP-420
36
Start Sewing
37
LCD Display Section at the Time of Sewing Shape Selection
38
Sewing Shape Data Input Screen
38
Sewing Screen
40
Performing Sewing Shape Selection
42
Changing Item Data
44
Checking Pattern Shape
46
Performing Modification of Needle Entry Point
47
Editing the Thread Tension
47
Editing the Intermediate Presser Height
48
How to Use Temporary Stop
49
To Continue Performing Sewing from some Point in Sewing
49
To Perform Re-Sewing from the Start
50
When Setting of Sewing Product Is Difficult Because of Interruption of Needle Tip
51
Winding Bobbin Thread
52
When Performing Winding Bobbin Thread While Performing Sewing
52
When Performing Winding Bobbin Thread Only
52
Using Counter
53
Setting Procedure of the Counter
53
Count-Up Releasing Procedure
55
How to Change the Counter Value During Sewing
55
Performing New Register of Users' Pattern
56
Naming Users' Pattern
57
Performing New Register of Pattern Button
58
LCD Display Section at the Time of Pattern Button Selection
59
Pattern Button Data Input Screen
59
Sewing Screen
61
Performing Pattern Button No. Selection
63
Selection from the Data Input Screen
63
Selection by Means of the Shortcut Button
64
Changing Contents of Pattern Button
65
Copying Pattern Button
66
Changing Sewing Mode
67
LCD Display Section at the Time of Combination Sewing
68
Pattern Input Screen
68
Sewing Screen
70
Performing Combination Sewing
72
Selection of Combination Data
72
Creating Procedure of the Combination Data
73
Deleting Procedure of the Combination Data
74
Deleting Procedure of the Step of the Combination Data
74
Using the Simple Operation Mode
75
LCD Display When the Simple Operation Is Selected
76
Data Input Screen (Individual Sewing)
76
Sewing Screen (Individual Sewing)
79
Data Input Screen (Combination Sewing)
82
Sewing Screen (Combination Sewing)
84
Changing Memory Switch Data
86
Using Information
87
Observing the Maintenance and Inspection Information
87
Releasing Procedure of the Warning
88
Using Communication Function
89
Handling Possible Data
89
Performing Communication by Using the Media
89
Performing Communication by Using USB
89
Take-In of the Data
90
Taking in Plural Data Together
91
Performing Formatting of the Media
93
Using 2-Step Stroke Function
94
Setting of 2-Step Stroke Function
94
Setting of 2-Step Stroke Position
94
Motion of 2-Step Stroke Function
96
Operation at the Time of X/Y Motor Position Slip
98
When the Error Is Displayed During Sewing
98
When the Error Is Displayed after End of Sewing
99
When the Rest Switch Is Not Displayed
99
Memory Switch Data List
100
Data List
100
Initial Value List
106
Error Code List
108
Message List
115
Maintenance of Sawing Machine
118
Maintenance
118
Adjusting the Height of the Needle Bar (Changing the Length of the Needle)
118
Adjusting the Needle-To-Shuttle Relation
118
Height and Angle of the Work Clamp
120
Height of the Work Clamp (S Type)
120
Height of the Work Clamp (L Type)
121
Angle of the Work Clamp (All Models Excluding 1306L Type)
121
Adjusting the Vertical Stroke of the Intermediate Presser
122
The Moving Knife and Counter Knife
122
Needle Thread Clamp Device
123
Thread Breakage Detector Plate
123
Draining Waste Oil
123
Amount of Oil Supplied to the Hook
124
Replacing the Fuse
124
Changing the Voltage of 100,/200V
125
Replenishing the Designated Places with Grease
126
Location Where Exclusive Grease Is Provided
127
Points to be Applied with JUKI Grease a
127
Points to be Applied with JUKI Grease B
129
Applying Grease to Other Sections
130
Troubles and Corrective Measures (Sewing Conditions)
131
Optional
133
Table of Needle Hole Guide
133
Silicon Oil Tank
133
Advertisement
JUKI IP-420 Instruction Manuals (135 pages)
Brand:
JUKI
| Category:
Sewing Machine
| Size: 4 MB
Table of Contents
Instruction Manual
1
Table of Contents
2
Mechanical Section (with Regard to the Sewing Machine)
5
Specifications
5
Configuration
6
Installation
7
Removing the Bed Fixing Bolt
7
Adjusting the Safety Switch
7
Installing the Throat Plate Auxiliary Cover
8
Installing the Panel
9
Installing the Thread Stand
10
Raising the Machine Head
10
Installing the Air Hose
12
Cautions for the Compressed Air Supply (Source of Supply Air) Facility
13
Installing the Eye Protection Cover
14
Preparation of the Sewing Machine
15
Lubrication
15
Attaching the Needle
15
How to Needle Thread the Machine Head
16
Procedure for Clamping the Needle Thread
18
Installing and Removing the Bobbin Case
18
Installing the Bobbin
19
Adjusting the Thread Tension
19
Procedure for Adjusting the Thread Breakage Detection Sensor
20
Intermediate Presser Height
20
Adjusting the Thread Take-Up Spring
21
When You Want to Change the Stroke of the Thread Take-Up Spring
21
When You Want to Change the Tension of the Thread Take-Up Spring
21
Operation of the Sewing Machine
22
Sewing
22
Needle Thread Clamp Device
22
II.operation Section (with Regard to the Panel)
23
Preface
23
When Using Ip-420
27
Name of each Section of IP-420
27
Buttons to be Used in Common
28
Basic Operation of IP-420
29
Start Sewing
30
LCD Display Section at the Time of Sewing Shape Selection
31
Sewing Shape Data Input Screen
31
Sewing Screen
33
Performing Sewing Shape Selection
35
Changing Item Data
37
How to Change the Color Change Mode
39
How to Input Color Change Commands in Pattern Data
40
Inputting Color Change Commands by Means of the Sewing Data Creation/Edit Software PM-1
40
Inputting a Color Change Command Using the Main Unit Input Function
42
Checking the Color Change Commands Using the Main Unit Input Function
43
Displaying the Pattern Shape with Color-Coded Using the Main Unit Input Function
44
Checking Pattern Shape
45
Performing Modification of Needle Entry Point
46
Editing the Intermediate Presser Height
46
How to Edit the Color Change
48
How to Use Temporary Stop
50
To Continue Performing Sewing from some Point in Sewing
50
To Perform Re-Sewing from the Start
51
When Setting of Sewing Product Is Difficult Because of Interruption of Needle Tip
52
How the Change over the Needle Bar and Thread Presser to be Threaded
52
How to Clamp the Needle Thread
53
Winding Bobbin Thread
54
When Performing Winding Bobbin Thread Only
54
When Performing Winding Bobbin Thread While Performing Sewing
54
Using Counter
55
Setting Procedure of the Counter
55
Count-Up Releasing Procedure
57
How to Change the Counter Value During Sewing
57
Performing New Register of Users' Pattern
58
Naming Users' Pattern
59
Performing New Register of Pattern Button
60
LCD Display Section at the Time of Pattern Button Selection
61
Pattern Button Data Input Screen
61
Sewing Screen
63
Performing Pattern Button No. Selection
65
Selection from the Data Input Screen
65
Selection by Means of the Shortcut Button
66
Changing Contents of Pattern Button
67
Copying Pattern Button
68
Changing Sewing Mode
69
LCD Display Section at the Time of Combination Sewing
70
Pattern Input Screen
70
Sewing Screen
72
Performing Combination Sewing
74
Selection of Combination Data
74
Creating Procedure of the Combination Data
75
Deleting Procedure of the Combination Data
76
Deleting Procedure of the Step of the Combination Data
76
Setting of the Skip of Steps
77
Using the Simple Operation Mode
78
LCD Display When the Simple Operation Is Selected
79
Data Input Screen (Individual Sewing)
79
Sewing Screen (Individual Sewing)
82
Data Input Screen (Combination Sewing)
85
Sewing Screen (Combination Sewing)
87
Changing Memory Switch Data
89
Using Information
90
Observing the Maintenance and Inspection Information
90
Releasing Procedure of the Warning
91
Using Communication Function
92
Handling Possible Data
92
Performing Communication by Using the Media
92
Performing Communication by Using USB
92
Take-In of the Data
93
Taking in Plural Data Together
94
Performing Formatting of the Media
96
Operation at the Time of X/Y Motor Position Slip
97
When the Error Is Displayed During Sewing
97
When the Error Is Displayed after End of Sewing
98
When the Rest Switch Is Not Displayed
98
Precautions to be Taken When Creating Patterns
99
Memory Switch Data List
101
Data List
101
Initial Value List
107
Error Code List
109
Message List
116
Maintenance of Sawing Machine
119
Maintenance
119
Adjusting the Needle-To-Shuttle Relation
119
Adjusting the Height of the Feeding Frame
121
Adjusting the Vertical Stroke of the Intermediate Presser
121
Wiper Position
122
The Moving Knife and Counter Knife
123
Needle Thread Clamp Device
123
Replenishing the Designated Places with Grease
124
Location Where Exclusive Grease Is Provided
125
Points to be Applied with JUKI Grease a
125
Points to be Applied with the Exclusive Grease for the LM Guide
128
Amount of Oil Supplied to the Hook
129
Draining Waste Oil
129
Replacing the Fuse
129
Changing the Voltage of 100 ←→ 200V
130
Troubles and Corrective Measures (Sewing Conditions)
131
Optional
134
Table of Needle Hole Guide
134
Felt Thread Guide
134
Bar Code Reader
135
JUKI IP-420 Instruction Manual (131 pages)
Brand:
JUKI
| Category:
Sewing Machine
| Size: 4 MB
Table of Contents
Table of Contents
2
Mechanical Section (with Regard to the Sewing Machine)
5
Specifications
5
Configuration
6
Installation
7
Removing the Machine Head Fixing Plate
7
Setting up the Machine
8
Preparations of Switches
10
Connecting the Power Switch
11
Installing the Panel
12
Installing the Thread Stand
12
How to Install the Thread Stand for Bobbin Winding
13
Connecting the Cord
14
Installing the Air Hose
17
Cautions for the Compressed Air Supply (Source of Supply Air) Facility
18
Ambient Environment
18
Preparation of the Sewing Machine
19
Lubrication
19
Adjusting the Oil Quantity in the Hook
20
Checking the Oil Quantity in the Hook
20
Adjusting the Hook Oil Quantity (Oil Spots)
21
Sample of Proper Quantity of Hook Oil (Oil Spots)
21
Checking the Emergency Stop Switch
22
Attaching the Needle
22
Needle Size and Gauge
23
Adjustment
23
Gauge
23
Threading the Machine Head
24
Installing and Removing the Bobbin Case
25
Installing the Bobbin
25
Preparing the Cassette Clamp
26
Adjusting the Thread Tension
29
Intermediate Presser Height
30
Adjusting the Thread Take-Up Spring
30
Operation of the Sewing Machine
31
Sewing
31
Operation Section (with Regard to the Panel)
32
Preface
32
When Using Ip-420
36
Name of each Section of IP-420
36
Buttons to be Used in Common
37
Basic Operation of IP-420
38
LCD Display Section at the Time of Sewing Shape Selection
39
Sewing Shape Data Input Screen
39
Sewing Screen
41
Return to Origin
41
Performing Sewing Shape Selection
43
Changing Item Data
45
Checking Pattern Shape
47
Performing Modification of Needle Entry Point
48
Editing the Thread Tension
48
Editing the Intermediate Presser Height
49
How to Use Temporary Stop
50
To Continue Performing Sewing from some Point in Sewing
50
To Perform Re-Sewing from the Start
51
When Setting of Sewing Product Is Difficult Because of Interruption of Needle Tip
52
Winding Bobbin Thread
53
Using Counter
55
Setting Procedure of the Counter
55
Count-Up Releasing Procedure
57
How to Change the Counter Value During Sewing
57
Performing New Register of Users' Pattern
58
Naming Users' Pattern
59
Performing New Register of Pattern Button
60
LCD Display Section at the Time of Pattern Button Selection
61
Pattern Button Data Input Screen
61
Sewing Screen
63
Performing Pattern Button No. Selection
65
Selection from the Data Input Screen
65
Selection by Means of the Shortcut Button
66
Changing Contents of Pattern Button
67
Copying Pattern Button
68
Changing Sewing Mode
69
LCD Display Section at the Time of Combination Sewing
70
Pattern Input Screen
70
Pattern Selection
71
Sewing Screen
72
Performing Combination Sewing
74
Selection of Combination Data
74
Creating Procedure of the Combination Data
75
Deleting Procedure of the Combination Data
76
Deleting Procedure of the Step of the Combination Data
76
Setting of the Skip of Steps
77
Using the Simple Operation Mode
77
LCD Display When the Simple Operation Is Selected
78
Data Input Screen (Individual Sewing)
78
Number of Stitches
79
Sewing Screen (Individual Sewing)
81
Counter Value
82
Data Input Screen (Combination Sewing)
84
Sewing Order
84
Sewing Screen (Combination Sewing)
86
Changing Memory Switch Data
88
Using Information
89
Observing the Maintenance and Inspection Information
89
Releasing Procedure of the Warning
90
Using Communication Function
91
Handling Possible Data
91
Performing Communication by Using the Media
91
Performing Communication by Using USB
91
Take-In of the Data
92
Taking in Plural Data Together
93
Performing Formatting of the Media
95
Operation at the Time of X/Y Motor Position Slip
96
When the Error Is Displayed During Sewing
96
When the Error Is Displayed after End of Sewing
97
When the Rest Switch Is Not Displayed
97
Memory Switch Data List
98
Data List
98
Initial Value List
103
Error Code List
105
MAIN CONTROL P.C.b
114
Message List
116
Maintenance of Sawing Machine
119
Maintenance
119
Adjusting the Height of the Needle Bar (Changing the Length of the Needle)
119
Adjusting the Needle-To-Shuttle Relation
120
Adjusting the Vertical Stroke of the Intermediate Presser
122
The Moving Knife and Counter Knife
122
Thread Breakage Detector Plate
123
Amount of Oil Supplied to the Hook
123
Periodical Cleaning of the Oil Shield
123
Replacing the Fuse
124
Replenishing the Designated Places with Grease
125
Types of Grease
126
Points to be Applied with JUKI Grease a
126
Troubles and Corrective Measures (Sewing Conditions)
128
Optional
130
List of the Needle Hole Guides and Intermediate Pressers
130
Bar Code Reader
131
Advertisement
JUKI IP-420 Instruction Manual (139 pages)
input
Brand:
JUKI
| Category:
Sewing Machine Accessories
| Size: 3 MB
Table of Contents
Table of Contents
2
1 Start and End of the Body Input Mode
5
Move to the Body Input Mode
5
Return to the Normal Sewing Mode
8
2 Basic Operation and Display
9
Common Button
9
Body Input Mode Standard Screen
10
Selection of Function
14
Input the Numeric Value
15
Specifying the Position
16
3 Example of Operating Procedure
18
Pattern Input
18
Trial Sewing
21
Modification of the Pattern
22
Pattern Writing
25
Pattern Reading
26
4 Input of Pattern
27
Ordinary Sewing
27
Jump Feed (020)
27
LNear OrdNary SewNg (023)
29
SplNe OrdNary SewNg (024)
31
Arc OrdNary SewNg (025)
33
CRcle OrdNary SewNg (026)
34
PoNt SewNg (021)
35
OrdNary SewNg (022)
36
Zigzag Sewing (030 to 033)
37
Offset Sewing (034 to 037)
39
Double Sewing
41
Double Orderly SewNg (040 to 043)
41
Double Reverse SewNg (044 to 047)
43
Overlapped Reverse SewNg (050 to 053)
44
Machine Control Command
46
Thread TrMMNg (001)
46
The 2Nd OrGN (002)
46
Stop (003)
47
One RevolutOn of SewNg MachNe (006)
48
Mark 1 and Mark 2 (008, 009)
49
Thread TensOn Controller No. 3 (007)
49
Delay (010)
50
External Nput (011)
50
External Output (012)
51
Enlargement/ReductOn Reference PoNt (004)
52
InversOn PoNt (005)
53
Thread TensOn SettNg (014)
54
IntermedAte Presser HeGht SettNg (018)
55
Area Classification (016)
56
SewNg MachNe Stop (019)
57
MachNe Control Command DeletOn (059)
58
SewNg Speed (092)
58
Automatic Back-Tack (064)
59
Condensation Sewing (065)
60
Overlapped Sewing (066)
61
Breakpoint (Spline and Ordinary Sewing)
62
5 Modification of the Pattern
65
Point Modification
65
PoNt DeletOn (070 and 074)
65
PoNt Move (071 and 075)
67
PoNt AddNg (076)
69
Vertex Modification
71
Vertex DeletOn (072 and 077)
71
Vertex Move (073 and 078)
72
Element Deletion (063)
73
Jump Feed Speed Change (060)
74
Sewing Speed Section Change (061)
75
Sewing Pitch Change (062)
76
Symmetry
77
X-AxS Symmetry (082)
77
Y-AxS Symmetry (083)
77
PoNt Symmetry (084)
78
Y Symmetry Pattern NversOn Orderly SewNg (098)
78
Shape Point Modification
79
Shape PoNt AddNg (135)
79
Shape PoNt Move (136)
81
Shape PoNt DeletOn (137)
82
6 Pattern Operation
84
Pattern Copy (086)
84
Pattern Move (085)
85
Pattern Erase (087)
86
Pattern Reading
87
Read the Pattern Data
87
Set the Enlargement/ReductOn RatO
89
Set the KNd of ReadNg Data
91
Pattern Writing
93
WrTe the Pattern Data
93
7 Formatting Media (090)
94
8 Trial Sewing
95
Preparing the Trial Sewing
95
Performing the Trial Sewing
97
9 Setting Function
99
Comment Input
99
Clamp Inversion Setting (091)
100
Thread Tension Reference Value Setting (113)
100
Intermediate Presser Height Reference Value Setting (115)
101
10 Selecting Ending Procedure (110)
102
11 Allocating Functions to F1 through F5 Buttons (112)
103
12 Displaying Detailed Information on the Set Value (093)
105
13 Displaying Detailed Information on the Current Needle Position
107
14 Performing Setting of Display
109
15 ELEMENT FORWARD/BACKWARD (130 and 131)
113
16 Direct Instructions by Touching the Screen
114
Coordinate Direct Instructions
114
Needle Entry/Shape Points Direct Instructions
116
17 Performing Setting of the Memory Switch Data
117
Setting of the Memory Switch Data Is Performed
117
Change over the Display Language
118
Changing the Display Color of the Current Point
119
Setting the Zigzag Sewing Output Method
120
18 Selecting the Function Code to be Displayed
121
19 Function Code List
122
20 Setting Range List
130
21 Backup
134
22 Error Code List
135
23 Message List
138
JUKI IP-420 Instruction Manuals (120 pages)
Brand:
JUKI
| Category:
Sewing Machine
| Size: 2 MB
Table of Contents
Instruction Manual
1
Table of Contents
2
Mechanical Section (with Regard to the Sewing Machine)
5
Specifications
5
Configuration
6
Installation
7
Installing the Throat Plate Auxiliary Cover
7
Table Position Adjustment: Only for 6030
8
Installing the Panel
10
Installing the Thread Stand
10
Installing the Air Hose
11
Installing the Eye Protection Cover
11
Changing the Height of the Table and Stand
12
Preparation of the Sewing Machine
13
Lubrication
13
Attaching the Needle
13
Threading the Machine Head
14
Installing and Removing the Bobbin Case
14
Installing the Bobbin
14
Adjusting the Thread Tension
15
Intermediate Presser Height
15
Adjusting the Thread Take-Up Spring
16
Operation of the Sewing Machine
16
Sewing
16
Needle Thread Clamp Device
17
How to Use the Plastic Blank (Supplied with the Machine as an Accessory)
18
Operation Section (with Regard to the Panel)
19
Preface
19
When Using Ip-420
23
Name of each Section of IP-420
23
Buttons to be Used in Common
24
Basic Operation of IP-420
25
Start Sewing
26
LCD Display Section at the Time of Sewing Shape Selection
27
Sewing Shape Data Input Screen
27
Sewing Screen
29
Performing Sewing Shape Selection
31
Changing Item Data
33
Checking Pattern Shape
35
Performing Modification of Needle Entry Point
36
Editing the Thread Tension
36
Editing the Intermediate Presser Height
37
How to Use Temporary Stop
38
To Continue Performing Sewing from some Point in Sewing
38
To Perform Re-Sewing from the Start
39
When Setting of Sewing Product Is Difficult Because of Interruption of Needle Tip
40
Winding Bobbin Thread
41
When Performing Winding Bobbin Thread While Performing Sewing
41
When Performing Winding Bobbin Thread Only
41
Using Counter
42
Setting Procedure of the Counter
42
Count-Up Releasing Procedure
44
How to Change the Counter Value During Sewing
44
Performing New Register of Users' Pattern
45
Naming Users' Pattern
46
Performing New Register of Pattern Button
47
LCD Display Section at the Time of Pattern Button Selection
48
Pattern Button Data Input Screen
48
Sewing Screen
50
Performing Pattern Button No. Selection
52
Selection from the Data Input Screen
52
Selection by Means of the Shortcut Button
53
Changing Contents of Pattern Button
54
Copying Pattern Button
55
Changing Sewing Mode
56
LCD Display Section at the Time of Combination Sewing
57
Pattern Input Screen
57
Sewing Screen
59
Performing Combination Sewing
61
Selection of Combination Data
61
Creating Procedure of the Combination Data
62
Deleting Procedure of the Combination Data
63
Deleting Procedure of the Step of the Combination Data
63
Setting of the Skip of Steps
64
Using the Simple Operation Mode
64
LCD Display When the Simple Operation Is Selected
65
Data Input Screen (Individual Sewing)
65
Sewing Screen (Individual Sewing)
68
Data Input Screen (Combination Sewing)
71
Sewing Screen (Combination Sewing)
73
Changing Memory Switch Data
75
Using Information
76
Observing the Maintenance and Inspection Information
76
Releasing Procedure of the Warning
77
Using Communication Function
78
Handling Possible Data
78
Performing Communication by Using the Media
78
Performing Communication by Using USB
78
Take-In of the Data
79
Taking in Plural Data Together
80
Performing Formatting of the Media
82
Using 2-Step Stroke Function
83
Setting of 2-Step Stroke Function
83
Setting of 2-Step Stroke Position
83
Motion of 2-Step Stroke Function
85
Operation at the Time of X/Y Motor Position Slip
87
When the Error Is Displayed During Sewing
87
When the Error Is Displayed after End of Sewing
88
When the Rest Switch Is Not Displayed
88
Memory Switch Data List
89
Data List
89
Initial Value List
95
Error Code List
97
Message List
104
Maintenance of Sawing Machine
107
Maintenance
107
Adjusting the Height of the Needle Bar (Changing the Length of the Needle)
107
Adjusting the Needle-To-Shuttle Relation
107
Adjusting the Timing of Main Shaft and Hook Driving Shaft
109
Adjusting the Height of the Feeding Frame
110
Adjusting the Vertical Stroke of the Intermediate Presser
110
The Moving Knife and Counter Knife
110
Needle Thread Clamp Device
111
Thread Breakage Detector Plate
111
Draining Waste Oil
112
Amount of Oil Supplied to the Hook
112
Replacing the Fuse
112
Changing the Voltage of 100 ⇔ 200V
113
Replenishing the Designated Places with Grease
114
Points to be Applied with JUKI Grease a
115
Points to be Applied with JUKI Grease B
116
Troubles and Corrective Measures (Sewing Conditions)
117
Optional
119
Table of Needle Hole Guide
119
Silicon Oil Tank
119
Bar Code Reader
120
JUKI IP-420 Instruction Manual (144 pages)
Brand:
JUKI
| Category:
Sewing Machine
| Size: 2 MB
Table of Contents
Instruction Manual
1
Table of Contents
2
1 Name of each Section of the Operation Panel
5
Body
5
Buttons to be Used in Common
7
2 Basic Operation of Ip-420
8
3 Lcd Display Section at the Time of Sewing Shape Selection
9
Sewing Shape Data Input Screen
9
Sewing Screen
12
4 Performing Sewing Shape Selection
15
5 Sewing Shape List
18
Lk-1900B / Lk-1901B / Lk-1902B
18
Lk-1903B
20
7 Checking Pattern Shape
23
8 Changing Thread Tension Command at Every Needle Entry Point
25
Adding or Changing Thread Tension Command at Every Needle Entry Point
25
Deleting Thread Tension Command at Every Needle Entry Point
27
9 Performing Release of Grease-Up Error
29
10 Using Temporary Stop
30
To Continue Performing Sewing from some Point in Sewing
31
To Perform Re-Sewing from the Start
32
11 Winding Bobbin Thread
33
12 Using Counter
34
Setting Procedure of the Counter
34
Count-Up Releasing Procedure
37
How to Change the Counter Value During Sewing
37
13 Performing New Register of Users' Pattern
38
14 Performing New Register of Pattern Button
39
15 Lcd Display Section at the Time of Pattern Button Selection
40
Pattern Button Data Input Screen
40
Sewing Screen
43
16 PERFORMING PATTERN BUTTON No. SELECTION
46
Selection from the Data Input Screen
46
Selection by Means of the Shortcut Button
47
17 Changing Contents of Pattern Button
48
18 Naming Pattern
50
19 Copying Pattern Button
51
20 Changing Sewing Mode
53
21 Lcd Display Section at the Time of Combination Sewing
54
Pattern Input Screen
54
Sewing Screen
56
22 Performing Combination Sewing
59
How to Create Combination Data
59
Selection of Combination Data
60
How to Delete Combination Data
61
How to Delete Combination Data Step
62
23 Changing Memory Switch Data
63
How to Change Memory Switch Data
63
Level 1
63
Level 2
65
Memory Switch Data List
66
Level 1
66
Level 2
72
24 Error Code List
77
25 Message List
85
26 Using Communication Function
88
Handling Possible Data
88
Performing Communication by Using the Media
89
Performing Format
92
Performing Communication
93
Take-In of the Data
94
Taking in Plural Data Together
96
27 Information Function
98
Observing the Maintenance Inspection Information
98
Inputting the Inspection Time
100
Releasing Procedure of the Warning
101
Observing the Production Control Information
102
When Displaying from the Information Screen
102
When Displaying from the Sewing Screen
104
Performing Setting of the Production Control Information
105
Observing the Working Measurement Information
109
28 Trial Sewing Function
113
Performing Trial Sewing
113
29 Thread Tension Value Display Color List
116
30 Setting Approval/Disapproval of Calling of Pattern Data
117
31 Performing Adjustment of Origin of Presser
118
32 Performing Key Lock
119
33 Displaying Version Information
121
34 Using Check Program
122
To Display the Check Program Screen
122
Performing Compensation of Touch Panel
124
Performing LCD Check
127
Performing Sensor Check
128
Number of Rotations of Main Motor Check
131
Performing Output Check
132
Performing X/Y Motors/Origin Sensors Check
134
Performing Presser/Thread Trimmer Motor/Origin Sensor Check
135
Performing Thread Clamp Motor/Origin Sensor Check
136
How to Carry out the Continuous Operation
137
35 Communication Screen of Maintenance Personnel Level
138
Data Which Are Possible to be Handled
138
Displaying Maintenance Personnel Level
139
Performing Rewriting of Program
140
36 Information Screen of the Maintenance Personnel Level
142
Display of Error Record
142
Display of the Cumulative Working Information
144
JUKI IP-420 Instruction Manual (116 pages)
Brand:
JUKI
| Category:
Sewing Machine
| Size: 2 MB
Table of Contents
Instruction Manual
1
Table of Contents
2
Mechanical Section (with Regard to the Sewing Machine)
5
Specifications
5
Configuration
6
Installation
7
Installing the Throat Plate Auxiliary Cover
7
Installing the Panel
8
Installing the Thread Stand
9
Installing the Air Hose
9
Installing the Eye Protection Cover
9
Changing the Height of the Table and Stand
10
Preparation of the Sewing Machine
11
Lubrication
11
Attaching the Needle
11
Threading the Machine Head
12
Installing the Bobbin
12
Installing and Removing the Bobbin Case
12
Adjusting the Thread Tension
13
Intermediate Presser Height
13
Adjusting the Thread Take-Up Spring
14
Operation of the Sewing Machine
14
Sewing
14
Operation Section (with Regard to the Panel)
15
Preface
15
When Using Ip-420
19
Name of each Section of IP-420
19
Buttons to be Used in Common
20
Basic Operation of IP-420
21
Start Sewing
22
LCD Display Section at the Time of Sewing Shape Selection
23
Sewing Shape Data Input Screen
23
Sewing Screen
25
Performing Sewing Shape Selection
27
Changing Item Data
29
Checking Pattern Shape
31
Performing Modification of Needle Entry Point
32
Editing the Thread Tension
32
Editing the Intermediate Presser Height
33
How to Use Temporary Stop
34
To Continue Performing Sewing from some Point in Sewing
34
To Perform Re-Sewing from the Start
35
When Setting of Sewing Product Is Difficult Because of Interruption of Needle Tip
36
Winding Bobbin Thread
37
When Performing Winding Bobbin Thread While Performing Sewing
37
When Performing Winding Bobbin Thread Only
37
Using Counter
38
Setting Procedure of the Counter
38
Count-Up Releasing Procedure
40
How to Change the Counter Value During Sewing
40
Performing New Register of Users' Pattern
41
Naming Users' Pattern
42
Performing New Register of Pattern Button
43
LCD Display Section at the Time of Pattern Button Selection
44
Pattern Button Data Input Screen
44
Sewing Screen
46
Performing Pattern Button No. Selection
48
Selection from the Data Input Screen
48
Selection by Means of the Shortcut Button
49
Changing Contents of Pattern Button
50
Copying Pattern Button
51
Changing Sewing Mode
52
LCD Display Section at the Time of Combination Sewing
53
Pattern Input Screen
53
Sewing Screen
55
Performing Combination Sewing
57
Selection of Combination Data
57
Creating Procedure of the Combination Data
58
Deleting Procedure of the Combination Data
59
Deleting Procedure of the Step of the Combination Data
59
Setting of the Skip of Steps
60
Using the Simple Operation Mode
60
LCD Display When the Simple Operation Is Selected
61
Data Input Screen (Individual Sewing)
61
Sewing Screen (Individual Sewing)
64
Data Input Screen (Combination Sewing)
67
Sewing Screen (Combination Sewing)
69
Changing Memory Switch Data
71
Using Information
72
Observing the Maintenance and Inspection Information
72
Releasing Procedure of the Warning
73
Using Communication Function
74
Handling Possible Data
74
Performing Communication by Using the Media
74
Performing Communication by Using USB
74
Take-In of the Data
75
Taking in Plural Data Together
76
Performing Formatting of the Media
78
Using 2-Step Stroke Function
79
Setting of 2-Step Stroke Function
79
Setting of 2-Step Stroke Position
79
Motion of 2-Step Stroke Function
81
Operation at the Time of X/Y Motor Position Slip
83
When the Error Is Displayed During Sewing
83
When the Error Is Displayed after End of Sewing
84
When the Rest Switch Is Not Displayed
84
Memory Switch Data List
85
Data List
85
Initial Value List
91
Error Code List
93
Message List
100
Maintenance of Sawing Machine
103
Maintenance
103
Adjusting the Height of the Needle Bar
103
Adjusting the Needle-To-Shuttle Relation
103
Adjusting the Height of the Feeding Frame
105
Adjusting the Vertical Stroke of the Intermediate Presser
106
The Moving Knife and Counter Knife
106
Thread Breakage Detector Plate
107
Draining Waste Oil
107
Adjusting the Amount of Oil Supplied to the Hook
107
Replacing the Fuse
108
Changing the Voltage of 100 ⇔ 200V
109
Replenishing the Designated Places with Grease
110
Points to be Applied with JUKI Grease a
111
Points to be Applied with JUKI Grease B
112
Troubles and Corrective Measures (Sewing Conditions)
113
Optional
115
Gauge List
115
Silicon Oil Tank
115
Bar Code Reader
116
Advertisement
Related Products
JUKI IP-410
JUKI IP-200
JUKI IP-110 Type F
JUKI IP-310/ACF-172-1790
JUKI IP-100
JUKI IP-310
JUKI IP-100D
JUKI IP-100A
JUKI IP-510
JUKI IT-10
JUKI Categories
Sewing Machine
Industrial Equipment
Sewing Machine Accessories
Measuring Instruments
Accessories
More JUKI Manuals
Login
Sign In
OR
Sign in with Facebook
Sign in with Google
Upload manual
Upload from disk
Upload from URL