Sign In
Upload
Manuals
Brands
HellermannTyton Manuals
Tools
Autotool 2000 CPK
HellermannTyton Autotool 2000 CPK Tie Manuals
Manuals and User Guides for HellermannTyton Autotool 2000 CPK Tie. We have
6
HellermannTyton Autotool 2000 CPK Tie manuals available for free PDF download: Operating Instructions Manual, Automation Instructions
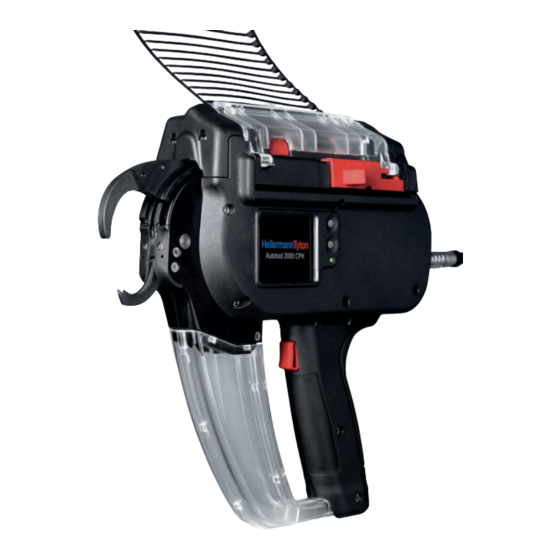
HellermannTyton Autotool 2000 CPK Operating Instructions Manual (87 pages)
Brand:
HellermannTyton
| Category:
Power Tool
| Size: 9.22 MB
Table of Contents
English
3
Table of Contents
3
1 Notes for the User
5
Information about the Product
5
Warranty
5
Contact Data
5
Information about These Operating Instructions
5
Copyright and Intellectual Property Rights
5
Keeping and Dissemination of the Operating Instructions
5
Target Group of These Operating Instructions
5
General Information
5
Conventions Adopted in These Operating Instructions
6
Classification of the Precautionary Notices
6
Other Notational Conventions
6
2 Safety Warnings
6
General Power Tool Safety Warnings
6
Work Area Safety
6
Electrical Safety
6
Personal Safety
7
Power Tool Use and Care
7
Servicing
7
Intended Use
8
Misuse
8
Personnel Qualification
8
Specialist Personnel for Operation
8
Specialist Personnel for Maintenance and Servicing
8
Authorised Person for Low-Voltage Electrical Equipment
8
Authorised Specialist for Repair and Testing
8
Underlying Hazards Associated with Use of the Device
8
Cleanliness at the Workplace
8
Spare Parts and Accessories
8
3 Design and Function
9
Overview of the Device
9
Scope of Supply
9
Checking Scope of Supply
9
At2000 Cpk
10
Power Pack CPK
10
Functional Description
11
Transporting the Device
11
Disposal
11
4 Assembly
11
Installing Accessories
11
Connecting the Device
11
5 Operation
12
Switching on
12
Switching off
12
Loading Cable Ties
12
Positioning and Binding Items for Bundling
12
Emptying Waste Container
13
6 Service Menu
13
Navigation
13
Start Menu
13
Main Menu
14
Languages Menu
14
Status Menu
14
Settings Menu
14
Force Level
14
English
14
Quality
15
Check of Binding
15
Interruption Front Sensor
15
Date / Time
15
Contact Menu
15
7 HT Data Management
16
First Steps
16
Access Levels
16
Rights for Access Levels
16
Start Page
17
Entering Password
17
Selecting a Language
17
Synchronising Time and Date
18
Binding Menu
18
Changing Binding Parameter Settings
18
Reading Binding Information
18
Service Menu
18
Changing Other Parameter Settings
18
Changing the Access Code in the AT2000 CPK
18
Memory Menu
19
Refreshing Memory Status
19
Selecting Bindings
19
Selecting Messages
19
Exporting Process Data
19
Update Menu
20
Change Password
20
Firmware Update
20
Binding Parameters Update
20
Update Additional Languages
21
Export Process Data Via Power Pack CPK
21
Convert CSV File
21
8 Troubleshooting
22
Important Notes
22
Display Messages
22
Possible Malfunctions
24
Troubleshooting a Cable-Tie Malfunction
25
Changing Back-Up Battery
25
9 Servicing
26
Important Notes
26
Spare Parts and Accessories
26
Spare Parts
26
Accessories
26
Servicing by Manufacturer
26
Maintenance Schedule
26
Maintenance Jobs
27
Checking Top Jaw
27
Changing Top Jaw
27
Check End Cap
27
Checking Tie Advancer
28
Changing Tie Advancer
28
10 Technical Data
29
At2000 Cpk
29
Power Pack CPK
29
Noise and Vibration Information
29
Français
30
EC Declaration of Conformity
31
1 Informations Destinées Aux Opérateurs
32
Informations Sur Le Produit
32
Garantie
32
Contact
32
Mise À Jour du Manuel D'utilisation
32
Droits D'auteur Et de Propriété
32
Conservation du Manuel D'utilisation
32
A Qui S'adresse Ce Manuel
32
Informations Générales
32
Conventions Utilisées Dans Le Manuel D'utilisation
33
Types D'avertissements
33
Informations Sur la Mise en Forme des Textes
33
2 Consignes de Sécurité
33
Consignes de Sécurité Générales Relatives Aux Outils Électriques
33
Sécurité Au Travail
33
Sécurité des Appareils Électriques
33
Sécurité Personnelle
34
Utilisation Et Entretien D'outils Électriques
34
Maintenance
34
Utilisation Conforme
35
Utilisation Non Conforme
35
Qualification du Personnel
35
Personnel Formé À L'utilisation
35
Personnel Formé Pour L'entretien Et la Maintenance
35
Électricien Qualifié
35
Personnel Qualifié Et Autorisé À Effectuer Les Réparations Et Les Contrôles
35
Risques de Base
35
Propreté Au Travail
35
Pièces Détachées Et Accessoires
35
3 Structure Et Fonctions
36
Vue D'ensemble de L'appareil
36
Volume de Livraison
36
Vérification À la Livraison
36
At2000 Cpk
37
Alimentation Secteur CPK
37
Description Fonctionnelle
38
Transport
38
Élimination
38
4 Pose
38
Pose des Accessoires
38
Raccordement de L'appareil
38
5 Utilisation
39
Mise en Marche
39
Arrêt
39
Chargement des Colliers de Serrage
39
Positionnement Et Fixation du Matériel Mis en Faisceau
39
Vider Le Réceptacle des Déchets
40
6 Menu de Service
40
Navigation
40
Démarrage
40
Menu Principal
41
Langues
41
Statut
41
Réglages
41
Tension de Serrage
41
Polski
41
Qualité
42
Contrôle du Serrage
42
Interruption Capteur Tête
42
Date / Heure
42
Contact
42
7 HT Data Management
43
Premiers Pas
43
Niveau D'accès
43
Autorisations Par Niveaux D'accès
43
Page de Démarrage
44
Entrer Le Mot de Passe
44
Sélectionner la Langue
44
Synchroniser L'heure Et la Date
45
Menu Serrage
45
Modifier Les Paramètres de Serrage
45
Lire Les Informations de Serrage
45
Menu Service
45
Modifier D'autres Paramètres
45
Modifier Le Code de L'at2000 CPK
45
Menu Mémoire
46
Actualiser Les Données Enregistrées
46
Sélectionner des Serrages
46
Sélectionner des Messages
46
Exporter Les Données de Processus
46
Mise À Jour
47
Changer Le Mot de Passe
47
Mettre À Jour Les Firmwares
47
Mettre À Jour Les Paramètres
47
Mise À Jour D'autres Langues
48
Exporter Les Données de Processus Via
48
L'alimentation Secteur CPK
48
Convertir un Fichier CSV
48
8 Élimination des Erreurs
49
Informations Importantes
49
Affichages Sur L'écran
49
Défauts Possibles
51
Éliminer un Défaut Au Niveau des Colliers de Serrage
52
Remplacer la Batterie Tampon
52
9 Maintenance
53
Informations Importantes
53
Pièces Détachées Et Accessoires
53
Pièces Détachées
53
Accessoires
53
Service Par Le Fabricant
53
Plan de Maintenance
53
Opérations de Maintenance
54
Contrôler la Pince Supérieure
54
Remplacer la Pince Supérieure
54
Contrôler Le Cache Frontal
54
Contrôler Le Guide D'avance des Colliers
55
Remplacer Le Guide D'avance des Colliers
55
10 Caractéristiques Techniques
56
At2000 Cpk
56
Alimentation Secteur CPK
56
Informations Concernant Les Bruits Et Les Vibrations
56
Advertisement
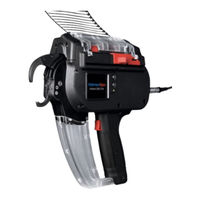
HellermannTyton Autotool 2000 CPK Automation Instructions (72 pages)
Cable tie gun
Brand:
HellermannTyton
| Category:
Power Tool
| Size: 5.56 MB
Table of Contents
English
3
Table of Contents
3
1 Notes for the User
5
Information about These Instructions
5
Warranty
5
Contact Data
5
Copyright and Intellectual Property Rights
5
Keeping and Dissemination of These Instructions
5
Target Group of These Instructions
5
General Information
5
Conventions Adopted in These Instructions
5
Classification of the Precautionary Notices
5
2 Safety Warnings
6
General Power Tool Safety Warnings
6
Intended Use
6
Misuse
6
Personnel Qualification
6
Specialist Personnel for Operation
6
Specialist Personnel for Maintenance and Servicing
6
Authorized Person for Low-Voltage Electrical Equipment
6
Authorized Specialist for Repair and Testing
6
Underlying Hazards Associated with Use of the Tool or Product
7
Cleanliness at the Workplace
7
Spare Parts and Accessories
7
3 Functional Description
7
At2000 Cpk
7
Power Pack with Control Box
7
Bench Mount Kit CPK
8
Overhead Suspension CPK
8
Robot Adapter CPK
8
Accessories
9
Deflector Hanger CPK
9
Bandoleer Cutter CPK
9
Stand-Off HH20
9
4 Transport, Accessories, Spare Parts and Storage
9
Transporting the Device
9
Accessories and Spare Parts
9
Take-Back
9
Disposal
9
Storage
10
Tool and Power Pack with Control Box
10
Cable Ties and Cable-Tie Reels
10
Installation
11
Installing the Bench Mount Kit CPK
11
Assembling the Bench Mount Kit CPK
11
Securing the Base Plate
12
Inserting the Tool
12
Inserting the Cable-Tie Reel
12
Connecting the Tool
13
Installing the Waste Disposal Equipment
13
Installing the Overhead Suspension CPK
14
Assembling the Overhead Suspension CPK
14
Installing the Power Pack with Control Box
15
Inserting the Tool
15
Inserting the Cable-Tie Reel
16
Connecting the Tool
16
Disposing of Waste Material
16
Installing the Robot Adapter CPK
16
Preparing the Tool
16
Inserting the Robot Adapter CPK
17
Disposing of Waste Material
17
Installing the Accessories
18
Installing the Deflector Hanger CPK
18
Installing the Bandoleer Cutter CPK
18
Positioning
18
Positioning the Material for Bundling
18
Installing the Stand-Off HH20
18
Geometries of Materials for Bundling
19
External Material Stock Monitoring
19
Check of Applied Cable Ties
19
6 Servicing
19
Important Notes
19
Spare Parts
19
General Servicing Operations
19
Replacing the Cable-Tie Reel on the Bench Mounting Kit CPK
20
Replacing the Cable-Tie Reel on the Overhead Suspension CPK
20
7 Technical Data
21
At2000 Cpk
21
Power Pack with Control Box
22
Overview of Interfaces, Power Pack with Control Box
23
Pinout, Tool Socket
24
Pinout of Serial Interface, Power Pack with Control Box
24
Bench Mount Kit CPK
25
BMK Tool Mount CPK
26
Hole Pattern of BMK Base Plate CPK
26
BMK Holder
26
Overhead Suspension CPK
27
Robot Adapter CPK
28
Cable-Tie Reel
28
Accessories
29
Bandoleer Cutter CPK
29
Stand-Off HH20
29
8 Program Interface
29
Overview
29
Serial Interface
29
Description
29
Settings of the Serial Interface
29
Data Format
29
Overview of Commands Sent Via Serial Interface (Without Data)
30
Overview of Commands Sent Via Serial Interface (with Data)
30
Overview of Commands Sent Via Serial Interface (Responses from Power Pack with Control Box)
31
Data Logging
31
9 Appendix
32
Glossary
32
Accessories, Bench Mount Kit CPK
33
Bundling Clips
34
Cable Ties
35
Cable-Tie Strip
36
Deutsch
37
1 Benutzerhinweise
39
Angaben zur Anleitung
39
Gewährleistung
39
Kontaktdaten
39
Urheber- und Schutzrechte
39
Aufbewahrung und Weitergabe der Anleitung
39
Zielgruppe der Anleitung
39
Allgemeine Angaben
39
Konventionen für diese Anleitung
39
Klassifizierung der Warnhinweise
39
2 Sicherheitshinweise
40
Allgemeine Sicherheitshinweise für Elektrowerkzeuge
40
Bestimmungsgemäße Verwendung
40
Bestimmungswidrige Verwendung
40
Qualifikation des Personals
40
Fachpersonal für Bedienung
40
Fachpersonal für Instandhaltung und Wartung
40
Ausgebildete Elektrofachkraft
40
Autorisierte Sachkundige für Reparatur und Prüfung
40
Grundsätzliche Gefahren Beim Umgang mit dem Werkzeug oder Produkt
41
Sauberkeit am Arbeitsplatz
41
Ersatzteile und Zubehör
41
3 Funktionsbeschreibung
41
Werkzeug AT2000 CPK
41
Netzgerät mit Steuerbox
41
Montagevorrichtung CPK
42
Hängevorrichtung CPK
42
Roboter Adapter CPK
42
Zubehör
43
Abweiserbügel CPK
43
Bandoliercutter CPK
43
Legehilfe HH20
43
4 Transport, Zubehör, Ersatzteile und Lagerung
43
Transport
43
Zubehör und Ersatzteile
43
Rücknahme
43
Entsorgung
43
Lagerung
44
Werkzeug und Netzgerät mit Steuerbox
44
Kabelbinder und Kabelbinderspulen
44
Montage
45
Montagevorrichtung CPK Montieren
45
Montagevorrichtung CPK Zusammensetzen
45
Grundplatte Befestigen
46
Werkzeug Einsetzen
46
Kabelbinderspule Einsetzen
46
Werkzeug Anschließen
47
Abfallentsorgung Anbringen
47
Hängevorrichtung CPK Montieren
48
Hängevorrichtung CPK Zusammensetzen
48
Netzgerät mit Steuerbox Montieren
49
Werkzeug Einsetzen
49
Kabelbinderspule Einsetzen
50
Werkzeug Anschließen
50
Abfallentsorgung
50
Roboter Adapter CPK Montieren
50
Werkzeug Vorbereiten
50
Roboter Adapter CPK Einsetzen
51
Abfallentsorgung
51
Zubehör Montieren
52
Abweiserbügel CPK Montieren
52
Bandoliercutter CPK Montieren
52
Positionierung
52
Bündelgut Positionieren
52
Legehilfe HH20 Montieren
52
Bündelgutgeometrien
53
Externe Materialbestandskontrolle
53
Kontrolle Gesetzter Kabelbinder
53
6 Wartung
53
Wichtige Hinweise
53
Ersatzteile
53
Allgemeine Wartungsmaßnahmen
53
Kabelbinderspule an der Montagevorrichtung CPK Austauschen
54
Kabelbinderspule an der Hängevorrichtung CPK Austauschen
54
7 Technische Daten
55
Werkzeug AT2000 CPK
55
Netzgerät mit Steuerbox
56
Schnittstellenübersicht Netzgerät mit Steuerbox
57
Pinbelegung Werkzeuganschluss
58
Pinbelegung Serielle Schnittstelle Netzgerät mit Steuerbox
58
Montagevorrichtung CPK
59
Werkzeugaufnahme BMK CPK
60
Bohrbild Bodenplatte BMK CPK
60
Halterung BMK
60
Hängevorrichtung CPK
61
Roboter Adapter CPK
62
Kabelbinderspule
62
Zubehör
63
Bandoliercutter CPK
63
Legehilfe HH20
63
8 Programmschnittstelle
63
Übersicht
63
Serielle Schnittstelle
63
Beschreibung
63
Einstellungen der Seriellen Schnittstelle
63
Datenformat
63
Befehlsübersicht Serielle Schnittstelle (ohne Daten)
64
Befehlsübersicht Serielle Schnittstelle (mit Daten)
64
Befehlsübersicht Serielle Schnittstelle (Antworten vom Netzgerät mit Steuerbox)
65
Datenprotokollierung
65
9 Anhang
66
Glossar
66
Zubehör Montagevorrichtung CPK
67
Bundlingclips
68
Kabelbinder
69
Bandkette
70
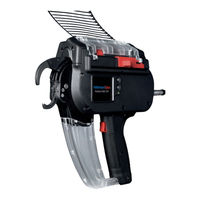
HellermannTyton Autotool 2000 CPK Operating Instructions Manual (41 pages)
Brand:
HellermannTyton
| Category:
Industrial Electrical
| Size: 6.3 MB
Table of Contents
Table of Contents
3
1 Notes for the User
5
Information about the Product
5
Warranty
5
Contact Data
5
Information about These Operating Instructions
5
Copyright and Intellectual Property
5
Rights
5
Keeping and Dissemination of the Operating Instructions
5
Target Group of These Operating Instructions
5
General Information
5
Conventions Adopted in These Operating Instructions
6
Classification of the Precautionary
6
Notices
6
Other Notational Conventions
6
2 Safety Warnings
6
General Power Tool Safety Warnings
6
Occupational Health and Safety
6
Electrical Safety
6
Safety of Persons
7
Use and Handling of the Power Tool
7
Service
7
Intended Use
7
Misuse
8
Personnel Qualification
8
Specialist Personnel for Operation
8
Specialist Personnel for Maintenance
8
And Servicing
8
Qualified Electrician
8
Authorised Specialist for Repair and Testing
8
Underlying Hazards Associated with Use of the AT2000 CPK
8
Cleanliness at the Workplace
8
Spare Parts and Accessories
8
3 Design and Function
9
Overview of the Device
9
Scope of Supply
9
Serial Number
9
Checking Scope of Supply
9
Functional Description
10
At2000 Cpk
10
Power Pack CPK
10
4 Transport, Disposal and Storage
11
Transporting the Device
11
Disposal
11
Storage
11
5 Installation
11
Installing the Accessories
11
Connecting the Device
11
6 Operation
11
Switching on
11
Switching off
11
Positioning and Binding Items for Bundling
12
Emptying the Waste Box
12
7 Settings in the Display Menu
12
Accessing the Settings
13
Accessing the Parameter Set
13
Setting the Force Level
13
Setting the Binding Quality
13
Setting the Loop Diameter
14
Setting the Cutting Mode
14
Setting Tension-Free Cutting
14
8 Settings in the Main Menu
15
Languages Menu
15
Status Menu
15
Settings Menu
15
Interruption Front Sensor
16
Date / Time
16
Check of Binding
16
Contact Menu
16
9 HT Data Management
17
First Steps
17
Access Levels
17
Binding Menu
17
Service Menu
17
Memory Menu
17
Update Menu
17
Measurement Environment Menu
17
Parameter Set Menu
17
Binding Menu
18
Entering Password
18
Select a Language
18
Synchronising Time and Date
19
Display Binding Information
19
Select Parameter Set
19
Set Interruption Front Sensor
19
Setting the Binding Check
19
Activating Consecutive Trigger
19
Status Indicators
19
Service Menu
20
Updating Service Information
20
Changing the Access Code in the AT2000 CPK
20
Memory Menu
21
Refresh Memory of the Tool
21
Limit the Time Period of the Bindings
21
Limit the Time Period of the Messages
21
Select Bindings
22
Select Messages
22
Read and Export the Process Data
22
On the HTDM
22
Export Data
22
Display Exported Data in the HTML
22
Format
22
Update Menu
23
Update Firmware
23
Change Password
24
Update Binding Parameters
24
Install Other Languages
24
Measurement Environment Menu
25
Using Measurement Mode
25
Deleting Measurement Results
26
Saving Measurement Results
26
Parameter Set Menu
27
Synchronise Parameter Sets
27
Save Parameter Sets
28
Load Parameter Sets
28
Export Process Data from the Power Pack CPK
29
Troubleshooting
29
Important Notes
29
Performing a Reset
30
Display Messages
30
Possible Fault
33
Troubleshooting a Cable-Tie Bandoleer
33
Malfunction
33
Changing Back-Up Battery
34
Advertisement
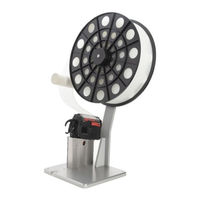
HellermannTyton Autotool 2000 CPK Operating Instructions Manual (32 pages)
Overhead Suspension
Brand:
HellermannTyton
| Category:
Tools
| Size: 2.18 MB
Table of Contents
English
3
Table of Contents
3
1 User Information
4
Field of Application
4
Warranty
4
Manufacturer Contact Data
4
Information on the Operating
4
Copyright and Intellectual Property Rights
4
Used Labels and Symbols
4
Keeping and Handing over These Instructions
4
Target Group of These Instructions
4
Applicable Documents
4
2 Safety Instructions
5
Representation and Layout of Warning Instructions
5
Classification of the Warning
5
Instructions
5
General Safety Instructions for Power Tools
5
Basic Safety Instructions
5
Cleanliness at the Workplace
5
Spare Parts and Accessories
5
Intended Use
6
Misuse
6
Operator Obligations
6
Personnel Qualification
6
Qualified Personnel for Operation
6
Qualified Personnel for Maintenance
6
Trained Electrician
6
Authorised Qualified Personnel for
6
3 Layout and Function
7
Layout
7
Scope of Delivery
7
Function
7
4 Transport and Storage
7
5 Installation and Initial Operation
8
Required Installation Tools
8
Installing the Overhead Suspension
8
Suitable Workplace
9
Installing the Overhead Suspension at the Workplace
9
Using the Tool
9
Adjusting the Balancer (Cable Pull)
9
Installing the Power Supply Unit with Control Box
10
Connecting the CPK Power Supply Unit
10
Inserting the Cable Tie Reel
11
Commissioning before Every Use
11
Check before Operation
11
Check after Operation
11
6 Operation
12
Switching the Tool on and off
12
Inserting the Band Chain in the Tool
12
Putting the Tool into Working
12
Operating the Tool
12
Emptying the Waste bin
12
Moving Tool from Working
12
Replacing Empty Cable Tie Reels
12
7 Troubleshooting
13
8 Maintenance
13
Cleaning
13
Cleaning the Overhead Suspension
13
Important Information
13
General Maintenance Measures
13
Repair
13
9 Taking out of Operation
14
Taking the Overhead Suspension out of Operation
14
Recommissioning the Overhead Suspension
14
10 Disposal
14
11 Technical Data
15
Dimensions
15
Work Area
16
Weight
16
12 Customer Service and Spare Parts
16
Deutsch
17
1 Benutzerhinweise
18
Geltungsbereich
18
Gewährleistung
18
Kontaktdaten Hersteller
18
Angaben zur Betriebsanleitung
18
Urheber- und Schutzrechte
18
Verwendete Kennzeichnungen
18
Und Symbole
18
Aufbewahrung und Weitergabe der Anleitung
18
Zielgruppe der Anleitung
18
2 Sicherheitshinweise
19
Darstellung und Aufbau von Warnhinweisen
19
Klassifizierung der Warnhinweise
19
Allgemeine Sicherheitshinweise für Elektrowerkzeuge
19
Grundsätzliche Sicherheitshinweise
19
Sauberkeit am Arbeitsplatz
19
Ersatzteile und Zubehör
19
Bestimmungsgemäße Verwendung
20
Bestimmungswidrige Verwendung
20
Pflichten des Betreibers
20
Qualifikation des Personals
20
Fachpersonal für Bedienung
20
Fachpersonal für Instandhaltung
20
Ausgebildete Elektrofachkraft
20
Autorisierte Sachkundige für Reparatur und Prüfung
20
3 Aufbau und Funktion
21
Aufbau
21
Lieferumfang
21
Funktion
21
4 Transport und Lagerung
21
5 Montage und Inbetriebnahme
22
Benötigtes Montagewerkzeug
22
Hängevorrichtung Montieren
22
Geeigneter Arbeitsplatz
23
Hängevorrichtung am Arbeitsplatz
23
Installieren
23
Werkzeug Einsetzen
23
Balancer (Seilzug) Justieren
23
Netzgerät mit Steuerbox
24
Montieren
24
Werkzeug und Netzgerät
24
Kabelbinderspule Einsetzen
25
Inbetriebnahme vor jeder Benutzung
25
Kontrolle vor der Bedienung
25
Kontrolle nach der Bedienung
25
6 Bedienung
26
Werkzeug Ein- und Ausschalten
26
Bandkette in das Werkzeug Einführen
26
Werkzeug in Arbeitsposition
26
Werkzeug Bedienen
26
Abfallbox Entleeren
26
Werkzeug aus der Arbeitsposition Entfernen
26
Leere Kabelbinderspule Austauschen
26
7 Fehlerbehebung
27
8 Instandhaltung
27
Reinigung
27
Hängevorrichtung Reinigen
27
Wartung
27
Wichtige Hinweise
27
Allgemeine Wartungsmaßnahmen
27
Instandsetzung
27
9 Außerbetriebnahme
28
Hängevorrichtung Außer Betrieb Nehmen
28
Hängevorrichtung wieder in Betrieb Nehmen
28
10 Entsorgung
28
11 Technische Daten
29
Maße
29
Arbeitsbereich
30
Gewicht
30
12 Kundenservice und Ersatzteile
30
HellermannTyton Autotool 2000 CPK Operating Instructions Manual (28 pages)
Brand:
HellermannTyton
| Category:
Industrial Equipment
| Size: 2.56 MB
Table of Contents
English
3
Table of Contents
3
1 User Information
4
Field of Application
4
Warranty
4
Manufacturer Contact Data
4
Information on the Operating
4
Copyright and Intellectual Property Rights
4
Used Labels and Symbols
4
Keeping and Handing over These Instructions
4
Target Group of These Instructions
4
Applicable Documents
4
2 Safety Instructions
5
Representation and Layout of Warning Instructions
5
Classification of the Warning
5
Instructions
5
General Safety Instructions for Power Tools
5
Basic Safety Instructions
5
Cleanliness at the Workplace
5
Spare Parts and Accessories
5
Intended Use
6
Misuse
6
Operator Obligations
6
Personnel Qualification
6
Qualified Personnel for Operation
6
Qualified Personnel for Servicing
6
Trained Electrician
6
Authorised Qualified Personnel for
6
3 Layout and Function
7
Layout
7
Items Included
7
Function
7
4 Transport and Storage
7
5 Installation and Initial Operation
7
Required Installation Tools
8
Installing the Bench Mount Kit
8
Suitable Workplace
8
Installing the Bench Mount Kit at the Workplace
9
Using the Tool
9
Connecting the Tool
10
Installing the Waste bin
10
Inserting the Cable Tie Reel
10
Commissioning before Every Use
10
Check before Operation
10
Check after Operation
10
6 Operation
11
Switching the Tool on and off
11
Inserting the Band Chain in the Tool
11
Operating the Tool with the Foot Switch
11
Emptying the Waste bin
11
Replacing Empty Cable Tie Reels
11
7 Troubleshooting
11
8 Servicing
11
Cleaning
11
Maintenance
12
Important Information
12
General Maintenance Measures
12
Repair
12
9 Taking out of Operation
12
Taking the Bench Mount Kit out of Operation
12
Putting the Bench Mount Kit Back into Operation
12
10 Disposal
12
11 Technical Data
13
Bench Mount Kit
13
Tool Mount
14
Base Plate
14
Column
14
Weight
14
12 Customer Service and Spare Parts
14
Deutsch
15
1 Benutzerhinweise
16
Geltungsbereich
16
Gewährleistung
16
Kontaktdaten Hersteller
16
Angaben zur Betriebsanleitung
16
Urheber- und Schutzrechte
16
Verwendete Kennzeichnungen
16
Und Symbole
16
Aufbewahrung und Weitergabe der Anleitung
16
Zielgruppe der Anleitung
16
2 Sicherheitshinweise
17
Darstellung und Aufbau von Warnhinweisen
17
Klassifizierung der Warnhinweise
17
Allgemeine Sicherheitshinweise für Elektrowerkzeuge
17
Grundsätzliche Sicherheitshinweise
17
Sauberkeit am Arbeitsplatz
17
Ersatzteile und Zubehör
17
Bestimmungsgemäße Verwendung
18
Bestimmungswidrige Verwendung
18
Pflichten des Betreibers
18
Qualifikation des Personals
18
Fachpersonal für Bedienung
18
Fachpersonal für Instandhaltung
18
Ausgebildete Elektrofachkraft
18
Autorisierte Sachkundige für Reparatur und Prüfung
18
3 Aufbau und Funktion
19
Aufbau
19
Lieferumfang
19
Funktion
19
4 Transport und Lagerung
19
5 Montage und Inbetriebnahme
20
Benötigtes Montagewerkzeug
20
Tischvorrichtung Montieren
20
Geeigneter Arbeitsplatz
20
Tischvorrichtung am Arbeitsplatz
21
Werkzeug Einsetzen
21
Werkzeug Anschließen
22
Abfallbehälter Montieren
22
Kabelbinderspule Einsetzen
22
Inbetriebnahme vor jeder Benutzung
22
Kontrolle vor der Bedienung
22
Kontrolle nach der Bedienung
22
6 Bedienung
23
Werkzeug Ein- und Ausschalten
23
Bandkette in das Werkzeug Einführen
23
Werkzeug mit Fußschalter Bedienen
23
Abfallbehälter Entleeren
23
Leere Kabelbinderspule Austauschen
23
7 Fehlerbehebung
23
8 Instandhaltung
23
Reinigung
23
Wartung
24
Wichtige Hinweise
24
Allgemeine Wartungsmaßnahmen
24
Instandsetzung
24
9 Außerbetriebnahme
24
Tischvorrichtung Außer Betrieb
24
Tischvorrichtung wieder in Betrieb Nehmen
24
10 Entsorgung
24
11 Technische Daten
25
Tischvorrichtung
25
Werkzeugaufnahme
26
Grundplatte
26
Säule
26
Gewicht
26
12 Kundenservice und Ersatzteile
26
HellermannTyton Autotool 2000 CPK Operating Instructions Manual (36 pages)
Brand:
HellermannTyton
| Category:
Tools
| Size: 6.82 MB
Table of Contents
Table of Contents
3
1 Notes for the User
5
Information about the Product
5
Warranty
5
Contact Data
5
Information about These Operating Instructions
5
Copyright and Intellectual Property Rights
5
Keeping and Dissemination of the Operating Instructions
5
Target Group of These Operating Instructions
5
General Information
5
Conventions Adopted in These Operating Instructions
6
Classification of the Precautionary Notices
6
Other Notational Conventions
6
2 Safety Warnings
6
General Power Tool Safety Warnings
6
Work Area Safety
6
Electrical Safety
6
Instructions 5
6
Personal Safety
7
Power Tool Use and Care
7
Servicing
7
Intended Use
7
Misuse
7
Personnel Qualification
8
Specialist Personnel for Operation
8
Specialist Personnel for Maintenance and Servicing
8
Authorised Person for Low-Voltage
8
Electrical Equipment
8
Authorised Specialist for Repair and Testing
8
Underlying Hazards Associated with Use of the Device
8
Cleanliness at the Workplace
8
Spare Parts and Accessories
8
3 Design and Function
9
Overview of the Device
9
Scope of Supply
9
Serial Number
9
Checking Scope of Supply
9
Functional Description
10
Tool AT2000 CPK
10
Power Pack CPK
10
4 Transport, Disposal and Storage
11
Transporting the Device
11
Disposal
11
Storage
11
5 Installation
11
Installing the Accessories
11
Connecting the Device
11
6 Operation
11
Switching on
11
Switching off
11
Positioning and Binding Items for Bundling
12
Emptying the Waste Box
12
7 Service Menu
12
Navigation
12
Start Menu
13
Main Menu
13
Languages Menu
13
Status Menu
13
Settings Menu
13
Force Level
13
Quality
14
Interruption Front Sensor
14
Date / Time
14
Check of Binding
14
Contact Menu
14
8 HT Data Management
15
First Steps
15
Access Levels
15
Start Page/Binding Menu
15
Service Menu
15
Memory Menu
15
Update Menu
15
Measurement Environment Menu
15
Binding Menu
16
Entering Password
16
Select a Language
17
Show Binding Information
17
Change Binding Parameter Settings
17
Status Indicators
17
Synchronising Time and Date
17
Service Menu
18
Changing Other Parameter Settings
18
Changing the Access Code in the AT2000
18
Cpk
18
Memory Menu
19
Refresh Memory of the Tool
19
Select Bindings
19
Select Messages
19
Export Process Data
20
Update Menu
20
Update Firmware
21
Change Password
21
Update Binding Parameter Settings
21
Install Other Languages
21
Measurement Environment Menu
22
Using Measurement Mode
22
Deleting Measurement Results
23
Saving Measurement Results
23
Deactivating Measurement Mode
23
Exporting Process Data from the Power Pack
23
Converting CSV File
23
9 Troubleshooting
24
Important Notes
24
Performing a Reset
24
Display Messages
25
Possible Fault
28
Troubleshooting a Cable-Tie Bandoleer
28
Malfunction
28
Changing Back-Up Battery
29
Advertisement
Related Products
HellermannTyton Autotool System 3080
HellermannTyton Autotool CPK hybrid
HellermannTyton 2608
HellermannTyton 102-00050
HellermannTyton 106-00050
HellermannTyton 106-60000
HellermannTyton 3080-ML
HellermannTyton ATS3080
HellermannTyton HDT16
HellermannTyton MK3PNSP2
HellermannTyton Categories
Power Tool
Tools
Printer
Measuring Instruments
Label Maker
More HellermannTyton Manuals
Login
Sign In
OR
Sign in with Facebook
Sign in with Google
Upload manual
Upload from disk
Upload from URL