
Related Manuals for NETGEAR AirCard Smart Cradle DC112A

Summary of Contents for NETGEAR AirCard Smart Cradle DC112A
- Page 1 AirCard® Smart Cradle Mode l DC112A Us e r Manual January 2015 202-11417-01 350 East Plumeria Drive San Jose, CA 95134...
- Page 2 For regulatory compliance information, visit http://www.netgear.com/about/regulatory. See the regulatory compliance document before connecting the power supply. Trademarks © NETGEAR, Inc. NETGEAR, Inc. NETGEAR, the NETGEAR Logo, ReadySHARE, and AirCard, are trademarks of NETGEAR, Inc. Information is subject to change without notice.
-
Page 3: Table Of Contents
Log In to the AirCard Smart Cradle........18 Access the AirCard Smart Cradle with NETGEAR genie Apps ....19 Chapter 3 Internet Setup Manage a Mobile Hotspot . - Page 4 AirCard Smart Cradle Chapter 4 Control Internet Access Set Up Parental Controls ..........42 Allow or Block Access to Your Network .
- Page 5 AirCard Smart Cradle Change the WiFi Data Speed Rate Settings ......82 Change the WiFi Password or Security Level ......83 Set Up a Guest Network .
- Page 6 Use the Scan Feature of a Multifunction USB Printer ....140 Change NETGEAR USB Control Center Settings ......141 Chapter 11 Troubleshooting Troubleshoot with the LEDs .
-
Page 7: Chapter 1 Hardware Setup
Hardware Setup The AirCard Smart Cradle allows you to transform your AirCard mobile hotspot into a powerful LTE router by combining the benefits of a home router and a WiFi signal booster. It charges your mobile hotspot battery, boosts the mobile hotspot’s 4G/3G signal, extends WiFi coverage, and expands your mobile hotspot connection to both wired and wireless devices. -
Page 8: Unpack Your Aircard Smart Cradle
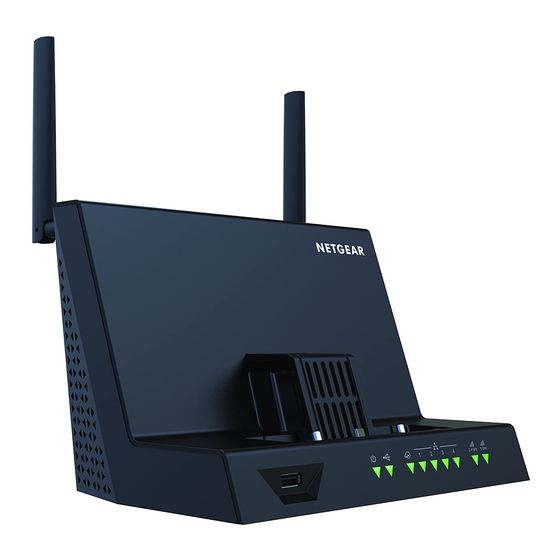
AirCard Smart Cradle Unpack Your AirCard Smart Cradle Your package contains the following items. External WiFi antennas (2) AirCard Smart Cradle Power adapter (appearance varies by region) Figure 2. Package contents Front Panel A USB port, an adjustable holder for the mobile hotspot, and the status LEDs and are located on the front of the cradle. - Page 9 AirCard Smart Cradle Table 1. LED descriptions Description Power • Solid amber. The cradle is booting. • Blinking amber. The firmware is upgrading, or someone pressed the Reset button. • Solid green. The cradle powered on and ready. • Blinking green. The firmware is corrupted. Contact your Internet service provider for technical support •...
-
Page 10: Rear Panel
AirCard Smart Cradle Rear Panel The rear panel connections and buttons are shown in the following figure. TS-9 Ethernet Internet Reset Power TS-9 Power button antenna port button On/Off antenna input LAN ports 1–4 connector button connector Figure 4. Cradle rear panel Pressing the WPS button lets you add a computer or WiFi device to the WiFi network without typing the WiFi network password (security key). -
Page 11: Dock The Mobile Hotspot In The Smart Cradle
AirCard Smart Cradle Dock the Mobile Hotspot in the Smart Cradle To dock the mobile hotspot in the Smart Cradle: Slide the antenna covers on the bottom of the mobile hotspot to the open position. Slide the Smart Cradle’s plastic holder back to allow enough room for the mobile hotspot. Dock the mobile hotspot in the Smart Cradle. - Page 12 AirCard Smart Cradle Slide the plastic holder forward to secure the mobile hotspot. Note: A gap of up to 1.5 mm between the plastic holder and the mobile hotspot is normal. Do not try to push the holder forward to fill the gap. When the Smart Cradle detects your mobile hotspot’s Internet connection, the Internet LED lights green and the Smart Cradle uses the mobile hotspot’s Internet connection.
-
Page 13: Undock The Mobile Hotspot From The Smart Cradle
AirCard Smart Cradle Undock the Mobile Hotspot from the Smart Cradle To undock the mobile hotspot from the Smart Cradle: Lift the mobile hotspot out of the AirCard Smart Cradle. Docking the mobile hotspot for the first time aligns the connectors, so the unit might be stiff going in and out. -
Page 14: Install Your Smart Cradle
AirCard Smart Cradle Computers Base of a cordless phone 2.4 GHz cordless phone • Place the cradle away from large metal surfaces, large glass surfaces, and insulated walls such as these: Solid metal doors Aluminum studs Fish tanks Mirrors Brick Concrete Install Your Smart Cradle ... - Page 15 AirCard Smart Cradle The mobile hotspot disables its WiFi signal so that you can connect to the cradle’s stronger WiFi signal. Note: Some hotspots require a firmware update before they automatically disable WiFi when docked. If your mobile hotspot broadcasts its WiFi signal when docked, manually set up your mobile hotspot to disable WiFi when USB is connected.
-
Page 16: Chapter 2 Connect To The Aircard Smart Cradle
Cradle This chapter covers the following topics: • Connect to the AirCard Smart Cradle • Types of Logins • Change the Language • Log In to the AirCard Smart Cradle • Access the AirCard Smart Cradle with NETGEAR genie Apps... -
Page 17: Connect To The Aircard Smart Cradle
AirCard Smart Cradle Connect to the AirCard Smart Cradle You can connect to the cradle’s network through a wired or WiFi connection. If you set up your computer to use a static IP address, change the settings so that it uses Dynamic Host Configuration Protocol (DHCP). -
Page 18: Types Of Logins
To change the language: Launch a web browser from a computer or wireless device that is connected to the Smart Cradle. In the address field of the browser, enter http://netgear.cradle or http://192.168.100.1. A login prompt displays. Enter the cradle user name and password. -
Page 19: Access The Aircard Smart Cradle With Netgear Genie Apps
For a wired connection, use an Ethernet cable to connect a computer to an Ethernet LAN port on the rear panel of the Smart Cradle. Launch a web browser. In the address field of the browser, enter http://netgear.cradle or http://192.168.100.1 A login prompt displays. Enter the cradle user name and password. -
Page 20: Chapter 3 Internet Setup
Internet Setup This chapter covers the following topics: • Manage a Mobile Hotspot • Use a WAN Internet Connection with Failover • Specify the Broadband Failover Detection Method • Manually Set Up the Internet Connection • Specify WAN Ethernet IPv6 Internet Connections •... -
Page 21: Manage A Mobile Hotspot
To manage a mobile hotspot: Launch a web browser from a computer or wireless device that is connected to the Smart Cradle. In the address field of the browser, enter http://netgear.cradle or http://192.168.100.1. A login prompt displays. Enter the cradle user name and password. - Page 22 Internet port Launch a web browser from a computer or wireless device that is connected to the Smart Cradle. In the address field of the browser, enter http://netgear.cradle or http://192.168.100.1. A login prompt displays. Enter the cradle user name and password.
-
Page 23: Specify The Broadband Failover Detection Method
To change the broadband failover detection method: Launch a web browser from a computer or wireless device that is connected to the Smart Cradle. In the address field of the browser, enter http://netgear.cradle or http://192.168.100.1. A login prompt displays. Enter the cradle user name and password. -
Page 24: Manually Set Up The Internet Connection
To specify the Internet connection settings: Launch a web browser from a computer or wireless device that is connected to the Smart Cradle. In the address field of the browser, enter http://netgear.cradle or http://192.168.100.1. A login prompt displays. Enter the cradle user name and password. -
Page 25: Specify An Internet Connection That Uses A Login
Use This MAC Address. Enter the MAC address that you want to use. Click the Apply button. Your settings are saved. Click the Test button to test your Internet connection. If the NETGEAR website does not display within one minute, see Chapter 11, Troubleshooting. Specify an Internet Connection That Uses a Login ... - Page 26 AirCard Smart Cradle The BASIC Home screen displays. Select Internet. Scroll to view more settings By default, in the Internet source section, the Only use mobile broadband (wireless network provider) radio button is selected. With this setting, the cradle only uses your mobile hotspot’s Internet connection.
-
Page 27: Specify Wan Ethernet Ipv6 Internet Connections
Use This MAC Address. Enter the MAC address that you want to use. Click the Apply button. Your settings are saved. Click the Test button to test your Internet connection. If the NETGEAR website does not display within one minute, see Chapter 11, Troubleshooting. Specify WAN Ethernet IPv6 Internet Connections Some Internet service providers (ISPs) and carriers support IPv6 Internet connections. - Page 28 To set up an IPv6 Internet connection: Launch a web browser from a computer or wireless device that is connected to the Smart Cradle. In the address field of the browser, enter http://netgear.cradle or http://192.168.100.1. A login prompt displays. Enter the cradle user name and password.
-
Page 29: Requirements For Entering Ipv6 Addresses
To set up an IPv6 Internet connection through auto detection: Launch a web browser from a computer or wireless device that is connected to the Smart Cradle. In the address field of the browser, enter http://netgear.cradle or http://192.168.100.1. A login prompt displays. Enter the cradle user name and password. -
Page 30: Use Auto Config For An Ipv6 Internet Connection
AirCard Smart Cradle The screen adjusts: The cradle automatically detects the information in the following fields: • Connection Type. This field indicates the connection type that is detected. • Router’s IPv6 Address on WAN. This field shows the IPv6 address that is acquired for the cradle’s WAN (or Internet) interface. - Page 31 AirCard Smart Cradle In the address field of the browser, enter http://netgear.cradle or http://192.168.100.1. A login prompt displays. Enter the cradle user name and password. The user name is admin. The default password is password. The user name and password are case-sensitive.
-
Page 32: Set Up An Ipv6 6To4 Tunnel Internet Connection
To set up an IPv6 Internet connection by using a 6to4 tunnel: Launch a web browser from a computer or wireless device that is connected to the Smart Cradle. In the address field of the browser, enter http://netgear.cradle or http://192.168.100.1. A login prompt displays. Enter the cradle user name and password. -
Page 33: Set Up An Ipv6 Pass Through Internet Connection
AirCard Smart Cradle The screen adjusts: The cradle automatically detects the information in the Router’s IPv6 Address on LAN field. This field shows the IPv6 address that is acquired for the cradle’s LAN interface. The number after the slash (/) is the length of the prefix, which is also indicated by the underline (_) under the IPv6 address. -
Page 34: Set Up An Ipv6 Fixed Internet Connection
To set up a pass-through IPv6 Internet connection: Launch a web browser from a computer or wireless device that is connected to the Smart Cradle. In the address field of the browser, enter http://netgear.cradle or http://192.168.100.1. A login prompt displays. Enter the cradle user name and password. - Page 35 AirCard Smart Cradle In the Internet Connection Type list, select Fixed. The screen adjusts: Configure the fixed IPv6 addresses for the WAN connection: • IPv6 Address/Prefix Length. The IPv6 address and prefix length of the cradle WAN interface. • Default IPv6 Gateway. The IPv6 address of the default IPv6 gateway for the cradle’s WAN interface.
-
Page 36: Set Up An Ipv6 Dhcp Internet Connection
To set up an IPv6 Internet connection with a DHCP server: Launch a web browser from a computer or wireless device that is connected to the Smart Cradle. In the address field of the browser, enter http://netgear.cradle or http://192.168.100.1. A login prompt displays. Enter the cradle user name and password. -
Page 37: Set Up An Ipv6 Pppoe Internet Connection
To set up a PPPoE IPv6 Internet connection: Launch a web browser from a computer or wireless device that is connected to the Smart Cradle. In the address field of the browser, enter http://netgear.cradle or http://192.168.100.1. A login prompt displays. Enter the cradle user name and password. - Page 38 AirCard Smart Cradle The screen adjusts: The cradle automatically detects the information in the following fields: • Router’s IPv6 Address on WAN. This field shows the IPv6 address that is acquired for the cradle’s WAN (or Internet) interface. The number after the slash (/) is the length of the prefix, which is also indicated by the underline (_) under the IPv6 address.
-
Page 39: Change The Mtu Size
“fragmented” to accommodate the device with the smallest MTU. The best MTU setting for NETGEAR equipment is often the default value. In some situations, changing the value fixes one problem but causes another. Leave the MTU unchanged unless one of these situations occurs: •... - Page 40 AirCard Smart Cradle A login prompt displays. Enter the cradle user name and password. The user name is admin. The default password is password. The user name and password are case-sensitive. The BASIC Home screen displays. Select ADVANCED > Setup > WAN Setup. In the MTU Size field, enter a value from 64 to 1500.
-
Page 41: Chapter 4 Control Internet Access
Control Internet Access This chapter covers the following topics: • Set Up Parental Controls • Allow or Block Access to Your Network • Use Keywords to Block Internet Sites • Block Services from the Internet • Schedule When to Block Internet Sites and Services •... -
Page 42: Set Up Parental Controls
If your Internet connection is working, the browser automatically goes online and displays the Parental Controls web page. Click either the Windows Users or Mac Users button. Follow the onscreen instructions to download and install the NETGEAR Live Parental Controls management utility. Control Internet Access... - Page 43 AirCard Smart Cradle After installation, Live Parental Controls automatically starts. Click the Next button. Read the note, and click the Next button again to proceed. Because Live Parental Controls uses free OpenDNS accounts, you are prompted to log in or create a free account. Select the radio button that applies to you: •...
-
Page 44: Allow Or Block Access To Your Network
To set up access control: Launch a web browser from a computer or wireless device that is connected to the Smart Cradle. In the address field of the browser, enter http://netgear.cradle or http://192.168.100.1. A login prompt displays. Enter the cradle user name and password. - Page 45 AirCard Smart Cradle Select ADVANCED > Security > Access Control. Select the Turn on Access Control check box. You must select this check box before you can specify an access rule and use the Allow and Block buttons. When this check box is cleared, all devices are allowed to connect, even if the device is in the blocked list.
-
Page 46: Manage Network Access Control Lists
To manage devices that are allowed or blocked: Launch a web browser from a computer or wireless device that is connected to the Smart Cradle. In the address field of the browser, enter http://netgear.cradle or http://192.168.100.1. A login prompt displays. Enter the cradle user name and password. -
Page 47: Use Keywords To Block Internet Sites
To block Internet sites: Launch a web browser from a computer or wireless device that is connected to the Smart Cradle. In the address field of the browser, enter http://netgear.cradle or http://192.168.100.1. A login prompt displays. Enter the cradle user name and password. -
Page 48: Delete Keywords From The List To Be Blocked
To delete keywords from the list: Launch a web browser from a computer or wireless device that is connected to the Smart Cradle. In the address field of the browser, enter http://netgear.cradle or http://192.168.100.1. A login prompt displays. Enter the cradle user name and password. - Page 49 AirCard Smart Cradle The user name is admin. The default password is password. The user name and password are case-sensitive. The BASIC Home screen displays. Select ADVANCED > Security > Block Services. Specify when to block the services: • To block the services all the time, select the Always radio button. •...
-
Page 50: Schedule When To Block Internet Sites And Services
To schedule blocking: Launch a web browser from a computer or wireless device that is connected to the Smart Cradle. In the address field of the browser, enter http://netgear.cradle or http://192.168.100.1. A login prompt displays. Enter the cradle user name and password. -
Page 51: Avoid Blocking On A Trusted Computer
To specify a trusted computer: Launch a web browser from a computer or wireless device that is connected to the Smart Cradle. In the address field of the browser, enter http://netgear.cradle or http://192.168.100.1. A login prompt displays. Enter the cradle user name and password. - Page 52 To set up email notifications: Launch a web browser from a computer or wireless device that is connected to the Smart Cradle. In the address field of the browser, enter http://netgear.cradle or http://192.168.100.1. A login prompt displays. Enter the cradle user name and password.
-
Page 53: Set Up Port Forwarding To A Local Server
78. Launch a web browser from a computer or wireless device that is connected to the Smart Cradle. In the address field of the browser, enter http://netgear.cradle or http://192.168.100.1. A login prompt displays. Enter the cradle user name and password. -
Page 54: Add A Custom Port Forwarding Service
Launch a web browser from a computer or wireless device that is connected to the Smart Cradle. In the address field of the browser, enter http://netgear.cradle or http://192.168.100.1. A login prompt displays. Enter the cradle user name and password. -
Page 55: Edit A Port Forwarding Service
To edit a port forwarding entry: Launch a web browser from a computer or wireless device that is connected to the Smart Cradle. In the address field of the browser, enter http://netgear.cradle or http://192.168.100.1. A login prompt displays. Enter the cradle user name and password. -
Page 56: Delete A Port Forwarding Entry
To delete a port forwarding entry: Launch a web browser from a computer or wireless device that is connected to the Smart Cradle. In the address field of the browser, enter http://netgear.cradle or http://192.168.100.1. A login prompt displays. Enter the cradle user name and password. -
Page 57: How The Cradle Implements The Port Forwarding Rule
AirCard Smart Cradle HTTP (port 80) is the standard protocol for web servers. (Optional) Register a host name with a Dynamic DNS service and specify that name in the Dynamic DNS screen of the cradle. Dynamic DNS makes it much easier to access a server from the Internet because you can type the name in the Internet browser. -
Page 58: Add A Port Triggering Service
To add a port triggering service: Launch a web browser from a computer or wireless device that is connected to the Smart Cradle. In the address field of the browser, enter http://netgear.cradle or http://192.168.100.1. A login prompt displays. Enter the cradle user name and password. -
Page 59: Enable Port Triggering
To enable port triggering: Launch a web browser from a computer or wireless device that is connected to the Smart Cradle. In the address field of the browser, enter http://netgear.cradle or http://192.168.100.1. A login prompt displays. Enter the cradle user name and password. -
Page 60: Application Example: Port Triggering For Internet Relay Chat
AirCard Smart Cradle Application Example: Port Triggering for Internet Relay Chat Some application servers, such as FTP and IRC servers, send replies to multiple port numbers. Using port triggering, you can tell the cradle to open more incoming ports when a particular outgoing port starts a session. -
Page 61: Chapter 5 Optimize Performance
Optimize Performance This chapter contains the following sections: • Optimize Internet Gaming with Upstream QoS • Add QoS Rules • Improve Network Connections with Universal Plug and Play • Wi-Fi Multimedia Quality of Service... -
Page 62: Optimize Internet Gaming With Upstream Qos
To enable upstream QoS: Launch a web browser from a computer or wireless device that is connected to the Smart Cradle. In the address field of the browser, enter http://netgear.cradle or http://192.168.100.1. A login prompt displays. Enter the cradle user name and password. -
Page 63: Add Qos Rules
To create a QoS policy for applications and online games: Launch a web browser from a computer or wireless device that is connected to the Smart Cradle. In the address field of the browser, enter http://netgear.cradle or http://192.168.100.1. A login prompt displays. Enter the cradle user name and password. - Page 64 AirCard Smart Cradle Click the Setup QoS rule button. To add a priority rule, scroll down to the bottom of the QoS Setup screen and click the Add Priority Rule button. In the QoS Policy for field, type the name of the application or game. From the Priority Category list, select either Applications or Online Gaming.
-
Page 65: Set Up Qos For A Lan Port On The Aircard Smart Cradle
To create a QoS policy for a device connected to one of the cradle’s LAN ports: Launch a web browser from a computer or wireless device that is connected to the Smart Cradle. In the address field of the browser, enter http://netgear.cradle or http://192.168.100.1. A login prompt displays. Enter the cradle user name and password. -
Page 66: Set Up Qos For A Mac Address
To create a QoS policy for traffic from a specific MAC address: Launch a web browser from a computer or wireless device that is connected to the Smart Cradle. In the address field of the browser, enter http://netgear.cradle or http://192.168.100.1. A login prompt displays. Enter the cradle user name and password. -
Page 67: Edit An Upstream Qos Policy
To edit a QoS policy: Launch a web browser from a computer or wireless device that is connected to the Smart Cradle. In the address field of the browser, enter http://netgear.cradle or http://192.168.100.1. A login prompt displays. Enter the cradle user name and password. -
Page 68: Improve Network Connections With Universal Plug And Play
To enable Universal Plug and Play: Launch a web browser from a computer or wireless device that is connected to the Smart Cradle. In the address field of the browser, enter http://netgear.cradle or http://192.168.100.1. A login prompt displays. Enter the cradle user name and password. -
Page 69: Wi-Fi Multimedia Quality Of Service
To disable WMM QoS: Launch a web browser from a computer or wireless device that is connected to the Smart Cradle. In the address field of the browser, enter http://netgear.cradle or http://192.168.100.1. A login prompt displays. Enter the cradle user name and password. -
Page 70: Chapter 6 Network Settings
Network Settings This chapter covers the following topics: • View WAN Settings • Set Up the AirCard Smart Cradle as a Default DMZ Server • Configure DMZ on an AirCard Mobile Hotspot • Change the Cradle’s Device Name • Change the LAN TCP/IP Settings •... -
Page 71: View Wan Settings
To view the WAN settings: Launch a web browser from a computer or wireless device that is connected to the Smart Cradle. In the address field of the browser, enter http://netgear.cradle or http://192.168.100.1. A login prompt displays. Enter the cradle user name and password. -
Page 72: Set Up The Aircard Smart Cradle As A Default Dmz Server
To set up a default DMZ server: Launch a web browser from a computer or wireless device that is connected to the Smart Cradle. In the address field of the browser, enter http://netgear.cradle or http://192.168.100.1. A login prompt displays. Enter the cradle user name and password. -
Page 73: Configure Dmz On An Aircard Mobile Hotspot
AirCard Smart Cradle The user name is admin. The default password is password. The user name and password are case-sensitive. The BASIC Home screen displays. Select ADVANCED > Setup > WAN Setup. The WAN Setup screen displays. Select the Default DMZ Server check box. Type the IP address. -
Page 74: Change The Cradle's Device Name
To change the cradle’s device name: Launch a web browser from a computer or wireless device that is connected to the Smart Cradle. In the address field of the browser, enter http://netgear.cradle or http://192.168.100.1. A login prompt displays. Enter the cradle user name and password. - Page 75 AirCard Smart Cradle Enter the cradle user name and password. The user name is admin. The default password is password. The user name and password are case-sensitive. The BASIC Home screen displays. Select ADVANCED > Setup > LAN Setup. In the IP Address field, type the IP address. In the IP Subnet Mask, type the subnet mask of the cradle.
-
Page 76: Specify The Ip Addresses That The Cradle Assigns
To specify the pool of IP addresses that the cradle assigns: Launch a web browser from a computer or wireless device that is connected to the Smart Cradle. In the address field of the browser, enter http://netgear.cradle or http://192.168.100.1. A login prompt displays. Enter the cradle user name and password. -
Page 77: Disable The Dhcp Server Feature In The Cradle
To disable the DHCP server feature in the cradle: Launch a web browser from a computer or wireless device that is connected to the Smart Cradle. In the address field of the browser, enter http://netgear.cradle or http://192.168.100.1. A login prompt displays. Enter the cradle user name and password. -
Page 78: Reserve Lan Ip Addresses
To reserve an IP address: Launch a web browser from a computer or wireless device that is connected to the Smart Cradle. In the address field of the browser, enter http://netgear.cradle or http://192.168.100.1. A login prompt displays. Enter the cradle user name and password. -
Page 79: Edit A Reserved Ip Address Entry
To edit a reserved IP address entry: Launch a web browser from a computer or wireless device that is connected to the Smart Cradle. In the address field of the browser, enter http://netgear.cradle or http://192.168.100.1. A login prompt displays. Enter the cradle user name and password. -
Page 80: Use The Wps Wizard For Wifi Connections
To use the WPS Wizard: Launch an Internet browser from a computer or wireless device that is connected to the Smart Cradle. In the address field of the browser, enter http://netgear.cradle or http://192.168.100.1 A login screen displays. Enter the user name and password. - Page 81 To specify basic wireless settings: Launch a web browser from a computer or wireless device that is connected to the Smart Cradle. In the address field of the browser, enter http://netgear.cradle or http://192.168.100.1 A login prompt displays. Enter the cradle user name and password.
-
Page 82: Change The Wifi Data Speed Rate Settings
To change the WiFi Mbps settings: Launch a web browser from a computer or wireless device that is connected to the Smart Cradle. In the address field of the browser, enter http://netgear.cradle or http://192.168.100.1. A login prompt displays. Enter the cradle user name and password. -
Page 83: Change The Wifi Password Or Security Level
To change the WPA settings: Launch a web browser from a computer or wireless device that is connected to the Smart Cradle. In the address field of the browser, enter http://netgear.cradle or http://192.168.100.1. A login prompt displays. Enter the cradle user name and password. -
Page 84: Set Up A Guest Network
To set up a guest network: Launch a web browser from a computer or wireless device that is connected to the Smart Cradle. In the address field of the browser, enter http://netgear.cradle or http://192.168.100.1. A login prompt displays. Enter the cradle user name and password. - Page 85 Scroll to the section for the guest WiFi network that you want to set up. The default guest wireless network names (SSIDs) are as follows: • NETGEAR-Guest is for the 2.4 GHz WiFi band. • NETGEAR-5G-Guest is for the 5 GHz WiFi band.
-
Page 86: Control The Wireless Radios
To enable or disable the wireless radios: Launch a web browser from a computer or wireless device that is connected to the Smart Cradle. In the address field of the browser, enter http://netgear.cradle or http://192.168.100.1. A login prompt displays. Enter the cradle user name and password. -
Page 87: Set Up A Wireless Schedule
To set up the wireless schedule: Launch a web browser from a computer or wireless device that is connected to the Smart Cradle. In the address field of the browser, enter http://netgear.cradle or http://192.168.100.1. A login prompt displays. Enter the user name and password. -
Page 88: Specify Wps Settings
To specify WPS Settings: Launch a web browser from a computer or wireless device that is connected to the Smart Cradle. In the address field of the browser, enter http://netgear.cradle or http://192.168.100.1. A login prompt displays. Enter the cradle user name and password. -
Page 89: Use The Smart Cradle As A Wireless Access Point
AirCard Smart Cradle The Router’s PIN field displays the PIN that you use on a registrar (for example, from the Network Explorer on a Vista Windows computer) to configure the cradle’s wireless settings through WPS. (Optional) Select or clear the Enable Router’s PIN check box. The PIN function might temporarily be disabled when the cradle detects suspicious attempts to break into the cradle’s wireless settings by using the cradle’s PIN through WPS. - Page 90 AirCard Smart Cradle In the address field of the browser, enter http://netgear.cradle or http://192.168.100.1. A login prompt displays. Enter the router user name and password. The user name is admin. The default password is password. The user name and password are case-sensitive.
-
Page 91: Set Up The Aircard Smart Cradle In Bridge Mode
AirCard Smart Cradle Set Up the AirCard Smart Cradle in Bridge Mode You can use your cradle in bridge mode to connect multiple devices wirelessly at the faster 802.11ac speed. You need another router in your network with an Ethernet Internet connection. -
Page 92: To Set Up Bridge Mode
(either 2.4 GHz or 5 GHz). Launch a web browser from a computer or WiFi device that is connected to the Smart Cradle. In the address field of the browser, enter http://netgear.cradle or http://192.168.100.1. A login prompt displays. Enter the user name and password. -
Page 93: Set Up A Facebook Wifi Guest Network
AirCard Smart Cradle Click the setup bridge mode wireless settings button. Specify the settings of the other cradle to which this cradle will connect. a. Select the wireless network frequency (2.4 GHz or 5 GHz). For 802.11ac mode, select 5 GHz. b. - Page 94 To set up Facebook WiFi: Launch a web browser from a computer or wireless device that is connected to the Smart Cradle. In the address field of the browser, enter http://netgear.cradle or http://192.168.100.1 A login prompt displays. Enter the cradle user name and password.
- Page 95 AirCard Smart Cradle Note: The WiFi code is different from your guest network passphrase. If you select this radio button, you must give customers the WiFi code for them to use your business WiFi. From the Session Length list, select a length of time that you want to allow your customers to be able to access your business WiFi after they check in.
-
Page 96: Chapter 7 Manage The Aircard Smart Cradle
Manage the AirCard Smart Cradle This chapter covers the following topics: • Update the AirCard Smart Cradle Firmware • Change the admin Password • Recover the admin Password • View AirCard Smart Cradle Status • Manage the AirCard Smart Cradle Configuration File •... -
Page 97: Update The Aircard Smart Cradle Firmware
Best practice is to use the provided Ethernet cable to connect your computer to an Ethernet LAN port on the cradle In the address field of the browser, enter http://netgear.cradle or http://192.168.100.1. A login prompt displays. Enter the cradle user name and password. -
Page 98: Change The Admin Password
To set the password for the user name admin: Launch a web browser from a computer or wireless device that is connected to the Smart Cradle. In the address field of the browser, enter http://netgear.cradle or http://192.168.100.1. A login prompt displays. Enter the cradle user name and password. -
Page 99: Recover The Admin Password
To set up password recovery: Launch a web browser from a computer or wireless device that is connected to the Smart Cradle. In the address field of the browser, enter http://netgear.cradle or http://192.168.100.1. A login prompt displays. Enter the cradle user name and password. -
Page 100: View Aircard Smart Cradle Status
To view cradle status and usage information: Launch a web browser from a computer or wireless device that is connected to the Smart Cradle. In the address field of the browser, enter http://netgear.cradle or http://192.168.100.1. A login prompt displays. Enter the cradle user name and password. -
Page 101: Display Internet Port Statistics
To display Internet port statistics: Launch a web browser from a computer or wireless device that is connected to the Smart Cradle. In the address field of the browser, enter http://netgear.cradle or http://192.168.100.1. A login prompt displays. Enter the cradle user name and password. -
Page 102: Check The Internet Connection Status
To check the Internet connection status: Launch a web browser from a computer or wireless device that is connected to the Smart Cradle. In the address field of the browser, enter http://netgear.cradle or http://192.168.100.1. A login prompt displays. Enter the cradle user name and password. -
Page 103: Manage The Aircard Smart Cradle Configuration File
To back up the cradle’s configuration settings: Launch a web browser from a computer or wireless device that is connected to the Smart Cradle. In the address field of the browser, enter http://netgear.cradle or http://192.168.100.1. A login prompt displays. Enter the cradle user name and password. -
Page 104: Erase The Current Configuration Setting
To erase the configuration settings: Launch a web browser from a computer or wireless device that is connected to the Smart Cradle. In the address field of the browser, enter http://netgear.cradle or http://192.168.100.1. A login prompt displays. Enter the cradle user name and password. -
Page 105: View And Customize Log Information
To view and customize the log information: Launch a web browser from a computer or wireless device that is connected to the Smart Cradle. In the address field of the browser, enter http://netgear.cradle or http://192.168.100.1 A login prompt displays. Enter the cradle user name and password. -
Page 106: Custom Static Routes
To set up a static route: Launch a web browser from a computer or wireless device that is connected to the Smart Cradle. In the address field of the browser, enter http://netgear.cradle or http://192.168.100.1. A login prompt displays. Enter the cradle user name and password. -
Page 107: Edit A Static Route
To edit a static route: Launch a web browser from a computer or wireless device that is connected to the Smart Cradle. In the address field of the browser, enter http://netgear.cradle or http://192.168.100.1. A login prompt displays. Enter the cradle user name and password. -
Page 108: Delete A Static Route
To delete a static route: Launch a web browser from a computer or wireless device that is connected to the Smart Cradle. In the address field of the browser, enter http://netgear.cradle or http://192.168.100.1 A login prompt displays. Enter the cradle user name and password. -
Page 109: Remote Management
AirCard Smart Cradle The user name is admin. The default password is password. The user name and password are case-sensitive. The BASIC Home screen displays. Select Attached Devices. The Wired Devices section lists devices that are connected to the cradle with Ethernet cables. - Page 110 AirCard Smart Cradle In the address field of the browser, enter http://netgear.cradle or http://192.168.100.1. A login prompt displays. Enter the cradle user name and password. The user name is admin. The default password is password. The user name and password are case-sensitive.
-
Page 111: Monitor Internet Traffic
To monitor Internet traffic: Launch a web browser from a computer or wireless device that is connected to the Smart Cradle. In the address field of the browser, enter http://netgear.cradle or http://192.168.100.1. A login prompt displays. Enter the cradle user name and password. -
Page 112: Set Up The Aircard Smart Cradle To Respond To Pings On The Internet Port
To set up responses to pings on the Internet port: Launch a web browser from a computer or wireless device that is connected to the Smart Cradle. In the address field of the browser, enter http://netgear.cradle or http://192.168.100.1. A login prompt displays. Enter the cradle user name and password. - Page 113 AirCard Smart Cradle Select Advanced > Setup > WAN Setup. Select the Respond to Ping on Internet Port check box. Click the Apply button. Your settings are saved. Manage the AirCard Smart Cradle...
-
Page 114: Chapter 8 Share A Usb Device Attached To The Aircard Smart Cradle
View Network Folders on a USB Device • Add a Network Folder on a USB Device • Edit a Network Folder on a USB Device • Approve USB Devices • Safely Remove a USB Device For more information about ReadySHARE features, visit www.netgear.com/readyshare. -
Page 115: Usb Device Requirements
The cradle works with most USB-compliant external flash and hard drives. For the most up-to-date list of USB devices that the cradle supports, visit http://kbserver.netgear.com/readyshare. Some USB external hard drives and flash drives require you to load the drivers onto the computer before the computer can access the USB device. - Page 116 Enter \\readyshare in the dialog box and click the OK button. To map the USB device to a Windows network drive: Visit www.netgear.com/readyshare. In the ReadySHARE USB Storage Access pane, click PC Utility link. The readyshareconnect.exe file is downloaded to your computer. Launch readyshareconnect.exe.
-
Page 117: Back Up Windows Computers With Readyshare Vault
To back up your Windows computer: Connect a USB HDD to a USB port on the cradle. Install the genie app on each Windows computer. To download the genie app, visit www.netgear.com/genie. Download ReadySHARE Vault from www.netgear.com/readyshare and install it on each Windows computer. -
Page 118: Prepare To Back Up A Large Amount Of Data
AirCard Smart Cradle Click the Apply button. Your settings are saved. Prepare to Back Up a Large Amount of Data Before you back up a large amount of data with Time Machine, Best practice is to follow this procedure. To prepare to back up a large amount of data: Upgrade the operating system of the Mac computer. -
Page 119: Control Access To The Usb Device
To specify the USB access settings: Launch a web browser from a computer or wireless device that is connected to the Smart Cradle. In the address field of the browser, enter http://netgear.cradle or http://192.168.100.1. A login prompt displays. Enter the cradle user name and password. -
Page 120: Use Ftp Within The Network
To set up FTP access: Launch a web browser from a computer or wireless device that is connected to the Smart Cradle. In the address field of the browser, enter http://netgear.cradle or http://192.168.100.1. A login prompt displays. Enter the cradle user name and password. -
Page 121: View Network Folders On A Usb Device
To view network folders: Launch a web browser from a computer or wireless device that is connected to the Smart Cradle. In the address field of the browser, enter http://netgear.cradle or http://192.168.100.1. A login prompt displays. Enter the cradle user name and password. -
Page 122: Add A Network Folder On A Usb Device
To add a network folder: Launch a web browser from a computer or wireless device that is connected to the Smart Cradle. In the address field of the browser, enter http://netgear.cradle or http://192.168.100.1. A login prompt displays. Enter the cradle user name and password. -
Page 123: Edit A Network Folder On A Usb Device
Launch a web browser from a computer or wireless device that is connected to the Smart Cradle. In the address field of the browser, enter http://netgear.cradle or http://192.168.100.1. A login prompt displays. Share a USB Device Attached to the AirCard Smart Cradle... -
Page 124: Approve Usb Devices
To approve USB devices: Launch a web browser from a computer or wireless device that is connected to the Smart Cradle. In the address field of the browser, enter http://netgear.cradle or http://192.168.100.1 A login prompt displays. Enter the cradle user name and password. -
Page 125: Safely Remove A Usb Device
To remove a USB disk drive safely: Launch a web browser from a computer or wireless device that is connected to the Smart Cradle. In the address field of the browser, enter http://netgear.cradle or http://192.168.100.1. A login prompt displays. Enter the cradle user name and password. - Page 126 AirCard Smart Cradle The USB Settings screen displays. Click the Safely Remove USB Device button. This takes the drive offline. Physically disconnect the USB device. Share a USB Device Attached to the AirCard Smart Cradle...
-
Page 127: Chapter 9 Access Usb Devices Through The Internet
Access USB Devices Through the Internet With Dynamic DNS, you can use the Internet to access a USB hard drive attached to the Smart Cradle’s USB port when you’re not home. This chapter includes the following sections: • Access USB Devices Through the Internet •... -
Page 128: Access Usb Devices Through The Internet
To set up FTP access: Launch a web browser from a computer or wireless device that is connected to the Smart Cradle. In the address field of the browser, enter http://netgear.cradle or http://192.168.100.1. A login prompt displays. Enter the cradle user name and password. - Page 129 AirCard Smart Cradle Select ADVANCED > USB Storage > Advanced Settings. Select the FTP (via Internet) check box. Click the Apply button. Your changes are saved. To limit access to the admin user, click the Edit button. In the Read Access list, select admin. In the Write Access list, select admin.
-
Page 130: Access Usb Devices Through The Internet With Ftp
AirCard Smart Cradle Access USB Devices Through the Internet with FTP You must first set up FTP through Internet access as described in Set Up FTP Access Through the Internet on page 128. To access a USB device with FTP from a remote computer: To download, launch a web browser. -
Page 131: Dynamic Dns
AirCard Smart Cradle NETGEAR Dynamic DNS (DDNS) service account and specify the account settings. See Up a New Dynamic DNS Account on page 132. FTP Directory: FTP://‘custom name’.mynetgear.com FTP Directory: FTP://‘custom name’.mynetgear.com FTP Directory: FTP://‘custom name’ . mynetgear.com Direc tory: FTP: //‘cus... -
Page 132: Set Up A New Dynamic Dns Account
AirCard Smart Cradle Set Up a New Dynamic DNS Account To set up Dynamic DNS and register for a free NETGEAR account: Launch a web browser from a computer or wireless device that is connected to the Smart Cradle. -
Page 133: Specify A Dns Account That You Already Use
For a www.no-ip or Dyn.com account, in the User Name field, type the user name for your account. For a NETGEAR account at www.no-ip, in the Email field, type the email address for your account. In the Password (6-32 characters) field, type the password for your DDNS account. -
Page 134: Change The Dynamic Dns Settings
To change your settings: Launch a web browser from a computer or wireless device that is connected to the Smart Cradle. In the address field of the browser, enter http://netgear.cradle or http://192.168.100.1. A login prompt displays. Enter the cradle user name and password. -
Page 135: Chapter 10 Share A Usb Printer
Download the ReadySHARE Printer Utility • Install the ReadySHARE Printer Utility • Use the Shared Printer • View or Change the Status of a Printer • Use the Scan Feature of a Multifunction USB Printer • Change NETGEAR USB Control Center Settings... -
Page 136: Install The Printer Driver And Cable The Printer
AirCard Smart Cradle Install the Printer Driver and Cable the Printer Some USB printer manufacturers (for example, HP and Lexmark) request that you do not connect the USB cable until the installation software prompts you to do so. To install the driver and cable the printer: On each computer on your network that shares the USB printer, install the driver software for the USB printer. -
Page 137: Install The Readyshare Printer Utility
Install the ReadySHARE Printer Utility You must install the ReadySHARE Printer utility on each computer that will share the printer. After you install it, the utility displays as NETGEAR USB Control Center on your computer. To install the utility: Double-click the ReadySHARE Printer utility setup file that you downloaded. -
Page 138: Use The Shared Printer
Select a language from the list and click the OK button. Some firewall software, such as Comodo, blocks NETGEAR USB Control Center from accessing the USB printer. If you do not see the USB printer displayed in the screen, you can disable the firewall temporarily to allow the utility to work. -
Page 139: View Or Change The Status Of A Printer
If another computer is already connected to the printer, your print job goes into a queue to wait to be printed. If your document does not print, use the NETGEAR USB Control Center to check the status. View or Change the Status of a Printer. -
Page 140: Use The Scan Feature Of A Multifunction Usb Printer
USB printer displayed in the Windows Printers and Faxes window is ready for print jobs. To use the scan feature of a multifunction USB printer: Click the NETGEAR USB Control Center icon Make sure that the printer status shows as Available. Share a USB Printer... -
Page 141: Change Netgear Usb Control Center Settings
The scanner screen displays so that you can use the USB printer for scanning. Change NETGEAR USB Control Center Settings You can stop the NETGEAR USB Control Center from starting automatically when you log in to Windows. You can also change the language and specify the time-out to release the printer connection. - Page 142 Click the NETGEAR USB Control Center icon Select Tools > Configuration. In the Language list, select a language. Click the OK button. The next time NETGEAR USB Control Center starts, the language changes. To specify the time-out: Click the NETGEAR USB Control Center icon...
- Page 143 AirCard Smart Cradle Select Tools > Configuration. In the Timeout field, type the number of minutes. The time-out is the number of minutes that a computer holds its connection to the printer when the connection isn’t being used. Click the OK button. Your change is saved.
-
Page 144: Chapter 11 Troubleshooting
Troubleshooting This chapter provides information to help you diagnose and solve problems you might have with your cradle. This chapter contains the following sections: • Troubleshoot with the LEDs • Cannot Log In to the Cradle • Cannot Access the Internet •... -
Page 145: Troubleshoot With The Leds
Make sure that the power adapter is securely connected to your cradle and securely connected to a working power outlet. Check that you are using the power adapter that NETGEAR supplied for this product. If the Power LED blinks slowly and continuously, the cradle firmware is corrupted. This can happen if a firmware upgrade is interrupted, or if the cradle detects a problem with the firmware. -
Page 146: Internet Led Is Off
AirCard Smart Cradle If all LEDs are still lit one minute after power-up, do the following: • Cycle the power to see if the cradle recovers. • Press and hold the Reset button to return the cradle to its factory settings. For more information, see Factory Settings on page 154. -
Page 147: Cannot Access The Internet
• If you are attempting to set up your NETGEAR cradle as a replacement for an ADSL gateway in your network, the cradle cannot perform many gateway services. For example, the cradle cannot convert ADSL or cable data into Ethernet networking information. -
Page 148: Troubleshoot Pppoe
To troubleshoot a PPPoE connection: Launch a web browser from a computer or wireless device that is connected to the Smart Cradle. In the address field of the browser, enter http://netgear.cradle or http://192.168.100.1 A login prompt displays. Enter the cradle user name and password. -
Page 149: Troubleshoot Internet Browsing
AirCard Smart Cradle The Connection Status screen displays. Check the Connection Status screen to see if your PPPoE connection is up and working. If the connection is not working, click the Connect button. The cradle continues to attempt to connect indefinitely. If you cannot connect after several minutes, the cradle might be set up with an incorrect service name, user name, or password, or your ISP might be experiencing a provisioning problem. -
Page 150: Cellular Network Connectivity
AirCard Smart Cradle Cellular Network Connectivity If you are not able to access the Internet through the cellular network, do the following: • Make sure you are in an area with cellular network coverage by checking if your phone has signal. •... -
Page 151: Test The Lan Path To Your Smart Cradle
AirCard Smart Cradle Test the LAN Path to Your Smart Cradle You can ping the cradle from your computer to verify that the LAN path to your cradle is set up correctly. To ping the cradle from a Windows computer: From the Windows toolbar, click Start and select Run. - Page 152 AirCard Smart Cradle where <IP address> is the IP address of a remote device such as your ISP DNS server. If the path is functioning correctly, messages display that are similar to those shown in Test the LAN Path to Your Smart Cradle on page 151.
-
Page 153: Appendix A Supplemental Information
Supplemental Information This appendix includes technical information about your Smart Cradle. This appendix covers the following topics: • Factory Settings • Technical Specifications... -
Page 154: Factory Settings
When the AirCard Smart Cradle restarts, all LEDs on the front panel light. Table 3. Factory default settings Feature Default behavior Smart Cradle User login URL netgear.cradle or http://192.168.100.1 login User name (case-sensitive) admin Login password (case-sensitive) password Internet... - Page 155 AirCard Smart Cradle Table 3. Factory default settings (continued) Feature Default behavior WiFi Wireless communication Enabled SSID name See the product label WiFi password or security key See the product label. Security WPA2-PSK (AES) Broadcast SSID Enabled Transmission speed Auto Country/region United States in the US;...
-
Page 156: Technical Specifications
AirCard Smart Cradle Technical Specifications Table 4. Cradle specifications Feature Description Data and routing protocols TCP/IP, RIP-1, RIP-2, DHCP, PPPoE, PPTP, Dynamic DNS, UPnP, and SMB Power adapter 240V, 50 Hz, input 12V/2.5A DC output Dimensions 157 x 230.4 x 148.75 mm (6.18 x 9.07 x 5.86 in.) Weight 800 g (1.76 lbs) Operating temperature...
Need help?
Do you have a question about the AirCard Smart Cradle DC112A and is the answer not in the manual?
Questions and answers