Otto Bock A200 Service Instructions Manual
Hide thumbs
Also See for A200:
- Instructions for use manual (142 pages) ,
- Using manual (152 pages) ,
- Instructions for use manual (22 pages)
Table of Contents
Advertisement
Advertisement
Table of Contents

Related Manuals for Otto Bock A200


Summary of Contents for Otto Bock A200
- Page 1 A200 Service Instructions...
-
Page 3: Table Of Contents
Service Instructions for the A200 Power Wheelchair Table of Contents Page 1 General Information ......................5 1.1 Preface ........................5 1.2 Intended Use ......................5 2 Safety Instructions ......................5 2.1 Explanation of Symbols ..................5 2.2 General Safety Instructions ...................5 2.3 Safety Instructions for the Use of Tools and Aids..........6 2.4 Safety Instructions for Service and Maintenance Tasks........7 2.5 S afety Instructions for Maintenance Tasks on Electrical Components ....8 2.6 ... - Page 4 8 VR 2 Wheelchair Control – Installation and Programming..........52 8.1 Overview .......................52 8.2 Installation and Wiring..................52 8.3 Programming Tools ....................53 8.3.1 Handheld Programming Device ................53 8.3.2 PC Programming Device ..................53 8.4 Programmable Parameters ..................54 8.4.1 Speed Settings ......................54 8.4.2 General Parameter Settings ..................57 8.4.3 Log Functions ......................58 9 Maintenance and Service Plan A200 ................59...
-
Page 5: General Information
These service instructions describe all regular maintenance tasks as well as repair and replace- ment tasks for the A200 from Otto Bock. They include all information required by dealers in or- der to correct functional and mechanical defects in components of the A200. -
Page 6: Safety Instructions For The Use Of Tools And Aids
NOTICE Risk of damage due to excessive heat or cold. The A200 may only be operated in the temperature range from -25 °C to +50 °C (-13 °F to 122 °F). It must not be operated at temperatures outside this range. -
Page 7: Safety Instructions For Service And Maintenance Tasks
Risk of damage due to improper preparation of maintenance tasks. • The A200 power wheelchair must be turned off and the fuse must be removed for all maintenance tasks. This does not apply to functional tests of the electrical components. -
Page 8: S Afety Instructions For Maintenance Tasks On Electrical Components
Check the operating performance of the A200 power wheelchair after cleaning. INfORMATION The tyres of the A200 power wheelchair contain chemical substances that can react with other chemi- cal substances (e.g. cleaning agents, acids etc.). 2.5 S afety Instructions for Maintenance Tasks on Electrical Components CAUTION Risk of injury while working on the battery. -
Page 9: Safety Instructions For Disposal
The A200 has been tested according to EMC regulations. The following particularities must be ob- served during operation and communicated to the user: • The driving characteristics of the A200 can be affected by electromagnetic fields (mobile phones or other radiating devices). Therefore all mobile devices must be turned off when driving. -
Page 10: Transportation And Storage
NOTICE Risk of damage due to falling. The maximum net weight of the A200 power wheelchair is 66 kg / 145 lbs. Hoisting devices and transportation vehicles used for transportation must have sufficient ca- pacity. -
Page 11: Storage
3.2 Storage INfORMATION If the A200 power wheelchair is not moved for several days, permanent colour changes may occur where the wheelchair comes into contact with the surface it is standing on. Otto Bock therefore rec- ommends parking the wheelchair on a suitable surface during extended periods of disuse. -
Page 12: Information Display
fig. 2 Tools fig. 3 Handheld programming device 5 Information Display INfORMATION Please see Section 7 “Error Diagnosis” for information on the display of error messages using the bat- tery capacity LED indicator or the handheld programming device / PC software. The wheelchair functions are displayed on the LED display fields of the control panel: Display function... -
Page 13: Service And Maintenance
Prevent deep discharge of the batteries in order to avoid loss of functionality and permanent battery damage. Ensure correct polarity is used when connecting the batteries and battery capacity meter. The A200 power wheelchair comes factory-equipped with two maintenance-free 32 Ah/ 12 V GEL batteries. 6.2.1 Battery Charging NOTICE Risk of damage due to incorrect battery handling. - Page 14 Driving for an extended period of time in the lower range of the battery indicator will result in deep discharge and therefore battery damage. In addition, there is the risk that the A200 power wheelchair may stop due to zero battery capacity and put the user in a dangerous situation.
-
Page 15: Battery Replacement
Display function All LEDs light up for a moment Once the connection to the mains supply has been established Yellow LED is lit Battery is charging Yellow LED flashes Battery is charged to 90 % Battery is fully charged; battery charger has changed to trickle Green LED is lit charge Incorrect polarity (immediately unplug the battery charger from... -
Page 16: Fuse Replacement
fig. 5 Battery pack bottom side 6.2.3 fuse Replacement The two 60 A fuses are located in the fuse holders on the bottom side of the battery packs (Fig. 5, item B). Preparation: ❒ Remove the battery pack (see Section 6.2.2). Steps: 1. -
Page 17: Contact Strip Replacement
fig. 6 Battery cable on the contact strip fig. 7 Controller with connector plugs 1 Control device connector 2 Motor 1 connector 3 Motor 2 connector 4 Battery cable connector 6.2.5 Contact Strip Replacement The contact strip is used to establish the connection between the battery packs and the main battery cable. -
Page 18: Controller Replacement
Steps: 6. Disconnect the old main battery cable from the contact strip (Fig. 6). 7. Remove the contact strip and replace, if necessary (Fig. 8). Properly reassemble all components upon completion of the work. fig. 8 Contact strip replacement 6.3 Controller Replacement INfORMATION Ensure correct polarity is used when connecting the cables. -
Page 19: Side Panels
fig. 9 Removing the protective cover / connectors on the controller 1 Control device connector 2 Motor 1 connector 3 Motor 2 connector 4 Battery connector 6.4 Side Panels INfORMATION For adjusting the side panel attachment devices (width setting), refer to Section 6.8.7. 6.4.1 Adapting / Replacing the Side Panels A side panel attachment device is located on the left and right sides of the seat frame. - Page 20 fig. 10 Adapting the side panel to the forearm length b) Adapting to the upper arm length Steps: 1. Loosen the set screw at the top of the side panel attachment device. 2. Move the arm rest to the required height. 3.
-
Page 21: Replacing The Clothing Protector
6.5 Footrests 6.5.1 Adapting / Replacing the footrests Various footrest systems with the same adjustment and mounting options are available for the A200 power wheelchair. The length and position of the footrests can be individually adjusted to the wheelchair user. - Page 22 As an option to the standard version, elevating footrests with calf and knee pads may be installed. Tools: ❒ 2 x Allen wrench, 5 mm ❒ Allen wrench, 6 mm ❒ Ring or open-end wrench, 10 / 13 mm a) Adapting to the lower leg length Steps: 1.
- Page 23 b) Adapting to thigh length (adjusting the footrest receiver) This setting is changed on the footrest holders that are mounted to the seat frame. Steps: 1. Pull the footrest lock lever back and pull the footrest up and out (see Figure 14). 2.
- Page 24 fig. 17 Replacing the knee pad e) Replacing the calf pad The calf pad is attached to the footrest tube. Steps: 1. Remove the footrest. 2. Loosen the Allen head screw. 3. Remove the calf pad or replace if required. Properly reassemble all components upon completion of the work.
-
Page 25: Replacing The Footplate
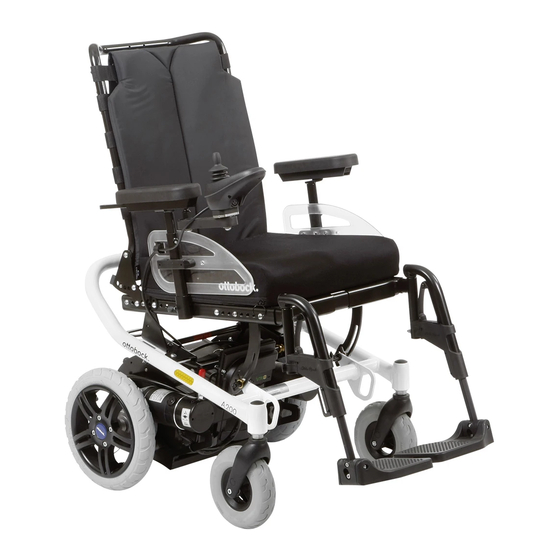
Replace the casing of pneumatic tyres if it is bald or shows signs of cracking or other damage. The A200 power wheelchair propelled by two 12.1” rear wheels and steered by means of two 8” front wheels. -
Page 26: Replacing The Casing Or Inner Tube Of Pneumatic Tyres
6.6.3 Replacing the Drive Wheel NOTICE Risk of damage due to improper preparation of maintenance tasks. Use suitable objects such as wooden blocks to secure the A200 power wheelchair against sliding or tipping. The drive wheels must rotate freely. Tools: ❒... -
Page 27: Replacing The Wheel Flange
Steps: 1. Jack up the drive wheels. 2. Loosen all four Allen head screws, remove the wheel and replace if required. Properly reassemble all components upon completion of the work. INfORMATION When installing the wheel, tighten all four Allen head screws to a torque of 25 Nm (18.4 ft.lbf/221 in.lbf). fig. -
Page 28: Replacing The Steering Caster
6.6.5 Replacing the Steering Caster NOTICE Risk of damage due to improper preparation of maintenance tasks. Use suitable objects such as wooden blocks to secure the A200 power wheelchair against sliding or tipping. The drive wheels must rotate freely. INfORMATION When installing the steering caster, ensure that the steering caster and drive wheel are aligned. -
Page 29: Replacing The Caster Fork
6.6.6 Replacing the Caster fork INfORMATION Do not tighten the fork too snugly; the fork must be able to turn by approximately 180° at a time. The caster forks for the A200 power wheelchair are supplied as complete units. Tools: ❒ Socket, 19 mm Steps: 1. -
Page 30: Replacing The Anti-Tipper Wheels
6.6.7 Replacing the Anti-Tipper Wheels Tools: ❒ Allen wrench, size 4 ❒ Ring or open-end wrench, 10 mm Steps: 1. Loosen the mounting screw. 2. Remove the anti-tipper wheel and replace if required. Properly reassemble all components upon completion of the work. fig. -
Page 31: Replacing The Control Panel Holder
27 Replacing the control panel 6.7.2 Replacing the Control Panel Holder The control panel holder for the A200 power wheelchair is clamped to the underside of the arm rest with an iron rail. Preparation: ❒ Remove the side panel. -
Page 32: Seats
6.8 Seats CAUTION Risk of burns in the proximity of fire. The back rest and seat bottom of the A200 power wheelchair are flame retardant but nevertheless flammable. Therefore utmost caution is required near any sources of open flame or sparks, especially lit cigarettes. -
Page 33: Standard Seat: Replacing / Adjusting The Back Upholstery
6.8.2 Standard Seat: Replacing / Adjusting the Back Upholstery Steps: 1. Completely remove the back upholstery and readjust, remove or replace the hook and loop straps according to individual user requirements. fig. 30 Standard seat: back upholstery 6.8.3 Standard Seat: Replacing the Seat Brackets In conjunction with the quick clamps, the seat brackets serve to adjust the seat inclination. -
Page 34: Standard Seat: Adjusting The Seat Angle
Ensure the quick clamps are snugly tightened after all seat angle adjustments. The A200 power wheelchair offers seat angle settings in 3 different positions (0°, 3°, 6°). For setting the position, the two quick clamps are used which are located at the front below the seat. -
Page 35: Standard Seat: Replacing The Seat Frame
fig. 33 Replacing the seat plate of the standard seat 1 Seat cushion 2 Seat plate 6.8.6 Standard Seat: Replacing the Seat frame Preparation: ❒ Remove the side panels. ❒ Remove the footrest receiver (see Section 6.5.1 b). ❒ Remove the seat brackets (see Section 6.8.4). ❒... -
Page 36: Standard Seat: Replacing The Seat Angles
6.8.7 Standard Seat: Replacing the Seat Angles INfORMATION The seat angle is part of the seat inclination bracket set. The seat angles connect the seat frame to the base frame. Preparation: ❒ Remove the seat frame (see Section 6.8.6). Tools: ❒... -
Page 37: Installing The Contour Seat (Option)
fig. 36 Replacing the side panel attachment device 1 Side panel attachment device 6.8.9 Installing the Contour Seat (Option) The optional contour seat is attached to the seat plate with hook and loop straps. You can mount the contour seat on the frame of the standard seat. Tools: ❒... -
Page 38: Base Frame
6.10.1 Replacing the Complete Drive Unit CAUTION Risk of injury due to electric current. Before working on the drive unit, turn off the A200 power wheel- chair. The drive unit can be separated from the base frame and replaced if required without the use of tools. -
Page 39: Replacing The Drive Motor
6.10.2 Replacing the Drive Motor CAUTION Risk of injury due to electric current. Turn off the control unit of the A200 power wheelchair and dis- connect the plug connections to the controller before performing any work on the drive motors. -
Page 40: Accessories
Steps: 1. Disconnect the motor connection on the controller. 2. Loosen the four self-locking nuts. 3. Remove the motor and replace if required. Properly reassemble all components upon completion of the work. fig. 40 Replacing the drive motor 6.11 Accessories 6.11.1 Retrofitting the Mechanical Back Angle Adjustment For installation of the mechanical back angle adjustment device, a back frame with mounting brace to receive the gas compression spring and a cross brace (including bearing plates) are... -
Page 41: Attaching The Bowden Cable (For Back Angle Adjustment)
6. Hook the bolt into the receiver on the cross tube at the bottom of the back frame. 7. Install the Bowden cable and mount it to the arm rest on the left or right (see Section 6.11.2). fig. 41 Retrofitting the mechanical back angle adjustment 6.11.2 Attaching the Bowden Cable (for Back Angle Adjustment) Preparation:... -
Page 42: Retrofitting The Curb Climbing Assist
42 Attaching the Bowden cable 6.11.3 Retrofitting the Curb Climbing Assist INfORMATION The central curb climbing assist of the A200 cannot be used in combination with a single-panel footrest. Preparation: ❒ Remove the footrests. Tools: ❒ Allen wrench, 5 mm Steps: 1. -
Page 43: Retrofitting The Rear View Mirror
6.11.4 Retrofitting the Rear View Mirror Tools: ❒ Allen wrench, 3 mm Steps: 1. Mount the rear view mirror opposite the control panel holder to the C-profile of the arm rest. 2. Individually adjust it to user requirements by turning it manually. fig. -
Page 44: Retrofitting The Lap Belt (Option)
46 Retrofitting the lap belt 6.11.7 Retrofitting the Swivelling Control Panel Holder (Option) To be able to use the swivelling control panel holder for the A200 power wheelchair, a new holder must be mounted underneath the control panel. Preparation: ❒... -
Page 45: Additional Lighting
All problems that have ever occurred are saved in a list and can be retrieved, e. g. in case of a general overhaul of the A200 (see Section 8.4.3). The saved data can be used to determine future service and maintenance intervals, for example. -
Page 46: Diagnostic Steps
7.1 Diagnostic Steps For an efficient and successful error diagnosis, proceed as follows: ❒ Verify whether the error was generated for a concrete reason or if the error was displayed sporadically. ❒ Find out the type of error. ❒ Check the possible causes in the error type table (Section 7.3, Table 6) and perform the recommended checks and corrective actions. - Page 47 The following table lists the error messages/flashing signals on the battery capacity LED indi- cator as well as causes and corrective measures: flashing LED(s) Error/warning Cause Measure Low battery capacity Battery deep dis- Charge the battery Battery cable malfunc- charge tioning / faulty connection Check the connection to the to the battery...
-
Page 48: Diagnosis Using The Handheld Programming Device (S. Also Section 8.3)
7.3 Diagnosis Using the Handheld Programming Device (s. also Section 8.3) INfORMATION The programming device may only be connected to the control system, once the LED indicator has started flashing. If the programming device was connected before the indicator started flashing, the error code will not be displayed. The following table lists the error codes and error types as well as references to the detailed error descriptions. - Page 49 Cause / Measures Low battery voltage The control system has detected a decline of the battery voltage to below 16 V. Check the condition of the batteries and the connections to the control system. If the error per- sists, there might be a defect in the power module. If error code 2C02 applies, the control system creates a log about the frequency of INfORMATION switch-offs caused by low battery voltage.
- Page 50 Cause / Measures Possible error in the control system The control system has detected an internal problem. The control system may only be repaired by an authorised specialist. Error in the electromagnetic brake The control system has detected a problem in the electromagnetic brakes or in the connections of the brakes.
-
Page 51: Other Errors (Not Displayed)
7.4 Other Errors (not displayed) These are errors that are not displayed by the handheld programming device or the LED indicator. The reasons can be: The control cannot be switched on, the error is not serious enough, or the control system cannot detect the error for any other reason. Error Possible cause Measure... -
Page 52: Vr 2 Wheelchair Control - Installation And Programming
8 VR 2 Wheelchair Control – Installation and Programming 8.1 Overview The VR2 control offers the possibility to display causes of error messages. Error sources in the drive section and in the electric options are indicated by flashing of the LEDs of the control unit (see Section 7.2). -
Page 53: Programming Tools
8.3 Programming Tools WARNING Risk of injury as a result of incorrect programming. Programming may only be conducted by special- ist staff with in-depth knowledge of the VR2 control. Incorrect programming could result in an unsafe set-up of a wheelchair for a user. Otto Bock or the manufacturer of the control accept no responsibility for losses of any kind if the programming of the control system is altered from the factory pre-set values. -
Page 54: Programmable Parameters
8.4 Programmable Parameters The following programmable parameters represent a selection. Information on other program- mings is contained in the document “VR2 SERIES WHEELCHAIR CONTROL SYSTEM; OP- ERATION, INSTALLATION & PROGRAMMING”. 8.4.1 Speed Settings Parameter Setting range Description Acceleration Single steps Adjusts the value for forward and reverse acceleration of the from 0 to 100 wheelchair. - Page 55 Parameter Setting range Description Power Single steps Sets the power of the wheelchair. Power is the ability of a wheel- from 0 to 100 chair to climb a hill or overcome an obstacle. If it is set to 100% then the wheelchair will provide full power. Values below 100% will result in reduced power.
- Page 56 Parameter Setting range Description Minimum 1% increments Adjusts the minimum value for forward and reverse decelera- Deceleration of the parame- tion of the wheelchair. ter Deceleration This percentage of the Deceleration value occurs when the speed setting is at 1. Programming example: •...
-
Page 57: General Parameter Settings
8.4.2 General Parameter Settings Parameter Setting range Description Sleep Timer 1-minute incre- Sets the period of time before the control system will turn itself ments from 0 to off if the wheelchair is not driven. 30 min. If the time is set to 0 the system will never turn itself off. Joystick Throw This allows programming so that full speed can be reached with a reduced joystick movement (throw). -
Page 58: Log Functions
8.4.3 Log functions The following functions are logged by the VR2 control and can be read with corresponding hardware: function Description Memory Functions The VR2 has a timer and a diagnostic log. These can be read and cleared using the PP1a programming device or the PC programming device. Read Timer The VR2 has a timer which records how long the wheelchair is in use. -
Page 59: Maintenance And Service Plan A200
9 Maintenance and Service Plan A200 Customer: Re-use Year of manufacture: Serial no.: A200 general condition Driving report: Component (group) Carefully check all components listed here for correct function, setting, damages or deformations, and whether the screw connections are tightened! - Page 60 Maintenance and Service Plan A200 7 Side panel Attachment devices Clothing protector 8 footrests Receivers Elevating footrest 9 Options Belt Curb climbing assist Adapter for headrest Mechanical back adjustment Comments: The maintenance service was carried out Place / date: Signature:...
- Page 63 Kundenservice/Customer Service Europe Asia/Pacifi c Otto Bock Australia Pty. Ltd. Otto Bock Romania srl Otto Bock HealthCare Deutschland GmbH Suite 1.01, Century Corporate Centre Șos de Centura Chitila-Mogoșoia Nr. 3 Max-Näder-Str. 15 · D–37115 Duderstadt 62 Norwest Boulevarde · Norwest Business Park RO–Chitila 077405, Jud.
- Page 64 Ihr Fachhändler/Your specialist dealer: Versandanschrift für Rücksendungen/Address for Returns: Otto Bock Manufacturing Königsee GmbH Lindenstraße 13 · 07426 Königsee/Germany Hersteller/Manufacturer: Otto Bock Mobility Solutions GmbH Lindenstraße 13 · 07426 Königsee/Germany Phone +49 69 9999 9393 · Fax +49 69 9999 9392 ccc@ottobock.com ·...
Need help?
Do you have a question about the A200 and is the answer not in the manual?
Questions and answers
comment installer la batterie
@antonio perez barreto
To install the battery for the Otto Bock A200:
1. Release the seat lock by pulling the release strap and tilting the locking bar backward.
2. Remove the old battery packs from under the seat.
3. Insert the new battery packs into the drive frame, ensuring:
- The red arrows on the battery packs point in the driving direction.
- The plug connectors engage correctly with the battery contacts.
4. Secure the battery packs by locking the locking lever.
5. Reconnect the main battery cable to the contact strip and controller, ensuring correct polarity.
6. Use new cable ties to secure the cable and cut off excess ends.
7. Do not open the battery packs to avoid damage.
This answer is automatically generated