
Related Manuals for StarTech.com 16 Port StarView CAT5 UTP KVM


Summary of Contents for StarTech.com 16 Port StarView CAT5 UTP KVM
-
Page 1: Instruction Manual
StarView CAT5 UTP KVM 8 Port StarView CAT5 UTP KVM 16 Port StarView CAT5 UTP KVM Instruction Manual *8 Port Model Shown... - Page 2 Where they occur these references are for illustrative purposes only and do not represent an endorsement of a product or service by StarTech.com, or an endorsement of the product(s) to which this manual applies by the third-party company in question. Regardless of any direct acknowledgement elsewhere in the body of this document, StarTech.com hereby acknowl-...
-
Page 3: Table Of Contents
Instruction Manual Instruction Manual Table of Contents Safety Precautions ............... iii Introduction ..................1 Features ..................1 Package contents ................1 Hardware Guide ................2 Installation ..................6 Stacking Switches and Rack Mounting ........6 Single Station Installation ............8 Server Interface Module Installation ..........10 SV5PS2S (PS2 Module)..............10 SV5USBS (USB Module) ............10 Daisy Chaining ................11... - Page 4 Instruction Manual Hotkey Port Control ..............27 Auto Scanning ................28 Skip Mode..................29 Hotkey Beeper Control ..............30 Hotkey Summary Table ..............30 Keyboard Emulation ..............32 Mac Keyboard................32 Sun Keyboard ................33 Firmware Upgrades ............... 34 Introduction ..................34 Performing the Upgrade ..............35 Server Interface Module Upgrade ..........37 Performing the Upgrade ..............38 Firmware Upgrade Recovery ............39 Connection Tables .................
-
Page 5: Safety Precautions
Instruction Manual Safety Precautions The following precautions should be employed to ensure safe, reliable operation of this device: Read the enclosed instructions, and save them for future reference • Do not place the device on an unstable surface. If the device falls, serious damage will result •... - Page 6 Instruction Manual combined ampere rating of all products used on the cord does not exceed the extension cord ampere rating. Make sure that the total of all devices connected to the wall outlet does not exceed 15 amperes • To help protect your system from sudden, transient increases and decreases in electrical power, use a surge suppressor, line conditioner or Uninterruptible Power Supply (UPS) •...
- Page 7 Instruction Manual need for service The device does not operate normally, when following the operating instructions • Only adjust controls that are described in the following operating instructions. Improper adjustment of other controls may result in damage that could lead to extensive repair...
-
Page 8: Introduction
Instruction Manual Introduction Thank you for purchasing a StarTech.com CAT 5 KVM switch. Allowing control of up to 8 (SV831DUTP) or 16 (SV1631DUTP) computers over a CAT 5 cable connection (between the switch and the slave computers), this device provides a cost-effective solution that’s simple to install, and equally easy to configure and control through pushbutton operation, hot- key commands or the convenient On-Screen Display. -
Page 9: Hardware Guide
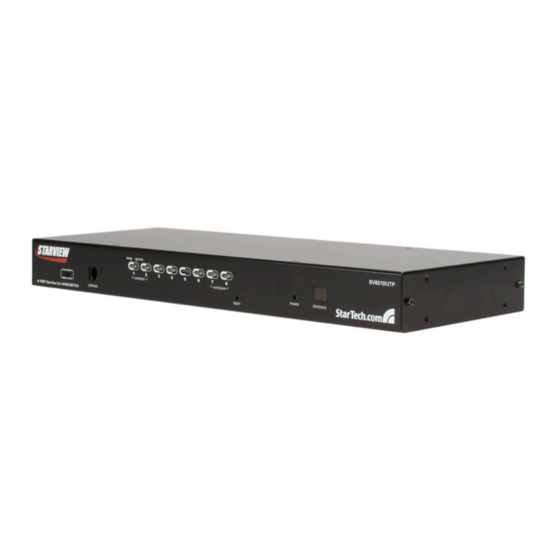
Instruction Manual Hardware Guide Front Panel View SV831DUTP 1&2 Front Panel View SV1631DUTP 1&2 Please refer to the tables on pages 3 and 4 for descriptions of the above illustrations. - Page 10 Instruction Manual Component Functions (Front Panel) Component Description a. Press a switch to give the KVM focus to the computer attached to its corresponding port. Port b. Simultaneously pressing buttons 1 and 2 for 3 Selection seconds performs a Keyboard and Mouse Reset. Switches c.
- Page 11 Instruction Manual Component Description The Firmware Upgrade Cable that transfers the firmware Firmware upgrade data from the administrator’s computer to the Upgrade SV831DUTP / SV1631DUTP, plugs into this RJ-11 Port connector. Lights to indicate that the SV831DUTP / SV1631DUTP is Power LED powered up and ready to operate.
- Page 12 Instruction Manual Component Functions (Rear Panel) Component Description Power Socket Power Switch When Daisy Chaining Units, the daisy chain cables plug in here. The port on the left is Daisy Chain Ports the Chain In port; the port on the right is the Chain Out port.
-
Page 13: Installation
Instruction Manual Installation Please ensure you have reviewed the safety precautions listed on page iii - v, before proceeding with installation. Please make sure that power to all of the devices that will be connected to the switch has been shut off; similarly, you must unplug the power cords of any computers that have the Keyboard Power On function. -
Page 14: Rack Mounting
Instruction Manual Please Note: To ensure adequate ventilation, allow at least 5.1cm (2”) on each side, and 12.7cm (5”) at the back for power cord and cable clear- ance. Rack Mounting SV831DUTP and SV1631DUTP can be mounted in a 19” (1U) rack. The mounting brackets can screw into either the front or the back of the unit so that it can attach to the front or the back of the rack. -
Page 15: Single Station Installation
Instruction Manual M3 x 8 Philips head hex M3 x 8 Philips head hex 3. Slide the unit into the front or rear of the rack and secure it to the rack. Single Station Installation In a Single Stage installation, there are no additional KVM switches cas- caded down from SV831DUTP / SV1631DUTP. - Page 16 Instruction Manual Plug the female end of the power cord into the SV831DUTP/ SV1631DUTP Power Socket; plug the male end into an AC power source. Turn on the power to SV831DUTP / SV1631DUTP. After the switch is powered up, you can turn on the computers.
-
Page 17: Server Interface Module Installation
Instruction Manual Server Interface Module Installation SV5PS2S (PS2 Module) SV5USBS (USB Module) -
Page 18: Daisy Chaining
40. To set up a daisy chained installation, do the following: Use a Straight Through DB25 M/F cable ( see StarTech.com part num- bers SC6MF or SC10MF) to connect the Chain Out port of the parent... -
Page 19: Daisy Chain Installation Diagram
Instruction Manual displayed before powering on the next station. c) After all stations are up, power on the computers. Daisy Chain Installation Diagram... -
Page 20: Basic Operation
Instruction Manual Basic Operation Port Selection SV831DUTP / SV1631DUTP installations provide three ways to obtain instant access to any computer in your installation: Manual, OSD, and Hotkey. Manual For manual port selection, simply press the Port Switch that corresponds with the device you want to access. For cascaded switches, first press the Port Switch on the parent unit that the cascaded switch is connected to, then press the Port Switch on the cascaded switch that corresponds to the device you wish to access. -
Page 21: Powering Off And Restarting
Instruction Manual and plugging into a new one. Following this, in order for the OSD menus to accordingly reflect the change, you must reset the OSD. See RESET STATION IDS, page 24, for details. Hot Plugging KVM Ports After switching KVM ports, in order for the OSD menus to accurately reflect the change, you must manually reconfigure the OSD information for the new Port information. -
Page 22: Port Id Numbering
Instruction Manual more than one station, power up the highest station first and work your way down to the lowest station. Wait for each station to display its Station ID on the front panel LED before powering on the subsequent station. - Page 23 Instruction Manual Please Note: You can optionally change the Hotkey to the Ctrl key, in which case you would tap [Ctrl] twice. With this method, the Ctrl keys used must be on the same side (both left, or both right). The OSD incorporates a two level (Administrator / User) password sys- tem.
-
Page 24: Osd Navigation
Instruction Manual OSD Navigation [Esc] • To dismiss the menu, and deactivate the OSD, press [F8] • To Logout, press Up and • To move up or down through the list one line at a time, use the Down Arrow Keys. If there are more list entries than there is room for on the Main Screen, the screen will scroll. - Page 25 Instruction Manual To access an OSD function: Press a Function Key on the keyboard. In the Submenus that appear, make your choice by scrolling the Highlight Bar to it, then pressing [Enter]. [Esc] to return to the previous menu level. Press F1 GOTO Pressing [F1] activates the GOTO function.
- Page 26 Instruction Manual Move the Highlight Bar to the choice you want, then press [Enter]. An icon appears before the choice indicating that it is currently selected. F3 SET This function allows the Administrator and each User to personalize/con- figure their own working environment. A separate profile for each is stored by the OSD and is activated according to the Username that is provided during Login.
- Page 27 Instruction Manual Setting Function QVIEW + Lists only the ports that have been selected as Quick View Ports and are connected to powered computers POWERED ON Selects how the Port ID is displayed PORT ID Options include: The Port Number alone (PORT DISPLAY NUMBER), the Port Name alone (PORT NAME), or the Port Number plus the Port Name (PORT NUMBER...
- Page 28 Instruction Manual F4 ADM F4 is an Administrator only function, which allows the Administrator to configure the overall operation of the OSD. To change a setting use the Up and Down Arrow Keys to move the highlight bar, then press [Enter]. Following item selection, a submenu with further choices appears.
- Page 29 Instruction Manual Setting Function To help remember which computer is attached to a particular port, every port can be given a name. This function allows the Administrator to create, modify, or delete port names. To Edit a port name: 1. Use the Navigation Keys to move the highlight bar to the port you want, then press [Enter].
- Page 30 Instruction Manual Setting Function This function lets the Administrator select which Ports to include as Quick View ports: • To select/deselect a port as a Quick View Port, use the Navigation Keys to move the highlight bar to it, then press [Enter] •...
- Page 31 Instruction Manual Setting Function RESET STATION If you change the position of one of the Stations in the daisy chain, the OSD settings will no longer apply. This function directs the OSD to rescan the station positions of the entire installation and updates the OSD so that the OSD Station information corresponds to the new physical layout.
- Page 32 Instruction Manual Setting Function ADAPTER In order to upgrade the Adapter Cables’ firmware, UPGRADE you must first invoke its Upgrade Mode with this setting F5 SKP Pressing [F5] invokes Skip (SKP) Mode. This function enables you to easily skip backward or forward - switching the console focus from the currently active computer port to the previous or next available one.
- Page 33 Instruction Manual Auto Scan Mode. • If the scanning stops on an empty port, or one where the computer is attached but is powered Off, the monitor screen will be blank, and the mouse and keyboard will have no effect. Simply wait - after the Scan Duration time is up, the Scan function will move on to the next port.
-
Page 34: Hotkey Operation
Instruction Manual Hotkey Operation Hotkey Port Control Hotkey Port Control allows you to assign KVM focus to a particular com- puter directly from the keyboard. SV831DUTP/SV1631DUTP provides the following Hotkey Port Control features: • Selecting which port is active • Auto Scanning •... -
Page 35: Auto Scanning
Instruction Manual input. Pressing [Esc] exits Hotkey Mode. Selecting the Active Port Each Computer Port is assigned a Port ID. You can directly access any computer on the installation with a Hotkey combination that specifies the Port ID of the Computer Port that the computer is connected to. The steps involved are: Invoke Hotkey Mode. -
Page 36: Skip Mode
Instruction Manual Invoking Auto Scan To start Auto Scanning, key in the following Hotkey combination: Invoke Hotkey Mode. [A]. After you press A, you automatically exit Hotkey Mode, and Press enter Auto Scan Mode, and Auto Scanning begins. • While you are in Auto Scan Mode, you can pause the scanning in order to maintain focus on a particular computer by pressing [P]. -
Page 37: Hotkey Beeper Control
Instruction Manual → Skips from the current port to the next accessible port ↑ Skips from the current port to the last accessible port of the previous station ↓ Skips from the current port to the first accessible port of the next station •... - Page 38 Instruction Manual [Port ID] Switches access to the computer that [Enter] corresponds to that Port ID Sets the Auto Scan interval to n [T] [n] [Enter] seconds - where n is a number from 1 - 255 Invokes Auto Scan Mode. When Auto Scan Mode is in effect, [P] pauses Auto Scanning.
-
Page 39: Keyboard Emulation
Instruction Manual Keyboard Emulation Mac Keyboard The PC compatible (101/104 key) keyboard can emulate the functions of the Mac keyboard. The emulation mappings are listed in the table below: PC Keyboard Mac Keyboard [Shift] Shift [Ctrl] Ctrl ÿ [Ctrl] [1] [Ctrl] [2] [Ctrl] [3] [Ctrl] [4]... -
Page 40: Sun Keyboard
Instruction Manual Sun Keyboard The PC compatible (101/104 key) keyboard can emulate the functions of the Sun keyboard when the Control key [Ctrl] is used in conjunction with other keys. The corresponding functions are shown in the table below: PC Keyboard Sun Keyboard [Ctrl] [T] Stop... -
Page 41: Firmware Upgrades
3. Using a straight through DB25 M/F serial cable (please see Accessory Products from StarTech.com) connect a COM port on the computer to which the update has been downloaded to the Firmware Upgrade Port... -
Page 42: Performing The Upgrade
Instruction Manual Please Note: On a daisy chained installation, connect the cable to the First Station (Master) unit. The chained stations (Slaves) will receive the upgrade via the daisy chain cables. Shut down all of the computers - but not the Stations - on your KVM installation. - Page 43 Instruction Manual If you didn’t enable Check Firmware Version, the Utility installs the upgrade files without checking whether they are a higher level or not. As the Upgrade proceeds, status messages appear in the Status Messages panel and the progress toward completion is shown on the Progress bar.
-
Page 44: Server Interface Module Upgrade
To find the latest upgrade packages and informa- tion relating to them, please visit: http://www.startech.com/Downloads Before You Begin to prepare for the firmware upgrade, do the following: From a computer that is not part of your KVM installation go to our Internet support site and choose the model name that relates to your device to get a list of available Firmware Upgrade Packages. -
Page 45: Performing The Upgrade
Instruction Manual select the F4ADM function. 5. Scroll down to ADAPTER UPGRADE. Press [Enter]. 6. In the screen that comes up, press [Y] to invoke Upgrade Mode. Please Note: A message appears reminding you to connect an adapter cable. The message appears even if you have adapter cables connected. -
Page 46: Firmware Upgrade Recovery
Instruction Manual upgrade files without checking whether they are a higher level or not. As the Upgrade proceeds, status messages appear in the Status Messages panel, and the progress toward completion is shown on the Progress bar. After the upgrade has completed, a screen will appear informing you that the procedure was successful. -
Page 47: Connection Tables
Instruction Manual Recovery Switch back to the Normal position. Plug the adapter cable back into the computer. This completes the recovery procedure. Connection Tables The following table indicates the relationship between the number of SV831DUTP/SV1631DUTP units and the number of computers that they control: SV831DUTP # of... - Page 48 Instruction Manual SV1631DUTP # of # of # of # of Slaves Slaves Slaves Slaves Units Units Units Units 129 - 257 - 385 - 1 - 16 145 - 273 - 401 - 17 - 32 161 - 289 - 417 - 33 - 48 177 -...
-
Page 49: Administrator Login Failure
Instruction Manual Administrator Login Failure If you are unable to perform an Administrator login (because the User- name and Password information has become corrupted or you have forgotten it, for example) you can clear the login information with the following procedure: 1. -
Page 50: Osd Factory Default Settings
Instruction Manual OSD Factory Default Settings Setting Default OSD Hotkey [Scroll Lock] [Scroll Lock] Port ID Display Position Upper Left Corner Port ID Display Duration 3 Seconds Port ID Display Mode The Port Number plus the Port Name Scan Duration 5 Seconds Scan/Skip Mode Screen Blanker... -
Page 51: Specifications
Instruction Manual Specifications Function SV831DUTP SV1631DUTP Direct Slave Maximum (Daisy Connections Chained) OSD (On Screen Display); Port Selection Hotkeys Pushbutton Switches 1 x 6-pin Mini-DIN F (Purple) Console Video 1 x HDB-15 F Mouse 1 x 6-pin Mini-DIN F (Green) Connectors KVM Ports 8 x RJ-45... - Page 52 Instruction Manual Specifications - Cont’d Function SV831DUTP SV1631DUTP Emulation Keyboard / Mouse PS/2 Scan Interval 1–255 secs. 1600 x 1200 @ 60Hz (30m); Video 1280 x 1024 @ 60Hz (40m); DDC2B Operating Temp. 0–50o C Environment Storage Temp. -20–60o C Humidity 0–80% RH Housing...
-
Page 53: Technical Support
Limitation of Liability In no event shall the liability of StarTech.com Ltd. and StarTech.com USA LLP (or their officers, directors, employees or agents) for any damages (whether direct or indirect, special, punitive, incidental, consequential, or... - Page 54 StarTech.com has been making “hard-to-find easy” since 1985, providing high quality solutions to a diverse IT and A/V customer base that spans many channels, including government, education and industrial facilities to name just a few. We offer an unmatched selection of computer parts, cables, A/V products, KVM and Serv-...
Need help?
Do you have a question about the 16 Port StarView CAT5 UTP KVM and is the answer not in the manual?
Questions and answers