
Related Manuals for Mircom TX3 Series


Summary of Contents for Mircom TX3 Series
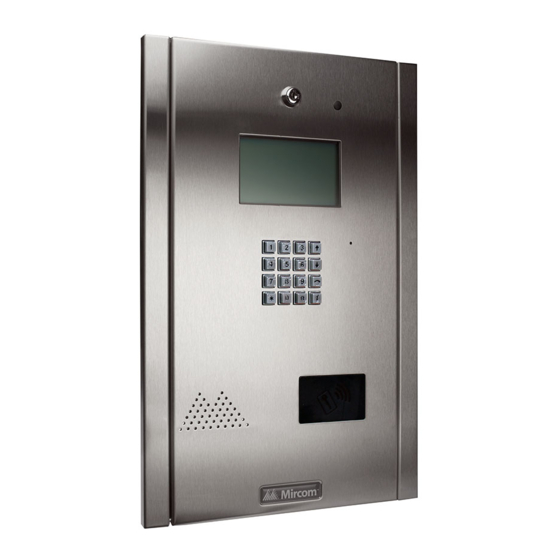
- Page 1 TX3 Series TELEPHONE ACCESS SYSTEM User Guide - Keypad Configuration Version 1.1 Mircom 1 (42) LT-968 Copyright 2012...
- Page 2 It is subject to change without notice, and should not be construed as a commitment by Mircom. Mircom assumes no responsibility or liability for any errors or inaccuracies that appear in this book.
-
Page 3: Table Of Contents
Contents Introduction Introducing the TX3 Telephone Access System Warranty and Special Notices About This Manual Configuration Using the TX3 Telephone Access System Frequently Used Functions Viewing Configuration Information Entering Configuration Mode Keypad Navigation Exiting Configuration Mode Main Door DTMF Setup Auxiliary Door DTMF setup Sensitivity DTMF setup 2.10... - Page 4 Telephone Access System User Guide 4 (42) Version 1.1 LT-968 Copyright 2012...
- Page 5 List of Figures Figure 1. Viewing Configuration Information Figure 2. Entering Configuration Mode Figure 3. Keypad Navigation Figure 4. Main Door DTMF Setup Figure 5. Auxiliary Door DTMF Setup Figure 6. DTMF Sensitivity Figure 7. Talk Timer Setup Figure 8. Main Door Timer setup Figure 9.
- Page 6 Telephone Access System User Guide 6 (42) Version 1.1 LT-968 Copyright 2012...
-
Page 7: Introduction
Telephone Access System and provides you with instructions to configure the TX3 Telephone Access System from the main entry panel keypad. Note: Mircom periodically updates panel firmware and Configurator Software to add features and correct any minor inconsistencies. For information about the latest firmware or software visit the Mircom website at www.mircom.com. -
Page 8: Introducing The Tx3 Telephone Access System
Introduction Introducing the TX3 Telephone Access System The TX3 Telephone Access System is part of the Mircom suite of products that provide building ready monitoring, control and integrated security solutions for use in the high end multi-tenant residential market. The TX3 Telephone Access System addresses the need within today’s high end multi-tenant residential market for an easy-to-use tenant access system and an easy-to-use configuration utility. - Page 9 TX3-CX Card Access System Installation and Operation Manual LT-980 • TX3 Two Door Card Access System Kit Catalogue Number 6531 • TX3 Series Elevator Restriction Accessories Catalogue Number 6532 1.3.3 Contact Us You can contact us from Monday to Friday 8:00 A.M. to 5:00 P.M. E.S.T.
- Page 10 Introduction 1.3.6 Technical Support For technical support contact Mircom’s Technical Support Department between 8 A.M. and 5 P.M. (EST) Monday through Friday, excluding holidays. Toll Free: 1-888-MIRCOM5 Local: 905-695-3535 Local Phone: 905-660-4655 Toll Free Phone: 1-888-660-4655 Email: techsupport@mircom.com 1.3.7 Website www.mircom.com...
-
Page 11: Configuration
Configuration This chapter provides information on how to configure the most commonly used functions of the TX3 Telephone Access System. This chapter explains • How to access the TX3 Telephone Access System • Frequently Used Functions • Viewing Configuration Information •... -
Page 12: Using The Tx3 Telephone Access System
Configuration Using the TX3 Telephone Access System The TX3 Entry Panel LCD shows a scrollable view of the resident names and dial codes. The LCD also comes in an 8 line LCD handset version and a paper version of the resident list is available. To use the TX3 Telephone Access System To view the resident list press the up or down arrow keys to scroll the list line by line. -
Page 13: Viewing Configuration Information
Configuration Viewing Configuration Information To view configuration information, you must first enter the configuration mode. To enter configuration mode Main Menu Press 1. Configuration 2. Operation Press the (scroll down) to “View Cfg Info”. 3. View CFG Info Press the key to enter. -
Page 14: Keypad Navigation
Configuration Keypad Navigation The diagram below shows how to use the keypad when in CONFIGURATION MODE. In configuration mode Press to scroll up Press to scroll down. In configuration mode Press to enter Press to move and confirm selection. left. Press to cancel the selection or exit... -
Page 15: Main Door Dtmf Setup
Configuration Main Door DTMF Setup The main door DTMF setup feature allows the resident to use their telephone touch tone keypad to open the main door. To set up the main door DTMF Select Configuration Menu, System Option. 2.Line Type 3.Main Door DTMF<... -
Page 16: Auxiliary Door Dtmf Setup
Configuration Auxiliary Door DTMF setup The auxiliary door DTMF setup feature allows the resident to use their telephone touch tone keypad to open the auxiliary door. To set up the auxiliary door DTMF If you have not setup Main Door DTMF, 3. -
Page 17: Sensitivity Dtmf Setup
Configuration DTMF Sensitivity setup The DTMF sensitivity feature allows the resident to change how sensitive the TX3 unit is to receiving DTMF signals. DTMF sensitivity can be set from 1 to 8. A sensitivity of 1 indicates the lowest sensitivity while 8 is the highest sensitivity. The default sensitivity is 5. -
Page 18: Setting The Talk And Door Timers
Configuration 2.10 Setting the Talk and Door Timers To set the talk time and door timers, you must be in Configuration Mode. Refer to Entering Configuration Mode on page 13 for instructions. 2.11 Talk Timer setup The talk timer defines the maximum length of time that a visitor speaks with a resident. -
Page 19: Main Door Timer Setup
Configuration 2.12 Main Door Timer Setup The main door timer defines the length of time the main (lobby) door release stays unlocked. To set up the main door Press (scroll up) or (scroll down) to 4. Aux Door DTMF 5. Main Door Timer < find “Door Timer”. -
Page 20: Auxiliary Door Timer Setup
Configuration 2.13 Auxiliary Door Timer Setup The auxiliary door timer defines the length of time the auxiliary door stays unlocked. To set up the auxiliary door Press (scroll up) or (scroll down) to 5. Main Door Timer 6. Aux Door Timer < find “Door Timer”. -
Page 21: Configuration Menu Using The Entry Panel Keypad
Configuration To change your passcode Press (scroll up) or (scroll down) to 7. Correlation 8. Change Passcode < find “Change Passcode”. Press when the arrow is beside “Change Passcode”. The display enters Change Passcode Enter Access Level setup. < 001> Use the up down arrows to see all of the access levels. - Page 22 Configuration 2.15.1 Adding New Records Photocopy and then fill out the worksheet provided on page 35 to record the resident information needed for adding new records. 2.15.2 Entering resident names Once you have entered the configuration menu, select the database menu and then press the telephone key to enter the Add Record menu.
-
Page 23: Figure 11. Entering Resident's Names
Configuration Figure 11. Entering Resident’s Names Note: If you accidentally enter the wrong character while configuring a name, press * once to backspace or press 0 to delete the letter. For example, to enter the last name “Doe”, a. Press “3” four times for the upper case letter “D”. b. - Page 24 Configuration Table 1: List of Screens Enter Elev Rest Addr Enter the ID (or address) of the Elevator Restriction controller for the resident. [_ _] Enter Elev Rest Relay Enter the elevator restriction relay number for the resident. [_ _] Keyless Corr Select which door (main, auxiliary or both) can be opened by the resident using a keyless...
- Page 25 Configuration 2.15.4 Selecting a ring pattern (NSL System only) The ring pattern selection is part of the Database Menu. Table 2: Available Ring Pattern Ring Available Ring Pattern Pattern 2s ON 4s OFF standard ring A 800ms 400ms 800ms 4s OFF distinct ring B 200ms...
- Page 26 Configuration Re-enter the correct information. See paragraph 2.15.2 for instructions on entering data. When you are finished editing the record, press the info key. The display returns to the record list. At this point you may edit another record or press the information key to return to the record list.
- Page 27 Configuration To sort by name Scroll the arrow to “Sort by Name” and press the enter (telephone) key. Selecting this feature during database downloaded displays the following message: Sorting please wait The display now returns to the configuration menu. 2.15.8 Sorting by d-code To sort by d-code Select this feature if you want the list of residents to be sorted numerically by dial...
- Page 28 Configuration Use the up arrow to move from number of residents in increments of 5 to the desired number. The maximum depends on the TX3 Model (it can be 200, 1000 or 2000). Note: Only 200 names can be added at a time. Press the telephone (enter) key to accept.
- Page 29 Configuration 2.15.10 Deleting All Records Select this feature if you want to delete all the resident data (all names, dial codes, everything). To delete all the resident data Scroll the arrow to “Delete all Records” and press the enter (telephone) key.
-
Page 30: Glossary
Configuration 2.16 Glossary Add Record This function is used to add a new resident to the system. Part of the Database Menu. Aux Door When this function is set, the resident can press a number on his or her tele- phone pad to unlock the auxiliary door. -
Page 31: Tx3 Adc Frequently Asked Questions
Configuration 2.17 TX3 ADC Frequently Asked Questions Q. What is the ADC feature? A. The telephone access system is an auto-dialer that is connected to a public telephone line. When a visitor enters a resident’s dial code number, the system dials the resident’s home or cell telephone number (Note: as a security precaution, the visitor cannot see the resident’s home or cell telephone number). - Page 32 Q. I misplaced the key for the telephone access system. How do I obtain a replacement? A. The Mircom key part number is LK-304. Contact your local distributor or Mircom Head Office for a replacement. Q. What happens when the visitor gets an answering machine when trying to contact a resident? A.
- Page 33 Q. I misplaced the key for the telephone access system. How do I obtain a replacement? A. The Mircom key part number is LK-304. Contact your local distributor or Mircom Head Office for a replacement. Q. What happens when the visitor gets an answering machine when trying to contact a resident? A.
- Page 34 Configuration Q. Is the ring pattern programmable? The ring pattern selection is a standard NSL system feature.The system provides up to five ring patterns to choose from for every resident. Telephone Access System User Guide 34 (42) Version 1.1 LT-968 Copyright 2012...
-
Page 35: Resident Directory Worksheet
Configuration 2.18 Resident Directory Worksheet For your records, photocopy this sheet and fill in the resident information. Phone Unit No. Keyless Type Dial Phone Resident’s Name Entry Code Number (pulse or Code Flr. Apt. tone) Version 1.1 Telephone Access System User Guide 35 (42) LT-968 Copyright 2012... - Page 36 Configuration Telephone Access System User Guide 36 (42) Version 1.1 LT-968 Copyright 2012...
-
Page 37: Warranty & Warning Information
During the warranty period, Mircom shall, at its option, repair or replace any defective product upon return of the product to its factory, at no charge for labour and materials. - Page 38 And of all other obligations or liabilities on the part of Mircom neither assumes nor authorizes any other person purporting to act on its behalf to modify or to change this warranty, nor to assume for it any other warranty or liability concerning this product.
-
Page 39: Out Of Warranty Repairs
Products which Mircom determines to be repairable will be repaired and returned. A set fee which Mircom has predetermined and which may be revised from time to time, will be charged for each unit repaired. Products which Mircom determines not to be repairable will be replaced by the nearest equivalent product available at that time. -
Page 40: Special Notices
Special Notices Product Model Number: TX3 AC REN (U.S.): 0.0B AC REN (CANADA): 0.0 Complies With Federal Communications Commission (FCC): • TIA-968-A Technical requirement for connection of equipment tot he telephone network. • CFR 47, Part 15, Subpart B, Class B •... - Page 41 Repairs to certified equipment should be made by an authorized Canadian maintenance facility designated by the supplier. Any repairs or alteration made by the user to this equipment, or equipment malfunctions, may give the telecommunications company cause to request the user to disconnect the equipment.
- Page 42 In the event repairs are ever needed on the Communicator, they should be performed by Mircom or an authorized representative of Mircom. For information contact Mircom at the address and telephone numbers in Chapter 1. If this equipment, TX3 Telephone Access System, causes harm to the telephone network, the telephone company will notify you in advance that temporary discontinuance of service may be required.
- Page 43 Equipment Failure If trouble is experienced with the TX3 Telephone Access System, for repair or warranty information, please contact Mircom. If the equipment is causing harm to the telephone network, the telephone company may request that you disconnect the equipment until the problem is resolved.
- Page 44 Telephone Access System User Guide 44 (42) Version 1.1 LT-968 Copyright 2012...
Need help?
Do you have a question about the TX3 Series and is the answer not in the manual?
Questions and answers
Je ne sis pas capable de rentrer dans le programme ou on peut retirer , ajouter, changer le nom et 3 de téléphone des condos
To access the programming for the Mircom TX3 Series and add, remove, or change names and phone numbers:
1. Use the main entry panel keypad.
2. Navigate to the configuration menu.
3. Select the option to add, delete, or edit records.
4. Follow the on-screen instructions to enter or modify resident names and dial codes using the alphanumeric keypad.
5. Confirm changes by pressing the telephone (enter) key.
The system allows adding up to 200 names at a time, depending on the model's capacity (200, 1000, or 2000 names).
This answer is automatically generated
Does the tx3 have a battery backup in case of power outages?