
Related Manuals for Minolta Di 152f


Summary of Contents for Minolta Di 152f
-
Page 1: User Manual
User Manual Di 152f/Di 183f Fax Unit (FX-1) for Di 152/Di 183 www.minoltaeurope.com The essentials of imaging... -
Page 2: Table Of Contents
Contents Introduction END USER LICENSE AGREEMENT ..........1-1 1. SOFTWARE................1-1 2. LICENSE AGREEMENT .............1-1 3. LICENSE..................1-1 4. RESTRICTIONS .................1-2 5. LIMITED WARRANTY ..............1-2 6. LIMITATION OF REMEDIES ............1-2 7. TERMINATION ................1-3 8. GOVERNING LAW ..............1-3 9. GOVERNMENT END USERS ............1-3 We Want You to Be a Satisfied Customer ........1-4 CE Marking (Declaration of Conformity) .........1-4 Safety Information.................1-5 Warning and Precaution Symbols...........1-5... - Page 3 Precautions Installation Precautions ............... 2-1 Installation site................2-1 Power source.................. 2-1 Space Requirements ..............2-2 Operation Precautions ..............2-3 Operating Environment..............2-3 Proper Use ..................2-3 Transporting the Machine............... 2-4 Care of Machine Supplies .............. 2-4 Legal Restrictions on Copying............ 2-5 Before Making Copies or Faxing Available Copy Features..............
- Page 4 Power Switch and Default Settings ...........3-28 Turning the Machine On and Off...........3-28 To turn on the machine ..............3-28 To turn off the machine ..............3-28 Turning On the Machine..............3-29 Default Settings................3-29 Selecting and Checking Initial Settings ........3-30 Required Settings................3-30 Checking the Initial Settings............3-30 To set the current date and time ...........3-31 To specify the user fax number.............3-32 To program the user name............3-33...
- Page 5 Selecting the Paper Source ............4-11 To make copies using the “Auto Paper” function......4-11 To copy with a manually selected paper size ....... 4-12 To copy onto special paper (1st Tray) .......... 4-13 Making Copies on Manually Fed Paper ........4-14 Paper That Can Be Fed Manually ..........
- Page 6 Programmed Copy Jobs.............5-14 To store a copy program ...............5-14 To recall a copy program ..............5-15 Faxing Document Specifications for Transmission .......6-1 Basic Faxing ..................6-3 To fax using the Automatic Document Feeder........6-3 To fax documents positioned on the Original Glass......6-5 If the Memory Becomes Full While Scanning Fax Documents ..6-7 Transmission Settings..............6-8 Adjusting the Fax Resolution ............6-8 To specify the resolution ..............6-8...
- Page 7 To fax using mailbox transmission ..........7-9 Relay Initiation Transmission............7-11 To fax using relay initiation transmission........7-11 Relay Broadcast Transmission............. 7-13 Direct Transmission..............7-14 To fax using direct transmission ........... 7-14 Polling Transmission ..............7-16 To set up polling transmission ............7-16 To delete a document from the polling transmission setup ..
- Page 8 To set the “LANGUAGE” function ...........9-9 To set the “INITIAL MODE” function ..........9-10 Setting Up the Paper Sources (“PAPER SOURCE SETUP” Menu) ..........9-11 To select the “PAPER SOURCE SETUP” menu......9-12 To specify the automatic paper size detection units (“INCH/METRIC” function) ............9-13 To specify the size of paper loaded into the 1st Tray (“TRAY1 PAPER”...
- Page 9 10 Utility Mode – Fax Functions 10.1 Programming Fax Settings (“FAX REGISTRATION” Menu) ... 10-1 To select the “FAX REGISTRATION” menu......... 10-2 Setting Up One-Touch Dialing (“ONE-TOUCH DIAL” function)..10-3 To program a one-touch dial key..........10-4 To change/delete a programmed one-touch dial key ....10-6 Setting Up Speed Dialing (“SPEED DIAL”...
- Page 10 To set the “NO.of RINGS” function ..........10-45 To set the “REDUCTION RX” function........10-45 To set the “RX PRINT” function ..........10-46 To set the “RX MODE” function ..........10-46 To set the “FORWARD” function..........10-47 To set the “FOOTER” function ............10-48 To set the “SELECT TRAY” function...........10-48 10.4 Specifying Communication Settings (“COMM.SETTING”...
- Page 11 12.2 When the Message “TONER EMPTY” Appears ....... 12-5 To replace the toner bottle............12-5 12.3 When the Message “PAPER JAM” Appears ......12-8 To clear a paper misfeed in the main unit or 1st Tray ....12-8 To clear a paper misfeed in the Paper Feed Cabinet....12-12 To clear a paper misfeed in the Multiple Bypass Tray....
- Page 12 14.6 Power Outages ................14-16 14.7 Glossary..................14-17 Terms and Definitions ..............14-17 15 Index Di152f/Di183f...
- Page 13 Di152f/Di183f...
-
Page 14: Introduction
Agreement, you are not granted any rights to patents, copyrights, trade names, trademarks (whether registered or unregistered), or any other rights, franchises or licenses in respect of the Software. Title to the Software and any copy made from it is retained by Minolta or such other owners. 3. LICENSE... -
Page 15: Restrictions
5. LIMITED WARRANTY Minolta warrants the media on which the software is recorded to be free from defects in materials and workmanship under normal use. Warranty details and limitations for the Hardware containing the Software are described in the Statement of Limited Warranty which was supplied with the hardware. -
Page 16: Termination
7. TERMINATION You may terminate your license at any time by destroying the Software and all your copies of it or as otherwise described in these terms. Minolta may terminate your license if you fail to comply with these terms. Upon such termination, you agree to destroy all your copies of the Software. -
Page 17: We Want You To Be A Satisfied Customer
Introduction We Want You to Be a Satisfied Customer Thank you for choosing a Minolta Di152/Di152f/Di183/Di183f. This User Manual describes the functions, operating procedures, precautions, and basic troubleshooting for the Di152*/Di152f/Di183*/ Di183f. Before using this machine, be sure to read the User Manual thoroughly in order to ensure that you use the machine efficiently. -
Page 18: Safety Information
Introduction Safety Information This section contains detailed instructions on the operation and mainte- nance of this machine. To achieve optimum utility of this device, all oper- ators should carefully read and follow the instructions in this manual. Please keep this manual in a handy place near the machine. Please read the next section before using this device. -
Page 19: Warning
Introduction WARNING • Do not modify this product: Fire, electrical shock, or breakdown could re- sult. If the product employs a laser, the laser beam source could cause blindness. • Do not attempt to remove the covers and panels which have been fixed to the product. -
Page 20: Caution
Introduction CAUTION • Do not use flammable sprays, liquids, or gases near this product, as fire could result. • Do not leave a toner unit or drum unit in a place within easy reach of children. Licking or ingesting any of these substances could injure your health. •... -
Page 21: Precautions For Routine Use
Introduction Precautions for Routine Use • Do not store toner units, PC drum units, or other supplies and consumables in a place subject to direct sunlight and high temperature or humidity, as poor image quality and malfunction could result. • Do not attempt to replace the toner unit and PC drum unit in a place ex- posed to direct sunlight. -
Page 22: Laser Safety
A full-length Declaration of Conformity is available at Minolta under Fax.: +49-511-7404-346, Tel.: +49-511-7404-272 in informing us on the serial number of your product. -
Page 23: Cdrh Regulation
Introduction Therefore, the print head unit should not be opened under any circumstances. Print Head Laser Aperture of the Print Head Unit There is a laser aperture at the location shown above, which must, however, NEVER be viewed directly by the user. CDRH Regulation This machine is certified as a Class 1 Laser product under Radiation Performance Standard according to the Food, Drug and Cosmetic Act of... -
Page 24: For European Users
Introduction CAUTION Use of controls, adjustments or performance of procedures other than those specified in this manual may result in hazardous radiation exposure. This is a semiconductor laser. The maximum power of the laser diode is 5 mW and the wavelength is 770-795 nm. For European Users CAUTION Use of controls, adjustments or performance of procedures other than... -
Page 25: For Finland, Sweden Users
Introduction For Finland, Sweden Users LOUKAN 1 LASERLAITE KLASS 1 LASER APPARAT VAROITUS! Laitteen Käyttäminen muulla kuin tässä käyttöohjeessa mainitulla taval- la saattaa altistaa käyttäjän turvallisuusluokan 1 ylittävälle näkymät- tömälle lasersäteilylle. Tämä on puolijohdelaser. Laserdiodin sunrin teho on 5 mW ja aallonpituus on 770-795 nm. -
Page 26: Laser Safety Label
Introduction Laser Safety Label A laser safety label is attached to the outside of the machine as shown be- low. Ozone Release NOTE = Locate the Machine in a Well Ventilated Room = A negligible amount of ozone is generated during normal operation of this machine. -
Page 27: Acoustic Noise
Introduction Acoustic Noise For European Users Machine Noise Regulation 3 GSGV, 18.01.1991 : The sound pressure lev- el at the operator position according to EN 27779 is equal to or less than 70dB(A). Notice for Ni-MH Batteries Ni-MH (Nickel Metal Hydride) Batteries are installed inside machine as back up memory batteries. -
Page 28: About The User Manual
Introduction About the User Manual Explanation of Manual Conventions The marks and text formats used in this manual are described below. WARNING Failure to observe instructions highlighted in this manner may result in fatal or critical injuries. ➜ Observe all warnings in order to ensure safe use of the machine. CAUTION Failure to observe instructions highlighted in this manner may result in serious injuries or property damage. -
Page 29: Explanation Of Basic Concepts And Symbols
Introduction Explanation of Basic Concepts and Symbols The use of words and symbols in this manual are explained below. Paper Feeding During printing, paper is supplied from the right side of the machine and fed into the Exit Tray on top with the printed surface of the page facing down. -
Page 30: Width" And "Length
Introduction “Width” and “Length” Whenever paper dimensions are mentioned in this manual, the first value always refers to the width of the paper (shown as “A” in the illustration) and the second to the length (shown as “B”). A: Width B: Length Paper Orientation Lengthwise (... - Page 31 Introduction 1-18 Di152f/Di183f...
-
Page 32: Precautions
Precautions Precautions Observe the following precautions to keep the machine in the best possible conditions. Installation Precautions Installation site To ensure utmost safety and prevent possible malfunctions, install the machine in a location that meets the following requirements: A location away from curtains, etc. that may catch fire and burn easily A location that is not exposed to water or other liquids A location free from direct sunlight A location out of the direct airflow of an air conditioner or heater, and... -
Page 33: Space Requirements
Precautions Space Requirements To ensure easy machine operation, supply replacement, and mainte- nance, adhere to the recommended space requirements detailed below. <Di152/Di152f> 1038 <Di183/Di183f> 1038 Unit: mm Note Be sure to allow a clearance of 100 mm or more at the back of the machine, and 150 mm or more at the right of the machine for the removal of misfed papers. -
Page 34: Operation Precautions
Precautions Operation Precautions Operating Environment The environmental requirements for correct operation of the machine are as follows: Temperature: 10°C to 30°C (50°F to 90°F) with fluctuations of no more than 10°C (18°F) within an hour Humidity: 15% to 85% with fluctuations of no more than 10% within an hour Proper Use To ensure the optimum performance of the machine, follow the... -
Page 35: Transporting The Machine
Precautions CAUTION The area around the Fusing Unit is extremely hot. ➜ Do not touch any area other than those authorized in the manual to reduce the risk of burns. Be especially careful not to touch parts marked with warning labels, and their surrounding areas. ➜... -
Page 36: Legal Restrictions On Copying
Precautions Legal Restrictions on Copying Certain types of documents must not be copied with the purpose or intent to pass copies of such documents off as the originals. The following is not a complete list, but is meant to be used as a guide to responsible copying. - Page 37 Precautions Di152f/Di183f...
-
Page 38: Before Making Copies Or Faxing
Before Making Copies or Faxing Before Making Copies or Faxing Available Copy Features The main copy functions available with this machine are listed below. For details on their operation, refer to the pages indicated. Copying (p. 4-1) Single-sided copies “2in1” copy function “4in1”... - Page 39 Before Making Copies or Faxing “Zoom” function (p. 4-21) Reduced/full-sized/enlarged “X/Y Zoom” function (p. 4-23) Di152f/Di183f...
- Page 40 Before Making Copies or Faxing Finishing (p. 5-5) “Sort” function “Group” function Crisscross output (sorting) Crisscross output (grouping) Note The required options differ depending on the desired copy function. Di152f/Di183f...
- Page 41 Before Making Copies or Faxing Special features “Erase” function (p. 5-9) Negative/positive-inverted copy function (p. 5-12) “File Margin” function (p. 5-13) Di152f/Di183f...
- Page 42 Before Making Copies or Faxing “Mixed Orig.” function (p. 4-2) Mixed originals Note The “Mixed Orig.” function is only available when an Automatic Document Feeder (optional) is installed. Di152f/Di183f...
-
Page 43: Available Fax Features
Before Making Copies or Faxing Available Fax Features Sending Broadcast transmission (p. 7-4) Timer transmission (p. 7-7) Relay initiation transmission (p. 7-11) Polling transmission (p. 7-16) Transmission request Send Di152f/Di183f... - Page 44 Before Making Copies or Faxing Receiving Memory reception (p. 7-21) Polling reception (p. 7-23) Transmission request Receive Mailbox reception (p. 7-22) Mailbox Mailbox ID transmission (F code) Print Forwarding (p. 10-47) Di152f/Di183f...
-
Page 45: Components And Their Functions
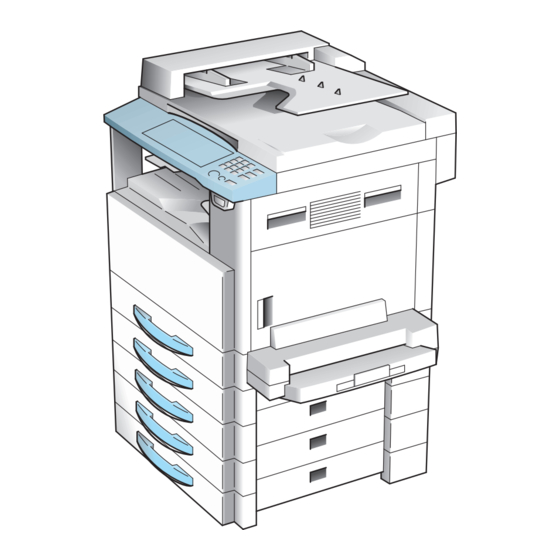
Before Making Copies or Faxing Components and Their Functions Each of the components of the machine as well as their functions are described below. Main unit Di152/Di152f/Di183/ Di183f Original Cover Kit OC-5 (optional) Presses down on the document positioned on the Original Glass. Automatic Document Feeder AF-10 (optional) Automatically feeds one document... - Page 46 Before Making Copies or Faxing Multiple Bypass MB-5 (optional) Allows a maximum of 50 sheets of paper to be supplied through the Bypass Tray. Copy Desk CD-1H (optional) Adjusts the height of the machine after Paper Feed Cabinets have been installed (Use when only one or no Paper Feed Cabinets are installed.) Printer Controller Pi1802e (optional)
-
Page 47: Part Names And Their Functions
Before Making Copies or Faxing Part Names and Their Functions Main Unit *The illustration above shows the optional Original Cover Kit installed. 3-10 Di152f/Di183f... - Page 48 Before Making Copies or Faxing Part Name Description Copy Tray Collects fed-out copies facing down. Front Cover Opened when replacing the toner bottle. (p. 12-5) 1st Tray • Holds up to 250 sheets of paper. • The paper size can be adjusted freely. •...
-
Page 49: Inside Of Main Unit
Before Making Copies or Faxing Inside of Main Unit Part Name Description Imaging Unit Creates the copy image. Replacement of the Imaging Unit must be performed by a service representative. Toner Bottle Holder Opened when replacing the toner bottle. Pressure Lever Used when clearing paper misfeeds in the fusing unit. -
Page 50: Automatic Document Feeder (Optional)
Before Making Copies or Faxing Automatic Document Feeder (Optional) Part Name Description Document Exit Tray Collects documents that have been scanned. Document Guide Plate Adjusted to the size of the document. (p. 4-1) Document Feeder Cover Opened when clearing document misfeeds. (p. 12-8) (Doc. -
Page 51: Multiple Bypass Tray (Optional)
Before Making Copies or Faxing Multiple Bypass Tray (Optional) Part Name Description Bypass Tray Holds up to 50 sheets (plain paper) or 20 sheets (special paper) of paper. (p. 4-17) Bypass Tray Extender Pulled out when large-sized paper is loaded. 3-14 Di152f/Di183f... -
Page 52: Paper Feed Cabinet (Optional)
Before Making Copies or Faxing Paper Feed Cabinet (Optional) Part Name Description 2nd Tray Holds up to 250 sheets of paper (plain paper). With the Di183/Di183f, up to four Paper Feed Cabinets 3rd Tray can be installed. With the Di152/Di152f, one Paper Feed Cabinet can be 4th Tray installed. -
Page 53: Shifting Unit (Optional)
Before Making Copies or Faxing Shifting Unit (Optional) Part Name Description Copy Tray Collects fed-out copies that have been sorted. 3-16 Di152f/Di183f... -
Page 54: Job Tray (Optional)
Before Making Copies or Faxing Job Tray (Optional) With the Job Tray installed Part Name Description Copy Tray Lamp Lights up when paper is fed into the Upper Copy Tray. Upper Copy Tray Collects computer printouts or received faxes. Lower Copy Tray Collects copies. -
Page 55: Names Of Control Panel Parts And Their Functions
Before Making Copies or Faxing Names of Control Panel Parts and Their Functions Control Panel Parts and Their Functions 8 9 10 11 12 131415 1617 18 19 Part Name Function “Error” indicator Lights up when an error has occurred. Refer to “Error Messages”... - Page 56 Before Making Copies or Faxing Part Name Function “Memory TX” indicator Lights up when the memory transmission function is selected. “Auto RX” indicator Lights up when the automatic reception function is selected. [Resolution] key Used to select the image quality (transmission resolution).
- Page 57 Before Making Copies or Faxing 40 39 37 36 35 Part Name Function [Auto/Photo] key, • Used to specify the scanning density of copies. keys • Used to specify the selection at the left or right in setting screens. [Paper] key Used to select the size of the paper to be printed on.
- Page 58 Before Making Copies or Faxing Part Name Function [Energy Saver] key Press to enter Energy Saver mode. (p. 3-25) [Access] key Used with user management. (p. 3-26) [Copy] key Press to enter Copy mode. The indicator lights up in green to indicate that the machine is in Copy mode. [Fax] key Press to enter Fax mode.
-
Page 59: Display Indications
Before Making Copies or Faxing Display Indications In Copy mode: Display Indication Description Copy density (document Indicates the document type for the copy density setting. type) “[A]” (AUTO), “PHOTO” or “TEXT” Copy density (density Indicates the density level for the copy density setting. level) Paper source Indicates the selected paper tray. -
Page 60: Symbol List
Before Making Copies or Faxing In Fax mode: Display Indication Description Mode or function name • Indicates the currently selected mode or function settings. • Displays the current menu, function or settings. • Error messages are displayed when errors occur. •... -
Page 61: Useful Operations
Before Making Copies or Faxing Useful Operations Cancelling Settings Press the [Panel Reset] key to cancel all modes and functions (zoom ratio, number of copies, recipient specified for fax transmission, fax resolution, etc.) and reset them to their defaults. (All selected settings are cancelled.) Pressing the [Panel Reset] key is the easiest way to cancel all specified settings at the same time. -
Page 62: Energy Saver Mode (Preheat Mode)
Before Making Copies or Faxing Energy Saver Mode (Preheat Mode) Instead of turning off the machine, it can be put into a standby mode (Energy Saver mode). The Energy Saver mode can be turned on by pressing the [Energy Saver] key. -
Page 63: Interrupting Copy Jobs
Before Making Copies or Faxing Interrupting Copy Jobs During long continuous copy or print operations, the machine may be needed to quickly copy a different document. Press the [Interrupt] key to temporarily stop the current copy operation. Press the [Interrupt] key again to continue the previously stopped copy operation. -
Page 64: To Enter An Access Number
Before Making Copies or Faxing To enter an access number Using the 10-Key Pad, enter the 3- digit account (section) access number. ❍ If you wish to correct the entered access number, press the [No] key, and then enter the correct number. Press the [Access] key. -
Page 65: Power Switch And Default Settings
Before Making Copies or Faxing Power Switch and Default Settings Note Do not turn off the machine while it is making copies or printing, otherwise a paper misfeed may occur. Make sure that all copy/print operations are finished before turning off the machine. Do not turn off the machine while it is sending or receiving a fax, otherwise a transmission error or paper misfeed may occur. -
Page 66: Turning On The Machine
Before Making Copies or Faxing Turning On the Machine After the machine is turned on, the indicator on the [Start] key lights up in orange and “PLEASE WAIT!” appears in the display while the machine warms up. At this time, a document can be loaded into the Automatic Document Feeder and the [Start] key pressed to queue the job. -
Page 67: Selecting And Checking Initial Settings
Before Making Copies or Faxing Selecting and Checking Initial Settings In order for the many functions of this machine to be used to their fullest capacity, certain settings including the time and one-touch dial key must first be specified. In addition, several settings, such as when the various reports are printed, are specified during production, but can be changed as required. -
Page 68: To Set The Current Date And Time
Before Making Copies or Faxing To set the current date and time Press the [Utility] key. The first screen of the Utility mode appears. Press the key 11 times to select “INITIAL USER DATA”. From the 10-Key Pad, press the [1] key. -
Page 69: To Specify The User Fax Number
Before Making Copies or Faxing To specify the user fax number The user fax number is the fax number that will appear in the header of faxes sent from this machine. The fax number can contain a maximum of 20 digits. The keys that can be used to enter the fax number are: the number keys (0 through 9), Space, + and -. -
Page 70: To Program The User Name
Before Making Copies or Faxing To program the user name The user name is the name that will appear in the header of faxes from this machine. The transmission source information is printed at the top of sent faxes. This machine can be set to not print the transmission source information in sent faxes. -
Page 71: Specifying The Phone Dialing System
Before Making Copies or Faxing Specifying the Phone Dialing System There are two types of telephone dialing systems: tone dialing (PB) and pulse dialing (DP10pps or DP20pps). Faxes cannot be sent if this machine is not set to the system used by your telephone line. Select the correct setting after checking which type of dialing system is used. -
Page 72: Specifying The Phone Wiring System
Before Making Copies or Faxing Specifying the Phone Wiring System The connected wiring system can be set to either PSTN (Public Switched Telephone Network) or PBX (Private Branch Exchange). For a PBX system, the outside line access number (or extension number) must be specified. -
Page 73: Entering Text
Before Making Copies or Faxing Entering Text When specifying the user name or programming one-touch dial keys with the recipient name, letters, accented characters, numbers and symbols can be entered. Key operation: One-touch dial keys [01] through [27]: Used to enter letters and symbols. -
Page 74: Inputting Example
Before Making Copies or Faxing Inputting Example To enter the name “NJ Office” * The cursor (_) flashes alternately with the character at its current location. NAME=_ Press the [MNO] key twice. NAME=N Press the [JKL] key once. NAME=NJ Press the [Space] key once. NAME=NJ Press the [MNO] key 3 times. - Page 75 Before Making Copies or Faxing Correcting text and input precautions To erase all entered text, press the [No] key. To delete only part of the entered text, use the keys to move the cursor (_) to the character that you wish to delete, and then press the [Delete] key (one-touch dial key [27]).
-
Page 76: Copy Paper
Before Making Copies or Faxing 3.10 Copy Paper Paper Specifications 1st Tray Specifications Paper types Plain paper (60 g/m to 90 g/m ), recycled paper Special paper: Cards (91 g/m to 157 g/m ), OHP transparencies, postcards, and label sheets Paper sizes A3 L to A5 C, FLS (210 mm 330 mm) - Page 77 Before Making Copies or Faxing Note: Load only copy paper of the specified type, size and amount, otherwise paper misfeeds or other problems may occur. If paper with a size in inches (Letter, Legal, etc.) is loaded into a paper tray, select the appropriate setting for the “INCH/METRIC”...
- Page 78 Before Making Copies or Faxing The following types of paper should not be used, otherwise decreased print quality, paper misfeeds or damage to the machine may occur. OHP transparencies that have already been fed through the machine (even if the transparency is still blank) Paper that has been printed on by a heat-transfer printer or an inkjet printer Paper that is either extremely thick or extremely thin...
-
Page 79: Print Area
Before Making Copies or Faxing Print Area Any part of the image within the area indicated below is not copied. A margin 4 mm from the leading edge of the paper (A) A margin 4 mm from the trailing edge of the paper (B) A margin 4 mm on both sides of the paper (C) (If the Printer Controller is installed and the machine is being used to print from a host computer, the image cannot be printed within the area 4 mm from all... -
Page 80: Original Documents
Before Making Copies or Faxing 3.11 Original Documents Document Feeding Note Be sure to use documents appropriate for the feed method being used, otherwise a paper misfeed or damage to the document may occur. Document feed Document type Document size method Automatic Document Sheet documents... -
Page 81: Precautions For Loading Documents Into The Automatic Document Feeder
Before Making Copies or Faxing Precautions for Loading Documents into the Automatic Document Feeder The following types of documents should not be loaded into the Automatic Document Feeder, otherwise paper misfeeds or damage to the document may occur. Instead, these types of documents should be positioned on the Original Glass. -
Page 82: Basic Copy Operations
Basic Copy Operations Basic Copy Operations Loading the Document The document can be loaded into the Automatic Document Feeder (optional) or positioned on the Original Glass. Position the document correctly according to the type of document being copied. With the Automatic Document Feeder To load the document Adjust the Document Guide Plates to fit the size of the document. -
Page 83: To Load Documents Of Mixed Sizes
Basic Copy Operations ➜ Documents of mixed sizes can be loaded into the Automatic Document Feeder. Refer to “To load documents of mixed sizes” on page 4-2 for more information. Select the desired copy settings. For details, refer to “Making Copies” on page 4-9 and “Advanced Copy Operations”... - Page 84 Basic Copy Operations Open the Document Guide Plates. Load the document pages to be copied face up. Adjust the Document Guide Plates to fit the size of the document. Have the necessary precautions been observed when loading the document? ➜ A maximum of 50 document pages can be loaded.
- Page 85 Basic Copy Operations Press the [Auto Paper/Auto Size] key until the “Auto Paper” function is selected. ❍ Check that “AUTO” appears in the bottom line of the screen. Press the [Start] key to begin feeding and copying the loaded document pages, starting from the top page.
-
Page 86: With The Original Glass
Basic Copy Operations With the Original Glass To position sheet documents For plain documents or documents that cannot be loaded into the Automatic Document Feeder, position them as described below. Lift open the Original Cover, or the Automatic Document Feeder if it is installed. -
Page 87: To Position Translucent Or Transparent Documents
Basic Copy Operations To position translucent or transparent documents When copying a highly transparent or translucent document, such as OHP transparencies, tracing paper or diazo photosensitive paper, position it as described below. Lift open the Original Cover, or the Automatic Document Feeder if it is installed. -
Page 88: To Position A Book
Basic Copy Operations To position a book When copying two facing pages of a bound document, such as a book or magazine, position it as described below. Lift open the Original Cover, or the Automatic Document Feeder if it is installed. - Page 89 Basic Copy Operations Press the [Original] key until the “Book Separation” indicator lights Select the desired copy settings. For details, refer to “Making Copies” on page 4-9 and “Advanced Copy Operations” on page 5-1. Press the [Start] key to copy the document. Di152f/Di183f...
-
Page 90: Making Copies
Basic Copy Operations Making Copies The following procedure describes how to load documents and make a simple copy of it. To make a simple copy Press the [Copy] key to enter Copy mode. Load the document to be copied. ❍ Refer to “Loading the Document”... - Page 91 Basic Copy Operations Using the 10-Key Pad, enter the desired number of copies. The number of copies can be set to any number between 1 and 99. Press the [Start] key. The set number of copies are made. To stop copying before the set number of copies have been made, press the [Stop] key.
-
Page 92: Selecting The Paper Source
Basic Copy Operations Selecting the Paper Source Before making a copy, the paper tray containing the paper that will be used must be selected. Either the paper source is selected automatically when the size of the document is detected, or the desired paper source can be selected manually. -
Page 93: To Copy With A Manually Selected Paper Size
Basic Copy Operations Note If “NO SUITABLE PAPER” appears in the display immediately after the [Start] key is pressed, no tray is loaded with paper of the most suitable size. Either load paper with the appropriate size, or press the [Paper] key and select the desired paper size, and then press the [Start] key again. -
Page 94: To Copy Onto Special Paper (1St Tray)
Basic Copy Operations To copy onto special paper (1st Tray) If special paper, such as OHP transparencies, postcards or cards, are loaded into the 1st Tray, first set the “TRAY1 PAPER” function in the “PAPER SOURCE SETUP” menu of the Utility mode (“To specify the size of paper loaded into the 1st Tray (“TRAY1 PAPER”... -
Page 95: Making Copies On Manually Fed Paper
Basic Copy Operations Making Copies on Manually Fed Paper Manually feed the copy paper if you wish to make copies onto paper not loaded into any paper tray or onto special paper, such as OHP transparencies, postcards or cards. Paper That Can Be Fed Manually Paper types: Plain or recycled paper (thickness: 60 g/m to 90 g/m... -
Page 96: Copying Onto Manually Fed Paper
Basic Copy Operations Copying Onto Manually Fed Paper To copy using the Manual Bypass Tray Load the document to be copied. ❍ Refer to “Loading the Document” on page 4-1. Adjust the paper guides to fit the size of the paper, and then insert one sheet of paper with the front side facing down, lightly sliding the paper as much as possible into the... - Page 97 Basic Copy Operations ❍ If paper with a non-standard size is loaded, press the (“CUSTOM”), and then use the 10-Key Pad to enter the paper size. (For details, refer to page 4-19.) Do you know the size of FLS paper? ➜...
-
Page 98: To Copy Using The Multiple Bypass Tray
Basic Copy Operations To copy using the Multiple Bypass Tray Load the document to be copied. ❍ Refer to “Loading the Document” on page 4-1. Adjust the Bypass Tray Extender and the paper guides to fit the size of the paper, and then load the paper with the front side facing down, lightly sliding the paper as much as possible into the feed slot. - Page 99 Basic Copy Operations ❍ If paper with a non-standard size is loaded, press the (“CUSTOM”), and then use the 10-Key Pad to enter the paper size. (For details, refer to page 4-19.) ❍ If “OHP” was selected in step 3, set the paper size to A4C or A4L.
-
Page 100: To Copy Onto A Custom Paper Size
Basic Copy Operations To copy onto a custom paper size Precautions for entering custom paper sizes: ✔ When entering a custom paper size, be sure to specify the width and Width (y) length measurements correctly. Length (x) Load the document to be copied. Load the paper into the Manual Bypass Tray. - Page 101 Basic Copy Operations Using the 10-Key Pad, enter the width (mm) of the loaded paper. ❍ The paper width can be set between 90 mm and 297 mm. ❍ If you wish to correct the entered setting, press the [No] key, and then use the 10-Key Pad to enter the new number.
-
Page 102: Specifying A Zoom Setting
Basic Copy Operations Specifying a Zoom Setting By specifying a zoom ratio, the copy can be enlarged or reduced. Zoom Settings “Zoom” setting Description Full size Copies are made at the same size as the document ( 1.00). “AUTO” zoom ratio The most appropriate zoom ratio is automatically selected based on the size of the document loaded and the specified paper size. -
Page 103: To Make Copies Using A Specific Zoom Setting
Basic Copy Operations Press the [Paper] key, and then select the desired paper size. If necessary, specify any other copy settings. ❍ Copy density (p. 4-25) Using the 10-Key Pad, enter the desired number of copies, and then press the [Start] key. To make copies using a specific zoom setting Load the document to be copied. -
Page 104: To Make Copies Using The "X/Y Zoom" Function
Basic Copy Operations To make copies using the “X/Y Zoom” function Load the document to be copied. ❍ Refer to “Loading the Document” on page 4-1. Press the [X/Y Zoom] key until the “X/Y Zoom” indicator lights up. Using the keys, select the desired zoom ratio for the length (X), and then press the [Yes] key. - Page 105 Basic Copy Operations If necessary, specify any other copy settings. ❍ Paper (p. 4-11) ❍ Copy density (p. 4-25) Using the 10-Key Pad, enter the desired number of copies, and then press the [Start] key. 4-24 Di152f/Di183f...
-
Page 106: Specifying The Copy Density ("Auto/Photo" Function)
Basic Copy Operations Specifying the Copy Density (“Auto/Photo” function) Document type and copy density settings “TEXT” setting: The automatic density level and 5 manual density levels are available. ❍ “AUTO” density level: The density level is automatically adjusted according to the document being copied. -
Page 107: To Make Copies After Specifying A Copy Density
Basic Copy Operations To make copies after specifying a copy density Load the document to be copied. ❍ Refer to “Loading the Document” on page 4-1. Press the [Auto/Photo] key to select between the “[A]” (AUTO), “PHOTO” and “TEXT” settings. ❍... -
Page 108: Interrupting Copy Jobs
Basic Copy Operations Interrupting Copy Jobs Long continuous copy operations can quickly be paused by pressing the [Interrupt] key in order to copy a different document. Note Some functions cannot be interrupted. In addition, some functions are not available while a copy job is interrupted. For details, refer to “Function Combination Table”... - Page 109 Basic Copy Operations Using the 10-Key Pad, enter the desired number of copies, and then press the [Start] key to copy the other document. After the other document is copied, press the [Interrupt] key. The “Interrupt” indicator goes off, and all copy functions return to their previous settings.
-
Page 110: Advanced Copy Operations
Advanced Copy Operations Advanced Copy Operations Single-Sided Copies The setting combinations of the various document and copy types and the procedures for selecting the appropriate settings are described below. Using the various functions available by pressing the [Original] and the [Copy] keys, you can select the most suitable copy method. -
Page 111: To Make Copies Using The "2In1" (Or "4In1") Copy Function
Advanced Copy Operations To make copies using the “2in1” (or “4in1”) copy function Load the document to be copied into the Automatic Document Feeder. ❍ Refer to “Loading the Document” on page 4-1. Press the [Copy] key until the “2in1” (or “4in1”) indicator lights up. -
Page 112: To Make Copies Using The "Book Separation" Function
Advanced Copy Operations To make copies using the “Book Separation” function Load the document to be copied. ❍ Refer to “Loading the Document” on page 4-1. Press the [Original] key until the “Book Separation” indicator lights ❍ The default binding setting is for left-bound books. - Page 113 Advanced Copy Operations Do you know how large of an area is erased? ➜ The width of the erased area for the “Frame” setting can be set between 5 mm and 20 mm, in 1 mm increments. The default setting is 10 mm. ➜...
-
Page 114: Finishing Copies ("Sort" And "Group" Functions)
Advanced Copy Operations Finishing Copies (“Sort” and “Group” functions) When copying or printing two or more sets of a document, the copies can be divided either by sets containing a copy of each page (sorted) or by pages (grouped). Finishing methods Non-sort: Copies Documents... -
Page 115: Sorting
Advanced Copy Operations Sorting The copies are fed out automatically separated into sets. There are three ways of sorting: electronic sorting, shifted sorting and crisscross sorting. Electronic sorting The copies are fed out automatically divided into sets containing one copy of each page. ❍... -
Page 116: Grouping
Advanced Copy Operations Grouping The copies are fed out automatically separated by page. There are three ways of grouping: grouping, shifted grouping and crisscross grouping. Grouping All copies of a single page are fed out in sets. ❍ The Automatic Document Feeder must be installed. -
Page 117: Specifying Finishing
Advanced Copy Operations Specifying Finishing To make copies using a Finishing function Load the document to be copied into the Automatic Document Feeder. ❍ Refer to “Loading the Document” on page 4-1. Press the [Finishing] key until the indicator for the desired Finishing function lights up. -
Page 118: Erasing Sections Of Copies
Advanced Copy Operations Erasing Sections of Copies Areas such as the unclean-looking frames around copies can be erased. The “Erase” function can be set to one of four settings. “Left” erase setting: Copies Documents The left side of the document is erased from the copy. -
Page 119: Precautions On The Erased Margin Location
Advanced Copy Operations Precautions on the Erased Margin Location The location of the erased area in the copy depends on how the document is positioned. “Erase” Original Glass Automatic Document Feeder setting Left Upper Frame 5-10 Di152f/Di183f... -
Page 120: Setting The "Erase" Function
Advanced Copy Operations Setting the “Erase” Function To make copies using an “Erase” setting Load the document to be copied. ❍ Refer to “Loading the Document” on page 4-1. Press the [Erase] key until the indicator for the desired “Erase” setting lights up. -
Page 121: Negative/Positive Inverted Copying
Advanced Copy Operations Negative/Positive Inverted Copying Copies can be made with the light-colored areas of the document (media) and the dark-colored areas of the document (text) inverted. Documents Copies To make copies using the negative/positive inverted copy function Load the document to be copied. ❍... -
Page 122: Making Copies For Filing ("File Margin" Function)
Advanced Copy Operations Making Copies for Filing (“File Margin” function) So that copies can easily be stored in filing binders, copies can be made with a file margin. Left-side binding: Documents Copies Copies are printed with the contents of the document slightly shifted to the right in order to create a binding margin at the left. -
Page 123: Programmed Copy Jobs
Advanced Copy Operations Programmed Copy Jobs Store up to two of the more frequently used copy setting programs for immediate recall when necessary. Note Copy programs cannot be stored while the machine is warming up or while a copy job is paused (Interrupt mode). To store a copy program Select the copy settings to be stored as the copy program. -
Page 124: To Recall A Copy Program
Advanced Copy Operations To recall a copy program Load the document to be copied. ❍ Refer to “Loading the Document” on page 4-1. Press the [Job Recall] key. Using the keys, select the program number of the copy program that you wish to recall, and then press the [Yes] key. - Page 125 Advanced Copy Operations 5-16 Di152f/Di183f...
-
Page 126: Faxing
Faxing Faxing This machine is a G3 fax. Faxes can only be sent or received with this machine if the recipient’s or sender's machine complies with the G3 standard. Document Specifications for Transmission Using the Automatic Document Feeder Fed documents will be sent with a width of an A4 L-, B4 L-, or A3 L- size page (whichever is smallest, but still larger than the document). - Page 127 Faxing CAUTION Documents with staples and paper clips attached may damage the machine. ➜ Be sure to remove all staples and paper clips from the document before faxing it. Placing documents on the Original Glass The fax document sizes that can be set using the Control Panel are A4 L, A4 C, B4 L and A3 L.
-
Page 128: Basic Faxing
Faxing Basic Faxing To fax using the Automatic Document Feeder Press the [Fax] key. The machine enters Fax mode, and the fax screen appears. Load the document to be faxed into the Automatic Document Feeder. ❍ Adjust the Document Guide Plates to fit the size of the document. - Page 129 Faxing About 390 A4-size document pages can be scanned and stored in the memory at one time. If the optional expansion memory (8MB Memory for Fax) is installed, as many as 1,170 document pages can be stored. If an A4-size document page is positioned crosswise, the scanned image is rotated 90°...
-
Page 130: To Fax Documents Positioned On The Original Glass
Faxing To fax documents positioned on the Original Glass Press the [Fax] key. The machine enters Fax mode, and the fax screen appears. Lift open the Original Cover, and then position the document to be faxed on the Original Glass. ❍... - Page 131 Faxing Check that the correct document size appears in the screen. ❍ To change the document size, press the key, and then use keys to select the desired document size in the screen that appears. Press the [Yes] key to scan the page. If the document to be faxed contains multiple pages, position the next page of the document on the...
-
Page 132: If The Memory Becomes Full While Scanning Fax Documents
Faxing About 390 A4-size document pages can be scanned and stored in the memory at one time. If the optional expansion memory (8MB Memory for Fax) is installed, as many as 1,170 document pages can be stored. If an A4-size document page is positioned crosswise, the scanned image is rotated 90°... -
Page 133: Transmission Settings
Faxing Transmission Settings Adjusting the Fax Resolution Selecting one of the following resolutions to match the type of document to be faxed (documents containing a lot of small print, detailed illustrations or photos) will produce a sharper result. Document type Resolution setting Documents with normal print Standard... - Page 134 Faxing Note Depending on the recipient’s fax machine, faxes sent with the Super Fine or Super Fine + Half Tone setting may not be sent as specified, and instead are sent with the Fine or Half Tone setting. If the Half Tone or Super Fine + Half Tone setting is specified, the fax may be sent with a decreased resolution depending on the quality of the recipient’s fax machine or whether the document size is larger than the paper loaded in the recipient’s fax machine.
-
Page 135: Dialing
Faxing Dialing The recipient’s fax number can be dialed using any of the seven different dialing methods described below. The procedures described below assume that the fax is being sent using the Automatic Document Feeder. Sending international faxes: If the country code and recipient’s fax number are entered immediately after the prefix for making an international call, not enough time may be allowed for making the connection, making the fax number seem busy. -
Page 136: To Fax By Entering The Fax Number Directly Using The 10-Key Pad
Faxing To fax by entering the fax number directly using the 10-Key Pad Press the [Fax] key to enter Fax mode. Load the document into the Automatic Document Feeder. If necessary, change the “Resolution” setting (p. 6-8). Using the 10-Key Pad, enter the fax number of the recipient. -
Page 137: To Fax Using One-Touch Dialing
Faxing To fax using one-touch dialing If one-touch dial keys have already been programmed with fax numbers, the fax number of a recipient can be specified by pressing just the corresponding one-touch dial key. For details on programming the one-touch dial keys, refer to “Setting Up One-Touch Dialing (“ONE-TOUCH DIAL”... -
Page 138: To Fax Using Speed Dialing
Faxing To fax using speed dialing If speed dial numbers have already been programmed, the fax number of a recipient can be specified quickly by entering the corresponding speed dial number. For details on programming speed dial numbers, refer to “Setting Up Speed Dialing (“SPEED DIAL”... -
Page 139: To Fax Using Group Dialing
Faxing To fax using group dialing If one-touch dial keys have already been programmed with a group of fax numbers, the fax numbers of all recipients in the group can be specified by pressing just the corresponding one-touch dial key. For details on programming one-touch dial keys with a group of fax numbers, refer to “Setting Up One-Touch Dialing (“ONE-TOUCH DIAL”... -
Page 140: To Fax Using Program Dialing
Faxing To fax using program dialing If one-touch dial keys have already been programmed with fax numbers and a transmission/reception function (such as timer transmission or polling reception), that function can be carried out by pressing just the corresponding one-touch dial key. For details on setting program dialing, refer to “Setting Up Program Dialing (“PROGRAM DIAL”... -
Page 141: To Fax Using Combination Dialing
Faxing To fax using combination dialing If one-touch dial keys or speed dial numbers have already been programmed with special prefix numbers, a fax number can be specified by recalling the prefix number from the one-touch dial key or speed dial number, and combining it with the fax number of a recipient either entered using the 10-Key Pad or recalled from a one-touch dial key or speed dial number. -
Page 142: To Fax Using The Phone Book
Faxing To fax using the phone book The phone book contains all programmed one-touch dialing and speed dialing numbers, allowing you to search for and select the recipient that you wish to send the fax to. Press the [Fax] key to enter Fax mode. Load the document into the Automatic Document Feeder. -
Page 143: To Search The Phone Book
Faxing To search the phone book Press the [Phone Book] key. Using the keys, select “SEARCH”, and then press the [Yes] key. A screen appears, allowing you to enter the text to be searched for. Using the one-touch dial keys, enter the first few characters of the name programmed for the desired recipient. -
Page 144: To Redial The Last Recipient Called
Faxing Using the keys, select the desired recipient. ❍ If the desired recipient name does not appear in the search results, press the [No] key to return to the screen allowing you to enter the search text, and then try searching for different text. Press the [Start] key to begin scanning and sending the fax. -
Page 145: Receiving
Faxing Receiving Receiving Automatically/Manually If the machine is set to receive faxes automatically, no further operations are required. If the machine is set to receive faxes manually, the telephone receiver must be picked up in order to receive the fax. For details on changing the reception method, refer to “To set the “RX MODE”... - Page 146 Faxing Paper sizes of received faxes ❍ The sizes of documents that can be received are A3 L, B4 L, A4, B5 C and A5 C. ❍ If paper of the same size as the document is not loaded in a paper tray, the fax is printed on paper of a larger size.
-
Page 147: Checking Transmission Results
Faxing Checking Transmission Results The transmission result information for a maximum of 60 sent and received documents is saved. To check the transmission result Press the [Confirm] key. Press the [Yes] key. Using the keys, display the desired transmission results to check them. -
Page 148: Fax Transmission/Reception Methods
Fax Transmission/Reception Methods Fax Transmission/Reception Methods Transmission Methods Memory Transmission With memory transmission, the document is scanned, then stored in the memory for transmission (queued transmission). Memory transmission is selected as the default transmission mode. For details on sending faxes through memory transmission, refer to “Basic Faxing”... -
Page 149: To Send A Fax Manually
Fax Transmission/Reception Methods Even when pulse dialing is being used, entering “ ” produces signals for tone dialing. To send a fax manually Load the document into the Automatic Document Feeder. If necessary, change the “Resolution” setting (p. 6-8). Pick up the telephone receiver. ❍... -
Page 150: Batch Transmission
Fax Transmission/Reception Methods Batch Transmission Multiple documents can be stored in the memory and faxed together at a specified time. In order to use this function, the corresponding Utility mode function must first be used to program a one-touch dial key with the batch transmission settings (transmission time) (p. -
Page 151: Broadcast Transmission
Fax Transmission/Reception Methods Broadcast Transmission The same document can be sent to multiple recipients at one time. A maximum of 143 recipients can be specified for the same transmission. The recipients can be specified by using the one-touch dial keys, the speed dial numbers or group dialing, by selecting from the phone book, or by entering the fax number using the 10-Key Pad. - Page 152 Fax Transmission/Reception Methods Specify the fax number of the recipient. Repeat the appropriate operations described below until all recipients have been specified. ❍ When using the one-touch dial keys: Press the one-touch dial key programmed with the desired fax number. Press the [Yes] key, and then specify the next recipient.
- Page 153 Fax Transmission/Reception Methods To check the recipients, press the [Yes] key. ❍ If you do not wish to check the recipients, skip to step 9. The recipients specified in step 5 are displayed in the order that they were selected. Check the recipient, and then press the [Yes] key.
-
Page 154: Timer Transmission
Fax Transmission/Reception Methods Timer Transmission A document can be scanned and stored in the memory to be sent at a specified time. This function is convenient for sending documents with a large number of pages at discounted calling times. Note The time is set for a 24-hour period. - Page 155 Fax Transmission/Reception Methods Using the 10-Key Pad, enter the desired transmission time, and then press the [Yes] key. ❍ If you wish to correct the time, press the [No] key, and then enter the correct time. Specify the fax number of the recipient.
-
Page 156: Mailbox Transmission
Fax Transmission/Reception Methods Mailbox Transmission The fax can be sent to a recipient’s mailbox. This is perfect for sending an important document to a specific person. Note Mailbox transmission is compatible with F code transmission. Machines compatible with F codes can be specified as recipients for mailbox transmission. - Page 157 Fax Transmission/Reception Methods Using the 10-Key Pad, enter the mailbox ID of the recipient. ❍ Enter the mailbox ID (SUB) (20 digits or less) registered for the recipient. ❍ If the recipient is specified using a one-touch dial key or a speed dial number also programmed with a sub-address, the sub- address is displayed as the mailbox ID.
-
Page 158: Relay Initiation Transmission
Fax Transmission/Reception Methods Relay Initiation Transmission Documents can be sent from this machine (transmitting station) to another fax machine (acting as a relay station), which then sends the documents to multiple recipients (receiving stations). By relaying the documents through a fax machine closer to the remote recipients, the transmission time and cost for the transmitting station are reduced. - Page 159 Fax Transmission/Reception Methods Specify the relay station, and then press the [Yes] key. ❍ Refer to “Dialing” on page 6-10. A screen appears, allowing you to specify the relay box ID. Using the 10-Key Pad, enter the relay box ID. ❍...
-
Page 160: Relay Broadcast Transmission
Fax Transmission/Reception Methods Relay Broadcast Transmission If this machine is specified as a relay station, it can receive documents sent from another fax machine (transmitting station), then send the documents to multiple recipients (receiving stations). In order to fax using relay broadcast transmission, a relay box must first be programmed. -
Page 161: Direct Transmission
Fax Transmission/Reception Methods Direct Transmission If direct transmission is specified, one page of the document at a time can be scanned, according to the transmission status. This ensures that even documents with many pages can be sent. Note When faxing using direct transmission, the document should be loaded into the Automatic Document Feeder. - Page 162 Fax Transmission/Reception Methods If necessary, change the “Resolution” setting (p. 6-8). Specify the fax number of the recipient. ❍ Refer to “Dialing” on page 6-10. Press the [Start] key to begin scanning and sending the fax. Note When transmission is finished, the transmission mode returns to the default setting.
-
Page 163: Polling Transmission
Fax Transmission/Reception Methods Polling Transmission Documents scanned and saved in the memory can be retrieved by the recipient. Note Polling transmission is compatible with F code transmission. If the memory is full, polling transmission cannot be set. With polling transmission, the recipient incurs the cost of the call. To set up polling transmission Position the document to be faxed. - Page 164 Fax Transmission/Reception Methods Using the 10-Key Pad, enter the 4- digit polling ID, and then press the [Yes] key. ❍ If you do not wish to set a polling ID, skip to step 8. ❍ The polling ID can be set to any number between 0000 and 9999. Using the 10-Key Pad, enter the 4- digit password.
-
Page 165: To Delete A Document From The Polling Transmission Setup
Fax Transmission/Reception Methods To delete a document from the polling transmission setup Press the [Function] key. Press the [5] key from the 10-Key Pad. Press the [Function] key 5 times to select “POLLING TX”, and then press the [Yes] key. If polling transmission has been set, a screen appears, allowing you to specify the polling ID. -
Page 166: Cancelling (Deleting) A Document Queued In The Memory For Transmission
Fax Transmission/Reception Methods Cancelling (Deleting) a Document Queued in the Memory for Transmission Of the documents stored in the memory and waiting to be sent, a specific document can be selected and deleted. To cancel a queued document Press the [Function] key. Press the [8] key from the 10-Key Pad. - Page 167 Fax Transmission/Reception Methods ❍ To check the recipient of the currently displayed transmission job, press the key. After checking, press the [Yes] key to return to the previous screen. Press the [Yes] key to delete the displayed job. “CANCEL RESERV.” appears in the display.
-
Page 168: Reception Methods
Fax Transmission/Reception Methods Reception Methods Manual Reception This machine normally receives faxes automatically. However, if a telephone is connected and the same line is used for phoning and faxing, the document can simply be received after talking with the caller over the phone. -
Page 169: Mailbox Reception
Fax Transmission/Reception Methods Mailbox Reception If mailbox numbers and F codes (mailbox IDs and passwords) have already been programmed on this machine, this function can be used to receive only those faxes with an identical mailbox ID and password specified by the caller. Since the received fax can only be retrieved after entering the corresponding mailbox ID, confidential faxes can safely be sent and received. -
Page 170: Polling Reception
Fax Transmission/Reception Methods Polling Reception Using polling reception, documents set up in other fax machines can be received. Note Polling reception is compatible with F code transmission. To receive a fax using polling reception Press the [Function] key. Press the [6] key from the 10-Key Pad. - Page 171 Fax Transmission/Reception Methods Using the 10-Key Pad, enter the polling ID (20 digits or less), and then press the [Yes] key. Using the 10-Key Pad, enter the password (20 digits or less), and then press the [Yes] key. To specify multiple fax numbers, repeat steps 3 through 6.
-
Page 172: Using F Codes
Fax Transmission/Reception Methods Using F codes This machine is compatible F code transmissions. F codes are mailbox functions, such as “SUB” (sub-addresses), “SEP” (selective polling), “SID” and “PWD” (passwords), regulated by the G3 standards of the ITU-T (International Telecommunication Union). Mailbox transmission and reception is possible only with similar machines compatible with F code transmission. -
Page 173: Using Mailboxes
Fax Transmission/Reception Methods Using Mailboxes Specifying mailboxes: Mailboxes can be used if they are set up using the corresponding Utility mode function. Refer to “Mailbox Reception” on page 7-22. Mailbox Mailbox ID transmission (F code) Print F code mailbox transmission/reception: A maximum of 10 mailboxes can be set up. -
Page 174: Specifying F Codes
Fax Transmission/Reception Methods Specifying F codes When sending faxes F codes can be specified when the 10-Key Pad is being used to enter the fax number of a recipient while sending a fax. Using the 10-Key Pad, enter the fax number of the recipient. -
Page 175: Programming Recipients
Fax Transmission/Reception Methods Programming recipients F codes can be specified when programming one-touch dial keys or speed dial numbers. Using the 10-Key Pad, enter the fax number of the recipient. Press the key, and then use the 10-Key Pad to enter the sub- address. -
Page 176: Expanded Functions By Connecting A Computer
Expanded Functions by Connecting a Computer Expanded Functions by Connecting a Computer Setting Up for PC Faxing/PC Scanning If commercially available LaserFAX or WinFax Pro V.10.0 is installed on the computer, this machine can be used for PC faxing. If used for PC faxing, this machine functions as a fax/modem. Using PC fax software, transmission at 14400 bps between this machine and the computer is possible. - Page 177 Expanded Functions by Connecting a Computer Di152f/Di183f...
-
Page 178: Utility Mode - Copy Functions
Utility Mode – Copy Functions Utility Mode – Copy Functions This chapter describes the various Utility mode functions that can be used to set copy-related functions. Note Depending on the options installed, some functions may not be available. If an unavailable functions is selected, an error message appears. -
Page 179: Specifying Machine Settings ("Machine Setting" Menu)
Utility Mode – Copy Functions Specifying Machine Settings (“MACHINE SETTING” Menu) From the “MACHINE SETTING” menu, various functions of the machine’s operating environment can be set. “MACHINE SETTING” menu: MACHINE SETTING Description AUTO PANEL RESET This function can be used to set the length of time until the Control Panel automatically returns to its default settings after copying or the last operation is finished. -
Page 180: To Select The "Machine Setting" Menu
Utility Mode – Copy Functions To select the “MACHINE SETTING” menu Press the [Utility] key. “MACHINE SETTING” appears. From the 10-Key Pad, press the key ([1] through [9]) for the “MACHINE SETTING” function that you wish to set. ❍ The “MACHINE SETTING” functions are as follows: 1 AUTO PANEL RESET 2 ENERGY SAVE MODE 3 AUTO SHUT OFF... -
Page 181: To Set The "Auto Panel Reset" Function
Utility Mode – Copy Functions To set the “AUTO PANEL RESET” function Select the “MACHINE SETTING” menu. ❍ Refer to “To select the “MACHINE SETTING” menu” on page 9-3. Press the [1] key from the 10-Key Pad to select “AUTO PANEL RESET”. -
Page 182: To Set The "Energy Save Mode" (Preheat Mode) Function
Utility Mode – Copy Functions To set the “ENERGY SAVE MODE” (preheat mode) function Select the “MACHINE SETTING” menu. ❍ Refer to “To select the “MACHINE SETTING” menu” on page 9-3. Press the [2] key from the 10-Key Pad to select “ENERGY SAVE MODE”. -
Page 183: To Set The "Auto Shut Off" Function
Utility Mode – Copy Functions To set the “AUTO SHUT OFF” function Precautions for setting the “AUTO SHUT OFF” function: ✔ Whether or not auto shut off is possible depends on the “AUTO SHUT OFF” function in the “ADMIN. MANAGEMENT” menu. Select the “MACHINE SETTING”... -
Page 184: To Specify The Adf (Automatic Document Feeder) Scanning Image Quality ("Density(Adf)" Function)
Utility Mode – Copy Functions Note If “AUTO SHUT OFF” is set to “ON”, the auto power off function will operate. Once the power has been turned off, it will not be possible to receive faxes or perform printing from the computer. To specify the ADF (Automatic Document Feeder) scanning image quality (“DENSITY(ADF)”... -
Page 185: To Specify The Printing Density ("Print Density" Function)
Utility Mode – Copy Functions To specify the printing density (“PRINT DENSITY” function) Select the “MACHINE SETTING” menu. ❍ Refer to “To select the “MACHINE SETTING” menu” on page 9-3. Press the [5] key from the 10-Key Pad to select “PRINT DENSITY”. Using the keys, select one of the five settings between... -
Page 186: To Set The "Buzzer Volume" Function
Utility Mode – Copy Functions To set the “BUZZER VOLUME” function Select the “MACHINE SETTING” menu. ❍ Refer to “To select the “MACHINE SETTING” menu” on page 9-3. Press the [7] key from the 10-Key Pad to select “BUZZER VOLUME”. Using the keys, select “HIGH”, “LOW”... -
Page 187: To Set The "Initial Mode" Function
Utility Mode – Copy Functions To set the “INITIAL MODE” function Select the “MACHINE SETTING” menu. ❍ Refer to “To select the “MACHINE SETTING” menu” on page 9-3. Press the [9] key from the 10-Key Pad to select “INITIAL MODE”. Using the keys, select either “COPY”... -
Page 188: Setting Up The Paper Sources ("Paper Source Setup" Menu)
Utility Mode – Copy Functions Setting Up the Paper Sources (“PAPER SOURCE SETUP” Menu) From the “PAPER SOURCE SETUP” menu, various functions for the paper trays can be set. “PAPER SOURCE SETUP” menu: PAPER SOURCE Description SETUP INCH/METRIC This function can be used to set the size measurement system for the paper loaded in each tray. -
Page 189: To Select The "Paper Source Setup" Menu
Utility Mode – Copy Functions To select the “PAPER SOURCE SETUP” menu Press the [Utility] key. Press the key once to select “PAPER SOURCE SETUP”. From the 10-Key Pad, press the key ([1] through [3]) for the “PAPER SOURCE SETUP” function that you wish to set. ❍... -
Page 190: To Specify The Automatic Paper Size Detection Units ("Inch/Metric" Function)
Utility Mode – Copy Functions To specify the automatic paper size detection units (“INCH/METRIC” function) Select the “PAPER SOURCE SETUP” menu. ❍ Refer to “To select the “PAPER SOURCE SETUP” menu” on page 9-12. Press the [1] key from the 10-Key Pad to select “INCH/METRIC”. -
Page 191: To Specify The Size Of Paper Loaded Into The 1St Tray ("Tray1 Paper" Function)
Utility Mode – Copy Functions To specify the size of paper loaded into the 1st Tray (“TRAY1 PAPER” function) Select the “PAPER SOURCE SETUP” menu. ❍ Refer to “To select the “PAPER SOURCE SETUP” menu” on page 9-12. Press the [2] key from the 10-Key Pad to select “TRAY1 PAPER”. - Page 192 Utility Mode – Copy Functions Have the necessary precautions been observed when entering the paper size? ➜ Refer to the diagram at the right Width (y) and be sure to specify the paper Length (x) width and length measurements correctly. Using the 10-Key Pad, enter the paper width (mm), and then press the [Yes] key.
-
Page 193: To Set The "Auto Select" Function
Utility Mode – Copy Functions To set the “AUTO SELECT” function Select the “PAPER SOURCE SETUP” menu. ❍ Refer to “To select the “PAPER SOURCE SETUP” menu” on page 9-12. Press the [3] key from the 10-Key Pad to select “AUTO SELECT”. Using the keys, select a paper tray, and then press the [Yes]... -
Page 194: Specifying User-Managed Service Tasks ("User Management" Menu)
Utility Mode – Copy Functions Specifying User-Managed Service Tasks (“USER MANAGEMENT” Menu) From the “USER MANAGEMENT” menu, certain service operations can be performed in order to maintain the machine’s efficiency. “USER MANAGEMENT” menu: USER Description MANAGEMENT DRUM DEHUMIDIFY When the room temperature changes drastically (such as when a heater is used in the winter) or when the machine is used in an extremely humid location, condensation may form on the surface of the PC drum inside the machine, resulting... -
Page 195: To Perform The "Toner Replenisher" Function
Utility Mode – Copy Functions To perform the “TONER REPLENISHER” function Press the [Utility] key. The first screen of the Utility mode appears. Press the key twice to select “USER MANAGEMENT”. Using the keys, select “TONER REPLENISHER”, and then press the [Yes] key. Toner replenishing begins, and the main screen appears. -
Page 196: Specifying Administrative Settings ("Admin. Management" Menu)
Utility Mode – Copy Functions Specifying Administrative Settings (“ADMIN. MANAGEMENT” Menu) From the “ADMIN. MANAGEMENT” menu, various functions for controlling the use of the machine can be set. In order to set an “ADMIN. MANAGEMENT” function, the administrator access number must be entered. -
Page 197: To Select The "Admin. Management" Menu
Utility Mode – Copy Functions To select the “ADMIN. MANAGEMENT” menu Press the [Utility] key. Press the key 3 times to select “ADMIN. MANAGEMENT”, and then press the [Yes]. Using the 10-Key Pad, enter the 6- digit administrator access number, and then press the [Yes] key. -
Page 198: To Set The "Auto Shut Off" Function
Utility Mode – Copy Functions To set the “AUTO SHUT OFF” function Select the “ADMIN. MANAGEMENT” menu. ❍ Refer to “To select the “ADMIN. MANAGEMENT” menu” on page 9-20. Press the [1] key from the 10-Key Pad to select “AUTO SHUT OFF”. Using the keys, select either “DISABLE”... -
Page 199: To Turn On/Off User (Section) Management
Utility Mode – Copy Functions To turn on/off user (section) management Select the “ADMIN. MANAGEMENT” menu. ❍ Refer to “To select the “ADMIN. MANAGEMENT” menu” on page 9-20. Press the [2] key from the 10-Key Pad to select “COPY TRACK”. Using the keys, select “COPY TRACK MODE”, and then... -
Page 200: To Register User (Section) Access Numbers
Utility Mode – Copy Functions To register user (section) access numbers Select the “ADMIN. MANAGEMENT” menu. ❍ Refer to “To select the “ADMIN. MANAGEMENT” menu” on page 9-20. Press the [2] key from the 10-Key Pad to select “COPY TRACK”. Using the keys, select “ACCESS NO. -
Page 201: To Change/Delete User (Section) Access Numbers
Utility Mode – Copy Functions To change/delete user (section) access numbers Select the “ADMIN. MANAGEMENT” menu. ❍ Refer to “To select the “ADMIN. MANAGEMENT” menu” on page 9-20. Press the [2] key from the 10-Key Pad to select “COPY TRACK”. Using the keys, select “ACCESS NO. - Page 202 Utility Mode – Copy Functions Using the keys, select either “EDIT” or “DELETE”, and then press the [Yes] key. ❍ If “EDIT” was selected, a screen appears, allowing you to edit the access number. (Continue with step 7.) ❍ If “DELETE” was selected, the current access number is deleted. (The message “ACCESS NO.
-
Page 203: To Display/Clear The Total Count For A Specific Account
Utility Mode – Copy Functions To display/clear the total count for a specific account Select the “ADMIN. MANAGEMENT” menu. ❍ Refer to “To select the “ADMIN. MANAGEMENT” menu” on page 9-20. Press the [2] key from the 10-Key Pad to select “COPY TRACK”. Using the keys, select “COPY TRACK DATA”, and then... - Page 204 Utility Mode – Copy Functions To clear the counter, press the [No] key. (Continue with step 7.) To finish without clearing the counter, press the [Yes] key. The “COPY TRACK DATA” function appears again. After the counter is cleared, press the [Yes] key.
-
Page 205: To Print The Total Counts For All Accounts (Sections)
Utility Mode – Copy Functions To print the total counts for all accounts (sections) Select the “ADMIN. MANAGEMENT” menu. ❍ Refer to “To select the “ADMIN. MANAGEMENT” menu” on page 9-20. Press the [2] key from the 10-Key Pad to select “COPY TRACK”. Using the keys, select “COPY TRACK DATA”, and then... -
Page 206: To Clear The Total Counts For All Accounts
Utility Mode – Copy Functions To clear the total counts for all accounts Select the “ADMIN. MANAGEMENT” menu. ❍ Refer to “To select the “ADMIN. MANAGEMENT” menu” on page 9-20. Press the [2] key from the 10-Key Pad to select “COPY TRACK”. Using the keys, select “COPY TRACK DATA”, and then... -
Page 207: To Set The "Remote Monitor" Function
Utility Mode – Copy Functions To set the “REMOTE MONITOR” function Select the “ADMIN. MANAGEMENT” menu. ❍ Refer to “To select the “ADMIN. MANAGEMENT” menu” on page 9-20. Press the [3] key from the 10-Key Pad to select “REMOTE MONITOR”. Using the keys, select “LIMITED”, “FULL”... -
Page 208: Specifying Copy Settings ("Copy Setting 1" & "Copy Setting 2" Menus)
Utility Mode – Copy Functions Specifying Copy Settings (“COPY SETTING 1” & “COPY SETTING 2” Menus) The settings that are automatically selected when the machine is turned off or the [Panel Reset] key is pressed are called the “default settings”. From the “COPY SETTING 1”... -
Page 209: To Select The "Copy Setting 1" Menu
Utility Mode – Copy Functions “COPY SETTING 2” menu: COPY SETTING 2 Description MIXED ORIGINAL This function can be used to set whether or not the “Mixed Orig.” function is selected when the machine starts up or after the Control Panel is reset. •... -
Page 210: To Set The "Paper Priority" Function
Utility Mode – Copy Functions From the 10-Key Pad, press the key ([1] through [7]) for the “COPY SETTING 1” function that you wish to set. ❍ The “COPY SETTING 1” functions are as follows: 1 PAPER PRIORITY 2 DENSITY PRIORITY 3 DENSITY LEVEL(A) 4 DENSITY LEVEL(M) 5 BINDING POS. -
Page 211: To Set The "Density Priority" Function
Utility Mode – Copy Functions To set the “DENSITY PRIORITY” function Select the “COPY SETTING 1” menu. ❍ Refer to “To select the “COPY SETTING 1” menu” on page 9-32. Press the [2] key from the 10-Key Pad to select “DENSITY PRIORITY”. -
Page 212: To Set The Manual Density Level ("Density Level(M)" Function)
Utility Mode – Copy Functions To set the manual density level (“DENSITY LEVEL(M)” function) Select the “COPY SETTING 1” menu. ❍ Refer to “To select the “COPY SETTING 1” menu” on page 9-32. Press the [4] key from the 10-Key Pad to select “DENSITY LEVEL(M)”. -
Page 213: To Specify The Binding Width ("Margin Setting" Function)
Utility Mode – Copy Functions To specify the binding width (“MARGIN SETTING” function) Select the “COPY SETTING 1” menu. ❍ Refer to “To select the “COPY SETTING 1” menu” on page 9-32. Press the [6] key from the 10-Key Pad to select “MARGIN SETTING”. Using the 10-Key Pad, enter the binding width (margin), and then press the [Yes] key. -
Page 214: To Select The "Copy Setting 2" Menu
Utility Mode – Copy Functions Using the 10-Key Pad, enter the width of the area to be erased, and then press the [Yes] key. ❍ The width of the area to be erased can be set between 5 mm and 20 mm. ❍... -
Page 215: To Set The "Mixed Original" Function
Utility Mode – Copy Functions To set the “MIXED ORIGINAL” function Select the “COPY SETTING 2” menu. ❍ Refer to “To select the “COPY SETTING 2” menu” on page 9-37. Press the [1] key from the 10-Key Pad to select “MIXED ORIGINAL”. Using the keys, select either “ON”... -
Page 216: To Specify The Default Finishing Mode ("Output Priority" Function)
Utility Mode – Copy Functions To specify the default finishing mode (“OUTPUT PRIORITY” function) Select the “COPY SETTING 2” menu. ❍ Refer to “To select the “COPY SETTING 2” menu” on page 9-37. Press the [3] key from the 10-Key Pad to select “OUTPUT PRIORITY”. -
Page 217: To Set The "Crisscross Mode" Function
Utility Mode – Copy Functions To set the “CRISSCROSS MODE” function Select the “COPY SETTING 2” menu. ❍ Refer to “To select the “COPY SETTING 2” menu” on page 9-37. Press the [5] key from the 10-Key Pad to select “CRISSCROSS MODE”. -
Page 218: Utility Mode - Fax Functions
Utility Mode – Fax Functions Utility Mode – Fax Functions This chapter describes the various Utility mode functions that can be used to set fax-related functions. 10.1 Programming Fax Settings (“FAX REGISTRATION” Menu) From the “FAX REGISTRATION” menu, various settings can be specified in order to take advantage of this machine’s many fax functions. -
Page 219: To Select The "Fax Registration" Menu
Utility Mode – Fax Functions FAX REGISTRATION Characteristic/Description RELAY BOX This function can be used to program the relay boxes in order for this machine (acting as a relay station) to receive a document from another fax machine (transmitting station), then transmit the document to multiple recipients (receiving stations). -
Page 220: Setting Up One-Touch Dialing ("One-Touch Dial" Function)
Utility Mode – Fax Functions Setting Up One-Touch Dialing (“ONE-TOUCH DIAL” function) If the one-touch dial keys are programmed with fax numbers, the recipient can be specified easily and accurately without the need to manually enter the number using the 10-Key Pad. A maximum of 27 numbers can be programmed. -
Page 221: To Program A One-Touch Dial Key
Utility Mode – Fax Functions To program a one-touch dial key Select the “FAX REGISTRATION” menu. ❍ Refer to “To select the “FAX REGISTRATION” menu” on page 10-2. Press the [1] key from the 10-Key Pad to select “ONE-TOUCH DIAL”. Press the one-touch dial key that you wish to program. - Page 222 Utility Mode – Fax Functions Press the key, and then use the 10-Key Pad to enter the sub- address. ❍ A number up to 20 digits long can be entered for the sub- address. ❍ To enter an SID, continue with step 6. ❍...
-
Page 223: To Change/Delete A Programmed One-Touch Dial Key
Utility Mode – Fax Functions To change/delete a programmed one-touch dial key Select the “FAX REGISTRATION” menu. ❍ Refer to “To select the “FAX REGISTRATION” menu” on page 10-2. Press the [1] key from the 10-Key Pad to select “ONE-TOUCH DIAL”. Press the one-touch dial key that you wish to change or delete. - Page 224 Utility Mode – Fax Functions Using the keys, select either “EDIT” or “DELETE”, and then press the [Yes] key. ❍ If “EDIT” was selected, the fax number is displayed. (Continue with step 6.) ❍ If “DELETE” was selected, the settings programmed for the one- touch dial key are deleted and the “FAX REGISTRATION”...
-
Page 225: Setting Up Speed Dialing ("Speed Dial" Function)
Utility Mode – Fax Functions Setting Up Speed Dialing (“SPEED DIAL” function) If speed dial numbers are programmed with fax numbers, the recipient can be specified easily and accurately without the need to manually enter the number using the 10-Key Pad. A maximum of 100 fax numbers (001 to 100) can be programmed. - Page 226 Utility Mode – Fax Functions Using the 10-Key Pad, enter the fax number of the recipient. ❍ The fax number can contain a maximum of 30 digits. For details on the characters that can be entered, refer to p. 6-8. ❍...
- Page 227 Utility Mode – Fax Functions Using the keys, select the desired modem speed. Press the [Yes] key. The settings are registered. To program another speed dial number, repeat steps 3 through 11. Press the [No] key to finish programming. The “FAX REGISTRATION” menu appears again.
-
Page 228: To Change/Delete A Programmed Speed Dial Number
Utility Mode – Fax Functions To change/delete a programmed speed dial number Select the “FAX REGISTRATION” menu. ❍ Refer to “To select the “FAX REGISTRATION” menu” on page 10-2. Press the [2] key from the 10-Key Pad to select “SPEED DIAL”. Using the 10-Key Pad, enter the speed dial number that you wish to change or delete. - Page 229 Utility Mode – Fax Functions ❍ If a speed dial number used in group dialing or program dialing is deleted, it is also deleted from the corresponding group dialing or program dialing. Change the fax number, F codes (sub-address and SID), and modem speed as desired.
-
Page 230: Setting Up Group Dialing ("Group Dial" Function)
Utility Mode – Fax Functions Setting Up Group Dialing (“GROUP DIAL” function) A single one-touch dial key can be programmed with a maximum of 50 different fax numbers as one group. Programming a one-touch dial key with a group of fax numbers is convenient when documents are frequently sent to a set group of multiple recipients. -
Page 231: To Change/Delete A Programmed Group Of Fax Numbers
Utility Mode – Fax Functions Press the [Yes] key, and then specify another recipient. ❍ Repeat steps 5 and 6 until all recipients have been specified. ❍ A maximum of 50 different fax numbers can be specified as one group. ❍... - Page 232 Utility Mode – Fax Functions Press the [No] key. Using the keys, select either “EDIT” or “DELETE”, and then press the [Yes] key. ❍ If “EDIT” was selected, the group name is displayed. (Continue with step 6.) ❍ If “DELETE” was selected, the group dialing settings are deleted and the “FAX REGISTRATION”...
-
Page 233: Setting Up Program Dialing ("Program Dial" Function)
Utility Mode – Fax Functions Setting Up Program Dialing (“PROGRAM DIAL” function) If one-touch dial keys have been programmed with fax numbers and a transmission/reception function, that function can be carried out by pressing just the corresponding one-touch dial key. Transmission/reception functions that can be programmed: Broadcast transmission Timer transmission... -
Page 234: To Change/Delete A Programmed Broadcast Transmission
Utility Mode – Fax Functions From the 10-Key Pad, press the key ([1] through [3], [6] or [7]) for the desired function. ❍ Functions that can be selected: 1 BROADCAST 2 TIMER TX 3 MAILBOX TX 6 POLLING RX 7 RELAY INITIATE Follow the instructions for the selected function. - Page 235 Utility Mode – Fax Functions Press the one-touch dial key ([24] through [27]) programmed with the broadcast transmission that you wish to change or delete. Press the [No] key. Using the keys, select either “EDIT” or “DELETE”, and then press the [Yes] key. ❍...
-
Page 236: To Change/Delete A Programmed Timer Transmission
Utility Mode – Fax Functions To change/delete a programmed timer transmission Select the “FAX REGISTRATION” menu. ❍ Refer to “To select the “FAX REGISTRATION” menu” on page 10-2. Press the [4] key from the 10-Key Pad to select “PROGRAM DIAL”. Press the one-touch dial key ([24] through [27]) programmed with the timer transmission that you wish to... -
Page 237: To Change/Delete A Programmed Mailbox Transmission
Utility Mode – Fax Functions To change the recipient, press the [No] key, and then by using the one- touch dial keys or the speed dial numbers, or by entering the fax number using the 10-Key Pad, specify a different recipient. ❍... - Page 238 Utility Mode – Fax Functions Using the keys, select either “EDIT” or “DELETE”, and then press the [Yes] key. ❍ If “EDIT” was selected, the specified recipient is displayed. (Continue with step 6.) ❍ If “DELETE” was selected, the program dialing settings are deleted and the “FAX REGISTRATION”...
-
Page 239: To Change/Delete A Programmed Polling Reception
Utility Mode – Fax Functions To change/delete a programmed polling reception Select the “FAX REGISTRATION” menu. ❍ Refer to “To select the “FAX REGISTRATION” menu” on page 10-2. Press the [4] key from the 10-Key Pad to select “PROGRAM DIAL”. Press the one-touch dial key ([24] through [27]) programmed with the polling reception that you wish to... -
Page 240: To Change/Delete A Programmed Relay Initiation Transmission
Utility Mode – Fax Functions When you are finished making changes, press the [Start] key. Other program dialing settings can be changed. Press the [No] key to return to the “FAX REGISTRATION” menu. To change/delete a programmed relay initiation transmission Select the “FAX REGISTRATION”... - Page 241 Utility Mode – Fax Functions Using the keys, select either “EDIT” or “DELETE”, and then press the [Yes] key. ❍ If “EDIT” was selected, the specified recipient is displayed. (Continue with step 6.) ❍ If “DELETE” was selected, the program dialing settings are deleted and the “FAX REGISTRATION”...
-
Page 242: Setting Up Batch Transmissions ("Batch Tx" Function)
Utility Mode – Fax Functions Setting Up Batch Transmissions (“BATCH TX” function) If the batch transmission setting (transmission time) is specified for a one- touch dial key programmed with recipient fax numbers, multiple documents can be stored in the memory and sent out together at the specified time. - Page 243 Utility Mode – Fax Functions Was the one-touch dial key that was pressed one programmed for group dialing, program dialing, or combination dialing, or not programmed at all? ➜ An error message appears. Using the 10-Key Pad, enter the desired transmission time, and then press the [Yes] key.
-
Page 244: To Change The Batch Transmission Setting
Utility Mode – Fax Functions To change the batch transmission setting Select the “FAX REGISTRATION” menu. ❍ Refer to “To select the “FAX REGISTRATION” menu” on page 10-2. Press the [5] key from the 10-Key Pad to select “BATCH TX”. Press the one-touch dial key programmed with the batch transmission setting that you wish to... -
Page 245: To Delete The Batch Transmission Setting
Utility Mode – Fax Functions To delete the batch transmission setting Select the “FAX REGISTRATION” menu. ❍ Refer to “To select the “FAX REGISTRATION” menu” on page 10-2. Press the [5] key from the 10-Key Pad to select “BATCH TX”. Press the one-touch dial key programmed with the batch transmission setting that you wish to... -
Page 246: Setting Up Mailboxes ("Mailbox" Function)
Utility Mode – Fax Functions Setting Up Mailboxes (“MAILBOX” function) Mailbox IDs must first be specified in order to receive faxes with mailbox reception only if the mailbox ID sent by the caller matches the mailbox ID set on this machine. Note A mailbox ID cannot be the same as a relay box ID. -
Page 247: To Delete A Mailbox
Utility Mode – Fax Functions Using the 10-Key Pad, enter the 4- digit password, and then press the [Yes] key. ❍ The password can be set to any number between 0000 and 9999. ❍ If you wish to change the password, press the [No] key, and then enter the new password. -
Page 248: Setting Up Relay Boxes ("Relay Box" Function)
Utility Mode – Fax Functions Using the 10-Key Pad, enter the 4- digit mailbox ID, and then press the [Yes] key. ❍ If you wish to change the ID, press the [No] key, and then enter the new number. The specified mailbox is deleted. Press the [Panel Reset] key. -
Page 249: To Program The Relay Box
Utility Mode – Fax Functions To program the relay box Select the “FAX REGISTRATION” menu. ❍ Refer to “To select the “FAX REGISTRATION” menu” on page 10-2. Press the [7] key from the 10-Key Pad to select “RELAY BOX”. Using the 10-Key Pad, enter the relay box number. - Page 250 Utility Mode – Fax Functions To send back a relay result report, specify the recipient using either a one-touch dial key or speed dial number programmed with the recipient’s fax number. A screen appears, allowing you to specify the receiving stations. Using the one-touch dial keys or the speed dial numbers, or by entering the fax number using the 10-Key...
-
Page 251: To Delete The Relay Box
Utility Mode – Fax Functions To delete the relay box Select the “FAX REGISTRATION” menu. ❍ Refer to “To select the “FAX REGISTRATION” menu” on page 10-2. Press the [7] key from the 10-Key Pad to select “RELAY BOX”. Using the 10-Key Pad, enter the number of the relay box that you wish to delete. -
Page 252: Specifying Transmission Settings ("Tx Operation" Menu)
Utility Mode – Fax Functions 10.2 Specifying Transmission Settings (“TX OPERATION” Menu) From the “TX OPERATION” menu, various functions for sending faxes can be set. “TX OPERATION” menu: TX OPERATION Characteristic/Description SCAN CONTRAST This function can be used to set the default scanning contrast level to one of five settings between “LIGHT”... -
Page 253: To Specify The Default Scanning Contrast ("Scan Contrast" Function)
Utility Mode – Fax Functions From the 10-Key Pad, press the key ([1] through [5]) for the “TX OPERATION” function that you wish to set. ❍ The “TX OPERATION” functions are as follows: 1 SCAN CONTRAST 2 RESOLUTION 3 DEFAULT TX 4 HEADER 5 OT-DIAL IN COPY If, at any time, you wish to quit setting a “TX OPERATION”... -
Page 254: To Specify The Default Resolution Setting ("Resolution" Function)
Utility Mode – Fax Functions To specify the default resolution setting (“RESOLUTION” function) Select the “TX OPERATION” menu. ❍ Refer to “To select the “TX OPERATION” menu” on page 10-35. Press the [2] key from the 10-Key Pad to select “RESOLUTION”. Using the keys, select the desired resolution setting, and... -
Page 255: To Set The "Default Tx" Function
Utility Mode – Fax Functions To set the “DEFAULT TX” function About memory transmission: ✔ Memory transmission is only available when the optional Automatic Document Feeder is installed. Select the “TX OPERATION” menu. ❍ Refer to “To select the “TX OPERATION”... -
Page 256: To Specify If One-Touch Dialing Transmission (Copy Mode) Is Allowed ("Ot-Dial In Copy" Function)
Utility Mode – Fax Functions To specify if one-touch dialing transmission (Copy mode) is allowed (“OT-DIAL IN COPY” function) Select the “TX OPERATION” menu. ❍ Refer to “To select the “TX OPERATION” menu” on page 10-35. Press the [5] key from the 10-Key Pad to select “OT-DIAL IN COPY”. -
Page 257: Specifying Reception Settings ("Rx Operation" Menu)
Utility Mode – Fax Functions 10.3 Specifying Reception Settings (“RX OPERATION” Menu) From the “RX OPERATION” menu, various functions for receiving faxes can be set. “RX OPERATION” menu: RX OPERATION Characteristic/Description MEMORY RX MODE This function can be used to set whether to allow (“ON”) memory reception or not (“OFF”). - Page 258 Utility Mode – Fax Functions RX OPERATION Characteristic/Description FOOTER This function can be used to set whether or not the reception information (date received, number of pages, etc.) is printed at the bottom of each received document. • The manufacturer’s default setting is “OFF”. SELECT TRAY This function can be used to select which paper tray can be used to supply paper when printing received documents or...
-
Page 259: To Select The "Rx Operation" Menu
Utility Mode – Fax Functions To select the “RX OPERATION” menu Press the [Utility] key. The first screen of the Utility mode appears. Press the key 8 times to select “RX OPERATION”. From the 10-Key Pad, press the key ([1] through [8]) for the “RX OPERATION”... -
Page 260: To Select The Memory Reception Mode ("Memory Rx Mode" Function)
Utility Mode – Fax Functions To select the memory reception mode (“MEMORY RX MODE” function) Select the “RX OPERATION” menu. ❍ Refer to “To select the “RX OPERATION” menu” on page 10-42. Press the [1] key from the 10-Key Pad to select “MEMORY RX MODE”. -
Page 261: To Cancel Memory Reception
Utility Mode – Fax Functions To cancel memory reception Memory reception is automatically cancelled at the specified ending time, and the received documents are printed. If no ending time has been set or if you wish to cancel memory reception before the ending time, follow the procedure described below. -
Page 262: To Set The "No.of Rings" Function
Utility Mode – Fax Functions To set the “NO.of RINGS” function Select the “RX OPERATION” menu. ❍ Refer to “To select the “RX OPERATION” menu” on page 10-42. Press the [2] key from the 10-Key Pad to select “NO.of RINGS”. Using the 10-Key Pad, enter the desired number of rings, and then press the [Yes] key. -
Page 263: To Set The "Rx Print" Function
Utility Mode – Fax Functions To set the “RX PRINT” function Select the “RX OPERATION” menu. ❍ Refer to “To select the “RX OPERATION” menu” on page 10-42. Press the [4] key from the 10-Key Pad to select “RX PRINT”. Using the keys, select either “MEMORY RX”... -
Page 264: To Set The "Forward" Function
Utility Mode – Fax Functions To set the “FORWARD” function Select the “RX OPERATION” menu. ❍ Refer to “To select the “RX OPERATION” menu” on page 10-42. Press the [6] key from the 10-Key Pad to select “FORWARD”. Using the keys, select “ON”, “ON(PRINT)”... -
Page 265: To Set The "Footer" Function
Utility Mode – Fax Functions To set the “FOOTER” function Select the “RX OPERATION” menu. ❍ Refer to “To select the “RX OPERATION” menu” on page 10-42. Press the [7] key from the 10-Key Pad to select “FOOTER”. Using the keys, select either “ON”... -
Page 266: Specifying Communication Settings ("Comm.setting" Menu)
Utility Mode – Fax Functions 10.4 Specifying Communication Settings (“COMM.SETTING” Menu) From the “COMM.SETTING” menu, various functions are available for specifying communication settings. “COMM.SETTING” menu: COMM.SETTING Characteristic/Description TONE/PULSE This function can be used to specify the dialing system. If this function is not correctly set to the type of dialing system used, faxes cannot be sent. -
Page 267: To Set The "Line Monitor" Function
Utility Mode – Fax Functions To set the “LINE MONITOR” function Press the [Utility] key. The first screen of the Utility mode appears. Press the key 9 times to select “COMM.SETTING”. From the 10-Key Pad, press the [2] key. A screen appears, allowing you to select the monitoring volume. -
Page 268: Specifying Report Output ("Reporting" Menu)
Utility Mode – Fax Functions 10.5 Specifying Report Output (“REPORTING” Menu) From the “REPORTING” menu, various functions are available for specifying which reports are automatically printed. “REPORTING” menu: REPORTING Characteristic/Description ACTIVITY REPORT Every 60 transmissions/receptions, a report can be printed to show the results of the transmissions/receptions. -
Page 269: To Set The "Activity Report" Function
Utility Mode – Fax Functions From the 10-Key Pad, press the key ([1] through [4]) for the “REPORTING” function that you wish to set. ❍ The “REPORTING” functions are as follows: 1 ACTIVITY REPORT 2 RESERV.REPORT 3 TX RESULT REPORT 4 RX RESULT REPORT If, at any time, you wish to quit setting/changing a “REPORTING”... -
Page 270: To Set The "Reserv.report" Function
Utility Mode – Fax Functions To set the “RESERV.REPORT” function Select the “REPORTING” menu. ❍ Refer to “To select the “REPORTING” menu” on page 10-51. Press the [2] key from the 10-Key Pad to select “RESERV.REPORT”. Using the keys, select either “ON”... -
Page 271: To Set The "Rx Result Report" Function
Utility Mode – Fax Functions To set the “RX RESULT REPORT” function Select the “REPORTING” menu. ❍ Refer to “To select the “REPORTING” menu” on page 10-51. Press the [4] key from the 10-Key Pad to select “RX RESULT REPORT”. Using the keys, select either “ON”... -
Page 272: Confirmation Mode
Confirmation Mode Confirmation Mode 11.1 Checking Transmission Results The transmission result information for a maximum of 60 sent and received documents is saved. For details on checking the transmission results, refer to “To check the transmission result” on page 6-22. 11.2 Checking the Machine’s Counters (“MACHINE COUNTER”... -
Page 273: To Check The Counters
Confirmation Mode To check the counters Press the [Confirm] key twice, and then press the [Yes] key. The “MACHINE COUNTER” menu appears. Using the keys, select the counter that you wish to check. Press the [Yes] key to return to the “MACHINE COUNTER” menu. Press the [No] key to return to the main screen. -
Page 274: Outputting A Report/List ("Print Report" Menu)
Confirmation Mode 11.3 Outputting a report/list (“PRINT REPORT” menu) The various reports and lists of programmed settings can be printed using the functions available when the [Confirm] key is pressed. To output a report/list Press the [Confirm] key 3 times. A confirmation message appears, asking whether or not to print a report. -
Page 275: Transmission Result Report
Confirmation Mode Transmission Result Report The document number, recipient name, date sent, starting time of transmission, number of document pages, time required, mode, and transmission result are printed. SESSION FUNCTION No. DESTINATION DATE TIME PAGE DURATION MODE RESULT STATION 0001 AAA NEWYORK APR.19 18:00... -
Page 276: Queued Job List
Confirmation Mode Queued Job List This is a list of documents stored in the memory and waiting to be sent, and documents specified for timer transmission, batch transmission or polling reception. The document number, type of operation being performed, time, recipient/ caller name, and number of document pages are printed. -
Page 277: Relay Box List
Confirmation Mode Relay Box List The status and settings for the 5 relay boxes can be printed and checked. Machine Settings List The current machine settings are printed. Configuration Page This function is only available when the Printer Controller (optional) is installed. -
Page 278: Error Messages
Error Messages Error Messages 12.1 When the Message “LOAD PAPER” Appears When the currently selected paper tray runs out of paper, the message shown below appears, and copying and printing cannot be performed. The paper source and paper size appear in the bottom line of the screen. (For the sample message shown above, supply A4 L-size paper into the 1st Tray.) Check the message for the empty paper tray and the paper size, and then... - Page 279 Error Messages Press down on the Paper-Lifting Paper-Lifting Plate Plate until it locks into place. Load the paper into the tray so that the front side of the paper (the side facing up when the package was unwrapped) faces up. Have the necessary precautions been observed when loading the paper?
-
Page 280: To Load Paper Into The 2Nd Tray
Error Messages To load paper into the 2nd Tray Load paper into the 3rd, 4th and 5th paper trays using the same procedure described below. Pull out the 2nd Tray. Press down on the Paper-Lifting Plate until it locks into place. Paper-Lifting Plate Load the paper into the tray so that the front side of the paper (the side... -
Page 281: To Load Paper Into The Multiple Bypass Tray
Error Messages Slide the paper guides against the edges of the paper. Is the paper guide positioned correctly? ➜ Make sure that the paper guides are pushed up against the edges of the paper. Close the paper tray. To load paper into the Multiple Bypass Tray Load the paper into the Bypass Tray. -
Page 282: When The Message "Toner Empty" Appears
Error Messages 12.2 When the Message “TONER EMPTY” Appears When toner is about to run out, the message shown below appears. When this message appears, replace the toner bottle with a new one. Note Use only toner developed specifically for this machine. Use of any other type of toner may cause damage to the machine. - Page 283 Error Messages Holding the sealed end of the new toner bottle up, slowly peel off the seal toward you. Have the necessary precautions been observed when peeling off the seal? ➜ Since some toner may spurt out while the seal is being peeled off, be sure to peel off the seal slowly.
- Page 284 Error Messages Close the Toner Bottle Holder, and then close the Front Cover. When the Front Cover is closed, the toner automatically begins refilling. Are copies faint immediately after the toner bottle is replaced? ➜ Perform the “TONER REPLENISHER” function in the Utility mode (p.
-
Page 285: When The Message "Paper Jam" Appears
Error Messages 12.3 When the Message “PAPER JAM” Appears If a paper misfeed occurs while copying or printing, the message shown below appears, and copying and printing stops. A message indicating the location of the paper misfeed appears in the bottom line of the screen. - Page 286 Error Messages Open the Side Cover of the main unit. Pull down the Pressure Levers. Have the necessary precautions been observed when pulling down the Pressure Levers? ➜ Only hold the green part of the Pressure Levers when pulling them down. Pressure Levers Slowly pull out the paper.
- Page 287 Error Messages While turning the knob on the roller, slowly pull out the paper. Have the necessary precautions been observed when turning the roller? ➜ Only turn the green knob when turning the roller. Return the Pressure Levers to their original positions.
- Page 288 Error Messages Slide the paper guides against the edges of the paper. Is the paper guide positioned correctly? ➜ Make sure that the paper guides are pushed up against the edges of the paper. Close the 1st Tray. Di152f/Di183f 12-11...
-
Page 289: To Clear A Paper Misfeed In The Paper Feed Cabinet
Error Messages To clear a paper misfeed in the Paper Feed Cabinet Open the Side Cover of the Paper Feed Cabinet. Slowly pull out the paper. Close the Side Cover of the Paper Feed Cabinet. 12-12 Di152f/Di183f... -
Page 290: To Clear A Paper Misfeed In The Multiple Bypass Tray
Error Messages To clear a paper misfeed in the Multiple Bypass Tray Remove all paper from the tray. Open the Side Cover of the main unit. Slowly pull out the paper. Transfer Roller Have the necessary precautions been observed when pulling out the paper? ➜... - Page 291 Error Messages Load the paper into the Bypass Tray again. 12-14 Di152f/Di183f...
-
Page 292: When The Message "Original Doc.jam" Appears
Error Messages 12.4 When the Message “ORIGINAL DOC.JAM” Appears If a document misfeed occurs while the document is being fed, the message shown below appears, and copying and printing stops. Remove the misfed document according to the following procedure. To clear a misfeed in the Automatic Document Feeder Open the Document Feeder Cover. - Page 293 Error Messages Lift open the Automatic Document Feeder. While turning the Document Feed Knob in the direction of the arrow, slowly pull out the document. Close the Automatic Document Feeder and the Document Feeder Cover. 12-16 Di152f/Di183f...
- Page 294 Error Messages Load the documents removed in step 2 back into the tray. Note If “RETURN 1 (2) ORIG. to ADF and PRESS START KEY” appears on the display, also load the one or two document pages that caused the paper misfeed.
-
Page 295: Main Error Messages And Their Remedies
Error Messages 12.5 Main Error Messages and Their Remedies Message Cause Remedy PAPER JAM A paper misfeed occurred in Open the cover at the the main unit. indicated location, and then (Flashing alternately) remove the misfed paper. (“When the Message OPEN XXX SIDE COVER “PAPER JAM”... - Page 296 Error Messages Message Cause Remedy SET ORIGINAL TO ADF A document was not loaded Load a document into the into the Automatic Document Automatic Document Feeder. Feeder before beginning a Securely close the Automatic copy function (such as, “2in1” Document Feeder. copying or “Mixed Orig.”...
- Page 297 Error Messages Message Cause Remedy MEMORY FULL The size of the data for the Press the [Panel Reset] key, scanned image has or turn the machine off, then (Flashing alternately) exceeded the capacity of the on again. (The scanned data memory.
- Page 298 Error Messages Message Cause Remedy CALL SERVICE(M1) A maintenance is due. Contact your service representative. CALL SERVICE(M2) The Imaging Unit should be Contact your service replaced. representative. MACHINE TROUBLE Some problem occurred in Turn the machine off, then on the machine. again.
- Page 299 Error Messages 12-22 Di152f/Di183f...
-
Page 300: Troubleshooting
Troubleshooting Troubleshooting 13.1 When Incorrect Copies Are Produced Symptom Possible Cause Remedy The copy is too light. The copy density is set too Use the Auto/Photo key light. to select a darker copy density (p. 4-25). The copy paper is damp. Replace the paper. - Page 301 Troubleshooting Symptom Possible Cause Remedy There are streaks through the The Original Glass is dirty. Wipe the glass with a soft copy. dry cloth. (p. 14-9) The document pad is dirty. Clean the document pad with a soft cloth dampened with a mild detergent.
- Page 302 Troubleshooting Symptom Possible Cause Remedy The image is not aligned The document is not Correctly position the properly on the paper. positioned correctly. document against the Document Scales. (p. 4-1) If the Automatic Document Feeder is installed, correctly adjust the Document Guide Plates for the size of the document.
-
Page 303: When Copying Is Not Performed Correctly
Troubleshooting 13.2 When Copying Is Not Performed Correctly Symptom Possible Cause Remedy Nothing appears on the Only the [Start] key The machine is in Energy display. indicator is lit up in green. Saver mode (preheat mode). Press any key to cancel Energy Saver mode. -
Page 304: When Faxing Is Not Performed Correctly
Troubleshooting 13.3 When Faxing Is Not Performed Correctly Faxes Cannot Be Sent Symptom Possible Cause Remedy The document cannot be The document is too thick. Position the document on scanned. the Original Glass to send it. (p. 6-5) The document is too thin or Position the document on too small. -
Page 305: Faxes Cannot Be Received
Troubleshooting Faxes Cannot Be Received Symptom Possible Cause Remedy The received fax is not clear. Paper that does not meet Use paper that meets specifications has been specifications. (p. 3-39) used. The paper is damp. Replace the paper. (p. 12-1) The toner is empty. -
Page 306: Calls Cannot Be Sent
Troubleshooting Calls Cannot Be Sent Symptom Possible Cause Remedy Nothing can be heard from the The cord from the Correctly connect the connected telephone. telephone is not connected telephone cord to the main correctly to the main unit. unit. The telephone cord from Correctly connect the the wall jack is not telephone cord from the... - Page 307 Troubleshooting 13-8 Di152f/Di183f...
-
Page 308: Appendix
Appendix Appendix 14.1 Specifications Main Unit Di152*/Di152f/Di183*/Di183f * Only when Fax unit for Di183/Di152 FX-1 is installed Specification Di152/Di152f Di183/Di183f Type Desktop Platen Stationary Photo conductor Copying system Digital laser copying Developing system MT-HG system Fusing system Heat-roller-fixing system Resolution 600 dpi Document Types: Sheets, books, and other three-dimensional objects... -
Page 309: Automatic Document Feeder Af-10
Appendix Specification Di152/Di152f Di183/Di183f Copy speed 10 sheets/minute (A3 L) 11 sheets/minute (A3 L) 12 sheets/minute (A4 L) 14 sheets/minute (A4 L) 15 sheets/minute (A4 C) 18 sheets/minute (A4 C) 16 sheets/minute (B5 C) 20 sheets/minute (B5 C) Magnification ratios Full size: 1.00 Enlargement ratios:... -
Page 310: Paper Feed Cabinet Pf-120
Appendix Paper Feed Cabinet PF-120 Specification Paper types Plain paper (60 g/m to 90 g/m ), recycled paper Paper sizes A3 L to A5 C, FLS (210 mm 330 mm) In inches: 17 L to 5-1/2 8-1/2 C Paper capacity 250 sheets Power consumption Less than 9 W... -
Page 311: Multiple Bypass Tray Mb-5
Appendix Multiple Bypass Tray MB-5 Specification Paper types Plain paper (60 g/m to 90 g/m ), recycled paper Special paper: Cards (91 g/m to 157 g/m ), OHP transparencies, postcards, and label sheets Paper sizes Width: 90 mm to 297 mm; Length: 140 mm to 432 mm Paper capacity Plain or recycled paper: 50 sheets Special paper: 20 sheets... -
Page 312: List Of Utility/Function/Confirm Menu Commands
Appendix 14.2 List of Utility/Function/Confirm Menu Commands Utility Menu Commands Manufacturer’s default settings appear in bold. Menu Function Settings 1 MACHINE SETTING AUTO RESET ON (0.5/1/2/3/4/5)/OFF ENERGY SAVE MODE TIMER=1-240 min. (Default: 15) AUTO SHUT OFF ON (TIMER=15-240 min.)/OFF DENSITY (ADF) MODE1/MODE2 PRINT DENSITY LIGHT to DARK (5 levels) - Page 313 Appendix Menu Function Settings 5 COPY SETTING 1 PAPER PRIORITY A3 L/B4 L/A4 L/B5 L/A5 L/FLS L/ A4 C/B5 C/A5 C/11 17 L/ 14 L/LG L/LT L/HL L/LT C/ HL C/1ST/2ND/3RD*/4TH*/5TH*/ MULTI BYPASS (* Only with Di183/Di183f) DENSITY PRIORITY AUTO/MANUAL/PHOTO DENSITY LEVEL(A) LIGHT to DARK (3 levels) DENSITY LEVEL(M)
-
Page 314: Function Menu Commands
Appendix Menu Function Settings 9 RX OPERATION MEMORY RX MODE ON/OFF NO.of RINGS 1-16 REDUCTION RX ON/OFF/CUT RX PRINT MEMORY RX/PRINT RX RX MODE AUTO RX/MANUAL RX FORWARD ON/ON (PRINT)/OFF FOOTER ON/OFF SELECT TRAY (For each paper tray) DISABLE/ ENABLE 10 COMM.SETTING TONE/PULSE TONE/PULSE... - Page 315 Appendix Confirm Menu Commands Menu Function TX/RX RESULT — TOTAL PAGE TOTAL COUNT SIZE COUNT TOTAL SCAN TX PAGES RX PAGES PRINT REPORT TX RESULT REPORT RX RESULT REPORT ACTIVITY REPORT MEMORY DATA LIST MEMORY IMAGE LIST ONE TOUCH LIST SPEED DIAL LIST KEY SETTING LIST RELAY BOX LIST...
-
Page 316: Care Of The Machine
Appendix 14.3 Care of the Machine Cleaning Turn off the machine before cleaning it. Housing ➜ Clean the surface of the housing by wiping it with a soft cloth dampened with a mild household detergent. Original Glass ➜ Clean the Original Glass by wiping it with a soft, dry cloth. -
Page 317: Control Panel
Appendix Control Panel ➜ Clean the Control Panel by wiping it with a soft, dry cloth. CAUTION Incorrectly cleaning the Control Panel keys may damage them. Never use mild household detergent or glass cleaner to clean the Control Panel. 14-10 Di152f/Di183f... -
Page 318: Function Combination Table
Appendix 14.4 Function Combination Table Function Combination Table Function combination codes Code Description The functions can be combined. The functions cannot be combined. (The function set first takes precedence.) × The functions cannot be combined. (The function set last takes precedence.) If paper is loaded into the manual bypass tray, the function set first takes precedence. -
Page 319: Paper Size And Zoom Ratio Tables
Appendix 14.5 Paper Size and Zoom Ratio Tables Copy Paper Sizes Paper format Size (millimeters) Size (inches) 297 mm 420 mm 11-3/4 16-1/2 210 mm 297 mm 8-1/4 11-3/4 148 mm 210 mm 5-3/4 8-1/4 105 mm 148 mm 4-1/4 5-3/4 257 mm 364 mm... -
Page 320: Zoom Ratios
Appendix Zoom Ratios Metric sizes Document size Paper size Zoom ratio 0.70 297 mm 420 mm 0.50 11-3/4 16-1/2 0.86 0.61 0.70 210 mm 297 mm 0.50 8-1/4 11-3/4 0.86 0.61 1.41 1.22 0.70 148 mm 210 mm 0.86 5-3/4 8-1/4 1.41 2.00... - Page 321 Appendix 0.81 128 mm 182 mm 1.64 7-1/4 1.15 2.00 1.41 English sizes Document size Paper size Zoom ratio 11 14 0.82 279.4 mm 431.8 mm Legal 0.77 Foolscap 0.75 Letter 0.64 Invoice 0.50 0.93 279.4 mm 381 mm Legal 0.75 Foolscap 0.77...
- Page 322 Appendix Invoice 2.00 5-1/2 8-1/2 1.64 139.7 mm 215.9 mm Legal 1.54 Foolscap 1.50 Letter 1.29 Zoom ratio=Paper size/Document size 1 inch = 25.4 mm 1 mm = 0.0394 inch Di152f/Di183f 14-15...
-
Page 323: Power Outages
Appendix 14.6 Power Outages Even if a power outage occurred, transmission and reception information are stored in the memory for about 10 hours. After 10 hours, all stored information is lost. If a document is lost due to a power outage, a memory clear report is automatically printed after the power is restored and the machine is turned on. -
Page 324: Glossary
Appendix 14.7 Glossary Terms and Definitions Term Definition Automatic redialing If a call cannot be completed, for example if the recipient's machine is busy, the recipient is automatically called again. If a document queued in the memory to be sent contains multiple pages, until the time for redialing has been reached, it is advanced in the queue and sent. - Page 325 Appendix Term Definition Abbreviation for private branch exchange Exchange equipment installed in a company or a plant to connect a number of telephone sets with multiple station lines in order to enable unrestricted communications between the telephone sets. Protocols The necessary rules for communication Touch-tone signals A signal used on the telephone line;...
- Page 326 Index Index Numerics 1st Tray paper setting ................9-14 2in1 copying ..................5-2 4in1 copying ..................5-2 Access numbers ................3-26 Activity report ...................10-52 Administrative settings ...............9-19 Auto panel reset ................ 3-24 Auto paper ..................4-11 Auto paper source change ..............3-26 Auto Select function ................9-16 Auto shut-off ................
- Page 327 Index Communication settings Monitoring volume ..............10-50 Components ..................3-8 Control Panel ..................3-18 Access key .................. 3-27 Energy Saver key ................ 3-25 Interrupt key ................4-27 Panel Reset key ................3-24 Copy density ..................4-25 Setting ..................4-26 Copy functions 4in1 Copy Order ................
- Page 328 Index Energy Saver mode ..............3-25 Entering text ..................3-36 Erase function ..................5-9 Error messages ................12-18 F codes ....................7-25 Fax resolution ..................6-8 Fax transmission Basic faxing ..................6-3 Dialing ..................6-10 Loading documents into the Automatic Document Feeder ....6-3 Positioning documents on the Original Glass ........6-5 Finishing copies ...................5-5 Grouping ..................5-7 Sorting ....................5-6...
- Page 329 Index Loading documents ................4-1 Automatic Document Feeder ............4-1 Books .................... 4-7 Mixed sizes ..................4-2 OHP transparencies ..............4-6 Original Glass ................4-5 Translucent or transparent documents .......... 4-6 Loading paper ................... 12-1 1st Tray ..................12-1 2nd (3rd/4th/5th) Tray ..............12-3 Multiple Bypass Tray ..............
- Page 330 Index Options Automatic Document Feeder ............3-13 Job Tray ..................3-17 Multiple Bypass Tray ..............3-14 Paper Feed Cabinet ..............3-15 Shifting Unit ..................3-16 Paper Feed Cabinet ................14-3 Paper feeding ..................1-16 Paper misfeed clearing ..............12-8 Automatic Document Feeder .............12-15 Main unit ..................12-8 Multiple Bypass Tray ..............12-13 Paper Feed Cabinet ..............12-12 Paper orientation ................1-17 Paper size and zoom ratio tables ............14-12...
- Page 331 Index Queued copy jobs ................3-25 Queued jobs report ................. 10-53 Reception result report ..............10-54 Reception settings Footer printing ................10-48 Forwarding setup ............... 10-47 Memory reception mode ............10-43 Number of rings ................. 10-45 Printing mode ................10-46 Reception mode ................
- Page 332 Index Transmission settings Default transmission mode ............10-38 Header printing ................10-38 Resolution ..................10-37 Scanning contrast ..............10-36 Turning on/off ..................3-28 User fax number ................3-32 User management Administrative settings ..............9-22 User name ..................3-33 User-managed service tasks .............9-17 Utility mode ................9-1 10-1 Copy Setting 1 ................9-32 Copy Setting 2 ................9-37 Zoom setting ..................4-21 Auto zoom ratio ................4-21...
- Page 333 Index 15-8 Di152f/Di183f...
Need help?
Do you have a question about the Di 152f and is the answer not in the manual?
Questions and answers