AJA Ki PRO rack Operation Manual
1 ru rack-mounted digital video recorder
Hide thumbs
Also See for Ki PRO rack:
- Quick start manual (137 pages) ,
- Installation and operation manual (110 pages) ,
- Installation and operation manual (113 pages)
Table of Contents
Advertisement
Quick Links
Advertisement
Table of Contents

Related Manuals for AJA Ki PRO rack


Summary of Contents for AJA Ki PRO rack
- Page 1 Installation and Operation Guide Version 4.2 Published: September 30, 2013...
-
Page 2: Table Of Contents
In This Manual..............10 Chapter 2: Ki Pro Rack at a Glance ......11 Overview. - Page 3 4.1 ANALOG AUDIO ............47 Ki Pro Rack v4.2...
- Page 4 Preparing to Update Software ..........76 Upload and Install the Software on Your Ki Pro Rack ..... . 77 Ki Pro Rack v4.2...
- Page 5 Index............110 Ki Pro Rack v4.2...
-
Page 6: Notices
Copyright Copyright © 2013 AJA Video, Inc. All rights reserved. All information in this manual is subject to change without notice. No part of the document may be reproduced or transmitted in any form, or by any means, electronic or mechanical, including photocopying or recording, without the express written permission of AJA Inc. -
Page 7: Chapter 1: Introduction
FireWire 800 drives. With Ki Pro Rack you can acquire video using the same codecs that you use for editing— Apple ProRes 422 or Avid DNxHD. Ki Pro Rack supports all four types of Apple ProRes 422 (including HQ, LT and Proxy) as well as Avid DNxHD 220x, Avid DNxHD 145 and for 1080p formats, Avid DNxHD 36. -
Page 8: Features
• 3-year warranty Software • Remote Browser control software. When a Mac® or PC are connected via the Ki Pro Rack Ethernet port, the device can control the Ki Pro Rack via a web browser • 20 Preset registers for storing and recalling system preset configurations •... -
Page 9: Apple Prores 422 Advantages
• 185 Mb/second or 175 Mb/second when DNxHD 220x has been selected (Mb/second varies depending upon the format and frame rate) • 145Mb/second • 120 Mb/second or 115Mb/second when DNxHD 145 has been selected (Mb/second varies depending upon the format and frame rate). Ki Pro Rack v4.2 www.aja.com... -
Page 10: In This Manual
Presents a product overview, showing front and rear panel controls, connectors, and options. Chapter 3 Explains how to install Ki Pro Rack and set up the initial configuration. Chapter 4 Provides complete instructions for operating the Ki Pro Rack from the front panel. -
Page 11: Chapter 2: Ki Pro Rack At A Glance
When using Ki Pro Rack, you’ll make media cable connections to a variety of equipment based on how the system is being used. Chapters 2 and 3 discuss Ki Pro Rack configurations, options, indicators, controls, and connections so you’ll have a working knowledge of how it can be used to tie together the worlds of acquiring media (production) and post-production. -
Page 12: Operator Side
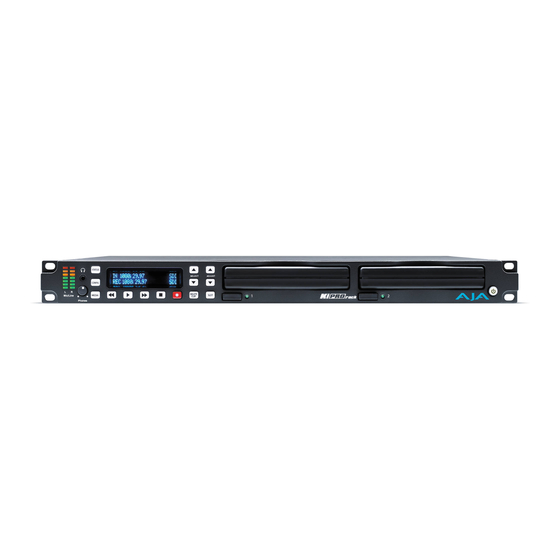
Figure 1. Ki Pro Operator Side (front panel) Controls and The Operator Side or front panel of Ki Pro Rack features a variety of buttons, knobs, jacks, Displays and indicators for operating the product. Each of these items is described briefly on the following pages. - Page 13 STOP button flashes. A second push of STOP completely stops the playback and directs Ki Pro Rack's outputs into an E to E mode (the currently selected inputs bypass to the outputs). To determine at a glance if the STOP button is in a “pause”...
-
Page 14: Displays And Indicators
6 (on a scale of 1-8) and users will be able to diminish this value to conserve as much as 22% power consumption for the VFD. The intensity setting of the VFD also correlates to the backlit buttons on the unit (play, select up, select down, etc.). Ki Pro Rack v4.2 www.aja.com... -
Page 15: Other Front Panel Features
Connect any camcorder, camera, or audio source—digital or analog—regardless of brand or format, to Ki Pro Rack’s many connectors. On the back side of the unit, two AC line cords provide redundant 100-240 VAC 50/60 Hz power to the dual power connectors (see Installation later in this chapter). -
Page 16: Connections
422 devices. IMPORTANT: Not all RS-422 devices have been tested with Ki Pro Rack, so AJA cannot definitively say which devices may or may not communicate as expected with Ki Pro Rack when operated under RS- 422 remote control. Refer to the latest Release Notes document for which devices or non- linear editors have been tested with Ki Pro operating under RS-422 control. - Page 17 SMPTE/EBU N10, Betacam (NTSC), and Betacam (NTSC Japan). These three formats differ in level only. NOTE: Setting the Ki Pro Rack component input and/or output to "Beta" for HD material results in an "Invalid Selection" alarm that must be corrected before recordings or other operations may take place.
-
Page 18: Power Connector (Back Of Unit)
Record hours of media to portable removable hard-drive storage modules with built-in FireWire 800. Ki Pro Rack media may also be used with Windows OS editing systems when third party software, such as MediaFour’s MacDrive, is installed. Both media types mount on your OSX desktop for immediate editing and file access. -
Page 19: Formatting Media
NAME parameter is the name of the media that will appear mounted on the OSX desktop. Once a Ki Pro storage device is mounted, each clip recorded by Ki Pro Rack will be a file on its file system that can be opened in Final Cut Pro. Because the clips were recorded as Apple ProRes 422, Apple ProRes 422 (HQ), Apple ProRes 422 (LT), or Apple ProRes 422 (Proxy) with proper Final Cut Pro metadata, they’re instantly ready to edit. -
Page 20: Using Ki Pro Rack Media With Avid Media Composer
AJA recommends using the "Link to AMA File(s)" feature provided in Avid Media Composer. NOTE: While Ki Pro Rack recorded files can be directly accessed from Avid Media Composer via AMA for editorial, AJA advises transferring/copying media to a local drive or disk array for editing. Ki Pro Rack v4.2... -
Page 21: Chapter 3: Installation
Chapter 3: Installation Overview The installation and set up of a Ki Pro Rack is straight-forward. If you’ll be controlling the unit from the front panel buttons and display, it’s ready right out of the box. Just cable the system’s audio and video sources, VTR(s), monitors, and audio equipment, mount the Ki Pro Rack unit as desired, and begin recording. -
Page 22: What's In The Box
• Recording a live video feed from a camera; Ki Pro Rack is rackmounted, receiving component video input. • Recording a corporate video live from a camera; Ki Pro Rack sits on a computer work desk receiving HDMI audio and video input. -
Page 23: Applying Power
Applying Power To begin using Ki Pro Rack, plug at least one of the supplied AC line cords into one of the power sockets on the back of Ki Pro Rack. Then plug the AC line cord into 100-240 VAC 50/60 Hz (the supply is autosensing). -
Page 24: Remote Network Control
Category-5 cable. If connecting via a LAN, you then connect the Ki Pro Rack’s Ethernet connector to a hub or switch on the LAN. A LAN is a shared network that includes other Ethernet devices all attached via a hub or digital switch. -
Page 25: Tcp/Ip Information You'll Need
Airport base station wireless router), then you need to do nothing other than plugging the Ki Pro Rack into the net. To manually select DHCP: use the Select buttons to navigate to the parameter “50.1 IP CONFIG”, and then use the Adjust buttons to select “DHCP”. -
Page 26: Networking Ki Pro Using A Static Ip Address
Ki Pro Rack’s browser status screen. If Ki Pro Rack cannot get an address from the DHCP server on the LAN while Ki Pro Rack is set to DHCP via parameter 50.1, it will then automatically drop back to a preset factory IP address of 192.168.0.2. - Page 27 (i.e., 10.0.180.0). For these parameters, the Select button selects the octet and then the Adjust buttons select the desired number. Pressing Select again advances to the next octet. At the final octet, the address will flash—pressing Select at that point confirms the setting. Ki Pro Rack v4.2 www.aja.com...
-
Page 28: Networking Ki Pro Using The Factory Default Ip
Networking Ki Pro If you don’t want to use DHCP to network Ki Pro Rack and also don’t want to set your own using the Factory static IP address, you can simply use a Default setting to use a factory setting of 10.65.74.65. -
Page 29: Chapter 4: Front Panel Operation
Chapter 4: Front Panel Operation Overview There are two ways to control Ki Pro Rack: from the front panel or remotely from a web browser connected via ethernet. This chapter discusses controlling and using Ki Pro Rack from its front panel. Remote control via browser is discussed in Chapter 4. -
Page 30: Transport Mode (Default)
MEDIA Menu (like CONFIG) TRANSPORT Mode (default) TRANSPORT mode is the default mode for Ki Pro Rack operation. When you power up Ki Pro Rack, the first display you’ll see is the TRANSPORT mode menu. Any clip that previously was recorded is referenced in the display and can be played. -
Page 31: Transport Lockout
Recording a Clip There is more than one way to record a clip, since you can control Ki Pro Rack in numerous ways. The MEDIA and CONFIG menus presented later in this chapter detail the parameters available to control recording. Before we get into that level of detail, here’s an example of just how simple recording can be: 1. -
Page 32: Recording Notes
"Closing File" prompt on the display. • Ki Pro Rack alerts you when the media is nearly full with a "Media Low" prompt at 15% of the remaining capacity. At 10% of the total capacity of the media, the "Media Full"... -
Page 33: Deleting Clips
2. When you find a clip you want to delete, press the DELETE CLIP button. 3. Ki Pro Rack will ask “Are you sure”—press the ADJUST up arrow button to confirm deletion. Pressing the down arrow, or any other button, will abort the deletion. -
Page 34: Alarm Status
UNRECOGNIZED MEDIA WARNING MEDIA IN USE Ki Pro Rack features a variety of alarms to help you diagnose the condition of the unit, possible configuration issues, or possible signal issues. Here is a list of warning messages and their meanings: "WARNING Input Format Changed"... - Page 35 "WARNING Backup and Reformat" may appear if media has issues being mounted by the Ki Pro Rack. As the prompt indicates, it is best to back up the media by copying it to another drive or disk array and then reformat the media. Some signs that the media is in a read-only state: even though clips have been recorded to the media, "N/A"...
-
Page 36: Media Menus
"WARNING Unsupported Media" appears when a USB-only or SxS card was inserted into the Ki Pro Rack's ExpressCard/34 slot. These types of media are not supported by Ki Pro Rack. Choose an ExpressCard/34 from the approved list on AJA's website. -
Page 37: Data-Lan Considerations
After you select the Data state, you can connect the Ki Pro Rack to a host computer via the Ethernet connection. When using Data-FW, the Ki Pro Rack mounts the selected volume, designated by the lit LED. -
Page 38: Encode Type
This parameter determines how playback handles dropped frames. These are the available options: CONTINUE In the unlikely event that the playback of a clip(s) begins to STOP drop frames, this parameter allows users to define whether the playback continues or stops. Ki Pro Rack v4.2 www.aja.com... -
Page 39: Format Media
The Ki Pro Storage Module can be used to hold data other than Apple ProRes 422 QuickTime recordings. If other files are saved to the Ki Pro Storage Module, they should be placed outside of the "AJA" folder. Any material inside of the "AJA" folder will be erased if a MEDIA>Delete Clips>DELETE ALL is performed. - Page 40 TK value (which can be manually overridden via parameter 17.8 Take). Ki Pro Rack offers these parameter choices for easy identification of the QuickTime files, so that the names can logically match the shooting script, and are acceptable when imported into the Final Cut Pro 7 Browser window, Final Cut Pro X's Events or Avid Media Composer Bins.
-
Page 41: Clip Number
Reel Name, Clip Name, Clip Number, Clip Append, Alpha Append, and Take settings. 3. If the number is at “999”, Ki Pro Rack will not auto-increment; instead it will register a “Name In Use” alarm. This prompts you to select a new Clip Name, Clip Number, Clip Append, Alpha Append, and/or Take settings so that a new unique “prefix”... -
Page 42: Use Custom Clip Name
Ki Pro units, then "Slave Name" should be selected. Selecting "Slave Name" means that the recording will take it's name from the individual Ki Pro's parameters and not accept the value pushed to the Slave by the Master Ki Pro. Ki Pro Rack v4.2 www.aja.com... -
Page 43: Config Menus
As in the MEDIA menus already presented, pressing one of the parameter Adjust buttons changes the current CONFIG parameter’s value to a new one from the Ki Pro Rack’s list of choices—repeating the list if you continue to press Adjust—or adjusting a numerical value up or down. -
Page 44: Record Type
These are the available options: NONE (default) No conversion of selected input. Convert selected input to SD HD 720 Convert selected input to HD 720 HD 1080 Convert selected input to HD 1080 Ki Pro Rack v4.2 www.aja.com... -
Page 45: Out Convert
CVBS ON Y Forces SD Out Convert if HD NOTE: Setting the Ki Pro Rack component input and/or output to "Beta" for HD material causes an "Invalid Selection" alarm requiring correction before operations can continue. 1.8 HDMI OUT This parameter defines whether the HDMI output matches the file format or has the 1.5 OUT CONVERT selection applied to it. -
Page 46: Super Out
8 channel audio may be the appropriate choice in such situations. Ki Pro Rack only allows for the selection of either 2 channels or 8 channels of audio to be written to the QuickTime file that is recorded. -
Page 47: Component In Lvl
NOTE: Not all devices support 8 channel audio. Ki Pro Rack does not provide a "mixdown" option for 8-channel recordings on output, so be sure to use devices that support 8-channel audio via SDI or AES if the 8 channels recorded are desired. -
Page 48: Audio Lvl L
Image is zoomed slightly to fill a 14x9 image with black sidebars ZOOM LTTRBOX Image is zoomed to fit the full screen (this can introduce a small aspect ratio change) PILLARBOX Image is not changed; black sidebars surround image Ki Pro Rack v4.2 www.aja.com... -
Page 49: Downconversion
Image is reduced with black top and bottom added to image area, with the aspect ratio preserved. CROP Image is cropped to fit new screen size. ANAMORPHIC HD image is converted to full-screen SD with a 16x9 aspect ratio (anamorphic). Ki Pro Rack v4.2 www.aja.com... -
Page 50: Genlock
Use timecode from HDMI input (Sony cameras only) NOTE: Ki Pro Rack, when used with select Sony cameras, only works with HDMI timecode matched to the recording format and HDMI output: 1080i 29.97 (1080i 59.94) or 1080i 25 (1080i 50). If a 1080p 24 recording on the Sony camera's internal media with a 1080i 29.97 HDMI output is... -
Page 51: Tc Value
If the TC In is SDI RP188, LTC, or RS422, the TC Type selection does not apply. TC Type only applies to the TC Value or the Time of Day value generated by Ki Pro Rack. These are the available options:8.3 ARM RECORDING 8.3 ARM RECORDING... -
Page 52: Interval Frames
SDI ancillary data. The default for this parameter is “None”; when this is selected, no camera metadata is passed to any of the Ki Pro Rack parameters even if a camera with SDI ancillary data is connected to the Ki Pro Rack. If an appropriate camera is... -
Page 53: Important Notes About Cameras Supported By 13.1
Take: _001 Timecode Value: 20:11:05:12 Within the Ki Pro Rack, the Reel Name that is written to the file is “A230” instead of using the 17.0 Reel Name that is set to “001” within the menu parameter. ” The full file name is “A230_C001_0714SW_001instead of using the standard clip naming convention produced by the MEDIA menu parameters 17.0, 17.2, 17.3, 17.4, and 17.5... -
Page 54: Important Note About Using Dnxhd Encoding With 13.1 Camera Data
Configure the camera's HDMI settings prior to connecting the HDMI output of the camera to the Ki Pro Rack. Since the Canon HDMI selection is not camera specific like the other Camera Data selections, other parameters must be set manually and are not auto-configured by this selection. -
Page 55: Remote Control
The CONFIG menu parameter 8.0 TC IN is set automatically to correspond to the RS422 Only. When the 8.0 TC IN is set to RS422, it allows Ki Pro Rack to accept an RS422 in-point timecode value as the beginning timecode value for the recording. Example: the value 01:00:00:00 is received as the in-point;... -
Page 56: Video Sg Frmt
Media Composer>Digital Cut: Only connect the output signal of the NLE to the Ki Pro Rack to avoid the possibility of an EE feedback loop; if the input and output of both the NLE and the Ki Pro Rack are connected and EE is entered, a feedback loop may occur. -
Page 57: Video Sg
41.3 AUDIO SG This parameter determines the audio signal output from Ki Pro Rack’s internal test signal generator. These are the available options: OFF (default) Turn audio test signal output OFF. -
Page 58: Subnet Mask
Ki Pro will be unable to see other Ki Pros on the network, although you may still be able to control the Ki Pro Rack via a web browser. Also, without a proper gateway defined, the discovery feature “Available Ki Pros—Click to Refresh” on the Network web page will not work correctly and list other Ki Pros on the network. -
Page 59: System Name
50.5 SYSTEM NAME This parameter defines a name for Ki Pro Rack and gives it a unique identifier. This same name is used both when displaying systems via the web interface and for display on Ki Pro Rack’s screen saver (if System name is chosen in Parameter 70.1 Screen Saver). These... -
Page 60: Date Set
NOTE: If authentication is used, it provides a minimum security safeguard against unauthorized use of the Ki Pro Rack in a networked environment. You should not consider it a substitute for proper network security measures. Disabled (default) Disables the requirement for a login password when accessing the device via the web UI. -
Page 61: Display Intensity
This parameter determines the speed of Ki Pro Rack’s internal cooling fan. In some environments where audio recording is occurring close to the Ki Pro Rack unit, it may be desirable to set the fan speed to “QUIET RECORD” for optimum quiet operation. These are... -
Page 62: Chapter 5: Browser Remote Control
Status screen. General Screen All Ki Pro Rack web screens have certain areas in common. On the left of each screen is a Menu panel listing all the available Ki Pro Rack screens. Click any of these links to jump to Information that screen. -
Page 63: Config Screen
Click arrow or gear icon to show/hide. Config Screen The Config screen is a general purpose screen used to configure Ki Pro Rack’s I/O choices, conversion choices, and also set up Ki Pro Rack’s environment (name, clock settings, display etc.) Ki Pro Rack v4.2... - Page 64 Figure 11. Ki Pro Rack Web Interface, Config Screen NOTE: In the following web screen control definitions, the number in parentheses refers to the Parameter descriptions in Chapter 2—you can read more information there about the choices and their meanings.
- Page 65 Record button also remains active and available to start recording. Interval Record (9.0): The Ki Pro Rack can be used to create timelapse recordings via the 9.0 Interval Record, 9.1 Interval Frames and 9.2 Interval Time selections. Note that the 9.1 and 9.2 menu options will not appear unless 9.0 Interval Record is enabled.
- Page 66 The CONFIG menu parameter 8.0 TC IN is set automatically to correspond to the RS422 Only. When the 8.0 TC IN is set to RS422, it allows Ki Pro Rack to accept an RS422 in-point timecode value as the beginning timecode value for the recording. Example: the value 01:00:00:00 is received as the in-point;...
-
Page 67: Media Screen
The Media screen offers settings for a variety of media-related functions, including formatting storage media, type of Apple ProRes 422 encoding, and reel and clip definitions. Figure 12. Ki Pro Rack Web Interface, Media Screen Media State (12.1): This parameter defines whether the media is used for video/audio recording or data transfer using an Ethernet LAN. - Page 68 "Flying" entered. As a result, the first recording will be overwritten by the second recording. AJA does not typically recommend disabling the use of the custom clip take, but in some situations, overwriting an existing file may be desirable.
-
Page 69: Transport Screen
Ki Pro Rack. The screen also duplicates what is displayed on the Ki Pro Rack front visual display, so you can see exactly what the Ki Pro Rack operator/camera person is seeing. -
Page 70: Presets Screen
Figure 14. Ki Pro Rack Web Interface, Transport Screen Gang View Presets Screen The Presets screen allows you to save Preset Configurations into 20 separate memory registers and recall the presets whenever needed. - Page 71 Non-editable parameters are not saved. To change a preset name, click in the name's text field and type a new name. Then press Enter. Figure 16. Ki Pro Rack Web Interface, Changing Preset Name Ki Pro Rack v4.2 www.aja.com...
-
Page 72: Network Screen
Ki Pro Rack IP Address and netmask fields filter keystrokes and only allow legal characters. The Ki Pro Rack also checks the format of the entry to ensure it is valid; if found to be invalid, the background of the IP Address or netmask will turn red. If you click the Update button while an invalid entry exists in one of the these fields, Ki Pro Rack will display an error dialog—you... - Page 73 IP Address Type (50.1): Use to set the type of IP address for Ki Pro Rack. You can select a Static address that you enter in the IP Address field, you can select DHCP for automatic IP address assignment by your network router, or you can select Default to set Ki Pro Rack to its default IP address, which is 0.65.74.65.
-
Page 74: Playlists Screen
“Using Playlists” on page 81 at the end of this chapter for an additional tutorial on working with playlists. Ki Pro Rack v4.2 www.aja.com... -
Page 75: Alarms Screen
Figure 18. Ki Pro Rack Web Interface, Clips Screen Alarms Screen The Alarms display is present on each screen and constantly shows you the state of any alarms in the system. The Alarms area normally contains a green box displaying, “None” if there are no alarms. -
Page 76: Update Firmware Screen
Figure 19. Ki Pro Rack Web Interface, Alarm Configuration Screen Update Firmware The Update Firmware screen allows you to update your Ki Pro Rack to later versions of software as they are issued by AJA and posted on the website. When software updates... -
Page 77: Upload And Install The Software On Your Ki Pro Rack
3. When you have selected a valid Ki Pro Rack image file, click the “Upload” button in the web browser. The file you select will upload to the Ki Pro Rack and be tested for validity. Incomplete, corrupted, or non-Ki Pro software files are rejected. -
Page 78: Advanced Features
UI when Ki Pro units have IP addresses configured under a common network and subnet mask and are connected via their LAN connections to an ethernet switch or hub to a host computer. AJA recommends that all Ki Pro units in a gang use the same firmware version Example: You have a Ki Pro "Master"... - Page 79 "SC" or "Clip" presented brings up the pulldown and the "OK" box. "Clip Number" must be entered manually with a valid value for Ki Pro Rack of 1 through 999 and then the enter/return key must be hit. NOTE: If the enter/return key is not entered after the Ki Pro Rack v4.2...
-
Page 80: Gang Recording Summary
"Master Name" or "Slave Name" with an "OK" confirmation button. If the desire is to have clips named the same across all Ki Pro Rack units' recordings, then the Use: "Master Name" selection should be made. If the desire is to have clips named independently on Ki Pro Rack units, then "Slave Name"... -
Page 81: Using Playlists
The default state of the Playlists is to list All Clips available. All Clips represents all of the Clips Playlist recordings made on the Ki Pro Rack or valid files transferred to the Ki Pro Rack. Figure 22. Ki Pro Rack Web Interface, All Clips Playlist You can cue up a clip quickly for review by simply double-clicking the clip in the list. - Page 82 You may create multiple playlists. Playlists are stored as a simple file on the Ki Pro Rack media alongside the clips.
-
Page 83: Playback Of A Playlist
Using Presets Beginning with version 3.0 firmware, Ki Pro Rack offers a simple and efficient way to configure multiple parameters of the device from a preset. You can store a preset configuration and then recall that preset later to return Ki Pro Rack to the stored configuration. -
Page 84: Recalling Presets
To customize presets, click on the second column of text fields and name the preset. Figure 27. Ki Pro Rack Web Interface, Naming a Preset After you have entered a name for the preset, press Enter. The preset is not stored until you save it. - Page 85 NOTE: AJA recommends that presets only be used between the same types of devices. In other words, only use presets from Ki Pro Racks with other Ki Pro Racks, not with Ki Pro Minis. At any time you may perform a recall of the Factory Settings if you have presets enabled.
-
Page 86: All Clips And Media State > Data-Lan
If the Ki Pro Rack is configured for Media State > Data-LAN, appropriately encoded State > Data-LAN QuickTime files may be uploaded to the Ki Pro Rack or downloaded from the Ki Pro Rack via the All Clips portion of the interface. (See ““Appropriately Encoded Clips”... -
Page 87: Appropriately Encoded Clips
50Hz regions, HD and SD are both top field first if interlaced. NOTE: DNxHD 36 only supports progressive. • Proper sound settings: Format > Linear PCM, Channels > Stereo (L R) or 2 Discrete Channels, Rate > 48.000 kHz, Sample size > 24 bits, and Little Endian. Ki Pro Rack v4.2 www.aja.com... -
Page 88: Appendix A: Specifications
• AES 24-bit, 8 channel, 48kHz (4xBNC) • SDI embedded audio, 24-bit, 8 channel, 48kHz • HDMI embedded, 2 channel Analog: • 24-bit D/A, 2 channel balanced XLR, 48kHz Network • 10/100/1000 Ethernet (RJ45) • Embedded webserver for remote control Ki Pro Rack v4.2 www.aja.com... -
Page 89: Panel User Interface
Down-conversion - 10-bit Anamorphic: Full-screen Letterbox: Image is reduced with black top and bottom added to image area with the aspect ratio preserved Crop: Image is cropped to fit new screen size Ki Pro Rack v4.2 www.aja.com... -
Page 90: Physical
12.5 inches from front panel to back of deepest connector (37.74 cm) Operating Temperature Range: C to 40 Safe Storage Temperature C to 60 Range (power OFF): Power Voltage: 100-240 VAC 50/60 Hz Typical Operating Power: Ki Pro Rack v4.2 www.aja.com... -
Page 91: Appendix B: Safety And Compliance
Cet appareil numérique respecte les limites de bruits radioélectriques visant les appareils numériques de classe B prescrites dans le Règlement sur le brouillage radioélectrique du ministère des Communications du Canada. Cet appareil numérique de la Classe B est conforme à la norme NMB-003 du Canada. Ki Pro Rack v4.2 www.aja.com... -
Page 92: European Union And European Free Trade Association (Efta)
Gegenmaßnahmen verantwortlich ist. Attention! Ceci est un produit de Classe B. Dans un environnement domestique, ce produit risque de créer des interférences radioélectriques, il appartiendra alors à l’utilisateur de prendre les mesures spécifiques appropriées. Ki Pro Rack v4.2 www.aja.com... -
Page 93: Korea Kcc Compliance Statement
Chinese Compliance Statement This product has been tested to the following Chinese standards: GB13837-2003, GB8898-2011, and GB17625.1-2003 This product meets the requirements of implementation rules for compulsory certification (REF NO. CNCA-01C-17:2010) under certificate number 2012010805558398. Ki Pro Rack v4.2 www.aja.com... -
Page 94: Translated Caution Statements, Warning Conventions And Warning Messages
¡Advertencia! No utilice este dispositivo cerca del agua y límpielo solamente con un paño seco. Aviso! Não utilize este dispositivo perto da água e limpe-o somente com um pano seco. Avviso! Non utilizzare questo dispositivo vicino all'acqua e pulirlo soltanto con un panno asciutto. Ki Pro Rack v4.2 www.aja.com... - Page 95 Aviso! Não instale perto de nenhuma fonte de calor tal como radiadores, saídas de calor, fogões ou outros aparelhos (incluindo amplificadores) que produzam calor. Avviso! Non installare vicino a fonti di calore come termosifoni, diffusori di aria calda, stufe o altri apparecchi (amplificatori compresi) che emettono calore. Ki Pro Rack v4.2 www.aja.com...
- Page 96 è stato rovesciato del liquido è stato rovesciato o qualche oggetto è caduto nel dispositivo, il dispositivo è stato esposto a pioggia o umidità, non funziona correttamente o è caduto. Ki Pro Rack v4.2 www.aja.com...
- Page 97 ¡Advertencia! Cuando mueva la unidad desenchufe de la red eléctrica el/los cable(s) de la fuente de alimentación CA tipo brick. Advertência! Remova os cabos CA de alimentação brick da rede elétrica ao mover a unidade. Avvertenza! Scollegare il cavo dell’alimentatore quando si sposta l’unità. Ki Pro Rack v4.2 www.aja.com...
- Page 98 ¡Advertencia! Utilice solamente los accesorios y conexiones especificados y/o vendidos por el fabricante. Aviso! Utilize apenas equipamentos/acessórios especificados e/ou vendidos pelo fabricante. Avviso! Utilizzare soltanto i collegamenti e gli accessori specificati e/o venduti dal produttore. Ki Pro Rack v4.2 www.aja.com...
- Page 99 Lo spinotto largo o il terzo polo sono forniti per motivi di sicurezza. Se la spina fornita non si inserisce nella presa di corrente, contattare un elettricista per la sostituzione della presa obsoleta. Ki Pro Rack v4.2 www.aja.com...
- Page 100 Aviso! Desconecte este dispositivo da tomada durante trovoadas ou quando não é utilizado durante longos períodos de tempo. Avviso! Utilizzare soltanto i collegamenti e gli accessori specificati e/o venduti dal produttore, quali il treppiedi e l'esoscheletro. Ki Pro Rack v4.2 www.aja.com...
- Page 101 Warning! Do not open the chassis. There are no user-serviceable parts inside. Opening the chassis will void the warranty unless performed by an AJA service center or licensed facility. Avertissement! Ne pas ouvrir le châssis. Aucun élément à l’intérieur du châssis ne peut être réparé...
- Page 102 Warning! The AJA Ki Pro Rack contains a lithium battery soldered in place permanently (it is not user replaceable). If you ever dispose of the Ki Pro, ensure you follow local regulations for safe disposal. The lithium battery shall not be exposed to excessive heat, such as sunshine or fire.
- Page 103 à mídia. Avviso! La rimozione di qualsiasi supporto con il LED della scanalatura illuminato o lampeggiante può comportare problemi di riconoscimento del supporto o potenziali danni allo stesso. Ki Pro Rack v4.2 www.aja.com...
- Page 104 Avviso! La mancata installazione o disinstallazione del supporto nella maniera corretta, oppure una perdita imprevista di alimentazione durante la registrazione, possono causare una perdita irrecuperabile dei dati. Ki Pro Rack v4.2 www.aja.com...
- Page 105 Warning! AJA recommends you only update the Ki Pro when on mains power, or with a fully charged battery. Avertissement ! AJA vous recommande de mettre à jour le Ki Pro uniquement lorsqu'il est raccordé...
- Page 106 (exceto as configurações de rede, as quais são mantidas). Avviso! La selezione di questo parametro e il richiamo dei valori predefiniti di fabbrica sovrascrivono le impostazioni attuali (con l'eccezione delle impostazioni di rete, che sono mantenute). Ki Pro Rack v4.2 www.aja.com...
- Page 107 "Flying" inserido na primeira gravação. Como resultado, a primeira gravação será substituída pela segunda gravação. Em geral, a AJA não recomenda desabilitar o uso do custom clip take, entretanto, em algumas situações, a substituição de um arquivo existente pode ser desejável.
-
Page 108: Warranty And Liability Information
AJA Video, with shipping charges prepaid. AJA Video shall pay to return the product to Customer but only if to a location within the country in which the AJA Video service center is located. -
Page 109: Limitation Of Liability
Limitation of Liability UNDER NO CIRCUMSTANCES SHALL AJA VIDEO BE LIABLE IN ANY WAY FOR ANY LOST, CORRUPTED OR DESTROYED DATA, FOOTAGE OR WORK, OR FOR ANY OTHER INDIRECT, SPECIAL, INCIDENTAL OR CONSEQUENTIAL DAMAGES, OR FOR ANY THIRD PARTY CLAIM,... -
Page 110: Index
LTC I/O 8, 16 Default settings, resetting to 62 DELETE CLIP button 14 DHCP 25, 62 Manual 10 Disk Storage Module Status LED 15 MEDIA button 13 Display 14 MEDIA menus 30, 36 Displays and indicators 14 Ki Pro Rack v4.2 www.aja.com... - Page 111 Media screen 67 Software 8 MENU mode 29 Specifications 88 Module Release button 14 Static IP address 26 Mounting Ki Pro Rack 22 Static IP address, using 62 Multiple Ki Pros 78 STATUS button 12 STATUS menu 30 STATUS menus 33...
Need help?
Do you have a question about the Ki PRO rack and is the answer not in the manual?
Questions and answers