AJA Ki PRO Installation And Operation Manual
Hide thumbs
Also See for Ki PRO:
- Quick start manual (137 pages) ,
- Operation manual (111 pages) ,
- Installation and operation manual (90 pages)
Table of Contents
Advertisement
Quick Links
Download this manual
See also:
Operating Manual
Advertisement
Table of Contents

Related Manuals for AJA Ki PRO


Summary of Contents for AJA Ki PRO
- Page 1 Installation and Operation Guide Version 3.2 Published: September 5, 2013 ®...
-
Page 2: Table Of Contents
Camera Mounting with Exo-skeleton..........28 Ki Pro v3.2 www.aja.com... - Page 3 1.3 1080p PLAYBACK........... . . 54 Ki Pro v3.2 www.aja.com...
- Page 4 80.1 SERIAL NUMBER........... . . 72 Ki Pro v3.2 www.aja.com...
- Page 5 Hardware Conversion ............105 Ki Pro v3.2 www.aja.com...
- Page 6 Index............108 Ki Pro v3.2 www.aja.com...
-
Page 7: Notices
Copyright Copyright © 2013 AJA Video, Inc. All rights reserved. All information in this manual is subject to change without notice. No part of the document may be reproduced or transmitted in any form, or by any means, electronic or mechanical, including photocopying or recording, without the express written permission of AJA Inc. -
Page 8: Chapter 1: Introduction
With its extensive analog and digital connectivity, virtually any video and audio source can be fed into Ki Pro. Also included is AJA's powerful 10-bit realtime up/down/cross conversion, allowing you to record in the format you want to edit and deliver. -
Page 9: Features
Like AJA’s famous KONA and Io HD desktop products, Ki Pro offers unparalleled connectivity. Within its portable and rugged form factor, Ki Pro offers SD/HD analog I/O, SD/HD digital I/O including SDI, HD-SDI and HDMI, two channels of balanced and unbalanced analog audio with switch selectable line/mic levels, and LTC timecode in/out. -
Page 10: Software
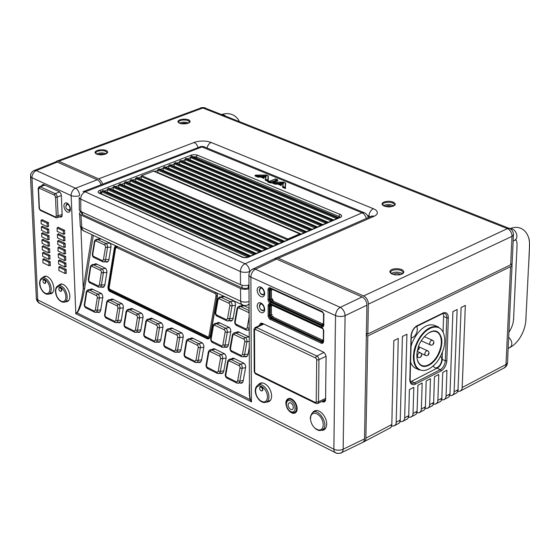
• Alarms to alert you to conditions that may need your attention Options AJA’s Ki Pro can be enhanced by purchasing several options: • Ki Pro Exo-skeleton—provides a surrounding chassis for the Ki Pro that can both mount to a tripod and provide a mount for a camera on top; this combination allows convenient access to controls Figure 1. -
Page 11: System Requirements
UNAVAILABLE OPTION ABOVE - SUGGEST REMOVE UNTIL SUPPORTED System Requirements AJA Video recommends that the Mac Pro or MacBook Pro used with the Ki Pro offer a FireWire 800 port and support Apple ProRes 422 with a satisfactory level of performance. -
Page 12: In This Manual
Provides complete instructions for operating the Ki Pro from the front panel. Chapter 5 Discusses remote web browser control of Ki Pro via Ethernet or 802.11b/g. Appendix A Provides specifications for various aspects of the system. Index Ki Pro v3.2 www.aja.com... -
Page 13: Chapter 2: Ki Pro At A Glance
On the following pages are front and rear panel illustrations with notations that summarize all of the connectors and indicators. Detailed descriptions of each of the connectors and indicators follow afterward. Ki Pro v3.2 www.aja.com... -
Page 14: Operator Side
Caution! The AJA Ki Pro contains a lithium battery soldered in place permanently (it is not user replaceable). If you ever dispose of the Ki Pro, ensure you follow local regulations for safe disposal. The lithium battery shall not be exposed to excessive heat, such as sunshine or fire. -
Page 15: Buttons
FFWD : Press button to begin fast playback of the current clip at 2x speed. Successive pushes increase the speed to 4x, 8x, and 16x. (Pushing the button after 16x speed is reached has no further effect.) When fast-forwarding, audio is muted. Ki Pro v3.2 www.aja.com... - Page 16 Press and hold to physically release a storage module from the unit; you must pull out Button: the storage module while pressing the button. This action prevents a storage module from accidental removal while recording/playing. For safe removal of any media, either Ki Pro v3.2 www.aja.com...
-
Page 17: Displays And Indicators
Disk Storage Module LED The following states for the LED indicator denote the media status: Status Indicator: • LED lit/on: selected media • LED unlit/off: inactive media, okay to eject or no media inserted Ki Pro v3.2 www.aja.com... -
Page 18: Other Front Panel Features
ExpressCard Memory Slots (2): Both of these slots accept ExpressCard/34 (34mm wide) memory cards (not ExpressCard/ 54). Only cards qualified for use by AJA should be used with the Ki Pro. NOTE: ExpressCard memory is not supported in Ki Pro firmware versions 1.0 through 2.0. Support for ExpressCards is enabled for Slot 1 only, beginning with firmware version 3.0. -
Page 19: Connections
Connections are high impedance. One BNC is for input and the other for output. Note: the Ki Pro LTC output does not provide output during EE or recording operations; the output is only for use during playback, as might be Ki Pro v3.2 www.aja.com... -
Page 20: Sdi Input And Outputs
Pro supports it at output. Because Ki Pro’s (and SMPTE SDI) native format is YPbPr, AJA recommends the use of YPbPr whenever possible. Although component video monitors often have RGB inputs, it’s better to use YPbPr when the monitor supports it. -
Page 21: Analog 2 Channel Balanced Audio Input And Output
IMPORTANT: Not all RS-422 devices have been tested with Ki Pro, so AJA cannot definitively say which devices may or may not communicate as expected with Ki Pro when operated under RS-422 remote control. Refer to the latest Release Notes document for which devices or non-linear editors have been tested with Ki Pro operating under RS-422 control. -
Page 22: Lanc Loop
Ki Pro record/stop functions. Lens Tap This connector supports an optional “Lens Tap” kit AJA offers for controlling Ki Pro. A proprietary AJA cable connects between the camera body and the lens, intercepting the camera’s own interconnecting cable. This enables Ki Pro transport control (record/stop) by simply operating the shutter/record button on the camera. -
Page 23: Removable Storage Modules (Hdd Or Ssd)
Only the PCIe connector is functional on such cards when they are used with Ki Pro; do not connect the USB connector to any device while the card is inserted in the Ki Pro. Visit the Ki Pro support page on our website for a list of AJA-qualified cards: http://www.aja.com/support/ki-pro/ki-pro.php Removable Storage... - Page 24 "AJA" folder on the Ki Pro Storage Module. Placing non-Apple ProRes QuickTime files in the "AJA" folder can lead to problematic issues when attempting "Play All" operation of clips; if media other than Apple ProRes QuickTime files must be kept on the Ki Pro Storage Module, they should be placed outside of the "AJA"...
-
Page 25: Chapter 3: Ki Pro Installation
Do not block any ventilation openings. Install in accordance with the manufacturer's instructions. Warning! Do not use this device near water and clean only with a dry cloth. Warning! Unplug this device during lightning storms or when unused for long periods of time. Ki Pro v3.2 www.aja.com... -
Page 26: What's In The Box
Ki Pro Installation and Operation Manual in PDF format on CD Ki Pro Documentation CD Read Me First Notice and Registration Sheets HDD Storage Module AC Adaptor and Line Cord Ki Pro Recorder Storage Module AC Adaptor Ki Pro v3.2 www.aja.com... -
Page 27: Stand-Alone Usage
• Recording live music at a remote location, Ki Pro receives video feed from event producer’s switcher and picks up audio from a stereo pair of phantom-powered condenser microphones. Ki Pro v3.2 www.aja.com... -
Page 28: Camera Mounting With Exo-Skeleton
The Exo-skeleton option has two configurations. As it comes out of the box, it contains an and Adjustment adjustable camera mount on top, a plate on the bottom for tripod mounting, and two thumbscrews for securing the Ki Pro unit to the Exo-skeleton. Ki Pro v3.2 www.aja.com... - Page 29 3. Place the camera on the mount, orienting the mount’s alignment pin to camera’s corresponding pin socket. Once aligned, tighten the mounting screw to secure the camera. Slide the camera and mount back on the rail and tighten the locking knob. Ki Pro v3.2 www.aja.com...
-
Page 30: Accessory Rod Kit Setup And Adjustment
Adjustment accessories. Figure 13. Rod Accessory Kit Option Kit components: Optional Rod Accessory Kit Assembly 2 endplates 4 screws (5/32 allen) 4 knobs with plastic washers Ki Pro v3.2 www.aja.com... - Page 31 To raise or lower the rods, simply loosen the rod height adjustment knobs (the ones you installed in step 2), lift the rods to the desired height, and then tighten the knobs once complete Figure 14. Exo-skeleton Endplates and Rod Height Adjustment. Ki Pro v3.2 www.aja.com...
-
Page 32: Applying Power
Do not open the chassis. There are no user-serviceable parts inside. Opening the chassis will void the warranty unless performed by an AJA service center or licensed facility. Remove the supplied AC line cord from mains power when moving the unit. -
Page 33: Using Dc Power
To prevent power loss, use batteries with metering or remaining charge indicators and stop recording while sufficient power remains. For very long recordings, use the supplied AC power supply instead of battery power. Ki Pro v3.2 www.aja.com... -
Page 34: Remote Network Control
Ki Pro’s Ethernet connector to a hub or switch on the LAN. A LAN is a shared network that includes other Ethernet devices all attached via a hub or digital switch. LANs may be divided into zones separated by software or hardware routers. Ki Pro v3.2 www.aja.com... -
Page 35: Tcp/Ip Information You'll Need
Warning! Intentional radiators, such as the AJA Ki Pro client adapter, are not intended to be operated with any antenna(s) other than those furnished by AJA. An intentional radiator may only be operated with the antenna(s) with which it is authorized. -
Page 36: Networking Ki Pro Using A Static Ip Address
If Ki Pro fails to find a DHCP server via its network connection, it will fall back to using the factory default static IP of 192.168.0.2—or whatever IP address you’ve previously defined. AJA recommends you define a Static IP address with parameter 50.2 so you’ll be prepared in the event your DHCP server fails. - Page 37 (i.e., 10.0.180.0). The Select button selects the octet and then the Adjust buttons select the desired number. Pressing Select again advances to the next octet. At the final octet, the address will flash—pressing Select at that point confirms the setting. Ki Pro v3.2 www.aja.com...
-
Page 38: Networking Ki Pro Using The Factory Default Ip
You can enable or disable wireless control of Ki Pro for security. Further, you can select a type of wireless security to match other devices; popular methods such as WEP, WPA and WPA2 are supported. To use wireless control you’ll follow this basic process: • Enable wireless control of Ki Pro Ki Pro v3.2 www.aja.com... - Page 39 Wireless control of Ki Pro is managed using menus 53.1 through 53.5 as listed in Chapter 3, under Config Menu Parameters. The steps of setting up and using Wireless control are then discussed later in Chapter 4 under Browser Remote Control. Ki Pro v3.2 www.aja.com...
-
Page 40: Chapter 4: Front Panel Operation
The Adjust buttons have no effect on the STATUS menu. The following shows the display for the STATUS menu: Input Format Input selected Recording Format Audio input selected STATUS Menu (Record Mode) Media Format Output Conversion STATUS Menu (Play Mode) Ki Pro v3.2 www.aja.com... -
Page 41: Transport Mode (Default)
This means you can specify the type of recording via the In Convert as “None”, leaving the incoming signal as is, or convert the signal to another format for your recording. Ki Pro v3.2 www.aja.com... -
Page 42: Recording A Clip
(front panel, web browser, and wireless). From the front panel these are the basic steps: 1. Press the STOP button to get to the TRANSPORT mode (if not already there). Find the clip name in the display (it shows the current clip/reel). Ki Pro v3.2 www.aja.com... -
Page 43: Deleting Clips
TRANSPORT mode, where an action could still be occurring (like playback or even recording). Record and Play Modes Line 1: Status (Record) displays the input format; the 4 characters on the right display the selected input video format: SDI, CMP, HDMI. Status (Play) displays the media format. Ki Pro v3.2 www.aja.com... -
Page 44: Alarm Status
(i.e., the reason for the alarm), the alarm notification will reappear on the display. Note: the STATUS button will blink if there is an active alarm condition. Ki Pro v3.2 www.aja.com... - Page 45 Ki Pro was not able to correct. To resolve this issue, mount the drive on an Apple computer under Mac OSX, copy the clips from the media, then re- insert the media into Ki Pro. If it does not read properly, you will need to format the media. Ki Pro v3.2 www.aja.com...
- Page 46 "WARNING No Clip Name" appears when an attempt was made on a ganged slave unit to set the clip name to use from a master, but the name was empty. The custom clip name on the master may be empty. Ki Pro v3.2 www.aja.com...
-
Page 47: Media Menus
"WARNING Unsupported Media" appears when a USB-only or SxS card was inserted into the Ki Pro's ExpressCard/34 slot. These types of media are not supported by Ki Pro. Choose an ExpressCard/34 from the approved list on AJA's website. "WARNING Please Reboot" appears when media was removed without using the slot button and the Ki Pro cannot continue operating without rebooting. -
Page 48: Data-Lan And Data-Fw Considerations
Finder next to the volume. If this step is not followed, the Mac OS may report that a disk has been improperly removed. If this happens, AJA recommends mounting the disk to a Mac OS system in order to correct any directory error that may have occurred due to the improper disk removal. -
Page 49: Dropped Frames
The Ki Pro Storage Module can be used to hold data other than Apple ProRes 422 QuickTime recordings. If other files are saved to the Ki Pro Storage Module, they should be placed outside of the "AJA" folder. Any material inside of the "AJA" folder will be erased if a MEDIA>Delete Clips>DELETE ALL is performed. -
Page 50: Clip Naming-Two Examples
Final Cut Pro Browser column headings. Final Cut Pro X also uses such information and can provide even more support for QuickTime file metadata. Example 1 Using the factory default AJA parameter settings: REEL NAME CLIP NAME... -
Page 51: Clip Number
Beginning with Ki Pro 2.0 firmware, users can elect to give their clips names other than Naming the standard criteria provided by AJA. IMPORTANT: Certain characters may not be allowed or supported if entered for a clip name. Examples include: punctuation marks (other than internal spaces or periods), special characters (like @), and non-ASCII UTF-8 characters are rejected outright. -
Page 52: Use Custom Clip Name
When we talk about menus, we discuss the Parameter Number and Name on the top line of the display and the Parameter Setting(s) possible as shown on the bottom line of the display; remember, the current setting is what is shown. Ki Pro v3.2 www.aja.com... -
Page 53: Config Menu Parameters
A 23.98Hz source is automatically treated as PsF, regardless of this setting. For 29.97 Hz or 25 Hz, “NORMAL” means encode as interlaced and “PSF” means encode as progressive. This only applies to 1080 formats. The following details clarify each case: Ki Pro v3.2 www.aja.com... -
Page 54: 1080P Playback
There is one converter available for output—if selected, it will be applied as appropriate, based on other settings (1.6, 1.7 and 1.8) possibly affecting multiple outputs. Output conversion of 1080psf23.98 is only supported for SD (not 720p). Ki Pro v3.2 www.aja.com... -
Page 55: Sdi Out
The message, “WARNING A/V Mismatch” may appear if SDI video is selected and HDMI audio is selected or vice versa. Embedded audio, via SDI or HDMI, must be matched to the video source. Analog audio can be used with any video input. Ki Pro v3.2 www.aja.com... -
Page 56: Audio Input
Selects BETACAM input signal levels NOTE: Setting the Ki Pro component input and/or output to "Beta" for HD material will result in an "Invalid Selection" alarm that will need correction before recordings or other operations may take place. Ki Pro v3.2 www.aja.com... -
Page 57: Component Out Lvl
Image is zoomed slightly to fill a 14x9 image with black sidebars Image is zoomed to fit the full screen (this can introduce a ZOOM LTTRBOX small aspect ratio change) PILLARBOX Image is not changed; black sidebars surround image Ki Pro v3.2 www.aja.com... -
Page 58: Down Conversion
Image is reduced with black top and bottom added to image area, with the aspect ratio preserved CROP Image is cropped to fit new screen size ANAMORPHIC HD image is converted to full-screen SD with a 16x9 aspect ratio (anamorphic) Ki Pro v3.2 www.aja.com... -
Page 59: Genlock
00:00:00:00 to 23:00:00:00 Use the ADJUST buttons to select a timecode hour. (Default: 01:00:00:00) For example: “01:00:00:00”, “02:00:00:00”, etc. 8.2 TC TYPE This parameter selects drop frame or non-drop frame timecode. These are the options: Ki Pro v3.2 www.aja.com... -
Page 60: Arm Recording
"Overcranking" or "slow mo" is not supported by the interval recording feature. 9.1 INTERVAL FRAMES Determines how many frames from the incoming video will be used for the recording. These are the options: Incrementing Value Sets number of frames to use for the recording. Ki Pro v3.2 www.aja.com... -
Page 61: Interval Time
SDI ancillary data and that camera manufacturer/model is selected from the list, then AJA passes as much of the metadata that is available from the camera (and is viable for AJA to support) into the Ki Pro’s timecode value, file name, and other applicable parameters. -
Page 62: Important Notes About The Various Cameras Supported By 13.1
CONFIG and MEDIA menu parameters. Important Notes About RED Epic: With the RED Epic, AJA recommends sending the camera an appropriate The Various Cameras genlock/reference signal so that the Ki Pro recordings will be timecode accurate when compared to the RED Epic recordings. -
Page 63: Loss Of Video
Module. Whether one clip or all clips are active under RS422 is determined by the MEDIA menu parameter 15.1 Play Media. IMPORTANT: Ki Pro may react erratically if invalid clips or media are present and 15.1 Play Media "All" is selected. Ki Pro v3.2 www.aja.com... - Page 64 Ki Pro under RS422, but may seem different from how a tape-based VTR would respond under similar conditions. AJA recommends the following for use with Apple's Final Cut Pro 7>Edit to Tape and Avid's Media Composer>Digital Cut: • Only connect the output signal of the NLE to the Ki Pro to avoid the possibility of an EE feedback loop;...
-
Page 65: Video Sg Frmt
DEFAULT ADDR DHCP (default) Select automatic IP address assignment from DHCP server on LAN. NOTE: If Ki Pro cannot find a DHCP server to communicate with, it will select the default factory IP address of 192.168.0.2. Ki Pro v3.2 www.aja.com... -
Page 66: Ip Address
Ki Pro will be unable to see other Ki Pros on the network, although you may still be able to control the Ki Pro via a web browser. Also, without a proper gateway defined, the discovery Ki Pro v3.2 www.aja.com... -
Page 67: System Name
The character set allowed is: 0 through 9, '-' , ' . ' , A through Z (uppercase) and a through z (lowercase). Default: AJA Ki Pro 50.6 MAC ADDRESS This parameter is an information only field showing the MAC address of the Ki Pro’s ethernet adapter. -
Page 68: User Authentication
53.1 802.11 CONTROL This parameter determines whether Ki Pro can be controlled remotely from a wireless browser. DISABLED (default) Disable wireless control of Ki Pro ENABLED Enable wireless 802.11 control of Ki Pro Ki Pro v3.2 www.aja.com... -
Page 69: Network
Use WEP packet and stream encryption Use WPA packet and stream encryption WPA2 Use WPA2 packet and stream encryption NOTE: WEP is an entry level encryption, with WPA being better and WPA2 the best of the three. Ki Pro v3.2 www.aja.com... -
Page 70: Password
IP address is about to be saved. You can save the edited IP address (press the Select arrow up to save) or choose not to save by pressing the Select arrow down button. Ki Pro v3.2 www.aja.com... -
Page 71: Dhcp Mask
70.1 SCREEN SAVER When set to “AJA Logo”, a rolling AJA logo screen saver will appear on the alphanumeric display after 3 minutes of inactivity—defined as no button presses on the front panel. When the Screen saver is on, the STATUS button or STOP button will exit the screen saver. -
Page 72: Display Intensity
(down) buttons at the same time. NOTE: To set a single parameter to its factory default value, go to that parameter and hold down both the Adjust (up) and Adjust (down) buttons at the same time. Ki Pro v3.2 www.aja.com... -
Page 73: Chapter 5: Browser Remote Control
NOTE: Safari is the preferred web browser for Ki Pro control on the Mac, and additionally Chrome and Firefox on Windows. Other web browsers may work, but AJA cannot guarantee consistent operation for all web browsers or web browser versions. -
Page 74: Config Screen
Ki Pro’s serial number and software version. This latter information is useful if you ever have to call AJA Technical Support to discuss a problem or get help. Below the Connection panel, the Network panel shows the Ki Pro systems on the network and allows you to switch control between systems. - Page 75 This parameter defines whether the HDMI output matches the file format or has the 1.5 OUT CONVERT selection applied to it. Super Out (1.9): This parameter enables or disables superimposition of timecode and transport state (Record, Pause, etc.) onto the SDI, SDI2, Component, HDMI, and CVBS on Y outputs. Ki Pro v3.2 www.aja.com...
- Page 76 This parameter controls the use of camera-generated ancillary data. Some cameras produce ancillary data that Ki Pro Mini users may want to transfer to their recordings. Examples include: start/stop commands, timecode, reel name, clip name and take. If a Ki Pro v3.2 www.aja.com...
-
Page 77: Media Screen
Apply to set the date and time. Screen Saver (70.1): When set to “AJA Logo”, a rolling AJA logo screen saver will appear on the alphanumeric display after 3 minutes of inactivity—defined as no button presses on the front panel. - Page 78 You may also click and drag on the slider to make adjustments. To increment by single values using the slider, click the slider to highlight it, and press the "back" arrow or "forward" arrow on your keyboard. Ki Pro v3.2 www.aja.com...
- Page 79 "Flying" entered. As a result, the first recording will be overwritten by the second recording. AJA does not typically recommend disabling the use of the custom clip take, but in some situations, overwriting an existing file may be desirable.
-
Page 80: Transport Screen
(up=forward, down=reverse). DELETE CLIP: Dedicated button that when pressed, deletes the currently selected clip. When pressed, the system displays a precautionary “ARE YOU SURE?” prompt. Ki Pro v3.2 www.aja.com... -
Page 81: Presets Screen
This screen also includes Export and Import functions that allow exporting one or all presets to your computer as files and importing exported preset files from your computer. A displayed message indicates successful or failed saves, recalls, exports, and imports. Ki Pro v3.2 www.aja.com... - Page 82 Only editable parameters are saved in the presets. Non- editable parameters are not saved. To change a preset name, click in the name's text field and type a new name. Then press Enter. Ki Pro v3.2 www.aja.com...
-
Page 83: Network Screen
IP Address or netmask will turn red. If you click the Update button while an invalid entry exists in one of the these fields, Ki Pro will display an error dialog—you must correct the error before updating. Ki Pro v3.2 www.aja.com... - Page 84 Status screen of that Ki Pro. Note: the Ki Pro you control may be running a different software version so screens may look different. As a rule, it’s Ki Pro v3.2 www.aja.com...
-
Page 85: Wireless Screen
802.11 Connection Status: Shows the status of connection (connected or not connected) KiPro 802.11 Control (53.1): This parameter determines whether Ki Pro can be controlled remotely from a wireless browser. Enabling wireless control turns on the internal 802.11 radio. Parameters 53.2 through 53.5 must be set correctly to configure Ki Pro so it can be controlled. -
Page 86: Playlists Screen
You will also see the Playlist being added to highlighted in green when the addition is made. 4. After adding the clips you want, click the playlist name to open the playlist; the clips you added will be listed. Ki Pro v3.2 www.aja.com... -
Page 87: Alarms Screen
If an alarm is generated, the Alarms area displays a red box containing text describing the alarm. If multiple alarms are generated, they appear as multiple red boxes, each one containing text describing the associated alarm. Ki Pro v3.2 www.aja.com... -
Page 88: Update Firmware Screen
The Update Firmware screen allows you to update your Ki Pro to later versions of Screen software as they are issued by AJA and posted on the website. When software updates are released, they often contain new features, improvements, and bulletins that may be very useful. -
Page 89: Preparing To Update Software
Although Ki Pro comes from the factory pre-installed with software, it may not be as up- Software to-date as software posted on our AJA website. This topic describes the steps required to upgrade the software in your Ki Pro. 1. Download the Latest Ki Pro Software Current and past releases of Ki Pro software are available on the World Wide Web from AJA's website. -
Page 90: Web Browser Via Wireless Device
Caution! AJA recommends you only update the Ki Pro when on mains power, or with a fully charged battery. Web Browser via Wireless Device Another option for remote control is Ki Pro’s built-in 802.11 wireless transceiver which can communicate with properly configured 802.11 wireless access points such as an Airport Basestation or 802.11 wireless router. -
Page 91: Using Wireless Devices To Control Ki Pro
Ki Pro>/iphone.html For example, if your Ki Pro is 10.0.7.110, then on an iPhone, you’d enter: http://10.0.7.110/iphone.html Once entered, the URL takes you to the Status screen with these KiPro control menus • Status • Alarms •... -
Page 92: When Using An Iphone To Control Ki Pro
• Buttons to access other menus: Status, Config, Media, Alarms, Playlists, Transport. • List of Ki Pro alarm conditions in red. • When there are no alarms, the display is green and says, “None.” Ki Pro v3.2 www.aja.com... -
Page 93: Config
• Buttons to access other menus: Status, Config, Media, Alarms, Playlists, Transport. • Media behavior, formatting, and naming parameters.. For details, see “Media Screen” on page • As with the Config screen, selections are made via pull-down menus. Ki Pro v3.2 www.aja.com... -
Page 94: Playlists
VTR-like transport controls as the web browser UI. Controls include. For operational details, see “Transport Screen” on page 80. You can turn the iPhone sideways while displaying the Transport screen, to see a larger display. Ki Pro v3.2 www.aja.com... -
Page 95: Advanced Features
UI when Ki Pro units have IP addresses configured under a common network and subnet mask and are connected via their LAN connections to an ethernet switch or hub to a host computer. AJA recommends that all Ki Pro units in a gang use the same firmware version Ki Pro v3.2... -
Page 96: How To Use Gang Recording
IMPORTANT: Gang control via the web UI is only supported under wired ethernet connections, not under 802.11 wireless connections. AJA recommends disabling the 802.11 wireless connections when working with Ki Pro units under gang control. Leaving 802.11 wireless connections enabled while operating Ki Pro units under gang control can lead to sluggish or erratic web UI interactions. -
Page 97: Gang Recording Summary
2. Click Show Gang View on the Transport screen to see the Gang controls. This view shows available Ki Pro systems. 3. To gang systems together, click the checkbox in the Gang column for each system you want included. Ki Pro v3.2 www.aja.com... -
Page 98: Using Playlists
7. Use the master system to control record start and stop and clip naming. Using Playlists Beginning with Ki Pro version 3.0 firmware, AJA provides tools for reviewing clips and creating playlists of clips. These clip playlists can be managed on the web browser Playlists screen, which includes a default All Clips playlist showing all clips on the Ki Pro unit. -
Page 99: Creating A Playlist
You may create multiple playlists. Playlists are stored as a simple file on the Ki Pro media alongside the clips. Playback of a Playlist If you want to play a playlist you have created, first select Play Media>Playlist in the Media menu parameters. Ki Pro v3.2 www.aja.com... -
Page 100: Using Presets
Beginning with version 3.0 firmware, Ki Pro offers a simple and efficient way to configure multiple parameters of the device from a preset. You can store a preset configuration and then recall that preset later to return Ki Pro to the stored configuration. Ki Pro v3.2 www.aja.com... -
Page 101: Storing A Preset
The preset is not stored until you save it. IMPORTANT: Be sure that you have made all of the parameter settings you want for a particular preset before you save it. By default, all parameters are stored and recalled. Ki Pro v3.2 www.aja.com... -
Page 102: Recalling Presets
NOTE: AJA recommends that presets only be used between the same types of devices. In other words, only use presets from Ki Pros with other Ki Pros, not with Ki Pro Minis. At any time you may perform a recall of the Factory Settings if you have presets enabled. -
Page 103: Appendix A: Specifications
• 2 channel unbalanced (2 RCA) Audio Outputs Digital:: • 24-bit SDI embedded audio, 8 channel, 48kHz • HDMI embedded, 8 channel Analog:: • 24-bit D/A, 2 channel balanced XLR, 48kHz • 2 channel unbalanced (2 RCA) Ki Pro v3.2 www.aja.com... -
Page 104: Network
Control • LANC Loop (2 LANC connectors)—not supported prior to Version 3.0 • Lens Tap: connects to optional AJA Lens Tap intercept cable placed between camera body and lens for start/stop control—not yet supported by firmware. • IEEE-1394a/FireWire 400 for control and timecode data, not supported prior to v 3.0 Serial Port RS-422 (slave pinout), 9-pin (available beginning with version 2.0 firmware). -
Page 105: Hardware Conversion
Safe Storage Temperature to 60 Range (power OFF): Power Voltage: 100-240 VAC (to supplied AC Adapter) 12Vdc to power connector 12 Vdc minimum, 18 Vdc maximum input on side of chassis: Current: 3.3A (maximum) Typical operating power: Ki Pro v3.2 www.aja.com... -
Page 106: Warranty And Liability Information
AJA Video, with shipping charges prepaid. AJA Video shall pay to return the product to Customer but only if to a location within the country in which the AJA Video service center is located. -
Page 107: Limitation Of Liability
Limitation of Liability UNDER NO CIRCUMSTANCES SHALL AJA VIDEO BE LIABLE IN ANY WAY FOR ANY LOST, CORRUPTED OR DESTROYED DATA, FOOTAGE OR WORK, OR FOR ANY OTHER INDIRECT, SPECIAL, INCIDENTAL OR CONSEQUENTIAL DAMAGES, OR FOR ANY THIRD PARTY CLAIM,... -
Page 108: Index
CONFIG Button 15 HDMI I/O 9 CONFIG menus 41, 53 Head Phone Jack 18 Config screen 74 Head Phone Volume Knob 17 Connectors 18 Control Specifications 104 I frame-only encoding 12 IEEE 21 D/A (output) 20 Ki Pro v3.2 www.aja.com... - Page 109 Video Inputs Specifications 103 Video Outputs Specifications 103 QuickTime files 8 VU Meters 17 RECORD button 15 Web browser control 38 Recording a Clip 42 Web screens 73 Registration Sheet 26 Wireless 9 Removable Storage Modules 23 Ki Pro v3.2 www.aja.com...
- Page 110 Wireless screen 85 Wireless transceiver 38 Wireless web connection 90 XLR power connector 22 YPbPr/RGB Video 19 YUV 20 Ki Pro v3.2 www.aja.com...
Need help?
Do you have a question about the Ki PRO and is the answer not in the manual?
Questions and answers