Table of Contents
Advertisement
Quick Links
Advertisement
Table of Contents
Troubleshooting

Related Manuals for Gerber SOLARA UV2


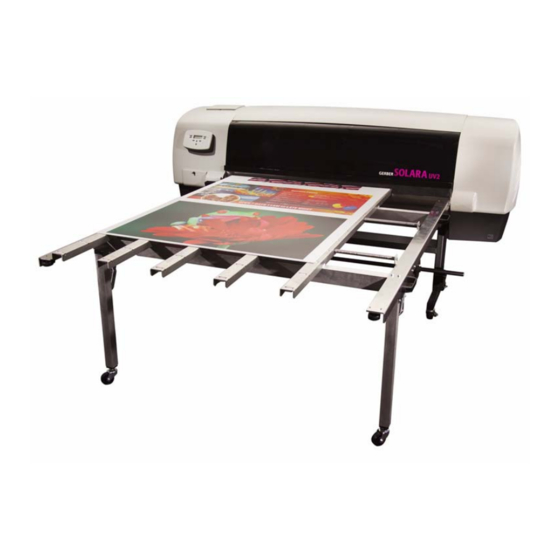
Summary of Contents for Gerber SOLARA UV2
- Page 1 SOLARA GERBER UV2™ Ink Jet Printer Owner's Guide...
-
Page 3: Copyright Notice
This document may not be reproduced by any means, in whole or in part, without written permission of the copyright owner. This document is furnished to support the GERBER SOLARA UV2 Ink Jet Printer. In consideration of the furnishing of the information contained in this document, the party to... -
Page 4: Fcc Compliance
FCC Compliance Warning: Changes or modifications to this unit not expressly approved by the party responsible for compliance could void the user’s authority to operate the equipment. Note: This equipment has been tested and found to comply with the limits for a Class A digital device, pursuant to Part 15 of the FCC rules. -
Page 5: Table Of Contents
Automatic ink level check .........................22 UV lamp cool-down ...........................22 Warming the print heads........................23 Chapter 3: Setting up the GERBER SOLARA UV2 ............... 25 Networking your GERBER SOLARA UV2 printer ................25 Using DHCP to assign network addresses..................25 Resetting the IP Source to Automatic (DHCP) ................26 Setting fixed (static) network addresses ..................27... - Page 6 Printing margins ..........................68 Manually initiating a material width scan ..................69 Viewing scanned material width......................70 Troubleshooting material scans ......................71 Chapter 5: Printing Jobs on the GERBER SOLARA UV2 ............ 75 Using RIP software and profiles.......................75 Print quality options...........................75 UV lamp operations ...........................75 UV lamp automatic shut-off (60 seconds) ..................76...
- Page 7 Printing the NozzleJob test print ....................101 Wiping the print head to prevent ink build up ................103 Resetting the head cleaning timer ....................103 Weekly/monthly maintenance.......................104 Cleaning the outside of the GERBER SOLARA UV2..............104 Cleaning the grit wheels ........................104 Cleaning the exhaust fans........................104 Cleaning the platen...........................104 Cleaning the material bumpers.......................104...
- Page 8 The ink forms small puddles on the print ..................139 Job data errors ............................139 Data errors and interruptions during printing ................139 Color balance is different between software and print ...............140 The printer pauses between passes ....................140 Purging an ink line to remove air......................141 Messages ..............................146 Menu Tree –...
-
Page 9: Quick Print Checklist
Quick Print Checklist After you have setup your GERBER SOLARA UV2 for the first time, use this checklist to help guide you through the steps required for getting the machine ready for printing. Refer to the page numbers provided next to each step for more information. -
Page 11: Chapter 1: Introduction
PVC, aluminum and MDO, shops can utilize the GERBER SOLARA UV2 flatbeds. The GERBER SOLARA UV2 prints at a resolution of 300 x 360 dpi (up to 600 dpi apparent). When printing in Production or High Quality mode, the GERBER SOLARA UV2 uses multiple- drop technology to provide vivid colors and expanded color gamut. -
Page 12: In This Manual
Chapter 4: Loading Inks and Materials directs you in loading the GERBER SOLARA UV2 ink cartridges and both flexible and rigid materials. Chapter 5: Printing Jobs on the GERBER SOLARA UV2 describes how to print on either flexible or rigid material (including rigid bleed) with RIP software. -
Page 13: Safety Information
Ink handling and disposal ♦ Do not use inks other than GERBER SOLARA UV2 Inks. Using other inks will void the warranty and will damage the printer. ♦ Consult the GERBER SOLARA UV2 Ink MSDS for proper handling, disposal, and safety recommendations. -
Page 14: Customer Support
CHAPTER 1 Introduction Customer support If you have questions regarding using, maintaining, or troubleshooting the GERBER SOLARA UV2 please contact your Gerber distributor or GSP® Service. phone: 800-828-5406 / 860-644-6971 fax: 860-871-3862 e-mail: gspservice@gspinc.com www.gspinc.com Additional sources of information ♦ Gerber FastFacts™ provides answers to technical and service questions. FastFacts are available on the Gerber web site: www.gspinc.com under “Support.”... -
Page 15: Chapter 2: Product Overview
GERBER SOLARA UV2 size, weight, and recommended operating conditions. Size and weight You must have enough room to maneuver the packed GERBER SOLARA UV2 to its final location where you can unpack it. Alternately, you can unpack the GERBER SOLARA UV2 and then wheel it to its final location. -
Page 16: Power Supply
GERBER SOLARA UV2. If the computer is not configured properly, if it does not have a network card, or if the proper data cable is not used, you can run a test print on the GERBER SOLARA UV2 but you cannot send jobs from the computer. -
Page 17: Uv Bulb Technology
After turning off the GERBER SOLARA UV2, the bulbs can not be used again until they have sufficiently cooled down. The cool down period lasts up to three minutes, during which time... -
Page 18: Storing Inks And Materials
CHAPTER 2 Product Overview Storing inks and materials Store GERBER SOLARA UV2 inks and qualified materials as instructed for the best quality output when printing. Improper storage of inks or materials will effect overall output quality. UV Ink storage Certain inks have a shelf life of approximately nine to twelve months from date of manufacture when stored as recommended. - Page 19 CHAPTER 2 Product Overview Title Menu item Menu item Menu item Menu item Instructions ENTER CANCEL The LCD shows menus, instructions, system and job status, and messages. Each menu has a title (for example, MAIN MENU). To navigate through menus, press the function keys. The F1, F2, F3, and F4 function keys select other menus and change parameter values or settings.
-
Page 20: Exploring The Main Menu
No Job F1, Start-Job, Pause-Job, or blank The F1 line of the MAIN MENU changes depending on the state of the GERBER SOLARA UV2. It is blank when the printer is idle in Single mode, it displays when the Job Status is... -
Page 21: F4, Operate
Job Status The Job Status line located on the bottom line of the Main Menu shows the current state of the GERBER SOLARA UV2. The function key choices depend on the Job Status as shown in the table below. Job Status... -
Page 22: Firmware Startup And Internal Diagnostics
♦ Print head warming Firmware startup and internal diagnostics When the GERBER SOLARA UV2 is turned on the internal firmware starts up just like a computer. The LCD display on the left side of the printer will display the name of the printer and the firmware version that is currently installed. -
Page 23: Warming The Print Heads
CHAPTER 2 Product Overview Tip: You can load the material, send the job, and press F1, Start-Job before the UV lamps complete their startup sequence. The GERBER SOLARA UV2 will begin printing once the startup sequence completes. Warming the print heads When initially powering up the printer or when coming out of idle mode, the print head temperatures may not be at the proper temperature. -
Page 25: Chapter 3: Setting Up The Gerber Solara Uv2
Networking your GERBER SOLARA UV2 printer The GERBER SOLARA UV2 is a network device and your computer must have a 10/100 Mbps auto-switch network interface board installed to communicate with the printer. Gerber supplies two Ethernet cables to connect the printer to the network: ♦... -
Page 26: Resetting The Ip Source To Automatic (Dhcp)
1 If not already connected, connect the computer to your network hub or Ethernet switch using a straight though RJ45 cable. 2 Connect the GERBER SOLARA UV2 to your network hub or Ethernet switch using the supplied straight-through RJ45 cable. Install one end into the RJ45 jack on the back of the GERBER SOLARA UV2 and the other end in the hub or switch. -
Page 27: Setting Fixed (Static) Network Addresses
If your network is not equipped with DHCP, or if you are using direct connection to the computer via a cross-over cable, you will install the GERBER SOLARA UV2 using fixed (static) network addresses. You will need to obtain and assign the correct addresses in order for the computer to be able to communicate with the printer. - Page 28 Name SOLARA UV2-A1 4 Press F1, IP Settings to open the IP Source menu. The GERBER SOLARA UV2 is set to Automatic as the default setting from the factory. Press F1 to toggle it to Fixed and press ENTER to save the setting.
-
Page 29: Setting The Ip Address And Subnet Mask Of Your Computer
Press ENTER to save the changes and return to the IP Source menu. Setting the IP Address and Subnet Mask of your computer When using Fixed network settings, the default IP address of the GERBER SOLARA UV2 is: 169.254.000.002 and the default Subnet mask is 255.255.000.000. The following procedure uses 169.254.000.001 for the computer's IP address and 255.255.000.000 for the Subnet mask. - Page 30 CHAPTER 3 Setting up the GERBER SOLARA UV2 4 Click Internet Protocol (TCP/IP) in the list. 5 Click Properties to open the Internet Protocol (TCP/IP) Properties dialog box. 6 Click Use the following IP address: 7 Enter 169.254.0.1 for IP Address.
-
Page 31: Assigning A Network Name For The Printer
Assigning a network name for the printer You can assign a name for your GERBER SOLARA UV2 printer to help you distinguish it from other GERBER SOLARA UV2s on your network. This is helpful when DHCP is activated as the printer's IP address may change. -
Page 32: Checking Network Connections
Do not type any leading zeros that may be in the address. For example, to test a GERBER SOLARA UV2 connected directly to a computer you would type: ping 169.254.0.2 3 If the network connection is working you will see a reply from the GERBER SOLARA UV2's network address (Your IP Reply from 169.254.0.2 bytes=32 Time<1Oms TTL=225. - Page 33 CHAPTER 3 Setting up the GERBER SOLARA UV2 To view the current network settings 1 Press F3, Setup from the MAIN MENU to open the SETUP MENU. SETUP MENU Network Calibrate Diag Vacuum ENTER for Main Menu 2 Press F1, Network to open the NETWORK INFO menu.
-
Page 34: Activating Your Gerber Solara Uv2 Printer
Setting up the GERBER SOLARA UV2 Activating your GERBER SOLARA UV2 printer This page is for activating or adding hours of print time to GERBER SOLARA UV2 printers that are being financed, leased or under other restrictions. For most owners no activation should be necessary and the printer should be set to unlimited hours of operation. - Page 35 (See “Web page listing” on page 106 for more information.) 5 Click on the Activation link to access the GERBER SOLARA UV2 Activation page. You should see one of the following displays in the activation menu: ♦...
-
Page 36: Unlimited Activation
For most GERBER SOLARA UV2 owners the activation settings will be set to “unlimited” hours of operation and it is not necessary to access the activation page again. If your activation settings are already set to unlimited, you do not need to activate the GERBER SOLARA UV2 and can begin printing without limitations. - Page 37 (The internet connection does not have to be active.) 3 Enter the IP Address for the specific GERBER SOLARA UV2 you wish to access as the web address in the web browser and press enter. (Do not use any slashes or colons.) 4 If done correctly the Home page should appear on your web browser.
- Page 38 CHAPTER 3 Setting up the GERBER SOLARA UV2...
-
Page 39: Chapter 4: Loading Inks And Materials
GERBER SOLARA UV2 uses six inks colors: Yellow (Y), Green (G), Magenta (M), Cyan (C), GERBER SOLARA UV2 uses six inks colors: Yellow (Y), Green (G), Magenta (M), Cyan (C), Violet (V), and Black (K) supplied in 250 gram (230 ml) cartridges. The ink cartridges are Violet (V), and Black (K) supplied in 250 gram (230 ml) cartridges. -
Page 40: Replacing Empty Ink Cartridges (When Ink Remains In The Reservoir)
Replacing empty ink cartridges (when ink remains in the reservoir) When the cartridge becomes empty and is unable to refill the reservoir to the Full level, the GERBER SOLARA UV2 displays on the Job status line. Replace the ink Ink Cartridge Empty! cartridge to allow automatic refilling and uninterrupted printing. -
Page 41: Manually Starting An Ink Refill
CHAPTER 4 Loading Inks and Materials Manually starting an ink refill You must start an ink refill to replenish the reservoir after installing a new ink cartridge. You can start an ink fill while printing. The Start Refill command is located in the INK MENU. 1 From the MAIN MENU press F4, Operate to open the OPERATION menu. -
Page 42: Loading The Material
Loading Inks and Materials Loading the material The GERBER SOLARA UV2 is a friction fed printer that uses six moveable pinch wheels and a series of grit wheels to grip and move the material. When loading material, the pinch wheels are aligned with rollers located at standard material widths between 18"... -
Page 43: Compatible Material
These components are collapsible for easy storage and relocation. Compatible material The GERBER SOLARA UV2 prints on a variety of uncoated materials from up to 60" (152 cm) wide and ½" (13mm) thick to meet your graphic needs including outdoor signage, indoor signage, Point of Purchase displays, banners, backlit displays, and reflective signage. -
Page 44: Adjusting The Pinch Wheel Force
Loading Inks and Materials Adjusting the pinch wheel force The GERBER SOLARA UV2 contains six movable pinch wheels that help hold the material against the grit wheels to move it across the platen. The force of the pinch wheels can be adjusted depending on the type pf material being used. - Page 45 CHAPTER 4 Loading Inks and Materials CAUTION: When reaching inside the printer avoid contact with the printer Encoder Strip as this component is very delicate and easily damaged. CAUTION: Do NOT pull on the lamp assembly to move the carriage. INCORRECT INCORRECT 2 Move the lamp assembly from the LOW position to the HIGH position by lifting up...
-
Page 46: Adjusting The Uv Shields
6 Close the front cover. The carriage will automatically move to the home position. Adjusting the UV shields The GERBER SOLARA UV2 comes with two UV shields that are positioned on either end of the platen to protect the internal elements of the printer from over exposure to UV light. They also serve as material hold down devices for vinyl and other non-rigid materials. - Page 47 CHAPTER 4 Loading Inks and Materials To position the UV shields for vinyl material Once the vinyl material is loaded across the platen, position the UV shields over the material so that the material fills half of each the holes in the side of both shields. This will position the shields ¼"...
- Page 48 CHAPTER 4 Loading Inks and Materials Move the UV shield by grabbing the shield bracket here DO NOT TOUCH DO NOT TOUCH To adjust the right UV shield The right UV shield can move up and down the entire length of the carriage beam over the platen to adjust to any material width.
-
Page 49: Loading Vinyl Material
♦ Loading roll material into the printer ♦ Loading and removing material from the winding unit Note: The GERBER SOLARA UV2 does not detect sheet length. When loading sheet material, you must verify that there is sufficient material for the completion of the job. -
Page 50: Using The Material Roller
CHAPTER 4 Loading Inks and Materials Using the material roller When loading roll material onto a material roller, place the roll on a flat surface. Never load a roll of material onto a roller standing on end as it can damage the material and the roller. WARNING: Material rolls can be heavy. - Page 51 CHAPTER 4 Loading Inks and Materials Metal rings 7 Insert the left (adjustable core flange) end of the roller into the left receiver. Dancer Bar Torque Bar (Do not wrap material around this bar; it is not part of the material path.) 8 Wrap the material under the dancer bar and into the printer with the printable surface facing up as shown in the illustration.
-
Page 52: Loading Roll Material Into The Printer
The following procedure applies to both sheet and roll fed material. Note: The GERBER SOLARA UV2 does not detect sheet length. When loading sheet material, you must verify that there is sufficient material for the completion of the job. - Page 53 See “Detecting material width” on page 67. 8 Feed the material with the printable side facing up through the back of the GERBER SOLARA UV2 over the platen and under the pinch wheels so that it extends about 12 inches (30 cm) in the front.
- Page 54 CHAPTER 4 Loading Inks and Materials Allowing the material to extend about 12" (30 cm) in front of the printer makes it easier to load. Note: The material on the supply roll must not be slack to insure proper media feed. Re-roll around the supply roll if necessary.
- Page 55 CHAPTER 4 Loading Inks and Materials 11 Holding the material in position, push in the material load lever to engage the pinch wheels. From the front, push the material load lever in to lower the pinch wheels. 12 When you load material into the printer, if the beam height needs to be adjusted the following message will be displayed: MATERIAL SETUP: Adjust Beam Height...
-
Page 56: Using The Winding Unit
MATERIAL SETUP: Close Front Cover And Shutter or Press CANCEL for Main Menu 17 Once the front cover and the shutter door are closed, the GERBER SOLARA UV2 displays the following message: Select material type Rigid Bleed- -Vinyl... - Page 57 CHAPTER 4 Loading Inks and Materials Once material is loaded, the winding unit operates automatically during printing. A material sensor monitors the length of printed material and activates the winding unit as required. When the printed material loop passes in front of the sensor, the winding unit turns on and winds the excess material onto the take-up roll.
- Page 58 CHAPTER 4 Loading Inks and Materials 3 Load the material in the printer and align it on the platen as described in “Loading roll material into the printer” on page 51. 4 Align the material to the take-up roll so that the leading edge is parallel to it while maintaining alignment on the platen.
-
Page 59: Removing Material From The Winding Unit
CHAPTER 4 Loading Inks and Materials Removing material from the winding unit The winding unit is equipped with a free-wheeling mode that allows easy removal of wound material from the take-up roll. To remove the material from the winder 1 Carefully cut the printed material off of the supply roll. 2 Lift the left end of the material take-up roll and slide it to the right so that the take-up roller hub rests on the idler roller. -
Page 60: Loading Rigid Material
To set up the material tables 1 Make sure there is enough space in front of and in back of the GERBER SOLARA UV2 to place the material tables once they are upright. Note: With the material tables attached, the total length of the printer becomes approximately 15 feet. - Page 61 CHAPTER 4 Loading Inks and Materials 3 Identify which table is the front table and which is the rear. The rear table will have a metal material guide on the right side. Rigid material Material guide 4 Roll the tables into position in front of and in back of the printer using the auxiliary set of wheels at the bottom of the folded tables.
-
Page 62: Calibrating The Material Guide
CHAPTER 4 Loading Inks and Materials Calibrating the material guide Use the following procedure to verify that the material guide is correctly aligned with the printer. This will insure that rigid material is loaded straight. For this procedure you will need the following tools: ♦... -
Page 63: Loading Rigid Material Into The Printer
See “Printing full bleed on rigid materials” on page 86 for details. Note: The GERBER SOLARA UV2 does not detect sheet length. When loading sheet material, you must verify that there is sufficient material for the completion of the job. - Page 64 Rigid material Material guide Note: Gerber recommends cleaning the surface of rigid material by spraying the surface to be printed on with 99% Isopropyl Alcohol and wiping it away evenly. This improves the output quality and durability of the print.
- Page 65 CHAPTER 4 Loading Inks and Materials Note: Once you cover up the rear material sensor the printer will produce an audible signal. This sound simply means that the beam height needs to be adjusted. It is important to finish aligning the material in the printer before adjusting the beam height. 8 Feed the material with the printable side facing up through the back of the printer over the platen and under the pinch wheels so that it extends past the material line.
- Page 66 MATERIAL SETUP: Close Front Cover And Shutter or Press CANCEL for Main Menu 17 Once the front cover and the shutter door are closed, the GERBER SOLARA UV2 displays the following message: Select material type Rigid Bleed- -Vinyl...
-
Page 67: Detecting Material Width
See “Printing full bleed on rigid materials” on page 86 for detailed instructions. 19 The GERBER SOLARA UV2 will automatically home the carriage and scan the material to determine its width. CAUTION: Do not leave the pinch wheels engaged over soft rigid material when not printing. -
Page 68: Printing Margins
Loading Inks and Materials Printing margins The GERBER SOLARA UV2 is able to print on a wide variety of materials at widths ranging from 18" to 60" (46 to 152 cm). When scanning the material width the GERBER SOLARA UV2 will also automatically apply a ¼"... -
Page 69: Manually Initiating A Material Width Scan
Rigid- (CANCEL to Abort) 5 Press F2 if vinyl material is loaded, or press F4 if rigid material is loaded. The GERBER SOLARA UV2 will automatically home and scan the material. Note: If the GERBER SOLARA UV2 fails to detect the material width after a scan, see the... -
Page 70: Viewing Scanned Material Width
CHAPTER 4 Loading Inks and Materials Note: If the GERBER SOLARA UV2 fails to scan rigid material after indexing the material to the front sensor, the printer will NOT index the material back to the starting point. The user must manually slew the material back to the intended starting point using the slew keys on the control panel and then repeat the scan process. -
Page 71: Troubleshooting Material Scans
If the error messages continue after attempting the remedy, call Gerber Service for assistance. Note: Slew the material forward so that only fresh un-printed material is over the platen to insure the most accurate material scan. - Page 72 CHAPTER 4 Loading Inks and Materials Error Message Material Possible Causes and Solutions ERROR: MATERIAL SCAN Rigid The gap between the RIGHT shield and the edge of the material is less than ¼”. Adjust the RIGHT shield and/or the material so that the gap is RT Shield Gap Small between ¼”...
- Page 73 CHAPTER 4 Loading Inks and Materials Error Message Material Possible Causes and Solutions Vinyl ERROR: MATERIAL SCAN Carriage located RIGHT shield hole, but the hole was less than ¼” in width. Check for dust, debris, and/or partially obstructed shield hole RT Shield Hole Small and/or slot in platen.
-
Page 75: Chapter 5: Printing Jobs On The Gerber Solara Uv2
Print quality options The GERBER SOLARA UV2 can be set to three different levels of print quality from the RIP software program: Draft, Production, and High Quality which can be printed in either Uni- directional or Bi-directional mode. (Values shown refer to vinyl material) ♦... -
Page 76: Uv Lamp Automatic Shut-Off (60 Seconds)
CHAPTER 5 Printing Jobs on the GERBER SOLARA UV2 UV lamp automatic shut-off (60 seconds) The UV lamps are designed to automatically turn off after the carriage sits at the home position for one minute. While printing, the lamps will remain on for the duration of the job(s). After finishing a job (or jobs) the UV bulbs remain lit for one minute after the completion to facilitate the beginning of a new job without re-striking the bulbs. -
Page 77: Uv Lamp Extension (3 Minutes)
CHAPTER 5 Printing Jobs on the GERBER SOLARA UV2 UV lamp extension (3 minutes) The UV lamps are designed to automatically turn off after the carriage sits at the home position for one minute. You can extend the time the UV lamps remain on for an additional 3 minutes by using the UV lamp extension option. -
Page 78: Material Preheating
Ready Start-Job There are two modes for printing jobs: Single and Multi. In Single mode, the GERBER SOLARA UV2 waits for you to start the job after it is received (see “Printing a single job” on page 79). In Multi mode, you must press Start-Job to begin the first job, and subsequent jobs start without operator initiation when they are received (see “Printing multiple jobs”... -
Page 79: Printing A Single Job
♦ Change material between jobs ♦ Advance the material before the next job After a job prints, the GERBER SOLARA UV2 waits for you to press F1, Start-Job again to begin the next job once it is received at the printer. - Page 80 Job Status: Running Note: Do not turn off the GERBER SOLARA UV2 or attempt to open the front cover while a job is printing or it will terminate the job. Tip: To pause the job press F1. To re-start the job, press F1 again. The printer resumes printing where it left off and then F1 line of the display returns to Pause-Job.
-
Page 81: Printing Multiple Jobs
CHAPTER 5 Printing Jobs on the GERBER SOLARA UV2 Printing multiple jobs Multi mode lets you run several jobs without having to press Start-Job between each one. When one job finishes, the next job begins immediately on the same material loaded in the printer. - Page 82 If a job does not start when running in multi mode When the GERBER SOLARA UV2 is printing in multi mode, the next job will not begin if one of the following conditions occurs: ♦ The CANCEL key is pressed ♦...
-
Page 83: Pausing, Restarting, And Canceling Jobs
CHAPTER 5 Printing Jobs on the GERBER SOLARA UV2 Pausing, restarting, and canceling jobs Pausing a job suspends it temporarily. You can pause a job by pressing F1, Pause-Job while the job is running. The printer will stop at the next available break point. The slew keys are not operational when a job is running or paused. -
Page 84: Pausing A Job Due To Ink Starvation
CHAPTER 5 Printing Jobs on the GERBER SOLARA UV2 Pausing a job due to ink starvation If an empty cartridge is not replaced and the reservoir falls below the Full ink level when printing, the following message is displayed and the job pauses until a new ink cartridge is installed and the ink reservoir is full again. -
Page 85: Choosing Print Job Justification
Printing Jobs on the GERBER SOLARA UV2 Choosing print job justification The GERBER SOLARA UV2 gives you the option to position or “justify” your image. You can select where on the material you would like to position the print job: the left side, the right side, or in the center. -
Page 86: Printing Full Bleed On Rigid Material
Printing full bleed on rigid material Jobs that are wider and longer than the material stock can be sent to the GERBER SOLARA UV2 using the following procedure. Jobs that exceed the size of the material will bleed off one or more edges and result in ink over spraying the edges of the rigid material onto the platen. - Page 87 – no more than 1/8" (3mm) 3 Load the material into the GERBER SOLARA UV2 with the leading and trailing extension pieces attached. Align the left edge of the material to the material guide on the rear table. Make sure the front edge of the material is not covering the front material sensor.
- Page 88 LEFT/RIGHT MARGINS 8 Apply tape to the platen to keep the ink from adhering to the platen and entering the vacuum holes. Gerber recommends Scotch-Blue Painter's Tape for Delicate Surfaces #2080. 9 Apply the tape under the left and right side of the material width so that the material overlaps the tape 1/4"...
- Page 89 CHAPTER 5 Printing Jobs on the GERBER SOLARA UV2 JUSTIFY JOB CENTER ENTER for Main Menu 12 Press F3 or F4 to toggle through the choices of LEFT, CENTER, or RIGHT until CENTER displays. Press the ENTER key to accept.
- Page 90 CHAPTER 5 Printing Jobs on the GERBER SOLARA UV2 4 Give the custom material a name and enter the width of the sign blank plus 0.5"/12.7mm (for the bleed margin) in the Width box. Leave the default height as is (3937.0").
-
Page 91: Printing Two-Sided Full Bleed On Rigid Material
6 Load the material and print from ImageRIP Plus or Pro as previously described. 7 When printing completes, carefully remove all tape from the printed material and the GERBER SOLARA UV2. Clean any adhesive residue from the print and the machine using a lint-free wipe moistened with 99% isopropyl alcohol. - Page 92 CHAPTER 5 Printing Jobs on the GERBER SOLARA UV2 Creating a jig for full bleed/double sided printing If you are printing a quantity of full bleed or double-sided prints, it may be helpful to construct a jig using a router. To construct a jig you will need the following items: ♦...
- Page 93 7 Use double-sided tape or glue to bond the pocket layer to the carrier layer. 8 Insert the sign blank into the pocket and clean it in preparation for printing. 9 Load the jig into the GERBER SOLARA UV2. To prepare the job file 1 In your design software (such as OMEGA™...
- Page 94 CHAPTER 5 Printing Jobs on the GERBER SOLARA UV2 4 Click Add to open the Add Page Size dialog box where you can create a custom material size to match your sign blank. 5 Give the custom material a name and enter the width of the sign blank plus 0.5"/12.7mm (for the bleed margin) in the Width box.
- Page 95 CHAPTER 5 Printing Jobs on the GERBER SOLARA UV2 7 Choose the Media Configuration Name (color profile), Media type, and page size that matches the custom material you previously created. 8 Select Print Jobs Individually from the Placement drop-down menu and click the Setup button to open the Placement Strategy dialog box.
- Page 96 CHAPTER 5 Printing Jobs on the GERBER SOLARA UV2...
-
Page 97: Chapter 6: Routine Printer Maintenance
Daily maintenance CAUTION: Throughout the day you must wipe the print heads with a swab moistened with GERBER SOLARA UV2 Cleaning Solution to prevent ink build up. Perform this simple maintenance procedure to maximize print head life. Follow this daily maintenance schedule: ♦... - Page 98 CHAPTER 6 Routine Printer Maintenance To prime the print heads 1 From the MAIN MENU, press F4, Operate to open the OPERATION menu. OPERATION Material Lamps ENTER for Main Menu 2 Press F2, Ink to open the INK MENU. INK MENU Levels Service Start Refill...
- Page 99 ENTER when done 8 Moistened a swab with several drops of GERBER SOLARA UV2 Cleaning Solution and blot off excess using a lint-free cloth. Gently wipe the primed print head from back to front one time. Repeat the swabbing procedure using a new swab moistened with Cleaning Solution for each print head that has been primed.
-
Page 100: Main Menu
CHAPTER 6 Routine Printer Maintenance Swab the print heads one at a time from back to front Shutter door slid back to reveal print head nozzle plates 9 Press ENTER when done and the display changes to: CLOSE Inner Head Shutter ENTER when done 10 Close inner head shutter by sliding it forward until it clicks into place. -
Page 101: Printing The Nozzlejob Test Print
There are 14 sections total, each with 9 horizontal lines per color. To print the NozzleJob test print 1 Load Gerber-qualified white material in the printer. 2 Press F3, Setup from the MAIN MENU to open the SETUP MENU. SETUP MENU... - Page 102 CHAPTER 6 Routine Printer Maintenance 7 Before the job starts to print a reminder window will appear reminding you to check the settings for the lamp height and the pinch wheel force. Check to make sure these setting are correct and press any key to continue. REMINDER: Set/Check Lamp Height:...
-
Page 103: Wiping The Print Head To Prevent Ink Build Up
Routine Printer Maintenance Wiping the print head to prevent ink build up After four hours of printing the GERBER SOLARA UV2 prompts the user to clean the print heads to prevent ink build up. The Job Status line displays WARNING: Head Cleaning is needed! Moisten a swab with several drops of GERBER SOLARA UV2 Cleaning Solution and blot off excess using a lint-free cloth. -
Page 104: Weekly/Monthly Maintenance
Cleaning the outside of the GERBER SOLARA UV2 As needed, the covers of the GERBER SOLARA UV2 can be wiped down with a soft lint-free cloth to remove dust and fingerprints. CAUTION: Do not use glass cleaner on the smoked front cover as it causes the cover to craze. -
Page 105: The Solara Uv2 Web Pages
1 Open a web browser menu on the connected computer. (The internet connection does not have to be active.) 2 Enter the IP Address for the specific GERBER SOLARA UV2 you wish to access as the web address in the web browser. (Do not use any slashes or colons.) -
Page 106: Home Page
CHAPTER 6 Routine Printer Maintenance Home page This page displays the printer name, the status (idle or running), the status of the carriage assembly and control system, and the current version of firmware. The name of the printer now displays as a prefix to the name of the webpage enclosed in square brackets. Example IP address Links to other SOLARA UV2... -
Page 107: Ink Levels Page
CHAPTER 6 Routine Printer Maintenance Ink Levels page This page displays the status of the ink in each of the six reservoirs. This page will need to be refreshed periodically when the printer is running to get current accurate readings. -
Page 108: Head Status Page
CHAPTER 6 Routine Printer Maintenance Head Status page This page displays the status of each of the six print heads, including head voltage, head temperature, and each head’s efficiency factor. This page will need to be refreshed periodically when the printer is running to get current accurate readings. -
Page 109: Carriage Status Page
This page displays the general status of the carriage assembly including the supply voltage, the current and ambient temperatures and firing cycle information. CAUTION: Do NOT access this page while the GERBER SOLARA UV2 is printing as it may disrupt the print job. -
Page 110: Sensor Status Page
CHAPTER 6 Routine Printer Maintenance Sensor Status page This page displays the status of all sensors and all fans, with the exception of the material width sensor and the EMI fan. This page will need to be refreshed periodically when the printer is running to get current accurate readings. -
Page 111: Firmware Versions Page
CHAPTER 6 Routine Printer Maintenance Firmware Versions page This page lists the current version of firmware loader on the printer and relevant statistics. -
Page 112: Uv Lamps Page
CHAPTER 6 Routine Printer Maintenance UV Lamps page This page displays information on both the left and right UV lamps including their current status, hours used and maximum life hours. This page also includes links to the UV Lamp Installation page and UV Lamp Installation History page. Link to UV Lamp Installation page Link to UV Lamp Installation History page... - Page 113 CHAPTER 6 Routine Printer Maintenance UV Lamp Install page UV Lamp Installation History page...
-
Page 114: Recent Errors Page
CHAPTER 6 Routine Printer Maintenance Recent Errors page This page lists the last 16 system errors by number. The most recent error is at the top of the list. -
Page 115: Activation Page
Routine Printer Maintenance Activation page This page is for activating or adding hours of print time to GERBER SOLARA UV2 printers that are being leased or under other restrictions. For most owners no activation should be necessary and the printer should be set to unlimited hours of operation. -
Page 116: Find Printers Page
CHAPTER 6 Routine Printer Maintenance Find Printers page This page is for navigating between multiple SOLARA UV2 printers. The page lists all of the printers found on the network including the current printer. Clicking the printer's name in the list, displays that printer's home page. The Find Printers link is available from most SOLARA UV2 web pages. -
Page 117: Downloader Page
Before you can upgrade the GERBER SOLARA UV2 firmware you must have a compatible download file with a GSP filename (for example: SolaraUV_0001.gsp). This file can either be in a... - Page 118 To download firmware 1 Open the GERBER SOLARA UV2 web pages by opening a web browser and entering the printer’s IP address in the address bar. (See “Accessing the SOLARA UV2 web pages” on page 105.) 2 On the Main Page, click on “Downloader”...
- Page 119 CHAPTER 6 Routine Printer Maintenance 4 A web page is displayed showing a table of firmware versions. Under Version, the File column is the firmware versions in the file you selected, the Printer column is the currently loaded version in the printer. There is a column showing what action the Loader will take based on the versions.
- Page 120 CHAPTER 6 Routine Printer Maintenance 5 Click on “Continue Programming” to begin the loading process. Click on “REBOOT Printer” to cancel the download and return to the SOLARA Home page. 6 The loading process may take several minutes to complete as each firmware component is loaded into its corresponding system within the printer.
-
Page 121: Downloader Error Messages
Routine Printer Maintenance Downloader Error messages If the download process fails, the Downloader Error message page displays. See the following chart for corrective action. If the error reoccurs after a recommended action, contact Gerber Service for assistance. ERROR # MESSAGE... - Page 122 CHAPTER 6 Routine Printer Maintenance ERROR # MESSAGE ACTION Raster: Intel-Hex R0 checksum error Make sure the correct file was chosen for downloading. Retry. Raster: Intel-Hex checksum error Make sure the correct file was chosen for downloading. Retry. Raster: Record type 3 error Make sure the correct file was chosen for downloading.
-
Page 123: Uv Lamp Assembly Maintenance
UV lamp cartridge must be replaced. Inadequate curing may not be visible but can lead to printed image failure at any time in the future. Gerber is not responsible for printed image failures that result from the failure to comply with recommended lamp replacement. -
Page 124: Viewing The Estimated Remaining Bulb Life
Replacing the UV lamp cartridge After extended use the UV bulbs deteriorate, curing effectiveness is reduced, and the UV lamp cartridge must be replaced. If you do not replace the UV lamps, Gerber disclaims any liability for ink curing failures. - Page 125 During the UV lamp cartridge replacement procedure you will need to enter the lamp cartridge serial number and lamp code in the lamp installation page of the GERBER SOLARA UV2 web pages. The web page is accessible via any computer networked to the GERBER SOLARA UV2.
- Page 126 UV lamp cartridge 5 Plug the GERBER SOLARA UV2 into the power source and turn it on. The printer recognizes that one or two lamp cartridges have been removed and displays the following message: Lamps removed.
- Page 127 9 Push the carriage back into its park position and close the printer cover. 10 Plug the GERBER SOLARA UV2 into the power source and turn it on. The printer displays the following message where the : is the current IP address of the Addr GERBER SOLARA UV2.
- Page 128 16 Click the Install button. A screen will appear indicating that the installation was successful. 17 The code is verified and the lamp life counter is reset at the GERBER SOLARA UV2. The UV Lamps web page displays again. The Installation field displays...
-
Page 129: Viewing And Printing Uv Lamp Cartridge Replacement History
20 Close out of the web browser showing the GERBER SOLARA UV2 web pages. Viewing and printing UV lamp cartridge replacement history You can view a record of the UV lamp cartridge replacement history through the GERBER SOLARA UV2 web pages. - Page 130 CHAPTER 6 Routine Printer Maintenance UV Lamps link 2 Click the UV Lamps link to open the Lamps web page where you can view the specific lamp cartridge information. Lamp History link 3 Click the Lamp History button to open the UV Lamp Installation History web page. 4 Click the PRINT button at the bottom of the page to send this to a paper printer.
-
Page 131: Adjusting The Low Lamp Life Warning Hours
Low Lamp Life when there are 100 hours of usable life left on the UV lamp cartridge. To adjust the Low Lamp Life warning hours 1 From the GERBER SOLARA UV2 MAIN MENU press F4, Operate to open the OPERATION menu. OPERATION... - Page 132 CHAPTER 6 Routine Printer Maintenance WARNING: UV bulbs are hot when operating. Before disassembling the UV lamp assembly, ensure that the system has had adequate time to cool. CAUTION: Wear cotton or rubber gloves when handling the UV quartz plate. Oil from your skin as this can cause permanent damage to the plate.
- Page 133 Note: If the quartz plate is becoming opaque, or is chipped, cracked, or no longer able to be cleaned, the lamp assembly must be replaced. Contact Gerber or your distributor. 8 Reattach the lamp assembly to the carriage. Tighten the two screws using the long- handled 3mm Allen wrench inserted through the slots in the side of the cartridge.
-
Page 135: Chapter 7: Troubleshooting
The GERBER SOLARA UV2 contains several internal calibration and diagnostic tools. If you suspect that the printer is out of alignment refer to the Gerber SOLARA UV2 Installation Guide for more information and specific instructions for performing these calibration operations. -
Page 136: Printer Issues
Plug in the power cord. See “Ambient conditions” to the printer and the plugged into an on page 15. active outlet? Is the GERBER SOLARA UV2 power Turn on the power See “Starting the printer” switch turned on? switch. on page 21. -
Page 137: Material Jams
Adjust the beam height See “Loading the material” correctly? within the acceptable on page 42. range for the material. Is the GERBER SOLARA UV2 being Use the SOLARA UV2 in See ”Ambient conditions” used in adverse environmental the specified on page 15. -
Page 138: Banding In The Print
Adjust the pinch wheel See ‘Loading the material’ correct force setting for the material force setting for the on page 42. loaded? material loaded. Is the print head beyond its Replace the print head. Call Gerber Service. recommend service life? -
Page 139: Objects Are Printing In The Wrong Place
Are you using the correct Use the correct See “Networking your communications cable? communications cable. GERBER SOLARA UV2 printer” on page 25. Is the image printing on top of the Perform a manual See “ UV shields? material scan. -
Page 140: Color Balance Is Different Between Software And Print
Gerber-approved on page 43. material. Store material in correct environmental conditions. Are you using the correct Gerber Verify or change the See “Using RIP software color profiles for the material you are current profile you are and profiles” on page 75. -
Page 141: Purging An Ink Line To Remove Air
CHAPTER 7 Troubleshooting Purging an ink line to remove air Occasionally you may have air induced in the system that must be removed. If you notice ink leaking or pooling during printing, this is an indication that you should purge the ink line. The UV lamps must be off and cool before purging can begin. - Page 142 CHAPTER 7 Troubleshooting Valve open for line to be purged (black) 7 Press ENTER when done. The display changes to: OPEN WASTE valve for selected ink color & empty waste bottle. ENTER when done 8 Check waste bottle contents and empty if necessary. Dispose of waste ink according to local laws and regulations.
- Page 143 CHAPTER 7 Troubleshooting 11 Open the priming door at the left side of the printer and install a lint-free wipe (absorbent pad) in the tray. Head shutter handle in closed position. Slide backward to open. Lint-free wipes in tray Outer priming door 12 Press ENTER when done.
- Page 144 CHAPTER 7 Troubleshooting 15 Moisten a swab with several drops of GERBER SOLARA UV2 Cleaning Solution and blot excess using a lint-free cloth. Gently wipe the primed print head from back to front one time. Repeat the swabbing procedure using a new swab moistened with Cleaning Solution for each print head that has been purged.
- Page 145 CHAPTER 7 Troubleshooting 19 Close the waste valves for the colors you have loaded. All waste valves should be closed at this point. 20 Empty the waste bottle if necessary. Dispose of the waste ink according to local laws and regulations. Press ENTER when done and the display changes to: OPEN ALL ink lines for ALL ink colors...
-
Page 146: Messages
Troubleshooting Messages The following messages may appear on the GERBER SOLARA UV2 display. The first group of messages appear on the Job Status line of the display. The second group of messages are common warning messages. The third group lists the common numbered error messages. - Page 147 CHAPTER 7 Troubleshooting Common Warning Messages Description OUT OF MATERIAL Rear material sensor indicates end of material. Current job is Material End Found. canceled. Load new material to fix. Job CANCELED (Press a key) No Material has Pinch wheels have been lowered but either the front or rear been loaded material sensor does not detect material.
- Page 148 CHAPTER 7 Troubleshooting Common Warning Messages Description INK LINE ERROR!! Before a purge or ink dry load operation, one or more ink CLOSE BYPASS on reservoirs could not be completely filled. This indicates an empty these Inks: ink cartridge. The colors are identified in the 3rd line of the ENTER when done message.
- Page 149 CHAPTER 7 Troubleshooting Numbered Error Messages Description ***WARNING #1*** Print jobs must be ripped and transformed for the printer’s Job Calibration specific calibration settings. The print job does not match the Incompatible printer’s current settings. Check to make sure you are using F1 to Print compatible RIP software and re-send the job.
- Page 150 CHAPTER 7 Troubleshooting Numbered Error Messages Description E014: AIR PUMP FAIL Turn off the printer, wait 10 seconds and turn it back on. If the error occurs again, seek technical assistance by an authorized dealer. E015: HOLD FAN FAIL E016: VENT FAN FAIL E017: CARRG FAN FAIL E018: ELECT OVERTEMP E019: SYS INTPT ERR...
- Page 151 CHAPTER 7 Troubleshooting Numbered Error Messages Description E031: POWER FAILURE Turn off the printer, wait 10 seconds and turn it back on. If the error occurs again, seek technical assistance by an authorized dealer. E032: MATL POS ERROR Verify that there are no material jams and nothing is hindering carriage movement.
- Page 152 CHAPTER 7 Troubleshooting Numbered Error Messages Description E045: Edge Detection Verify that there are no material jams and nothing is hindering MOTION ERROR carriage movement. Turn off the printer, wait 10 seconds and turn it back on. If error recurs, download or reload the latest version of firmware via the SOLARA UV2 web pages.
-
Page 153: Menu Tree - Main Menu
MATERIAL WIDTH: Press F3 or ENTER 48.52 in 123.2 cm MAX. JOB WIDTH 48.02 in 122.0 cm MY JOB Gerber 220 30 x 45 in SET MATERIAL WIDTH: 76.2 x 114.3 cm Set Width JUSTIFY JOB ENTER Key to Accept... -
Page 154: Menu Tree - Ink Menu
COLOR: K V C M G Y LEVEL: F e e F F E (Press a key) Full Ink Cartridge empty Ink Reservoir and Cartridge empty Fault- Call Gerber Service INK SERVICE Dry Load HeadClean Messages guide users through the F2 Clear Line Purge Dry Load sequence. -
Page 155: Menu Tree - Lamp Menu
Menu Tree – Lamp Menu UV LAMPS Life Low Life Used (Turn off) (EXTEND) Lamp ON Options in parentheses ( ) are disabled LOW LAMP LIFE HOURS UV LAMP HOURS USED Life Low LEFT RIGHT – ENTER key to Accept. (Press a key) -
Page 156: Menu Tree - Setup Menu
Menu Tree – Setup Menu SETUP MENU See CALIBRATION MENU… Network Calibrate Diag Vacuum ENTER for Main Menu HOLD DOWN FANS Select ENABLE DIAGNOSTICS (Only English available) Test Jobs Language Displays last 12 error codes Versions ErrHistory Displays firmware versions TEST JOBS NozzleJob EncoderJob... -
Page 157: Menu Tree - Network Configure Menu
Menu Tree – Network Configure Menu NETWORK CONFIGURATION IP Settings Name SOLARA UV2-A1 SET NETWORK NAME Default SOLARA UV2-A1 IP Source: Fixed Gateway IP Address Subnet ENTER = Save Changes SET IP ADDRESS Default = = = 1 6 9 . 2 5 4 . 0 0 0 . 0 0 2 SET IP SUBNET MASK Default 2 5 5 . -
Page 158: Menu Tree - Calibration Menu
Menu Tree – Calibration Menu CALIBRATION MENU Feed Adj. Head Move Head Setup ENTER for Main Menu HEAD SETUP Head Rank Head Alignment ENTER for CAL Menu HEAD RANK HEAD ALIGNMENT Adjust All Default Adjust All Default K: 0.87 V: 0.83 C: 0.89 K+0,+1 V+0,-1... -
Page 160: Index
Index Activation Firmware upgrades ....... 117 checking status ......34 Firmware Versions web page ..111 entering codes.......36 Function keys ........19 print-hour ........36 Grit wheels........104 unlimited ........36 Head Clean menu ......104 web page........115 Head cleaning......... 103 Alignment .........85 Head Status web page.... - Page 161 removing roll ........59 Pinch wheels, adjusting ....44 removing vinyl ......59 Ping command ......... 32 rigid ..........43 Platen, cleaning ......104 rigid bleed ........43 Power switch ........21 slewing...........19 Preheating ......... 78 vinyl ..........43 Priming print heads......97 Material bumpers, cleaning ..104 Print heads Material guide, calibrating....62 periodic cleaning......
- Page 162 Personal .........13 ventilation ........17 Ventilation........13 UV lamp Sensor Status web page ....110 adjusting warning...... 131 Sensors automatic shut off ......76 ink...........39 cleaning quartz plates ....131 Set Width ...........67 cool down......17, 22, 76 Setup menu ........20 extending on time ......77 Shields..........46 failure...........
- Page 163 P79665A Rev D 83 Gerber Road South Windsor, CT 06074-9864 USA www.gspinc.com...
Need help?
Do you have a question about the SOLARA UV2 and is the answer not in the manual?
Questions and answers