Rational iCombi Pro Original Instructions For Use
Hide thumbs
Also See for iCombi Pro:
- User manual ,
- Original instructions for use (188 pages) ,
- Original installation manual (108 pages)
Table of Contents
Advertisement
Quick Links
Advertisement
Table of Contents

Related Manuals for Rational iCombi Pro


Summary of Contents for Rational iCombi Pro
- Page 1 ® iCombi Original instructions for use...
-
Page 2: For Your Safety
WARNING FOR YOUR SAFETY Do not store or use gasoline or other flammable vapours and liquids in the vicinity of this or any other appliance. WARNING Improper installation, adjustment, alteration, service or maintenance can cause property damage, injury or death Read the installation, operating and maintenance instructions thoroughly before installing or servicing this equipment. -
Page 3: Table Of Contents
Explanation of warnings.................................. 10 1.5.4 Illustrations......................................10 1.5.5 Technical changes....................................10 2 The iCombi Pro......................................11 3 General safety information..................................12 Safety information for units with gas line connections........................13 Personal protective equipment ................................13 4 Working with the unit ....................................14 Initial start-up ........................................ - Page 4 5.2.9 Sous-vide......................................33 5.2.10 Pasteurizing......................................33 Cooking food intelligently ..................................34 5.3.1 Accessing intelligent cooking paths............................. 34 5.3.2 Starting an intelligent cooking path............................. 34 5.3.3 Pre-select start time ..................................35 Fine-tuning your results ..................................... 36 5.4.1 cooking parameter.................................... 36 5.4.2 Additional functions ..................................
- Page 5 10.4.1 Combination check ................................... 56 10.4.2 Positioning logic ....................................56 10.4.3 Close planning gaps..................................56 10.4.4 Time optimization ..................................... 57 10.4.5 Energy optimization ..................................58 10.5 Editing and deleting tickets ..................................59 10.6 Target time cooking..................................... 59 10.7 Planning........................................... 59 10.7.1 Creating plans.....................................
- Page 6 13.5.9 Danger ........................................76 13.5.10 IR remote control ....................................77 13.5.11 Empty steam generator................................... 77 13.5.12 VarioSmoker ....................................... 77 13.6 Cook ..........................................77 13.6.1 Primary national cuisine .................................. 77 13.6.2 Secondary national cuisine ................................77 13.6.3 A la carte plate weight..................................77 13.6.4 Banqueting plate weight .................................
- Page 7 14.2.2 Connecting the network cable ..............................91 14.2.3 Establish network connection ............................... 92 14.3 ConnectedCooking ...................................... 92 14.3.1 Connect the unit with ConnectedCooking ..........................93 14.4 Run software update ....................................94 15 Automatic cleaning - iCareSystem................................95 15.1 General safety information ..................................95 15.2 Cleaning modes......................................
- Page 8 19.1 Transporting the unit....................................111 20 Decommissioning and disposal................................113 20.1 Decommissioning......................................113 20.2 Disposal ........................................... 113 21 Technical data ......................................114 21.1 Units with electrical connections................................114 21.2 Types and model names ..................................... 114 21.3 Conformity ........................................114 21.3.1 Units with electrical connections..............................
-
Page 9: Introduction
The iCombi Pro is the most intelligent combi-steamer. It cooks a multitude of different dishes for 20 or several thousands of guests. Whether these are fish, meat, poultry, side dishes or baked goods, or whether they are fried, steamed, grilled or baked. -
Page 10: Explanation Of Pictograms
1 | Introduction 1.5.2 Explanation of pictograms The following pictograms are used in this document: Caution! Read the instructions for use before using the unit. General warning symbol Useful information to help you use your unit. 1.5.3 Explanation of warnings The following warnings are used to advise you of potentially dangerous situations and how to avoid them. -
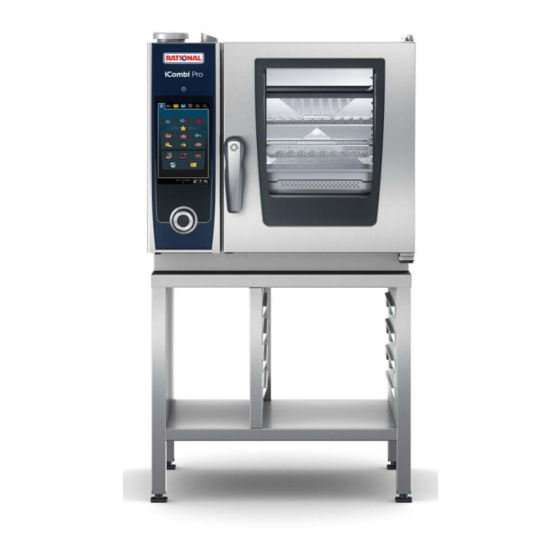
Page 11: The Icombi Pro
2 | The iCombi Pro The iCombi Pro Cooking cabinet Control panel Cooking cabinet door Display Door handle Central selection knob USB port Care drawer Hand shower Air filter Original instructions for use 11 / 120... -
Page 12: General Safety Information
Do not use the cooking system if it is damaged in general, or if the connection cable is damaged. Damaged cooking systems are unsafe and could cause burns or other injuries. Do not use the unit if the glass on the cooking cabinet door is damaged. Contact your RATIONAL Service Partner and have the cooking cabinet door glass replaced. -
Page 13: Safety Information For Units With Gas Line Connections
3 | General safety information – Only use original RATIONAL accessories. – Only smoke food using the VarioSmoker. If there is food in the cooking cabinet that has already been brought up to serving temperature, do not load cold food into the cooking cabinet. -
Page 14: Working With The Unit
Initial start-up When you start your unit for the first time, it will have already been properly installed by a RATIONAL Service Partner, The self-test will have been completed, so the unit will be ready for use. Information related to installation is available in the installation manual included in delivery. -
Page 15: Home Screen
4 | Working with the unit Home screen iProductionManager Programming mode iCookingSuite iCareSystem Search assistant Home User profile Manual cooking Favorites Intelligent cooking modes Cooking method Back / Cancel Date, Time, Status Help Settings iProductionManager [} 52] Intelligent cooking - iCookingSuite [} 23] Home Pressing this button will take you to the home screen. -
Page 16: Favorites
4 | Working with the unit 2 search assistant [} 104] 4.3.1 Favorites You can save any intelligent cooking paths and programs you use especially often as favorites, and then call them up via the home screen. For example, you can save the dishes on your seasonal menu as favorites so that you can access them as quickly as possible. -
Page 17: Help Function
4 | Working with the unit ConnectedCooking connection This symbol indicates that your cooking system is connected to ConnectedCooking. If your cooking system is not connected to ConnectedCooking, this symbol will be shown: Water connection This symbol indicates that your cooking system is not connected to a water supply. When you switch the cooking system on, you will be prompted to pour 3 liters of water into the cooking cabinet. -
Page 18: Maximum Load Capacities
4 | Working with the unit Maximum load capacities NOTE Damage to the unit due to overloading Exceeding the maximum load capacity may damage the unit. 1. Never load the unit past the maximum capacity specified here. Model Max. load capacity [lb] Max. -
Page 19: Inserting Core Temperature Probes
4 | Working with the unit 4. Close the cooking cabinet door. Make sure to close the cooking cabinet door all the way, and make sure that the handle is in the vertical position. NOTE! If the cooking system has been turned off or disconnected from power for less than 15 minutes, the current process will resume where it left off. - Page 20 4 | Working with the unit If you often prepare very thin or liquid food, we recommend using the optional positioning aid. Insert the core temperature probe into the positioning aid first, and then into the food. If the core temperature probe is hotter than the set core temperature, use the hand shower to cool the core temperature probe.
- Page 21 4 | Working with the unit Fish fillets 1. Insert the core temperature probe into the food at an angle, all the way to the handle, so that the core temperature probe is as far down into the food as possible. Whole fish 1.
-
Page 22: Using The Hand Shower
4 | Working with the unit Using the hand shower Please note that you have the option of ordering a cooking system without a hand shower. CAUTION The hand shower water and the hand shower itself may reach temperatures exceeding 140°F. Grasping heated parts or coming into contact with hot water may cause scalding injuries. -
Page 23: Intelligent Cooking - Icookingsuite
Intelligent cooking - iCookingSuite The iCookingSuite is the cooking intelligence in the iCombi Pro. You specify which type of food you want to prepare using which cooking method, and then you’ll be taken to a list of cooking paths to choose from in order to get the results you want. -
Page 24: Intelligent Cooking Paths
5 | Intelligent cooking - iCookingSuite Boiling Roasting Baking Grilling Each cooking mode is assigned a specific set of intelligent cooking paths. These cooking paths reflect cultural cooking customs, which you can adjust by setting the Primary national cuisine [} 77] and Secondary national cuisine [} 77]. -
Page 25: Meat
5 | Intelligent cooking - iCookingSuite Breaded Select this cooking process if you would like to prepare breaded poultry pieces. Peking duck Select this cooking path if you want to cook traditional Peking duck. Roasted turkey Select this cooking path to cook whole turkeys or parts of turkey. Select this cooking path if you want to cook stuffed turkey. - Page 26 5 | Intelligent cooking - iCookingSuite Roast Select this cooking process if you want to fry large pieces of meat. Grilling Select this cooking path if you want to cook pieces of meat with a grill pattern. Semi-preserves Select this cooking path if you want to make semi-preserves out of meat such as boiled sausages, goulash, or stew.
-
Page 27: Seafood
5 | Intelligent cooking - iCookingSuite Sukiyaki Select this cooking path if you would like to cook meat that has been marinated in Tsukeyaki (sukiyaki) sauce and is to be cooked in the ideal climate. Black Char Siu Select this cooking path to cook Chinese char siu. (Only in Chinese national cuisine) 5.2.3 Seafood Pan-fry... -
Page 28: Egg Dishes And Desserts
5 | Intelligent cooking - iCookingSuite 5.2.4 Egg dishes and desserts Baking dessert Select this cooking path if you want to cook fresh, sweet puddings, such as semolina or rice pudding, strudel, baked apples or kaiserschmarrn. Select this cooking path if you would like to prepare convenience products. Steaming dessert Select this cooking path if you want to cook steamed desserts, such as steamed dumplings or yeast dumplings. - Page 29 5 | Intelligent cooking - iCookingSuite Congee Select this cooking path if you want to cook congee or Chinese rice pudding. Steaming Choose this cooking path if you would like to steam fresh or frozen side dishes or whole potatoes. Dim sum Select this cooking path if you want to cook Chinese dim sum.
-
Page 30: Baked Goods
5 | Intelligent cooking - iCookingSuite French fries Select this cooking path if you want to cook conventional, pre-fried potatoes. Fried rice Select this cooking path if you would like to prepare fried rice dishes. Steamed rice Select this cooking path if you want to steam rice or grains, such as pearl barley or couscous. Sushi rice Select this cooking process if you would like to prepare sushi rice. - Page 31 5 | Intelligent cooking - iCookingSuite Proof Choose this cooking path if you would like to proof fresh or frozen yeast dough or sourdough. Sweet Yeast Dough Select this cooking path if you would like to bake cakes or baked goods from fresh yeast dough, such as yeast buns, yeast pastries or yeast dough topped with fruit.
-
Page 32: Finishing
5 | Intelligent cooking - iCookingSuite 5.2.7 Finishing Container service Select this cooking path if you want to heat up food that is already cooked and cooled in containers to serving temperature. Heat through Select this cooking path if you want to heat up previously cooked dishes to the desired core temperature and keep it at this temperature. -
Page 33: Sous-Vide
5 | Intelligent cooking - iCookingSuite Hot smoking Fish Select this cooking path to smoke fish. These can be cooked in parallel. The desired core temperature and a simple cooking time can be determined here. Hot smoking Side Dishes Select this cooking path to smoke side dishes or produce unusual vegetarian or vegan dishes and components. These can be cooked in parallel. -
Page 34: Cooking Food Intelligently
5 | Intelligent cooking - iCookingSuite Cooking food intelligently 5.3.1 Accessing intelligent cooking paths You can access intelligent cooking paths in 2 ways: About iCookingSuite About programming mode [} 62] iCookingSuite 1. In the menu bar, press this button: > With iCookingSuite, you can access intelligent cooking paths in three ways: By choosing an operating mode, e. g., Vegetables and side dishes. -
Page 35: Pre-Select Start Time
5 | Intelligent cooking - iCookingSuite 5. Load product now. 6. Close the cooking cabinet door. > The cooking path will continue. 7. Follow the instructions on the cooking system. > Once the cooking time has elapsed or the food has reached the set core temperature, a signal tone will sound, prompting you to check whether the food has reached your desired level of doneness. -
Page 36: Fine-Tuning Your Results
5 | Intelligent cooking - iCookingSuite 7. Load product now. 8. Close the cooking cabinet door. >> The cooking path will start at the set time. To cancel a pre-selected start time setting, press and hold this button: Fine-tuning your results After you have selected an intelligent cooking path, the unit will show you specific cooking parameters and functions for that path. - Page 37 5 | Intelligent cooking - iCookingSuite Cooking cabinet temperature Use this cooking parameter to adjust the cooking cabinet temperature. Whenever the heating element is activated in order to achieve the set cooking cabinet temperature, this symbol will be displayed: Once the cooking cabinet has reached the target temperature, this symbol will be displayed: To view the current cooking cabinet temperature and humidity level: 1.
-
Page 38: Additional Functions
5 | Intelligent cooking - iCookingSuite 5.4.2 Additional functions Cooking cabinet humidity Use this additional function to adjust moisture levels inside the cooking cabinet. Two levels are available to choose from. The higher the level you choose, the more moisture will be in the cooking cabinet - humidity levels will be higher throughout the entire cooking path. -
Page 39: Information
5 | Intelligent cooking - iCookingSuite Blend Mix the food (e.g., totopos). 5.4.4 Information During the cooking path, the display will indicate which steps are currently being carried out. Preheat The unit is being preheated to a temperature that is either a default temperature for a manual operating mode or specified for an intelligent cooking path. -
Page 40: Monitoring An Intelligent Cooking Path
5 | Intelligent cooking - iCookingSuite New batch Use this option to load another batch into the unit and resume the same cooking path with the defined cooking parameters. You will be prompted to unload the cooking system first and then load it again. Once you have loaded a new batch into the cooking system and closed the cooking cabinet door, the cooking path will resume. -
Page 41: Canceling An Intelligent Cooking Path
5 | Intelligent cooking - iCookingSuite Canceling an intelligent cooking path 1. Press and hold this button: > The cooking path is canceled. The home screen will appear. Sorting intelligent cooking paths You can either sort the intelligent cooking paths alphabetically or based on frequency of use in the iCookingSuite. 1. -
Page 42: Manual Cooking
6 | Manual cooking Manual cooking With the manual modes, the iCombi Pro supports you in your personal craft. By selecting this mode, you set the climate and select whether you want to cook the food in steam, with convection heat or with a combination of steam and convection. Then you set the cooking cabinet temperature, the air speed and cooking time and make all the necessary decisions yourself. -
Page 43: Additional Functions
6 | Manual cooking Core temperature Use this cooking parameter to specify the core temperature you want the food to reach. Setting a core temperature will disable the cooking time option. 6.1.2 Additional functions Delta-T cooking NOTE Please note that, when using Delta-T cooking with a cooking time, the core temperature probe must also be inserted into the product. -
Page 44: Prompts And Information
6 | Manual cooking 6.1.3 Prompts and information During the cooking process, you may be shown the same prompts and information [} 39] as you would during an intelligent cooking path. Steam 6.2.1 Cooking cabinet climate and temperature range Cooking cabinet climate cooking method Cooking cabinet humidity Cooking cabinet... -
Page 45: Combi-Steam
6 | Manual cooking >> The cooking path will continue. Once the cooking time has elapsed or the food has reached the set core temperature, a signal tone will sound, prompting you to check whether the food has reached your desired level of doneness. -
Page 46: Convection
6 | Manual cooking convection 6.4.1 Cooking cabinet climate and temperature range Cooking cabinet climate cooking method Cooking cabinet humidity Cooking cabinet temperature Baking 0 – 100% 85 – 575°F Pan-fry Grilling Deep-fry Browning Glazing If the cooking cabinet temperature remains above 500°F for 30 minutes, it will automatically be reduced to 500°F if you do not work with the unit during that time. -
Page 47: Cancel Manual Cooking
6 | Manual cooking Cancel manual cooking 1. Press and hold this button: > The cooking process is canceled. The home screen will appear. Original instructions for use 47 / 120... -
Page 48: Sous-Vide Cooking
7 | Sous-vide cooking Sous-vide cooking In sous-vide cooking, food is prepared, seasoned, marinated and/or seared before being placed into a vacuum bag and cooked at a low temperature. The method results in very flavorful food which retains its natural color, vitamins and minerals, and the gentle cooking process minimizes cooking losses. -
Page 49: Low Temperature Cooking
8 | Low temperature cooking Low temperature cooking Cooking large meat and poultry products requires a lot of time-intensive monitoring and many years of experience, plus it renders conventional appliances unavailable for hours on end. With your cooking system, you can face these challenges with less worry: you can roast, boil, or braise food slowly at low temperatures during off-peak hours, such as during the afternoon or outside of service periods, so you can make optimum use of your cooking system, up to 24 hours a day. -
Page 50: Finishing
9 | Finishing Finishing Finishing allows you to separate food production and service, giving you more flexibility to spend time on important things like planning, menu design, or creative plating. Finishing minimizes loss of quality caused by long holding periods, so your food always comes out tasting great. You can Finish exactly as much food as you currently need, so you can respond easily to changing guest numbers. - Page 51 9 | Finishing 750 g – 899 g 900 g – 1099 g >1100 g Original instructions for use 51 / 120...
-
Page 52: Iproductionmanager
10 | iProductionManager iProductionManager iProductionManager organizes the entire production process intelligently and flexibly. It identifies which foods can be prepared together, determines the perfect order to prepare the foods, and monitors each cooking path separately. iProductionManager lets you know when each dish needs to be put in or taken out. You decide whether to optimize cooking speed, maximize your energy efficiency, or have your food ready at a target time, and iProductionManager intelligently arranges the order of preparation accordingly. -
Page 53: Ticket Board
10 | iProductionManager 1. In the menu bar, press this button: 2. Press this button: 3. Press this button: 4. Select the operating mode: Steam [} 44] , Combi-Steam [} 45] or Convection [} 46] 5. Adjust the cooking parameters as desired. You can also set the speed of the fan wheel. To do so, press this button: 6. -
Page 54: Ticket Board Editor
10 | iProductionManager 4. To send a shopping cart to the iProductionManager, tap the shopping cart you want to use. > The shopping cart will be sent to the iProductionManager. All programs will be displayed on the ticket board. 10.2.3 Ticket board editor 1. -
Page 55: Placing Tickets
10 | iProductionManager 1. To place a timer at the current time, first tap the timer on the ticket board, and then select a rack level. > The timer will be placed at the current time. 2. To place a timer in the future, drag the timer to the start time and rack level of your choice. 3. -
Page 56: Combination Check
10.4.2 Positioning logic Based on the combination check, the iCombi Pro decides where the ticket is placed. The tickets are positioned optimally in the iProductionManager depending on the result of the check. A color marking in the rack levels indicates whether a new ticket will impact the already positioned tickets in the iProductionManager: If the rack levels are marked in yellow, you can place a ticket, but tickets that are already placed are moved. -
Page 57: Time Optimization
You can have tickets that you have already placed in the iProductionManager optimized automatically by your iCombi Pro so that the dishes are cooked in an optimal sequence and time gaps are closed. The time sequence and positioning on the rack levels is retained. -
Page 58: Energy Optimization
You can have tickets that you have already placed in the iProductionManager optimized automatically by your iCombi Pro so that the dishes are cooked in the most energy-efficient way. This enables the unit utilization to be optimized and energy to be saved. Please note that the time sequence of the tickets can change during this process. -
Page 59: Editing And Deleting Tickets
10 | iProductionManager 10.5 Editing and deleting tickets Manual tickets Once you have placed a manual ticket, you can either adjust the core temperature or extend the cooking time. You cannot adjust the climate settings. 1. Tap the ticket. > The settings for that ticket will be displayed. -
Page 60: Creating Plans
10 | iProductionManager It is not possible to save previously completed tickets as a plan. The Moisten function is not available in planning. 10.7.1 Creating plans 1. In the menu bar, press this button: 2. In the menu bar, press this button: 3. -
Page 61: Starting Plans
10 | iProductionManager 3. Enter a name. 4. To confirm, press this button: >> The plan will be added to your list of plans. 10.7.2 Starting plans Use this feature after creating plans. [} 60] Make sure that the iProductionManager is not currently running a ticket. If tickets are in progress, a message will be displayed to notify you that all tickets will need to be canceled before the plan can be run. -
Page 62: Programming Mode
11 | Programming mode Programming mode You can create, save, and manage your own manual programs [} 62], intelligent cooking paths [} 64] and shopping carts [} 66] in programming mode. You can choose from among any of the available manual operating modes [} 42], intelligent cooking paths [} 23], cleaning programs and pre-programmed shopping carts. 11.1 Creating programs manually 1. - Page 63 11 | Programming mode 8. To edit a cooking step, press this button: > The cooking parameters and additional functions available for that operating mode will be displayed. cooking step Cooking parameter Additional functions Preheat Cooking cabinet temperature Fan speed Steam Cooking cabinet temperature Delta-T cooking...
-
Page 64: Creating An Intelligent Program
11 | Programming mode 8. Select an image. 9. To confirm, press this button: 10. To set a low fan level after loading, press this button: Saving a program 1. To give the profile a name, press the button: 2. Enter a name. 3. - Page 65 11 | Programming mode 2. Press this button: > Any editable cooking parameters and additional functions for that cooking path will be displayed. Standard settings for the cooking path are marked with this symbol: 3. Adjust the cooking parameters as desired. 4.
-
Page 66: Programming Shopping Carts
11 | Programming mode 11.3 Programming shopping carts 1. In the menu bar, press this button: 2. Press this button:+ New element 3. Press this button: 4. To add intelligent cooking paths to the shopping cart, press this button: > All intelligent cooking paths will be displayed. -
Page 67: Editing And Deleting Programs
11 | Programming mode Reviewing shopping carts 1. To review the shopping cart, press this button: > All selected intelligent cooking paths and programs will be displayed. 2. To delete an element from the shopping cart, press this button: Saving a shopping cart 1. -
Page 68: Planning
11 | Programming mode Shopping carts 1. To add a shopping cart to iProductionManager, tap the shopping cart you want to use. > All elements within the shopping cart will be shown on the ticket board. You can now place the tickets as usual [} 55]. -
Page 69: Starting Plans
11 | Programming mode 3. Enter a name. 4. To confirm, press this button: >> The plan will be added to your list of plans. 11.6.2 Starting plans Use this feature after creating plans. [} 68] Make sure that the iProductionManager is not currently running a ticket. If tickets are in progress, a message will be displayed to notify you that all tickets will need to be canceled before the plan can be run. -
Page 70: Switching Between Operating Modes
12 | Switching between operating modes Switching between operating modes With iCombi Pro, you can switch easily between the manual cooking, iCookingSuite and iProductionManager cooking modes at any time. This offers the optimal mix of automatic, work-saving cooking intelligence and individually desired control options. -
Page 71: Settings
13 | Settings Settings You can permanently change the factory settings on your unit to suit your requirements. 1. Press this button: > You will see a list of all available settings options: Favorites [} 71] Display [} 71] Light [} 72] Sound [} 73] Cooking system [} 75] Cooking [} 77] cleaning [} 79]... -
Page 72: Temperature Format
13 | Settings >> The date is applied automatically. Time of day 1. Press this button: Time of day > The time is shown. 2. Press the time. 3. Set the desired time. >> The time is applied automatically. Switch 24h/12h 1. -
Page 73: Display Brightness
13 | Settings 13.3.1 Display brightness Here, you can adjust the display brightness on a scale of 0 - 100 %. 1. Press this button: Display brightness 2. Select the desired value on the scale or set it using the dial. >> The display brightness is adjusted automatically. Automatic dimming 1. -
Page 74: Program Step End
13 | Settings 7. If you only want the sound to play for a certain length of time, press this button: Continuous playback OFF > The Tone length field will be activated. 8. Set the length anywhere between 0 – 180 seconds. 9. -
Page 75: Cooking System
13 | Settings 2. Press the sound you would like to use. > The sound will be played. 3. To turn off sounds, press this button: OFF 4. Tap in the icon bar to return to the overview screen. 5. If you want the sound to play continuously until the cooking system has been loaded or the action has been confirmed, press this button: ... -
Page 76: Demo Mode
Activating the control nozzle can be especially useful for preventing undesired condensation in the kitchen. Deactivating the control nozzle allows you to save water if your ventilation system is sufficiently powerful. Consult your RATIONAL service partner before activating or deactivating the function. 1. Press this button: ... -
Page 77: 13.5.10 Ir Remote Control
A la carte plate weight Before starting the Finishing step, set how heavy an empty plate is. Based on this information, your iCombi Pro will adjust the cooking steps so that they achieve an ideal Finishing result and so that no moisture forms on the plates. -
Page 78: Banqueting Plate Weight
Banqueting plate weight Before starting the Finishing step, set how heavy an empty plate is. Based on this information, your iCombi Pro will adjust the cooking steps so that they achieve an ideal Finishing result and so that no moisture forms on the plates. -
Page 79: Iproductionmanager 3D
13 | Settings 13.6.9 iProductionManager 3D Use this setting to specify that you want to load two trays per level in iProductionManager. Each tray will be monitored separately. Please note that no more than 12 levels can be displayed at once. 1. -
Page 80: Export All Data
13 | Settings HACCP data [} 82] Service [} 82] Export MyDisplay 13.8.1 Export all data Start by plugging a USB stick into the cooking system. 1. Press this button: Export all data >> You can now export all data to a USB stick. 13.8.2 Cooking programs Use this function to export, import or delete all programs you have created. -
Page 81: User Images
13 | Settings 2. To confirm, press this button: >> A message will be shown confirming that all of your own profiles have been deleted. 13.8.4 User images Use this screen to import and export any images that you wish to assign to programs or shopping carts. Images must fit the following parameters: File type: PNG Color depth: 3 x 8 bit... -
Page 82: Haccp Data
13 | Settings >> The basic settings will be imported. 13.8.7 HACCP data Here, you can export the HACCP data recorded by the unit to a USB stick. You can also have the HACCP data sent automatically to ConnectedCooking. Start by plugging a USB stick into the cooking system. 1. - Page 83 13 | Settings 5. Select the wireless network you wish to use. > You will be prompted to enter the password for the wireless network. 6. To confirm, press this button: > Once the connection has been established successfully, the following symbol appears in the footer: >...
-
Page 84: User Profile
13 | Settings The Network status button can be used to check whether the cooking system is connected to the router and the Internet. 13.10 User profile You can compile users to profiles and assign access authorizations to these profiles. By default, your cooking system is assigned a profile that cannot be deleted. -
Page 85: 13.10.2 Edit Profile
13 | Settings 13.10.2 Edit profile You have created a profile. 1. Press this button: Edit profile > You can now select a profile to be edited. Once you have selected a profile, you can make the following settings: Profile settings 1. - Page 86 13 | Settings Creating and editing display screens 1. Press this button:ON or OFF, the option : Create and edit screen to enable or disable the Create new screen [} 87] option. Edit footer 1. Press this button: Edit footer. >> Now you can set whether the Cooking system help function is shown or hidden in the footer.
-
Page 87: 13.10.3 Add Profile
13 | Settings 2 Add profile [} 87] 13.10.3 Add profile Here you can add a new profile. 1. Press this button: Add profile >> You can now add a new profile. 1. Press this button: from an existing profile to create a profile based on an existing one. You can now change settings for the newly added profile under the Edit profile [} 85] menu item. -
Page 88: Service
Serial number information Hotline - Chef [} 104] Hotline - Service [} 104] Service level This function is only available to RATIONAL service partners. Software update info [} 88] Installed software version [} 88] Service messages of the last 14 days Open source licenses 13.11.1 Software update info... - Page 89 13 | Settings 1. Press this button: 2. Press this button: ConnectedCooking To learn how to connect your cooking system to ConnectedCooking and discover the available functions, go here: ConnectedCooking [} 92] When your cooking system is connected to ConnectedCooking, you have the following setting options. 1.
-
Page 90: Kitchen Management
Operate both units of a Combi-Duo installation on just one unit. Connect the units with ConnectedCooking. If you would like to network units of a Combi-Duo installation, please contact your RATIONAL service partner. 90 / 120 Original instructions for use... -
Page 91: Establish Wlan Connection
14 | Kitchen management 14.2.1 Establish WLAN connection Connecting the unit to a wireless network that requires you to log in via a website will not allow the unit to establish a wireless connection. 1. Press this button: 2. Press this button: Network 3. -
Page 92: Establish Network Connection
ConnectedCooking opens up a wealth of new and convenient possibilities. All you have to do is connect your RATIONAL cooking system to a network and then visit connectedcooking.com to register. In ConnectedCooking, you can see the online status, cleaning details, operating statistics and whether HACCP specifications are complied with at a glance. -
Page 93: Connect The Unit With Connectedcooking
14 | Kitchen management 14.3.1 Connect the unit with ConnectedCooking Once you connect your cooking system to ConnectedCooking, the following features will be available: Transmitting HACCP data to ConnectedCooking automatically [} 90] Transmitting service data to ConnectedCooking automatically [} 105] Operate the unit remotely via ConnectedCooking Monitor device display remotely Make sure you have established a network connection. -
Page 94: Run Software Update
14 | Kitchen management 14.4 Run software update Automatic software updates via ConnectedCooking Start by connecting your unit to ConnectedCooking. 1. Press this button: 2. Press this button: ConnectedCooking 3. To activate the Download software updates automatically function, press the button: 4. -
Page 95: Automatic Cleaning - Icaresystem
15 | Automatic cleaning - iCareSystem Automatic cleaning - iCareSystem The iCareSystem is the intelligent cleaning and descaling system in the iCombi Pro. It recognises how dirty the unit is and proposes the ideal cleaning program and the optimal quantity of care products. -
Page 96: Cleaning Programs
15 | Automatic cleaning - iCareSystem Eco mode If you select this cleaning mode, cleaning programs [} 96] will use less cleaning chemicals and water to clean the cooking system, but cleaning will take longer than it does in Normal mode. Normal mode If you select this cleaning mode, cleaning programs [} 96] will use more cleaning chemicals and water to clean the cooking system, but they will be shorter than in Eco mode. -
Page 97: Starting Automatic Cleaning
If foam builds up in the cooking cabinet even though you have used the recommended number of Active Green cleaner tabs, use fewer tabs the next time you run automatic cleaning. If foam continues to build up, please contact your RATIONAL Service Partner. 15.6 Canceling automatic cleaning You can cancel all automatic cleaning programs at any time. -
Page 98: Forced Cleaning After Operating Hours
15 | Automatic cleaning - iCareSystem > Cancellation will proceed. > Once cancellation has finished, you will be prompted to check the cooking cabinet for Active Green cleaner tab residue. 7. Open the cooking cabinet door. 8. Close the cooking cabinet door. >>... -
Page 99: Care
16 | Care Care WARNING Accumulated grease or food residue in the cooking cabinet Failure to clean the cooking cabinet sufficiently could result in food residue or accumulated grease creating a fire hazard. 1. Clean the unit daily. 2. If a fire breaks out, leave the cooking cabinet door closed in order to cut off the fire’s oxygen supply. Switch the unit off. -
Page 100: Cleaning The Cooking Cabinet Door
16 | Care Unsuitable care products Do not use any of the following products to clean the unit or its functional components or accessories: Scouring agents Hydrochloric acid, lye, sulphurous substances, or other oxygen-consuming agents Undiluted alcohol, methanol, or solutions such as acetone, benzene, toluene, or xylene Oven cleaner or grill cleaner Pot scrubber with steel wool Steel wool... -
Page 101: Descaling The Steam Nozzle
16 | Care 1. Clean the cooking cabinet door gasket with lukewarm water, a mild detergent and a soft cloth. 2. Allow the cooking cabinet door gasket to dry completely. Cleaning the door drip pan Using your cooking system in continuous operation, frequently cooking at high temperatures (above 500°F), and cooking primarily products containing high levels of fat and gelatin can all result in the door drip pan becoming very dirty. -
Page 102: Cleaning The Air Filter
16 | Care 16.6 Cleaning the air filter NOTE Spraying water may penetrate into the unit if the air filter is not inserted correctly Correct attachment of the air filter is the only way of protecting the unit from water spraying in any direction. 1. -
Page 103: Cleaning Accessories
16 | Care 3. To unlock the display, press and hold this button: > The display will show this symbol: 4. Remove the selection dial by hand, without using tools. Lift straight up. 5. Clean the selection dial and the surface underneath it using a soft cloth. 6. -
Page 104: Inspiration And Help
Telephone help ® ChefLine Whenever you have application or recipe questions, we’d be happy to provide assistance through our ChefLine. We offer quick, straightforward advice from one chef to another, 365 days a year. Just call the RATIONAL ® ® ChefLine . -
Page 105: Service-Related Help
17 | Inspiration and help RATIONAL Service Partners Our cooking systems are reliable and built to last. Should you ever encounter technical issues, our RATIONAL Service Partners can provide fast, efficient assistance. Spare part supplies are guaranteed, and weekend emergency service is included. -
Page 106: Error Messages For Gas Units
Error messages for gas units If your unit it connected to the gas supply, the following additional error message could appear. For all error messages, please contact your RATIONAL Service Partner [} 104]. Always have the serial number of your unit ready. -
Page 107: Error Messages Humidity
17 | Inspiration and help Error report Cause Cooking possible Service 42.3 The water supply is faulty. The steam injection function is not available. Service 42.6 The water supply is faulty. Service 43.3 The internal water supply is not closing. Only the convection mode is available at the moment. -
Page 108: Notification Centre
17 | Inspiration and help Error report Cause Cooking possible Service 49.2 The water supply is faulty. 17.5.7 Notification centre Error report Cause Cooking possible Service 17 The unit model is incorrect. Service 29 The board temperature is too high. Service 31.1 The core probe in the cooking cabinet is Yes, but you cannot use the... -
Page 109: Maintenance
18 | Maintenance Maintenance You can perform the following maintenance yourself: Replacing air filters [} 109] Replacing the cooking cabinet door seal [} 109] 18.1 Replacing air filters NOTE Do not use sharp objects Do not use sharp objects such as knives to open the air filter cover, as this could damage the filter holder. NOTE Spraying water may penetrate into the unit if the air filter is not inserted correctly Correct attachment of the air filter is the only way of protecting the unit from water spraying in any direction. - Page 110 18 | Maintenance Open the cooking cabinet door. 2. Pull the cooking cabinet door gasket out from the groove and dispose of it. 3. Moisten the retaining lips of the new gasket with soapy water. 4. First press the corners of the gasket into the corners of the groove. 5.
-
Page 111: Transport
19 | Transport Transport 19.1 Transporting the unit WARNING Moving the unit or the Combi-Duo with the locking brake on can damage the castors Damaged castors can result in the unit or Combi-Duo tipping over and injuring you severely. 1. Always release the locking brake on the castors before transporting or shifting the unit or Combi-Duo. WARNING Moving the unit or the Combi-Duo with the locking brake on can damage the castors Damaged castors can result in the unit or Combi-Duo tipping over and injuring you severely. - Page 112 19 | Transport 3. If you want to pull the cooking system out while cleaning the kitchen, release the locking brakes on the mobile stand or the casters, 4. and then carefully pull the cooking system forward. 5. Once you are finished cleaning the kitchen, push the cooking system carefully back into position and activate the locking brakes.
-
Page 113: Decommissioning And Disposal
20 | Decommissioning and disposal Decommissioning and disposal 20.1 Decommissioning If you want to take your unit out of operation, please contact your RATIONAL Service Partner. 20.2 Disposal Old cooking systems contain recyclable materials. Dispose of old cooking systems in an environmentally safe way, using appropriate collection systems. -
Page 114: Technical Data
The type designation and the model names on the identification plate are different. Please consult this table for guidance. Type Model name LMxxxA iCombi Pro XS 21.3 Conformity 21.3.1 Units with electrical connections This unit conforms to the following EU directives:... -
Page 115: Regulatory Information
22 | Regulatory Information Regulatory Information Canada This device complies with Industry Canada license-exempt RSS standard(s). Operation is subject to the following two conditions: (1) this device may not cause interference, and (2) this device must accept any interference, including interference that may cause undesired operation of the device. - Page 116 22 | Regulatory Information 116 / 120 Original instructions for use...
-
Page 117: Directory Of Keywords
Directory of keywords Cool down function 43 Core temperature 37 Air filter core temperature probe Cleaning 102 Baked goods 21 Automatic cleaning Error report 21 Cleaning programs 96 Fish fillets 21 Inserting core temperature probes 19 Large pieces of meat 20 Blend 39... - Page 118 combi-steam 45 convection 46 steam 44 New batch 40 Online help 104 Operating the unit Central selection knob 17 Gestures 17 Performing maintenance yourself 109 Pierce 38 Preheat 39 Product size 36 Prove 38 Reinsert core temperature probe 38 remaining time 39 Replace gasket 110...
- Page 120 RATIONAL AG Siegfried-Meister-Straße 1 86899 Landsberg am Lech Tel. +49 (0)8191 3270 Fax +49 (0)8191 21735 info@rational-online.com rational-online.com...
Need help?
Do you have a question about the iCombi Pro and is the answer not in the manual?
Questions and answers