Table of Contents
Advertisement
Quick Links
Advertisement
Table of Contents

Related Manuals for Endless Pools HYDROSTRIDE


Summary of Contents for Endless Pools HYDROSTRIDE
- Page 1 Endless™ Pools HYDROSTRIDE ™ OWNER’S MANUAL...
-
Page 2: Warnings And Safety Information
IMPORTANT SAFETY INSTRUCTIONS IMPORTANT SAFETY INFORMATION CONSIGNES DE SÉCURITÉ IMPORTANTES IMPORTANT SAFETY INFORMATION READ, FOLLOW, AND UNDERSTAND ALL INSTRUCTIONS SAVE THESE INSTRUCTIONS LIRE, SUIVRE ET COMPRENDRE TOUTES LES INSTRUCTIONS BEFORE INSTALLING OR USING THIS PRODUCT, READ AND DANGER FOLLOW ALL SAFETY INSTRUCTIONS. FAILURE TO DO SO Manufacturers Safety Instructions CAN RESULT IN PROPERTY DAMAGE, INJURY, OR DEATH SERIOUS BODILY INJURY OR DEATH CAN RESULT IF THIS... - Page 3 Other Important Safety Instructions WARNING: To reduce the risk of injury, do not permit children to use this product unless they are closely supervised by an adult at all times. AVERTISSEMENT: Pour réduire le risque de blessure, ne permettez pas aux enfants d’utiliser ce produit à moins qu’ils ne soient surveillés de près en tout temp WARNING: To reduce the risk of injury:...
- Page 4 DANGER: RISK OF ACCIDENTAL DROWNING: Extreme caution must be exercised to prevent unauthorized access by children. To avoid accidents, ensure that children cannot use this spa unless they are supervised by an adult at all times. DANGER: RISQUE DE NOYADE ACCIDENTELLE: Une extrême prudence doit être exercée pour empêcher tout accès non autorisé...
- Page 5 AVERTISSEMENT: LA CONSOMMATION D’ALCOOL OU DE DROGUE AUGMENTE CONSIDÉRABLEMENT LES RISQUES D’HYPERTHERMIE MORTELLE DANS UNE CUVE DE RELAXATION. WARNING: PREGNANT OR POSSIBLY PREGNANT WOMEN SHOULD CONSULT A PHYSICIAN BEFORE USING A SPA OR HOT TUB. AVERTISSEMENT: LES FEMMES ENCEINTES, QUE LEUR GROSSESSE SOIT CONFIRMÉE OU NON, DEVRAIENT CONSULTER UN MÉDECIN AVANT D’UTILISER UNE CUVE DE RELAXATION WARNING: WATER TEMPERATURE IN EXCESS OF 100 °F (38 °C) CAN BE INJURIOUS TO YOUR HEALTH.
-
Page 6: Table Of Contents
Hydrostride & Grab Bar Mounting Kit Installation ..8 Using Your Hydrostride ......26 Assembly of Hydrostride . -
Page 7: General Overview Of The Hydrostride
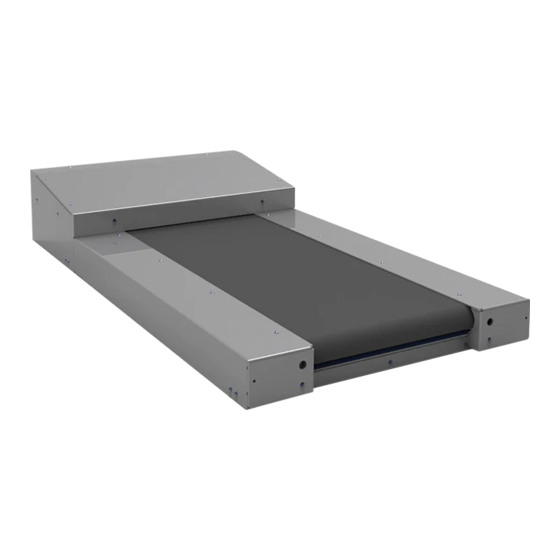
Hydrostride to add intensity to the workout. If installing in a traditional gunite pool, the Hydrostride can sit above the pool floor as shown in Figure 1a or can be recessed so that the unit sits flush with the pool floor as shown in Figure 1b. -
Page 8: Choosing A Location For Your Hydrostride
18” (46cm) to any adjacent wall. In addition, 18” (46cm) of clearance is recommended at the rear of the Hydrostride. These recommendations allow ample space for stepping on to and off of the unit. The water depth where the Hydrostride is installed should be based upon the height and preference of the end user. -
Page 9: Receiving Your Hydrostride
The hardware required for the assembly is located in the Hydrostride Installation Kit. When assembling the unit, a low torque setting should be used on your drill to prevent the holes in the acrylic from stripping. With a minimum of two people, carefully lift and rotate the Hydrostride upright, onto its front end (A) (Fig. 3). Fig. 3... - Page 10 (Fig. 4). After this step has been completed, carefully lower the unit to the ground. Fig. 4 3. Attach the End Standoff (A) to the front of the Hydrostride using the 1” (25mm) Phillips Truss Head Screws (B) (Fig. 5). Fig. 5...
- Page 11 4. Attach the Side Decks (A) and (B) to the Hydrostride using the 1” (25mm) Phillips Truss Head Screws (C) (Fig. 6). Fig. 6...
- Page 12 5. Prior to attaching the two End Covers, the covers MUST be modified to account for the radius at the bottom of the pool wall, where the wall meets the floor, (if a radius is present). Attach the End Covers (A) and (B) to the Hydrostride using the 1”...
- Page 13 The next step is attaching the Submersible Hydraulic Hoses (A) and (B) to the Hydraulic Motor (C). Remove the cap from each motor fitting (D) and verify the o-ring is properly seated. Attach the hose with red electrical tape wrapped around it to the fitting marked “A.”...
-
Page 14: Hydrostride & Grab Bar Installation
Hydrostride should be assembled and ready to be mounted on the pool wall. HYDRAULIC RUN HOSES Each Hydraulic Run Hose has a white label (A) that reads “Pool” on the end that attaches to the Hydrostride in the pool (Fig. 10). - Page 15 MOUNTING HYDROSTRIDE TO POOL WALL With a minimum of two people, lower the Hydrostride into the pool. Align the mounting holes (A) with the Threaded Rods/Studs (B) and position against the pool wall. If being installed in a vinyl liner pool, make sure the Rubber Washers (C), included in the mounting kit, are installed (Fig.
- Page 16 Flat Washer (B) onto each stud. On the left stud, install the Bonding Wire (C). WIRE IS INSTALLED. Secure Hydrostride using Lock Washers (D) and Jam Nuts (E). Tighten nuts until the unit is fully seated against the pool wall. Tighten another half turn. DO NOT OVERTIGHTEN (Fig. 14).
- Page 17 3. Apply Teflon tape to the threads of the Liquid Tight Fittings (A) and then install the fittings onto the Sub Hoses (B). There is red tape wrapped around one of the Sub Hoses (B) and one of the Run Hoses (C) representing low-pressure. Attach the Sub Hose with the red tape to the Run Hose with the red tape.
- Page 18 Grab Bar, prior to installing (Fig. 18). Fig. 18 Prior to filling the pool, it is necessary to perform a continuity test to ensure the Hydrostride and Grab Bar are Refer to Section 9 for detailed instructions. properly bonded.
- Page 19 8. If the Fastlane® Pro is being installed, it should be mounted on the pool wall at this time. Refer to the Fastlane Pro Owner’s Manual for detailed instructions (Fig. 19). Fig. 19...
-
Page 20: Hydraulic Power Unit Installation
7. Hydraulic Power Unit Installation Hydraulic Power Unit Installation The Hydraulic Power Unit should be placed on a solid, level surface, preferably not on wet ground. If placing the unit outside, it is recommended that the optional Weather Guard (A) be purchased but should not be subject to driving rain (Fig. - Page 21 HYDRAULIC HOSE CONNECTIONS Attaching the Hydraulic Run Hoses to the power unit is next. Remove the caps on the ports of the power unit. Attach the Low-Pressure Hose (A), hose with the red tape wrapped around the end, to the fitting attached to the Fill Cap (B). Attach the High Pressure-Hose (C) to the fitting on the Silver Manifold Block (D).
-
Page 22: Electrical Requirements - 60Hz
8a. Electrical Requirements - 60Hz Electrical Requirements - 60Hz (and countries with a similar power supply) (and countries with a similar power supply) ALL ELECTRICAL CONNECTIONS SHOULD BE MADE BY A LICENSED ELECTRICIAN. NOTE: The following instructions are intended for Single Phase equipment. If Three Phase equipment was ordered, refer to the Three Phase Equipment Supplemental Guide at this time. -
Page 23: Electrical Requirements - 50Hz
8b. Electrical Requirements - 50Hz Electrical Requirements - 50Hz (and countries with a similar power supply) (and countries with a similar power supply) ALL ELECTRICAL CONNECTIONS SHOULD BE MADE BY A LICENSED ELECTRICIAN. NOTE: The following instructions are intended for Single Phase equipment. If Three Phase equipment was ordered, refer to the Three Phase Equipment Supplemental Guide at this time. -
Page 24: Bonding Your Hydrostride
The electrical potential IS DANGEROUS and can incapacitate a pool user. The Endless Pools equipment is properly bonded when the Hydrostride, Hydraulic Power Unit, and power unit controller are tied into the pool’s equipotential bonding grid. - Page 25 2. When the Hydrostride is being mounted on the pool wall, the #8 solid copper wire, attached during the assembly of the unit, MUST be attached to the left threaded rod/threaded stud protruding into the pool. Making this connection will ensure that the metal components of the Hydrostride are connected to the pool’s bonding grid.
- Page 26 Hydrostride. This connection is located on the left threaded rod/threaded stud used to mount the Hydrostride to the pool wall under the End Cover (Refer to Figures 13 and 14).
-
Page 27: Using Your Hydrostride
The Wireless Transmitter is used to operate the Hydrostride. Turn on the Hydraulic Power Unit by pressing and holding the On/Off Button (A). Press and hold the Faster Button (B) to increase the speed of the Hydrostride. Press and hold the Slower Button (C) to decrease the speed. -
Page 28: Product Installation Information
3. Included on the Hydraulic Power Unit controller is a Product Information Label containing the specifications of the Endless Pools product that was purchased. Refer to the one-page Endless Pools Product Information Label Document D12002 for detailed instructions. -
Page 29: Hydrostride Maintenance
Wipe the stainless steel grab bar with a blue scotch-brite to remove any corrosion Placing the Hydrostride in a pool using a salt-chlorine generator creates an increased risk of a hydraulic system failure and oil leaks! It is imperative that this maintenance is followed! HYDRAULIC MAINTENANCE •... - Page 30 Endless™ Pools 1601 Dutton Mill Rd Aston, PA 19014-2931 D12008_en 0424 (800) 910-2714 ©2024 Wellness Marketing Corporation www.myendlesspool.com...
Need help?
Do you have a question about the HYDROSTRIDE and is the answer not in the manual?
Questions and answers