Table of Contents
Advertisement
Quick Links
Advertisement
Table of Contents

Related Manuals for Dentsply Sirona X-Smart Pro


Summary of Contents for Dentsply Sirona X-Smart Pro
- Page 1 2023-05 New as of: X-Smart® Pro+ X-Smart® Pro Instructions for Use English...
-
Page 2: Table Of Contents
Target group........................ Indications for Use....................... 1.10 Contraindications......................1.11 Obligation to notify authorities ..................1.12 Cyber security ......................Safety notices....................System description ..................Design of the X-Smart Pro/Pro+.................. Technical data ......................Standards and approvals .................... Electromagnetic compatibility..................3.4.1 Electromagnetic emission ................3.4.2 Interference immunity ................... - Page 3 Dentsply Sirona Table of contents Instructions for Use X-Smart Header and footer ..................5.1.2 Header ..................5.1.2.1 Footer ..................5.1.2.2 General operating keys................. 5.1.3 Selecting the file sequence............5.1.3.1 File selection................5.1.3.2 File settings.................. 5.1.3.3 Automatically changing the direction of rotation ......
- Page 4 Table of contents Dentsply Sirona Instructions for Use X-Smart 7.10 LED ..........................Adjusting the brightness................7.10.1 LED functionality ................... 7.10.2 7.11 Conducting a cable test....................7.12 Using the apex locator....................Connecting the apex locator set ..............7.12.1 Check apex locator system................
- Page 5 Dentsply Sirona Table of contents Instructions for Use X-Smart Interference ..................... 11.1 Error messages ......................11.2 Troubleshooting and repair ..................11.2.1 For error messages related to insulation test..........11.2.1.1 Fitting and removing an insulation sleeve ........11.2.2 Remedy for pairing problems with the foot control........
-
Page 6: General Information
Smart Pro/Pro+ endodontic motor can be operated either using the finger switch on the handpiece or the optional wireless foot control. The X-Smart Pro/Pro+ endodontic motor also has the latest in motor technology and apex location. It also features a wide range of torque and speed. -
Page 7: General Information About These Instructions For Use
Dentsply Sirona 1 General information Instructions for Use X-Smart 1.3 General information about these instructions for use General information about these instructions for Follow the instructions for use Please familiarize yourself with the unit by reading through these instructions for use before putting it into operation. It is essential that you comply with the warning and safety information listed. -
Page 8: Structure Of The Document
1 General information Dentsply Sirona 1.4 Structure of the document Instructions for Use X-Smart Structure of the document 1.4.1 Identification of danger levels To prevent personal injury and material damage, please observe the warning and safety information provided in these operating instructions. -
Page 9: Scope Of These Instructions For Use
The manufacturer assumes no liability whatsoever in cases involving: ● Service or repairs made by other persons who are not authorized by the manufacturer or dealer ● Use of the X-Smart Pro/Pro+ that does not comply with its intended 67 98 487 D3778 D3778.201.01.02.02 2023-05... -
Page 10: Intended Use
1 General information Dentsply Sirona 1.7 Intended use Instructions for Use X-Smart Intended use The device is used in dentistry to drive endodontic instruments for the mechanical preparation of the patient’s root canal and cavity. Some models incorporate an electronic apex locator that assists the operator to locate the file tip inside the root canal. -
Page 11: Safety Notices
Damaged products may cause injury. Notify your dental depot or the manufacturer. Repair WARNING Do not attempt to repair X-Smart Pro/Pro+ yourself. Please contact your local authorized DS customer service for repairs. Spare parts and accessories Use only original Dentsply Sirona parts or parts approved by Dentsply Sirona. - Page 12 2 Safety notices Dentsply Sirona Instructions for Use X-Smart Storage conditions: Temperature: -40 °C – +70 °C. Humidity: 10 % - 95 %. Air pressure: 50 – 106 kPa Operating conditions: Temperature: +15 °C – +35 °C. Humidity: <80%. Air pressure: 60 – 106 kPa No operation over 3000 m.
-
Page 13: System Description
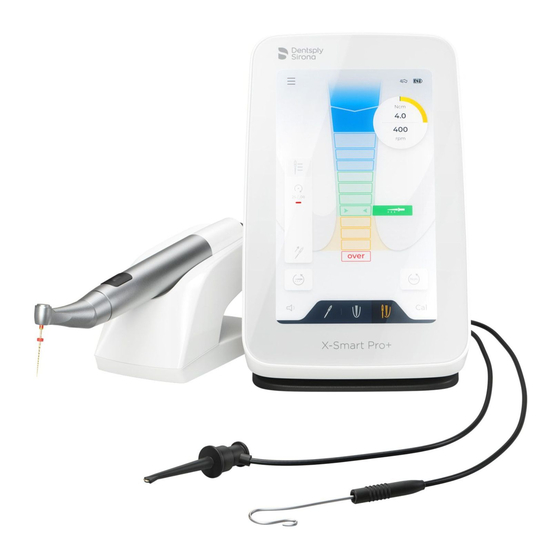
System description Design of the X-Smart Pro/Pro+ The full version of the X-Smart Pro+ is described below. It serves as an example for both versions (X-Smart Pro and X-Smart Pro+). Components that are relevant for apex location (H, I, J and K) are not part of X-Smart Pro, as this product version is not equipped with this function. - Page 14 3 System description Dentsply Sirona 3.1 Design of the X-Smart Pro/Pro+ Instructions for Use X-Smart User interface Contra-angle handpiece Finger switch Rotating handpiece sleeve Integrated handpiece holder Handpiece Separate handpiece holder File clamp (including cable) Lip clip cable Lip clip...
-
Page 15: Technical Data
Dentsply Sirona 3 System description Instructions for Use X-Smart 3.2 Technical data Technical data Endodontic unit X-Smart Pro/Pro+ Large touchscreen in inches Operation with Finger switch Wireless foot control Power supply unit manufacturer Meanwell Model GEM60I12-P1J Operating conditions No operation over 2000 m. - Page 16 3 System description Dentsply Sirona 3.2 Technical data Instructions for Use X-Smart Safety protocol WPA2, WPA3 1 to 1 pairing / binding with proprietary proto- Additional The WLAN interface The BLE interface can Information serves the user as a be used to connect to...
-
Page 17: Standards And Approvals
● ISO 14457 (dentistry – handpieces and motors) ● IEC 62471 (photobiological safety) ● IEC 14971 (risk management) X-Smart Pro/Pro+ complies with the requirements of the RoHS Directive 2011/65/EU. This product bears the CE marking in accordance with the provisions of the Regulation (EU) 2017/745 of April 5, 2017 concerning medical devices. - Page 18 3 System description Dentsply Sirona 3.3 Standards and approvals Instructions for Use X-Smart Harmonized and non-harmonized articles of Directive 2014/53/EU standard reference EN 62311, EN 50665:17, 3.1 (a): Health and safety of the EN 62368-1:2014+A11:2017 user Draft EN 301 489-1 V2.2.0, 3.1 (b): Electromagnetic compatibil- Draft EN 301 489-,17 V3.2.0,...
-
Page 19: Electromagnetic Compatibility
EMC aspects. X-Smart Pro/Pro+ complies with the requirements for electromagnetic compatibility (EMC) according to IEC 60601-1-2:2014/AMD1:2020 X-Smart Pro/Pro+ is designed for use in environments in professional health care facilities. X-Smart Pro/Pro+ is hereinafter referred to as UNIT. Essential performance: The product has no clinical functions that are not related to basic safety and whose loss or impairment would lead to an unacceptable risk. -
Page 20: Interference Immunity
3 System description Dentsply Sirona 3.4 Electromagnetic compatibility Instructions for Use X-Smart 3.4.2 Interference immunity Enclosure Phenomenon Basic EMC standard Interference immunity test level for profes- or test method sional healthcare facilities Electrostatic discharge IEC 61000-4-2 ± 8 kV contact ± 2 kV, ± 4 kV, ± 8 kV, ± 15 kV air RF electromagnetic fields IEC 61000-4-3... - Page 21 Dentsply Sirona 3 System description Instructions for Use X-Smart 3.4 Electromagnetic compatibility Test specifications for the immunity of enclosure ports to RF wireless communications equipment Frequencies according to Table 9 of IEC 60601-1-2:2014/AMD1:2020: Test fre- Frequency band Radio service Modulation...
-
Page 22: Working Clearances
3 System description Dentsply Sirona 3.4 Electromagnetic compatibility Instructions for Use X-Smart Test fre- Frequency band Radio service Modulation Immunity test quency (MHz) level (V/m) (MHz) 4400 1700 - 1990 C-band Pulse modulation 4700 LTE and 5G NR 217 Hz 5000... -
Page 23: Product Labeling
Dentsply Sirona 3 System description Instructions for Use X-Smart 3.5 Product labeling Product labeling Can be thermally Sterilizable in a disinfected steam sterilizer (autoclave) at the temperature speci- fied Order number Serial number Type designation Unique Device Identification Date of manufac-... - Page 24 3 System description Dentsply Sirona 3.5 Product labeling Instructions for Use X-Smart On the basis of the Directive 2012/19/EU and the coun- try-specific disposal regulations on waste electrical and electronic equipment, we would like to stress that such equipment must be disposed of accordingly within the European Union (EU).
-
Page 25: Getting Started
4.1 Transport and unpacking Getting started Transport and unpacking All Dentsply Sirona units are carefully checked prior to shipment. Please perform an incoming inspection immediately after delivery. 1. Check the delivery note to ensure that the consignment is complete. 2. Check whether the product shows any visible signs of damage. -
Page 26: Switching Off The Unit
4 Getting started Dentsply Sirona 4.4 Switching off the unit Instructions for Use X-Smart ON/OFF button Apex locator socket Power supply socket On initial startup 1. The contra-angle handpiece and accessories must be sterilized before each treatment. [→ 44] 2. Select the appropriate power supply adapter for your country and attach it to the power supply part. -
Page 27: User Interface
Main dialogs The following description applies to the expanded view of the product X- Smart Pro+. The product X-Smart Pro includes only the main dialog "Treatment without apex location [→ 27]" (A). The main menu is divided into three main dialogs. - Page 28 5 User interface Dentsply Sirona 5.1 Main menu Instructions for Use X-Smart 5.1.1.1.1 View of X-Smart Pro+ Heading [→ 33] File settings [→ 36] Display of the current file and possible change to another file within this sequence [→ 35] Button for changing the sequence [→ 34] Button for automatically switching the direction of rotation when reaching the maximum set torque ...
- Page 29 Dentsply Sirona 5 User interface Instructions for Use X-Smart 5.1 Main menu 5.1.1.1.2 View of X-Smart Pro Heading [→ 33] File settings [→ 36] Display of the current file and possible change to another file within this sequence [→ 35] Button for changing the sequence [→ 34] Button for automatically switching the direction of rotation when reaching the maximum set torque ...
-
Page 30: Manual Apex Location
5 User interface Dentsply Sirona 5.1 Main menu Instructions for Use X-Smart 5.1.1.2 Manual apex location Header [→ 33] Distance to apex display before manual apex location. Distance display to apex. The colored boxes show the cur- rent penetration depth during apex location. A simulation can be viewed under "Settings"... -
Page 31: Treatment With Apex Location
Dentsply Sirona 5 User interface Instructions for Use X-Smart 5.1 Main menu 5.1.1.3 Treatment with apex location View before treatment Heading [→ 33] File settings [→ 36] Display of the current file and possible change to another file within this sequence [→ 35] Button for changing the sequence ... - Page 32 5 User interface Dentsply Sirona 5.1 Main menu Instructions for Use X-Smart View during treatment Heading [→ 33] View of the most relevant information on the file being used Distance display to apex. The colored boxes show the cur- rent penetration depth during apex location. A simulation can be viewed under "Settings"...
-
Page 33: Header And Footer
"Calibrating the drive [→ 53]". When calibration has been completed successfully, a green check mark can be seen next to the icon. Only with X-Smart Pro+ In the middle of the footer it is possible to switch among the three "Main dialogs ... -
Page 34: General Operating Keys
5 User interface Dentsply Sirona 5.1 Main menu Instructions for Use X-Smart 5.1.3 General operating keys 5.1.3.1 Selecting the file sequence Clicking on the icon displayed in the main menu opens a window. A new file sequence from the categories "File Se- quences"... -
Page 35: File Selection
Dentsply Sirona 5 User interface Instructions for Use X-Smart 5.1 Main menu 5.1.3.2 File selection Opens the "File Sequences: and "My Sequences" from the "Customize File Library" and allows the file sequence to be changed. Name of the current "File Sequences"... -
Page 36: File Settings
5 User interface Dentsply Sirona 5.1 Main menu Instructions for Use X-Smart 5.1.3.3 File settings Set values for torque (Ncm) and speed (rpm). Change the standard setting for torque using the plus/minus keys. Change the standard setting for speed using the plus/minus keys. -
Page 37: Automatically Changing The Direction Of Rotation
Dentsply Sirona 5 User interface Instructions for Use X-Smart 5.2 Settings 5.1.3.4 Automatically changing the direction of rotation On reaching the preferred working length Selecting this key activates an automatic change of direction when the set working length is reached. The setting for working length can be defined under "Apex locator settings ... -
Page 38: Systems
5 User interface Dentsply Sirona 5.2 Settings Instructions for Use X-Smart 5.2.1.1 Systems All standard files in the unit are listed in alphabetical order by systems. The file names within these systems are also alphabetized. Back key to "Settings" Within the selected category "Systems"... -
Page 39: Sequences
Dentsply Sirona 5 User interface Instructions for Use X-Smart 5.2 Settings 5.2.1.2 Sequences Standard files in the unit are listed in alphabetical order by sequences. The file names within these sequences are also alphabetized. Back key to "Settings" Within the selected category "Sequences"... -
Page 40: My Sequences
5 User interface Dentsply Sirona 5.2 Settings Instructions for Use X-Smart 5.2.1.3 My sequences Within this category are the preferred standard files from the "Systems" and "Sequences" categories and files added by you from within sequences compiled by you. The order of the sequences is determined by the order they were created. - Page 41 Dentsply Sirona 5 User interface Instructions for Use X-Smart 5.2 Settings 5.2.1.3.1 File settings under "My sequences" Changes can be made to the settings of files added to the "My Sequences" section. The following settings can be changed: ● Direction of rotation ●...
-
Page 42: Apex Locator Settings
5 User interface Dentsply Sirona 5.2 Settings Instructions for Use X-Smart If there is a deviation from the standard setting (blue triangle), the "Reset" icon can be used to reset the torque or speed to the standard setting. This function is not available for files added by you. -
Page 43: Update
In this dialog level, there is a QR code that can be read with a scanner and opens a website with further information on the X-Smart Pro/Pro+ unit. In this website, you can find the SW updates for your X-Smart Pro/Pro+. 67 98 487 D3778 D3778.201.01.02.02 2023-05... -
Page 44: Before Use
6 Before use Dentsply Sirona 6.1 Initial start-up and longer breaks in use Instructions for Use X-Smart Before use Initial start-up and longer breaks in use ➢ Sterilize the X-Smart 5:1 AL contra-angle handpiece, the handpiece sleeve, the file clamp, and lip clip cable and lip clip before initial startup. -
Page 45: Operation
Dentsply Sirona 7 Operation Instructions for Use X-Smart 7.1 Changing handpiece sleeve Operation WARNING Risk of file breakage due to fatigue fracture The patient could inhale broken files and choke. ➢ To prevent fatigue fracture as much as possible, use only fully intact, undamaged files. -
Page 46: Changing The Contra-Angle Handpiece
7 Operation Dentsply Sirona 7.2 Changing the contra-angle handpiece Instructions for Use X-Smart Removing handpiece sleeve ü The motor is at a standstill. ➢ Detach the handpiece sleeve. Do not pull on the supply hose. Changing the contra-angle handpiece WARNING... -
Page 47: Attaching And Removing A File
Dentsply Sirona 7 Operation Instructions for Use X-Smart 7.3 Attaching and removing a file Attaching and removing a file CAUTION Burning hazard at push button! Press the button only when the contra-angle handpiece is stopped. WARNING Risk of file breakage due to fatigue fracture The patient could inhale broken files and choke. -
Page 48: Adding New Files/Sequences
7 Operation Dentsply Sirona 7.4 Manage "My file sequences" Instructions for Use X-Smart 3. Add the selection of an existing sequence or a new sequence in "My Sequences". Procedure: - Select an existing sequence ("blue circle with plus symbol" when selecting) and press "Add". -
Page 49: Changing/Restoring The File Settings
Dentsply Sirona 7 Operation Instructions for Use X-Smart 7.4 Manage "My file sequences" ü The "My sequences [→ 40]" dialog is open. 1. Press "Create File". 2. Assign a name to your file. Tip: note the desired file name. It cannot be changed later, but the file can be deleted, see more under "Removing files/sequences ... -
Page 50: Removing Files/Sequences
7 Operation Dentsply Sirona 7.4 Manage "My file sequences" Instructions for Use X-Smart Assign the setting to added files WARNING Improperly selected speeds and torque values can endanger the patient! Improper settings can cause treatment errors or file fracture. ➢ The files require different working techniques. Always observe the file manufacturer's specifications. -
Page 51: Changing The Order Of The Files
Dentsply Sirona 7 Operation Instructions for Use X-Smart 7.5 Changing the file / file sequence during treatment Changing the order of the files 7.4.5 The illustrated order of the files within the view in the main dialog "Treatment without apex location [→ 27]" or "Treatment with apex location ... -
Page 52: Recommendation For The Treatment Procedure
● Work without exerting any pressure on the file. ● The apex locator function assists preparatory work for root canal treatment. The number of X-rays can be reduced with X-Smart Pro+. However, you must always take at least one X-ray image to determine the depth for preparatory work. -
Page 53: Calibrating The Drive
Dentsply Sirona 7 Operation Instructions for Use X-Smart 7.7 Calibrating the drive including knowledge of the anatomy of root canals is important for interpreting the results. ● When performing the apex location, wear non-conductive gloves. This will prevent inaccurate measurements caused by undesired leakage currents. -
Page 54: Operating The Foot Control
Pairing the foot control with the unit ü The foot control is charged prior to initial operation. 1. Go to "Settings" of the X-Smart Pro/Pro+ and select the operating mode "Foot Control"(A). 2. Press the pin (B) onto the pairing button (C) on the back of the foot control for three seconds. -
Page 55: Led
Dentsply Sirona 7 Operation Instructions for Use X-Smart 7.10 LED 7.10 7.10.1 Adjusting the brightness The brightness of the LED is continuously adjustable. To adjust the LED, move the slider in the Settings/General settings menu to the desired position. To switch off the LED, move the slider to the far left position. -
Page 56: Conducting A Cable Test
7 Operation Dentsply Sirona 7.11 Conducting a cable test Instructions for Use X-Smart 7.11 Conducting a cable test Interval: ● Before each patient ü You are in the "Settings"/"Cable Check" dialog ➢ Follow the instructions on the display. Ä In all categories, a successful test is indicated by a green check mark. -
Page 57: Check Apex Locator System
Dentsply Sirona 7 Operation Instructions for Use X-Smart 7.12 Using the apex locator 7.12.2 Check apex locator system Before starting apex location, a functional test can be conducted by shorting the electrodes. ➢ Short the electrical system. Hold the inserted files directly against the lip clip. -
Page 58: Setting Working Length And Function When It Is Reached
7 Operation Dentsply Sirona 7.12 Using the apex locator Instructions for Use X-Smart Orange region Corresponds to the apical region. The tip of the root canal file has reached the apical region, and has passed the mid-apical region (two green arrows, see below). -
Page 59: Performing Apex Location Using A File Clamp
Dentsply Sirona 7 Operation Instructions for Use X-Smart 7.12 Using the apex locator Ä The set distance is shown with a "file icon". If the file is within the green or yellow region, the file is displayed in the color of the corresponding region. -
Page 60: Switching The Torque Reverse Function On/Off
7 Operation Dentsply Sirona 7.13 Switching the torque reverse function on/off Instructions for Use X-Smart 1. Attach a root canal file to the file clamp. 2. Before starting apex location, a functional test can be conducted by shorting the electrodes. Hold the inserted files directly against the lip clip. -
Page 61: Changing The Volume
Dentsply Sirona 7 Operation Instructions for Use X-Smart 7.14 Changing the volume 7.14 Changing the volume Changing the volume of the unit 1. Press the key with the sound icon. 2. Change the volume in three stages by putting your finger on the controller (A) and moving it up or down. -
Page 62: Perform An Update
7 Operation Dentsply Sirona 7.16 Perform an update Instructions for Use X-Smart Additional beeps The following additional beeps are played and are not switched off even if the sound is switched off: ● A beep sounds when the set torque value is reached. -
Page 63: Replacing The Battery
7.17.2 Foot control battery When the loading cycles of the battery deteriorate, send the medical device to an authorized Dentsply Sirona service partner. NOTICE Defect or worn out batteries may be replaced only by an authorized Dentsply Sirona service partner. -
Page 64: After Use
If you detect wear or tear of the cables, contact the service center. NOTICE Use only Dentsply Sirona T1 Spray. ü Wear suitable protective clothing. 1. Remove the file with tweezers. 2. Detach the contra-angle handpiece from the handpiece sleeve. -
Page 65: Reprocessing
Dentsply Sirona 9 Reprocessing Instructions for Use X-Smart 9.1 Overview of the parts to be reprocessed Reprocessing Overview of the parts to be reprocessed Cleaning and disinfection Sterilization Manual Automated Brush (only Wipe Washer-dis- wrapped cleaning) infector* Housing – –... -
Page 66: Reprocessing Methods
9 Reprocessing Dentsply Sirona 9.2 Reprocessing methods Instructions for Use X-Smart Reprocessing methods 9.2.1 General reprocessing instructions The general reprocessing instructions apply to the unit in general provided there are no other product-specific reprocessing instructions in the instructions for use. - Page 67 Dentsply Sirona 9 Reprocessing Instructions for Use X-Smart 9.2 Reprocessing methods Manual wipe cleaning and disinfection NOTICE Disinfectants All disinfectants must be approved in your country and have proven bactericidal, fungicidal and virucidal properties. Use only disinfectants with no protein-fixing properties.
-
Page 68: Manual Maintenance
5. Repeat the process until the spray that comes out of the contra- angle handpiece is clear. 9.2.3.2 Care of the push button chuck Use Dentsply Sirona T1 Spray on the push-button chuck to remove deposits and ensure proper functioning of the clamping system. Interval ● At least once a week... -
Page 69: Sterilization
Dentsply Sirona 9 Reprocessing Instructions for Use X-Smart 9.3 Inspection, maintenance and testing 9.2.4 Sterilization Wrapped sterilization The product must be cleaned/disinfected according to the table "Overview of the parts to be reprocessed [→ 65]" prior to sterilization. The contra-angle handpiece is lubricated according to section "Manual maintenance ... -
Page 70: Maintenance
10.1 Lubricate the lock washer Interval ● 1x weekly Procedure 1. Spray some Dentsply Sirona T1 Spray on the stop spring ring (A). 2. Turn the lock washer to distribute the Dentsply Sirona T1 Spray. 10.2 Replacing O-rings NOTICE Do not use any sharp tools and do not stretch the new O-rings. -
Page 71: Interference
Dentsply Sirona 11 Interference Instructions for Use X-Smart 11.1 Error messages Interference 11.1 Error messages Contact your service technician if one of the following error messages appears on your unit: ● MO_001: Serious motor error ● AP_001: Serious apex error ●... -
Page 72: Fitting And Removing An Insulation Sleeve
● Press the reset button of the foot control with the pin and "Pair again [→ 54]". If the pairing problem cannot be solved by the remedy, it must be checked by an authorized Dentsply Sirona service partner. 67 98 487 D3778 D3778.201.01.02.02 2023-05... -
Page 73: Storage And Transport Conditions
Dentsply Sirona 12 Storage and transport conditions Instructions for Use X-Smart Storage and transport conditions Dispatch Clean and disinfect the contra-angle handpiece or accessory part used on the patient before sending it in. WARNING Risk of cross contamination! ➢ Before sending the unit for repairs, all parts must be properly processed (cleaned/disinfected/sterilized). -
Page 74: Disposal
13 Disposal Dentsply Sirona 11.2 Troubleshooting and repair Instructions for Use X-Smart Disposal In accordance with Directive 2012/19/EU and national disposal regulations regarding old electrical and electronic devices, please be advised that such items must be disposed of in a special way within the European Union (EU). -
Page 75: Batteries
Please dispose the batteries according to the disposal regulations and legal requirements applicable in your country. Prior to disposal, remove the following batteries: ● Batteries in the foot control ● Lithium battery in the X-Smart Pro/Pro+ 13.2 Accessories Contra-angle handpiece and handpiece sleeve incl. touch button of the finger switch can be disposed of in household waste. - Page 76 We reserve the right to make any alterations which may be required due to technical improvements. © SIRONA Dental Systems GmbH Sprache: englisch Printed in Germany D3778.201.01.02.02 2023-05 Ä.-Nr.: 133 981 SIRONA Dental Systems GmbH 67 98 487 D3778 Fabrikstraße 31 Order No ...
Need help?
Do you have a question about the X-Smart Pro and is the answer not in the manual?
Questions and answers