Table of Contents
Advertisement
Advertisement
Table of Contents

Related Manuals for Dentsply Sirona X-Smart Apex Locator


Summary of Contents for Dentsply Sirona X-Smart Apex Locator
- Page 1 X-Smart ® Apex Locator User Manual For dental use only...
- Page 2 PAGE INTENTIONALLY LEFT BLANK 2/38...
-
Page 3: Table Of Contents
Table of contents Introduction ....................... 5 Indication For Use ..................... 6 Contraindications ...................... 6 Warnings ........................6 Precautions ........................ 7 Adverse Reactions ....................8 Step-by-Step Instructions ..................8 Content ..........................8 ® X-Smart Apex Locator Overview ..................9 Connecting the AC Plug Adapter ..................10 Recharging the Battery ..................... - Page 4 Disclaimer ......................27 Certification ......................27 European Authorized Representative ............... 28 Disposal of the Product ..................28 Reporting of Incident to Manufacturer .............. 28 Technical Characteristics ................... 28 Identification of Symbols ................... 30 Appendix ......................32 For additional languages, visit our website: dentsplysirona.com/ifu Technical modifications on our product are not subject to notification.
-
Page 5: Introduction
Introduction ® Congratulations on the purchase of X-Smart Apex Locator. ® X-Smart Apex Locator is indicated for root canal treatment, which requires the precise determination of position of the endodontic file in the canal with respect to the root apex. The device is aimed at detecting the minor apical foramen based on analysis of electrical properties of different tissues inside the root canal system. -
Page 6: Indication For Use
Indication For Use ® X-Smart Apex Locator is an electronic device used for apex localization and working length determination during root canal treatment. The intended patient population consists of patients who need to undergo root canal treatment. Contraindications ® X-Smart Apex Locator is not recommended for use in patients that have a pacemaker or other implanted electrical devices. -
Page 7: Precautions
Precautions ® Do not use X-Smart Apex Locator in the vicinity of devices emitting electromagnetic noise such as x-ray viewer with fluorescent lamps, film viewers, ultrasonic devices, etc. ® During device operation protect X-Smart Apex Locator from occasional spillage of liquids. ®... -
Page 8: Adverse Reactions
Adverse Reactions None. Step-by-Step Instructions Content Check the content of the equipment before use: ® X-Smart Apex Locator Charger Measurement cable Lip clip (2 pcs) File clip (2 pcs) Touch probe User manual Tip card Lip clip File clip Measurement Touch probe (2 pcs.) (2 pcs.) -
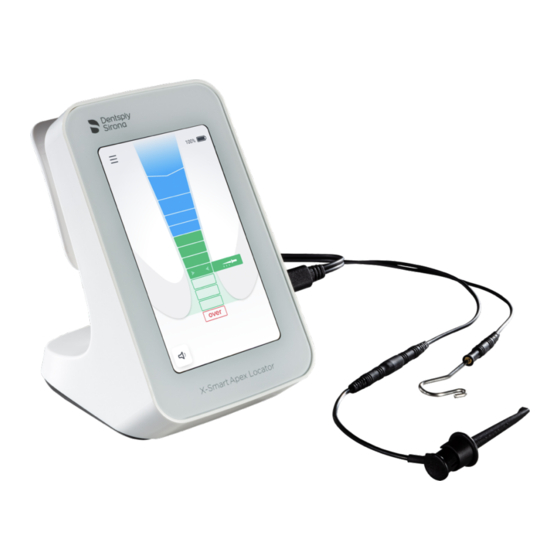
Page 9: X-Smart Apex Locator Overview
® X-Smart Apex Locator Overview Battery level Settings menu On/Off button Sound level adjustment Measurement cable/Charger cable receptacle Fig. 1 Front view Measurement cable management Fig. 2 Rear view 9/38... -
Page 10: Connecting The Ac Plug Adapter
Connecting the AC Plug Adapter Select the plug adapter that matches your electric power outlet. USA/JAP plug plug plug plug Locking button Fig. 3 Plug adapters for the charger Slide the plug adapter downwards into the slots until it locks in place with a click. -
Page 11: Cable Connection Test
® 3. Connect the charger cable to X-Smart Apex Locator USB-C receptacle located on the right side of the device. See Fig. 1 4. Connect the charger to the mains. Warning While charging, the charger and the device should be outside patient environment (at least 1.5m from the patient). -
Page 12: Apex Localization
Apex Localization 6.6.1 Getting Started Disconnect the charger from the device if connected. 1. Before connecting the measurement cable with attached lip clip and file clip to the patient, plug the measurement cable into the device and turn on the device by pressing the “ON / OFF” button 2. -
Page 13: Apex Localization
Coronal / medial section Sound is activated very close to apical region Apical region Mid-Apical region Minor Apical Foramen Over - instrumentation Fig. 8 Note Absence of the two beeps audio signal indicates a faulty connection. Disconnect the measurement cable from the patient and check cable connections, clean the file clip and the lip clip, moisten the canal if necessary and start again. -
Page 14: Over-Instrumentation
6.6.3 Over-Instrumentation A red “over” segment and an audio warning signal (rapid intermittent signal) indicate that the file has passed the apex – see Fig. 8. 6.6.4 Completion of the measurements Before unplugging the measurement cable from the device receptacle, disconnect the lip clip and the file clip from the patient. -
Page 15: Device Settings
Device Settings To enter the Settings Menu, tap the Settings icon on the top left corner on the screen. Tap on the required feature to activate or adjust its setting. Use the Up and Down arrows icons to see all menu features. Fig. -
Page 16: Dr's Choice
6.8.1 Dr’s Choice This feature enables to mark an individual predetermined reference position at the required distance from the apex. This variable apical line can be set between the first green bar and the last green bar. When Dr’s Choice apical line is set, clear visual and audio indication is given that the file tip has reached this pre-selected position. -
Page 17: Language Selection
6.8.2 Language selection To modify the user interface language: Enter the Settings Menu and tap the Language tab. Select your preferred language from the available languages list – see Fig. 14. Use the Up and Down arrows icons to see all the available languages. -
Page 18: Demo Mode
Connect the file clip and the lip clip to the measurement cable and plug the measurement cable to the device. Tap on the “Run File Clip check” button and follow the instructions on the screen. The results will be shown on the screen. Either ok - “Error”... -
Page 19: Automatic Shutdown
® To wake-up the X-Smart Apex Locator from the Sleep Mode, simply tap anywhere on the display, connect lip clip to file clip or start your measurements. 6.8.6 Automatic Shutdown Automatic shutdown of the X-Smart ® Apex Locator can be adjusted between 5 min to 15 min of device non-use. -
Page 20: Maintenance, Cleaning, Disinfection And Sterilization
Maintenance, Cleaning, Disinfection and Sterilization General Recommendations The device does not contain user serviceable parts. The service and repair should be provided by factory trained service personnel only. After each use, all objects that were in contact with infectious agents should be cleaned using single-use wipes or a soft cloth impregnated with a disinfecting and detergent solution (a bactericidal, fungicidal and aldehyde free solution), according to manufacturer's directions. -
Page 21: Disinfection And Sterilization Procedure
Disinfection and Sterilization Procedure for lip clip, file clip and touch probe Foreword For hygiene and sanitary safety purposes, the lip clip, the file clip and the touch probe must be cleaned, disinfected and sterilized before each usage to prevent any cross-contamination between patients. - Page 22 Operation Instructions Details and Warning Cleaning: • The accessories are Automated not intended for automated cleaning • Clean the • The file clip should be Cleaning: accessories with an activated during cleaning Manual adequate brush or process (pressed and towel soaked in a released several times) disinfectant solution •...
- Page 23 Operation Operating mode Warning • Steam sterilization at • Follow maintenance and Sterilization 135°C (275°F) during operation procedures of 10 minutes in gravity the autoclave provided type autoclave by the manufacturer (Tabletop, N type) • The only sterilization • Drying time after parameters to be used are those that have been sterilization –...
-
Page 24: Troubleshooting
Troubleshooting Please review the checklist below should you experience a problem ® with your X-Smart Apex Locator. If the problem persists after following the proposed solutions, please contact your distributor. Warning The following patient related factors may prevent accurate readings: - Blocked root canals;... - Page 25 Problem Possible cause Solution Remove the file, close the perforation and repeat the apex Perforation. detection procedure, carefully inserting the file into canal. Try continuing the Large lateral canal. procedure by gently advancing the file. Perform the Check Mode sequence as Bad electrical contact.
-
Page 26: Warranty
Problem Possible cause Solution Contact your Electronic malfunction. distributor. Dry the access cavity Short circuit due to excess with a cotton pellet / liquid (irrigation solution, air-blower. In case of saliva, blood) in the pulp excess bleeding wait chamber. until it has stops. Display reaction is A direct contact of the file For isolation:... -
Page 27: Disclaimer
Except for the warranties specifically set forth in this manual, the manufacturer provides no warranties or guarantees of any kind cover- ing the product, expressed or implied, including, without limitation, any warranties as to merchantability or fitness for a particular purpose. -
Page 28: European Authorized Representative
European Authorized Representative European Authorized Representative who has been empowered to enter into commitments in our behalf: CEpartner4U B.V. ESDOORNLAAN 13, 3951 DB MAARN, THE NETHERLANDS. Contact Person: Mr. Ton Pennings Tel. +31 343 442 524, Fax +31 343 442 162 Email: office@cepartner4u.com Disposal of the Product Recycling: PLEASE DO NOT THROW AWAY! This product and all... - Page 29 The device is intended for indoor use only Environmental conditions during storage/transportation: - Temperature: –20°C to +60°C (-4°F to 140°F) - Relative humidity: 10% to 90%, non-condensing - Atmospheric pressure: 106 kPa to 50 kPa. Environmental conditions during device usage: - Temperature: 10°C to +40°C (50°F to 104°F) - Relative humidity: 10% to 90%, non-condensing - Atmospheric pressure: 106 kPa to 70 kPa.
-
Page 30: Identification Of Symbols
Identification of Symbols Symbols used in these directions for use, packaging, device and parts. Symbol Identification Serial number Catalogue number Lot number Direct current (connection for power supply) Manufacturer Date of manufacture Class II equipment Type BF applied part Consult instructions for use Refer to instruction manual/booklet Recycling PLEASE DO NOT THROW AWAY! This product and all its components must absolutely be... - Page 31 Humidity limitation Atmospheric pressure limitation Additional information, explanation on operation and performance Warning Medical Device Authorized Representative in the European Community Authorized Representative in Switzerland Authorized Representative in the United Kingdom UK Conformity Assessed marking INMETRO marking CE marking 0344 Caution: Federal law (USA) restricts this device to sale by or on the order of a licensed healthcare practitioner Sterilizable in a steam sterilizer (autoclave) at...
-
Page 32: Appendix
Appendix Electromagnetic Compatibility Notes: ® - X-Smart Apex Locator requires special precautions with regard to electromagnetic compatibility. - It must be installed and prepared for use as described in section 6.6.1 “Getting Started”. - Certain types of RF wireless communication equipment such as mobile ®... - Page 33 Declaration - electromagnetic emissions Electromagnetic Emissions test Compliance environment - guidance ® The X-Smart Apex Locator uses RF energy only for its internal function. Therefore, its RF emissions are very low RF emissions Group 1 Class A and are not likely to cause any CISPR 11 interference in nearby electronic equipment.
- Page 34 Declaration – Electromagnetic Immunity IEC 60601 Compliance Electromagnetic Immunity test Test level level environment - guidance Floors should be wood, Electrostatic 8 kV contact 8 kV contact concrete or ceramic tile. If discharge floors are covered with 2, 4, 8, 15 kV air 2, 4, 8, 15 kV air (ESD) synthetic material, the relative...
- Page 35 Declaration – Electromagnetic Immunity IEC 60601 Compliance Electromagnetic Immunity test Test level level environment - guidance Mains power quality Voltage dips, 0% UT; 0.5 0% UT; 0.5 should be that of a short interruptions cycle at 0°, 45°, cycle at 0°, typical commercial or and voltage 90°, 135°,180°,...
- Page 36 Declaration – Electromagnetic Immunity IEC 60601 Compliance Electromagnetic environment - IMMUNITY test TEST LEVEL level guidance Portable and mobile RF communications equipment should be used no closer to any ® part of the X-Smart Apex Locator, including cables, than the recommended separation distance calculated from the equation applicable to the 3 Vrms, 6 V...
- Page 37 Recommended separation distances between ® portable and mobile RF communications equipment and the X-Smart Apex Locator Rated Separation distance according to frequency of transmitter maximum output 150 kHz to 80 150 kHz to 80 80 MHz to 800 800 MHz to 2,5 power of transmitter outside ISM...
- Page 38 Test specifications for ENCLOSURE PORT IMMUNITY to RF wireless communications equipment Test Maximum Immunity Complian Band Distance frequency Service Modulation power test level ce level (MHz) (MHz) (V/m) (V/m) Pulse 380 – TETRA 400 modulation 18 Hz 430 – GMRS 460, ±...
- Page 39 PAGE INTENTIONALLY LEFT BLANK...
- Page 40 The latest revision can be accessed through this email: info@forumtec.net dentsplysirona.com 0344 Forum Engineering CEpartner4U B.V. Esdoornlaan 13 Technologies (96) Ltd. 3951 DB Maarn 40 Hutsot Hayotser St. The Netherlands Ashkelon 7878563, Israel. Contact Person: P. O. Box 3095 Mr. Ton Pennings Tel: +972-8-6788217 Tel.
Need help?
Do you have a question about the X-Smart Apex Locator and is the answer not in the manual?
Questions and answers