Dentsply Sirona X-Smart IQ User Manual
Hide thumbs
Also See for X-Smart IQ:
- Directions for use manual (88 pages) ,
- Getting started manual (13 pages) ,
- Directions for use manual (20 pages)
Table of Contents
Advertisement
Advertisement
Table of Contents

Subscribe to Our Youtube Channel
Related Manuals for Dentsply Sirona X-Smart IQ


Summary of Contents for Dentsply Sirona X-Smart IQ
- Page 1 X-Smart IQ ™ User Manual...
- Page 2 PAGE INTENTIONALLY LEFT BLANK B EN XSIQ DFU MAS / Rev.10 / 01-2017 2/74...
-
Page 3: Table Of Contents
Table of contents Table of contents Introduction ......... . . 6 Indications for Use . - Page 4 Table of contents Motor Handpiece ........25 6.6.1 Description of the Motor Handpiece .
- Page 5 Table of contents Cleaning, Disinfection and Sterilization ....53 Foreword ..........53 Single Use of Custom Barrier .
-
Page 6: Introduction
Congratulations on your purchase of the X-SMART IQ™ endo motor. The User Manual is always kept up to date by Maillefer Instruments Holding Sàrl (hereafter Dentsply Sirona) to bring it in line with the latest developments. You will find the current version on www.dentsplymaillefer.com and integrated into the DENTSPLY ENDO... -
Page 7: Indications For Use
Indications for Use Indications for Use X-SMART IQ™ is a cordless motor handpiece with torque control used for driving files in both reciprocating and continuous rotation mode during an endodontic procedure. B EN XSIQ DFU MAS / Rev.10 / 01-2017... -
Page 8: Contraindications
(such as electric shavers, hair dryers, etc.), X-SMART IQ™ must not be used. • Do not use X-SMART IQ™ for implants or any other dental procedure outside endodontics. • Safety and effectiveness have not been established in pregnant women and children. -
Page 9: Warnings
If this happens, the interference should be reduced by reorienting or repositioning the device or by screening off the immediate environment. The electromagnetic radiations emitted by the X-SMART IQ™ motor handpiece are below the recommended limits specified by the applicable relevant provisions (DIN EN 60601-1-2:2007). - Page 10 • Gloves and a rubber dam are absolutely essential during treatment. • If any irregularities with the device should occur during treatment, switch it off. Contact Dentsply Sirona or your Dentsply Sirona authorized service partner. Battery • Always use the original charger with the charging cable to charge the device.
- Page 11 • Before treatment, check the contra-angle for any damage or loose parts. • Only use the original Dentsply Sirona contra-angle. Root canal instruments • Before use, make sure the instrument is securely locked in place. •...
- Page 12 Repairs, alterations and modifications to the device are not permitted unless the manufacturer's prior consent has been obtained. Dentsply Sirona cannot be held liable if the device has been altered or modified. If a defect should occur, contact Dentsply Sirona or your Dentsply Sirona authorized service partner.
- Page 13 • Leaking liquid can be an indicator of a defective battery. Standards and regulations that apply to the transport of X-SMART IQ™ Air freight Land freight • UN 3481 Lithium batteries in •...
-
Page 14: Precautions
Precautions Precautions Read the following precautions before use. • Please check the compatibility of your DENTSPLY ENDO IQ™ ® application before updating the iPad operating system. • Always install the latest version of the DENTSPLY ENDO IQ™ ® application. Regularly check for updates on the App Store B EN XSIQ DFU MAS / Rev.10 / 01-2017 14/74... -
Page 15: Adverse Reactions
Adverse Reactions Adverse Reactions There are no known adverse reactions. Safety and effectiveness have not been established in pregnant women and children. B EN XSIQ DFU MAS / Rev.10 / 01-2017 15/74... -
Page 16: Step By Step Instructions
Step by Step Instructions Step by Step Instructions 3 Warnings Refer to the chapter to verify any special care to exercise before starting to use the complete device. Before use, please check the exact contents of the package. 6.3 Package Contents. -
Page 17: Package Contents
Carefully remove the device and the accessories from their packaging and place them on a flat surface. Check that the X-SMART IQ™ is supplied with all the components listed below. Not all components presented below are available in all kits. -
Page 18: Components Not Included
Step by Step Instructions Components not included The following components are not included in the kit: ® iPad with iOS app (not part of the kit). System Setup ® 6.5.1 Turning on the iPad and setting the Volume N° Action ®... -
Page 19: Activating The Assistivetouch
Step by Step Instructions 6.5.2 Activating the AssistiveTouch The AssistiveTouch feature replaces the actions of the iPad Home ® button which is not accessible when in the protective case. To activate the AssistiveTouch N° Action Select Settings. Select General. Select Accessibility. Select AssistiveTouch. - Page 20 Step by Step Instructions To press the Home button with AssistiveTouch N° Action Tap on the virtual home button. Select HOME. It is also possible to use the 5 fingers to swipe in and to return to the Home screen. B EN XSIQ DFU MAS / Rev.10 / 01-2017 20/74...
-
Page 21: Activating The Wifi
Step by Step Instructions 6.5.3 Activating the WiFi You need to activate the WiFi to download the DENTSPLY ENDO IQ™ application. N° Action Select Settings. Select WiFi. Set WiFi to ON. Select your network and enter your password. ® 6.5.4 Activating the Bluetooth ®... -
Page 22: Installing And Updating The Dentsply Endo Iq™ Application
Step by Step Instructions 6.5.5 Installing and Updating the DENTSPLY ENDO IQ™ Application It is strongly recommended that data is backed up regularly by synchronizing with iTunes. ® The DENTSPLY ENDO IQ™ application is available in the App Store N° Action ®... -
Page 23: Setting Up The Complete System
Step by Step Instructions 6.5.6 Setting up the Complete System N° Action According to your iPad Mini™ model, use the suitable kit. Stick the foams of your kit at the places indicated on the protective case. Enclose and center the iPad Mini™ in the protective case. Place the corresponding plugs on the camera and the charging port. - Page 24 Step by Step Instructions N° Action Install the motor handpiece cover as a protective case holder. Place the assembly on a steady surface. Multiple configurations are possible. Insert the contra-angle on the motor handpiece. Be sure the motor is always turned off when connecting or disconnecting the contra-angle.
-
Page 25: Motor Handpiece
Step by Step Instructions Motor Handpiece 6.6.1 Description of the Motor Handpiece ® ® iPad /Motor handpiece Bluetooth connection status LED ►See 6.7.3 Connecting the Motor Handpiece Motor START/STOP button Reciprocating motion mode status LED Continuous rotation Battery charge status LED mode status LED ►See 6.6.1.1 Description of... -
Page 26: Description Of The Led Colors
Step by Step Instructions 6.6.1.1 Description of the LED Colors Button State Description /LED Motor handpiece ready. Motor handpiece ready for calibration. Or motor handpiece in energy-saving mode. Motor handpiece turning. Motor handpiece turning in reverse. Or motor handpiece locked. Error detected. - Page 27 Step by Step Instructions Button State Description /LED ® Second motor handpiece connected to the iPad 6.7.3.1 Connecting a Second Motor Handpiece. Motor handpiece in stand-alone mode. 6.6.3 Stand-alone mode: operation without the DENTSPLY ENDO IQ™ Application. Reciprocating motion mode active. Continuous rotation mode active.
-
Page 28: The Auto Reverse (Autorev) Functionality
Step by Step Instructions Button State Description /LED Low battery level. Connect the motor handpiece to the AC-adapter. 6.8 Storing and charging the Motor Handpiece. For acoustic signals, see 6.6.1.3 Description of Sounds. Very low battery level. Immediately connect the motor handpiece to the AC-adapter. -
Page 29: Description Of The Sounds
Step by Step Instructions 6.6.1.3 Description of the Sounds Mode Description Intermittent sound when: Device running in • The device is rotating in reverse. continuous rotation • The torque measured is about 75% over the defined torque. Device running in Intermittent sound when: reciprocating •... -
Page 30: Battery Care
If the battery is completely flat, charging can take up to six hours. • Continuous operation with the charger connected shortens the lifetime of the battery. Dentsply Sirona recommends working without the charging cable connected. 6.6.2 Inserting and removing the File 6.6.2.1... -
Page 31: Removing The File
Step by Step Instructions 6.6.2.2 Removing the File N° Action Press the pushbutton ( ) and pull out the file ( 6.6.3 Stand-alone mode: operation without the DENTSPLY ENDO IQ™ Application ® The motor handpiece can be used without the iPad and the DENTSPLY ENDO IQ™... -
Page 32: Dentsply Endo Iq™Application
Step by Step Instructions DENTSPLY ENDO IQ™Application 6.7.1 Starting the Application ® DENTSPLY ENDO IQ™ is a multi-user iOS application for iPad which includes the following features: • A treatment log and reporting system (see 6.7.6.1 Treatment Details). • A file library (see 6.7.7 Customize File Sequences). -
Page 33: Editing Or Creating A User Profile
Step by Step Instructions 6.7.2 Editing or creating a User Profile The first time you use the application, you will be requested to create an user profile. You can edit the profile with your data. If there is only one user defined, you will be automatically connected as this user. -
Page 34: Connecting The Motor Handpiece
Step by Step Instructions 6.7.3 Connecting the Motor Handpiece ® ® The motor handpiece and the iPad communicate via Bluetooth N° Action ® Press the multifunction button until the Bluetooth LED blinks. ® 6.6.1.1 Description of the LED Colors. Bluetooth LED blinks blue, see Wait until the motor handpiece is visible on the DENTSPLY ENDO IQ™... - Page 35 Step by Step Instructions N° Action Select the corresponding motor handpiece serial number from the pop-up. The serial number (2) can be found at the back of the motor handpiece. When the motor handpiece is connected : The icon (3) appears. ®...
-
Page 36: Connecting A Second Motor Handpiece
Step by Step Instructions 6.7.3.1 Connecting a Second Motor Handpiece It is not possible to connect more than two motor handpieces to the DENTSPLY ENDO IQ™ application. If two motor handpieces are connected to the DENTSPLY ENDO IQ™ application, they have the same motor settings. A second motor handpiece can be connected to the DENTSPLY ENDO IQ™... -
Page 37: Disconnecting The Motor Handpiece
Step by Step Instructions 6.7.3.2 Disconnecting the Motor Handpiece N° Action Click on the icon (1). Select Disconnect (2) and confirm the operation. The motor handpiece disappears from the status bar. B EN XSIQ DFU MAS / Rev.10 / 01-2017 37/74... -
Page 38: Interface Presentation
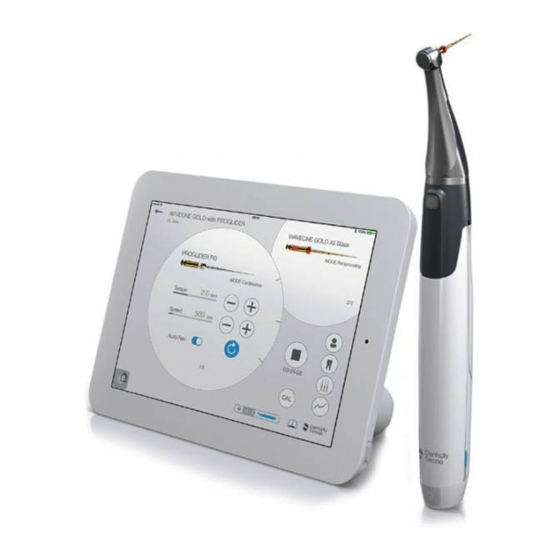
►See 6.7.5.3 Start and Record Treatment User Manual ►See 6.7.5.1 Motor Handpiece Information and Settings X-SMART IQ™ Warnings Home button, back to home screen Education Library ►See 6.7.7 Customize File Sequences ►See 6.7.6 Treatment Reports ►See 6.7.5.2 Start Treatment B EN XSIQ DFU MAS / Rev.10 / 01-2017... - Page 39 Step by Step Instructions The following buttons are also present in the application: Button Action Takes you back to the previous page without saving. Save and leave the actual page. Patient information (see 6.7.6 Treatment Reports). Treatment notes (see 6.7.6.2 Treatment Notes).
- Page 40 Step by Step Instructions The following labels are also present in the application: Button Action Continuous rotation mode. Reciprocating motion mode. ® ® Bluetooth connection level between the iPad and the motor handpiece. Motor turning. Motor handpiece battery level. B EN XSIQ DFU MAS / Rev.10 / 01-2017 40/74...
-
Page 41: Three Modes Of Use
Step by Step Instructions 6.7.5 Three Modes of Use Stand-alone Mode Start and Record Treatment Start Treatment Using the motor Using the motor Using the motor handpiece handpiece in one handpiece with predefined with predefined sequences predefined mode without sequences (default or (default or custom DENTSPLY ENDO IQ™... -
Page 42: Motor Handpiece Information And Settings
Step by Step Instructions 6.7.5.1 Motor Handpiece Information and Settings ® Bluetooth connection level Motor handpiece is ® between the iPad and the motor handpiece running Click on it to display the pop-up below: This symbol is blue for the first motor handpiece Motor handpiece battery connected and green for the second motor level... -
Page 43: Start Treatment
You can easily access "Start Treatment" by clicking on the Motor START/STOP button once the motor handpiece is connected to the X-SMART IQ™ application. Press the multifunction button on the motor handpiece to move to the next file. Double press to move to the previous file. -
Page 44: Start And Record Treatment
Step by Step Instructions 6.7.5.3 Start and Record Treatment The buttons and functions described in "Start Treatment" are also applicable to "Start and Record Treatment". To assign the current treatment to a patient To select the tooth on which the treatment is being carried out and add treatment notes. -
Page 45: Treatment Reports
Step by Step Instructions 6.7.6 Treatment Reports Treatment reports allow you to: • Create, edit or delete a patient. • View, edit or delete the treatments associated with the patients. To sort patients by Patient ID To select the current user's patients To sort patients by treatment date (Mine) or all users' patients (if multiple users defined) -
Page 46: Treatment Details
Step by Step Instructions 6.7.6.1 Treatment Details Basic information for the patient and specific information for the associated treatment To create and send a PDF report by email To delete the treatment To review your treatment notes. ►See 6.7.6.2 Treatment Notes To display a torque graph in real time Technical data of the files used for the treatment... -
Page 47: Treatment Notes
Step by Step Instructions 6.7.6.2 Treatment Notes Treated tooth Takes you back to the To save the treatments previous page without saving. To delete the treatment To add an extra canal Information related to the treatments: Canal type, Length, Obturation Method, Obturation Product, Obturation Size, File and Note B EN XSIQ DFU MAS / Rev.10 / 01-2017 47/74... -
Page 48: Customize File Sequences
6.7.7 Customize File Sequences A file sequence is a collection of files that are used during a treatment. It is composed of files provided by Dentsply Sirona or a third-party manufacturer. The file sequences are divided into 4 categories: •... - Page 49 Therefore, the preset values in the library must be checked prior to use. Torque values shown on the application are accurate and reliable only if the X-SMART IQ™ 6:1 contra-angle is properly maintained and lubricated. B EN XSIQ DFU MAS / Rev.10 / 01-2017...
-
Page 50: Create New File
Step by Step Instructions 6.7.7.1 Create new File File color Indicates the type of rotation for the file Continuous Rotation File Systems Selection of the Auto Reverse Function mode. Reciprocating File Systems ►See 6.6.1.2 The Auto Reverse (AutoRev) Functionality File picture To save the created file File name... -
Page 51: Create File Sequence
Step by Step Instructions 6.7.7.2 Create File Sequence The standard file sequence can not be edited or deleted but it is possible to create a copy that can be edited. A custom file can only be deleted if not used in any sequence. Select the file system for your sequence. -
Page 52: Storing And Charging The Motor Handpiece
Step by Step Instructions Storing and charging the Motor Handpiece N° Action Store the motor handpiece in the motor handpiece holder Plug in the motor charger. Fit the motor handpiece cover. Charging time: maximum 6 hours B EN XSIQ DFU MAS / Rev.10 / 01-2017 52/74... -
Page 53: Cleaning, Disinfection And Sterilization
Cleaning, Disinfection and Sterilization Cleaning, Disinfection and Sterilization Foreword Regular maintenance of X-SMART IQ™ is essential to ensure that work performed is completely hygienic and that the device will have a long service life. The components of X-SMART IQ™ have not been disinfected or sterilized when they are delivered. - Page 54 After any pre-cleaning, lightly soak a paper tissue or soft cloth in a mild, aldehyde-free disinfection and cleaning solution (bactericidal and fungicidal) and use it to clean/disinfect all components. Dentsply Sirona recommends the use of Dentsply VoloWipes™. Thoroughly disinfect surfaces with a soaked wipe (min. 30 seconds), making sure the entire surface is wetted, and allow to act (contact time >...
- Page 55 Cleaning, Disinfection and Sterilization Motor handpiece iPad Mini™ protective case Spray adapter Motor handpiece cover Motor handpiece support Charging cable B EN XSIQ DFU MAS / Rev.10 / 01-2017 55/74...
-
Page 56: Lubrication Of The Contra-Angle
30 min. of use, but at least once a day. Dentsply Sirona recommends the use of W&H Service Oil F1 MD-400 Oil Spray Can, 400ml. When lubricating the contra-angle take care to ensure that no oil gets into the motor handpiece. -
Page 57: Cleaning, Disinfection And Sterilization Of The Contra-Angle
Cleaning, Disinfection and Sterilization Cleaning, Disinfection and Sterilization of the Contra- Angle The contra-angle must be pre-cleaned, thermal-disinfected (if applicable) and sterilized prior to and following every treatment. Always start with preparation at the point of use and manual pre- cleaning in accordance with section 7.5.1 Pre-Treatment of the Contra-Angle. -
Page 58: Pre-Treatment Of The Contra-Angle
Cleaning, Disinfection and Sterilization 7.5.1 Pre-Treatment of the Contra-Angle Do not place the contra-angle in a disinfectant solution or in an ultrasonic bath. Wear protective gloves during preparation and transportation of the contra-angle. Use only cleaning agents that do not have a protein-binding effect. Prior to any manual pre-treatment, detach the used file and separate the contra-angle from the motor handpiece. -
Page 59: Machine-Based Reprocessing Of The Contra-Angle (Thermal-Disinfection)
Cleaning, Disinfection and Sterilization 7.5.2 Machine-based Reprocessing of the Contra-Angle (Thermal-Disinfection) N° Operation Remarks Use washer-disinfector conforming to EN ISO 15883, e.g. Belimed WD, programme: Automatic cleaning / neutral. disinfection Use cleaning solution: e.g. 0.5% (v/v) deconex Cleaning at 65°C (149°F) 24 LIQ, Borer Chemie. -
Page 60: Sterilization Of The Contra-Angle (Autoclaving)
Cleaning, Disinfection and Sterilization 7.5.3 Sterilization of the Contra-Angle (Autoclaving) The fast sterilization procedure and the sterilization procedure with non-packaged accessories are not permissible. In addition, do not use hot-air sterilization, radiation sterilization or sterilization with formaldehyde, ethylene oxide or plasma. Always calibrate the motor handpiece after the contra-angle has been sterilized or exchanged. -
Page 61: Approved Sterilization Procedure Of The Contra-Angle
Cleaning, Disinfection and Sterilization 7.5.3.1 Approved Sterilization Procedure of the Contra-Angle N° Operation Remarks Clean and disinfect before sterilization. The Packaging contra-angle should also be lubricated before Place the contra-angle in sterilization. sterile barrier packages Use a sterilization temperature with tolerance in conforming to EN 868-5. -
Page 62: Technical Characteristics
Description Maillefer Instruments Holding Sàrl Chemin du Verger 3 Manufacturer CH-1338 Ballaigues Switzerland Model X-SMART IQ™ Dimensions (Length x Height x Width) 206 mm x 24.6 mm x 24.8 mm PBT / PET Stainless steel 316L TPE (thermoplastic elastomer) Material... - Page 63 Technical Characteristics Specification Description • Use: in enclosed spaces; Ambient temperature: • 15°C - 35°C; (59°F - 95°F) • Relative humidity: < 80%; non- condensing at 0°C; Ambient conditions • Operating altitude < 2 000 m (~ 6561ft 8in) above sea level;...
-
Page 64: Motor Handpiece Error Code
Motor Handpiece Error Code Motor Handpiece Error Code If a failure occurs on the motor handpiece, the nature of the failure is given by a combination of colors as described in the following table. State Failure Solution Re-initialize the motor handpiece with a Total system 6.6.1 Description of the Factory Reset (see... - Page 65 Motor Handpiece Error Code State Failure Solution The Motor START/STOP 6.6.1 Description of Reset the device (see button sensor the Motor Handpiece). is not working properly 6.6.1 Description of Bluetooth radio Reset the device (see the Motor Handpiece). module failure 7.5.3.1 Lubricate the contra-angle (see Approved Sterilization Procedure of the...
-
Page 66: Troubleshooting
Troubleshooting Troubleshooting If the device is not operating properly, read the following checklist. If you are unable to solve the problem by referring to the checklist, contact your service center. Also refer to the any error codes which may be indicated on the device, 9 Motor Handpiece Error Code. - Page 67 Troubleshooting Problem Cause / Solution ® iPad switched off (empty battery). The handpiece keeps the last used settings for 5 min. You ® can either recharge the iPad and reconnect the motor handpiece or use it in stand-alone mode. Lost connection ®...
-
Page 68: Warranty
Full performance capability of X-SMART IQ™ is covered by a 12-month warranty and that of the contra-angle is covered by a 24-month warranty that commences on the date of delivery to the customer (as indicated on the delivery documents bearing the serial number of the product, issued by the seller upon sale). -
Page 69: Exclusion Of Liability
Warranty The warranty explicitly excludes defects that: • have been caused by damage in transit to Dentsply Sirona/to a service partner authorized by Dentsply Sirona for the purpose of repair; • have been caused by atmospheric events such as lightning strike, fire and moisture. -
Page 70: Disposal Of The Product
Disposal of the Product Disposal of the Product Comply with your national regulations, guidelines and requirements for the disposal of end-of-life electrical equipment and batteries. Specialist dental dealers will be pleased to provide you with country-specific information concerning disposal. Make sure the product or battery is not mixed with other types of waste when it is being disposed of. -
Page 71: Identification Of Symbols
Identification of Symbols Identification of Symbols 13.1 Normative Symbols Symbol Identification Serial number Lot number Catalogue number Refer to instruction manual / booklet Electronic instruction for use Date of manufacture Manufacturer Class II equipment Type BF applied part Recycling: PLEASE DO NOT THROW AWAY! This product and all its components must absolutely be recycled through your distributor Direct current (connection for power supply) 134 C... - Page 72 Identification of Symbols Symbol Identification Opened packages are not replaced CE Mark 0459 Alternate current Temperature limit Humidity limitation Atmospheric pressure limitation Keep away from rain Fragile, handle with care Accessory Use by date ° Do not sterilize Do not re-use Caution, consult accompanying documents Plastic B EN XSIQ DFU MAS / Rev.10 / 01-2017...
- Page 73 Identification of Symbols PAGE INTENTIONALLY LEFT BLANK B EN XSIQ DFU MAS / Rev.10 / 01-2017 73/74...
- Page 74 www.dentsplymaillefer.com Maillefer Instruments Holding Sàrl Chemin du Verger 3 CH-1338 Ballaigues Switzerland email: info@dentsplymaillefer.com Registrado por: DENTSPLY Indústria e Comércio Ltda. Rua Alice Hervê, 86 – Petrópolis-RJ. CEP 25665-010 www.dentsply.com.br – Central de Relacionamento: 0800 721 1200 CNPJ 31.116.239/0001-55 - Indústria Brasileira Responsável Técnico: Marcelle Cortezia –...
Need help?
Do you have a question about the X-Smart IQ and is the answer not in the manual?
Questions and answers