
Related Manuals for Dentsply Sirona Xios AE


Summary of Contents for Dentsply Sirona Xios AE
- Page 1 09.2019 New as of: Xios AE Sensor USB interface and sensors Operating Instructions English...
-
Page 2: Table Of Contents
Table of contents Dentsply Sirona Operating Instructions Xios AE Sensor USB interface and sensors Table of contents General information ....................Dear Customer,.................... Contact information..................General information about this operating manual ........Other valid documents ................. Intended use ....................Indications and contraindications.............. - Page 3 Dentsply Sirona Table of contents Operating Instructions Xios AE Sensor USB interface and sensors 2.10.13 Product Damage during Shipment..........2.10.14 Use Only Approved Disinfectants ..........2.11 Electrostatic discharge................. System description ....................System structure ..................USB interface....................USB cable ....................USB hub (optional)..................
- Page 4 Table of contents Dentsply Sirona Operating Instructions Xios AE Sensor USB interface and sensors Position sensor with AimRight reusable sensor holder system ....4.8.1 Anterior tooth exposure..............4.8.2 Posterior tooth exposures .............. 4.8.3 Horizontal bite wing exposures ............Release the exposure ..................
- Page 5 Dentsply Sirona Table of contents Operating Instructions Xios AE Sensor USB interface and sensors Diagnostics ....................8.2.1 Performing USB interface test ............8.2.2 Performing sensor test..............Maintenance and inspection ................... Hygiene......................9.1.1 Care, cleaning agents, and disinfectants ........9.1.2 USB interface and sensors ............
-
Page 6: General Information
Intraoral X-ray system from Dentsply Sirona. The system is characterized by many features and a high day-to-day reliability. Xios AE sensors are available in three sizes (0, 1 and 2) and use enhanced image processing functions in Sidexis 4 through special filters. -
Page 7: Contact Information
Dentsply Sirona 1 General information Operating Instructions Xios AE Sensor USB interface and sensors 1.2 Contact information Contact information Customer Service Center In the event of technical queries, please use our online contact form at the following address: http://srvcontact.sirona.com Authorized agent in the EU... -
Page 8: General Information About This Operating Manual
1 General information Dentsply Sirona 1.3 General information about this operating manual Operating Instructions Xios AE Sensor USB interface and sensors General information about this operating manual Observe the Operating Instructions Please familiarize yourself with the unit by reading through these Operating Instructions before putting it into operation. -
Page 9: Intended Use
Operating Instructions Xios AE Sensor USB interface and sensors 1.5 Intended use Intended use The Xios AE X-ray system is designed for digital acquisition of intraoral X-ray images for diagnostic purposes. The system is used on patients by dental professionals. The digital images produced are transferred to a PC and displayed on a monitor. -
Page 10: Structure Of The Document
1 General information Dentsply Sirona 1.7 Structure of the document Operating Instructions Xios AE Sensor USB interface and sensors Structure of the document 1.7.1 Identification of the danger levels To prevent personal injury and material damage, please observe the warning and safety information provided in these instructions for use. -
Page 11: Safety Instructions
The system may only be installed and operated by skilled or properly trained personnel. Xios AE installation is to be performed exclusively by trained and authorized distributors of Dentsply Sirona or service technicians designated by Dentsply Sirona. For more information, please refer to the section on Contact Information and use the e-mail address or phone number to reach us directly. -
Page 12: Pc System And Software
2 Safety instructions Dentsply Sirona 2.4 PC system and software Operating Instructions Xios AE Sensor USB interface and sensors PC system and software During the exposure, the data connection and power supply must be ensured via the USB port. Under Power Options on the control panel set the PC so that it never switches to stand-by operation or goes to sleep. -
Page 13: Modifications And Extensions Of The System
For reasons of product safety, this product may be operated only with original Dentsply Sirona accessories or third-party accessories expressly approved by Dentsply Sirona. The user assumes the risk of using non-approved accessories. If any devices not approved by Dentsply Sirona are connected, they must comply with the applicable standards, e.g.:... -
Page 14: Apply Recommended Procedures For Cleaning
2 Safety instructions Dentsply Sirona 2.10 Additional instructions Operating Instructions Xios AE Sensor USB interface and sensors Any instrumentation or equipment for professional use located near the sensor must conform to Electromagnetic Compatibility regulations, to which the EMC tables in this document serve as guidance. Non-... -
Page 15: Wait For Appropriate Prompts Before Operating X-Ray Source
2.10.10 Always Use Sheaths with Sensors Use Dentsply Sirona sheaths every time the sensor is used. Never use the sensor without a protective sheath. Never use a damaged sheath. Always dispose of the sheath after every patient. Protective sheaths are single-use items and must not be reused under any circumstance. -
Page 16: Electrostatic Discharge
2 Safety instructions Dentsply Sirona 2.11 Electrostatic discharge Operating Instructions Xios AE Sensor USB interface and sensors Electrostatic discharge 2.11 Protective measures ESD stands for ElectroStatic Discharge. Electrostatic discharge from people can damage electronic components when the components are touched. Damaged components usually have to be replaced. - Page 17 Dentsply Sirona 2 Safety instructions Operating Instructions Xios AE Sensor USB interface and sensors 2.11 Electrostatic discharge Note: nanosecond = 1/1,000,000,000 second = 1 billionth of a second Voltage differentials exceeding 30,000 volts per centimeter may lead to a charge transfer (electrostatic discharge, lightning, spark-over).
-
Page 18: System Description
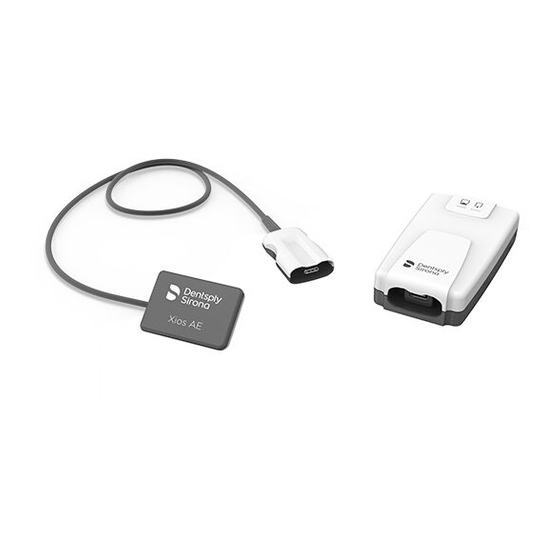
3 System description Dentsply Sirona 3.1 System structure Operating Instructions Xios AE Sensor USB interface and sensors System description System structure USB interface USB cable Sensor (size 0, 1 or 2) with cable and plug USB hub (optional) Sidexis PC with ●... -
Page 19: Usb Interface
(A) to the PC workstation and a USB 3.0 “micro-B” connection (B) to the USB module. The USB cable conforms to USB 2.0 and USB 3.0 standards and is designed especially for use with Xios AE. CAUTION Standard commercial USB cables do not offer adequate protection from electromagnetic interference. -
Page 20: Usb Hub (Optional)
(e.g. VDE, UL, CSA) Sensors Xios AE sensors are available in three sizes (0, 1 and 2). By using Xios AE sensors enhanced image processing functions are available to you in Sidexis 4 through special filters. Depending on the indication you can apply the corresponding filter to the X-ray image in order to amplify the relevant structures. -
Page 21: Sensor Holder Systems
Dentsply Sirona 3 System description Operating Instructions Xios AE Sensor USB interface and sensors 3.6 Sensor holder systems Sensor holder systems 3.6.1 Single-use sensor holder system There are different sensor holders available depending on the type of exposure. The localizer rings and sensor holder tabs are color-coded. -
Page 22: Aimright Reusable Sensor Holder System
3 System description Dentsply Sirona 3.6 Sensor holder systems Operating Instructions Xios AE Sensor USB interface and sensors 3.6.2 Aimright reusable sensor holder system There are different sensor holders available depending on the type of exposure. The sensor holders are color-coded. -
Page 23: Intraoral X-Ray Tube Assembly
Dentsply Sirona 3 System description Operating Instructions Xios AE Sensor USB interface and sensors 3.7 Intraoral X-ray tube assembly Intraoral X-ray tube assembly The following requirements apply to the intraoral X-ray tube assembly: Intraoral X-ray tube assembly with multipulse technology (direct current) 0.14 –... -
Page 24: Pc System
3 System description Dentsply Sirona 3.8 PC system Operating Instructions Xios AE Sensor USB interface and sensors PC system The digital X-ray exposures are transferred to a PC via a USB port. In addition to Sidexis 4 the Sidexis 4 Sensor Plugin must be installed. -
Page 25: Technical Data
Dentsply Sirona 3 System description Operating Instructions Xios AE Sensor USB interface and sensors 3.9 Technical data Technical data AE Sensor USB interface Electric class: Protection class II Type of protection against electric shock: Applied part type BF Degree of protection... -
Page 26: Certification And Standards
Operating altitude: ≤ 2000 m 3.10 Certification and standards The Xios AE sensor and the AE Sensor USB Interface comply with the following standards, among others. They comply with the requirements of these regulations. EMC / safety ● IEC 60601-1 (Standard for Safety Medical Electrical Equipment - Part 1: General Requirements for Safety) -
Page 27: Symbols
Dentsply Sirona 3 System description Operating Instructions Xios AE Sensor USB interface and sensors 3.11 Symbols Symbols 3.11 Unit with protection class II in accordance with IEC 60601-1 Type BF applied part according to IEC 60601-1 This symbol indicates the need for the user to consult the instructions for use. -
Page 28: Position Of The Labels
3.12 Position of the labels Operating Instructions Xios AE Sensor USB interface and sensors Position of the labels 3.12 The following labels are attached to components of the Xios AE USB system: AE Sensor USB interface AE Sensor (size 2 shown) -
Page 29: Operation
Connected Amber Error condition, such as incompatible sensor. Connected Green Xios AE sensor and USB Interface are connected. Sidexis is configured properly and has detected the USB Interface. Start Sidexis 4 (or other imaging program). Connected Green “flashing” USB Interface is transferring image from sensor to PC. LED flashes for duration of the image transfer. -
Page 30: Connect The Sensor
2. Click on the desired patient in the patient list. 3. Click the "Register and exposure" button to prepare the software for a new exposure. Ä Sidexis 4 software enters the Exposure phase. 4. Select the Xios AE sensor in the device screen. 67 29 433 D3780 D3780.201.01.01.02 09.2019... -
Page 31: Slide The Hygienic Protective Sleeve Over The Sensor
4.4 Slide the hygienic protective sleeve over the sensor Slide the hygienic protective sleeve over the sensor Hygienic protective sleeves for use with Xios AE sensors are available depending on the size of the sensor (0, 1 or 2). To reorder the hygienic protective sleeves, see "Consumables and spare parts."... -
Page 32: Enable Exposure Readiness
4 Operation Dentsply Sirona 4.5 Enable exposure readiness Operating Instructions Xios AE Sensor USB interface and sensors Enable exposure readiness 4.5.1 Select a template Templates (or exposure series) are available in Sidexis 4, enabling clinicians to perform multiple intraoral X-ray exposures on the same patient without repeating some steps manually. -
Page 33: Example Of Taking An Image (Series)
ü The Sidexis 4 Sensor Plugin is installed. ü The patient is registered. ü The "Exposure" work phase is opened. ü An intraoral device (such as Xios AE) is selected. Work phase “Exposure” with selected intraoral sensor 1. Select the "Bitewings" template (A). - Page 34 4 Operation Dentsply Sirona 4.5 Enable exposure readiness Operating Instructions Xios AE Sensor USB interface and sensors "Bitewings" exposure series 4. Take the X-ray exposure. Ä Following the exposure, the X-ray image is displayed in the preview window. The next anatomic region is selected (automatically) and the exposure cycle begins again.
- Page 35 Dentsply Sirona 4 Operation Operating Instructions Xios AE Sensor USB interface and sensors 4.5 Enable exposure readiness Post-exposure options IMPORTANT Other actions are also available after each exposure. These include changing image orientation (A), using the Exposure meter (B), performing an image retake (C), and changing the tooth numbering (D).
- Page 36 4 Operation Dentsply Sirona 4.5 Enable exposure readiness Operating Instructions Xios AE Sensor USB interface and sensors Exposure series complete Exposure series (individual images and exam) in the "Timeline" Ä The individual exposures as well as the exposure series are displayed in the "Exposures"...
-
Page 37: Repeating An Exposure In The Series
Dentsply Sirona 4 Operation Operating Instructions Xios AE Sensor USB interface and sensors 4.5 Enable exposure readiness 4.5.1.2 Repeating an exposure in the series Performing an image retake — a feature also available in the "Light Box" — is available for any image in the current exam at any time. Most commonly, this feature is used immediately after an image is acquired. -
Page 38: Canceling An Exposure Series
4 Operation Dentsply Sirona 4.5 Enable exposure readiness Operating Instructions Xios AE Sensor USB interface and sensors 4.5.1.3 Canceling an exposure series An exposure series can be canceled or closed at any time, even if one or more of the exposure windows are not used during the patient exam and do not contain images. - Page 39 Dentsply Sirona 4 Operation Operating Instructions Xios AE Sensor USB interface and sensors 4.5 Enable exposure readiness Empty exposure window in the “Light box” Ä The empty exposure window (B) is displayed in the "Light box" of the "Examination" work phase along with the exposures that were taken in the series.
-
Page 40: Continuing An Exposure Series
4 Operation Dentsply Sirona 4.5 Enable exposure readiness Operating Instructions Xios AE Sensor USB interface and sensors 4.5.1.4 Continuing an exposure series An exposure series that has been canceled can be continued later at any time. 1. Open the compilation of the exposure series from the "Timeline"... -
Page 41: Templates For The Exposure Series
Dentsply Sirona 4 Operation Operating Instructions Xios AE Sensor USB interface and sensors 4.5 Enable exposure readiness Ready to continue the series 4. Take the X-ray exposure to continue with the exposure series. Ä The exposure series continues. 4.5.2 Templates for the exposure series Use the menu "Global tools"... -
Page 42: Position The Ae Sensor
Since the positioning of the sensors in the beam path of the cone strongly influences the image quality, using the parallel technique with the Xios AE sensor holders is recommended for optimal positioning of the sensors. Sensor holder tabs may be detached and re-applied several times during an exposure series on the same patient. -
Page 43: Position Sensor With Single-Use Sensor Holder System
Dentsply Sirona 4 Operation Operating Instructions Xios AE Sensor USB interface and sensors 4.7 Position sensor with single-use sensor holder system Position sensor with single-use sensor holder system 4.7.1 Anterior tooth exposure For anterior tooth exposures use the blue sensor holder. -
Page 44: Posterior Tooth Exposures
4 Operation Dentsply Sirona 4.7 Position sensor with single-use sensor holder system Operating Instructions Xios AE Sensor USB interface and sensors 4.7.2 Posterior tooth exposures For posterior tooth exposures use the yellow sensor holder. 1. Place the yellow localizer ring (B) onto the double-angled guide rod (C). -
Page 45: Bite Wing Exposures
Dentsply Sirona 4 Operation Operating Instructions Xios AE Sensor USB interface and sensors 4.7 Position sensor with single-use sensor holder system 4.7.3 Bite wing exposures For bite wing exposures use the red sensor holder. 1. Place the red localizer ring (B) onto the straight guide rod (C). -
Page 46: Endodontics Exposures With The Half-Angle Technique
4 Operation Dentsply Sirona 4.7 Position sensor with single-use sensor holder system Operating Instructions Xios AE Sensor USB interface and sensors 4.7.4 Endodontics exposures with the half-angle technique For endodontics exposures with the half-angle technique use the green universal sensor holder tab. -
Page 47: Measurement Exposure For Endodontics
Dentsply Sirona 4 Operation Operating Instructions Xios AE Sensor USB interface and sensors 4.7 Position sensor with single-use sensor holder system 4.7.5 Measurement exposure for endodontics Endodontic needles and files can remain in the root canal for the measurement exposure. -
Page 48: Position Sensor With Aimright Reusable Sensor Holder System
4 Operation Dentsply Sirona 4.8 Position sensor with AimRight reusable sensor holder system Operating Instructions Xios AE Sensor USB interface and sensors Position sensor with AimRight reusable sensor holder system 4.8.1 Anterior tooth exposure Preparing the sensor holder For anterior tooth exposures use the blue sensor holder. - Page 49 Dentsply Sirona 4 Operation Operating Instructions Xios AE Sensor USB interface and sensors 4.8 Position sensor with AimRight reusable sensor holder system Positioning the sensor for exposures of the lower jaw 1. Look through the localizer ring to check the alignment of the sensor.
- Page 50 Dentsply Sirona 4.8 Position sensor with AimRight reusable sensor holder system Operating Instructions Xios AE Sensor USB interface and sensors Positioning the sensor for exposures of the upper jaw 1. Look through the localizer ring to check the alignment of the sensor.
- Page 51 Dentsply Sirona 4 Operation Operating Instructions Xios AE Sensor USB interface and sensors 4.8 Position sensor with AimRight reusable sensor holder system 5. Align the cone of the X-ray tube assembly parallel to the sensor directly on the localizer ring.
-
Page 52: Posterior Tooth Exposures
4 Operation Dentsply Sirona 4.8 Position sensor with AimRight reusable sensor holder system Operating Instructions Xios AE Sensor USB interface and sensors 4.8.2 Posterior tooth exposures Preparing the sensor holder For posterior tooth exposures use the yellow sensor holders. 1. For the right upper jaw and left lower jaw: Fasten the guide rod for the sensor holder (C) in the perforation (B) of the localizer ring (A). - Page 53 Dentsply Sirona 4 Operation Operating Instructions Xios AE Sensor USB interface and sensors 4.8 Position sensor with AimRight reusable sensor holder system Position the sensor 1. Look through the localizer ring to check the alignment of the sensor. The sensor must be located centrally in front of the opening in the localizer ring.
- Page 54 Dentsply Sirona 4.8 Position sensor with AimRight reusable sensor holder system Operating Instructions Xios AE Sensor USB interface and sensors Ä Example: Positioning on the upper jaw 3. Align the cone of the X-ray tube assembly parallel to the sensor directly on the localizer ring.
-
Page 55: Horizontal Bite Wing Exposures
Dentsply Sirona 4 Operation Operating Instructions Xios AE Sensor USB interface and sensors 4.8 Position sensor with AimRight reusable sensor holder system 4.8.3 Horizontal bite wing exposures Preparing the sensor holder For bite wing exposures use the red sensor holder. - Page 56 Dentsply Sirona 4.8 Position sensor with AimRight reusable sensor holder system Operating Instructions Xios AE Sensor USB interface and sensors 2. Position the sensor directly on the dental arch. Ä The bite block of the sensor holder must be located between the upper molars, parallel to the occlusal plane.
-
Page 57: Release The Exposure
4.9.1.2 Recommended dose for AE sensors Xios AE sensors have a very wide effective dose area, so that, depending on the object and diagnostic question at hand, the selection of an optimal parameter adjustment is always possible. IMPORTANT... -
Page 58: Heliodent Plus Exposure Times
4 Operation Dentsply Sirona 4.9 Release the exposure Operating Instructions Xios AE Sensor USB interface and sensors 4.9.1.3 Heliodent Plus exposure times 4.9.1.3.1 Pre-programmed exposure times for AE sensors with 200 mm (8") FHA cone 0.01 0.02 0.03 0.04 0.05 0.06... - Page 59 Dentsply Sirona 4 Operation Operating Instructions Xios AE Sensor USB interface and sensors 4.9 Release the exposure 4.9.1.3.2 Pre-programmed exposure times for AE sensors with 300 mm (12") FHA cone 0.03 0.04 0.05 0.06 0.08 0.10 0.12 0.16 0.20 0.25 0.32...
-
Page 60: Releasing The Exposure
4 Operation Dentsply Sirona 4.9 Release the exposure Operating Instructions Xios AE Sensor USB interface and sensors 4.9.2 Releasing the exposure ü The exposure parameters for the X-ray tube assembly are set. Please refer to "Select the exposure parameters for the X-ray tube assembly". -
Page 61: After The Exposure
Dentsply Sirona 5 After the exposure Operating Instructions Xios AE Sensor USB interface and sensors 5.1 Remove the hygienic protective sleeve from the sensor After the exposure Remove the hygienic protective sleeve from the sensor 5.1.1 With single-use sensor holder system Have the sensor holder tab and the sensor holder glued onto the hygienic protective sleeve. - Page 62 5 After the exposure Dentsply Sirona 5.1 Remove the hygienic protective sleeve from the sensor Operating Instructions Xios AE Sensor USB interface and sensors 3. Slide the sensor further out of the hygienic protective sleeve with your thumb. 4. Hold the sensor cable firmly to prevent the sensor from falling out of the hygienic protective sleeve.
-
Page 63: With Aimright Reusable Sensor Holder System
Dentsply Sirona 5 After the exposure Operating Instructions Xios AE Sensor USB interface and sensors 5.1 Remove the hygienic protective sleeve from the sensor 5.1.2 With Aimright reusable sensor holder system NOTE The sensor cable is sensitive to mechanical influences. -
Page 64: Edit Exposures
6 Edit exposures Dentsply Sirona 6.1 Edit exposures in X-ray series Operating Instructions Xios AE Sensor USB interface and sensors Edit exposures Edit exposures in X-ray series 6.1.1 Swapping images Swapping is a simple drag-and-drop action so you can move an image to a different exposure window in the same series or to swap two images in different exposure windows. -
Page 65: Changing Tooth Numbers
Dentsply Sirona 6 Edit exposures Operating Instructions Xios AE Sensor USB interface and sensors 6.1 Edit exposures in X-ray series 6.1.3 Changing tooth numbers Changing tooth numbers — a feature also available in the "Light Box" — is possible using the edit button located after any Tooth # assignments. -
Page 66: Retaking Images
6 Edit exposures Dentsply Sirona 6.1 Edit exposures in X-ray series Operating Instructions Xios AE Sensor USB interface and sensors 6.1.5 Retaking images Performing an image retake — a feature also available in the "Light Box" — is available for any image in the current exam at any time. Most commonly, this feature is used immediately after an image is acquired. -
Page 67: Edit Exposures In Light Box
6.2 Edit exposures in Light box Edit exposures in Light box 6.2.1 Optimizing images with AE sensors Specific features for the Xios AE sensors are available in the "Light Box". To apply a filter enhancement and additional image sharpening, please perform the following steps: ü... -
Page 68: Setting Image Filters
6 Edit exposures Dentsply Sirona 6.2 Edit exposures in Light box Operating Instructions Xios AE Sensor USB interface and sensors 6.2.3 Setting image filters Any enhancement filter can be set as a default and will be applied automatically to the image when it is opened in the "Light Box"... -
Page 69: Resend Exposures
Dentsply Sirona 7 Resend exposures Operating Instructions Xios AE Sensor USB interface and sensors 7.1 Information Resend exposures Information During normal use, Sidexis software saves patient data and images to the server and makes them available whenever needed. In some situations, however, communication with the Sidexis server may be disrupted, preventing images from being saved properly. -
Page 70: Resend Images In Rescue Mode (Recommended)
7 Resend exposures Dentsply Sirona 7.2 Resend images in Rescue mode (recommended) Operating Instructions Xios AE Sensor USB interface and sensors Resend images in Rescue mode (recommended) To rescue unsaved images, please perform the following steps: ü Resolve the issue that caused the Sensor plugin to enter Rescue mode. -
Page 71: Export Images In Rescue Mode (Alternate)
Dentsply Sirona 7 Resend exposures Operating Instructions Xios AE Sensor USB interface and sensors 7.3 Export images in Rescue mode (alternate) Export images in Rescue mode (alternate) To rescue unsaved images by exporting them, please perform the following steps: ü This procedure is an alternate approach to rescue images if you are unable to resend them using the recommended procedure. -
Page 72: Configuration
8 Configuration Dentsply Sirona 8.1 Device information Operating Instructions Xios AE Sensor USB interface and sensors Configuration Device information 8.1.1 Displaying serial number and firmware To obtain information about a sensor and USB interface, please perform the following steps: ü Verify that the USB Interface and the sensor are connected to the PC workstation. -
Page 73: Updating From File
Dentsply Sirona 8 Configuration Operating Instructions Xios AE Sensor USB interface and sensors 8.1 Device information ü Verify that the USB Interface and the sensor are connected to the PC workstation. 1. In Sidexis 4 click on "Settings" > "Exposure" > "Devices"-2 . -
Page 74: Diagnostics
8 Configuration Dentsply Sirona 8.2 Diagnostics Operating Instructions Xios AE Sensor USB interface and sensors Diagnostics 8.2.1 Performing USB interface test This diagnostic checks the connection between the USB Interface and the host computer. IMPORTANT Please make sure that the USB Interface is connected to the PC. -
Page 75: Maintenance And Inspection
Dentsply Sirona 9 Maintenance and inspection Operating Instructions Xios AE Sensor USB interface and sensors 9.1 Hygiene Maintenance and inspection Hygiene Disinfect and sterilize accessories prior to initial use and after each patient. 9.1.1 Care, cleaning agents, and disinfectants NOTE... -
Page 76: Sensor Holders
Sensor holders The rods and rings of the single-use sensor holder system recommended for the Xios AE sensor and all parts of the reusable sensor holder system can be sterilized. The rods and rings must be sterilized before initial use and once a treatment has ended. -
Page 77: Regular Inspections
CAUTION Should you identify faulty components on your Xios AE product, please inform your appointed service engineer. In this case, the device should no longer be used for patient exposures. -
Page 78: Replace The Sensor Cable
Unscrew a damaged cable from the sensor 1. Disconnect the Xios AE sensor from the USB interface. 2. With a dental instrument remove the protective screw cap from the rear side of the sensor. - Page 79 Use the new parts supplied with the cable for the assembly! IMPORTANT The spare parts for the Xios AE sensor are white. The Elastomer strip (or frame) must be placed exactly in the slot so that the sensor works. Attach a replacement cable 1.
-
Page 80: Consumables And Spare Parts
10 Consumables and spare parts Dentsply Sirona Operating Instructions Xios AE Sensor USB interface and sensors Consumables and spare parts Hygienic protective sleeves for sensors Hygienic protective sleeves for sensor size 0 and 1, quantity 300 REF 64 09 960... - Page 81 Dentsply Sirona 10 Consumables and spare parts Operating Instructions Xios AE Sensor USB interface and sensors Aimright reusable sensor holder system Localizer ring (red), quantity 1 REF 65 45 599 Sensor holder for bite wing exposures (red), for sensor size 1, quantity...
- Page 82 10 Consumables and spare parts Dentsply Sirona Operating Instructions Xios AE Sensor USB interface and sensors Sensor holder for posterior tooth exposures (yellow), for sensor size 1, quantity 4 (2 for right lower jaw / left upper jaw and 2 for left lower jaw / right upper...
- Page 83 Dentsply Sirona 10 Consumables and spare parts Operating Instructions Xios AE Sensor USB interface and sensors Sensor cable for USB module Xios AE USB cable kit 90 cm REF 67 24 772 Xios AE USB cable kit 180 cm REF 67 24 780...
-
Page 84: Electromagnetic Compatibility
Electromagnetic compatibility Xios AE complies with the requirements for electromagnetic compatibility (EMC) according to IEC 60601-1-2. Xios AE is hereinafter referred to as the "UNIT". Observance of the following information is necessary to ensure safe operation regarding EMC aspects. Accessories 11.1... -
Page 85: Immunity To Interference
Dentsply Sirona 11 Electromagnetic compatibility Operating Instructions Xios AE Sensor USB interface and sensors 11.3 Immunity to interference Immunity to interference 11.3 The UNIT is intended for operation in the electromagnetic environment specified below. The customer or user of the UNIT should make sure that it is used in such an environment. - Page 86 11 Electromagnetic compatibility Dentsply Sirona 11.3 Immunity to interference Operating Instructions Xios AE Sensor USB interface and sensors Interference immunity IEC 60601-1-2 test Compliance level Electromagnetic environment - tests level guidelines Conducted RF interfer- d= [1.2] √P ence 150 kHz to 80 MHz...
-
Page 87: Working Clearances
Dentsply Sirona 11 Electromagnetic compatibility Operating Instructions Xios AE Sensor USB interface and sensors 11.4 Working clearances Test fre- Frequency Radio service Modulation (b) Power max. Distance Immunity test quency band level (MHz) (MHz) (V/m) 800 - 960 Pulse modula-... - Page 88 11 Electromagnetic compatibility Dentsply Sirona 11.4 Working clearances Operating Instructions Xios AE Sensor USB interface and sensors Power rating of the transmitter Working clearance according to transmission frequency [m] 150 kHz to 80 MHz 80 MHz to 800 MHz 800 MHz to 2.5 GHz...
-
Page 89: Disposal
Dentsply Sirona 12 Disposal Operating Instructions Xios AE Sensor USB interface and sensors Disposal In accordance with Directive 2012/19/EU and national disposal regulations regarding old electrical and electronic devices, please be advised that such items must be disposed of in a special way within the European Union (EU). - Page 90 We reserve the right to make any alterations which may be required due to technical improvements. © Sirona Dental, Inc. Sprache: englisch Printed in Germany D3780.201.01.01.02 09.2019 Ä.-Nr.: 000 000 Sirona Dental, Inc. 67 29 433 D3780 30-30 47th Avenue, Suite 500 Order No ...
Need help?
Do you have a question about the Xios AE and is the answer not in the manual?
Questions and answers