
Related Manuals for Burmester 077


Summary of Contents for Burmester 077
-
Page 1: Table Of Contents
O P E R A T I O N M A N U A L Table of contents INTRODUCTION List of Functions Unpacking and setting up OVERVIEW OF THE 07 7 Functional overview of the preamp front panel Rear panel with internal power supply (not longer available) Rear panel with external power supply Functional overview of external power supply unit Rear Panel... -
Page 2: Introduction
O P E R A T I O N M A N U A L Introduction Remote control and BurLink Remote Control BurLink Connections Commands GENER AL IN STRUCTION S Warranty Care Battery hazard Technical Specifications 2 | 7 6 2 | 7 6 3 | 7 6... - Page 3 P R E A M P L I F I E R Dear Audiophile, Thank you for choosing this Burmester audio component. We sincerely appreciate your trust in our products. You have purchased a unit, which excels in musical fidelity and combines uncompromising manufacturing quality with technical innovation and the highest degree of operating flexibility.
-
Page 4: List Of Functions
P R E A M P L I F I E R List of Functions Through factory settings a lot of functions are disabled to operate the 077 as Phono MM module (optional), with balanced XLR 3pins inputs, input a simple preamp. With the menus you are comfortably able to activate the sensitivity and input impedance are selectable;... -
Page 5: Unpacking And Setting Up
Base plate with carbon fiber damping discs for the preamp The feet of the preamp and of the power supply unit are constructed as spikes. AC BURMESTER power cord mm² • They can either be placed directly on the aluminum of the base plate or on the supplied carbon fiber damping discs. -
Page 6: Overview Of The 07
Overview of the 077 1 1 | 7 6 1 1 | 7 6... -
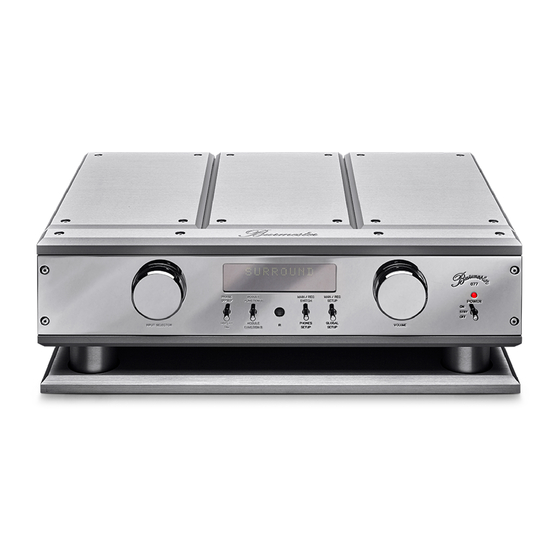
Page 7: Functional Overview Of The Preamp Front Panel
O P E R A T I O N M A N U A L 0 7 7 P R E A M P L I F I E R FUNCTIONAL OVERVIEW OF THE PREAMP FRONT PANEL REAR PANEL WITH INTERNAL POWER SUPPLY (not longer available) Input selector High level inputs INPUT 1 to INPUT 5, POWER switch to switch the unit on &... -
Page 8: Rear Panel With External Power Supply
O P E R A T I O N M A N U A L 0 7 7 P R E A M P L I F I E R REAR PANEL WITH EXTERNAL POWER SUPPLY FUNCTIONAL OVERVIEW OF EXTERNAL POWER SUPPLY UNIT Base plate Foot –... -
Page 9: Start-Up And Connections
Start-up and connections 1 7 | 7 6... -
Page 10: The "Simple" Preamp - Factory Settings
Phono MC module, Phono MM module or with a D/A converter module. • Make sure, that the AC mains switch (33) on the rear panel of the 077 or on the external power supply unit is set to OFF position. - Page 11 NOTICE: Please do only use BURMESTER XLR-RCA adapter. NOTICE: Subsequent installation of other modules must only be done by Wiring of the Adapter Plugs your authorized dealer or by Burmester Audiosysteme GmbH. MASSE GROUND • PHONO MM module With a PHONO MM module the module input is a balanced PHONO MM input to...
- Page 12 OUTPUT MAIN (21) as a regular balanced preamp output. Burmester class audio output from the list of audio devices. When playing back This output provides the volume-controlled signal of the selected input of the music over the PC now, it will be output via the .
- Page 13 REMOTE The output terminal OUTPUT REC (22) must be connected to the recording Connecting DC OUT (27) to the corresponding DC IN-jack of another BURMESTER- input of an analog recording device (mostly named TAPE IN or REC). unit offers the function to switch on or off this other unit simultaneous by the .
-
Page 14: Ac Mains Switch
When the POWER switch is in “STBY” position the unit can be switched on and off remote control. If the phase reversal is activated ( ˚), the PHASE LED (2) by pulling up the POWER switch, pushing the POWER button on the BURMESTER illuminates. remote control, the Burlink interface or by the DC IN jack. -
Page 15: Special Functions
Special Functions 2 9 | 7 6... -
Page 16: Record Output
VOLUME SCALE configuration of the device. Most functions are adjustable in the SETUP MENUS. Through factory settings the volume steps are set to the BURMESTER curve. The volume indicator is divided into steps between (mute) to... -
Page 17: Input Sensitivity
O P E R A T I O N M A N U A L 0 7 7 P R E A M P L I F I E R INPUT SENSITIVIT Y INPUT NAMES Through factory settings all inputs are set to the same input sensitivity. As expe- Through factory settings all inputs of the preamp are assigned with specific rience has shown, connected reproducers deliver different output levels. -
Page 18: Serial Number
O P E R A T I O N M A N U A L 0 7 7 P R E A M P L I F I E R SERIAL NUMBER In order to view the serial number of your preamp after switching on the device, the function needs to be activated. -
Page 19: Setup Menus
Setup Menus 3 7 | 7 6... -
Page 20: Activating The Setup Menus
While the SETUP menu is active, the volume selector (6) on the PH-MC input is selected. front panel of the 077 serves to change the settings of the various menu MM SETUP: items. During this procedure the volume level can only be changed by the Pushing down the switch key (12) or longer pressing (approx. - Page 21 O P E R A T I O N M A N U A L 0 7 7 P R E A M P L I F I E R The Global Setup The GLOBAL SETUP offers the adjustment of global functions like INPUT LEVEL, INPUT LEVEL INPUT NAMES, displaying the SERIAL NUMBER, 4 CHANNEL MODE, SWITCHING By adjusting the input level, you can equalize jumps in the volume resulting from...
- Page 22 O P E R A T I O N M A N U A L 0 7 7 P R E A M P L I F I E R Now select YES/NO with the navigation buttons ▲ ▼ and confirm by pressing the OK button on your remote control.
- Page 23 To confirm the warning press the OK button on your remote control or use the right rotary switch. Volume scale Indication in dB or Burmester steps M-SCALE (BUR) / dB The display indicates BUILDING followed by PRESET, which confirms that factory...
- Page 24 With the right rotary switch or the navigation buttons ▲ ▼ on your remote control you may select one of the following: Volume indicated in BURMESTER steps (00 to 60) Volume indicated in dB steps (-99dB to +5dB or +21dB at high...
-
Page 25: The Record Setup
Sets volume left/right ratio R-BAL OFF R, - R to R (<C>) L to - To operate BURMESTER power amps we recommend the setting LOW. OFF L CONFIGUR ATION OF INPUT 6 Initial volume Selects volume after R-VOL ) to... - Page 26 OFF R the right channel of the RECORD level is muted Volume indicated in BURMESTER steps (00 to 60) the left channel of the RECORD level will be reproduced with Volume indicated in dB steps (-99dB to +5dB or +21dB at high...
-
Page 27: The Phones Setup
O P E R A T I O N M A N U A L 0 7 7 P R E A M P L I F I E R This menu item preselects which input cannot be selected as input for the RECORD To exit and automatically save the menu push down the switch key (14) or press the output. -
Page 28: The Phono Setup
NOTICE: This function measures the channel differences and automatically adjusts them. This menu is only available if your preamp 077 is equipped with This requires that your record player is configured correctly. a PHONO MC or PHONO MM module and the according input is selected. -
Page 29: The Mc Setup
NOTICE: This menu is only available if your preamp 077 is equipped with a PHONO MM module and the input PH- MM is selected To exit and automatically save the menu push down the switch key (12) or press the AUDIO button on your remote control. - Page 30 O P E R A T I O N M A N U A L The MM SETUP MENU is activated by pushing down the switch (12) on the front panel or by an extended pushing of the AUDIO button (approx. 2 sec) on your remote control.
-
Page 31: Remote Control And Burlink
Remote control and BurLink 6 1 | 7 6... - Page 32 O P E R A T I O N M A N U A L 0 7 7 P R E A M P L I F I E R Remote Control Equipped as standard is the 005 remote control Furthermore you have the option to switch through all inputs, independent of the names, with the buttons STATION+ and STATION-.
-
Page 33: Burlink
O P E R A T I O N M A N U A L 0 7 7 P R E A M P L I F I E R BurLink INPUT D/A MODULE CONNECTIONS If you have a D/A-converter module and the module input is selected, you have the Connections to the BURLINK interface can either be done by the -pin D-SUB option to select between the USB and the RCA input. - Page 34 MC menu or the MM menu, VOL_BURxx\r PH_AMP_SETUP\r BURMESTER scale if equipped sets the volume level to the value xx referred to the dB VOL_DByxx\r...
-
Page 35: General Instructions
General Instructions 6 8 | 7 6 6 9 | 7 6... - Page 36 Provide adequate air circulation; avoid placing the equipment in enclosures. IR RECEIVER • Slots and other openings in the housing are for ventilation. They must not be The IR receiver receives signals from the BURMESTER remote control and must not covered up. be covered up by any objects. •...
-
Page 37: Warranty
P R E A M P L I F I E R Warranty We provide a three-year warranty on your Burmester device. In order for the warranty to be valid, the device must have been connected and operated This symbol points to important notes, which can be found in the owner´s manual. -
Page 38: Technical Specifications
(external power supply) slow 50mA E or H F1, F2, F3 slow 1A E or H slow 1A E or H Model 077-100 100 V~, 50/60 Hz F4, F5, F7 slow 1A E oder H slow 50mA E oder H... - Page 39 O P E R A T I O N M A N U A L VERSION: BA_077_EN_2-2_2308 BURMESTER HOME AUDIO GMBH Wilhelm–Kabus Straße 47 10829 Berlin Germany www.burmester.de 7 6 | 7 6...
Need help?
Do you have a question about the 077 and is the answer not in the manual?
Questions and answers