Table of Contents
Advertisement
Advertisement
Table of Contents

Related Manuals for Burmester 099


Summary of Contents for Burmester 099
- Page 1 OWNER’S MANUAL CLASSIC LINE 099 PREAMPLIFIER HIGH END MADE IN GERMANY...
- Page 2 VERSION: 1.2 from August 15 2018...
- Page 3 Dear Audiophile, Thank you for choosing this Burmester audio component. We sincerely appreciate your trust in our products. You have purchased a unit, which excels in musical fidelity and combines uncompromising manufacturing quality with technical innovation and the highest degree of operating flexibility.
-
Page 4: Table Of Contents
CONTENT INTRODUCTION UNPACKING AND INSTALLATION FRONT AND REAR VIEW OF THE 099 The Front Panel The Rear Panel THE REMOTE CONTROL FREQUENTLY ASKED QUESTIONS TROUBLESHOOTING GETTING STARTED CONNECTIONS Analog Inputs Adapter Plugs Digital Inputs USB Port Analog Output Digital Output... -
Page 5: Introduction
- Open fire sources such as burning candles must never be put on top of the unit. AC power Use only the supplied three-core power cable to connect the 099 to your AC outlet. The ground lead must not be disabled under any circumstances and the unit should only be connected to a grounded AC outlet. - Page 6 Reset If the preamp does not respond to command inputs it can be reset by switching it off and back on using the AC mains power switch on the rear panel. Lightening strikes During the summer months, malfunctions often occur due to voltage spikes in the power lines after lightening strikes.
-
Page 7: Unpacking And Installation
UNPACKING AND INSTALLATION PLEASE NOTE: To protect its surface the 099 preamplifier is being shipped in a sturdy plastic bag. Please keep children away from this plastic bag to avoid the danger of suffocation. Unpacking To avoid damaging the finish of the housing, do not use sharp or pointy tools to open the packaging. -
Page 8: Front And Rear View Of The 099
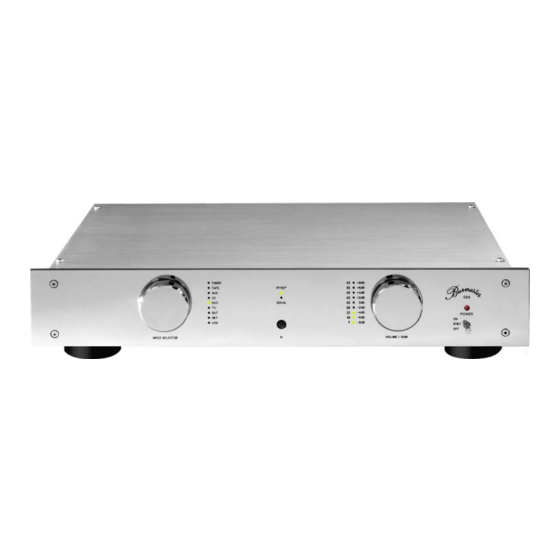
FRONT AND REAR VIEW OF THE 099 THE FRONT PANEL (1) Input selection LEDs (5) Input selector knob switches between inputs (2) PHASE LED illuminates in case of a 180˚ phase (6) IR sensor for remote commands shift for each input... -
Page 9: The Rear Panel
THE REAR PANEL (10) AC mains terminal (20) USB input port (11) AC mains switch (21) REMOTE output socket (12) BURLINK interface RS-232 with control LEDs (22) REMOTE input socket (13) BURLINK interface USB port with control LEDs (23) balanced preamp output (14) Headphones preamp output right channel XLR (15) Headphones socket for 6.3mm jack... -
Page 10: The Remote Control
THE REMOTE CONTROL All functions of the 099 may be controlled by remote. Just point the remote directly at the IR sensor (6) and press the appropriate buttons. POWER button switches the preamplifier on or corresponding input * NUMERICAL buttons... - Page 11 To navigate through the menu and select different options you may use the buttons ► ◄ ▲ ▼ and OK on the remote control of the 099. For details about using the menu please refer to the chapter SETUP MENU.
-
Page 12: Frequently Asked Questions
It can now be switched on by toggling the switch briefly upwards, by remote control, by the Remote In jack or by using the BURLINK interface. The 099 switches to active operating mode and the color of the Power LED (9) changes to red. - Page 13 Why is the output level always so low when I switch the 099 on? The 099 preamplifier has been set up in the factory to always start up in the same lowest volume level. You can change the start-up volume level using the menu. How to do it is described in the chapter SETUP MENU starting page 16.
-
Page 14: Troubleshooting
The power supply is unable to provide voltage to the main transformer. Using the AC Mains switch (11) turn the 099 off and wait for app. 30 seconds before turning it back on. If nothing happens try it again. If the error persists it is most likely that one of the fuses is defective. -
Page 15: Getting Started
GETTING STARTED The 099 preamplifier sports the BURMESTER GREEN power supply. This power supply automatically adjusts to the available AC voltage. Therefore, it is possible to operate this equipment in any country that supplies electricity within the voltage limits printed on the rear panel of the unit. -
Page 16: Connections
However, the manifold possibilities to adjust and customize your 099 are easy to access and execute via a setup menu. If desired, the 099 can be easily reset to the factory settings. Analog inputs Line-level sources such as CD player, FM tuner, tape decks etc. -
Page 17: Usb Port
The 099 only supports the USB 2.0 standard. Please note: You may control the playback volume with the PC as well as with the 099. Hence, if the volume level on the PC has been set to 0 the 099 receives no input signal. Analog output To connect power amps or active speakers the 099 preamplifier offers a balanced preamp output (23), (25) as well as an unbalanced preamp output (24).The signal from a selected... -
Page 18: Headphones Output
REMOTE By connecting the DC OUT (21) socket with a corresponding DC IN socket of another Burmester component you enable the 099 to remotely switch this other component on or off. In this operating mode the 099 functions as master. -
Page 19: Operation And Control Features
OPERATING AND CONTROL FEATURES The operating controls of the 099 preamplifier are located on the front panel. The AC mains switch is located on the rear panel of the preamp. AC mains switch The AC mains switch (11), which completely separates the preamp from AC power, is located on the rear panel above the AC mains input. -
Page 20: Setup Menu
SETUP MENU The 099 preamplifier offers a whole range of special settings and functionalities that enable you to customize the unit according to your individual requirements. Use the SETUP MENU to navigate and choose special settings. Activate the menu by pressing the MENU button on the remote. When the menu function has been chosen the Phase LED (2) and the Audio LED (3) start blinking to indicate that the preamp is in menu mode. -
Page 21: Input Level
A perfect adjustment may not be possible in all cases but the 099 lets you lower or boost the gain by up to 14dB. This should be sufficient to adjust the inputs for most source components to an identical level. -
Page 22: Disabling The Control Knobs
Disabling the control knobs To prevent unwanted use of the 099 preamplifier the control knobs on the front panel may be disabled. The unit will then only respond to the POWER switch. The 099 can now be controlled by remote only. This serves as child safety for example. -
Page 23: Fixed Output Level
Fixed output level The output volume of the 099 preamplifier may be set at a fixed level. In this operating mode it can function as a busbar for different source components by passing their differing signals on at a uniform output level. If a fixed output level has been set the top LED of the Volume level LEDs (4) will illuminate. -
Page 24: Burlink
Before using the USB port the appropriate drivers must be installed. The software for the USB port is compatible with the operating systems WINDOWS 2000 and WINDOWS XP. COMMANDS All necessary commands to control the 099 preamplifier are listed below. The commands must be sent in capital letters and each command must end with a „carriage return“ \r. POWON\r... - Page 25 AUDIO\r switches the D/A converter between 96kHz and 192kHz sampling rate AUDIO96\r changes the sampling rate of the D/A converter module to 96kHz AUDIO192\r changes the sampling rate of the D/A converter module to 192kHz USB\r switches between USB Class 1 and USB Class 2 USB1\r changes the USB input to Class 1 Audio USB2\r...
-
Page 26: Technical Specifications
TECHICAL SPECIFICATIONS Dimensions (W x H x D) 482 x 95 x 345 mm (19 x 3.7 x 13.6 inch) Weight app. 8,5 kg (approx. 18.7 lbs( Voltage requirement 100 V - 120 V 50Hz/60Hz 200 V - 240 V 50Hz/60Hz Fuses F1, F2 slow 500mA E... - Page 27 REMARKS...
- Page 28 HIGH END MADE IN GERMANY BURMESTER HOME AUDIO GMBH • WILHELM-KABUS-STR. 47 • 10829 BERLIN • GERMANY TEL +49/(0)30/78 79 68 – 0 • FAX +49/(0)30/78 79 68 – 68 • E-MAIL: mail@burmester.de • www.burmester.de...
Need help?
Do you have a question about the 099 and is the answer not in the manual?
Questions and answers