
Related Manuals for Burmester 088


Summary of Contents for Burmester 088
-
Page 1: Table Of Contents
O P E R A T I O N M A N U A L Table of contents LIST OF FUNCTION S UNPACKING AND S ETTING UP FUNCTIONAL OVERVIEW OF THE PRE AMP Front panel Rear panel FIRST STARTUP CONNECTION S OPER ATING CONTROLS AC mains switch Switching ON and OFF... - Page 2 P R E A M P Dear Audiophile, Thank you for choosing this Burmester audio component. THE MC S ETUP We sincerely appreciate your trust in our products. You have purchased a unit, which excels in musical fidelity and combines...
-
Page 3: List Of Functions
Through factory settings a lot of functions are disabled to operate the • X-AMP MK modules 088 as a simple preamp. With the menus you are comfortably able to activate the numerous options the 088 offers. In daily use these functions • balanced TAPE output, XLR pins, with fixed volume for analogue tape are hidden. -
Page 4: Unpacking And Setting Up
O P E R A T I O N M A N U A L 0 8 8 P R E A M P Unpacking and setting up Setting up PLEASE NOTE: The preamp is shipped inside a plastic protective cover. -
Page 5: Functional Overview Of The Preamp
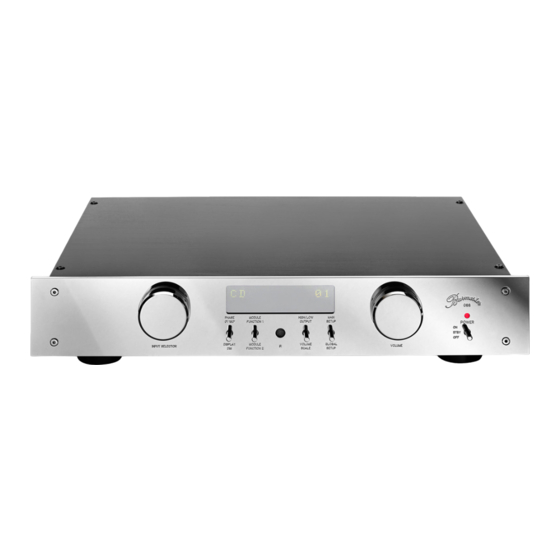
O P E R A T I O N M A N U A L 0 8 8 P R E A M P Functional overview of the preamp FRONT PANEL REAR PANEL POWER LED lights up red when the unit SURROUND input, balanced Input selector AC Mains Terminal... -
Page 6: First Startup
O P E R A T I O N M A N U A L 0 8 8 P R E A M P First Startup Connections All connection terminals are located on the rear panel. While connecting the preamp, PLEASE NOTE: Before connecting the unit, please check if the input all components of the music system must be turned off. - Page 7 USB input, which supports USB class audio and USB class audio, your authorized dealer or by Burmester Audiosysteme GmbH. depending on the operating system of your computer. Since the USB input is LINE module a so-called slave connection, no USB sticks or USB hard disks may be connected.
- Page 8 The headphone jack PHONES (18) requires headphones with a mm ( ") from the 088. So if the PC volume level is set to zero, the 088 will receive Ω or more. For security measures the volume stereo plug and an impedance of no signal.
-
Page 9: Operating Controls
When the POWER switch is in “STBY” position the unit can be switched on and off by pulling up the POWER switch, pushing the POWER button on the BURMESTER remote control, the Burlink interface or by the DC IN jack. -
Page 10: Input Selection
O P E R A T I O N M A N U A L 0 8 8 P R E A M P INPUT SELECTION MODULE FUNCTION SWITCH KEY With the input selector (1) you select the input you want to listen to. The selected input will be shown in the alphanumeric display ( SUBSONIC FILTER The input selector also controls functions in the SETUP menus. -
Page 11: Special Functions
0 8 8 P R E A M P Special Functions The preamp 088 offers a variety of special functions in order to allow a personalized INPUT NAMES configuration of the device. Most functions are adjustable in the SETUP MENUS. -
Page 12: Serial Number
Changes in some of the settings have an In order to view the serial number of your preamp 088 after switching on the device, impact on the reproduction of the signal. We recommend, selecting a moderate the function needs to be activated. -
Page 13: The Global Setup
O P E R A T I O N M A N U A L 0 8 8 P R E A M P The Global Setup Select menu item The GLOBAL SETUP offers the adjustment of global functions like INPUT LEVEL, The different items of the SETUP menus are selected by turning the input INPUT NAMES, displaying the SERIAL NUMBER, SWITCHING OFF CONTROL selector (1) on the front panel or pressing the navigation buttons ►... - Page 14 O P E R A T I O N M A N U A L 0 8 8 P R E A M P Input level In order to return to the menu item level, you have to select the item BACK with the navigation buttons ►...
-
Page 15: The Main Setup
O P E R A T I O N M A N U A L 0 8 8 P R E A M P The Main Setup Input selection with the remote control The MAIN SETUP offers the adjustment of functions like BALANCE and INITIAL VOLUME. -
Page 16: The Mc Setup
O P E R A T I O N M A N U A L 0 8 8 P R E A M P The MC Setup Balance The MC SETUP offers the adjustment of functions like AMPLIFICATION and INPUT RESISTANCE. Some spatial arrangements require a shift of the volume ratio between the two reproducing channels. -
Page 17: The Mm S Etup 3
O P E R A T I O N M A N U A L 0 8 8 P R E A M P The MM Setup Amplification The MM SETUP offers the adjustment of functions like AMPLIFICATION and INPUT CAPACITANCE. With this option you are able to adjust the playback volume of the PHONO MC module to your record player. -
Page 18: Remote Control
O P E R A T I O N M A N U A L 0 8 8 P R E A M P Remote Control Amplification SWITCHING ON/OFF With this option you are able to adjust the playback volume of the PHONO MM The POWER button switches the preamp on or off, provided the Mains switch on module to your record player. - Page 19 By holding down the MODE key (for approx. two seconds), you can switch the ascending order (INPUT INPUT etc…), with the STATION - button in volume increments and display between the dB scale and the Burmester scale. descending order (INPUT INPUT etc…).
-
Page 20: Burlink
WINDOWS XP operating system. scale SCALE_BUR\r sets the volume level to the Burmester curve COMMANDS SCALE_DB\r sets the volume level to the dB curve Listed below are the possible commands to control the preamp . -
Page 21: General Instructions
O P E R A T I O N M A N U A L 0 8 8 P R E A M P General Instructions Please read the owner’s manual carefully and keep it safely. If you have any DIM2\r switches the display brightness to low questions, we ask you to contact your local authorized dealer. - Page 22 Warranty Terminals We provide a three-year warranty on your Burmester device. In order for the warranty to be valid, the device must have been connected and operated properly without The pins of the connecting terminals on the back panel must not be touched under overloading, the mechanical integrity of the device must not have been compromised, any circumstances.
-
Page 23: Technical Specifications
Weight approx. 9.5 kg (approx. 21 lbs) This symbol on or inside the equipment warns of dangerously high Mains voltage Model 088-100 100 V~, 50/60 Hz voltage. and fuses F4, F5, F7 slow 1A, slow 50mA,... - Page 24 VERSION: BA_088_EN_2-2_2308 BURMESTER HOME AUDIO GMBH Wilhelm–Kabus Straße 47 10829 Berlin, Germany www.burmester.de...
Need help?
Do you have a question about the 088 and is the answer not in the manual?
Questions and answers