
Subscribe to Our Youtube Channel
Related Manuals for Ariston NIMBUS HYBRID MODULE UNIVERSAL NET


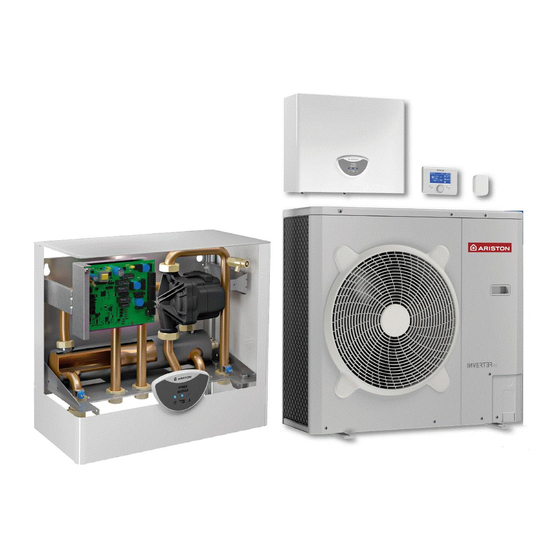
Summary of Contents for Ariston NIMBUS HYBRID MODULE UNIVERSAL NET
- Page 1 NIMBUS HYBRID MODULE UNIVERSAL NET ISTRUZIONI TECNICHE PER L’INSTALLAZIONE E LA MANUTENZIONE TECHNICAL INSTRUCTIONS FOR INSTALLATION AND MAINTENANCE 3301137 420000449700...
-
Page 2: Table Of Contents
INDICE MESSA IN FUNZIONE GENERALITÀ Installazione dell’interfaccia di sistema ........... 22 Norme di sicurezza ...................3 Interfaccia di sistema simboli display: ..........23 Condizioni di garanzia ................6 Indicazione LED ..................23 Descrizione del sistema ................7 Menù tecnico ................... 24 Principio di funzionamento ..............7 Regolazione dei parametri .............. -
Page 3: Norme Di Sicurezza
NORME DI SICUREZZA Rumorosità durante il funzionamento. Non danneggiare, nel forare la parete, ATTENZIONE cavi elettrici o tubazioni preesistenti. seguente manuale costituisce parte Folgorazione per contatto con conduttori integrante ed essenziale del prodotto. Deve sotto tensione. essere conservato con cura e deve sempre essere allegato al prodotto, anche in caso Danneggiamento impianti preesistenti. - Page 4 utilizzarle correttamente, non intralciare Danneggiamento dell’apparecchio o di i passaggi con il cavo di alimentazione, oggetti circostanti per urti, colpi, incisioni, assicurarle da eventuale caduta dall’alto, schiacciamento. scollegare e riporle dopo l’uso. Indossare, durante le lavorazioni, gli indu- Lesioni personali per proiezione di scheg- menti e gli equipaggiamenti protettivi indi- ge o frammenti, inalazione polveri, urti, tagli, viduali.
- Page 5 Nel caso si avverta odore di bruciato o si ATTENZIONE! veda del fumo fuoriuscire dall’ apparec- L’apparecchio può essere utilizzato da bambinni chio, togliere l’alimentazione elettrica, di età non inferiore a 8 anni e da persone con aprire le fi nestre ed avvisare il tecnico. ridotte capacità...
- Page 6 GARANZIA La garanzia non si applica nei casi di manutenzione in- suffi ciente: • Incrostazioni anormali dei corpi riscaldanti e degli orga- La garanzia è valida esclusivamente se l’installazione del ni di sicurezza sistema viene eff ettuata da un tecnico autorizzato. •...
-
Page 7: Descrizione Del Sistema
Il sistema ibrido è in grado di provvedere anche al raff res- - Un generatore di calore ausiliario che può essere gene- camento estivo degli ambienti, in quanto dotato di pompa rico o una caldaia a condensazione ARISTON dotata di di calore reversibile. connessione BUS. -
Page 8: Schemi
SCHEMI SCHEMA CON UNICO IMPIANTO PER RISCALDAMENTO Legenda: Modulo Ibrido 2. Unità esterna 3. Sonda esterna 4. By-pass 5. Zona riscaldamento alta temperatura 6. Controllo Remoto Sensys e Sensys Net Filtro 8. Cartuccia antigelo 9. Caldaia mista 10. Filtro defangatore NOTA: Installazioni con Impianto a Pavimento Nelle installazioni con impianto a pavimento, prevedere l’impiego di un dispositivo di sicurezza sul circuito di mandata riscaldamento secondo le indicazioni del DTU 65.11. - Page 9 SCHEMA CON IMPIANTI SEPARATI RISCALDAMENTO E RAFFRESCAMENTO CON IMPIANTI SEPARATI (FUNZIONAMENTO IN RISCALDAMENTO) Legenda: Modulo Ibrido 2. Unità esterna 3. Sonda esterna 4. Valvola deviatrice 5. Zona riscaldamento alta temperatura 6. Controllo Remoto Sensys e Sensys Net Filtro 8. Cartuccia antigelo 9.
- Page 10 SCHEMA CON UNICO IMPIANTO PER RISCALDAMENTO E RAFFRESCAMENTO (FUNZIONAMENTO IN RISCALDAMENTO) Legenda: Modulo Ibrido 2. Unità esterna 3. Sonda esterna 4. Valvola deviatrice 5. Zona riscaldamento bassa temperatura 6. Controllo Remoto Sensys e Sensys Net Filtro 8. Cartuccia antigelo 9. Caldaia mista 10.
-
Page 11: Dimensioni E Pesi
UNITÀ ESTERNA L’unità esterna fornita è uno dei modelli seguenti: • NIMBUS 40 M EXT • NIMBUS 50 M EXT • NIMBUS 70 M EXT • NIMBUS 70 M-T EXT • NIMBUS 90 M-T EXT • NIMBUS 110 M-T EXT 40-50 M EXT 1016 Dimensioni e Pesi... - Page 12 90 - 110 M-T EXT 1016 ø 10 12 /...
- Page 13 HYBRID MODULE Dimensioni e Pesi Vista dal basso Vista frontale A. Ingresso acqua calda dall’unità esterna G 1” m B. Ritorno al generatore ausiliario C. Mandata dal generatore ausiliario D. Mandata riscaldamento G 1” m E. Rubinetto di scarico F. Pressacavo cavo di alimentazione G.
-
Page 14: Vista Globale
Vista globale 1. Tubo mandata generatore di calore 2. Tubo ritorno generatore di calore 3. Rubinetto ingresso acqua calda dall’uni- tà esterna G 1” M 4. Rubinetto mandata impianto di riscaldamento G 1” M 5. Rubinetto rete idrica 6. Sonda temperatura di mandata impianto riscaldamento 7. -
Page 15: Prestazioni Termodinamiche Dell'unità Esterna
TAGLIA MODELLI Soglia di OFF fl ussimetro [l/h] Soglia di ON fl ussimetro [l/h] Flusso nominale [l/h] 40 M 50 M 70 M 1120 70 M-T 1120 90 M-T 1440 110 M-T 1755 TABELLA FREQUENZA COMPRESSORE POMPA DI CALORE Frequenza min [Hz] Frequaneza max Frequenza max (riscaldamento) [Hz]... -
Page 16: Dispositivi Di Controllo Remoto
NTC 5 k 1% Riposizionare il coperchio della sonda. Grado di risoluzione 0,1°C SCHEDA PRODOTTO Nome del fornitore ARISTON Modello identifi cativo del fornitore Sensys Sonda esterna Classe del controllo di temperatura Contributo all'effi cienza energetica % per il riscaldamento degli ambienti... -
Page 17: Guida All'installazione
Scelta del posizionamento GUIDA ALL’INSTALLAZIONE • Evitare il posizionamento dell’unità esterna in luoghi di diffi cile accesso per le successive operazioni di installazione e manu- Attenzione tenzione. • Evitare il posizionamento in prossimità di fonti di calore. L’installazione delle unità esterne ed interna deve •... -
Page 18: Rimozione Del Pannello Frontale
2. Rimozione pannello frontale Attenzione Rimuovere le viti che bloccano il pannello frontale, tirarlo Prima dell’installazione verifi care la resistenza e l’orizzontalità in avanti e verso il basso. della base di appoggio. Basandosi sulle immagini sotto ripor- tate, fi ssare solidamente la base dell’unità esterna al suolo, servendosi di opportuni bulloni d’ancoraggio (M10 X 2 paia). -
Page 19: Distanze Minime Per L'installazione
Esempio collegamento generatore esterno HYBRID UNIVERSAL MODULE Collegare i tubi di mandata e ritorno del generatore ausialiario alle connessioni dedicate sul modulo universal come indicato Installazione preliminare in fi gura L’HYBRID UNIVERSAL MODULE deve essere posizionata presso un vano con funzione abitativa al fi ne di garantire le migliori pres- tazioni. -
Page 20: Verifiche
VERIFICHE Prima di eff ettuare i collegamenti idraulici veirifcare che: • la pulizia dell’impianto sia stata eff ettuata • non siano presenti impurità nell’acqua di impianto • vengano utilizzati componenti compatibili tra loro (evitare connesioni in ferro e rame insieme) •... -
Page 21: Collegamenti Elettrici
COLLEGAMENTI ELETTRICI Attenzione I collegamenti elettrici vanno eff ettuati dopo aver completato tutti i collegamenti idraulici. ATTENZIONE In caso di utilizzo di caldaie della serie Talia Green System Ultra, Urbia Green Ultra, Mira C Green Ultra, Niagara C Green Ultra o Serelia Green Ultra è... -
Page 22: Connessioni Elettriche Dell'unità Esterna
ATTENZIONE: Eseguire il collegamento a terra prima di tutti gli altri collegamenti elettrici. Le unità interne ed esterne devono essere alimentate separatamente. Per evitare qualsiasi rischio, il cavo di alimentazione dell’unità esterna ed interna deve essere sostituito solo da tec- nici specializzati . - Page 23 Attenzione Le scariche elettriche possono provocare lesioni gravi fi nanche la morte. I collegamenti elettrici devono essere eff ettuati esclusi- vamente da personale tecnico qualifi cato. Eff ettuare la messa a terra prima di procedere con gli altri collegamenti elettrici. Connessioni elettriche dell’unità...
-
Page 24: Connessioni Elettriche Dell'hybrid Module
Connessioni elettriche dell’HYBRID MODULE Prima di ogni intervento sul sistema, interrompere l’alimenta- Fig. A zione dall’interruttore generale. Rispettare le connessioni di neutro e fase. Per accedere al quadro elettrico dell’HYBRID MO- DULE, rimuovere le quattro viti indicate in fi gura (A) ed estrarre il coperchio del quadro elettrico (B). -
Page 25: Schema Elettrico
SCHEMA ELETTRICO BK = Nero YE = Giallo BN = Marrone GN = Verde BU = Blu GY = Grigio RD = Rosso WH = Bianco OR = Arancio PI = Rosa ENERGY MANAGER CN14 YE/GN CN13 PM AUX ST 1 IN 3 IN 1 IN 2... -
Page 26: Installazione Dell'interfaccia Di Sistema
INSTALLAZIONE DELL’INTERFACCIA DI SISTEMA Posizionamento L’interfaccia di sistema riconosce la temperatura ambiente, per cui si deve tener conto di questo fattore nello scegliere il posi- zionamento della stessa. Si consiglia un posizionamento lontano da fonti di calore (radia- tori, esposizione diretta alla luce solare, camini etc.) cosi come si consiglia di evitare un posizionamento in prossimità... -
Page 27: Interfaccia Di Sistema Simboli Display
Oppure ci chiami al’800 300 633. Il nostro Servizio Clienti è a sua disposizione 7 giorni su 7 (dalle 8 alle 20) * Verifi care la disponibilità del servizio Ariston NET nel vostro paese con il vostro rivenditore di fi ducia. -
Page 28: Termoregolazione
12.0.2 ECO / COMFORT ATTENZIONE Premere il tasto OK. Per garantire la sicurezza e il corretto funzionamento dell’in- Defi nisce il tempo di intervento della caldaia partendo dal massimo ri- terfaccia di sistema, la messa in funzione deve essere eseguita sparmio energetico (ECO PLUS) al più... - Page 29 Premere il tasto ok. Girare la manopola e selezionare: 12.3.1 Tempo attesa tentativi precircolazione 12.1.3 Ingresso AUX 1 Defi nisce il tempo di attesa del circolatore tra un tentativo di pre-circo- - Nessuna funzione lazione e il successivo. - Ingresso umidostato: quando il contatto è chiuso la pompa di calore 12.3.2 Post Circolazione Riscaldameto è...
- Page 30 Premere il tasto OK. Ruotare la manopola e selezionare: 12.6 MODO MANUALE - 1 Permette l’attivazione manuale dei componenti del modulo idraulico. Ruotare la manopola e selezionare: 12.7 MODO MANUALE - 2 Permette l’attivazione manuale della pompa di calore. Ruotare la manopola e selezionare: 12.7.0 Attivazione modo manuale Ruotare la manopola e selezionare:...
- Page 31 Ruotare la manopola e selezionare: Ruotare la manopola e selezionare: 12.9 IMPOSTAZIONE TARIFFE ENERGETICHE 12.10 STATISTICHE ENERGY MANAGER Visulaizza le informazioni relative alle ore di funzionamento del sistema. Premere il tasto OK. Ruotare la manopola e selezionare: 12.9.0 Min Rapporto Costo Elettricità/Gas Defi...
- Page 32 - impianto a bassa temperatura (pannelli a pavimento) Termoregolazione curva da 0,2 a 0,8 Per impostare i parametri di termoregolazione premere contem- - impianto ad alta temperatura (radiatori) poraneamente i tasti indietro “ “ e “OK” fi no alla visualizzazio- curva da 1,0 a 3,5 ne sul display “Inserimento codice “.
- Page 33 Termoregolazione raff rescamento La verifi ca dell’idoneità della curva scelta richiede un tempo lun- Per impostare i parametri di raff rescamento premere contempo- go nel quale potrebbero essere necessari alcuni aggiustamenti. All’aumentare della temperatura esterna (estate) si possono ve- raneamente i tasti indietro “ “...
- Page 34 RETE Rete BUS Interfaccia di sistema Energy Manager Rete BUS attuale Pompa di calore Sensore ambiente Controllo multi zona Interfaccia di sistema Nessuna zona selezionata Numero zona Zona selezionata Correzione temperatura ambiente Versione SW interfaccia PARAMETRI CALDAIA Impostaz Generali Indicazione dispositivi Impostazione temperatura sanitario connessi via BUS Parametri generici...
- Page 35 IMPOSTAZIONE DESCRIZIONE RANGE DI FABBRICA Press Riempimento Post vent Risc ON -OFF Tempo Incremento Temp Risc Max PWM pompa Min PWM pompa Solo Sonde T Dispositivo Rilevaz Pressione Risc Pressostato di Minima Sensore Pressione Abilitaz Riempim Semiautomatico Correzione T esterna Sanitario Disabilitata Funzione Comfort...
- Page 36 IMPOSTAZIONE DESCRIZIONE RANGE DI FABBRICA Attivazione estate/inverno auto OFF - ON Limite temp. estate/inverno auto 10 - 30 °C 20°C Ritardo commut. estate/inverno [0-600] 300 min Impostaz Zona1 Bassa Temperatura (LT) Range Temperatura Alta Temperatura (HT) Alta Temperatura (HT) Temperatura Fissa di Mandata Dispositivi ON/OFF Selezione Tipologia Termoregolazione Solo Sonda Ambiente...
- Page 37 IMPOSTAZIONE DESCRIZIONE RANGE DI FABBRICA Temperatura Notte 10 - 30 °C 13°C Temperatura Zona 2 par. 5.2.5 - 5.2.6 20 (LT) - 40 (HT) Temperatura Antigelo zona 2 - 15 °C 5°C Funzione estate/inverno automatico Attivazione estate/inverno auto OFF - ON Limite temp.
- Page 38 IMPOSTAZIONE DESCRIZIONE RANGE DI FABBRICA 7°C [FC]; Min T 7°C-MaxT [FC]; 18-MaxT [UFH] 18°C [Pavimento] DeltaT obbiettivo x modulaz [-5; -20°C] -5°C PARAMETRI IBRIDO EVO2 Parametri utente Auto Modalità ibrido Solo Caldaia Auto Solo PdC Massimo Risparmio Logica Energy Manager Massima Ecologia Massima Ecologia ECO PLUS...
- Page 39 IMPOSTAZIONE DESCRIZIONE RANGE DI FABBRICA Temp Est. x Disabilitazione Caldaia Temp Est. x Disabilitazione PdC - 40°C 35°C Temp Est. x Disabilitazione PdC -2O°C - Temp Est. x Disabilitazione Caldaia -20°C Correzione T esterna -3°C - +3°C 0°C Presenza anodo Pro-Tech OFF - ON Abilitazione antibloccaggio circ.
- Page 40 IMPOSTAZIONE DESCRIZIONE RANGE DI FABBRICA Attivazione funzione spazzacamino caldaia OFF - ON Anodo Pro-Tech OFF - ON Manual Mode - 2 Attivazione modo manuale OFF - ON Modalità rating riscaldamento OFF - ON Modalità rating raff rescamento OFF - ON Impostazione freq.
- Page 41 IMPOSTAZIONE DESCRIZIONE RANGE DI FABBRICA Costo stimato kWh da PdC solo lettura (Euro, cent.) Costo stimato kWh da Caldaia solo lettura (Euro, cent.) Diagnostica Pompa Calore - 1 Temperatura esterna solo lettura (°C) Temp mandata acqua pompa calore solo lettura (°C) Temp ritorno acqua pompa calore solo lettura (°C) Temp evaporatore...
- Page 42 IMPOSTAZIONE DESCRIZIONE RANGE DI FABBRICA Diagnostica scheda -1 Ingressi stand-by antigelo riscaldamento sanitario funzione sanifi cazione termica funzione disareazione funzione chimney Ciclo asciugatura del massetto no generazione calore modo manuale errore Stato sistema Sola lettura Inizializzazione raff rescamento Antigelo Sanitario Integrazione fotovoltaico Deumidifi...
- Page 43 IMPOSTAZIONE DESCRIZIONE RANGE DI FABBRICA Inizializzazione Idle Inizializzazione Acess Point Modalità Acess Point Stato connettività Connessione WiFI in corso WiFi connessa Connessione cloud in corso Cloud connesso Errore WiFi Livello del segnale Non collegato Stato dell'attivazione Non attivo Attivo Numero seriale Inizializzazione Attesa di aggiornamento Stato aggiornamento sw...
-
Page 44: Manutenzione
MANUTENZIONE Funzione antigelo dell’unità esterna Il circolatore primario dell’unità esterna parte alla minima velocità quando la temperatura di ritorno dell’acqua (EWT) ATTENZIONE misurata dal sensore è inferiore ai 7° in riscaldamento. Per garantire la sicurezza e il corretto funzionamento la ma- Oppure il sensore che misura la temperatura di mandata nutenzione deve essere eseguita da un tecnico qualifi... -
Page 45: Tabella Codici Errori
TABELLA CODICI ERRORI IBRIDO In caso di blocco sul display dell’interfaccia di sistema viene visualizzato un codice errore che si riferisce al tipo di arresto ed alla causa che lo ha generato. Per ripristinare il normale funzionamento seguire le istruzioni riportate sul display o se l’errore persiste si consiglia l’inter- vento del Centro di Assistenza Tecnico autorizzato. - Page 46 LISTA ERRORI UNITÀ ESTERNA LISTA ERRORI INVERTER RESET ERRORE DESCRIZIONE 1ph 3ph INVERTER Sovratemperatura Dissipatore Sovracorrente IPM Compressore Start-up Compressore Fallito Sovracorrente Compressore Mancanza di fase AC Ingresso DESCRIZIONE Errore Misura Corrente IPM Compressore Errore pilotaggio compressore Tensione DC bus troppo bassa Errore pilotaggio ventilatore all’avviamento Errore pilotaggio valvola 4 vie...
-
Page 47: Targa Dati
L’unità esterna facente parte del prodotto acquistato è fornita con l’etichetta energetica relativa ad una specifi ca confi gurazione, in ot- temperanza a quanto previsto dal Regolamento 811/2013; qualora la confi gurazione da voi scelta non corrisponda a quella in etichetta, è possibile recuperare l’etichetta corretta sul sito www.ariston.com o telefonando al numero clienti +39 0732 633528. / 47... - Page 48 CONTENTS PREPARING THE BOILER FOR OPERATION OVERVIEW Installing the system interface fi rmware ......... 58 Safety regulations .................. 39 System interface display symbols: ........... 59 Terms of guarantee ................42 LED signal ....................59 System description ................43 Technician menu ..................60 Operating principle ................
-
Page 49: Safety Regulations
SAFETY REGULATIONS Perform all electrical connections using wires which have a suitable section.he elec- CAUTION trical connection of the product must be This manual constitutes an integral and done following the instruction manual in the essential part of the product. It must be kept relative paragraph. - Page 50 incisions. Personal injury caused by electrocution, fall- Make sure any portable ladders are posi- ing splinters or fragments, inhalation of dust, tioned securely, that they are suitably strong shocks, cuts, puncture wounds, abrasions, and that the steps are intact and not slippery noise and vibration.
- Page 51 Don’t step upon the external and internal WARNING! This appliance can be used by children aged from 8 years unit. and above and person with reduced physical, sensory or Personal injury or damages to the appli- mental capabilities or lack of experience and knowledge if ance.
- Page 52 GUARANTEE The guarantee does not apply in cases of insuffi cient maintenance: The warranty is only valid if the appliance is installed by a • Abnormal build-up on the heating elements and the qualifi ed technician. safety devices Damage as a result of the following causes void the •...
-
Page 53: System Description
SYSTEM DESCRIPTION From these values it deduces the boiler effi ciency and the heat pump COP. In relation to the parameters initially set, the ENERGY System composition MANAGER decides which generator is the most suitable THE hybrid system is made up of: to heat the room. -
Page 54: Diagrams
DIAGRAMS SCHEME WITH A SINGLE SYSTEM FOR HEATING Legend: Hybrid module 2. External unit 3. Outdoor sensor 4. By-pass 5. High temperature heating zone 6. Sensys and Sensys Net remote control Filter 8. Anti-freeze cartridge 9. Combination boiler 10. Dirt separator fi lter NOTE: Installation with under-fl... - Page 55 SCHEME WITH SEPARATE HEATING AND COOLING SYSTEMS (HEATING-MODE OPERATION) Legend: Hybrid module 2. External unit 3. Outdoor sensor 4. Diverter valve 5. High temperature heating zone 6. Sensys and Sensys Net remote control Filter 8. Anti-freeze cartridge 9. Heat generator 10.
- Page 56 SCHEME WITH A SINGLE SYSTEM FOR HEATING AND COOLING (HEATING-MODE OPERATION) Legend: Hybrid module 2. External unit 3. Outdoor sensor 4. Diverter valve 5. Low temperature heating zone 6. Sensys and Sensys Net remote control Filter 8. Anti-freeze cartridge 9. Combination boiler 10.
-
Page 57: Dimensions And Weight
EXTERNAL UNIT The external unit supplied is one of the following models: • NIMBUS 40 M EXT • NIMBUS 50 M EXT • NIMBUS 70 M EXT • NIMBUS 70 M-T EXT • NIMBUS 90 M-T EXT • NIMBUS 110 M-T EXT 40-50 M EXT 1016 Dimensions and Weights... - Page 58 90 - 110 M-T EXT 1016 ø 10 58 /...
- Page 59 HYBRID MODULE Dimensions and Weights Vista dal basso Front view A. Inlet for hot water from external unit G 1" M B. Return to the auxiliary generator C. Delivery from the auxiliary generator D. Heating delivery G 1” M E. Discharge valve F.
- Page 60 Overall view 1. Heat generator delivery pipe 2. Heat generator return pipe 3. Inlet valve for hot water from external unit G 1" M 4. Heating system delivery valve G 1" M 5. Water mains tap 6. Heating system delivery temperature sensor 7.
- Page 61 Flowmeter OFF Flowmeter ON System Size Nominal fl ow rate [l/h] Threshold [l/h] Threshold [l/h] 40 M 50 M 70 M 1120 70 M-T 1120 90 M-T 1440 110 M-T 1755 COMPRESSOR FREQUENCY TABLE Heat Pump Frequency min [Hz] Frequency max (heat) [Hz] Frequency max (cool) [Hz] 4 kW 5 kW...
-
Page 62: Remote Control Devices
Resolution degree 0.1°C Place the sensor cover back in the correct position. PRODUCT FICHE SUPPLIER’S NAME ARISTON SUPPLIER’S MODEL IDENTIFIER Sensys Outdoor Sensor Class of the temperature control Contribution to seasonal space heating energy effi ciency in %... -
Page 63: Installation Guide
Choice of placement INSTALLATION GUIDE • Avoid a mounting where the ODU is surrounded by walls • Avoid a mounting in sinks. Cold air sinks down and by that Warning air short circuit could occur. The appliance must be installed by a qualifi ed technician in •... - Page 64 2. Removal of frontal panel Attention Remove the screws that block the frontal panel and pull it Before installation, check strength and horizontality of forward and down. the base. Based on the pictures, connect the base of the external unit fi rmly to the ground, using suitable anchor bolts (M10 x 2 pairs).
-
Page 65: Minimum Installation Distances
Example of connection to an external heat generator HYBRID MODULE Connect the external generator fl ow and return pipes to the related universal hybrid module connection as shown in the Preliminary installation fi gure. The HYBRID MODULE UNIVERSAL must be positioned close to a residential space to ensure best performance. -
Page 66: Checks
CHECKS Before making the water circuit connections, check that: • the system has been cleaned. • there are no impurities in the circuit water. • compatible components are used (do not connect copper and steel to each other). • the system has been hooked up via the water circuit. •... -
Page 67: Electrical Connections
ELECTRICAL CONNECTIONS Warning Carry out the electrical connections after having completed all the hydraulic connections. Warning If series Talia Green System Ultra, Urbia Green Ultra, Mira C Green Ultra, Niagara C Green Ultra or Serelia Green Ultra boilers are used, it is necessary to install the BUS decoupling board supplied with the product, by strictly observing the instructions con- tained in the kit. - Page 68 WARNING: Make ground connection prior to any other electrical connections. The internal and external units must be powered separately. To prevent any risk, the power supply cable of the outdoor and indoor unit must only be replaced by the technicians of the after-sales service.
-
Page 69: External Unit Electrical Connections
Warning Electric shocks can cause serious injuries and even death. The electrical connections must be made by qualifi ed technical personnel. Carry out grounding before proceeding with other electrical connections. External unit electrical connections The electrical panel of the outdoor unit is located at the front of the form, after removing the front panel. The power cable can be connected to the terminal block shown in the fi... - Page 70 Electrical connections HYBRID MODULE Before carrying out any work on the system, shut off the power Fig. A supply at the main switch. Comply with the neutral and phase connections. To access the HYBRID MODULE electrical panel, remove the four screws shown in fi gure (A) and remove the elec- trical panel cover (B).
-
Page 71: Wiring Diagram
WIRING DIAGRAM BK = Black YE = Yellow BN = Brown GN = Green BU = Blue GY = Grey RD = Red WH = White OR - Orange PI = Pink ENERGY MANAGER CN14 YE/GN CN13 PM AUX ST 1 IN 3 IN 1 IN 2... -
Page 72: Installing The System Interface Firmware
INSTALLING THE SYSTEM INTERFACE FIRMWARE Positioning The system interface recognises the ambient temperature. This factor must be taken into account when choosing its position. We recommend positioning away from heat sources (radiators, direct exposure to sunlight, fi replaces, etc.). You are also recom- mended to avoid positioning near draughts or external openings that could aff ect the operation of the system interface. - Page 73 Heat pump tic heating or cooling and water system. Silent operation mode Ariston Net allows you to start, stop and check the tem- Special functions perature of domestic heating or cooling and water any- Dehumidifi cation time, anywhere from a smartphone or PC.
- Page 74 12.0.3 AUTO function WARNING Press the OK button. To guarantee safety and correct operation of the system in- Activate/deactivate the thermoregulation function. terface, it must be commissioned by a qualifi ed technician in 12.0 4 Silent operation mode activation possession of the skills as required by law. Press the OK button.
- Page 75 - None 12.3.4 Delta T Pump Setpoint - Fault alarm: the contact is closed in case of a system error Adjust the circulator’s modulation to between 5°C and 20°C. - Humidistat alarm: the contact is closed when the AUX1 input is set as 12.3.7 Max PWM Pump a humidistat and the contact is closed...
- Page 76 Activate the heat pump in heating mode at fi xed frequency set by the parameter 12.7.3 12.7.2 Rating Cooling Mode Activate the heat pump in cooling mode at fi xed frequency set by the parameter 12.7.3. 12.7.3 Compressor frequency setting Defi...
- Page 77 Defi nes the kWh cost of the electricity consumed 12.9.5 Electricity kWh cost (low tariff ) Defi nes the kWh cost of the electricity consumed during the low-rate period. Press the OK button. Turn the knob and select: 12.9.6 External Boiler Effi ciency CH Defi...
- Page 78 THERMOREGULATION The checking process for the suitability of the curve requires a To set the temperature adjustment parameters, simultaneously long period of time during which several adjustments may be press and hold the back “ “ and “OK” buttons until “Enter necessary.
-
Page 79: Temperature Adjustment
To set the temperature adjustment parameters, simultane- When the outdoor temperature rises (summer), three con- ously press and hold back “ “ and “OK” buttons until ditions may arise: “Enter code” appears on the display. Turn the knob to en- 1. - Page 80 DESCRIPTION RANGE FACTORY SETTINGS NETWORK BUS network System interface Energy Manager Current BUS network Heat pump Room sensor Multizone control System interface No zone selected Zone number Zone selected Room temperature correction Interface SW version BOILER PARAMETERS General indication devices DHW Setpoint Temperature BUS connected Free parameters...
- Page 81 DESCRIPTION RANGE FACTORY SETTINGS Delta T Pump Set Central Heating-2 Min Pressure Warning Pressure Filling Pressure Post Ventilation CH ON -OFF Boost Time Max PWM Pump Min PWM Pump T Probes Only CH Press Detection Device Pressure Switch Pressure Sensor Semi-auto Filling External temperature correction Domestic Hot Water...
- Page 82 DESCRIPTION RANGE FACTORY SETTINGS T set Z1 par. 4.2.5 - 4.2.6 20°C (LT) - 40°C (HT) Zone frost temperature 2°C -15°C 5°C Summer/Winter Changeover S/W function activation Z1 OFF - ON S/W temperature threshold 10 - 30 °C 20°C S/W delay time [0-600] 300 min Z1 Settings...
- Page 83 DESCRIPTION RANGE FACTORY SETTINGS ZONE2 PARAMETERS Setpoint T Day 10 - 30 °C 19°C Heat - 24°C Cool T Night 10 - 30 °C 13°C T set Z2 par. 5.2.5 - 5.2.6 20 (LT) - 40 (HT) Zone frost temperature 2 - 15 °C 5°C Summer/Winter Changeover...
- Page 84 DESCRIPTION RANGE FACTORY SETTINGS 7°C [FC]; Min T 7°C-MaxT [FC]; 18-MaxT [UFH] 18°C [ Target deltaT for pump modulation cooling [-5; -20°C] -5°C HYBRID EVO 2 Param User Parameters Auto Hybrid Mode Only Boiler Auto Only HP Max Saving Energy Manager Logic Max Ecology Max Ecology ECO PLUS...
- Page 85 DESCRIPTION RANGE FACTORY SETTINGS Text for HP disabling - 20°C - Text for Boiler disabling -20°C External temperature correction -3°C - +3°C 0°C Pro-Tech anode active OFF - ON EM Antiblocking Function Enable OFF - ON Central Heating CH pump prerun time 30 - 255 sec.
- Page 86 DESCRIPTION RANGE FACTORY SETTINGS Force Hp Cool OFF - ON Force WHB OFF - ON Anode output OFF - ON Manual Mode - 2 Manual mode activation OFF - ON Rating Heating Mode OFF - ON Rating Cooling Mode OFF - ON Compressor frequency setting 18 ÷...
- Page 87 DESCRIPTION RANGE FACTORY SETTINGS HP water fl ow temp only reading (°C) HP water return temp only reading (°C) HP Evaporator temp only reading (°C) HP Suction temp only reading (°C) HP Discharge temp only reading (°C) HP condenser outlet temp only reading (°C) Flow Switch only reading (°C)
- Page 88 DESCRIPTION RANGE FACTORY SETTINGS Stand-by Antifreeze Cycle Heating Cycle Heating Temp. Reached DHW Cycle Thermal Cleanse Function Air Purge Function Chimney Function Floor drying cycle No Heat Generation Manual Mode Energy Manager Status only reading Error Initialization Cool Mode DHW Antifreeze Photovoltaic Integration Dehumidifi...
- Page 89 DESCRIPTION RANGE FACTORY SETTINGS Initialization Idle Acess Point initializing Acess Point mode on Connectivity Status Station Mode - Connecting Station Mode - Connected Station Mode - Provisioning Station Mode - Server Connected Wifi error Signal Level Not provisioned Active Status Provisioned - Not active Active Serial Number...
-
Page 90: Maintenance
INSTALLATION WITHOUT BOILER. Anti-freeze function of the external unit In case of installation without auxilary heat generator, connect The primary circulator of the external unit starts at the hydraulically the module to the outdoor unit and to the heating minimum speed when the water return temperature (EWT) system and plug the connections not used. - Page 91 TABLE HYBRID ERROR CODES If the system shuts down, a code will appear on the system interface display signalling the type of shutdown and the reason behind it. To restore normal operation, follow the instructions provided on the display or, if the error persists, contact an authorised Technical Service Centre for assistance.
- Page 92 EXTERNAL UNIT ERROR LIST INVERTER ERROR LIST RESET ERROR DESCRIPTION 1ph 3ph INVERTER Heat Sink-Overheat Compressor Ipm Over-Current Compressor Fail To Drive Compressor Over-Current DESCRIPTION Input Voltage Lack Of Phase Compressor control error Compressor Ipm Current Sampling Failure HP FAN Mismatch Error Compressor Drive Capacitors Precharge Errore pilotaggio valvola 4 vie Failure...
-
Page 93: Data Plate
Regulation (EU) No. 811/2013; if your chosen confi guration does not match the one on the label, you can fi nd the correct label on the website ariston.com or by contacting the customer service at +39 0732 633528. - Page 94 Viale Aristide Merloni, 45 60044 Fabriano (AN) Italy Telefono 0732 6011 Fax 0732 602331 info.it@aristonthermo.com www.aristonthermo.com Ariston Thermo UK Ltd Artisan Building - Hillbottom Road High Wycombe - HP12 4HJ http://www.ariston.co.uk/ info.uk@aristonthermo.com Technical Helpline: 0333 240 7777 Customer Service: 0333 240 8777...
Need help?
Do you have a question about the NIMBUS HYBRID MODULE UNIVERSAL NET and is the answer not in the manual?
Questions and answers