
Related Manuals for Ariston NIMBUS EXTERNAL UNIT 04 kW


Summary of Contents for Ariston NIMBUS EXTERNAL UNIT 04 kW
- Page 1 NIMBUS HYBRID ISTRUZIONI TECNICHE PER L’INSTALLAZIONE E LA MANUTENZIONE TECHNICAL INSTRUCTIONS FOR INSTALLATION AND MAINTENANCE 3318912 420000307701...
-
Page 2: Table Of Contents
INDICE MESSA IN FUNZIONE GENERALITÀ Installazione dell’interfaccia di sistema ............. 22 Norme di sicurezza ....................3 Interfaccia di sistema simboli display: ............23 Condizioni di garanzia ..................6 Indicazione LED ....................23 Descrizione del sistema ..................7 Menù tecnico ..................... 24 Principio di funzionamento ................ -
Page 3: Norme Di Sicurezza
NORME DI SICUREZZA Non danneggiare, nel forare la parete, cavi elettrici o tubazioni preesistenti. ATTENZIONE Folgorazione per contatto con conduttori sotto seguente manuale costituisce parte tensione. integrante ed essenziale del prodotto. Deve essere conservato con cura e deve sempre Danneggiamento impianti preesistenti. essere allegato al prodotto, anche in caso di Allagamenti per perdita acqua dalle tubazioni trasferimento presso altro proprietario o... - Page 4 tuale caduta dall’alto, scollegare e riporle Indossare, durante le lavorazioni, gli indumen- dopo l’uso. ti e gli equipaggiamenti protettivi individuali. Lesioni personali per proiezione di schegge o É vietato toccare il prodotto installato, senza frammenti, inalazione polveri, urti, tagli, puntu- calzature o con parti del corpo bagnate.
- Page 5 Non salire in piedi sull’unità esterna. Possibili infortuni o danneggiamento dell’appa- recchio. Non lasciare mai l’unità esterna aperta, senza mantellatura, oltre il tempo minimo necessa- rio per l’installazione. Possibile danneggiamento dell’apparecchio causato dalle intemperie. ATTENZIONE: In prossimità del sistema, non va posizionato alcun oggetto infi...
-
Page 6: Condizioni Di Garanzia
GARANZIA Marcatura CE Il marchio CE garantisce la rispondenza dell’apparecchio alle La garanzia è valida esclusivamente se l’installazione del sis- seguenti direttive: tema viene effettuata da un tecnico autorizzato. - 2004/108/EC - relativa alla Compatibilità Elettromagnetica I danni dovuti alle seguenti cause fanno decadere la garanzia: - 2006/95/EC - relativa alla sicurezza elettrica (LVD) Condizioni anormali dell’ambiente di installazione: Caratteristiche dell’acqua provvista all’impianto... -
Page 7: Descrizione Del Sistema
DESCRIZIONE DEL SISTEMA In relazione ai parametri impostati inizialmente, l’ENERGY MANAGER decide qual è il generatore più adatto a riscaldare l’ambiente. Composizione del sistema Il sistema ibrido offre la possibilità di defi nire anche i limiti di IL sistema ibrido è composto da: funzionamento della caldaia e della pompa di calore. -
Page 8: Schemi
SCHEMI SCHEMA CON CALDAIA MISTA Legenda: 1. Hybrid module 2. Unità esterna 3. Sonda esterna 4. Zona riscaldamento alta temperatura 5. Zona riscaldamento bassa temperatura 6. Controllo Remoto Sensys 7. Filtro 8. Cartuccia antigelo 9. Caldaia mista 10. By pass SCHEMA CON CALDAIA SYSTEM E BOLLITORE PER LA PRODUZIONE DI ACQUA CALDA SANITARIA Legenda: 1. -
Page 9: Dimensioni E Pesi
UNITÀ ESTERNA HYBRID MODULE L’unità esterna fornita è uno dei modelli seguenti: Dimensioni e Pesi • NIMBUS EXTERNAL UNIT 04 kW • NIMBUS EXTERNAL UNIT 06 kW • NIMBUS EXTERNAL UNIT 08 KW Dimensioni e Pesi 1’M 1’M A. Mandata riscaldamento G ¾” M 1/2’F... -
Page 10: Vista Globale
Vista globale PRESSIONE DISPONIBILE (HP 3 - 4 - 6 - 8 KW) Pressione disponibile da distribuire sull’installazione e sui collegamenti tra unità esterna ed interna La zona di funzionamento consigliata, tra delta T 7K e 5K, è rappresentata in grassetto sulle curve (7 °C - 35 °C). -
Page 11: Dati Tecnici Dell'unità Etserna
Dati tecnici dell’unità esterna UNITÀ ESTERNA 03 kW UNITÀ ESTERNA 04 kW UNITÀ ESTERNA06 kW UNITÀ ESTERNA 08 kW Liquido refrigerante Tipo R410A R410A R410A R410A Carica (1) (kg) 1,195 1,195 1,350 1,810 Compressore Tipo Rotary DC Inverter Technology Numero Tipo di avviamento Progressivo Progressivo... - Page 12 DATI TECNICI (ErP) MODELLO 3-4 kW 6 kW 8 kW Pompa di calore aria/acqua Con apparecchio di riscaldamento supplementare Potenza termica nominale [kW] 3,28 4,24 4,74 Consumo energetico annuo 2025 2687 3444 Effi cienza energetica in riscaldamento d’ambiente Livello potenza sonora, esterno [dB] Livello potenza sonora, interno [dB]...
-
Page 13: Dispositivi Di Controllo Remoto
Aggiungendo una Sonda Esterna Ariston: Classe del controllo di temperatura Contributo all'effi cienza energetica % per il riscaldamento degli ambienti In un sistema a 3 zone con 2 Sensori Ambiente Ariston: Classe del controllo di temperatura VIII Contributo all'effi cienza energetica % per il riscaldamento degli ambienti... -
Page 14: Guida All'installazione
GUIDA ALL’INSTALLAZIONE Scelta del posizionamento • Evitare il posizionamento dell’unità esterna in luoghi di diffi cile ac- cesso per le successive operazioni di installazione e manutenzione. • Evitare il posizionamento in prossimità di fonti di calore. Attenzione • Evitare il posizionamento in luoghi ove si sottopone l’unità esterna L’installazione dell’unità... -
Page 15: Procedimento Di Apertura Passaggi Per Colegamenti
3. Rimozione del pannello frontale Rimuovere le viti dal pannello frontale. Attenzione Tirare il pannello in avanti e verso il basso, afferrandolo per la maniglia. Prima dell’installazione verifi care la resistenza e l’orizzontalità della base di appoggio. Basandosi sulle immagini sotto riportate, fi... -
Page 16: Installazione Preliminare Hybrid Module
HYBRID MODULE Attenzione Al fi ne di evitare contaminazioni tra l’acqua dell’impianto e l’acqua Installazione preliminare sanitaria e al fi ne di evitare un riempimento inopportuno dell’im- L’HYBRID MODULE deve essere posizionata presso un vano con fun- pianto e la conseguente corrosione dei componenti del sistema, si zione abitativa al fi... -
Page 17: Verifiche
VERIFICHE Prima di effettuare i collegamenti idraulici veirifcare che: • la pulizia dell’impianto sia stata effettuata • non siano presenti impurità nell’acqua di impianto • vengano utilizzati componenti compatibili tra loro (evitare connesioni in ferro e rame insieme) • l’allaccio dell’impianto sia stato effettuato tramite la rete idrica •... -
Page 18: Collegamenti Elettrici
COLLEGAMENTI ELETTRICI Attenzione I collegamento elettrici vanno effettuati dopo aver completato tutti i collegamenti idraulici. L’ HYBRID MODULE, la caldaia e l’unità esterna devono essere alimentate separatamente rispettando le normative nazionali e locali vigenti. Tra l’HYBRID MODULE e l’unità esterna dovrà inoltre essere effettuata una connessione di tipo RS485. Questa connessione potrà essere effet- tuata mediante l’utilizzo di un cavo schermato di sezione ridotta (sezione consigliata 0.25 mm ). -
Page 19: Connessioni Elettriche Dell'unità Esterna
Attenzione Le scariche elettriche possono provocare lesioni gravi fi nanche la morte. I collegamenti elettrici devono essere effettuati esclusivamente da personale tecnico qualifi cato. Effettuare la messa a terra prima di procedere con gli altri collegamenti elettrici. Connessioni elettriche dell’unità esterna Il quadro elettrico dell’unità... -
Page 20: Connessioni Elettriche Dell'hybrid Module
Connessioni elettriche dell’HYBRID MODULE Prima di ogni intervento sul sistema, interrompere l’alimentazione Fig. A dall’interruttore generale. Rispettare le connessioni di neutro e fase. Per accedere al quadro elettrico dell’HYBRID MODULE, rimuovere le quattro viti indicate in fi gura (A) ed estrarre il coperchio del quadro elettrico (B). -
Page 21: Schema Elettrico
SCHEMA ELETTRICO BK = Nero YE = Giallo BN = Marrone GN = Verde BU = Blu GY = Grigio RD = Rosso WH = Bianco OR = Arancio PI = Rosa GATEWAY ENERGY MANAGER CN14 PUMP BN BK YE/GN CN13 CN83 PM AUX... -
Page 22: Installazione Dell'interfaccia Di Sistema
INSTALLAZIONE DELL’INTERFACCIA DI SISTEMA Posizionamento L’interfaccia di sistema riconosce la temperatura ambiente, per cui si deve tener conto di questo fattore nello scegliere il posizionamento della stessa. Si consiglia un posizionamento lontano da fonti di calore (radiatori, esposizione diretta alla luce solare, camini etc.) cosi come si consiglia di evitare un posizionamento in prossimità... -
Page 23: Interfaccia Di Sistema Simboli Display
Interfaccia di sistema simboli display: Tasti e display: 1. tasto indietro (visualizzazione precedente) Estate / Impostazioni acqua calda 2. manopola ) Inverno 3. tasto OK (conferma l’operazione o accede al menu principale) Solo riscaldamento / Impostazioni riscaldamento 4. DISPLAY Raffrescamento OFF sistema spento Programmazione oraria Funzionamento manuale... -
Page 24: Menù Tecnico
Ruotare la manopola e selezionare: ATTENZIONE 9.0.1 Logica Energy Manager Per garantire la sicurezza e il corretto funzionamento dell’inter- Premere il tasto OK. Ruotare la manopola e selezionare: faccia di sistema, la messa in funzione deve essere eseguita da - Max economia (il sistema funziona per avere il massimo risparmio) - Max ecologia (il sistema funziona in base al massimo rispetto dell’ambiente) un tecnico qualifi... - Page 25 - 3. Richiesta di calore esterna (non selezionare nel caso di utilizzo di una cal- Ruotare la manopola e selezionare: daia collegata via BUS) 9.5.8. Durata max Sanifi cazione Termica Premere il tasto OK. Ruotare la manopola e selezionare: Defi niscee la durata massima del ciclo di sanifi cazione termica. 9.1.8 Ingresso AUX 1 confi...
- Page 26 - 4. Pronto posa + Funzionale (riscaldamento del massetto a temperatura variabile da 25°C a 55°C secondo il periodo indicato nel grafi co, per un pe- riodo di 18 giorni, riscaldamento a temperatura fi ssa di 55°C nei seguenti 6 giorni) Periodo (giorni) - 5.
-
Page 27: Termoregolazione
Termoregolazione 2. la temperatura ambiente aumenta questo indica che bisogna impo- Per impostare i parametri di termoregolazione premere contempo- stare una curva con minore pendenza 3. la temperatura ambiente rimane costante, questo indica che la cur- Premere contemporaneamente i tasti indietro “ “... - Page 28 Termoregolazione raffrescamento La verifi ca dell’idoneità della curva scelta richiede un tempo lungo nel Per impostare i parametri di raffrescamento premere contemporane- quale potrebbero essere necessari alcuni aggiustamenti. amente i tasti indietro “ “ e “OK” fi no alla visualizzazione sul display All’aumentare della temperatura esterna (estate) si possono verifi...
-
Page 29: Tabella Menu
IMPOSTAZIONE DESCRIZIONE RANGE DI FABBRICA RETE Rete BUS Interfaccia di sistema Energy Manager Rete BUS attuale Pompa di calore Sensore ambiente Controllo multi zona Interfaccia di sistema Nessuna zona selezionata Numero zona Zona selezionata Correzione temperatura ambiente Versione SW interfaccia PARAMETRI CALDAIA Impostaz Generali Indicazione dispositivi... - Page 30 IMPOSTAZIONE DESCRIZIONE RANGE DI FABBRICA Impostaz Ritardo Accensione Risc Funzionamento Circolatore Postcircolazione Riscaldamento Funzionamento Circolatore DeltaT Modulazione Circolatore Riscaldamento-2 Press Minima Press Allerta Press Riempimento Post vent Risc ON -OFF Tempo Incremento Temp Risc Max PWM pompa Min PWM pompa Solo Sonde T Dispositivo Rilevaz Pressione Risc Pressostato di Minima...
- Page 31 IMPOSTAZIONE DESCRIZIONE RANGE DI FABBRICA Temperatura Giorno 10°C - 30°C 19°C Temperatura Notte 10°C - 30°C 16°C Temperatura set Z1 par. 4.2.5 - 4.2.6 20°C (LT) - 40°C (HT) Temperatura antigelo zona 2°C -15°C 5°C Parametri generici Impostaz Zona1 Bassa Temperatura (LT) Range Temperatura Alta Temperatura (HT) Alta Temperatura (HT)
- Page 32 IMPOSTAZIONE DESCRIZIONE RANGE DI FABBRICA Temperatura Notte 10°C - 30°C 16°C Temperatura Zona 2 par. 5.2.5 - 5.2.6 Temperatura Antigelo zona 2°C -15°C 5°C Parametri generici Parametro generico zona Parametro generico zona Parametro generico zona Impostazioni Zona 2 Bassa Temperatura (LT) Range Temperatura Alta Temperatura (HT) Alta Temperatura (HT)
- Page 33 IMPOSTAZIONE DESCRIZIONE RANGE DI FABBRICA PARAMETRI IBRIDO Parametri utente Auto Modalità ibrido Solo Caldaia Auto Solo PdC Massimo Risparmio Logica Energy Manager Massimo Risparmio Massima Ecologia ECO PLUS Modalità riscaldamento MEDIO MEDIO COMFORT COMFORT PLUS Assente Termoregolazione Presente Presente Attivazione modo silenzioso OFF - ON Ora attivazione modo silenzioso 00:00 - 24:00...
- Page 34 IMPOSTAZIONE DESCRIZIONE RANGE DI FABBRICA Riscaldamento - 1 Durata precirc. risc. 30 - 255 sec. 30 sec. Tempo attesa tentativi precirc. 0 - 100 sec. 90 sec. Post Circ Risc 0 - 15 min. ; 16 = sempre attiva 3 min. Velocità...
- Page 35 IMPOSTAZIONE DESCRIZIONE RANGE DI FABBRICA gg restanti asciugatura funzionale solo lettura gg restanti asciugatura pronto posa solo lettura Statistiche Energy Manager solo lettura PdC ore di funz. In risc. (h/10) solo lettura PdC+Caldaia ore di funz. (h/10) solo lettura PdC n. Cicli Accensione (n/10) solo lettura Ore di sbrinamento (h/10) solo lettura...
- Page 36 IMPOSTAZIONE DESCRIZIONE RANGE DI FABBRICA stand-by antigelo riscaldamento sanitario funzione sanifi cazione termica funzione disareazione funzione chimney Ciclo asciugatura del massetto Stato sistema Sola lettura no generazione calore modo manuale errore inizializzazione raffrescamento Antigelo Sanitario Integrazione fotovoltaico Temp Impostata Risc Sola lettura (°C) Temp mandata riscaldamento Sola lettura (°C)
-
Page 37: Manutenzione
Funzione antigelo INSTALLAZIONE SENZA CALDAIA. Protezione antigelo dell’unità esterna. In caso di installazione senza caldaia, collegare idraulicamente il mo- Il circolatore primario dell’HYBRID MODULE viene messo in funzione dulo alla pompa di calore e all’impianto come descritto. Chiudere le se la temperatura di ritorno dell’acqua all’unità esterna è pari o inferio- rimanenti connessioni libere. -
Page 38: Tabella Codici Errori
(*) Sovraccarico alimentazione BUS Tabella codici errori E’ possibile il verifi carsi di un errore di sovraccarico alimentazione BUS, In caso di blocco sul display dell’interfaccia di sistema viene visualizza- dovuta alla connessione di tre o più dispositivi presenti nel sistema to un codice errore che si riferisce al tipo di arresto ed alla causa che installato. -
Page 39: Targa Dati
Targa Dati dell’HYBRID MODULE Targa Dati dell’Unità Esterna Legenda: Omologazione Certifi cazione Modello Nr. di omologa Dati elettrici Legenda: Numero di serie 1. Marchio Potenza elettrica massima 2. Produttore Indice di protezione 3. Modello - Nr. di serie Protezione elettrica 4. - Page 40 CONTENTS PREPARING THE BOILER FOR OPERATION OVERVIEW Installing the system interface fi rmware ..........60 Safety regulations ..................... 41 System interface display symbols: ............. 61 Terms of guarantee ..................44 LED signal ......................61 System description ..................45 Parameter adjustment ..................62 Operating principle ...................
-
Page 41: Overview Safety Regulations
SAFETY RULES instructions given in this manual when hooking the product up electrically. Fire caused by overheating due to electrical WARNING current passing through undersized cables. This manual constitutes an integral and essential part of the product. It must be kept Protect connection piping and cables so as to with care and accompany the product at all prevent damage to them. - Page 42 Personal injury due to falling from a height or to Damage to the appliance or surrounding crushing (stepladders shutting accidentally). objects caused by shocks, knocks, incisions and squashing. Make sure that any rolling ladders are positioned securely, that they are suitably All operations on the inside of the appliance sturdy, that the steps are intact and not must be performed with the necessary...
- Page 43 WARNING: Do not leave fl ammable material in the vicinity of the system. Make sure that all components of the system are positioned as required by regulations. In the presence of noxious vapour or dust in the area of installation, install a separate air handling system for the product.
-
Page 44: Terms Of Guarantee
GUARANTEE CE mark The CE mark guarantees that the device conforms to the The warranty is only valid if the appliance is installed by a qualifi ed following directives: technician. - 2004/108/EC concerning electromagnetic compatibility Damage as a result of the following causes void the guarantee: - 2006/95/EC concerning the safety of electrical equipment (LVD) Abnormal installation environment conditions:... -
Page 45: System Description
SYSTEM DESCRIPTION In relation to the parameters initially set, the ENERGY MANAGER decides which generator is the most suitable to heat the room. The hybrid system also offers the ability to defi ne the limits of System composition operation of the boiler and the heat pump. THE hybrid system is made up of: Heat pump minimum external operating temperature: - condensing boiler... -
Page 46: Diagrams
DIAGRAMS DIAGRAM WITH COMBINATION BOILER Legend: 1. Hybrid module 2. External unit 3. Outdoor sensor 4. High temperature heating zone 5. Low temperature heating zone 6. Sensys remote control 7. Filter 8. Anti-freeze cartridge 9. Combination boiler DIAGRAM WITH BOILER SYSTEM AND STORAGE CYLINDER FOR DOMESTIC HOT WATER PRODUCTION Legend: 1. -
Page 47: Dimensions And Weight
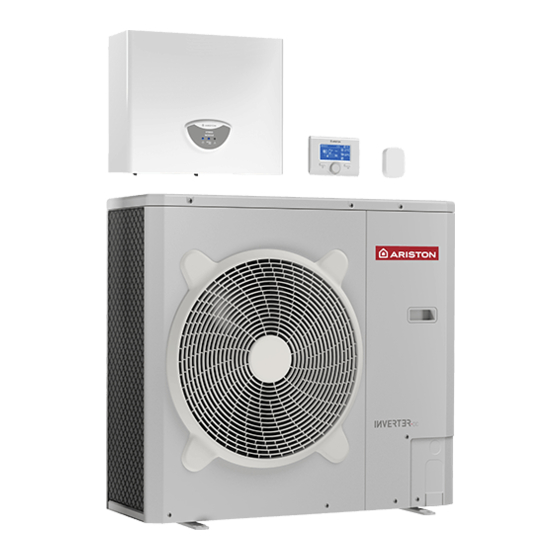
EXTERNAL UNIT HYBRID MODULE The external unit supplied is one of the following models: Dimensions and Weights • NIMBUS EXTERNAL UNIT 04 kW • NIMBUS EXTERNAL UNIT 06 kW • NIMBUS EXTERNAL UNIT 08 KW Dimensions and Weights 1’M 1’M A. -
Page 48: Global View
Global view AVAILABLE PRESSURE (HP 4 - 6 - 8 KW) Pressure available for distribution to installation and external and internal unit connections The recommended operating zone, between delta T 7K and 5K, is shown in bold on the curves (7 °C - 35 °C). 1100 1300 1500... -
Page 49: Thermodynamic Performance Of External Unit
THERMODYNAMIC PERFORMANCE OF EXTERNAL UNIT 30/35 APPLICATION Temperature conditions °C Temperature conditions °C 7/6_30/35°C -7/-8_ */35°C NIMBUS EXTERNAL UNIT Nominal power Power consumption Nominal power Power consumption 03 kW 3.90 0.97 4.02 2.78 1.19 2.34 04 kW 4.08 0.99 4.12 2.78 1.19 2.34... - Page 50 TECHNICAL DATA (ErP) MODEL 4 kW 6 kW 8 kW air to water heat pump with supplementary heater Rated heat output [kW] 3,28 4,24 4,74 Annual energy consumption 2025 2687 3444 Seasonal space heating energy effi ciency Sound power level, outdoor [dB] Sound power level, indoor (1 zona) [dB]...
-
Page 51: Remote Control Devices
Adding an Ariston Outdoor Sensor: Class of the temperature control Contribution to seasonal space heating energy effi ciency in % In a 3-zones system with 2 Ariston Room Sensors Class of the temperature control VIII Contribution to seasonal space heating energy effi ciency in %... -
Page 52: Installation Guide
INSTALLATION GUIDE Choosing the placement • Avoid positioning the external unit in places which are diffi cult to access for subsequent installation and maintenance operations. • Avoid positioning the units close to heat sources. Warning • Avoid positioning in locations where the external unit is subject to External and internal units installation must always be carried out continuous vibrations. -
Page 53: Routing The Cables
3. Removing the front panel Remove the front panel screws. Warning Pull the panel out and down by its handle. Before installing the system, check that its supporting base is suf- fi ciently resistant and level. With reference to the following fi g- ures, anchor the external unit's base to the ground, using anchor bolts (2 pairs of M10 bolts). -
Page 54: Hybrid Module Preliminary Installation
HYBRID MODULE Warning In order to avoid contamination between system water and do- Preliminary installation mestic hot water, and to avoid inadvertent fi lling of the system The HYBRID MODULE HYBRID MODULE must be positioned close to and subsequent corrosion to system components, you are advised a residential space to ensure best performance. -
Page 55: Checks
CHECKS Before making the water circuit connections, check that: • the system has been cleaned • there are no impurities in the circuit water • compatible components are used (do not connect copper and steel to each other) • the system has been hooked up via the water circuit •... -
Page 56: Electrical Connections
ELECTRICAL CONNECTIONS Warning Carry out the electrical connections after having completed all the hydraulic connections. The HYBRID MODULE, the boiler, and the external unit must be supplied separately, accordingly to the national and local normatives in force. You must make a RS485 type connection between the HYBRID MODULE and the external unit. This connection can be made using a shielded cable with a small cross-section (0.25 mm cross-section recommended). -
Page 57: External Unit Electrical Connections
Warning Electric shocks can cause serious injuries and even death. The electrical connections must be made by qualifi ed technical personnel. Carry out grounding before proceeding with other electrical connections. External unit electrical connections The electrical panel of the outdoor unit is located at the front of the form, after removing the front panel. The power cable can be connected to the terminal block shown in the fi... -
Page 58: Hybrid Module Electrical Connections
HYBRID MODULE electrical connections Before carrying out any work on the system, shut off the power supply Fig. A at the main switch. Comply with the neutral and phase connections. To access the HYBRID MODULE electrical panel, remove the four screws shown in fi... -
Page 59: Wiring Diagram
WIRING DIAGRAM BK = Black YE = Yellow BN = Brown GN = Green BU = Blue GY = Grey RD = Red WH = White GATEWAY ENERGY MANAGER CN14 PUMP BN BK YE/GN CN13 CN83 PM AUX RS 485 ANODE AUX 2 ST 1... -
Page 60: Installing The System Interface Firmware
INSTALLING THE SYSTEM INTERFACE FIRMWARE Positioning The system interface recognises the ambient temperature. This factor must be taken into account when choosing its position. We recommend positioning away from heat sources (radiators, direct exposure to sunlight, fi replaces, etc.). You are also recommended to avoid positioning near draughts or external openings that could affect the operation of the system interface. -
Page 61: System Interface Display Symbols
System interface display symbols: Buttons and display: 1. back button (previous display) Summer/Hot water settings 2. knob ) Winter 3. OK button (to confi rm operation or access main menu) Heating only/Heating settings 4. DISPLAY OFF system off Schedule programming Manual operation Desired room temperature Room temperature detected... -
Page 62: Parameter Adjustment
Turn the knob and select: WARNING 9.0.1 Energy Manager logic To guarantee safety and correct operation of the system inter- Press the OK button. Turn the knob and select: face, it must be commissioned by a qualifi ed technician in pos- - Max economy (the system operates for maximum saving) session of the skills as required by law. - Page 63 9.1.8 AUX 1 input confi guration Press the OK button. Turn the knob and select: Confi gures the function of the input with the following values: 9.7.1 Screed drying cycle - 0. None Defi nes the screed drying programme for under-fl oor systems using the fol- - 1.
- Page 64 Period (days) - 5. Manual (screed heating at temperature set in parameter 17.3.9) Turn the knob and select: Energy Manager statistics Displays information relating to system operating hours. Energy Manager info Displays information relating to energy costs consumed by the system. 9.10 Heat pump diagnostics - 1 9.11...
-
Page 65: Temperature Adjustment
Temperature adjustment 2. The temperature of the room may rise, indicating that a gentler To set the temperature adjustment parameters, simultaneously press curve should be set 3. The temperature of the room remains constant, indicating that the and hold the back “ ”... -
Page 66: Regulations Menu Table
DESCRIPTION RANGE FACTORY SETTINGS NETWORK BUS network System interface Energy Manager Current BUS network Heat pump Room sensor Multizone control System interface No zone selected Zone number Zone selected Room temperature correction Interface SW version BOILER PARAMETERS General indication devices DHW Setpoint Temperature BUS connected Free parameters... - Page 67 DESCRIPTION RANGE FACTORY SETTINGS Low speed Pump Speed Control High speed Modulating Delta T Pump Set Central Heating-2 Min Pressure Warning Pressure Filling Pressure Post Ventilation CH ON -OFF Boost Time Max PWM Pump Min PWM Pump T Probes Only CH Press Detection Device Pressure Switch Pressure Sensor...
- Page 68 DESCRIPTION RANGE FACTORY SETTINGS T Day 10°C - 30°C 19°C T Night 10°C - 30°C 16°C T set Z1 par. 4.2.5 - 4.2.6 20°C (LT) - 40°C (HT) Zone frost temperature 2°C -15°C 5°C Free parameters Z1 Settings Low temperature (LT) Zone 1 temperature range High temperature High temperature (HT)
- Page 69 DESCRIPTION RANGE FACTORY SETTINGS Slope 0,2 - 1 (LT); 1 - 3,5 (HT) 0,6 (LT) - 1,5 (HT) Offset -7°C + 7°C (LT); -14°C ; 14°C (HT) Room Infl uence Proportional O°C - 20°C 2°C (LT) - 10°C (HT) Max T 20°C - 45°C (LT);...
- Page 70 DESCRIPTION RANGE FACTORY SETTINGS None Fault alarm AFR contact confi guration (AUX Output 1) None Humidistat alarm External heat request None Fault alarm AUX Output 2 None Humidistat alarm External heat request None AUX input 1 setting None Humidistat sensor Energy Tariff Setting Min Admit Electricity/Gas Cost Ratio 0,5 - 4...
- Page 71 DESCRIPTION RANGE FACTORY SETTINGS Output AUX 1/2 contact OFF - ON Force Hp Heat OFF - ON Force Hp Cool OFF - ON Force WHB MAX CH MAX DHW Anode output OFF - ON Test & Utilities Air-purge function OFF - ON Functional Heating Curing Heating Floor drying cycle...
- Page 72 DESCRIPTION RANGE FACTORY SETTINGS Stand by Cooling Heating Heat Pump Mode Freeze Protection read only Defrost High Temperature Protection Timeguard System Fail HP Error read only Energy Manager Diagnostics -1 Input Stand-by Antifreeze Cycle Heating Cycle DHW Cycle Thermal Cleanse Function Air Purge Function Chimney Function Floor drying cycle...
-
Page 73: Maintenance
Anti-freeze function NSTALLATION WITHOUT BOILER. External unit anti-freeze protection. In case of installation without boiler, make the hydraulic connections The HYBRID MODULE primary circulation pump is activated if the re- to the heat pump and the heating system as described. Seal all the turn water temperature to the external unit is equal to or less than 7 remaning connections. -
Page 74: Table Of Error Codes
Table of error codes (*) BUS power supply overload If the system shuts down, a code will appear on the system interface A BUS power supply overload error may occur due to the connection display signalling the type of shutdown and the reason behind it. of three or more devices within the installed system. -
Page 75: Data Plate
HYBRID MODULE data plate External unit data plate Legend: Type-approval Certifi cation Model Certifi cation no. Electrical data Legend: Serial number 1. Brand Maximum electrical power 2. Manufacturer Protection index 3. Model - Serial no. Grade of protection of the electrical system 4. - Page 76 Ariston Thermo SpA Viale Aristide Merloni, 45 60044 Fabriano (AN) Italy Telefono 0732 6011 Fax 0732 602331 info.it@aristonthermo.com www.aristonthermo.com Ariston Thermo UK Ltd Hughenden Avenue - High Wycombe Bucks, HP13 5FT Telephone: (01494) 755600 Fax: (01494) 459775 www.aristonthermo.co.uk info.uk@aristonthermo.com Technical Advice: 0870 241 8180...
Need help?
Do you have a question about the NIMBUS EXTERNAL UNIT 04 kW and is the answer not in the manual?
Questions and answers