Konica Minolta bizhub PRO C5501 User Manual
Hide thumbs
Also See for bizhub PRO C5501:
- Product manual (68 pages) ,
- Release notes (38 pages) ,
- Security manual (32 pages)
Table of Contents
Advertisement
Advertisement
Table of Contents
Troubleshooting

Related Manuals for Konica Minolta bizhub PRO C5501


Summary of Contents for Konica Minolta bizhub PRO C5501
- Page 1 User’s Guide – Copier...
-
Page 3: Table Of Contents
If "Memory Full" message is displayed: Memory overflow ............5-10 If power off/on screen is displayed ..................... 5-12 Troubleshooting tips ........................5-13 Maintenance Cleaning the machine ........................6-3 Checking copy count ........................6-5 Preventive maintenance ......................... 6-7 bizhub PRO C5501 Contents-1... - Page 4 Color adjustment 10.1 About colors ........................... 10-3 10.2 Color copy quality.......................... 10-5 10.3 Adjusting density level ........................ 10-13 10.4 Changing colors using RGB values.................... 10-19 10.5 Changing colors using HSB values.................... 10-21 10.6 Adjusting sharpness........................10-27 Contents-2 bizhub PRO C5501...
- Page 5 Collate/uncollate output to the secondary (sub) tray ..............12-20 12.4.4 Making folded booklet (Multi half fold/Fold & Staple) ..............12-22 12.4.5 Folding copies in three (Multi tri-fold).................... 12-23 12.4.6 Punching file holes in copies (Punch).................... 12-25 bizhub PRO C5501 Contents-3...
- Page 6 Job operation on job list screen....................14-4 14.2.1 To check/control reserved jobs ....................... 14-4 14.2.2 To display output history ......................... 14-5 14.2.3 To display send history........................14-6 14.2.4 To check incomplete jobs ....................... 14-7 14.2.5 To check/operate suspended jobs ....................14-8 Index Contents-4 bizhub PRO C5501...
-
Page 7: Introduction/Safety Information
Introduction/Safety information... - Page 9 The illustrations used in this guide may appear slightly different from views of the actual equipment. ACKNOWLEDGEMENTS: KONICA MINOLTA, KONICA MINOLTA Logo, and The essentials of imaging are registered trademarks or trademarks of KONICA MINOLTA HOLDINGS, INC. bizhub PRO is registered trademark of KONICA MINOLTA BUSINESS TECHNOLOGIES, Inc.
-
Page 10: Composition Of User's Guide
Please refer to this guide for how to use the Security Strengthen mode, and for detailed machine operation in Security Strengthen mode. To operate safely, be sure to read "1 Introduction/Safety information" in "bizhub PRO C5501 User’s guide - Copier" before using the machine. -
Page 11: Energy Star
Machine Administrator setting. Automatic duplex copying To reduce paper consumption, use this function to make double-sided (duplex) copies, automatically. We recommend that you utilize the Auto Low Power function, the Automatic Shut-Off function, and the Automatic Duplex Copying function. bizhub PRO C5501... -
Page 12: License
And you must show them these terms so they know their rights. We protect your rights with two steps: (1) copyright the software, and (2) offer you this license which gives you legal permission to copy, distribute and/or modify the software. bizhub PRO C5501... - Page 13 In addition, mere aggregation of another work not based on the Program with the Program (or with a work based on the Program) on a volume of a storage or distribution medium does not bring the other work under the scope of this License. bizhub PRO C5501...
- Page 14 This section is intended to make thoroughly clear what is believed to be a consequence of the rest of this License. bizhub PRO C5501...
- Page 15 PRO C5501...
- Page 16 A "work based on the Library" means either the Library or any derivative work under copyright law: that is to say, a work containing the Library or a portion of it, either verbatim or with modifications and/or translated straightforwardly into another language. (Hereinafter, translation is included without limitation in the term "modification".) 1-10 bizhub PRO C5501...
- Page 17 Public License applies to all subsequent copies and derivative works made from that copy. This option is useful when you wish to copy part of the code of the Library into a program that is not a library. bizhub PRO C5501 1-11...
- Page 18 If distribution of the work is made by offering access to copy from a designated place, offer equivalent access to copy the above specified materials from the same place. e) Verify that the user has already received a copy of these materials or that you have already sent this user a copy. 1-12 bizhub PRO C5501...
- Page 19 The Free Software Foundation may publish revised and/or new versions of the Lesser General Public License from time to time. Such new versions will be similar in spirit to the present version, but may differ in detail to address new problems or concerns. bizhub PRO C5501 1-13...
- Page 20 Yoyodyne, Inc., hereby disclaims all copyright interest in the library `Frob' (a library for tweaking knobs) written by James Random Hacker. <signature of Ty Coon>, 1 April 1990 Ty Coon, President of Vice That's all there is to it! 1-14 bizhub PRO C5501...
- Page 21 Redistributions of source code must retain the copyright notice, this list of conditions and the following disclaimer. Redistributions in binary form must reproduce the above copyright notice, this list of conditions and the following disclaimer in the documentation and/or other materials provided with the distribution. bizhub PRO C5501 1-15...
- Page 22 The licence and distribution terms for any publically available version or derivative of this code cannot be changed. i.e. this code cannot simply be copied and put under another distribution licence [including the GNU Public Licence.] 1-16 bizhub PRO C5501...
-
Page 23: Available Features
The original image on the original glass or in the document feeder is copied and centered on a sheet. Image overlay Scans an original image and overlays it on the pages of another document. For example, you may want to incorporate a page heading, graphic design or logo into the pages of your document. bizhub PRO C5501 1-17... - Page 24 Collated and Uncollate modes using the secondary (sub) tray Fold&Staple, Multi Half Fold, and Multi Tri-Fold modes using the folding mode tray Selects an output mode and output tray (for Collate and Uncollate) on the Output Application Screen. 1-18 bizhub PRO C5501...
- Page 25 Off mode. Zoom Selects fixed ratios, four reduction, four enlargement, and three user-set ratios. Zoom ratios can be selected from 25% ~ 400% in 0.1% increments. bizhub PRO C5501 1-19...
-
Page 26: Legal Restrictions On Copying
This machine also provides the forgery prevention function in order to prevent financial instruments from being copied illegally. We appreciate your understanding that the copied image may have some noise due to this forgery prevention function. 1-20 bizhub PRO C5501... -
Page 27: For Eu Member States Only
Recycling of this product will help to conserve natural resources and prevent potential negative consequences for the environment and human health caused by inappropriate waste handling. bizhub PRO C5501 1-21... -
Page 28: Safety Information
A diagonal line indicates a prohibited This symbol warns against dismantling course of action. the device. A solid circle indicates an imperative This symbol indicates you must unplug course of action. the device. 1-22 bizhub PRO C5501... - Page 29 Should any of these conditions be found, immediately turn OFF the power switch, un- plug the power cord from the power outlet, and then call your authorized service rep- resentative. bizhub PRO C5501 1-23...
- Page 30 Ignoring this cautions could cause injury or damage to property. Do not ignore these safety advices. Caution Symbol • The outlet must be near the equipment and easily accessible. Otherwise you can not pull out the power plug when an emergency occurs. 1-24 bizhub PRO C5501...
- Page 31 7 WARNING Ignoring these warnings could cause serious injury or even death. Do not ignore these safety advices. Warning Symbol • Connect the power cord to an electrical outlet that is equipped with a grounding ter- minal. bizhub PRO C5501 1-25...
- Page 32 Caution Symbol • Always use this product in a well ventilated location. Operating the product in a poorly ventilated room for an extended period of time could injure your health. Ventilate the room at regular intervals. 1-26 bizhub PRO C5501...
- Page 33 • Do not store toner units and PC drum units near a floppy disk or watch that are sus- ceptible to magnetism. They could cause these products to malfunction. bizhub PRO C5501 1-27...
- Page 34 7 CAUTION Ignoring this cautions could cause injury or damage to property. Do not ignore these safety advices. Caution Symbol • Unplug the product when you will not use the product for long periods of time. 1-28 bizhub PRO C5501...
-
Page 35: Regulation Notices
This device must be used with a shielded network (10 Base-T/100 Base-TX) cable and a shielded parallel cable. The use of non-shielded cables is likely to result in interference with radio communications and is prohibited under CISPR rules and local rules. bizhub PRO C5501 1-29... - Page 36 Om apparaten används på annat sätt än i denna bruksanvisning specificerats, kan användaren utsättas för osynlig laserstrålning, som överskrider gränsen för laserklass 1. Det här är en halvledarlaser. Den maximala effekten för laserdioden är 15 mW och våglängden är 775-800 nm. 1-30 bizhub PRO C5501...
- Page 37 Introduction/Safety information bizhub PRO C5501 1-31...
- Page 38 Acoustic noise (For European Users Only) Maschinenlärminformations-Verordnung 3. GPSGV: Der höchste Schalldruckpegel beträgt 70 dB(A) oder weniger gemäss EN ISO 7779. 1-32 bizhub PRO C5501...
-
Page 39: Caution Notations And Labels
Introduction/Safety information Caution notations and labels Safety precaution notations and labels appear on this machine at the following positions. Be very careful that an accident does not occur when operations such as removing paper misfeeds are performed. bizhub PRO C5501 1-33... - Page 40 Introduction/Safety information 1-34 bizhub PRO C5501...
- Page 41 Do not remove caution labels or notations. If any caution label or caution notation is soiled, please clean to make legible. If you cannot make them legible, or if the caution label or notation is damaged, please contact your service representative. bizhub PRO C5501 1-35...
-
Page 42: Space Requirements
Combination size the main body and options may be different for the installation environment. Unit: mm 1619 1056 1021 1561 main body + OC-506 + OT-502 Unit: mm 1619 1021 2142 main body + OC-506 + OT-502 (side-view) 1-36 bizhub PRO C5501... - Page 43 Introduction/Safety information Unit: mm main body + DF-609 + LU-202 + FS-607 + PI-502 Unit: mm main body + DF-609 + LU-202 + FS-607 + PI-502 (side-view) bizhub PRO C5501 1-37...
- Page 44 + DF-609 + LU-202 + FS-520 + PI-502 Unit: mm main body + DF-609 + LU-202 + FS-520 + PI-502 (side-view) Reminder Be sure to allow a clearance of 200 mm or more at the back of this machine for the ventilation duct. 1-38 bizhub PRO C5501...
-
Page 45: Operation Precautions
Copies that are to be kept for a long time should be stored where they are not exposed to light or high temperature in order to prevent them from fading or sticking together. Adhesive that contains solvent (e.g., spray glue) may dissolve the toner on copies. bizhub PRO C5501 1-39... - Page 46 Introduction/Safety information 1-40 bizhub PRO C5501...
-
Page 47: Preparation For Use
Preparation for use... -
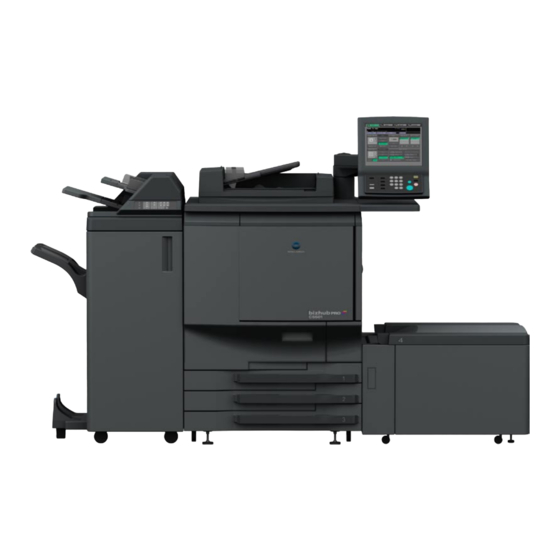
Page 49: Machine Configuration
Opens to allow removal of mishandled paper. Tray 3 Holds 500 sheets of SRA3 w, SRA4 w/v, A3 w, B4 w, A4 w/v, B5 w/v, A5 w, 12" e 18" w, 11" e 17" w, 8.5" e 11" v, plain paper (80 g/m bizhub PRO C5501... - Page 50 Used only by service representative to turn machine power on/off. Total counter Indicates the total number of prints made. Black print counter Indicates the total number of black prints made 7 CAUTION The internal fixing unit is very hot. To avoid getting burned, DO NOT TOUCH. bizhub PRO C5501...
- Page 51 Holds sets output in Multi Half Fold mode, Fold & Staple mode, or Multi Tri-Fold mode. Primary (Main) tray Holds sets output in Non-sort mode, Collate mode (offset), or Staple mode. Secondary (Sub) tray Holds sets output in Non-sort mode. bizhub PRO C5501...
- Page 52 Opens leftward to remove mishandled paper. Stacker conveyance lever Opens lower-leftward to remove mishandled paper. Stacker unit handle Withdraws unit to allow removal of mishandled paper and replacement of staple cartridge. Staple cartridge Holds staple case to be replaced when supplying staples. bizhub PRO C5501...
- Page 53 Hold cover sheets to fix the position. Upper tray Holds cover sheets for use in cover sheet mode. Lower tray Holds cover sheets for use in cover sheet mode. Lower tray guide plates Hold cover sheets to fix the position. bizhub PRO C5501...
- Page 54 Fixes the rear end of copy paper. Rear stopper knobs Can be turned to move or fix the rear stopper. Tray bottom plate Goes up automatically when paper supply becomes low, and goes down when the paper loading button is pressed. bizhub PRO C5501...
- Page 55 Preparation for use Standard/optional equipment PI-502 PK-512 DF-609 OC-506 PK-513 key counter FS-607 PI-502 PK-512 main body LU-202 HT-503 PK-513 HD-506 FS-520 IC-408 OT-502 bizhub PRO C5501...
-
Page 56: Turning On/Off The Power
Do you want to set reserve jobs while the machine is warming up? % Touch [COPY] tab to change the Machine Status Screen to the Copy Screen, then check that the message "Ready to set reserve job" is displayed in the message area. 2-10 bizhub PRO C5501... - Page 57 Open the front door and left side door to reach it. Reminder When turning the main power switch off then on, be sure to wait 10 seconds or longer before turning it on again; otherwise the machine may not operate properly. bizhub PRO C5501 2-11...
-
Page 58: Automatically Returning To The Default Settings: Auto Reset
Application: None Quality Adjustment: Standard Output Application: Selection available in the Utility mode Simplex/Duplex: 1->1 Paper Setting: Auto Detail To change the selection of Output Application for Full-auto, see the User’s guide – POD Administrator’s reference. 2-12 bizhub PRO C5501... -
Page 59: To Use Machine When Power Save Led Lights
Detail The Auto Low Power function can be set to OFF/ 5 minutes/ 10 minutes/ 15 minutes/ 30 minutes/ 60 minutes/ 90 minutes/ 120 minutes/ 240 minutes. See the User’s guide – POD Administrator’s reference. bizhub PRO C5501 2-13... - Page 60 The Auto shut-off can be set for 1 minute/ 30 minutes/ 60 minutes/ 90 minutes/ 120 minutes/ 240 minutes, or can be deactivated. For details, see the User’s guide – POD Administrator’s reference. To exit auto shut-off Press [Power Save]. The copying operation will become available. 2-14 bizhub PRO C5501...
- Page 61 When a machine is in OFF condition under control of Weekly Timer, the Power Save LED is lit and machine operation is unavailable. Detail For details of the Weekly Timer function, see the User’s guide – POD Administrator’s reference. bizhub PRO C5501 2-15...
- Page 62 Copying is available until the set time is up. When the machine operation is finished, press [Power Save] on the control panel for one second or longer, then release it. The machine returns to OFF condition. 2-16 bizhub PRO C5501...
-
Page 63: Making User Authentication
Copy quantity limit for each section can also be set. When the machine is turned on, one of the following User Authentication screen will be displayed according to the authentication setting. Copying will be available by the following procedure. bizhub PRO C5501 2-17... - Page 64 When machine operation is completed, press [Access]. The initial state will be restored, with the User Authentication Screen displayed on the touch panel. Note If the message "Copy limit reached" is displayed and machine operation becomes unavailable, contact your administrator. 2-18 bizhub PRO C5501...
-
Page 65: Paper And Original Information
Paper and original information... -
Page 67: Paper Information
60 to 128g/m (option for Finisher FS-520/FS-607) Output tray OT-502 64 to 300 g/m Reminder Be sure to use paper only of the weight specified for the tray; otherwise copy quality may be deteriorated or machine trouble may occur. bizhub PRO C5501... - Page 68 User’s guide – POD Administrator’s reference. Note Although the Finisher FS-520/FS-607 can actually handle paper of the weight less than 64 g/m described above, the paper fed from trays 1 to 4 and bypass tray will be 64 g/m at minimum. bizhub PRO C5501...
- Page 69 Max. folded sheets in Multi Tri-Fold: 3 sheets (60 to 80 g/m ) / 1 sheet (81 to 105 g/m Multi Tri-Fold: 50 sets for 1-sheet-folded set Punch kit PK-512/PK-513 Unlimited (option for Finisher FS-520/FS-607) Output tray OT-502 150 sheets bizhub PRO C5501...
- Page 70 Max. 216 mm e 297 mm to Min. 182 mm e 148 mm FS-607) Lower Tray Standard Size: SRA4 w, A3 w, B4 w, A4 w/v, B5 w/v, A5 v Custom Size: Max. 314 mm e 458 mm to Min. 182 mm e 148 mm bizhub PRO C5501...
- Page 71 A3 w, B4 w, A4 v, B5 v, 8K w, 16K v, 11" e 17" w, 8.5" e 11" v Swedish 4 holes (PK-513): A3 w, B4 w, A4 v, B5 v Output tray OT-502 Max. 331 mm e 488 mm to Min. 100 mm e 148 mm bizhub PRO C5501...
- Page 72 Store paper in a cool, dry area. Using damp paper may cause a paper misfeed. Keep partially used packages tightly wrapped during storage. Do not place paper packages vertically to store. Paper curl due to the vertical storage may cause a paper misfeed. bizhub PRO C5501...
-
Page 73: Original Information
The original glass is fragile. Do not place too heavy originals, or do not press strongly when thick original is placed and is under pressure of ADF, otherwise the glass may be broken and you may be injured. bizhub PRO C5501... - Page 74 Use the Thin original mode to copy original thinner than 50 g/m Feeder capacity 100 sheets (80 g/m Curling tolerance 10 mm or less Original placement Face up (see page 8-12 for details.) Note See below for the guide width of each combination. 3-10 bizhub PRO C5501...
- Page 75 Use the Thin original mode to copy original thinner than 50 g/m Original size 128 mm e 139.7 mm to 297 mm e 431.8 mm Feeder capacity 100 sheets (80 g/m Curling tolerance 10 mm or less Original placement Face up; orientation same as copy paper bizhub PRO C5501 3-11...
- Page 76 Paper and original information 3-12 bizhub PRO C5501...
-
Page 77: Supplies & Handling
Supplies & handling... -
Page 79: Loading Paper
Reminder Paper setting for each tray can be made from the Machine Status Screen or from the Copy Screen using the [Paper Setting] key. Be sure to load the specified paper; otherwise machine trouble may be caused. bizhub PRO C5501... - Page 80 See the size indication on the bottom plate of the tray to determine the position of the side guide plate. – Push down the lock lever firmly until it clicks in position in order to fix the side guide plate. bizhub PRO C5501...
- Page 81 Do not move the stopper forcibly, otherwise it may be damaged. Be sure that the rear guide plate is securely aligned to the paper; otherwise machine trouble may be caused. bizhub PRO C5501...
- Page 82 ) or above the limit indicated on the paper guides, otherwise paper misfeed may be caused. The indicator on the Machine Status Screen and Copy Screen will change to When copying is completed, close the bypass tray. bizhub PRO C5501...
- Page 83 Turn the four paper guide knobs and two rear stopper knobs counterclockwise to loosen them. – Move the upper part of the two paper guides to the appropriate positions according to the size indication. – Turn the tray paper guide knobs (two for each) clockwise to fix the guides. bizhub PRO C5501...
- Page 84 Turn the two rear stopper knobs clockwise to fix the rear stopper. Load paper into the tray. Press the paper loading button. Repeat the steps 3 and 4 until the bottom plate will not go down any more. Close the tray top door. bizhub PRO C5501...
- Page 85 Do not load above the limit indicated on the tray paper guides. Be sure that the rear stopper is correctly positioned according to the paper size to be loaded; otherwise paper misfeed or machine trouble may occur. bizhub PRO C5501...
-
Page 86: Loading Tabbed Sheets
Do not load above the limit level on the side guide plate. Be sure that the side guide plates and rear edge guide are securely aligned to the paper; otherwise the machine cannot detect the correct paper size, or machine trouble may occur. 4-10 bizhub PRO C5501... - Page 87 Specify the paper type as tabbed sheets for the bypass tray. – See page 9-33 for specifying the paper type of the bypass tray. Place tabbed sheets on the tray. – Place paper referring to the illustration shown above. bizhub PRO C5501 4-11...
- Page 88 Set paper aligning it to the paper feed roller side of the tray. – Move the side guide plates, and also move the rear stopper to the edge of the paper. Refer to page 4-7 for details. Close the tray top door. 4-12 bizhub PRO C5501...
-
Page 89: Adding Toner
Be careful not to spill toner inside the machine or get toner on your clothes or hands. If your hands become soiled with toner, immediately wash them with soap and water. If toner gets in your eyes, immediately flush them with water, and then seek professional medical attention. bizhub PRO C5501 4-13... - Page 90 Fully withdraw the toner bottle straightforward to remove the bottle. Loosen toner in the new toner bottle. – Tap both top and bottom of the new toner bottle on a solid surface five times each, then shake the bottle at least five times. 4-14 bizhub PRO C5501...
- Page 91 Close and lock the toner bottle cover, then close the toner access door. Reminder The toner bottle cover cannot be locked if the toner bottle is not set in place. Be sure to fully insert it. bizhub PRO C5501 4-15...
-
Page 92: Exchanging Toner Recovery Box
If it is thrown into a fire, the toner may ignite and cause a dangerous situation. DO NOT THROW the toner recovery box into a fire! To exchange toner recovery box Open the toner recovery box door on the rear-right side of the machine. Withdraw the toner recovery box. 4-16 bizhub PRO C5501... - Page 93 Set the new toner recovery box, then close the toner recover box door. Reminder Be sure to completely cover the used toner inlet with the sticker, otherwise the used toner may leak out to soil the machine. bizhub PRO C5501 4-17...
-
Page 94: Replenishing Staples
Pull out the stacker unit slowly by holding the stacker unit handle until it stops. Remove the staple cartridge. – Hold the lever on the staple cartridge, and then pull the cartridge down to remove it. 4-18 bizhub PRO C5501... - Page 95 Insert the new staple case into the staple cartridge. – Do not remove the staples remaining inside the cartridge; otherwise, the first sheet output after the replenishment will not be stapled. Return the stacker unit to its original position. Close the Finisher door. bizhub PRO C5501 4-19...
- Page 96 Machine Status Screen. Follow the procedure below to replenish staples. Open the Finisher door. Pull out the stacker unit. – Pull out the stacker unit slowly by holding the stacker unit handle until it stops. 4-20 bizhub PRO C5501...
- Page 97 – Do not remove the staples remaining inside the cartridge; otherwise, the first sheet output after the replenishment will not be stapled. bizhub PRO C5501 4-21...
- Page 98 Set the staple cartridge. – Insert the cartridge while sliding it along the stapler rail, then push down and in to secure it in place. Return the stacker unit to its original position. Close the Finisher door. 4-22 bizhub PRO C5501...
-
Page 99: Disposing Punch Waste
Punch Waste Basket indicator lights in red in the option status area of the Machine Status Screen. Follow the procedure below to empty the waste basket. Open the Finisher door. Withdraw the waste basket. Empty the waste basket. bizhub PRO C5501 4-23... - Page 100 Supplies & handling Return the waste basket to its original position, then close the Finisher door securely. 4-24 bizhub PRO C5501...
-
Page 101: Troubleshooting
Troubleshooting... -
Page 103: If "Please Call Service C-####" Message Is Displayed
In this case, you don’t have to make a call for the report code, because your machine has been monitored automatically by your service representative. After calling for service using the Utility setting, be sure to turn OFF the power immediately, then unplug the machine as described here. bizhub PRO C5501... - Page 104 A copying job can continue without using the troubled portion of the machine (ex. Tray 2). 7 CAUTION Precaution for limited use The machine should not keep operating by limited use for long time. Be sure to contact your service representative immediately when the Call for Service Screen is displayed. bizhub PRO C5501...
-
Page 105: Clearing Mishandled Paper
A jam code can be displayed in the message area of the Jam Position Screen. Contact your service representative, if desired. Before performing the clearing procedure, see page 1-33 for the caution label locations inside the machine. bizhub PRO C5501... - Page 106 Be especially careful not to put your hand into the fixing unit area when withdrawing the fixing conveyance unit to remove mishandled paper. 7 CAUTION Precaution for getting injured Be careful of removing staples stuck inside the machine so as not to get injured. bizhub PRO C5501...
-
Page 107: If [Machine] Tab Blinks In Orange
If the popup screen shown below is displayed after touching [Detail Check], the selected tray has become empty. Follow the procedure below to change the tray selection for the current job, or supply the empty tray with copy paper. bizhub PRO C5501... - Page 108 To supply the empty tray with paper Load paper in the empty tray. Touch [Close] to restore the Machine Status Screen. Press [Start]. Printing operation will resume using the tray supplied with paper. Detail For details of loading paper, see page 4-3. bizhub PRO C5501...
- Page 109 Follow the procedure for each to continue the machine operation. Replace paper in the tray with that specified in the paper setting, then touch [Change]. Press [Start] to start the printing operation. bizhub PRO C5501...
-
Page 110: If "Memory Full" Message Is Displayed: Memory Overflow
If the job settings include Booklet Pagination, the [Stop Scan] key will not appear. Reminder The original to be reloaded should be less in page count than the first loaded in order to prevent another memory overflow. 5-10 bizhub PRO C5501... - Page 111 Press [Start] on the control panel. – The machine starts scanning for the reloaded original to complete the job. Note If the reserve job settings include Booklet Pagination, the [Stop Scan] key will not appear. bizhub PRO C5501 5-11...
-
Page 112: If Power Off/On Screen Is Displayed
Follow the procedure below to turn the machine power off then on. To turn machine power off/on Turn OFF the sub power switch. Turn OFF the main power switch. Wait about 10 seconds. Turn ON the main power switch and sub power switch. 5-12 bizhub PRO C5501... -
Page 113: Troubleshooting Tips
EVEN THOUGH THAT SIZE IS LOADED IN ONE OF THE TRAYS THE COPY SCREEN DOES NOT Check with the machine manager, as Initial Settings may have been changed. DISPLAY SETTINGS AS DE- SCRIBED IN USER’S GUIDE bizhub PRO C5501 5-13... - Page 114 Status Screen. Empty the waste basket. COPIES CANNOT BE STAPLED Check to make sure the side guide plates are securely aligned to the copy paper OR PUNCHED IN POSITION in the paper tray to be used. 5-14 bizhub PRO C5501...
-
Page 115: Maintenance
Maintenance... -
Page 117: Cleaning The Machine
Raise the ADF, then clean the cover with a soft, dry cloth. Cleaning the original cover Keep the original cover clean; otherwise soil marks may be copied, resulting in dark lines on the copies. Raise the original cover, then clean it with a soft, dry cloth. bizhub PRO C5501... - Page 118 Clean the control panel with a soft, dry cloth. Reminder Pressing too hard on the control panel or the touch panel may damage them. Never use a household detergent, glass cleaner, benzine, or thinner to clean the control panel and touch panel. bizhub PRO C5501...
-
Page 119: Checking Copy Count
The Utility Menu Screen will be displayed. Check the counter information. – The counter information is displayed on the left side of the screen. – Touching [Exit] will exit the Utility mode and restore the previous screen. bizhub PRO C5501... - Page 120 After the counter list is printed out, the Utility mode will be released automatically and the previous screen will be restored. Note Touching [Detail] in step 3 will also display the [System Info.] key. Touch this key to display the system information of this machine. bizhub PRO C5501...
-
Page 121: Preventive Maintenance
The machine manager can call for service using the Utility setting. See the User’s guide – POD Administrator’s reference. In this case, you don’t have to make a call for preventive maintenance, because your machine has been monitored automatically by your service representative. bizhub PRO C5501... - Page 122 Maintenance bizhub PRO C5501...
-
Page 123: Specifications
Specifications... -
Page 125: Main Body Specifications
Specifications Specifications Main body specifications Main body Item Description Name bizhub PRO C5501 Type Console type Document holder Stationary Photoconductor Luminous source Xenon lamp Copying system Laser electrostatic transfer method Developing system Dry-type dual-component reverse magnetic brush developing Fusing system... - Page 126 786 (W) e 992 (D) e 1056 (H) mm (main body and original cover without control panel) Space requirements 293 mm or more on the back 100 mm or more on both sides In order to incorporate improvements, these product specifications are subject to change without notice. bizhub PRO C5501...
-
Page 127: Option Specifications
See p. 3-5 for details. Maximum power consumption 80 W or less Dimensions 424 (674.5 when primary (main) tray is attached/ 790.5 when the tray is pulled out) (W) e 656 (D) e 990 (H) mm Weight Approx. 60 kg bizhub PRO C5501... - Page 128 Output tray OT-502 Item Description Name OT-502 Function Paper output tray for main body Output tray capacity 150 sheets Dimensions 342 (470 when tray is pulled out) (W) e 456 (D) e 170 (H) mm Weight Approx. 1.85 kg bizhub PRO C5501...
- Page 129 Specifications Other options Original cover OC-506 Dehumidification fan heater HT-503 Hard disk unit HD-506 Image controller bizhub PRO C5501...
- Page 130 Specifications bizhub PRO C5501...
-
Page 131: Before Making Copies
Before making copies... -
Page 133: Control Panel And Basic Screens
[Mode Check] key Displays the Mode Check Screen to view the copy settings currently made. [Utility/Counter] key Displays the Utility Screen or various counters. bizhub PRO C5501... - Page 134 7 CAUTION The touch panel is covered with glass. Do not drop heavy objects on the glass, or put excess weight or pressure on it; otherwise the glass may break or scratched and you may be injured. bizhub PRO C5501...
-
Page 135: Copy Screen
Used to select the copy mode (1-1, 1-2, 2-1, or 2-2). [Punch] key Touched to use Punch mode. [Staple] key Touched to use Staple mode. Output icon area Displays the icon of the output settings currently specified. [Output Appli.] key Touched to specify the desired output mode. bizhub PRO C5501... - Page 136 Displays the icon of the original settings currently specified. [Original Setting] key Touched to specify the condition of the original to be scanned. Machine status icons Display to indicate various machine status. Message area Displays the machine status and procedure required at that time. bizhub PRO C5501...
-
Page 137: Machine Status Screen
Machine status display Prompts you if any door or cover is open. Scanner message Displays the current status of scanning job. Icon area Displays various machine status icons. Message area Displays messages concerning machine status. bizhub PRO C5501... -
Page 138: General Copy Operation
Color mode: See page 9-18. [Zoom]: See page 9-19. [Application]: See page 11-3. [Quality Adjust.]: See page 10-3. [Output Appli.]: See page 12-3. Simplex/Duplex mode: See page 9-23. [Paper Setting]: See page 9-30. [Rotation Off]: See page 9-32. bizhub PRO C5501... - Page 139 Copy Screen. See page 9-45 for details. – If No is touched, the Machine Status Screen will be restored. The current job will be displayed in the job list, with the count/set quantity indicated at the upper right corner of the screen. bizhub PRO C5501...
- Page 140 The Job List Screen is provided to change the operation order of reserve jobs or cancel the reserve job. See page 14-3 for details. To suspend the job in progress, press [Stop]. For details, see "To stop scanning/printing" on page 8-17. 8-10 bizhub PRO C5501...
-
Page 141: Positioning The Original
Copy Screen. Up to 100 sheets of the original can be set at a time. Adjust paper guides. Reminder Once closed, do not open the document feeder, otherwise the selected copy conditions may be altered automatically. bizhub PRO C5501 8-11... - Page 142 Up to 100 sheets of the original can be set at a time. Adjust paper guides. Reminder Once closed, do not open the document feeder, otherwise the selected copy conditions may be altered automatically. Detail To use the Mixed mode, see procedure on page 9-9. 8-12 bizhub PRO C5501...
-
Page 143: Positioning The Original On Original Glass
– The direction of the original should conform to the Original direction icon displayed on the Copy Screen. Gently close the ADF to prevent the original from shifting on the glass. bizhub PRO C5501 8-13... -
Page 144: Setting Print Quantity
Follow the procedure below to change the print quantity that has been already entered. Press [C] (clear quantity). The quantity displayed on the touch panel will return to 1. Enter the correct quantity from the control panel keypad. Newly entered quantity will be displayed on the touch panel. 8-14 bizhub PRO C5501... -
Page 145: Setting Job During Warmup
Position the original FACE UP in the ADF or FACE DOWN on the original glass. – For details on positioning the original, see page 8-11. Press [Start]. – When scanning the original for the job is started, the popup menu will appear on the Copy Screen. bizhub PRO C5501 8-15... - Page 146 The Job List Screen is provided to change the operation order of reserve jobs or cancel the reserve job. See page 14-3 for details. To suspend the job in progress, press [Stop]. For details, see "To stop scanning/printing" on page 8-17. 8-16 bizhub PRO C5501...
-
Page 147: To Stop Scanning/Printing
The popup menu will vary according to the job in progress. Both scanning and printing are in progress Touch [Stop Job] to cancel the job, or touch [Continue] to complete the job. Reminder Touching [Stop Job] will delete all the scanned data. bizhub PRO C5501 8-17... - Page 148 Touching [Stop Job] will delete all the scanned data. Batch printing is in progress Touch [Stop Job] to cancel the job, or touch [Continue] to complete the job. Reminder Touching [Stop Job] will delete all the scanned data. 8-18 bizhub PRO C5501...
- Page 149 Before making copies Scanning and printing the job using program job Touch [Stop Job] to cancel the job, or touch [Continue] to complete the job. Reminder Touching [Stop Job] will delete all the scanned data. bizhub PRO C5501 8-19...
- Page 150 Touch [Print] to stop printing and continue the scanning job. Touch [Scan/Print] to cancel both scanning and printing jobs. Touch [Continue] to complete both jobs. Reminder All the data scanned for stopped job will be deleted. 8-20 bizhub PRO C5501...
-
Page 151: Basic Job Settings
Basic job settings... -
Page 153: Original Setting
Original direction 2-1copying Duplex originals 2-2copying Detail See "Setting binding direction for duplex copies" on page 12-5 to make double-sided copies upside down on the reverse side, using the originals having the same edge as page top. bizhub PRO C5501... - Page 154 Touch [Top] in the Bind Direction area to highlight it. Touch [OK] to complete the setting and return to the Copy Screen. – Touch [Default Set] to restore the initial setting, or touch [Cancel] to resume the previous setting. bizhub PRO C5501...
-
Page 155: Specifying Orientation Of The Original: Direction
Select for the original positioned in the ADF with the top toward the right side of the machine. Or, select for the original positioned on the origi- nal glass with the top toward the left side of the machine. bizhub PRO C5501... - Page 156 Touch the desired original direction key to highlight it. Touch [OK] to complete the setting and return to the Copy Screen. – Touch [Default Set] to restore the initial setting, or touch [Cancel] to resume the previous setting. bizhub PRO C5501...
-
Page 157: Specifying Original Type: Image/Type
Select for copying the original composed of text only. In this mode, the edges of copied text will be sharpened to provide higher legibility. Text Original Select for copying colored original with small text, such as a map. bizhub PRO C5501... - Page 158 Select the desired mode for each of Image and Type. Touch [OK] to complete the setting and return to the Copy Screen. – Touch [Default Set] to restore the initial setting, or touch [Cancel] to resume the previous setting. bizhub PRO C5501...
-
Page 159: Copying Mixed Size Originals: Mixed
The Original Setting Screen will be displayed. Touch [Mixed] to highlight it. Touch [OK] to complete the setting and return to the Copy Screen. – Touch [Default Set] to restore the initial setting, or touch [Cancel] to resume the previous setting. bizhub PRO C5501... -
Page 160: Copying Z-Folded Original: Z-Folded
The Original Setting Screen will be displayed. Touch [Z-Folded] to highlight it. Touch [OK] to return to the Copy Screen. – Touch [Default Set] to restore the initial setting, or touch [Cancel] to resume the previous setting. 9-10 bizhub PRO C5501... -
Page 161: Specifying Original Thickness: Thickness
For the original of normal thickness (50 g/m to 128 g/m ), select [Normal]. Touch [OK] to return to the Copy Screen. – Touch [Default Set] to restore the initial setting, or touch [Cancel] to resume the previous setting. bizhub PRO C5501 9-11... -
Page 162: Copying Non-Standard Size Original: Custom
The Custom Size Screen will be displayed. Specify the desired scanning size. – Selecting from standard size keys: Touch the desired size key to highlight it. The machine scans the special size original as selected standard size. 9-12 bizhub PRO C5501... - Page 163 (3) Touch [Size Registration] to display the Size Registration Screen. (4) Touch the desired number key to highlight it, using [Next] and [Previous] as needed. Select the key with a name displayed to overwrite the size and name registered for that key. bizhub PRO C5501 9-13...
- Page 164 (4) Touch [OK] to restore the Size Setting Screen with recalled size displayed. (5) Touch [OK] to return to the Custom Size Screen with specified size displayed. Touch [OK]. The Original Setting Screen will be restored. 9-14 bizhub PRO C5501...
-
Page 165: Copying Tabbed Originals: Tab Paper
Touch the desired size key to highlight it, then touch [OK]. The Original Setting Screen will be restored. Touch [OK] to return to the Copy Screen. – Touch [Default Set] to restore the initial setting, or touch [Cancel] to resume the previous setting. bizhub PRO C5501 9-15... -
Page 166: Separate Scan Mode
Make copying selections on the Copy Screen, as desired. Touch [Separate Scan] to highlight it. The Separate Scan mode will be activated. If this key is already highlighted, the Separate Scan mode has been activated automatically due to some copy selection. 9-16 bizhub PRO C5501... - Page 167 Enter the desired print quantity, then press [Start]. All the data in memory will be output. Detail To delete the scanned data without printing or to suspend the printing job, press [Stop]. See "To stop scanning/printing" on page 8-17 for details. bizhub PRO C5501 9-17...
-
Page 168: Selecting Color Mode
– Touching Single Color will display the Single Color Screen. Select the desired color key, then touch [OK]. Select additional copy conditions, as desired. Enter the desired print quantity, then press [Start] on the control panel. 9-18 bizhub PRO C5501... -
Page 169: Zoom
Specifying paper size will release 1.000 magnification and set Auto Zoom automatically. In this case, touch [e1.0] to highlight it again. Detail The initial settings may be altered by the machine manager. Details can be referred in the User’s guide – POD Administrator’s reference. bizhub PRO C5501 9-19... -
Page 170: Changing Magnification Ratio
The entered ratio will be displayed on the screen. If wrong number is entered, continue by entering the correct number. Touching arrow keys [+] and [,] will change the ratio in 0.001 (0.1%) steps 9-20 bizhub PRO C5501... - Page 171 Touch the desired zoom key in the Enlarge/Reduce area. – Preset Zoom: Touch the desired preset zoom key in the Preset Zoom area. Touch [OK] to return to the Copy Screen. – Touch [Cancel] to resume the previous setting. bizhub PRO C5501 9-21...
-
Page 172: Setting Magnification Ratio Automatically: Auto Zoom
The machine detects the original size automatically. Touch a tray key on the Copy Screen to select the desired paper size. – Selected tray key will be highlighted, and the [Auto Zoom] key will also be highlighted. 9-22 bizhub PRO C5501... -
Page 173: Simplex/Duplex Setting
The normal double-sided copies (having the same edge as page top) can be made from double-sided originals printed upside down on the back pages. The machine is set to match the original binding direction and copy binding direction automatically. For details, see the User’s guide – POD Administrator’s reference. bizhub PRO C5501 9-23... - Page 174 [Top] in the Bind Direction area to highlight (4) Touch [OK] to return to the Copy Screen. – For details of original direction setting, see page 9-5. For details of original binding direction, see page 9-3. 9-24 bizhub PRO C5501...
- Page 175 (2) Touch the desired binding direction key to highlight it. To make double-sided copies arranged upside down on the back pages, select [Top]. (3) Touch [OK] to return to the Copy Screen. – For details in specifying binding direction of double-sided copies, see page 12-5. bizhub PRO C5501 9-25...
-
Page 176: Making Double-Sided Copies Using Original Glass
(1) Touch [Original Setting] on the Copy Screen to display the Original Setting Screen. (2) Touch to highlight the original direction key according to the direction of the original placed on the original glass. (3) Touch [OK] to return to the Copy Screen. 9-26 bizhub PRO C5501... - Page 177 When all originals are scanned, touch [Separate Scan] to exit the Separate Scan mode. Press [Start] to print. All the data in memory will be output. Detail To delete the scanned data without printing, or to suspend the printing job, press [Stop]. For details, see page 8-17. bizhub PRO C5501 9-27...
-
Page 178: Making Single-Sided Copies From Double-Sided Originals
The normal single-sided copies (having the same edge as page top) can be made from double-sided originals printed upside down on the back pages. Position the original in the ADF. Touch [2->1] on the Copy Screen to highlight it. 9-28 bizhub PRO C5501... - Page 179 [Top] in the Bind Direction area to highlight (4) Touch [OK] to return to the Copy Screen. – For details of original direction setting, see page 9-5. For details of original binding direction, see page 9-3. bizhub PRO C5501 9-29...
-
Page 180: Paper Setting
The following describes how to use Auto Paper Select, Auto Zoom, and Rotation functions, and how to temporarily change the paper size and other specifications registered for each tray as well as to recall preset specifications. 9-30 bizhub PRO C5501... -
Page 181: Selecting Paper Size Automatically: Auto Paper Select
Or, a message will be prompt you that the appropriate size cannot be found in any tray. In this case, load the paper of the size referred in the message. Reminder Auto Paper Select may not function for the tray of selected size due to the paper specifications registered for that tray. bizhub PRO C5501 9-31... -
Page 182: Turning On/Off The Rotation
Original sizes: A3 w, B4 w, A4 v/w, B5 v/w Touch [Rotation Off] on the Copy Screen to highlight it. When Rotation is released, the Rotation icon on the Copy Screen will disappear to indicate that this function is cancelled. 9-32 bizhub PRO C5501... -
Page 183: Using Paper Not Specified To Any Tray: Paper Setting
Load copy paper into the tray with the setting change made. – The changed setting will not be cleared when copying job is completed using that tray. Touch [Paper Setting]. The Paper Setting Screen will be displayed. bizhub PRO C5501 9-33... - Page 184 (3) Touch [OK] to return to the Paper Setting Screen. (4) Touch [Size Setting] to specify the paper size. For setting procedure, see step 6. (5) Touch [OK] to return to the Paper Setting Screen. 9-34 bizhub PRO C5501...
- Page 185 In this case, the paper name cannot be changed. (2) Touch [Paper Type], then select the desired paper type. Touch [OK] to complete the setting. The tray 4 exclusively allow the selection of four types of coated paper. bizhub PRO C5501 9-35...
- Page 186 Touch [OK] to complete the setting, or touch [Reset] to clear the setting. (5) Touch [Speed Setting]. Select the desired speed key, then touch [OK]. This setting is unavailable if paper weight is specified as 106-135 g/m 9-36 bizhub PRO C5501...
- Page 187 Touch [Non White] when using colored paper, or touch [White] for white paper. (8) Make a selection for Air Assist (only if tray 4 is selected). Touch [Auto] For automatic activation, [On] for compulsory activation, or [Off] for deactivation. bizhub PRO C5501 9-37...
- Page 188 (3) Use [Next] or [Previous] to scroll the list to the key to be registered with a new setting, then touch it to highlight it. Selecting a key having a name already displayed will overwrite and clear the existing data. 9-38 bizhub PRO C5501...
- Page 189 (1) Touch [Size Setting], then touch [Standard] to highlight it. The tray can be set to detect some specific standard sizes, if desired. Touch [Search Size Set], select the desired size to highlight it, then touch [OK]. (2) Touch [OK] to complete the setting. bizhub PRO C5501 9-39...
- Page 190 (6) Touch [Add] to display the Input Custom Size Name Screen. Touching [Delete] will display a popup menu to confirm the data deletion. Touch [Yes] to delete the data registered for that key. 9-40 bizhub PRO C5501...
- Page 191 The smallest size of the custom size can be changed. Contact your service representative for details. Use the [Size] key provided on the Machine Status Screen to display the actual dimensions specified for the tray loaded with custom paper size. bizhub PRO C5501 9-41...
- Page 192 Setting range: 0.0 to 999.9 (5) Touch [Adjustment Start]. (6) Repeat steps (2) to (5) until the desired result is obtained. Touch [Close] to complete the front side setting. (7) Similarly, touch [Back] and repeat the chart adjustment, if desired. 9-42 bizhub PRO C5501...
-
Page 193: Improving Unevenness On Large-Sized Paper Or Feedability Of Small-Sized Thick
Close the left side cover of the fixing unit, return the fixing conveyance unit to its original position, then close the front door of the main body. bizhub PRO C5501 9-43... - Page 194 7 CAUTION The internal fixing unit is very hot. To avoid getting burned, DO NOT TOUCH. 9-44 bizhub PRO C5501...
-
Page 195: Setting Reserve Job
Repeat steps 1 and 2. Up to 100 reserve jobs can be entered. – To check and operate the reserve jobs, touch [JOB LIST] tab to display the Job List Screen. See page 14-3 for details. Detail If any trouble occurs on a reserve job, see page 5-7. bizhub PRO C5501 9-45... -
Page 196: Copy Conditions Incompatible With Basic Job Settings
Basic job settings Copy conditions incompatible with basic job settings 9-46 bizhub PRO C5501... - Page 197 Basic job settings bizhub PRO C5501 9-47...
- Page 198 Basic job settings 9-48 bizhub PRO C5501...
- Page 199 Basic job settings bizhub PRO C5501 9-49...
- Page 200 D: Condition in the far left column does not function (ignored). E: Not grayed out but unavailable *1 Separate Scan mode is selected automatically. *2 1->1 mode is selected automatically. *3 Rotation without Auto Zoom is unavailable in Mixed. 9-50 bizhub PRO C5501...
- Page 201 *14 1->1 or 1->2 mode is selected automatically. *17 Output tray is limited to the secondary (sub) tray. *18 Auto Paper Select is unavailable with the ADF kept open. (The message "Select paper size" will be displayed when [Start] is pressed.) bizhub PRO C5501 9-51...
- Page 202 Basic job settings 9-52 bizhub PRO C5501...
-
Page 203: Color Adjustment
Color adjustment... -
Page 205: About Colors
Various colors can be created by mixing cyan (C), magenta (M), and yellow (Y) pigments (such as ink or toner), however, black (K) is actually used as the fourth color in addition to the three primary pigments. Three primary colors of light Three primary colors of pigment bizhub PRO C5501 10-3... - Page 206 (B). The above three elements are called the three attributes of color. With these three attributes, the Munsell color system has been created to describe colors in a three- dimensional space. Brightness Saturation 10-4 bizhub PRO C5501...
-
Page 207: Color Copy Quality
To enhance the copy quality, this machine allows you to modify colors by means of the three attributes of color based upon the human eye and perception. The following methods are provided: Adjust the density of the whole image. Original Density bizhub PRO C5501 10-5... - Page 208 Color adjustment Adjust the hue, saturation, and brightness. Original Saturation Brightness 10-6 bizhub PRO C5501...
- Page 209 The hue adjustment leads the color of the image to another color adjacent in the color circle of red (R), yellow (Y), green (G), cyan (C), blue (B), and magenta (M). Change the hue by varying the image’s red (R), green (G), and blue (B) individually or mutually. Original Green Blue bizhub PRO C5501 10-7...
- Page 210 Color adjustment Change the hue by varying the image’s cyan (C), magenta (M), yellow (Y), and black (K) individually or mutually. Original Cyan Magenta Yellow Black 10-8 bizhub PRO C5501...
- Page 211 The Screen methods provide fine quality in reproducing the gradation in scanned photographic images, however, text originals may not be reproduced clearly by using the same method as photo originals. Dot screen Black Images Color Images Dots Dots Line screen Color Images Black Images Line Line bizhub PRO C5501 10-9...
- Page 212 This function also allows you to obtain the optimum print results by modifying the standard for image distinction level according to the character size of the text or its proportion in the whole original. Solid Solid Detected as text 10-10 bizhub PRO C5501...
- Page 213 In addition to the color adjustment and image reproduction methods, this machine allows you to apply the following filters to improve the copy image quality. Sharpen the outline of the image. (Sharpness) Original Sharpness Increase the contrast of the image. (Contrast) Original Contrast bizhub PRO C5501 10-11...
- Page 214 Machine administrator can set the machine to display the frequently-used function key in the area under the [Quality Adjust.] key, so that the setting screen of that function can be directly accessed by a single touch from the Copy Screen. See the User’s guide – POD Administrator’s reference, if desired. 10-12 bizhub PRO C5501...
-
Page 215: Adjusting Density Level
Follow the procedure below to select the exposure (density) manually to make darker or lighter copies. Position the original. Touch [Quality Adjust.] on the Copy Screen. The Quality Adjustment Screen will be displayed. Touch [Copy Density] to display the Copy Density Screen. bizhub PRO C5501 10-13... - Page 216 The Copy Screen will be restored with the [Copy Density] key displayed and highlighted under the [Quality Adjust.] key. Use this key to directly jump to the Copy Density Screen, if any setting change is desired. 10-14 bizhub PRO C5501...
- Page 217 Adjust the background whiteness when copying newspaper or recycled paper original. Background Original Position the original. Touch [Quality Adjust.] on the Copy Screen. The Quality Adjustment Screen will be displayed. Touch [Adj. Back.] to display the Adjust Background Screen. bizhub PRO C5501 10-15...
- Page 218 The Copy Screen will be restored with the [Adj. Back.] key displayed and highlighted under the [Quality Adjust.] key. Use this key to directly jump to the Adjust Background Screen, if any setting change is desired. 10-16 bizhub PRO C5501...
- Page 219 Touch [B-Side Prevent] to display the B-Side Prevent Screen. Adjust the density level of the back side. – Touch the desired level key from [–1] to [–4] to make the back side lighter. – Touch [Standard] if adjustment is not needed. bizhub PRO C5501 10-17...
- Page 220 The Copy Screen will be restored with the [B-Side Prevent] key displayed and highlighted under the [Quality Adjust.] key. Use this key to directly jump to the B-Side Prevent Screen, if any setting change is desired. 10-18 bizhub PRO C5501...
-
Page 221: Changing Colors Using Rgb Values
To modify RGB value Position the original. Touch [Quality Adjust.] on the Copy Screen. The Quality Adjustment Screen will be displayed. Touch the desired color key. The Red, Green, or Blue Adjustment Screen will be displayed. bizhub PRO C5501 10-19... - Page 222 The Copy Screen will be restored with the modified color key displayed and highlighted under the [Quality Adjust.] key. Use this key to directly jump to that color adjustment screen, if any setting change is desired. 10-20 bizhub PRO C5501...
-
Page 223: Changing Colors Using Hsb Values
Touch the desired level key from [–1] to [–4] to make yellow closer to red, and red closer to magenta. (Adjustment goes anticlockwise in the color circle.) Or, touch a key from [+1] to [+4] to make yellow closer to green, and green closer to cyan. (Adjustment goes clockwise in the color circle.) bizhub PRO C5501 10-21... - Page 224 Touch [Close] on the Quality Adjustment Screen. The Copy Screen will be restored with the [Hue] key displayed and highlighted under the [Quality Adjust.] key. Use this key to directly jump to the Hue Screen, if any setting change is desired. 10-22 bizhub PRO C5501...
- Page 225 Make the desired adjustment. – Touch the desired level key from [–1] to [–4] to make the colors calm, or from [+1] to [+4] to make them vivid. – Touch [Standard] to select the middle level. bizhub PRO C5501 10-23...
- Page 226 Touch [Close] on the Quality Adjustment Screen. The Copy Screen will be restored with the [Saturation] key displayed and highlighted under the [Quality Adjust.] key. Use this key to jump to the Saturation Screen, if any setting change is desired. 10-24 bizhub PRO C5501...
- Page 227 Select the desired brightness level. – Touch the desired level key from [–1] to [–4] to make the image darker, or from [+1] to [+4] to make it brighter. – Touch [Standard] to select the middle level. bizhub PRO C5501 10-25...
- Page 228 Touch [Close] on the Quality Adjustment Screen. The Copy Screen will be restored with the [Brightness] key displayed and highlighted under the [Quality Adjust.] key. Use this key to jump to the Brightness Screen, if any setting change is desired. 10-26 bizhub PRO C5501...
-
Page 229: Adjusting Sharpness
Select the desired sharpness level. – Touch the desired level key from [–1] to [–4] to make the outline smoother, or from [+1] to [+4] to make it sharper. – Touch [Standard] to select the middle level. bizhub PRO C5501 10-27... - Page 230 Touch [Close] on the Quality Adjustment Screen. The Copy Screen will be restored with the [Sharpness] key displayed and highlighted under the [Quality Adjust.] key. Use this key to jump to the Sharpness Screen, if any setting change is desired. 10-28 bizhub PRO C5501...
-
Page 231: Adjusting Contrast
Select the desired contrast level. – Touch the desired level key from [–1] to [–4] to decrease the contrast, or from [+1] to [+4] to increase the contrast. – Touch [Standard] to select the middle level. bizhub PRO C5501 10-29... - Page 232 Touch [Close] on the Quality Adjustment Screen. The Copy Screen will be restored with the [Contrast] key displayed and highlighted under the [Quality Adjust.] key. Use this key to jump to the Contrast Screen, if any setting change is desired. 10-30 bizhub PRO C5501...
-
Page 233: Setting Image Distinction Level
For details on detecting images, see "What Is image distinction level?" on page 10-10. To set image distinction level Position the original. Touch [Quality Adjust.] on the Copy Screen. The Quality Adjustment Screen will be displayed. Touch [Distinction] to display the Image Distinction Level Screen. bizhub PRO C5501 10-31... - Page 234 Touch [Close] on the Quality Adjustment Screen. The Copy Screen will be restored with the [Distinction] key displayed and highlighted under the [Quality Adjust.] key. Use this key to jump to the Image Distinction Level Screen, if any setting change is desired. 10-32 bizhub PRO C5501...
-
Page 235: Selecting Screen Type Or Compression
Auto selects an appropriate reproducing method automatically according to the selected copy conditions. This mode is initially selected. To select reproducing method Position the original. Touch [Quality Adjust.] on the Copy Screen. The Quality Adjustment Screen will be displayed. bizhub PRO C5501 10-33... - Page 236 Touch [Close] on the Quality Adjustment Screen. The Copy Screen will be restored with the [Screen] key displayed and highlighted under the [Quality Adjust.] key. Use this key to jump to the Screen Setting Screen, if any setting change is desired. 10-34 bizhub PRO C5501...
-
Page 237: Changing Colors Using Cmyk Value
The adjustment value ranges from –10 to +10. To adjust color balance Position the original. Touch [Quality Adjust.] on the Copy Screen. The Quality Adjustment Screen will be displayed. Touch [Color Balance] to display the Color Balance Screen. Select the desired density area. bizhub PRO C5501 10-35... - Page 238 Touch [Close] on the Quality Adjustment Screen. The Copy Screen will be restored with the [Color Balance] key displayed and highlighted under the [Quality Adjust.] key. Use this key to jump to the Color Balance Screen, if any setting change is desired. 10-36 bizhub PRO C5501...
-
Page 239: Selecting Glossy
The Copy Screen will be restored with the [Glossy] key displayed and highlighted under the [Quality Adjust.] key. Do you want to restore the initial setting? % Touch [Default Set]. Detail Setting Glossy will lower the copy speed. For details, see the User’s guide – POD Administrator’s reference. bizhub PRO C5501 10-37... -
Page 240: Copy Conditions Incompatible With Color Adjustment
Color adjustment 10.12 Copy conditions incompatible with color adjustment 10-38 bizhub PRO C5501... - Page 241 B: Condition in the top row is selected automatically. Releasable. C: Not specified D: Condition in the far left column does not function (ignored). E: Not grayed out but unavailable *6 Image Distinction Level: Color Text only is grayed out or released automatically. bizhub PRO C5501 10-39...
- Page 242 Color adjustment 10-40 bizhub PRO C5501...
-
Page 243: Application Functions
Application functions... -
Page 245: To Use Application Function
Do you want to cancel all the selected application functions with the setting made for each remained? % Touch [All Off] on the Application Screen. Do you want to resume the initial setting? % Press [Reset] on the control panel. bizhub PRO C5501 11-3... - Page 246 [Application] key, so that the setting screen of that function can be directly accessed by a single touch from the Copy Screen. See the User’s guide – POD Administrator’s reference, if desired. 11-4 bizhub PRO C5501...
-
Page 247: Inserting Sheets And Covers: Insert Sheet
Back Cover + Blank A blank sheet for back cover will be inserted as the last sheet of copied set. The same result will be obtained when making double-sided copies. bizhub PRO C5501 11-5... - Page 248 With page 6 specified, the 11th and 12th pages of the double-sided original are duplex- copied onto the insertion which will be the 6th sheet of copied set. The 5th page of double-sided original is simplex-copied onto the insertion, which will be the 5th sheet of copied set. 11-6 bizhub PRO C5501...
- Page 249 – To use any other paper type/size than the specified paper, touch [Paper Setting] on the Copy Screen to change the setting temporarily. page 9-30 for details. Touch [Application] on the Copy Screen. bizhub PRO C5501 11-7...
- Page 250 Touch [None] if no cover is desired, [Print] to insert a copied front/back cover, or touch [Blank] to insert a blank front/back cover. – Touch [OK] to complete the setting and return to the Insert Sheet Screen, or touch [Cancel] to restore the previous setting. 11-8 bizhub PRO C5501...
- Page 251 Should the page number be entered from the smaller number? % Not necessary. The page number entered at random will be sorted automatically. What if the same page number is entered twice? % The second entry will be ignored on the screen. bizhub PRO C5501 11-9...
- Page 252 The Copy Screen will be restored, with highlighted [Insert Sheet] key displayed under the [Application] key. Use this key to jump to the subsequent screen to make any setting change. Enter the desired print quantity from the control panel keypad, then press [Start]. 11-10 bizhub PRO C5501...
-
Page 253: Locating Title Pages On The Right Side: Chapters
The chapter page can be copied on the sheet from another tray source. (Print Insertion) Use Stamp together with this function to print chapter number onto chapter page in addition to page number, numbering, or watermark numbering. bizhub PRO C5501 11-11... - Page 254 % The second entry will be ignored on the screen. Touch [OK] to complete the setting. – To restore the previous setting, touch [Cancel]. – To release the Chapters function with the current setting remained, touch [Function Off]. 11-12 bizhub PRO C5501...
- Page 255 Enter the desired print quantity from the control panel keypad, then press [Start]. Note Touch [Booklet Pagination] on the Chapters Screen to use this function. In this case, touching [OK] on the Booklet Pagination Screen will return to the Chapters Screen. bizhub PRO C5501 11-13...
-
Page 256: Lay Out Several Pages Onto One Sheet: Combine Originals
4 in 1 Select this setting to print four original images onto one sheet. The page arrangement (Numbering Direction) can be specified. Horizontal order, left binding Horizontal order, right binding Vertical order, left binding Vertical order, right binding 11-14 bizhub PRO C5501... - Page 257 Auto Zoom is automatically selected. Normally the fixed size of Tray 1 will be selected. (Available to be changed manually.) Position the original. Touch [Application] on the Copy Screen. Touch [Combine Originals] on the Application Screen. bizhub PRO C5501 11-15...
- Page 258 Auto Zoom is automatically selected. When selecting any tray other than the one that is set and displayed on the Copy Screen, touch the desired tray key. Enter the desired print quantity from the control panel keypad, then press [Start]. 11-16 bizhub PRO C5501...
-
Page 259: Making A Multiple Page Signature Booklet: Booklet
When selecting cover sheet mode (Cover With Copy Sheet or Cover With Blank Sheet), load the same size cover in any other tray. Touch [Application] on the Copy Screen. Touch [Booklet Pagination] on the Application Screen. bizhub PRO C5501 11-17... - Page 260 Use this key to jump to the subsequent screen to make any setting change. Auto Zoom is selected automatically. To release Auto Zoom, select the desired magnification, then select paper size. Enter the desired print quantity from the control panel keypad, then press [Start]. 11-18 bizhub PRO C5501...
-
Page 261: Inserting Different Original Images Into Printed Sets: Insert Image
The first scanned image will be inserted after page 2 of the finished set, and the second scanned image will be inserted after page 5. Up to 30 locations can be specified for the original from 1 to 999 pages. Separate Scan mode is automatically selected. bizhub PRO C5501 11-19... - Page 262 If desired, select the Booklet Pagination function as follows. – Touch [Booklet Pagination] on the Insert Image Screen, then select the desired mode. For details, see page 11-17. – Touch [OK] to complete the setting and return to the Insert Image Screen. 11-20 bizhub PRO C5501...
- Page 263 Touch [Separate Scan] to exit the Separate Scan mode. Enter the desired print quantity from the control panel keypad, then press [Start]. The machine will start printing when ready for output. bizhub PRO C5501 11-21...
-
Page 264: Dividing Spread Image Into Right And Left Pages: Book Copy
Printed sets will be output from the front cover page, divided document pages accord- Spread ing to pagination, then the back cover page. The original should be scanned from the front cover, back cover, then page spread orig- inals in page order. 11-22 bizhub PRO C5501... - Page 265 Page spread originals will be scanned from the left page to the right page, and will be output in page order. Right Bind Page spread originals will be scanned from the right page to the left page, and will be output in page order. bizhub PRO C5501 11-23...
- Page 266 Touch [OK] to complete the setting and return to the Book Copy Screen. Touch [OK] to complete the setting. – To restore the previous setting, touch [Cancel]. – To release the Book Copy function with the current setting remained, touch [Function Off]. 11-24 bizhub PRO C5501...
- Page 267 When all originals are scanned, touch [Separate Scan] to exit the Separate Scan mode. Enter the desired print quantity from the control panel keypad, then press [Start]. The machine will start printing when ready for output. bizhub PRO C5501 11-25...
-
Page 268: Programming Different Settings For An Output Job: Program Job
The [Separate Scan] key on the Copy Screen also appears highlighted to show that the Separate Scan mode is automatically selected. Select additional copy conditions, as desired. – The paper size determined at this time will be applied to all subsequent jobs. 11-26 bizhub PRO C5501... - Page 269 Touch [Output Appli.] to display the Output Application Screen, then select the desired output mode. – The setting made at this time will be applied to all subsequent jobs. Enter the desired print quantity from the control panel keypad. – Entered quantity will be the count of complete set. bizhub PRO C5501 11-27...
- Page 270 Application functions Press [Start]. The machine will start printing in conditions specified for each job. 11-28 bizhub PRO C5501...
-
Page 271: Dividing An Image For Enlarged Copy: Multi
Select the desired paper size on the Copy Screen. – Touch the desired tray key to highlight it. If Auto Paper Select is selected (initial setting), the largest paper size loaded in a tray will be selected automatically. Touch [Application] on the Copy Screen. bizhub PRO C5501 11-29... - Page 272 Use this key to jump to the subsequent screen to make any setting change. Enter the desired print quantity from the control panel keypad, then press [Start]. The machine will start printing when ready for output. 11-30 bizhub PRO C5501...
-
Page 273: Erasing Outside Area Of Original: Non-Image Area Erase
Available copy modes are 1->1 and 1->2. Selecting [1->2] will select [Separate Scan] automatically. Enter the desired print quantity from the control panel keypad, then press [Start]. The machine will start printing when ready for output. bizhub PRO C5501 11-31... - Page 274 See the User’s guide – POD Administrator’s reference. Non-Image Area Erase may perform incorrectly if the lighting in the work place is directly over the original glass. In this case, consult your service representative about an appropriate place for installation. 11-32 bizhub PRO C5501...
-
Page 275: Reversing Color In Image: Neg./Positive Reverse
This key can also be used to display the Application Screen for making setting change. Enter the desired print quantity from the control panel keypad, then press [Start]. The machine will start printing when ready for output. bizhub PRO C5501 11-33... -
Page 276: Repeating Original Image On One Sheet: Image Repeat
When selecting Size Auto Detect, open the ADF/original cover, then place the original facedown on the original glass. In this case, Non-Image Area Erase is automatically selected. Be sure to keep the ADF/original cover open. Touch [Application] on the Copy Screen. Touch [Image Repeat] on the Application Screen. 11-34 bizhub PRO C5501... - Page 277 To select Size Auto Detect: Touch [Auto] to highlight it. Touch [OK] to complete the setting. – To restore the previous setting, touch [Cancel]. – To release the Image Repeat function with the current setting remained, touch [Function Off]. bizhub PRO C5501 11-35...
- Page 278 You may find the [Bookmark] key at the lower-left corner of the Image Size Input Screen. Touch this key to highlight it, if desired, so that the screen may be directly accessed from the Copy Screen or Check Screen to change the setting you made. See page 13-3 for details. 11-36 bizhub PRO C5501...
-
Page 279: Specifying Repeat Times: Repeat
Both ADF and original glass are available. The scanning area varies according to the selected paper size, original direction, and selected repeat mode. Touch [Application] on the Copy Screen. Touch [Image Repeat] on the Application Screen. bizhub PRO C5501 11-37... - Page 280 Available copy modes are 1->1 and 1->2. Selecting [1->2] will select [Separate Scan] automatically. Enter the desired print quantity from the control panel keypad, then press [Start]. The machine will start printing when ready for output. 11-38 bizhub PRO C5501...
-
Page 281: Eliminating Copy Marks Along Borders: Frame Center Erase
When lowering the ADF/original cover onto thick original (e.g. open book), do not press it down too hard. Keep the ADF/original cover open, if required. Touch [Application] on the Copy Screen. Touch [Frame Center Erase] on the Application Screen. bizhub PRO C5501 11-39... - Page 282 To specify the erase amount for Erase/Each Side: Touch the desired side key on the right side of the screen to highlight the erase amount in the illustration, then use [,] and [+], or touch panel keypad to enter the desired erase amount. 11-40 bizhub PRO C5501...
- Page 283 Use this key to jump to the subsequent screen to make any setting change. Enter the desired print quantity from the control panel keypad, then press [Start]. The machine will start printing when ready for output. bizhub PRO C5501 11-41...
-
Page 284: Copying Image In The Center Of Copy Paper: Image Centering
The machine will start printing when ready for output. Reminder Image Centering may perform incorrectly if the lighting in the work place is directly over the original glass. In this case, consult your service representative about an appropriate place for installation. 11-42 bizhub PRO C5501... -
Page 285: Adjusting Position Of Copy Image: Page Margin - Shift
Down Left Copies Available shift direction: Top, Bottom, Right, Left Shift amount: 0 to 250 mm in 1 mm increments Position the original. Touch [Application] on the Copy Screen. Touch [Page Margin] on the Application Screen. bizhub PRO C5501 11-43... - Page 286 Setting the shift amount in 0.1 mm increments is also available by User/Administrator setting. For details, see the User’s guide – POD Administrator’s reference. Repeat the steps 5 and 6, if setting the shift amount for front and back sides individually. 11-44 bizhub PRO C5501...
- Page 287 Page Space function is available only when Booklet Pagination or 2 Repeat mode of Image Repeat has been already selected. Use this function to make the desired amount of blank space between the two images on a page. Page space Booklet Original Page space 2 Repeat In Repeat Page space Original bizhub PRO C5501 11-45...
-
Page 288: Reducing Images To Create Binding Margin: Page Margin - Reduce & Shift
Top binding margin Left Right Right Left Down Back Front Auto Zoom is automatically selected and cannot released. Reduction ratio will depend on the specified shift amount. Shift amount: 0 to 250 mm in 1 mm increments 11-46 bizhub PRO C5501... - Page 289 Use this key to jump to the subsequent screen to make any setting change. Enter the desired print quantity from the control panel keypad, then press [Start]. The machine will start printing when ready for output. bizhub PRO C5501 11-47...
-
Page 290: Printing Additional Information: Stamp/Image Overlay
The following seven modes are provided for the Stamp function. See page 11-73 for details on using these modes in combination. Mode Description Built-in Stamp URGENT CONFIDENTIAL IMPORTANT Set Numbering Page No. Date/Time Watermark 11-48 bizhub PRO C5501... - Page 291 Start number setting for Set Numbering mode Start number setting for Page No. mode Character size/type setting for Page No. and Date/Time modes Cover/Insert print setting for Page No. Color setting Mode Description Copy Protect Cherry Arabesque Lattice blossoms bizhub PRO C5501 11-49...
-
Page 292: Printing Stamp Onto Copies: Built-In Stamp
Touch one of the nine printing position keys to highlight it. If fine adjustment is desired, touch [Fine Adjustment]. See page 11-64 for details. – Touch [Character Size] to select Larger or Smaller. – Touch [Print Page] to select Cover Only or All Pages. – For selecting the stamp color, see page 11-66. 11-50 bizhub PRO C5501... - Page 293 Use this key to jump to the subsequent screen to make any setting change. Enter the desired print quantity from the control panel keypad, then press [Start]. The machine will start printing when ready for output. bizhub PRO C5501 11-51...
-
Page 294: Printing Distribution Number: Set Numbering
Touch [Character Size] to select 20 point or 36 point. – Touch [Print Page] to select Cover Only or All Pages. – To specify the start number, touch [Start Number]. See page 11-64 for details. – For selecting the stamp color, see page 11-66. 11-52 bizhub PRO C5501... - Page 295 Use this key to jump to the subsequent screen to make any setting change. Enter the desired print quantity from the control panel keypad, then press [Start]. The machine will start printing when ready for output. bizhub PRO C5501 11-53...
-
Page 296: Printing Page Number
Application functions 11.17.3 Printing page number: Page no. Print a page number onto the specified position of copies. Position the original. Touch [Application] on the Copy Screen. Touch [Stamp/Image Overlay] on the Application Screen. Touch [Page No.]. 11-54 bizhub PRO C5501... - Page 297 Use this key to jump to the subsequent screen to make any setting change. Enter the desired print quantity from the control panel keypad, then press [Start]. The machine will start printing when ready for output. bizhub PRO C5501 11-55...
-
Page 298: Printing Date/Time: Date/Time
– Touch [Change Character] to select the character size and type. See page 11-65 for details. – Touch [Print Page] to select Cover Only or All Pages. – For selecting the stamp color, see page 11-66. 11-56 bizhub PRO C5501... - Page 299 Use this key to jump to the subsequent screen to make any setting change. Enter the desired print quantity from the control panel keypad, then press [Start]. The machine will start printing when ready for output. bizhub PRO C5501 11-57...
-
Page 300: Printing Watermark Onto Copies: Watermark
Touch one of the seven color keys to highlight it. – Touch one of the four text density keys to highlight it. – If fine adjustment of the centered watermark position is required, touch [Fine Adjustment]. See page 11-64 for details. 11-58 bizhub PRO C5501... - Page 301 Use this key to jump to the subsequent screen to make any setting change. Enter the desired print quantity from the control panel keypad, then press [Start]. The machine will start printing when ready for output. bizhub PRO C5501 11-59...
-
Page 302: Printing Distribution Number As Watermark: Set Numbering
To specify the start number, touch [Start Number]. See page 11-64 for details. – Touch one of the seven color keys to highlight it. – Touch one of the four text density keys to highlight it. 11-60 bizhub PRO C5501... - Page 303 Use this key to jump to the subsequent screen to make any setting change. Enter the desired print quantity from the control panel keypad, then press [Start]. The machine will start printing when ready for output. bizhub PRO C5501 11-61...
-
Page 304: Printing Watermark And Background Pattern: Copy Protect
Printed position of watermark is the same as of Set Numbering of Watermark. Position the original. Touch [Application] on the Copy Screen. Touch [Stamp/Image Overlay] on the Application Screen. Touch [Copy Protect] in the Watermark area. 11-62 bizhub PRO C5501... - Page 305 Use this key to jump to the subsequent screen to make any setting change. Enter the desired print quantity from the control panel keypad, then press [Start]. The machine will start printing when ready for output. bizhub PRO C5501 11-63...
-
Page 306: Detailed Setting In Stamp/Watermark
Use [,] and [+], or touch panel keypad to enter the desired start number. Up to four digits can be specified. Touch [OK] to complete the setting and return to the previous screen. 11-64 bizhub PRO C5501... - Page 307 Use this function to specify the character size and type for Page No., and Date/Time. Touch one of the four keys under Character Size to highlight it. Touch either [Gothic] or [Ming] under Font to highlight it. Touch [OK] to complete the setting and return to the previous screen. bizhub PRO C5501 11-65...
- Page 308 Use this function to select the desired color in Built-in Stamp, Set Numbering, Page No., and Date/Time. Touch one of the seven color keys to highlight it. Touch [OK] to complete the setting and return to the previous screen. 11-66 bizhub PRO C5501...
-
Page 309: Overlaying Image Onto Printed Pages: Image Overlay
Select any other copy conditions, as desired. Press [Start] on the control panel. The original image will be scanned into memory. Position the original to be overlaid. – Position the original either in the ADF or on the original glass. bizhub PRO C5501 11-67... - Page 310 Repeat steps 9 and 10 for all originals. Touch [Separate Scan] to exit the Separate Scan mode. Enter the desired print quantity from the control panel keypad, then press [Start]. The machine will start printing when ready for output. 11-68 bizhub PRO C5501...
-
Page 311: Storing Overlay Image In Hdd/Overlaying Image Stored In Hdd: Program Overlay
Recall overlaying Image Output Output Recalled Image Copies in Overlay Memory mode Overlay originals Position the overlaying original facedown on the original glass. Touch [Application] on the Copy Screen. Touch [Stamp/Image Overlay] on the Application Screen. bizhub PRO C5501 11-69... - Page 312 The Copy Screen to store the overlaying image will be displayed. Select copy conditions, as desired. If a popup menu is displayed to prompt you that the entered image name has been already used, see page 11-72. 11-70 bizhub PRO C5501...
- Page 313 Repeat steps 12 and 13 for all originals. Touch [Separate Scan] to exit the Separate Scan mode. Enter the desired print quantity from the control panel keypad, then press [Start]. The machine will start printing when ready for output. bizhub PRO C5501 11-71...
- Page 314 Touch [Cancel] to overwrite the existing image data. To store the new data with a new name, touch [OK]. If the popup menu shows [OK] only, the existing image data cannot be overwritten. Touch [OK] to enter a new name. Either of the above two can be specified in the Administrator setting. 11-72 bizhub PRO C5501...
-
Page 315: Copy Conditions Incompatible With Application Functions
Application functions 11.20 Copy conditions incompatible with application functions bizhub PRO C5501 11-73... - Page 316 Application functions 11-74 bizhub PRO C5501...
- Page 317 Application functions bizhub PRO C5501 11-75...
- Page 318 Application functions 11-76 bizhub PRO C5501...
- Page 319 Application functions bizhub PRO C5501 11-77...
- Page 320 Watermark Set Numbering (Watermark) Copy Protect Image Overlay Program Overlay *15 Compatible if Booklet Pagination is selected in combination. *16 Back cover cannot be attached. *19 Only 2 in 1 and 2 Repeat modes are available. 11-78 bizhub PRO C5501...
-
Page 321: Output Applications
Output applications... -
Page 323: Selecting An Output Tray
Output tray positions are indicated as square marks on the front image of the machine, and the tray mark currently selected appears highlighted. Touch [Output Tray]. The Output Tray Selection Screen reflecting the combination of optional devices will be displayed. bizhub PRO C5501 12-3... - Page 324 The Output Application Screen will be restored, with the selected tray mark highlighted. Touch [OK] on the Output Application Screen. The Copy Screen will be restored. Reminder Be careful not to exceed the finisher tray capacity when selecting the print quantity, otherwise unexpected trouble may be caused. 12-4 bizhub PRO C5501...
-
Page 325: Setting Binding Direction For Duplex Copies
Resetting the machine will restore the right & left binding mode. Position the original. Touch [Output Appli.] on the Copy Screen. The Output Application Screen will be displayed. Touch [Top] under Bind Direction to select it. Touch [OK]. bizhub PRO C5501 12-5... -
Page 326: Using Finisher Fs-520
Combined with the output modes above except staple mode, you can also choose to output face up or face down, and output front to back or back to front. Example: Make 3 copied sets from 4 original sheets Non-sort Staple Collate Uncollate 2 staples Offset by 30mm 1 oblique Offset by 30mm staple 12-6 bizhub PRO C5501... - Page 327 Face down Face up uncollated non-sorted/collated uncollated non-sorted/collated This section describes the following output methods: Non-sort/Collate/Uncollate output to the primary (main) tray Stapled output to the primary (main) tray Non-sort/Collate/Uncollate output to the secondary (sub) tray bizhub PRO C5501 12-7...
-
Page 328: Non-Sort/Collate/Uncollate Output To The Primary (Main) Tray
Be careful not to exceed the finisher tray capacity when selecting the print quantity, otherwise unexpected trouble may be caused. 12-8 bizhub PRO C5501... -
Page 329: Stapling Output To The Primary (Main) Tray
If you want to change the stapling position, proceed to the following steps. Touch [Output Appli.] on the Copy Screen. The Output Application Screen will be displayed. Touch [Staple] to select the stapling position. The Staple Setting Screen will be displayed. bizhub PRO C5501 12-9... - Page 330 Be careful not to exceed the finisher tray capacity when selecting the print quantity, otherwise unexpected trouble may be caused. 12-10 bizhub PRO C5501...
-
Page 331: Collate/Uncollate Output To The Secondary (Sub) Tray
Select the secondary (sub) tray as the output tray. – Touch [Output Tray] to display the Output Tray Selection Screen. – Touch the tray position key of the secondary (sub) tray to highlight it, then touch [OK]. bizhub PRO C5501 12-11... - Page 332 Touch [OK] on the Output Application Screen. The specified output mode icon will be displayed on the Copy Screen. Reminder Be careful not to exceed the finisher tray capacity when selecting the print quantity, otherwise unexpected trouble may be caused. 12-12 bizhub PRO C5501...
-
Page 333: Punching File Holes In Copies (Punch)
– If you want to change the number of punch holes and punch position, proceed to the following steps. Touch [Output Appli.] on the Copy Screen. The Output Application Screen will be displayed. bizhub PRO C5501 12-13... - Page 334 Touch [OK] on the Output Application Screen. The specified output mode icon will be displayed on the Copy Screen. Reminder Be careful not to exceed the finisher tray capacity when selecting the print quantity, otherwise unexpected trouble may be caused. 12-14 bizhub PRO C5501...
- Page 335 Combined with the output modes above except staple mode, you can also choose to output face up or face down, and output front to back or back to front. Example: make 3 copied sets from 4 original sheets Non-sort Staple Collate Uncollate 2 staples Offset by 30mm 1 oblique Offset by 30mm staple bizhub PRO C5501 12-15...
- Page 336 Face down Face up uncollated non-sorted/collated uncollated non-sorted/collated This section describes the following output methods: Non-sort/Collate/Uncollate output to the primary (main) tray Stapled output to the primary (main) tray Non-sort/Collate/Uncollate output to the secondary (sub) tray 12-16 bizhub PRO C5501...
-
Page 337: Non-Sort/Collate/Uncollate Output To The Primary (Main) Tray
Be careful not to exceed the finisher tray capacity when selecting the print quantity, otherwise unexpected trouble may be caused. bizhub PRO C5501 12-17... -
Page 338: Stapling Output To The Primary (Main) Tray
If you want to change the stapling position, proceed to the following steps. Touch [Output Appli.] on the Copy Screen. The Output Application Screen will be displayed. Touch [Staple] to select the stapling position. The Staple Setting Screen will be displayed. 12-18 bizhub PRO C5501... - Page 339 Be careful not to exceed the finisher tray capacity when selecting the print quantity, otherwise unexpected trouble may be caused. bizhub PRO C5501 12-19...
- Page 340 Select the secondary (sub) tray as the output tray. – Touch [Output Tray] to display the Output Tray Selection Screen. – Touch the tray position key of the secondary (sub) tray to highlight it, then touch [OK]. 12-20 bizhub PRO C5501...
- Page 341 Touch [OK] on the Output Application Screen. The specified output mode icon will be displayed on the Copy Screen. Reminder Be careful not to exceed the finisher tray capacity when selecting the print quantity, otherwise unexpected trouble may be caused. bizhub PRO C5501 12-21...
- Page 342 Touch [Fold & Staple] or [Multi Half Fold] to highlight it. Touch [OK] on the Output Application Screen. The specified output mode icon will be displayed on the Copy Screen. With Multi Half Fold selected, Booklet Pagination in Application is also selected automatically. 12-22 bizhub PRO C5501...
-
Page 343: Folding Copies In Three (Multi Tri-Fold)
Selecting Inside Print automatically sets the output face to Face Up, while Outside Print sets to Face Down. Position the original. Touch [Output Appli.] on the Copy Screen. The Output Application Screen will be displayed. Touch [Multi Tri-Fold]. The Multi Tri-Fold Screen will be displayed. bizhub PRO C5501 12-23... - Page 344 To release the function with current setting remained, touch [Function Off]. The Output Application Screen will be restored. Touch [OK] on the Output Application Screen. The specified output mode icon will be displayed on the Copy Screen. 12-24 bizhub PRO C5501...
-
Page 345: Punching File Holes In Copies (Punch)
– If you want to change the number of punch holes and punch position, proceed to the following steps. Touch [Output Appli.] on the Copy Screen. The Output Application Screen will be displayed. bizhub PRO C5501 12-25... - Page 346 Be careful not to exceed the finisher tray capacity when selecting the print quantity, otherwise unexpected trouble may be caused. 12-26 bizhub PRO C5501...
-
Page 347: Cover Sheet Feeding (Paper Inserter)
Cover paper loaded in the paper inserter cannot be copied. Load cover paper into the upper and lower trays of the paper inserter. Upper tray Lower tray Use Insert Sheet or Booklet Pagination function to attach covers to the output copies. bizhub PRO C5501 12-27... -
Page 348: Using Finisher Fs-520/Fs-607 Manually
Finisher FS-607 + Paper inserter PI-502 + Punch kit PK-512/PK-513 – Staple (1 staple / 2 staples) – Fold & Staple – Multi Tri-Fold – Punch Start/Stop button Fold&Staple 1 oblique staple 2 parallel staples Multi Tri-Fold Punch 12-28 bizhub PRO C5501... - Page 349 To use Staple in combination, turn on the desired Staple mode lamp. To select only the Punch mode, turn off all the other mode lamps. Press Start/Stop button. Do you want to stop the output operation? % Press Start/Stop button on the operation panel of paper inserter. bizhub PRO C5501 12-29...
-
Page 350: Copy Conditions Incompatible With Output Applications
Output applications 12.7 Copy conditions incompatible with output applications 12-30 bizhub PRO C5501... - Page 351 Output applications bizhub PRO C5501 12-31...
- Page 352 E: Not grayed out but unavailable *16 Back cover cannot be attached. *27 A for 1 to N, o for N to 1 in FS-520/FS-607 *28 o for 1 to N, A for N to 1 in FS-520/FS-607 12-32 bizhub PRO C5501...
-
Page 353: Advanced Information
Advanced information... -
Page 355: Checking Feature Selections Before Copying: Mode Check
To make any setting change from the Check Screen, proceed to the next step. – To release any application function from the Check Screen, proceed to step 5. – If a sample copy is needed, proceed to step 6. – If settings are OK, proceed to step 7. bizhub PRO C5501 13-3... - Page 356 To start printing without proof copying, proceed to step 7. Release application functions. – Touch the desired application function key on the Check Screen to highlight it, then touch [Clear]. The confirmation popup menu will appear on the Check Screen. 13-4 bizhub PRO C5501...
- Page 357 If the desired selection cannot be changed, press [Reset] to delete all the data in memory and restart the job setting. Change the print quantity as required, then press [Start]. – If proof copying has been made, the machine will simply start printing without scanning originals. bizhub PRO C5501 13-5...
-
Page 358: Making Sample Set For Checking Results: Proof Copy
Some conditions can be changed from the Copy Screen. See page 13-3 for details. Change the settings or print quantity, as required, then press [Start]. – If the desired selection cannot be changed, press [Reset] to delete all the data in memory and restart the job setting. 13-6 bizhub PRO C5501... -
Page 359: Interrupting Job In Progress: Interrupt Mode
Position the original, then press [Start] to start the interrupt copying. When interrupt copying is completed, press [Interrupt] again. The [Interrupt] LED turns out and the settings of the previous job will be restored. Press [Start] to resume copying. bizhub PRO C5501 13-7... -
Page 360: Storing And Recalling Job Conditions: Mode Memory
Make job selections from the Copy Screen. Press [Mode Memory] on the control panel. The Mode Memory Screen will be displayed. Touch [Store]. The Job Store Check Screen will be displayed. Review the settings, then touch [OK]. 13-8 bizhub PRO C5501... - Page 361 Touch [OK] on the Mode Memory Screen to complete the setting and return to the Copy Screen. Note If you do not wish to enter a name, simply touch [OK]. The key displays 16 asterisks (*) in place of a name. bizhub PRO C5501 13-9...
-
Page 362: Recalling Stored Job Settings
The Job Recall Check Screen displays to enable you to review the settings. Review the settings, then touch [OK]. The settings of the selected job will be recalled on the restored Copy Screen. Press [Start] to print. 13-10 bizhub PRO C5501... -
Page 363: Recalling Previous Job Settings
The Mode Check Screen will be displayed. Check the settings of the previous job on the screen. – Recalled settings can be altered from this screen. See page 13-3 for details. Touch [OK]. The settings of the previous output job will be recalled on the Copy Screen. Press [Start] to print. bizhub PRO C5501 13-11... -
Page 364: Displaying Screen For Operation Guide: Help Mode
Hard keys provides information on function and operation of the keys on control panel. Parts exchange provides information on adding toner, loading paper, adding staples, and emptying punch/trimmer waste basket. To display help screen Press [Help] on the control panel. 13-12 bizhub PRO C5501... -
Page 365: Adjusting Response Time Of Touch Keys: Accessibility
To deactivated this function, press [Accessibility] for one second or longer. The Accessibility LED goes off, and normal response time will be restored in touch key operation. bizhub PRO C5501 13-13... -
Page 366: Controlling Copier From Browser: Remote Panel
When using Multi Monitor, the IP address of all the machines to be monitored should be specified. This setting is available in the Web Utilities function. For details, see the User’s guide – POD Administrator’s reference. 13-14 bizhub PRO C5501... - Page 367 Click [Operation Log On], then start the operation. To save the operation, click a number key under "Save to MFP." To recall the operation, click the desired number key under "Load from MFP." To replay the operation, click [Execute]. bizhub PRO C5501 13-15...
- Page 368 Note The background color of the Remote Monitor varies according to the state of the machine. Green: IDLING, WARMUP, ADJUSTMENT Blue: OPERATING Yellow: JAM Red: SC Detail For details of the Remote Panel, see page 13-15. 13-16 bizhub PRO C5501...
- Page 369 Note The background color of the Remote Monitor varies according to the state of the machine. Green: IDLING, WARMUP, ADJUSTMENT Blue: OPERATING Yellow: JAM Red: SC Detail For details of the Remote Panel, see page 13-15. bizhub PRO C5501 13-17...
- Page 370 Advanced information 13-18 bizhub PRO C5501...
-
Page 371: Job Management
Job management... -
Page 373: Overview Of Job List Screen
The Job List Screen will be displayed. Touch the desired key at the bottom of the screen. – See the following pages for details of each subsequent screen. Touch other tab key to exit the Job List Screen. bizhub PRO C5501 14-3... -
Page 374: Job Operation On Job List Screen
In this case, the letters [Suspended] on the key at the bottom of the screen will turn red to prompt you that a suspended job remains in the machine. Touch [Suspended] to resume printing operation. See page 14-8 for details. 14-4 bizhub PRO C5501... -
Page 375: To Display Output History
Touch [Next] to scroll, if 8 or more jobs are entered. Touch the desired job key, then touch [Details]. Detailed settings of the selected job will be displayed. Touch [Close] to return to the previous screen. bizhub PRO C5501 14-5... -
Page 376: To Display Send History
Touch [Next] to scroll, if 8 or more jobs are entered. Touch the desired job key, then touch [Details]. Detailed settings of the selected job will be displayed. Touch [Close] to return to the previous screen. 14-6 bizhub PRO C5501... -
Page 377: To Check Incomplete Jobs
Cause: Memory Full, Cancel, etc.(cause for which the job was not completed) Touch [JOB LIST] tab on the Copy Screen, then touch [Incomplete]. Check the status of the incomplete jobs. – Touch [Next] to scroll, if 8 or more jobs are entered. bizhub PRO C5501 14-7... -
Page 378: To Check/Operate Suspended Jobs
To check the settings of suspended job Touch to highlight the desired job key, then touch [Details]. – Check the settings of the selected job on the screen. Touch [Close] to return to the Job List Screen. 14-8 bizhub PRO C5501... - Page 379 Index...
- Page 381 Finisher FS-520 Call for service screen Finisher FS-607 12-15 Caution notations and labels 1-33 9-43 Fixing pressure 11-11 Chapters 9-43 Fixing unit Chart adjustment screen 9-42 Fold & Staple 12-22 Checking copy count Folding mode tray bizhub PRO C5501 15-3...
- Page 382 Positioning the original in Z-folded mode 8-13 Machine status screen 8-13 Positioning the original on original glass 10-8 Magenta (M) 1-23 Power cord Main body specifications Power LED 2-10 Main power switch 5-12 Power off/on screen 15-4 bizhub PRO C5501...
- Page 383 10-11 10-27 Sharpness 9-20 Zoom (proportional) 11-43 Shift Simplex/duplex setting 9-23 1-36 Space requirements Stamp/image overlay 11-48 Standard/optional equipment 12-6 12-15 Staple 4-20 Staple cartridge supply indicator 12-9 Stapling output to the primary (main) tray 12-18 bizhub PRO C5501 15-5...
- Page 384 Index 15-6 bizhub PRO C5501...
Need help?
Do you have a question about the bizhub PRO C5501 and is the answer not in the manual?
Questions and answers