Table of Contents
Advertisement
Quick Links
Advertisement
Table of Contents

Related Manuals for Automation Dr. Nix QNix 9500


Summary of Contents for Automation Dr. Nix QNix 9500
- Page 1 OPERATION MANUAL QNix 9500 ® QUALITY „MADE IN GERMANY“...
- Page 2 1.5. Reinigung und Pflege Automation Dr. Nix GmbH & Co KG Automation Dr. Nix GmbH & Co KG Gerät: Vor der Reinigung Gerät ausschalten! Ver - 1.5. Cleaning and Care Robert-Perthel-Strasse 2...
- Page 3 와 오물로부터 게이지를 보호하십시 rivenditore in loco o al nostro servizio di trybutora na miejscu lub do naszego działu Automation Dr. Nix GmbH & Co KG assistenza: www.q-nix.com/support obsługi klienta: www.q-nix.com/support 오. 습기, 화학 물질 및 공격적인 가...
- Page 4 QNix 9500 ® Index 1. General Information 2. Device Overview 2. 1 . Menus Overview 2. 1 . 1 . „Jobs“ Menu 2. 1 .2. „Limits“ Menu 2. 1 .3. „Adjustment“ Menu 2. 1 .4. „Settings“ Menu 3. Initial Operation 3.
-
Page 5: Device Management
5. System Settings 5. 1 . Select Language 5.2. Configure Display Options 5.3. Set Buzzer 5.4. Configure power save options 5.5. Change Unit 5.6. Set Pin 5.7. Set Date / Time 5.8. Configure Softkey 5.9. Factory Settings 5. 1 0. Formate Memory 6. -
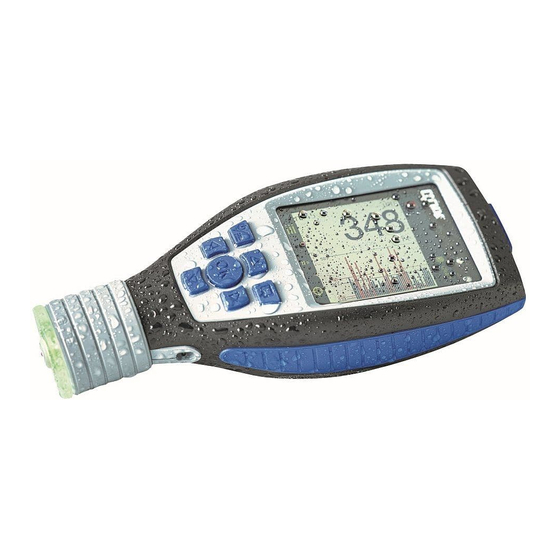
Page 6: Device Overview
QNix 9500 ® 2. Device Overview USB port (under protective cap) Ambient light sensor Status- LED Battery compartment (back) Colour display Power/Menu/Home button Q button OK button Navigation buttons Probe port Probe holder with probe Key functions Status LEDs Indicates USB connection Power/Menu/Home button Switch device on or off, or switch between menu and measurement display... - Page 7 2.1. Menu Overview Use the navigation buttons to navigate within the four main menus (Jobs, Limits, Adjustment , Settings). Navigating within the menus: Previous / next menu; when entering values: previous / next decimal place Previous / next menu item; when entering values: value up / down (hold button for fast scan) Confirm value / go to submenu / confirm selection Previous;...
- Page 8 QNix 9500 ® 2.1.1. „Jobs“ Menu Main menu Submenu Parameters / Values Jobs New job or Delete job Are you sure? job number / job name Save as new job New area or Activate area area number / area name Deactivate area Delete area Delete measurements...
- Page 9 2.1.2. „Limits“ Menu Main menu Submenu Parameters / Values Limits Limits off Averaging Quantity (2 – 9) Area automatic Quantity (2 – 99) Simple Limits Maximum value (0 – 9999 μm) Minimum value (0 – 9999 μm) Averaging Quantity (2 – 9) Area automatic Quantity (2 –...
- Page 10 QNix 9500 ® IMO PSPC * Maximum value (0 – 9999 μm) Target thickness (NDFT) value (0 – 9999 μm) Minimum thickness value (0 – 100 %) % �NDFT value (0 – 100 %) SSPC PA2 Level 1 * Maximum spot value (100 –...
- Page 11 SSPC PA2 Level 4 * Maximum spot value (100 – 999 %) Maximum value (0 – 9999 μm) Minimum value (0 – 9999 μm) Minimum Spot value (0 – 100 %) Averaging Quantity (2 – 9) Area automatic Quantity (2 – 99) SSPC PA2 Level 5 * Maximum Spot value (100 –...
- Page 12 QNix 9500 ® 2.1.3. „Adjustment“ Menu Main menu Submenu Parameters / value area Adjustment Start Settings Zeroing Averaging quantity (flexible/3/5/10) Roughness value (1 – 99 μm) 1-Point Averaging quantity (flexible/3/5/10) 2-Point Averaging quantity (flexible/3/5/10) Individual Zeroing required. No. of adjustment points quantity (1 –...
- Page 13 SSPC PA2 2-Punkt * No. of adjustment points quantity (1 – 5) Averaging quantity (flexible/3/5/10) Shows Fe Shows results Shows NFe Shows results Adjustment memory Retrieve of ´ Storage number Save data Storage number Delete all Are you sure? Factory adjustment Are you sure? Model QNix®...
- Page 14 QNix 9500 ® 2.1.4. „Settings“ Menu Main menu Submenu Parameters / value area Settings System Language Rotation Display value (0°/90°/180°/270°/ automatic) Brightness value (automatic/adjustment) Resolution value (normal/fine) Day/Night Mode value (day/night) Buzzer Volume Button tone Power Saving Display value (3 – 9999 sec) Power down value (10 –...
- Page 15 Probe Substrate setting Automatical Duplex Measurement Trigger Immediately Delayed 0,5 sec Delayed 1 sec Delayed 5 sec By button Ongoing Wake on probe System info...
-
Page 16: Initial Operation
QNix 9500 ® 3. Initial Operation 3.1. Insert Battery This device includes:: • Type mignon/AA (LR6 / FR 6 / AM3); quantity 2 • Type button cell CR-1220 (backup battery for system clock); quantity 1 The battery compartment is located at the back of the device. •... - Page 17 3.2. Insert Probe (optional) On devices with replaceable probe (grey probe latch), insert the probe as follows: Remove the probe holder or probe cable from the probe input • To unlock, turn the probe input anti-clockwise. The arrow on the probe holder shows the open padlock on the probe input.
- Page 18 QNix 9500 ® Probe cable Probe Probe holder The gauge is now ready for use. To remove a probe, follow the above steps in reverse order. 3.3. Check Basic Settings Check and, if necessary, change the factory settings of your device. At a minimum, check the settings for •...
-
Page 19: Operation And Controls
4. Operation and Controls 4.1. About Operation Please note the following instructions to ensure conclusive results: • Hold the device by the probe holder • Carefully place the device or the probe perpendicular on the surface • Ensure the probe makes good contact with the surface and avoid the probe shaking •... - Page 20 QNix 9500 ® Notice Measurement results During adjustment use the uncoated original substrate for the most accurate measurements. Notice Error of measurement Rough surfaces or dirt can cause errors of measurement. Adjustment methods Zeroing For zero point adjustment, simply place the probe on the uncoated original substra- te.
- Page 21 Available options Unit QNix® 9500B QNix® 9500P QNix® 9500P+ Settings Zeroing 1-Point 2-Point Individual ISO 19840 Zero/Offset ISO 19840 2-Point SSPC PA2 Zero/Offset SSPC PA2 2-Point Averaging on/off (flexible, 3, 5, 10) Roughness on/off (roughness adjustable) Save and retrieve adjustment Adjustment memory results Show Fe...
- Page 22 QNix 9500 ® 4.3 Measurement Display The measurement display contains these areas Device status bar Enabled job / area Measurement area Analysis area Probe status field Menu button assignment Q button assignment Depending on the context, the measurement display will contain the following information: Section Symbols Description...
- Page 23 Section Symbols Description Measurement Number of spots used in the enabled area range Number of measurements used for averaging, if over 5 values the display will show a number. filled boxes correspond to the number of measurements recorded μm / mil Unit for the coating thickness 294.3 Current measurement (within the limits)
- Page 24 QNix 9500 ® 4.3.1. Focus Frame You can already navigate through measurements whilst the test is running to analyse these or erase individual values. To do so, open the focus frame with the buttons and navigate to the desired area. Use the buttons to navigate between „Job/Area“, „Measurement area“...
- Page 25 To exit the focus frame, press the. button 4.4. Adding Jobs (QNix® 9500P+) Depending on the mode, measurements are stored in jobs and areas: Memory QNix® 9500B QNix® 9500P QNix® 9500P+ Number of jobs Number of areas per job Number of spots per area, max. 10 000 10 000 10 000...
-
Page 26: Check Device
QNix 9500 ® 4.5. Measure and Save Notice Check device Check the device with the zero plates before every job and calibrate if necessary. Zero with the uncoated original substrate for optimal measurements. • Select job (QNix® 9500P+ only) • Enable start area (QNix®... - Page 27 „Select „Erase measurements“ and press OK to confirm. A confirmation message will appear.. • and press OK to confirm. • Use the buttons to confirm or cancel NOTICE! A confirmation will not appear, the measurements in the selected area have been erased •...
- Page 28 QNix 9500 ® Adding via autorange: If the „Autorange“ field is enabled in a limit set, a new area will automatically be added when the set number of spots has been reached. The icon in the status bar indicates whether autorange is enabled (Also see chapter „Configure Limits“).
- Page 29 Delete all measurements in an area Select „Erase measurements“ and press OK to confirm. A confirmation message will appear. • , then press OK to confirm • Use the buttons to confirm or cancel Notice! A confirmation will not appear, the measurements in the selected area have been erased.
- Page 30 QNix 9500 ® These limit settings are available according to device type Available options QNix® 9500B QNix® 9500P QNix® 9500P+ No limits Simple limits Individual ISO 19840 IMO PSPC SSPC PA (Level 1-5) The probe has a colour indicator to show when the set limits have been exceeded. •...
-
Page 31: Limit Settings
To do measurements by using the specific limit settings, the following steps must be carried out: • Select the first of the areas to be filled in and activate it. • Do your measurements. If the area automatic within the limit settings is active, the next area will be activated automatically when you reach the number of measurements set in the area automatic. -
Page 32: System Settings
QNix 9500 ® 5. System Settings You can configure the device in the „Settings“ menu. 5.1. Select Language Use menu item „Language“ to configure the language for the entire device. Open the „Settings“ menu and press OK to confirm „System“. •... -
Page 33: Changing Units
5.3. Set Buzzer You can change the volume and the touch sound. Open the „Settings“ menu, select „System“ and press OK to confirm. • Press OK to confirm „Buzzer“. • Select „Volume“ and press OK to confirm. Adjust the volume in the submenu •... - Page 34 QNix 9500 ® 5.6. Set PIN You can add a 4-digit PIN to lock certain device functions. Open the „Settings“ menu, select „System“ and press OK to confirm. • Press OK to confirm „PIN“. • • Enter the 4-digit PIN with the buttons.
- Page 35 5.9. Factory Settings Caution Factory Settings This function goes back to the original factory settings. • Open menu „Settings“, select „System“ and press to confirm. • Confirm „factory settings“. An „are you sure“ question appears. You have to confirm it, if you are sure. In case an error occurs, please repeat this process.
- Page 36 QNix 9500 ® 6. Device Management via PC in QN9 You can use the QN9 software to manage your devices on a PC. Among other things, you will be able to • generate jobs and job templates and change them. •...
- Page 37 Index Software Menu Function 1, 11 Jobs Create job template Manage jobs Edit job Create job Specifications Manage measurement memory 2, 14 Live Measuring View Settings Create 3-click report 4, 5 Support Instructions Information Help/Support Teamviewer session / remote maintenance Connect to gauge Shows connection status File sync...
- Page 38 QNix 9500 ® 6.1. Install App You can download the app from our website at www.q-nix.com/downloads or directly from the hand-held unit when using the device for the first time. Proceed as follows: • Connect the gauge to the computer via USB cable. •...
- Page 39 6.2.1. Create Templates You can use the software to create job templates with actual names and transfer these to the device. If you then create a new job from a template on the device, the actual names will also be applied. You can name both jobs and areas.
- Page 40 QNix 9500 ® 6.2.2. 3ClickReport After exporting the measurement data from the hand-held unit, you can generate a report with just 3 clicks. • On the home screen, click the quick menu „Create“ • Select the desired template from „Report Templates“ •...
-
Page 41: Troubleshooting
8. Service and Repair The equipment must be repaired by a manufacturer authorised technician. If you have any questions, please contact your local retailer or our support: www.q-nix.com/support Automation Dr. Nix GmbH & Co KG Robert-Perthel-Straße 2 50739 Köln - Deutschland... - Page 42 QNix 9500 ® 9. Appendix 9.1. Gauge Technical Data 9.1.1. Gauge Mechanical Data Mechanical Data Display IPS-LCD, 2.4“, colour, 600 lm viewing angle 70° in all directions Dimensions (L x W x H) Ca. 160 mm x 68 mm x 38 mm Weight (without batteries) Ca.
- Page 43 9.2. Technical Data Probe 9.2.1. Mechanical Data Probe Mechanical Data Probe Upper housing material Stainless steel (1.4305) Bottom housing material Trogamid® (CX7323) Material measuring tip Polished ruby (Al Dimensions (length / diameter) 35,5 mm / 14,5 mm Weight 11,9 g Robustness/ ambient conditions IP-rating IP65 (closed)
- Page 44 QNix 9500 ® 9.3. Measuring Data Measuring Data Principle of Measurement Magnetic field principal, Magnetic field principal, Magnetic field change, Eddy current Hall effect As per standard (varies by model) DIN EN ISO 2808, DIN EN ISO 2808, DIN EN ISO 2178 DIN EN ISO 2360 DIN 50981, DIN 50984, BS 5411 (3 &...
- Page 46 Automation Dr. Nix GmbH & Co. KG Robert-Perthel-Str. 2 50739 Köln – Germany Tel. +49 (0) 221 91 74 55-0 Fax +49 (0) 221 91 74 55-29 info@automation.de www.q-nix.com...
Need help?
Do you have a question about the QNix 9500 and is the answer not in the manual?
Questions and answers