
Related Manuals for Ankom Flex Analyte Extractor


Summary of Contents for Ankom Flex Analyte Extractor
- Page 1 Operator’s Manual Rev 01/22/21 2052 O’Neil Rd, Macedon NY 14502 Telephone: (315) 986-8090 Fax: (315) 986-8091 www.ankom.com...
- Page 2 This page intentionally left blank...
-
Page 3: Table Of Contents
Methods ............................25 Diagnostics ............................26 Records and Updates ........................28 Training and Maintenance ......................29 ANKOM Products ..........................29 Who we are ............................. 29 Starting an Assay ............................30 Confirm Nitrogen Pressure ......................30 Fill the Solution Reservoir Bottles ....................30 Assemble Digestion Vessels ...................... - Page 4 Operator’s Manual Confirm Solution Reservoirs are Full ....................36 Start Run ............................36 Track Progress ..........................37 Abort Run ............................37 8.15 End of Run ............................38 Adjust Method ............................39 10. Custom Method ............................40 11. Uploading a New Method .......................... 41 12.
-
Page 5: Introduction
This warranty does not include damage to the instrument resulting from neglect or misuse. During the warranty period, should any failure result from defects in workmanship or materials, ANKOM Technology will, at its discretion, repair or replace the instrument free of charge. Extended warranties are available upon request. -
Page 6: Instrument Description
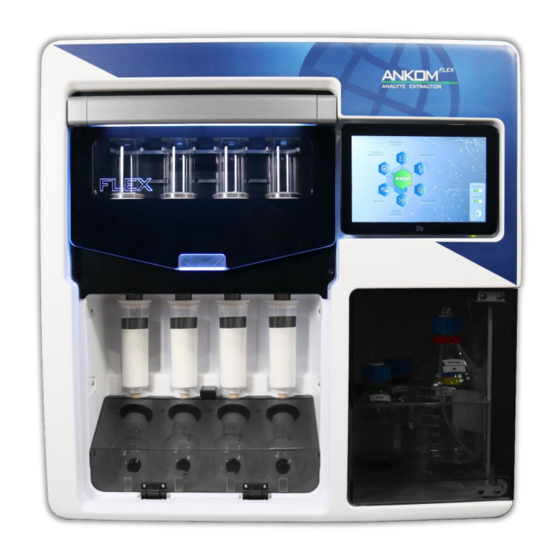
Operator’s Manual 4. Instrument Description FLEX The ANKOM Analyte Extractor simplifies fat-soluble vitamin, cholesterol, crude and hydrolysis (total) fat determinations and other possible applications. This fully automated system integrates all the steps involved in these analyses in one instrument. Supporting up to four samples at a time, the system will automatically complete saponification, solid phase extraction and evaporation of the solvent. -
Page 7: Safety Precautions
WARNING: Attempts to override safety features or to use this instrument in a manner not specified by ANKOM Technology voids the warranty and may result in serious injury or even death. This system is designed to meet and/or exceed the applicable standards of CE and CSA. -
Page 8: Instrument Installation
Operator’s Manual 6. Instrument Installation Site Requirements and Operating Environment FLEX To install and operate the ANKOM Analyte Extractor you will need the following: • Adequate Power: 100V−120V ~ 50/60Hz 15A 220V−240V ~ 50/60Hz 8A • Must have ability to connect to an exhaust system •... - Page 9 Operator’s Manual 500 ml Solution Reservoir Bottle 2000 ml Solution Reservoir Bottle Waste Bottle Assembly (3 Qty) (1 Qty) (1 Qty) part # 5605 part # 9365 part # FLEX49 Including 10 ft Exhaust Tubes (2 Qty) FLEX Support Items The following support items are needed to perform an assay and may be purchased separately.
-
Page 10: Wipe Down Components
Operator’s Manual Wipe down components 6.4.1. Wipe the digestion vessel top’s spray nozzles and O-rings, vessel bases, and the SPE column top’s O-rings with a towel wetted with water. Refer to FLEX Service Procedure FLS011. Make Connections 6.5.1. Connect waste assembly - Connect the shorter opaque tube to the vessel vent and waste port on the back of the instrument and the longer opaque tube to the globe vent port. - Page 11 Operator’s Manual 6.5.2. Connect nitrogen supply (N High Pressure) - Attach the black nitrogen supply tubing (part # 8216) to a High Pressure (>50psi) Nitrogen source and then attach to the instrument by pushing the black nitrogen supply tubing into the Nitrogen Supply port on the back of the instrument. Refer to FLEX Service Procedure FLS002. Nitrogen Supply Port 6.5.3.
-
Page 12: Power On
If the pressure sensors do not pass, press “OK” and proceed to the following section adjust Nitrogen pressure regulators. If any other component does not pass the self-test, contact ANKOM. Rev 1/22/2021 pg. 14... -
Page 13: Setting Nitrogen Pressures
Operator’s Manual Setting Nitrogen Pressures To confirm that the nitrogen levels are set correctly, press the “DIAGNOSTICS” section, and then go into the “COMMAND CENTER.” The N high pressure should be between 50-51 psi and the N low pressure should be between 2.2-2.5 psi. If the N high pressure does not fall within the acceptable range, follow Adjusting N High Pressure Regulator steps. - Page 14 Operator’s Manual 6.7.2. Adjusting N Low Pressure Regulator To increase: Rotate the lock disc counterclockwise (to the left) to unlock. Lock Disc Rotate the dial clockwise (to the right) until the pressure increases within the desired range on the HMI touchscreen. Dial In the “Command Center”, open the “Pump Waste.”...
- Page 15 Operator’s Manual To decrease: Rotate the lock disc counterclockwise (to the left) to unlock. See lock disc image above. Rotate the dial one quarter turn counterclockwise (to the left). NOTE: The user will not see a change in pressure on the HMI during this step. In the “Command Center”, open the “Pump Waste.”...
-
Page 16: Setting Nitrogen Flow Rate
Operator’s Manual Setting Nitrogen Flow Rate The flow meter should only be adjusted during the initial instrument installation and does not need to be regularly adjusted. Follow the steps below to check and adjust the flow meter. Make sure round bottom flasks are NOT installed in the evaporation chamber when checking the flow meter. -
Page 17: Prime Reservoir And Pump Lines
You must use the correct reservoir position for each solution as some solvents must not be vented. For further details on how to fill the reservoir bottles, refer to FLEX Service Procedure FLS005, found on the ANKOM website. 6.9.2. Assemble Digestion Vessels The following parts are need when running the line prime method: Digestion vessel (with or without port), filter, and vessel bottom assembly. - Page 18 Operator’s Manual 6.9.2.2. Wet the bottom outside edge of the digestion vessel with water. Do not use any other solution, as this will negatively impact the seal. 6.9.2.3. Insert the digestion vessel into the vessel bottom assembly by a slight twist motion. IMPORTANT: Make sure the digestion vessel seats evenly...
- Page 19 Operator’s Manual 6.9.3.5. Enter “Prime” as the sample name for all four positions. 6.9.3.6. Press “SAVE.” NOTE: If “SAVE” is pressed before all sample names were entered go back to the Home Screen and repeat the Load Method steps. 6.9.4. Install Digestion Vessels 6.9.4.1.
- Page 20 Operator’s Manual 6.9.5. Manually Close Digestion Oven Door 6.9.6. Install SPE Columns 6.9.6.1. Be sure to remove all shipping packaging from inside the columns. 6.9.6.2. Wipe the inside of the column top with a wetted paper towel (water) to remove sorbent dust before installing each column onto the instrument.
- Page 21 Operator’s Manual 6.9.7.4. Close the evaporation chamber door manually. 6.9.7.5. Press “YES,” confirming that all four round bottom flasks are installed properly. 6.9.8. Confirm Solution Reservoirs are Full 6.9.8.1. Confirm that each solution reservoir is filled with the appropriate chemicals. (Refer to Appendix A - Reagents) 6.9.8.2.
-
Page 22: Hmi Navigation
The home screen allows the user to see all the sections available for navigation. The user can enter a section by pressing one of the blue hexagons. To return to the home screen from any screen the user can press the green “ANKOM hexagon”. The bar on the right side of the home screen allows the user to open the toggle “Vessel Tops”... -
Page 23: Methods
Operator’s Manual Methods The method section allows the user to select preprogrammed methods or create custom methods. Faded hexagons represent unavailable methods. Method availability depends on the FLEX package purchased. Method options include: Vitamin A, E, D This folder contains preprogrammed vitamin methods that the user can run. For example, method “VitAED 75C 45m” is based on a combination of official vitamin methods such as: EN-12823-1, EN-12822, and AOAC 2011.07. -
Page 24: Diagnostics
Operator’s Manual Diagnostics The diagnostics section displays the solution delivery calibration, command center, and settings options. Solution Delivery Calibration This calibration should be done when a new chemical is added or if the user would like to confirm that solution delivery is accurate. - Page 25 To make any system configuration changes, contact ANKOM for the Administrator Password. Factory Settings This section is password protected for ANKOM’s use only. pg. 27 Rev 1/22/2021...
-
Page 26: Records And Updates
Operator’s Manual Records and Updates The records and updates section stores reports and raw data logs and allows the user to install new software updates. Records This section stores various reports and logs. Reports are short summaries that are viewable on the screen and exportable via USB flash drive. -
Page 27: Training And Maintenance
After a software update, module and fault configuration settings will be reset to factory default settings. Although these settings have been optimized for all instruments, in rare cases ANKOM will recommend adjusting certain configuration settings that must then be reapplied after a software update. Contact ANKOM for instructions. -
Page 28: Starting An Assay
This is automatically set according to the method the user has selected. For further details on how to fill the reservoir bottles, refer to FLEX Service Procedure FLS005 on the ANKOM website. Rev 1/22/2021... -
Page 29: Assemble Digestion Vessels
Operator’s Manual Assemble Digestion Vessels Before user assembles the digestion vessels, make sure that each element is clean and has been wiped down. The following parts make up one digestion vessel: Digestion vessel (with or without port), vessel bottom assembly, filter (specific to fat, or vitamin and cholesterol analysis), and magnetic cross stir-bar. -
Page 30: Load Method
Load Method From the Home Screen: 8.4.1. Press “METHODS.” 8.4.2. Select the desired method category. 8.4.3. Select the method of choice. Refer to the ANKOM website for the standard operating procedures of each method. FLEX Analysis Options using the ANKOM... -
Page 31: Weigh Sample
Load Method steps. Weigh Sample 8.5.1. Weigh sample into digestion vessels: For more details on sample size per method, refer to the SOPs of the selected methods on the ANKOM website. If weighing an oil sample, refer to Service Procedure FLS007. -
Page 32: Install Digestion Vessels
Operator’s Manual Install Digestion Vessels 8.6.1. Open the digestion oven door by pulling it open. 8.6.2. Make sure the vessel tops are open. If they are not open, press the “Vessel Top” toggle so that they are in the open position. 8.6.3. -
Page 33: Manually Close Digestion Oven Door
Operator’s Manual Manually Close Digestion Oven Door Install SPE Columns 8.9.1. Be sure to remove all shipping packaging from inside the columns. 8.9.2. Wipe the inside of the column top with a wetted paper towel (water) to remove sorbent dust before installing each column onto the instrument. -
Page 34: Install Round Bottom Flasks
Operator’s Manual Install Round Bottom Flasks 8.10.1. Open the evaporation chamber door manually. 8.10.2. Turn the large black release ring at each position clockwise (to the right), until it fully tightens. 8.10.3. Install glass round bottom flasks over the round bottom flask adapters in the evaporation chamber by pushing each until it seals tightly. -
Page 35: Track Progress
“Do NOT Drain” –Do not use this option unless CUSTOM mode is enabled or advised by ANKOM. When a run is aborted, the digestion oven will cool to a safe temperature. Do not remove the digestion vessels if filled with liquid. -
Page 36: End Of Run
If after running this instrument the user plans to leave it unused for one week or longer, the user must clear out the fluid lines to ensure proper operation. See “Instrument Out-of-use Procedure” located on ankom.com for more information. Rev 1/22/2021... -
Page 37: Adjust Method
Operator’s Manual 9. Adjust Method 9.1 From the Home Screen, select “METHODS.” 9.2 Select the desired method category. Example: “VITAMIN A, E, D” 9.3 Select the method of choice. A list of previously used methods will appear on the right side of the screen. Example: “Vit AED 75C 45m”... -
Page 38: Custom Method
This section is only available to users who have purchased an upgradable instrument. For full details on how to create a method refer to the ANKOM website. Custom functionality allows the user to: customize an existing method or build a new method from scratch. -
Page 39: Uploading A New Method
Operator’s Manual 11. Uploading a New Method This section explains how to upload a new method onto the FLEX instrument. 11.1 From the Home Screen, press the “Records & Updates” hexagon. 11.2 Press the “Updates” hexagon. 11.3 Select “Update Methods.” 11.4 Insert the USB drive, that contains the new method, into the USB port on the side of the instrument. -
Page 40: Faults
The user is alerted, and the instrument automatically aborts the run for safety reasons. The user will be asked whether they want to drain the content of the vessels to waste or not. Refer to the “Technical FAQs” section on www.ankom.com or call ANKOM Technology. -
Page 41: Periodic Maintenance
Operator’s Manual 13. Periodic Maintenance Inspect and clean solution reservoir bottles and filters On a monthly basis (or more frequently depending on usage), follow the steps below to inspect and clean the solution reservoir bottles and filters. 13.1.1. Inspect the bottles, filters, and internal tubing, for any precipitate, particles, or foreign matter. 13.1.2. -
Page 42: Troubleshooting & Replacement Parts
Operator’s Manual 14. Troubleshooting & Replacement Parts The ANKOM Technology website has the most current troubleshooting and replacement parts information. If you have any FLEX questions about the operation of your ANKOM Analyte Extractor, or if you need replacement parts, please visit our website at www.ankom.com. -
Page 43: Qc And Calibrations
Operator’s Manual 15. QC and Calibrations Solution Delivery Calibration The purpose of the solution delivery calibration is to confirm that the instrument pump is delivering the correct amount of solution. This calibration should be done when a new chemical is added, or if the user would like to confirm that solution delivery is accurate. - Page 44 This fault is most often caused by an empty reservoir. The user must refill the reservoir and press continue. If the message continues to be displayed, it may be caused by a restriction in the line or a leak in the system. Contact ANKOM Technology for assistance. Full Supply Line This message can occur if the lines are not cleared properly at the end of the solution delivery calibration.
- Page 45 • If No – Abort Calibration and re-try the Solution Delivery Calibration. If volume falls outside this range again (8.5 – 11.5ml), abort calibration and contact ANKOM Technology. 15.1.11. The following screen will be displayed when one calibration series has been completed, but calibration accuracy has not yet been reached.
-
Page 46: Appendix A - Reagents
Operator’s Manual 16. Appendix A – Reagents Best practices for solution preparation: Vitamin & Cholesterol Analysis Where high volume usage makes daily solution preparation less practical, the following guidelines can be used. Solution Storage Solution Reservoir Make up Shelf Life Content Requirements Ethanol... - Page 47 Operator’s Manual Automation saves time and money ANKOM Technology is an international company with products that include: DELTA Automated Fiber Analyzer with Pump System • Crude Fiber (AOCS Ba 6a-05), ADF, NDF determinations • Automatically adds solutions and rinses •...
Need help?
Do you have a question about the Flex Analyte Extractor and is the answer not in the manual?
Questions and answers