
Subscribe to Our Youtube Channel
Related Manuals for Victoria Arduino Adonis+ 2 Gr


Summary of Contents for Victoria Arduino Adonis+ 2 Gr
- Page 1 dal 1905 manuale tecnico d’uso - technical manual - manuel technique de mode d'emploi...
- Page 3 Legga con attenzione ciò che il libretto delle istruzioni consiglia di fare per “preparare” la sua Si accorgerà di quanto sia facile fare ottimi caffè e cremosi cappuccini. Col tempo, si renderà conto anche di quanta poca manutenzione servirà. Victoria Arduino...
-
Page 5: Caratteristiche Tecniche
Modello: 2 gruppi - Peso netto: 84 Kg - Peso Lordo: 90 Kg - Potenza termica: 4500 W - Capacità caldaia 14 lt - Volts 230-380V 50/60Hz Modello: 3 gruppi - Peso netto: 98 Kg - Peso Lordo: 108 Kg - Potenza termica: 5000 W - Capacità caldaia 17 lt - Volts 230-380V 50/60Hz Il marchio di approvazione certifica che tutte le macchine sono state sottoposte ad accuratissimi collaudi e controlli... -
Page 6: Table Of Contents
INDICE UTILIZZO .............. 18 PROCEDURA DI PRIMA INSTALLAZIONE O DOPO MANUTENZIONE CALDAIE (versione T3) ........ ACCENSIONE DELLA MACCHINA ............. CARATTERISTICHE TECNICHE ......3 ACCENSIONE LED ................LEGENDA TASTI (Configurazione Selezioni) ........NOTE GENERALI ALLA CONSEGNA ....5 REGOLAZIONE FLUSSO DEL VAPORE ..........PRESCRIZIONI DI SICUREZZA ............ -
Page 7: Note Generali Alla Consegna
NOTE GENERALI ALLA CONSEGNA 1.1 PRESCRIZIONI DI SICUREZZA ➌ ➍ Prima di collegare l’apparecchio accertarsi che Durante l'installazione del dispositivo devono esse- i dati di targa siano rispondenti a quelli della rete re utilizzati i componenti e i materiali in dotazione al ➊... - Page 8 ❻ ❾ non usare, prolunghe in locali adibiti a bagno o doccia; Questo apparecchio dovrà essere destinato solo Al termine dell'installazione, il dispositivo viene attiva- non tirare il cavo di alimentazione, per scollegare all’uso descritto in questo manuale. Il costruttore non to e portato fino alla condizione nominale di lavoro lascian- l’apparecchio dalla rete di alimentazione;...
- Page 9 Rivolgersi esclusivamente a personale professionalmente ⓯ ⓳ Allorché si decida di non utilizzare più un apparecchio Il massimo livello di disturbo sonoro emesso è qualificato. L’eventuale riparazione dei prodotti dovrà di questo tipo si raccomanda di renderlo inoperante dopo inferiore ai 70db. essere effettuata solamente dalla casa costruttrice o aver staccato la spina, tagliare il cavo di alimentazione.
- Page 10 chiatura giunta a fine vita agli idonei centri di raccolta differenziata dei rifiuti elettronici ed elettrotecnici, oppu- re riconsegnarla al rivenditore al momento dell’acquisto di una nuova apparecchiatura di tipo equivalente, in ragione di uno a uno. L’adeguata raccolta differenziata per l’...
-
Page 11: Descrizione
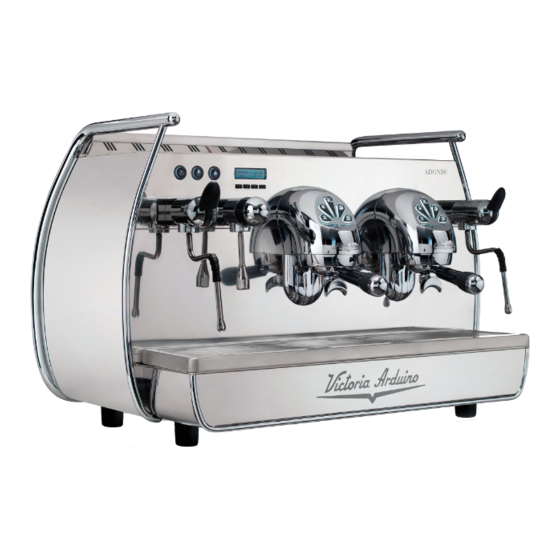
DESCRIZIONE - DIGIT - T3 Pulsanti Gruppo Erogatore Display LCD Scaldatazze Elettrico Pulsanti Selezione Acqua Calda / Vapore Tasti Programmazione Gruppo Erogazione Lancia Vapore Manuale Manopola Regolazione Portafiltro Flusso Vapore Lancia Acqua Calda Griglia Poggiatazze Piatto Raccogligocce Lancia Autosteam Interruttore Generale Macchina Piede Regolabile Fig. -
Page 12: Lista Accessori
2.1 LISTA ACCESSORI CODICE DESCRIZIONE 2 GRUPPI 3 GRUPPI Tubo carico ” Tubo scarico piano lavoro Ø 25 mm - l. 150 cm Porta ltro Filtro doppio Filtro singolo Filtro cieco Molla Becco erogazione doppio Becco erogazione singolo Pressa caffè Panno in micro bra Fig. -
Page 13: Trasporto E Movimentazione
TRASPORTO E MOVIMENTAZIONE 3.1 IDENTIFICAZIONE MACCHINA Sollevare lentamente il pallett a circa 30 cm da terra e ATTENZIONE PERICOLO DI INQUINAMENTO raggiungere la zona di carico. Dopo aver verificato che Una volta liberata la macchina del pallett o del contenitore, Per qualsiasi comunicazione con il costruttore Victoria non ci siano ostacoli, cose o persone, procedere al carico. -
Page 14: Installazione E Operazioni Preliminari
INSTALLAZIONE E OPERAZIONI PRELIMINARI Una volta rimosso l’imballo e aver verificato l’integrità ATTENZIONE della macchina e degli accessori, procedere come La pressione della rete idrica raccomandata è [2,3] bar . descritto di seguito: posizionare la macchina su un piano orizzontale; assemblare i piedini di sostegno della macchina ATTENZIONE inserendo l’inserto all’interno del guscio cilindrico... - Page 15 per voltaggio V 230 / monofase: ATTENZIONE PERICOLO DI SCOSSA ELETTRICA La macchina deve essere sempre protetta con un inter- ruttore automatico onnipolare di adeguata potenza con distanza di apertura dei contatti uguale o superiore a 3 mm. La Nuova Simonelli non risponde di alcun danno a cose o persone derivante dalla mancata osservanza 1 2 3 4 delle vigenti norme di sicurezza.
-
Page 16: Regolazioni Del Tecnico Qualificato
REGOLAZIONI DEL TECNICO QUALIFICATO 5.1 RIEMPIMENTO MANUALE Per effettuare il primo riempimento manuale, agire agire sul rubinetto livello manuale “A”, per permet- CALDAIA come descritto di seguito: tere l’ingresso dell’acqua nella caldaia; rimuovere la griglia e il piatto raccogligocce; dopo circa 45 secondi chiudere il rubinetto ”A” NOTA BENE Operazione da eseguire a macchina spenta. -
Page 17: Regolazione Pressostato / Pompa
5.2 REGOLAZIONE POMPA Agire sulla vite di regolazione della pompa per La pressione impostata della pompa viene visua- AUMENTARE (senso orario) oppure DIMINUIRE lizzata sul manometro, alloggiato all'interno della (senso antiorario) la pressione; macchina (vedi Fig. 11); NOTA BENE Operazione eseguibile anche a macchina accesa. Per modificare la pressione di esercizio della caldaia, quindi la temperatura dell’acqua, in funzione delle varie esigenze o delle caratteristiche del caffè... -
Page 18: Regolazione Economizzatore Acqua Calda
5.3 REGOLAZIONE ECONOMIZZATORE Per accedere all'economizzatore smontare la por- ruotare il pomello di registro in senso ANTIORARIO / ACQUA CALDA zione scaldatazze sinistro svitando le due viti "D" ORARIO per AUMENTARE / DIMINUIRE la tempera- come illustrato nella seguente figura. tura dell’acqua calda;... -
Page 19: Sostituzione Batteria Orologio
5.4 SOSTITUZIONE BATTERIA ATTENZIONE OROLOGIO La sostituzione della batteria al litio deve essere eseguita SOLO dal Tecnico Specializzato. La centralina elettronica è provvista di una batteria al litio La Nuova Simonelli non risponde di alcun danno a cose per l’alimentazione dell’orologio con autonomia di circa tre o persone, derivanti da una mancata osservanza delle anni, dopodichè... -
Page 20: Utilizzo
UTILIZZO L’operatore deve prima di iniziare la lavorazione, accertar- dall’interruttore generale posto in basso a destra, proce- 6.2 ACCENSIONE DELLA MACCHINA si di aver letto e ben compreso le prescrizioni di sicurezza dere come segue: di questo manuale. ① Se a display viene visualizzato “ OFF - OROLOGIO Chiudere il sezionatore e posizionare l’interruttore DISABILITATO “... - Page 21 ACCENSIONE / SPEGNIMENTO MANUALE NOTA BENE NOTA BENE La macchina non è operativa, in quanto l’interruttore Tutti i tasti di selezione sono abilitati sin dalla fine On - Off Automatico NON PROGRAMMATO generale permette solo l’alimentazione della scheda della diagnosi. elettronica.
-
Page 22: Accensione Led
6.4 LEGENDA TASTI La centralina effettua l’autodiagnosi delle funzioni, tutti i La macchina si SPEGNERA’ al primo orario di spegnimen- Configurazione selezioni tasti di selezione si illuminano. to programmato (vedi capitolo "PROGRAMMAZIONE" e Terminata la diagnosi, sul display compare la scritta: paragrafo "PROGRAMMAZIONE ON - OFF"). -
Page 23: Regolazione Flusso Del Vapore
6.5 REGOLAZIONE FLUSSO DEL 6.6 REGOLAZIONE LANCIA Fig. 17.A VAPORE TURBOCREAM (Ove Installata) Per aumentare/diminuire il flusso del vapore iniettato nel latte agire sulla leva come illustrato nella figura Per aumentare/diminuire la quantità di aria iniettata nel seguente. latte tramite lancia TurboCream (ed quindi aumentare/ diminuire la percentuale di crema nel latte montato) procedere come illustrato in Fig. -
Page 24: Regolazione Lancia Autosteam (Ove Installata)
6.7 REGOLAZIONE LANCIA Fig. 18.A NOTA BENE AUTOSTEAM Riducendo o aumentando la lunghezza (avvitando o (Ove Installata) svitandola) della cannula in teflon di qualche frazione di mm o mm si ottengono sensibili differenze nel livello Per aumentare/diminuire la quantità di aria iniettata nel di crema del latte montato. -
Page 25: Programmazione
PROGRAMMAZIONE 7.1 LEGENDA LISTA FUNZIONI VISUALIZZABILI (Mod. UTENTE) CICLO AUTOMATICO DI PULIZIA Sul display è visualizzato: CICL.AUT.PULIZIA DOSI CICL.AUT.PULIZIA CONT.EROGAZIONI TOTALE TOTALE MACCHINA CONTEGGIO LAVAGGI Premere ENTER e sul display verrà visualizzato: 7.2 VISUALIZZAZIONE (Mod. UTENTE) Fig. 19 CICL.AUT.PULIZIA ① Display LCD. Per entrare nell’ambiente di visualizzazione in modalità... - Page 26 possibile effettuare il lavaggio anche in più gruppi calda e vapore lampeggeranno. DOSI contemporaneamente. Premendo uno dei tasti lampeggianti a display verrà Sul display è visualizzato: visualizzato il corrispondente contatore. DOSI Premere il tasto per avviare il ciclo di pulizia Premere il tasto per tornare alla funzione prece- automatico sul gruppo.
-
Page 27: 11 7.3 Visualizzazione (Mod. Tecnico)
NON qualificati o di altre persone potrebbe inva- TOTALE MACCHINA PROGRAM. DOSI lidare la garanzia. CONT. EROGAZIONI EROGAZ. GRUPPI ATTIVI * Solo versione T3 PROGRAMM. ON/OFF Premere i tasti per visualizzare le altre funzioni. ° Solo versione Digit RISP. ENERGETICO RESET Premere il tasto per uscire dalla visualizzazione. - Page 28 CICLO AUTOMATICO DI PULIZIA CICL.AUT.PULIZIA MACCHINA PRONTA Sul display è visualizzato: ¡ L CICL.AUT.PULIZIA dove 1L indica che nel 1° gruppo è stato attivato il Nel caso in cui sia stato selezionato nella funzione ciclo di lavaggio. Terminato il ciclo di 15 erogazioni "EROGAZIONE IN LAVAGGIO"...
- Page 29 PROGRAMMAZIONE DOSI Il valore X.X è quello impostato. Variare la dose, agendo con i pulsanti Sul display è visualizzato: Premere i tasti per variare il tempo di fuoriu- Premendo il tasto caffè da programmare, inizierà scita dell’acqua calda da versare. l’erogazione (nel frattempo tutti gli altri tasti si spe- PROGRAM.DOSI Se si intende fare un nuovo campionamento preme-...
- Page 30 za della sonda e sul display comparirà la scritta: re nuovamente il pulsante Sul display verrà visualizzato: PROGRAM. DOSI TRASFERIME. DOSI Inizia l’erogazione. Quando la dose desiderata è raggiunta premere di nuovo il pulsante SELEZIONA GRUPPI TEMP. VAP. °C seguita dal valore già impostato dalla casa costrut- Sul display viene visualizzato il nuovo valore da noi a questo punto i tasti caffè...
- Page 31 Premere il tasto ENTER per confermare. ERRORE A questo punto i tasti caffè continuo inizieran- A questo punto sul display viene visualizzato: no a lampeggiare. PROGRAM. Selezionare uno o più tasti continui (il tasto/i sele- zionati rimarranno a luce fissa). CONTEGGIO EROGAZIONE DOSI SELEZIONA Il tasto/i richiameranno i valori delle dosi standard ai...
- Page 32 GRUPPI ATTIVI (Solo versione T3) il tasto e il pulsante del relativo gruppo. La Premere e sul display verrà visualizzato: E’ possibile impostare sia i gruppi effettivamente modifica temporanea è attiva fino a quando non TOTALE MACCHINA presenti sia quelli da attivare all’accensione della si spegne e riaccende la macchina dall’interruttore centralina stessa.
- Page 33 PROGRAM. ON/OFF all’orario programmato per lo spegnimento (la scrit- Questa funzionalità consente alla macchina di entrare o Sul display è visualizzato: ta OFF 23:30 comincerà a lampeggiare). meno in uno stato di STANDBY attivo, che permette di Utilizzare i tasti per variare l’orario di spegni- scegliere se spegnere completamente la macchina oppure PROGRAM.
- Page 34 display (impostato a luminosità minima) è mostrata SETPOINT TEMPERATURA REGOLAZIONE OFFSET la scritta "BASSO CONSUMO"; (E OFFSET) (Solo versione T3) Quando a display è visualizzato: STANDBY 0.80 bar: durante lo STANDBY la mac- E’ possibile accedere alla funzione premendo il ta- SETPOINT TEMP china mantiene una pressione pari a 0.80 bar e a sto ENTER.
- Page 35 PROGRAMMAZIONE SCALDATAZZE Temperatura singola Premendo il tasto ENTER, il display visualizzerà Sul display è visualizzato: Sul display è visualizzato: per esempio: PRO. SCALDATAZZE SCALDATAZZE PRO. SCALDATAZZE SETPOINT XXX°C ON XX OFF xx Nell’elenco delle funzioni nascoste programmabili (Vedi Tramite i tasti è...
- Page 36 PROGRAMMAZIONE DATA/ORA IMPOSTAZIONE DISPLAY (E TEMPO EROGAZIONE) Tramite i tasti è possibile diminuire e aumen- Sul display è visualizzato: (Solo versione T3) tare la temperatura n.1 nel range [40°C ÷ 80°C] / E’ possibile visualizzare nella pagina principale le tem- [104°F ÷...
- Page 37 Sul display è visualizzato: ne che con il Continuo, la riga inferiore del Display Nel caso in cui si sia scelto di abilitare la visualizzazione viene adibita alla visualizzazione del tempo di ero- delle temperature nella pagina principale, all’accen- TEMPO DI EROGAZ. gazione (o dei tempi se più...
- Page 38 tempi di erogazione siano disattivati, il processo di puli- Ad ogni gruppo è riservata una zona della riga infe- Premendo il tasto ENTER il display visualizzerà: zia verrà visualizzato sulla riga inferiore. riore: la zona a sinistra è per il gruppo 1, quella di TEMPO DI EROGAZ.
- Page 39 IMPOSTARE IL SETPOINT PRESS TABELLA PRESSIONE - TEMPERATURA 1,30 253,4 Il SETPOINT PRESS: permette di scegliere la pressio- 1,35 255,2 ne/temperatura di lavoro a regime. 1,40 124,5 256,1 °C °F 1,45 1,50 258,8 SETPOINT PRESS 0,50 110,5 230,9 1,55 126,5 0,55 111,5 232,7...
- Page 40 Per far scomparire la parola MANUTENZIONE oc- SELEZIONE LINGUA Premendo il tasto si scorrono gli ultimi dieci allar- correrà spostare la data in avanti oppure aumentare Sul display è visualizzato: mi memorizzati. Dopo il decimo allarme, premendo il numero dei caffè. di nuovo il tasto si passa alla pagina successiva.
- Page 41 Premendo il tasto ENTER, il display visualizza: ACCEDERE ALLE FUNZIONI NASCOSTE Premendo il tasto ENTER, sul display verrà visua- Questo permette di accedere ad altre funzioni speciali. lizzato: TEMPERATURA In REG. LUMINOSITA’ premere i tasti 1 caffè lungo PULSANTI FAHRENEIT DISPLAY del PRIMO &...
- Page 42 Livello in erogazione: non attivo - attivo COLLEGAMENTI DIRETTI sarà in gradi Celsius (°C) oppure in gradi Fahrenheit UP/DOWN per cambiare). Nello stato "macchina pronta" è possibile accedere (°F). L’impostazione della visualizzazione in temperatu- Taratura della temperatura: -15 - 0 - 15 °C/F direttamente alle impostazioni di seguito, invece di pas- ra e la scelta della scala modificano anche la pagina di UP/DOWN per cambiare).
-
Page 43: Pulizia E Manutenzione
PULIZIA E MANUTENZIONE 8.1 ARRESTO sollevandolo anteriormente verso l’alto e sfilarlo, toglie- NOTA BENE re il sottostante piatto raccogliacqua e pulire il tutto con Per la pulizia operare come descritto: Per arrestare la macchina bisogna ripremere l’interrut- acqua calda e detersivo. Pulizia carena: per pulire tutte tore generale e portarlo nella posizione "O". -
Page 44: Pulizia Del Gruppo Con L'ausilio Del Filtro Cieco
8.4 PULIZIA DEL GRUPPO CON ④ Ripetere l’operazione più volte. L'AUSILIO DEL FILTRO CIECO ⑤ Togliere i portafiltro ed effettuare alcune erogazioni. La macchina è predisposta per il lavaggio del gruppo erogazione tramite detergente specifico in polvere. 8.5 PULIZIA DEI FILTRI E PORTAFILTRI La macchina inizierà... -
Page 45: Messaggi Funzioni Macchina
MESSAGGI FUNZIONI MACCHINA INDICAZIONI DISPLAY CAUSA EFFETTO SOLUZIONE NOTA E TASTI Al momento della diagnosi il La macchina non riscalda e tutte ERRORE DIAGNOSI sistema presenta delle anomalie le funzioni sono bloccate. sulle eprom della centralina. Raggiunto il tempo limite di L'indicazione sul display erogazione (120 sec.) il Premere il tasto RESET o uno... - Page 46 INDICAZIONI DISPLAY CAUSA EFFETTO SOLUZIONE NOTA E TASTI La caldaia è provvista di un L'indicazione sul display Il sistema si autoripristina non termostato di sicurezza a riarmo Quando la temperatura della ERRORE PRESSIONE lampeggia, e la resistenza appena la temperatura scende manuale, se la resistenza non si macchina supera i 130°C.
- Page 47 Read carefully what is advised in the instruction manual for “setting-up” of your You will see how easy it is to make delicious coffee and creamy cappuccinos. With the passing of time, you will also realise how little maintenance is needed. Victoria Arduino...
- Page 49 Model: 2 groups - Net weight: 84 Kg - Gross weight: 90 Kg - Thermal power: 4500 W - Boiler capacity 14 lt - Volts 230-380V 50/60Hz Model: 3 groups - Net weight: 98 Kg - Gross weight: 108 Kg - Thermal power: 5000 W - Boiler capacity 17 lt - Volts 230-380V 50/60Hz The approval mark certifies that all machines have been subjected to accurate inspection tests and checks...
- Page 50 INDEX ..............62 COMMISSIONING PROCEDURE OR AFTER BOILER MAINTENANCE (T3 VERSION) ............TECHNICAL CHARACTERISTICS ...... 47 TURNING THE MACHINE ON ............LED SWITCH ON ................GENERAL REMARKS ON BUTTONS KEY (Selection Configuration) ..........THE CONSIGNMENT .......... 49 STEAM FLOW ADJUSTMENT ............SAFETY REGULATIONS ..............
- Page 51 GENERAL REMARKS ON THE CONSIGNMENT 1.1 SAFETY REGULATIONS ➌ ➍ Before connecting the machine, make sure that the When installing the device, it is necessary to use data of the plate correspond to those of the electrical the parts and materials supplied with the device itself. ➊...
- Page 52 ❻ ❾ do not use the machine barefoot; This machine will have to be used only for the At the end of installation, the device is switched on do not use extensions in places used as a bath or purpose described in this manual. and taken to rated operating conditions, leaving it in a shower;...
- Page 53 ⓬ ⓯ ⓳ In case of breakdown or wrong functioning of the In the event that you decide not to use a machine The maximum noise disturbance level is lower machine, switch it off. of this kind anymore, we advise you make it ineffective than 70db.
- Page 54 to give the equipment that got to its life cycle to the suit- able separate waste collection centres of electronic and electrotechnical wastes, or to give it back to the seller or dealer when buying a new equipment of equivalent type, in terms of one to one.
- Page 55 DESCRIPTION - DIGIT - T3 Delivery Unit Buttons LCD Display Electric Cup-Warmer Select Buttons Hot Water / Steam Programming Keys Delivery Unit Manual Steam Nozzle Adjustment Dial Filter-Holder Steam Flow Hot Water Nozzle Cup Rack Drip Tray Autosteam Nozzle Machine Main Switch Piede Regolabile Fig.
- Page 56 2.1 ACCESSORIES LIST CODE DESCRIPTION 2 GROUPS 3 GROUPS Filling tube ” Worktop draining tube Ø 25 mm - l. 150 cm Filter-holder Double lter Single lter Blind lter Spring Double delivery spout Single delivery spout Coffee presser Micro bre cloth Fig.
- Page 57 Once at destination, always using an adequate lifting Once the machine has been freed of the pallet or con- When contacting the manufacturer, Victoria Arduino for mechanism (eg. fork-lift), after making sure there is no tainer, do not discard these in the environment - pollution any reason, always quote the machine serial number.
- Page 58 INSTALLATION AND PRELIMINARY OPERATIONS After unpacking, assess that the machine and its WARNING accessories unit are complete, then proceed as fol- Recommended mains pressure for the water is [2.3] bar. lows: place the machine so that it is level on a flat sur- WARNING face;...
- Page 59 for V 380 / 3 phases voltage + Neutral: NOTE ① Black For a correct functioning of the machine the water ② Grey works pressure must not exceed 4 bars. ③ Brown Otherwise install a pressure reducer upstream of the ④...
- Page 60 ADJUSTMENTS TO BE MADE BY A QUALIFIED TECHNICIAN ONLY 5.1 FILLING BOILER MANUALLY turn the manual “A” level tap so that water will To fill the boiler manually for the first time, proceed as follows: enter the boiler; NOTE This operation must be carried out with the machine remove the grid and the drip tray;...
- Page 61 PRESSOSTAT / PUMP ADJUSTMENT Turn the pump registration screw, turning it clock- The set pump pressure is displayed in the pressure wise to INCREASE and counter clock wise to gauge, inside the machine (see Fig. 11); DECREASE the pressure; NOTE This operation can be carried out while the machine is turned on.
- Page 62 5.3 HOT WATER ECONOMISER To access the economiser, remove the cup warm- Turn the adjustment knob ANTICLOCKWISE / ADJUSTMENT er section on the left by loosening the two screws CLOCKWISE to INCREASE / REDUCE the tempera- "D" as illustrated in the following figure. ture of the hot water;...
- Page 63 5.4 CLOCK BATTERY REPLACEMENT WARNING Replacement of the lithium battery must be carried out The electronic control unit is equipped with a lithium bat- EXCLUSIVELY by Qualified Technician. tery to provide the clock with an approximately three-year Nuova Simonelli cannot be held liable for any damage autonomy period, after which replacing the battery may to people or things due to non observance of the safety prove necessary.
- Page 64 Before starting to use the appliance, the operator must be using the main switch positioned lower down and on the 6.2 TURNING THE MACHINE ON sure to have read and understood the safety prescriptions right and proceed as follows: contained in this booklet. ①...
- Page 65 MANUAL SWITCHING ON / OFF NOTE NOTE The machine is not operative in that the main switch On completion of the check up all the selection keys Automatic On / Off NOT PROGRAMMED only supplies the electronic card. are activated. SWITCH ON WARNING WARNING...
- Page 66 6.4 BUTTONS KEY The control unit will perform an auto diagnosis of all func- The machine will SWITCH OFF at the first time set for stop- Selection Configuration tions and all of the selection keys will light up. ping the coffee maker (see chapter on PROGRAMMING Once the diagnosis is complete, the display will read as and paragraph on PROGRAMMING ON –...
- Page 67 6.6 ADJUSTING THE TURBOCREAM 6.5 STEAM FLOW ADJUSTMENT Fig. 17.A NOZZLE (If Fitted) Use the lever to increase/reduce the flow of steam injected into the milk, as illustrated in the following figure. To increase/reduce the amount of air injected into the milk from the TurboCream nozzle (and therefore to increase/reduce the amount of foam in the heated milk) proceed as illustrated in Fig.
- Page 68 6.7 ADJUSTING THE AUTOSTEAM Fig. 18.A NOZZLE (If Fitted) To increase/reduce the amount of air injected into the milk from the TurboCream nozzle (and therefore to increase/reduce the amount of foam in the heated milk) proceed as illustrated in Fig. 18: ①...
- Page 69 PROGRAMMING 7.1 KEY LIST OF DISPLAY FUNCTIONS (USER MODE) AUTOMATIC CLEANING CYCLE AUTO CLEAN CYCLE The display will show: DOSES POURING COUNT AUTO.CLEAN.CYCLE TOTAL MACHINE TOTAL TOTAL WASHES Press ENTER and the display will read: 7.2 PROGRAMMING (USER Mode) Fig. 19 AUTO.CLEAN.CYCLE To enter the user mode display environment, hold down SELECT...
- Page 70 Carrying out a cleaning cycle in more than one unit responding counter on the display. DOSES at a time is possible. Press the key to return to the previous function. The display will read: RESET Press the key to quit the display mode. Press the key to start the unit automatic DOSES...
- Page 71 7.3 PROGRAMMING ON-OFF PROGRAM. Press the keys to view the other functions. (TECHNICIAN Mode) ENERGY SAVING Press the RESET key to quit the display mode. SETPOINT TEMPERATURE (and OFFSET) To enter the Technician Mode programming environ- WASH COUNT CUP-WARMER PRO. ENTER ment, hold down the key for at least 10 sec-...
- Page 72 Press ENTER and the display will read: been activated within the 1st unit. Once the WHILE WASHING” (see function), after the groups to cycle of 15 deliveries of 5 seconds each, with a be cleaned have been selected, pressing the ENTER 10-second pause between each delivery, has been key will quite the washing mode to use the other, non- AUTO.CLEAN.CYCLE...
- Page 73 The display will show the new dose amount which The display will show the new dose value set which Press ENTER, and the display will read: can still be changed by means of the keys can still be changed by pressing the keys.
- Page 74 automatically stop. button will turn off. In the standard version (without temperature probe), on pressing the the display will read: TRANSFERRING DOSES When the display reads: PROGRAM. DOSES PROGRAM DOSES STEA.SEC. SELECT followed by the amount already set by the manu- transferring the set dose to other units is possible by Fig.
- Page 75 STANDARD DOSES The display will read: By pressing the ENTER key the display will read: When the display reads: SELECTION TOTAL PROGRAM DOSES DOSES TRANSFER SELECT SELECT SELECT GROUPS All the delivery keys will start to flash on and off. By we mean to recall the standard dose values.
- Page 76 To access the automatic cleaning counter press NOTE: To make a change effective, it is necessary to should be X=3, for machines with 4 units, the ENTER. switch the machine off and then on again, using value should be X=4. the main switch located in the bottom right.
- Page 77 Use the keys to vary the starting up time. This function allows the machine to enter an active maintains a pressure of 0.80 bar and the display (set Press ENTER to confirm and to go on to the pro- STANDBY status, where it is possible to choose whether to minimum brightness) reads "LOW POWER USE".
- Page 78 unit has been confirmed, the function returns to the keys serve to adjust the OFFSET of the CUP-WARMER PROGRAMMING main menu. various unit boilers. The display will read: Pressing the RESET key moves to the next value to The ENTER key confirms and passes to the next CUPWARMER PROG.
- Page 79 Press RESET to return to the previous page without reduce the temperature no.2 within a certain range The message ON XX will begin to flash; use the confirming. [40°C ÷ 80°C] / [104°F ÷ 176°F]. keys to change the cup warmer open time (from Press ENTER to confirm and pass to the next step.
- Page 80 Confirm by pressing the ENTER key. menu. started - unless with the Continuous function - the Once the hours and the minutes have been varied If “NOT ACTIVE” is selected, this opens the “DELIV- bottom line of the display will show the delivery time press ENTER again and vary the day, the month ERY TIME”...
- Page 81 If the choice of activating the temperature display on the setting menu to switch off the machine either in manual When the ENTER key is pressed, the display will main page, when the power unit is switched on or the or automatic mode.
- Page 82 key is pressed, the display will a group is not delivering, the area is empty. When the ENTER 0,90 117,5 243,5 read Here below is an example: unit 1 is delivering (it has 0,95 244,4 SETPOINT PRESS just started and 0 seconds have passed); unit 2 has 1,00 246,2 been delivering for 12 seconds and unit 4 is deliver-...
- Page 83 By pressing the ENTER key, the display will read: Use the ENTER key to confirm. After setting the minute you return to the main menu. Once the set delivery limit or the set maintenance Pressing the RESET button to return to the main menu ERROR 01 date have been reached, the display will visualize and any changes made are not saved.
- Page 84 TEMPERATURE UNITY MEASURE SELECTION KEYBOARD LIGHTING ADJUSTMENT ENTER THE HIDDEN FUNCTIONS The display will read: The display will read: This allows to enter other special functions. In BRIGHTNESS ADJUST. mode, hold down the 1 long TEMPERATURE LIGHT ADJUSTMENT coffee keys of the FIRST & SECOND group for at least 3 sec to open the special menu.
- Page 85 Pressure calibration: -200 - 0 - +200 mbars Press ENTER to confirm and pass to the next step. UP/DOWN to switch). MONITORING UNIT (°C/°F - BAR) Pre brewing: not active - active The display can also show you the pressure or tempera- UP/DOWN to switch).
- Page 86 CLEANING AND MAINTENANCE 8.1 SWITCHING OFF THE MACHINE up from the front and sliding it out. Remove the water NOTE collection dish underneath and clean everything with hot To clean proceed as follows: To switch the machine off press the main switch and water and cleansers.
- Page 87 8.4 CLEANING THE UNIT WITH ④ Repeat the procedure several times. THE AID OF THE BLIND FILTER ⑤ Remove the filter-holder and carry our a few deliver- ies. The machine is pre-set for cleaning the delivery unit with a specific washing powder. 8.5 CLEANING FILTERS AND FILTER-HOLDERS The machine will initiate washing cycle which consists...
- Page 88 MACHINE FUNCTION MESSAGES DISPLAY AND KEY CAUSE EFFECT SOLUTION NOTES INDICATIONS At the time of the diagnosis the If after 90 sec of machine func- DIAGNOSIS OF ERROR system presents faults within the tioning the water level is not re- control unit EPROM.
- Page 89 DISPLAY AND KEY CAUSE EFFECT SOLUTION NOTES INDICATIONS The boiler is provided with a man- The display indicator will ash The system will be re-estab- When the machine’s tempera- ual re tting safety thermostat; if PRESSURE ERROR on and off and the resistor is de- lished as soon as the tempera- ture is higher than 130°C.
- Page 91 Lisez attentivement les indications contenues dans la notice d’instructions pour “préparer” votre Vous apprécierez la facilité d’opération pour obtenir d’excellents cafés et des cappuccinos crémeux. Avec le temps, vous remarquerez aussi que votre nouvelle machine requiert un entretien minimum. Victoria Arduino...
-
Page 93: Caractéristiques Techniques
Modèle: 2 groupes - Poids Net: 84 Kg - Poids Brut: 90 Kg - Puiss. Thermique: 4500 W - Capacité chaudière 14 lt - Volts 230-380V 50/60Hz Modèle: 3 groupes - Poids Net: 98 Kg - Poids Brut: 108 Kg - Puiss. Thermique: 5000 W - Capacité chaudière 17 lt - Volts 230-380V 50/60Hz La marque d’approbation certifie que toutes les machines ont été... - Page 94 SOMMAIRE UTILISATION ............106 PROCÉDURE DE PREMIERE INSTALLATION OU APRÈS L’ENTRETIEN DES CHAUDIÈRES (VERSION T3) ......MISE EN MARCHE DE LA MACHINE ..........CARACTÉRISTIQUES TECHNIQUES....91 ALLUMAGE VOYANTS LUMINEUX ..........LÉGENDE TOUCHES (Configuration sélections) ........ NOTES GÉNÉRALES A LA LIVRAISON....93 RÉGLAGE FLUX DE LA VAPEUR.............
-
Page 95: Notes Générales A La Livraison
NOTES GÉNÉRALES A LA LIVRAISON 1.1 PRESCRIPTIONS DE SÉCURITÉ ➌ L’emploi d’adaptateurs de même que de prises mul- Avant de brancher l’appareil, veillez à ce que les tiples et de rallonges est interdit. Si leur usage s’avère données indiquées sur la plaquette correspondent à ➊... - Page 96 d’installation. L’installateur doit recevoir de la part du ➑ - ouverture de chaque sortie vapeur pendant 1 minute. Les températures maximum et minimum de stoc- propriétaire/gérant de l’installation, une confirmation Au terme de l’installation, il serait préférable de rédiger kage doivent être comprises entre [- 5 + 50]°C. écrite indiquant que l’eau respecte les caractéristiques un rapport des opérations effectuées.
- Page 97 ⓫ ⓮ Le technicien autorisé doit, avant d’effectuer toute Afin d’éviter des surchauffes dangereuses, il est ATTENTION RISQUE DE BRULURES opération d’entretien, débrancher la prise après avoir conseillé de bien dérouler sur toute la longueur le câble éteint l’interrupteur de la machine. d’alimentation.
- Page 98 point de vue de l’environnement, contribue à éviter de ATTENTION possibles effets négatifs sur le milieu et sur la santé et il favorise le recyclage des matériels dont l’appareillage RENSEIGNEMENT AUX UTILISATEURS se compose. L’enlèvement illégal du produit de la part Aux sens de l’art.
-
Page 99: Description
DESCRIPTION - DIGIT - T3 Poussoirs Groupe de Distribution Affichage LCD Chauffe-tasses Électrique Poussoirs Sélection Eau Chaude / Vapeur Touches Programmation Groupe de Distribution Lance Vapeur Manuelle Poignée de Réglage Support à Filtres Flux Vapeur Lance Eau Chaude Grille Appuie-tasses Plateau à... -
Page 100: Liste Accessoires
2.1 LISTE ACCESSOIRES CODE DESCRIPTION 2 GROUPES 3 GROUPES Tube arrivée ” Tube évacuation plan de travail Ø 25 mm - l. 150 cm Support à ltres Double ltre Filtre unique Filtre borgne Ressort Double bec de distribution Bec unique de distribution Presse café... -
Page 101: Transport Et Déplacement
TRANSPORT ET DEPLACEMENT 3.1 IDENTIFICATION DE LA MACHINE protection; pour effectuer cette opération, consulter les ATTENTION RISQUE D’IMPACT OU D’ECRASEMENT caractéristiques techniques du produit afin de contrôler Lors des opérations de déplacement, l’opérateur doit Pour toute communication avec le fabricant Victoria le poids de la machine devant être emmagasinée et de s’assurer qu’aucune personne, chose ou objet ne se Arduino, indiquer toujours le numéro de série qui est celui... -
Page 102: Installation Et Opérations Préliminaires
INSTALLATION ET OPERATIONS PRELIMINAIRES Après avoir retiré l’emballage et avoir vérifié l’intégrité ATTENTION de la machine et de ses accessoires, procéder de la La pression du réseau hydrique conseillée est de 2,3 bars. façon suivante: position la machine sur un plan horizontal; ATTENTION assembler les pieds de support de la machine en Eviter les étranglements des tubes de connexion. - Page 103 pour un voltage V 230 / monophasé: ATTENTION RISQUE DE DÉCHARGÉ ÉLECTRIQUE La machine doit toujours être protégée par un interrupteur automatique omnipolaire de puissance appropriée, avec une distance d’ouverture des contacts égale ou supérieure à 3 mm. Nuova Simonelli ne répond d’aucun dommage aux personnes ou aux choses dérivant du non respect des normes de sécurité...
-
Page 104: Réglages Du Technicien Qualifie
REGLAGES DU TECHNICIEN QUALIFIE 5.1 REMPLISSAGE MANUEL Pour effectuer le premier remplissage manuel, agir de agir sur le robinet niveau manuel “A”, pour per- DE LA CHAUDIERE la façon suivante: mettre l’entrée de l’eau dans la chaudière; retirer la grille et le plateau à gouttes; après environ 45 secondes, fermer le robinet ”A”... -
Page 105: Réglage Pompe
5.2 RÉGLAGE POMPE Agir sur la vis de réglage de la pompe pour La pression programmée de la pompe est affichée AUGMENTER (vers la droite) ou DIMINUER (vers dans le manomètre, logé à l’intérieur de la machine la gauche) la pression; (voir Fig. -
Page 106: Réglage Économiseur Eau Chaude
5.3 RÉGLAGE ÉCONOMISEUR Pour accéder à l’économiseur, démonter la portion tourner la poignée de réglage vers la GAUCHE / EAU CHAUDE chauffe-tasses de gauche en dévissant les deux DROITE pour AUGMENTER / DIMINUER la tempé- vis "D" comme illustré dans la figure suivante. rature de l’eau chaude;... -
Page 107: Remplacement De La Batterie De La Montre
5.4 REMPLACEMENT DE LA ATTENTION BATTERIE DE LA MONTRE Le remplacement de la batterie au lithium doit être effec- tuée UNIQUEMENT par un Technicien Spécialisé. La centrale électronique est munie d’une batterie au Nuova Simonelli ne répond pas des dommages aux lithium pour l’alimentation de la montre, avec une auto- personne sou aux choses dérivant du non respect des nomie d’environ 3 ans, après lesquels il est nécessaire... -
Page 108: Utilisation
UTILISATION Avant de commencer à travailler, l’opérateur doit avoir lu machine avec l’interrupteur général situé en bas à droite, cette dernière relance de nouveau le cycle pen- et compris toutes les prescriptions de sécurité indiquées procéder comme suit: dant 45 secondes. dans ce manuel. - Page 109 L’affichage, non éclairé, indique: MISE EN MARCHE / ARRÊT MANUEL NOTE Toutes les touches de sélection sont validées dès la On - Off Automatique NON PROGRAMME fin du diagnostic. MISE EN MARCHE ATTENTION Frapper la touche RESET pendant 2 secondes, la Si le diagnostic indique des anomalies ou des pannes sonnette émet un bip sonore, l’affichage s’allume en NOTE...
-
Page 110: Allumage Voyants Lumineux
La centrale effectue l’auto-diagnostic des fonctions et La machine s'ÉTEINT au premier horaire d’arrêt program- 6.4 LÉGENDE TOUCHES Configuration sélections toutes les touches de sélection s’allument. mé (voir chapitre "PROGRAMMATION" et paragraphe Lorsque le diagnostic est terminé, l’affiche indique: "PROGRAMMATION ON - OFF"). CHAUFFAGE NOTE Il est possible d’allumer ou d’éteindre la machine... -
Page 111: Réglage Flux De La Vapeur
6.5 RÉGLAGE FLUX DE LA 6.6 RÉGLAGE LANCE TURBOCREAM Fig. 17.A VAPEUR (Si Installée) Pour augmenter/diminuer le flux de la vapeur injectée Pour augmenter/diminuer la quantité d’air injecté dans dans le lait, agir sur la levier comme illustré dans la le lait à... -
Page 112: Réglage Lance Autosteam (Si Installée)
6.7 RÉGLAGE LANCE AUTOSTEAM Fig. 18.A (Si Installée) Pour augmenter/diminuer la quantité d’air injecté dans le lait à travers la lance AutoSteam (et par conséquent pour augmenter/diminuer le pourcentage de crème dans le lait monté) procéder comme illustré en Fig. 18: ①... -
Page 113: Programmation
PROGRAMMATION 7.1 LÉGENDE LISTE DES FONCTIONS AFFICHABLES CYCLE AUTOMATIQUE DE NETTOYAGE (MOD. UTILISATEUR) L’afficheur visualise: CYCL. AUT. NETTOYAGE DOSES CYCL.AUT.NETTOY. COMPTE DISTRIBUTIONS TOTAL TOTAL MACHINE COMPTE LAVAGES ENTER Frapper et l’affichage indique: Fig. 19 7.2 AFFICHAGE (Mod. UTILISATEUR) CYCL.AUT.NETTOY. ① Affichage LCD. SELECTION Touche RESET: pour allumer et éteindre la... - Page 114 est possible aussi d’effectuer le lavage sur plu- RESET COMPTE DISTRIBUTION Appuyer sur la touche pour afficher la fonc- sieurs groupes en même temps. tion suivante ou pour quitter l’environnement d’affi- L’afficheur visualise: chage. Frapper la touche pour lancer le cycle de COMPT.DISTRIB.
- Page 115 met à clignoter et en la frappant, le nombre de cafés COMPTE DE LAVAGE ECONOMIE D’ENERGIE effectués avec ce groupe s’affiche. L’afficheur visualise: SETPOINT TEMPERATURE (ET OFFSET) Frapper les touches pour afficher les autres PRO. CHAUFFE-TASSES COMPT.LAVAGES fonctions. DATE/HEURE RESET Frapper la touche pour quitter l’environne- PROGR.
-
Page 116: Programmation (Mod. Technicien)
° Uniquement version Digit Frapper ENTER et l’affichage indique: où 1L indique que le cycle de nettoyage a été 7.3 PROGRAMMATION (Mod. TECHNICIEN) activé sur le 1er groupe. A la fin du cycle de 15 distributions de 5 secondes chacune, avec une CYCL.AUT.NETTOY. - Page 117 S’il a été sélectionné avec la fonction "DISTRIBUTION PROGRAMMATION DOSES Varier la dose, en agissant sur les poussoirs EN MODE LAVAGE" actionnée (voir fonction), après L’afficheur visualise: avoir sélectionné les groupes à laver, on peut quitter le Frapper la touche café qui doit être programmé, PROGRAM.
- Page 118 La valeur X.X est celle programmée. La distribution commence. Lorsque la dose désirée PROGRAM. DOSES Frapper les touches pour varier le temps de est atteinte, frapper à nouveau le poussoir TEMP. VAP. °C distribution d’eau chaude à verser. Si on désire effectuer un autre échantillonnage, L’affichage indique la nouvelle valeur programmée frapper à...
- Page 119 L’affichage indique: Frapper la touche ENTER pour confirmer. A ce point, les touches café continu L’affichage indique alors: TRANSFERT DOSES mettent à clignoter. PROGRAM. DOSES Sélectionner l’une ou plusieurs touches continues SELECT. GROUPES (la/les touche/s sélectionnées s’allument de façon SELECTION fixe).
- Page 120 COMPTAGE DISTRIBUTIONS GROUPES ACTIFS Frapper la touche et l’affichage indique: L’affichage indique: (Uniquement version T3) TOTAL MACHINE Il est possible de programmer les groupes effec- tivement présents ainsi que ceux qui devront être COMPT. DISTRIB. DISTR. XXXX actionnés au moment de la mise en marche de la centrale.
- Page 121 pal situé en bas à droite. PROGRAM. ON/OFF l’horaire programmé pour l’arrêt (l’indication OFF NOTE: Avec la condition de machine prête, il est L’affichage indique: 23:30 se met à clignoter). possible d’actionner/exclure les groupes Utiliser les touches pour modifier l’horaire exclus/actionnés en frappant la touche d’arrêt.
- Page 122 Cette fonction permet à la machine d’entrer dans une BASSE CONSOMMATION" SETPOINT TEMPERATURE visualise " condition de STANDBY actif qui permet de choisir STANDBY 0.80 bar: en modalité STANDBY la (ET OFFSET) (Uniquement version T3) d’éteindre entièrement la machine ou de la maintenir à Il est possible d’accéder à...
- Page 123 RÉGLAGE OFFSET OFFS. G3 : Offset groupe 3 En frappant la touche ENTER, l’affichage indique Quand l’afficheur visualise: OFFS. C3 : Offset chaudière 3 par exemple: OFFS. G4 : Offset groupe 4 SETPOINT TEMP OFFS. C4 : Offset chaudière 4 PROG.
- Page 124 Température Individuel PROGRAMMATION DATE/HEURE A l’aide des touches il est possible de dimi- L’affichage indique: L’affichage indique: nuer et d’augmenter la température n.1 à l’intérieur du range [40°C ÷ 80°C] / [104°F ÷ 176°F]. CHAUFFE-T. DATE/HEURE Frapper la touche RESET pour revenir à la page précédente sans confirmer.
- Page 125 PROGRAMMATION AFFICHEUR ET TEMPS En frappant la touche ENTER l’afficheur visualise: Chaque groupe est associée à une zone de la EXTRACTION (uniquement version T3) ligne inférieure: la zone de gauche est associée au TEMP DE DISTRIB. Il est possible d’afficher sur la page principale les tem- groupe 1, celle à...
- Page 126 DISTRIBUTION EN MODE LAVAGE PROGRAMMATION DU TEMPS DE DISTRIBUTION Frapper la touche RESET pour revenir à la page Il est possible d’actionner ou d’exclure la possibilité de (Uniquement version Digit) précédente sans confirmer. quitter le menu avec la touche ENTER durant un cycle Le modèle Digit est muni d’un dispositif électrique Si l’affichage du temps de distribution est actif de lavage hors du menu et de permettre les extractions.
- Page 127 Frapper la touche ENTER pour confirmer et passer 1,05 119,5 247,1 Zone réservée au temps Zone réservée au temps à la fonction suivante. 1,10 120,5 248,9 de distrib. du groupe 2 de distrib. du groupe 3 Frapper la touche RESET pour revenir à la page 1,15 249,8 précédente sans confirmer.
- Page 128 En frappant la touche ENTER, l’affichage indique: Utiliser les touches pour programmer les deux nant par contre le mode ACTIF, il est nécessaire de pro- valeurs. grammer avec les touches et ENTER les heures et Utiliser la touche ENTER pour confirmer. Après avoir les minutes après lesquelles l’alarme sera affichée.
- Page 129 CHOIX UNITÉ DE MESURE TEMPÉRATURE RÉGLAGE LUMINOSITÉ CLAVIER ACCÉDER AUX FONCTIONS CACHÉES L’affichage indique: L’affichage indique: Cela permet d’accéder aux autres fonctions spéciales. En modalité REG. LUMINOSITÉ, appuyer sur les REG.LUMINOSITE TEMPERATURE touches 1 café léger du PREMIER & DEUXIÈME groupe pendant au moins 3 secondes pour accéder au menu spécial.
- Page 130 Eau chaude : avec pompe - sans pompe ACCÈS DIRECTS est en degrés Celsius (°C) ou Fahrenheit (°F). La pro- Dans l’état 'machine prête' il est possible d’accéder grammation de l’affichage en température et le choix de UP/DOWN pour changer). Niveau en distribution directement aux programmations ci-dessous à...
-
Page 131: Nettoyage Et Entretien
NETTOYAGE ET ENTRETIEN 8.1 ARRÊT DE LA MACHINE faisant glisser; retirer le plateau de récupération de l’eau Pour le nettoyage, procéder de la façon suivante: et nettoyer le tout avec de l’eau chaude et du détergent. Pour arrêter la machine, il faut frapper à nouveau Nettoyage carrosserie: pour nettoyer toutes les parties Dévisser la vis située au centre de la douche. -
Page 132: Nettoyage Du Groupe Avec L'aide Du Filtre Borgne
8.4 NETTOYAGE DU GROUPE AVEC ③ Frapper l’une des touches café et interrompre L’AIDE DU FILTRE BORGNE après 10 secondes. ④ Répéter l’opération plusieurs fois. La machine est prédisposée pour le nettoyage du ⑤ Retirer le support à filtre et effectuer quelques distri- groupe de distribution à... -
Page 133: Messages Fonctions Machine
MESSAGES FONCTIONS MACHINE INDICATIONS AFFICHAGE ET CAUSES EFFET SOLUTION NOTE TOUCHES Au moment du diagnostic, le La machine ne se réchauffe ERREUR DIAGNOSTIC système présente des anomalies sur pas et toutes les fonctions les cartes Eprom de la centrale. sont bloquées. Après avoir atteint le temps limite L’indication clignote sur Frapper la touche RESET ou... - Page 134 INDICATIONS AFFICHAGE ET CAUSES EFFET SOLUTION NOTE TOUCHES La chaudière est munie d’un Le système se rétablit L’indication clignote sur thermostat de sécurité à Lorsque la température de la automatiquement dès que la ERREUR PRESSION l’af chage, et la réarmement manuel; si la machine dépasse les 130°...
- Page 136 Victoria Arduino Via Madonna d'Antegiano, 6 62020 Belforte del Chienti (MC) Italy T +39-0733-950243 F +39-0733-950247 Videoconf +39-0733-950201 info victoriaarduino.com www.victoriaarduino.com...
Need help?
Do you have a question about the Adonis+ 2 Gr and is the answer not in the manual?
Questions and answers