Table of Contents
Advertisement
Available languages
Available languages
Quick Links
BAGNOMARIA ELETTRICO
ELECTRIC BAIN-MARIE
ELEKTRISCHES BAINMARIE
BAIN MARIE ÉLECTRIQUE
BAÑOMARÍA ELÉCTRICO
MANUALE D'USO E INSTALLAZIONE
MANUEL D'UTILISATION ET D'INSTALLATION
USE AND INSTALLATION MANUAL
BEDIEN- UND INSTALLATIONSHANDBUCH
MANUAL DE USO E INSTALACIÓN
090BM1E
190BM2E
Italiano
English
Deutsch
Français
Español
Ed.1
06/2008
3071710
IT
GB
DE
FR
ES
Advertisement
Chapters
Table of Contents

Related Manuals for Angelo Po 090BM1E


Summary of Contents for Angelo Po 090BM1E
- Page 1 BAGNOMARIA ELETTRICO ELECTRIC BAIN-MARIE 090BM1E ELEKTRISCHES BAINMARIE 190BM2E BAIN MARIE ÉLECTRIQUE BAÑOMARÍA ELÉCTRICO MANUALE D’USO E INSTALLAZIONE USE AND INSTALLATION MANUAL BEDIEN- UND INSTALLATIONSHANDBUCH MANUEL D’UTILISATION ET D’INSTALLATION MANUAL DE USO E INSTALACIÓN Italiano English Deutsch Français Español Ed.1 06/2008...
-
Page 3: Table Of Contents
Raccomandazioni per la ma- Acqua, allacciamento Dismissione apparecchiatura nutenzione Allacciamento acqua Dispositivi di sicurezza Raccomandazioni per la movi- Allacciamento elettrico Guasti, ricerca mentazione e installazione 090BM1E Ricerca guasti Allacciamento elettrico Identificazione costruttore e Riempimento svuotamento 190BM2E apparecchiatura vasca Apparecchiatura e costruttore,... -
Page 4: Informazioni Generali
INFORMAZIONI GENERALI RACCOMANDAZIONI PER IL LETTORE parte: contiene tutte le informazioni ne- Per rintracciare facilmente gli argomenti specifici di interesse, consultare l'indice analitico posto all'ini- cessarie ai destinatari omogenei, cioè tutti gli zio del manuale. operatori esperti e autorizzati a movimentare, Questo manuale è... -
Page 5: Informazioni Tecniche
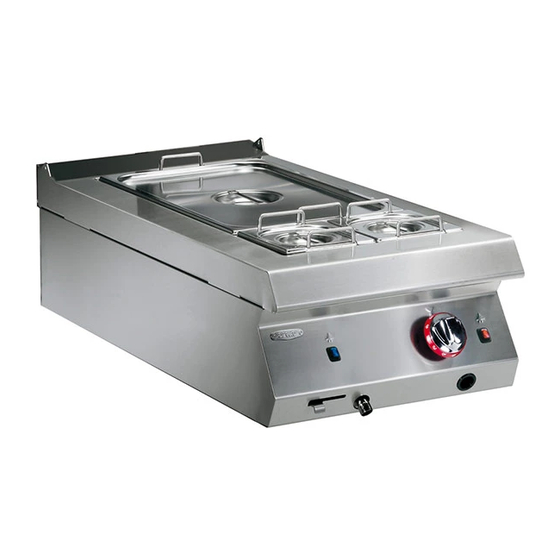
è prodotta in più versioni (vedi figura). ve per riscaldare gli alimenti a bagnomaria. 190BM2E 090BM1E Organi principali A)Vasca: è realizzata in acciaio inox B)Manopola comando resistenze: per regolare la potenza di riscaldamento. - Page 6 DATI TECNICI Vedi tabelle e “Scheda allacciamenti” in fondo al manuale. DISPOSITIVI DI SICUREZZA Anche se l’apparecchiatura è completa di tutti i di- spositivi di sicurezza, in fase di installazione e allac- ciamento essi dovranno, se necessario, essere integrati con altri in modo da rispettare le leggi vigenti in materia.
-
Page 7: Sicurezza
ACCESSORI A RICHIESTA A richiesta l’apparecchiatura può essere corredata dei seguenti accessori. A)Bacinelle B)Traversi per bacinelle C) Kit per installazione “su vano” (vedi pag. 12) BGN 1/6 D) Kit per installazione “a ponte” (vedi pag. 12) E) Kit trave di sostegno (vedi pag. 12) BGN 1/1 BGN 2/3 BGN 1/2 BGN 1/3 TRA 11 TRA 12... -
Page 8: Uso E Funzionamento
NORME PER LA SICUREZZA SULL'IMPATTO AMBIENTALE Ogni organizzazione ha il compito di applicare delle Sicurezza per lo smaltimento di Rifiuti di Appa- procedure per individuare e controllare l'influenza recchiature Elettriche ed Elettroniche (Direttiva che le proprie attività (prodotti, servizi, ecc.) hanno RAEE 2002/96) sull'ambiente. - Page 9 DESCRIZIONE COMANDI Sull'apparecchiatura sono disposti i comandi per at- C)Spia rete: accesa, segnala l'attivazione dell'alimen- tivare le funzioni principali. tazione elettrica. A)Manopola comando resistenze: per attivare, D)Spia temperatura: accesa, segnala che l'acqua non disattivare e regolare le resistenze di riscalda- ha raggiunto la temperatura impostata.
- Page 10 RIEMPIMENTO E SVUOTAMENTO VASCA Per questa operazione procedere nel modo indica- Riempimento 1 - Assicurarsi che la manopola (A) sia in posizio- ne "vasca chiusa". 2 - Premere il pulsante (B) per riempire la vasca d'acqua fino alla tacca di livello (C). IDM-39615700700.tif Svuotamento 1 - Posizionare un recipiente, di dimensioni...
-
Page 11: Manutenzioni
CONSIGLI PER L’USO Al fine di garantire un corretto uso dell’apparecchia- tura, è bene applicare i seguenti consigli: – utilizzare esclusivamente gli accessori indicati dal costruttore; – prima di riempire la vasca, verificare, tramite la manopola (A), che il rubinetto di scarico sia chiu- –... -
Page 12: Guasti
– Pulire accuratamente gli elementi che vengono a – Risciacquare le superfici con acqua potabile e contatto direttamente o indirettamente con gli ali- asciugarle. menti e tutte le zone limitrofe. – Prestare attenzione alle superfici in acciaio inox per non danneggiarle. In particolare, evitare l'uso Cautela - Avvertenza di prodotti corrosivi, non utilizzare materiale abra- sivo o utensili taglienti. -
Page 13: Movimentazione E Installazione
MOVIMENTAZIONE E INSTALLAZIONE RACCOMANDAZIONI PER LA MOVIMENTAZIONE E INSTALLAZIONE Importante Eseguire la movimentazione e l'installazio- Chi è autorizzato ad eseguire queste opera- ne nel rispetto delle informazioni fornite dal zioni dovrà, se necessario, organizzare un costruttore e riportate direttamente sull'im- "piano di sicurezza"... - Page 14 INSTALLAZIONE APPARECCHIATURA Tutte le fasi di installazione devono essere conside- rate sin dalla realizzazione del progetto generale. Prima di iniziare tali fasi, oltre alla definizione della zona di installazione, chi è autorizzato ad eseguire queste operazioni dovrà, se necessario, attuare un “piano di sicurezza”...
- Page 15 L) Kit trave di sostegno G)Kit per installazione “su vano” IDM-39614501300.tif ALLACCIAMENTO ELETTRICO (090BM1E) Importante L'allacciamento deve essere effettuato da personale autorizzato e qualificato, nel ri- spetto delle leggi vigenti in materia e con l'utilizzo di materiale appropriato e prescrit- to.
- Page 16 ALLACCIAMENTO ELETTRICO (190BM2E) Importante L'allacciamento deve essere effettuato da personale autorizzato e qualificato, nel ri- spetto delle leggi vigenti in materia e con l'utilizzo di materiale appropriato e prescrit- to. L'apparecchiatura viene fornita con ten- sione funzionamento 4000V/3N, commutabile a 230V/3. Cautela - Avvertenza Prima di eseguire qualsiasi intervento disatti- vare l'alimentazione elettrica generale.
- Page 17 6 - Rimuovere l'adesivo indicatore della tensione di collaudo applicato sulla targhetta di identifi- cazione e applicare quello nuovo per evidenzia- re la tensione in uso. Importante Ad operazione ultimata, accertarsi che non vi siano anomalie di funzionamento. IDM-3960200250.tif ALLACCIAMENTO ACQUA Per effettuare l'allacciamento, collegare il tubo di rete con il tubo di attacco dell'apparecchiatura, in- terponendo un rubinetto di intercettazione (A) per...
-
Page 18: Regolazioni
REGOLAZIONI MODALITÀ PER LE REGOLAZIONI Le funzioni principali dell’apparecchiatura non pre- di personale specializzato se non le regolazioni vedono particolari interventi di regolazione da parte eseguite in fase d’uso dall’utente. SOSTITUZIONI PARTI MODALITÀ PER LE SOSTITUZIONI L’apparecchiatura non prevede la sostituzione di nale specializzato se non la sostituzione di elementi parti funzionali che richiedano l’intervento di perso- di servizio che può... - Page 19 Description of controls Use, recommendations for Packaging and unpacking Electrical connection Use, useful advice for Procedure for requesting service (090BM1E) Useful advice for use Purpose of the manual Electrical connection (190BM2E) Water connection Recommendations for han- Environmental impact safety reg-...
-
Page 20: General Information
GENERAL INFORMATION INFORMATION FOR THE READER 2nd part: contains all the information neces- To find the specific topics of interest to you quickly, refer to the index at the start of the manual. sary for special categories of reader, i.e. all This manual is subdivided into two parts. -
Page 21: Technical Information
(see diagram). intended for heating food by the bain-marie method. 190BM2E 090BM1E Main Parts A)Well: in stainless steel B)Heating element control knob: for setting the heat- ing power. - Page 22 TECHNICAL DATA See tables and "Connection chart" at the back of the manual. SAFETY DEVICES Although the appliance is complete with all safety devices, during installation and connection addi- tional devices must be added if necessary to com- ply with the relevant legal requirements. A)Automatic resetting Thermostat: cuts off the electricity supply in case of overheating.
-
Page 23: Safety
OPTIONAL ACCESSORIES The appliance can be equipped with the following accessories on request. A)Containers B)Bridging bars for containers BGN 1/6 C)"Over cupboard" installation kit (see page 12) D)"Bridge" installation kit (see page 12) E)Supporting beam kit (see page 12) BGN 1/1 BGN 2/3 BGN 1/2 BGN 1/3 TRA 11 TRA 12 TRA 16... -
Page 24: Use And Operation
ENVIRONMENTAL IMPACT SAFETY REGULATIONS Every organisation is obliged to apply procedures to The Safe Disposal of Waste from Electrical and identify and monitor the effects of its operations Electronic Equipment (WEEE Directive 2002/96/ (products, services, etc.) on the environment. The procedures for identifying significant environ- Important mental impacts must consider the factors listed be- low. - Page 25 DESCRIPTION OF CONTROLS The appliance is fitted with the controls for use of its C)Mains light: comes on to indicate that the electricity main functions. supply is on. A)Heating element control knob: for turning the D)Temperature light: comes on to warn that the water heating elements off and on and setting their lev- is not yet at the preset temperature;...
- Page 26 FILLING AND EMPTYING THE WELL To carry out this operation, proceed as follows. Filling 1 - Check that the knob (A) is in the "well closed" position. 2 - Press the button (B) to fill the well with water up to the level marker (C).
-
Page 27: Servicing
USEFUL ADVICE FOR USE To ensure correct use of the appliance, the follow- ing rules should be adopted. – Use only the accessories recommended by the constructor. – Before filling the well, use the knob (A) to check that the drain tap is turned off. –... -
Page 28: Fault
– After use, clean the accessories with a suitable – Take special care not to damage stainless steel grease-remover product. If possible, wash in the surfaces. In particular, avoid the use of corrosive dishwasher. products and do not use abrasive materials or sharp tools. -
Page 29: Handling And Installation
HANDLING AND INSTALLATION RECOMMENDATIONS FOR HANDLING AND INSTALLATION Important When handling and installing the appliance use. If necessary, the person authorised to comply with the information provided by carry out these operations must organise a the constructor directly on the packaging, "safety plan"... - Page 30 INSTALLATION OF THE APPLIANCE All installation stages must be considered right from production of the general layout. Before starting these stages, as well as deciding the place of instal- lation, if necessary, the person authorised to carry out these operations must organise a "safety plan" to protect the people directly involved, and he must also ensure strict compliance with all legal require- ments, especially those relating to mobile work-...
- Page 31 H)"Bridge" installation kit arranging appliances in banks: L) Supporting beam kit G)"Over cupboard" installation kit IDM-39614501300.tif ELECTRICAL CONNECTION (090BM1E) Important The connection must be made by authorised, skilled personnel, in accordance with the rel- evant legal requirements, using appropriate and specified materials. The appliance is supplied with operating voltage 230V/1N, which cannot be switched to other values.
- Page 32 ELECTRICAL CONNECTION (190BM2E) Important The connection must be made by author- ised, skilled personnel, in accordance with the relevant legal requirements, using ap- propriate and specified materials. The ap- pliance is supplied with operating voltage 4000V/3N, which can be switched to 230V/3. Caution - warning Before doing any work, cut off the mains elec- tricity supply.
- Page 33 6 - Remove the test voltage indicator sticker from the dataplate and apply the new one to identify the voltage being used Important On completion of the operation make sure that there are no malfunctions. IDM-3960200250.tif WATER CONNECTION To make the connection, connect the mains line to the appliance's connection pipe, fitting a shut-off tap (A), to allow the water supply to be cut off when necessary.
-
Page 34: Adjustments
ADJUSTMENTS ADJUSTMENTS PROCEDURE The appliance's main functions do not require any settings made during use by the user. special adjustments by specialist staff except the REPLACING PARTS REPLACE PROCEDURE The appliance does not require the replacement of replacement of standard parts which can be carried operating components by specialist staff except the out by the user. - Page 35 Austauschverfahren Handhabung Installation, Sicherheitsvorschriften in Hin- Bedienelemente, Beschrei- Empfehlungen für die blick auf die Umweltbelastung bung Hersteller und Gerät, Kennzeich- Stromanschluss (090BM1E) Beschreibung Bedienele- nung Stromanschluss (190BM2E) mente Hinweisschilder, Sicherheit und Technische Daten Informationen Ein- und Ausschalten des Ge- Testlauf zur Abnahme des Ge- Hub und Handhabung räts...
-
Page 36: Allgemeines
ALLGEMEINES INFORMATIONEN FÜR DEN LESER 2. Teil: Diese Informationen wenden sich an Konsultieren Sie das Sachregister, das am Anfang des Handbuchs zu finden ist, um leichter unter be- eine bestimmte Zielgruppe. Sie sind für erfahre- stimmten Themen von besonderem Interesse ne Bediener bestimmt, die für Handhabung, nachschlagen zu können. -
Page 37: Technische Informationen
Das Gerät wird bedarfsabhängig in verschiedenen staurantbetrieben projektiert und konstruiert und dient Versionen hergestellt (siehe Abbildung). zum Erwärmen der Lebensmittel im Wasserbad. 190BM2E 090BM1E Hauptorgane A)Becken: aus Edelstahl B)Schalter Heizwiderstände: zum Einstellen der Heizleistung C)Schalter für Wasserablauf: zum Ablassen des Wassers aus dem Becken. - Page 38 TECHNISCHE DATEN Siehe Tabellen und „Anschlussschema" am Ende des Handbuchs. SICHERHEITSVORRICHTUNGEN Das Gerät wird zwar mit sämtlichen planmäßigen Sicherheitsvorrichtungen geliefert, es kann jedoch notwendig sein, während Installation und An- schluss ggf. weitere ergänzende Maßnahmen zu ergreifen, um den Anforderungen der einschlägi- gen geltenden Gesetze zu entsprechen.
-
Page 39: Sicherheit
OPTIONALES ZUBEHÖR Auf Wunsch kann das Gerät mit folgenden Zube- hörteilen ausgestattet werden. A)Behälter B)Träger für Behälter BGN 1/6 C)Einbausatz für die Montage auf Unterschrank (siehe Seite 12). D)Einbausatz für Brückenmontage (siehe Seite 12). E)Einbausatz für Träger (siehe Seite 12). BGN 1/1 BGN 2/3 BGN 1/2 BGN 1/3 TRA 11 TRA 12... -
Page 40: Gebrauch Und Betrieb
SICHERHEITSVORSCHRIFTEN IN HINBLICK AUF DIE UMWELTBELASTUNG Alle Betriebe müssen den Einfluss, den ihre Tätig- Sicherheit bei der Entsorgung von Elektro- und keiten (Produkte, Dienstleistungen usw.) auf die Elektronik-Altgeräten (WEEE-Richtlinie 2002/ Umwelt haben, durch geeignete Verfahren bestim- 96/EG) men und steuern. Die Verfahren zur Bestimmung der signifikanten Wichtig Auswirkungen auf die Umwelt müssen die nachste-... - Page 41 BESCHREIBUNG DER BEDIENELEMENTE Das Gerät ist mit Bedienelementen zur Aktivierung C)Kontrollleuchte Stromzufuhr: Das Leuchten zeigt der wichtigsten Funktionen ausgestattet. die Stomzufuhr an. A)Schalter Widerstände: Zum Ein-/Ausschalten D)Kontrollleuchte Temperatur: Das Leuchten zeigt und Einstellen der Heizwiderstände. an, dass das Wasser nicht die Einstelltemperatur B)Taste zum Füllen des Beckens: zum Füllen des hat;...
- Page 42 FÜLLEN UND ENTLEEREN DES BECKENS Für diesen Vorgang in der angegebenen Weise verfahren. Füllen 1 - Sicherstellen, dass sich der Schalter (A) in der Schaltstellung "Becken geschlossen" befindet. 2 - Die Taste (B) drücken, um das Wasserbecken bis Markierung (C) zu füllen. IDM-39615700700.tif Entleeren 1 - Ein passend großes Gefäß...
-
Page 43: Wartung
TIPPS FÜR DEN GEBRAUCH Um eine korrekte Anwendung des Gerätes zu ge- währleisten, sollten folgende Ratschläge befolgt werden: – Verwenden Sie ausschließlich das vom Herstel- ler angegebene Zubehör. – Vor dem Füllen des Beckens anhand des Schal- ters (A) kontrollieren, ob der Ablasshahn ge- schlossen ist. -
Page 44: Defekte
– Die Zubehörteile nach dem Gebrauch mit einem um sie nicht zu beschädigen. Insbesondere sollte geeigneten Fettlöser reinigen. Wir empfehlen die der Gebrauch von ätzenden Produkten, Scheu- Reinigung im Geschirrspüler. ermitteln und spitzen Gegenständen vermieden werden. Vorsicht – Achtung – Nur die äußeren Teile dürfen mit einem Wasser- strahl gereinigt werden. -
Page 45: Handhabung Und Installation
HANDHABUNG UND INSTALLATION EMPFEHLUNGEN FÜR DIE INSTALLATION UND HANDHABUNG Wichtig Beachten Sie die Hinweise des Herstellers, nen autorisierte Person wird bei Bedarf die direkt auf der Verpackung, auf dem Ge- einen „Sicherheitsplan" aufstellen müssen, rät selbst oder in der Gebrauchsanweisung um die Unversehrtheit der direkt an dem zu finden sind, wenn Sie das Gerät handha- Vorgang beteiligten Personen zu gewähr-... - Page 46 INSTALLATION DES GERÄTS Es müssen sämtliche Phasen der Installation, schon von der Umsetzung des allgemeinen Projekts an, be- rücksichtigt werden. Die für diese Operationen autori- sierte Person wird vor Einleitung dieser Phasen den Installationsstandort bestimmen und bei Bedarf einen „Sicherheitsplan" aufstellen, um die Unversehrtheit der direkt am Vorgang beteiligten Personen zu gewährlei- sten und die gesetzlichen Bestimmungen zu befolgen.
- Page 47 Für die in Reihe aufgestellten Geräte sind auf An- H)Einbausatz für Brückenmontage frage verschiedene Ausstattungssätze lieferbar. L) Einbausatz für Träger G)Einbausatz für die Montage auf Unterschrank IDM-39614501300.tif STROMANSCHLUSS (090BM1E) Wichtig Der Anschluss muss von autorisiertem Fachpersonal in Einklang mit den einschlä- gigen gesetzlichen Bestimmungen und un- Verwendung geeignetem vorschriftsmäßigem...
- Page 48 STROMANSCHLUSS (190BM2E) Wichtig Der Anschluss muss von autorisiertem Fachpersonal in Einklang mit den einschlä- gigen gesetzlichen Bestimmungen und un- Verwendung geeignetem vorschriftsmäßigem Material ausgeführt werden. Das Gerät wird mit einer Betriebs- spannung von 4000V/3N geliefert, die in 230V/3 umgeschaltet werden kann. Vorsicht –...
- Page 49 6 - Das Klebeschild mit Angabe der Abnahme- spannung vom Typenschild entfernen und das Klebeschild mit Angabe der neuen Spannung anbringen. Wichtig Nach Abschluss des Vorgangs sicherstel- len, dass alles einwandfrei funktioniert. IDM-3960200250.tif WASSERANSCHLUSS Schließen Sie den Zufuhrschlauch der Wasserlei- tung an das Anschlussrohr des Gerätes an.
-
Page 50: Einstellungen
EINSTELLUNGEN EINSTELLUNGSVERFAHREN Die wichtigsten Funktionen des Geräts erfordern nal, sondern können während des Gebrauchs vom keine besonderen Einstellungen durch Fachperso- Benutzer geregelt werden. AUSTAUSCH VON BAUTEILE AUSTAUSCHVERFAHREN Das Auswechseln von Betriebsteilen kann der Be- diener selbst, ohne Erfordernis von Fachpersonal vornehmen. - Page 51 Assistance, demande Inutilisation prolongée de l’appa- gnaux de reil B ranchement électrique sécurité, dispositifs de (090BM1E) Levage et manutention Sécurité, normes de Branchement électrique Signaux de sécurité et informa- Manutention et installation, re- (190BM2E) tion...
- Page 52 INFORMATIONS GENERALES INFORMATIONS POUR LE LECTEUR 2e partie: elle contient toutes les informa- Pour retrouver facilement les sujets qui vous inté- ressent, consulter l’index analytique au début du tions nécessaires aux destinataires homogè- manuel. nes, c’est-à-dire tous les opérateurs experts Ce manuel est divisé...
- Page 53 (voir figure). chauffer les aliments au bain marie. 190BM2E 090BM1E Organes principaux A)Cuve: en acier inox B)Manette de commande des résistances: pour ré- gler la puissance de chauffe.
- Page 54 DONNÉES TECHNIQUES Voir tableaux et « Fiche des raccordements » à la fin du manuel. DISPOSITIFS DE SÉCURITÉ Même si l’appareil est complet de tous les disposi- tifs de sécurité, lors de l’installation et du raccorde- ment, ils devront, si nécessaire, être intégrés avec d’autres pour respecter les lois en vigueur.
- Page 55 ACCESSOIRES SUR DEMANDE Sur demande l'appareil peut être équipé des acces- soires suivants. A)Bacs B)Traverses pour bacs C)Kit pour installation « sur soubassement » (voir BGN 1/6 page 12). D)Kit pour installation « en pont » (voir page 12). E)Kit traverse de soutien (voir page 12). BGN 1/1 BGN 2/3 BGN 1/2 BGN 1/3 TRA 11 TRA 12...
- Page 56 NORMES POUR LA SÉCURITÉ SUR L'IMPACT ENVIRONNEMENTAL Sécurité pour l’élimination des déchets d’équi- Chaque organisation a pour but d’appliquer des pements électriques et électroniques (Directive procédures pour trouver et contrôler l'influence des DEEE 2002/96/CE) propres activités (produits, services, etc.) sur l’envi- ronnement.
- Page 57 DESCRIPTION DES COMMANDES Sur l’appareil sont disposées les commandes pour C)Voyant de réseau: si allumé, il signale l'activation de activer les fonctions principales. l'alimentation électrique. A)Manette de commande des résistances: pour D)Voyant de la température: si allumé, il signale que activer, désactiver et régler les résistances de l'eau n'a pas atteint la température programmée;...
- Page 58 REMPLISSAGE ET VIDANGE DE LA CUVE Pour cette opération, procéder comme suit. Remplissage 1 - S’assurer que la manette (A) soit en position " cuve fermée ". 2 - Appuyer sur le bouton (B) pour remplir la cuve d’eau jusqu’à l’indicateur de niveau (C). IDM-39615700700.tif Vidange 1 - Placer un récipient, de dimensions appro-...
- Page 59 CONSEILS D’UTILISATION Afin de garantir une utilisation correcte de l’appa- reil, suivre ces conseils. – Utiliser exclusivement les accessoires indiqués par le fabricant. – Avant de remplir la cuve, vérifier, par la manette (A), si le robinet de vidange est fermé. –...
- Page 60 – Nettoyer les accessoires après leur utilisation – De faire attention aux surfaces en acier inox pour avec un dégraissant approprié. Le lavage en ne pas les endommager. En particulier, éviter lave-vaisselle est conseillé. l’utilisation de produits corrosifs, ne pas utiliser de matériau abrasif ou d’outils tranchants.
- Page 61 MANUTENTION ET INSTALLATION RECOMMANDATIONS POUR LA MANUTENTION ET L’INSTALLATION Important Effectuer la manutention et l’installation en effectuer ces opérations devra, si nécessai- respectant les informations fournies par le re, organiser un « plan de sécurité » pour fabricant, reportées directement sur l’em- sauvegarder la sécurité...
- Page 62 MISE EN PLACE DE L’APPAREIL Toutes les phases de mise en place doivent être prises en considération, dès la réalisation du projet général. Avant de commencer ces phases, outre la définition de la zone de mise en place, celui qui est autorisé...
- Page 63 : L) Kit traverse de soutien G)Kit pour installation « sur soubassement » IDM-39614501300.tif BRANCHEMENT ÉLECTRIQUE (090BM1E) Important Le branchement doit être fait par du per- sonnel autorisé et qualifié, conformément aux lois en vigueur à ce sujet en utilisant le matériel approprié...
- Page 64 BRANCHEMENT ÉLECTRIQUE (190BM2E) Important Le branchement doit être fait par du per- sonnel autorisé et qualifié, conformément aux lois en vigueur à ce sujet en utilisant le matériel approprié et prescrit. L’appareil est fourni avec tension de fonctionnement à 4000V/3N, commutable à 230V/3. Attention Avant toute intervention, couper l’alimenta- tion électrique générale.
- Page 65 6 - Enlever l’adhésif qui indique la tension d’essai appliqué sur la plaque d'identification et mettre le nouveau avec la tension utilisée. Important L’opération étant terminée, s’assurer qu’il n’y ait pas d’anomalies de fonctionnement. IDM-3960200250.tif RACCORDEMENT DE L'EAU Pour effectuer le raccordement, raccorder le tuyau de réseau et le tuyau de raccord de l’appareil, en in- terposant un robinet d’arrêt (A), pour interrompre, si nécessaire, l’alimentation de l’eau.
- Page 66 RÉGLAGES MODES DE RÉGLAGES Les fonctions principales de l’appareil ne prévoient personnel spécialisé sauf les réglages effectués pas d'interventions particulières de réglage par du lors de l'utilisation par l'usager. REMPLACEMENT DE PIÈCES MODES DE REMPLACEMENTS L'appareil ne prévoit pas le remplacement de par- le remplacement d'éléments de service qui peut ties fonctionnelles par du personnel spécialisé, sauf être effectué...
- Page 67 Búsqueda de averías Fabricante y equipo, identifica- ción Quemador de plano, regula- Conexión eléctrica ción aire primario (090BM1E) Identificación fabricante y equi- Conexión eléctrica (190BM2E) Recomendaciones de uso Consejos para el uso Informaciones previas Recomendaciones para efectuar Instalación del equipo el mantenimiento Datos técnicos...
-
Page 68: Informaciones De Carácter General
INFORMACIONES DE CARÁCTER GENERAL INFORMACIONES PREVIAS 2a parte: contiene todas las informaciones Para ubicar fácilmente los temas específicos de in- terés, consúltese el índice analítico que se encuen- necesarias para destinatarios homogéneos, tra al inicio del manual. esto es, todos los operadores expertos y au- Este manual comprende dos partes. -
Page 69: Informaciones De Carácter Técnico
(véa- se utiliza para calentar los alimentos en bañomaría. se figura). 190BM2E 090BM1E Órganos principales A)Cuba: fabricada en acero inox B)Mando de las resistencias: para regular la poten- cia de calentamiento. - Page 70 DATOS TÉCNICOS Véase tablas y "Ficha de enlaces" al final del ma- nual. DISPOSITIVOS DE SEGURIDAD Aunque el equipo cuente con todos los dispositivos de seguridad, en los casos en que así lo determi- nen las leyes vigentes en materia, se deberá com- plementar con otros dispositivos en las fases de instalación y enlace.
-
Page 71: Seguridad
ACCESORIOS BAJO PEDIDO Bajo pedido, el equipo puede ser suministrado con los accesorios que a continuación se indican. A)Cubetas B)Distanciadores para cubetas BGN 1/6 C)Kit para la instalación "en mueble" (véase pág. 12). D)Kit para la instalación "de puente" (véase pág. 12). E)Kit barra de soporte (véase pág. -
Page 72: Uso Y Funcionamiento
NORMAS DE SEGURIDAD RELATIVAS AL IMPACTO AMBIENTAL Toda organización tiene el deber de aplicar procedi- Eliminación segura de los residuos de aparatos mientos que le permitan conocer y controlar la influen- eléctricos y electrónicos (Directiva RAEE 2002/96/ cia de sus propias actividades (productos, servicios, etc.) en el ambiente. - Page 73 DESCRIPCIÓN DE LOS MANDOS Para activar las funciones principales, en el equipo C)Testigo red: su encendido indica la activación de la se han instalado los siguientes mandos. alimentación eléctrica. A)Mando de las resistencias: para activar, desac- D)Testigo temperatura: encendido indica que el agua tivar y regular las resistencias de calentamiento.
- Page 74 LLENADO Y VACIADO DE LA CUBA Para efectuar esta operación, aplicar las siguientes instrucciones. Llenado 1 - Verificar que el mando (A) esté en posición “cu- ba cerrada”. 2 - Presionar el botón (B) a fin de llenar la cuba con agua hasta la marca de nivel (C).
-
Page 75: Mantenimiento
CONSEJOS PARA EL USO A fin de garantizar un uso correcto del equipo, apli- car las siguientes recomendaciones. – Utilizar exclusivamente los accesorios indicados por el fabricante. – Antes de llenar la cuba verificar mediante el man- do (A) que el grifo de descarga esté cerrado. –... -
Page 76: Averías
– Limpiar los accesorios después del uso utilizan- – Prestar atención a las superficies de acero inoxi- do un desengrasante adecuado. Se aconseja dable, a fin de no dañarlas y, en especial, evitar efectuar el lavado en lavavajillas. el uso de productos corrosivos; no utilizar mate- rial abrasivo ni utensilios cortantes. -
Page 77: Desplazamiento E Instalación
DESPLAZAMIENTO E INSTALACIÓN RECOMENDACIONES PARA EL DESPLAZAMIENTO Y LA INSTALACIÓN Importante Efectuar el desplazamiento e instalación rizada para efectuar estas operaciones de- respetando las indicaciones proporciona- berá, si fuera necesario, organizar un "plan das por el fabricante, reproducidas directa- de seguridad", a fin de salvaguardar la in- mente sobre el embalaje, en el equipo y en columidad de las personas directamente las instrucciones de uso. - Page 78 INSTALACIÓN DEL EQUIPO Durante la realización del proyecto general, deben ser consideradas todas las fases de la instalación. Antes de comenzar dichas fases, además de esta- blecer la zona de instalación, la persona autorizada a efectuar estas operaciones deberá, si fuera nece- sario, aplicar un "plan de seguridad"...
- Page 79 L) Kit barra de soporte G)Kit para la instalación "en mueble" IDM-39614501300.tif CONEXIÓN ELÉCTRICA (090BM1E) Importante La conexión deberá asignarse al personal autorizado y experto, que deberá respetar las leyes vigentes en materia y utilizar siempre materiales adecuados y previstos por el constructor.
- Page 80 CONEXIÓN ELÉCTRICA (190BM2E) Importante La conexión deberá asignarse al personal autorizado y experto, que deberá respetar las leyes vigentes en materia y utilizar siempre materiales adecuados y previstos por el constructor. El aparato se suministra con tensión de funcionamiento a 4000V/3N, posible de conmutar a 230V/3.
- Page 81 6 - Retirar el adhesivo indicador de la tensión de prueba presente en la placa de identificación y aplicar el nuevo adhesivo indicador de la ten- sión en uso. Importante Una vez concluida la intervención controlar que no se verifiquen anomalías de funcio- namiento.
-
Page 82: Regulaciones
REGULACIONES MODALIDADES DE REGULACIÓN Las regulaciones relativas a las funciones principa- rio, sin necesidad de intervención de personal les del aparato pueden ser ejecutadas por el usua- especializado. SOSTITUCIÓN DE PIEZAS MODALIDADES DE SOSTITUCIÓN El aparato no necesita sostituciones de componen- dos sino la sostitución de elementos de servicio tes funcionales realizadas por técnicos especializa- que puede llevar a cabo el usuario. - Page 83 Spannung - Tension Frequenz - Fréquence Fre- Strom - Courant Potencia Modelo Tensión cuencia Corriente 090BM1E 3 kW 230V1~N 50-60Hz 13 A SCHEDA ALLACCIAMENTI 090BM1E - CONNECTION CARD 090BM1E ANSCHLUSSSCHEMA 090BM1E - FICHE DES RACCORDEMENTS 090BM1E FICHA DE ENLACES 090BM1E IDM-39615701700.tif...
- Page 84 Modello Dati elettrici - Electrical data - Daten zur Elektrik Potenza Model Données électriques - Datos eléctricos Power Modelle Leistung Tensione - Voltage Frequenza - Frequency Corrente - Current Puissance Modèle Spannung - Tension Frequenz - Fréquence Fre- Strom - Courant Potencia Modelo Tensión...
- Page 85 SCHEMA ELETTRICO 090BM1E - ELECTRIC DIAGRAM 090BM1E SCHALTBILD 090BM1E - SCHÉMA ÈLECTRIQUE 090BM1E ESQUEMA ELÉCTRICO 090BM1E IDM-39615700900.tif - Terminal board - Klemmenbrett - Plaque à bornes - Regleta de 1) Morsettiera 5) Lampada spia di rete - Mains signal lamp - Netz-Kontrollampe - Lampe témoin de ré- conexión...
- Page 86 SCHEMA ELETTRICO 190BM2E - ELECTRIC DIAGRAM 190BM2E SCHALTBILD 190BM2E - SCHÉMA ÈLECTRIQUE 190BM2E ESQUEMA ELÉCTRICO 190BM2E IDM-39615701100.tif 1) Morsettiera - Terminal board - Klemmenbrett - Plaque à bornes - Regleta de conexión 7) Termostato di sicurezza - Safety thermostat - Sicherheitsthermostat - Thermostat de sécurité...
Need help?
Do you have a question about the 090BM1E and is the answer not in the manual?
Questions and answers