
Related Manuals for PIONEER DJ DJM-S11


Summary of Contents for PIONEER DJ DJM-S11
- Page 1 Instruction Manual DJ Mixer DJM-S11 pioneerdj.com/support/ rekordbox.com http://serato.com/ For FAQs and other support information for this product, visit the websites above.
-
Page 2: Table Of Contents
Contents Before you start ................... 6 How to read this manual .................6 What’s in the box..................7 User guides .....................7 DJ software ..................8 Serato DJ Pro..................8 rekordbox ....................9 Part names ..................10 Top panel ....................10 Front panel ....................11 Rear panel.....................12 Touch screen ..................14 PC/Mac setup .................. - Page 3 Loading a track to the unit..............37 Playing a track..................37 Audio output ..................38 Channel section/master section ............38 Outputting sound...................40 Adjusting the sound................41 Setting the faders ..................41 Monitoring sound ................44 Headphones section ................44 Monitoring with headphones ..............44 Booth section ..................45 Using a booth monitor ................45 Microphone ..................
- Page 4 Using FX Trigger mode .................67 Smooth Echo..................68 Smooth Echo section ................68 Using Smooth Echo ................68 Loop ....................71 Loop section..................71 Using a loop ..................72 Using the Performance Pads............73 Performance Pad section..............73 Serato DJ Pro..................74 rekordbox ....................89 User mode ..................96 Using User modes.................96 Fader Start..................
- Page 5 Software license notice ...............125 Cautions on copyrights................126...
-
Page 6: Before You Start
Before you start How to read this manual • Thank you for choosing this Pioneer DJ product. Be sure to read this manual, the “Quick Start Guide” and the “Precautions for Use” which are also included with this product. These documents include important information that you should understand before using the unit. -
Page 7: What's In The Box
Before you start What’s in the box • Power cord • USB cable • Fader bumper A × 4 • Fader bumper B × 2 • Warranty (for some regions) • Quick Start Guide • Precautions for Use • Serato DJ Pro Expansion Pack voucher *1 One USB cable is included with the unit. -
Page 8: Dj Software
DJ software You can DJ with this unit by connecting it to a PC/Mac running Serato DJ Pro or rekordbox. Serato DJ Pro Serato DJ Pro is DJ software from Serato and compatible with DVS (page 29). The Serato DJ Pro software is not included with the unit. Download the software from the URL below. -
Page 9: Rekordbox
DJ software rekordbox rekordbox is a professional DJ application for music management and performing. The rekordbox software is not included with the unit. Download the software from the URL below. rekordbox.com/system • The unit is automatically recognized when you launch rekordbox, and the following functions will be available. -
Page 10: Part Names
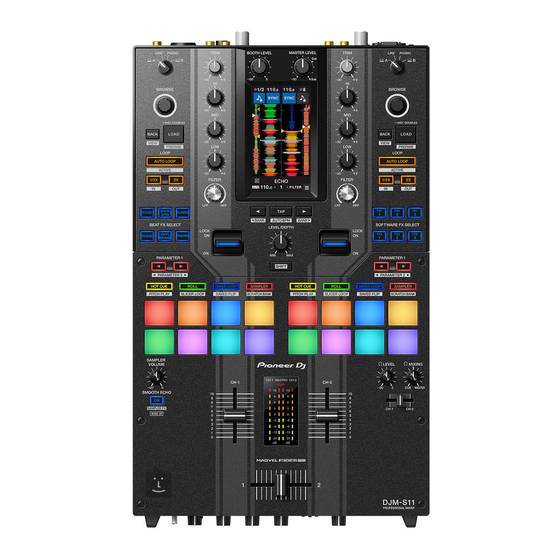
Part names Top panel Browse section (page 34) Loop section (page 71) Filter section (page 50) FX section (page 53) Performance Pad section (page 73) Master section (page 38) Sampler Volume knob (pages 78, 92) Smooth Echo section (page 68) Channel section (page 38) 10. -
Page 11: Front Panel
Part names 11. Touch screen (page 14) 12. Headphones section (page 44) Front panel MIC section (page 46) Crossfader section (page 42) PHONES terminals (page 44) 4. Front guard Protects the terminals and knobs on the front panel. • Do not stand the unit on the guards as if they're feet, or it may tip over. AUX section (page 49) Channel curve section (page 41) -
Page 12: Rear Panel
Part names Rear panel button Turns the unit on and off. Signal GND terminal (page 26) Connect a turntable’s ground wire. Reduces unwanted noises that occur when a turntable is connected to the unit. PHONO terminals (RCA) (page 26) Connect phono-level (MM cartridge) output devices. •... - Page 13 Part names • Do not connect storage devices (e.g. USB drives/hard disks, etc.) to the [CDJ/ CONTROLLER] terminals. Note that, if you turn the input selector switches, devices are forcibly disconnected from any PC/Mac connected to the unit and data on the devices may break. Kensington security slot Connect a cable lock.
-
Page 14: Touch Screen
Part names Touch screen Waveform screen 1. Information display Displays BPM and the number of beats for a loop. 2. Software controls Displays buttons that control software functions. — : Turns the key lock function on and off. — [SYNC] : Turns on the sync function that automatically synchronizes the tempo of a track to the beatgrid. - Page 15 Part names MENU screen (page 104) Displays the Utility menu. BROWSE (page 35) Displays the browse screen. 3. FX SETTING (page 63) Displays the FX screen. 4. TOUCH MIDI (page 103) Displays the Touch MIDI screen. TOUCH FX (page 62) Displays the Touch FX screen.
- Page 16 Part names 9. Effect display/MENU button Displays the information for the selected effect. Touch to display the previous screen. MENU transition MENU WAVEFORM (page 15) (page 14) DECK 3 SCREEN SELECT (page 100) (page 101) SCREEN SELECT DECK 4 (page 100) (page 101) SETTING TOUCH FX...
-
Page 17: Pc/Mac Setup
PC/Mac setup Dedicated software To input or output your PC/Mac’s audio to/from the unit, install the dedicated audio driver software and/or Setting Utility on your computer. If you install the audio driver software to your PC (Windows), Setting Utility will also be installed with the driver software. - Page 18 PC/Mac setup Installation Notes on installation • Turn the unit off and disconnect the USB cable connected to the unit and the PC/Mac before installation. • Close all applications running on the PC (Windows) before installation. • You will need admin rights to install the audio driver software to your PC (Windows). •...
-
Page 19: Setting Utility
You can check and set connections between the unit and a PC/Mac using the Setting Utility installed on the PC/Mac. Launching Setting Utility 1 Click [Pioneer] > [DJM-S11 Setting Utility] from applications list on a PC/Mac. Setting Utility launches. • You can also launch it from [PC UTILITY] in the Utility menu (page 111). - Page 20 Setting the audio data output from the unit to a PC/Mac 1 Click the [MIXER OUTPUT] tab. 2 Click the pull-down list under [DJM-S11 Audio Output] and select the audio data output from the unit to the PC/Mac. Read more: Audio Output pull-down list (page 25) 3 Click the pull-down list under [USB Output Level] and select a level of volume to output from the unit.
- Page 21 PC/Mac setup Adjusting the buffer size (for Windows ASIO) • Close any running applications (DJ applications, etc.) which use the unit as the default audio device before adjusting the buffer size. 1 Click the [ASIO] tab. 2 Adjust the buffer size with the slider. •...
- Page 22 PC/Mac setup Changing the assignment of the FX You can change the FX assigned to the [BEAT FX SELECT] and [SOFTWARE FX SELECT] buttons and the [FILTER] knob on the unit. You can register the settings to [BANK A], [BANK B], [BANK C], or [BANK D], and call up the settings when you need to.
- Page 23 PC/Mac setup Setting items Description Mark the check box to activate the loop length set by the slider. LOOP options. Clear the check box to set the [AUTO LOOP] button on the unit to work as the Auto Beat Loop button. Mark the check box to enable Pad mode switching by pressing a Pad mode button twice, three, or four times in succession.
- Page 24 PC/Mac setup Setting items Description Adjust the DVS control Reduce the signal level if the playback points of the tone signal level for control vinyl and DJ software deviate while scratching. PHONO. Checking the firmware and software versions 1 Click the [About] tab.
- Page 25 PC/Mac setup Audio Output pull-down list • CH4 (USB 7/8), CH 5 (USB 9/10) is fixed to [FX SEND]. #: indicates channel number CH 1 (USB 1/2), CH 2 (USB 3/4) CH 3 (USB 5/6) CH# Control Tone PHONO MIX(REC OUT) CH# Control Tone LINE CROSSFADER A Post CH# Fader...
-
Page 26: Connections
Connections Turn the unit off and disconnect the power cord before connecting other units. Connect the power cord after all the connections are complete. • Use the supplied power cord. • Read the instruction manuals for the devices you are going to connect with the unit. Connecting to the input terminals •... -
Page 27: Connecting To The Output Terminals
Connections Connecting to the output terminals Rear panel of the unit Front panel of the unit Power amplifier Headphones To power outlet Power amplifier (booth monitor) • Use the [MASTER 1] terminals for balanced output. Connecting the terminals to unbalanced inputs (RCA, etc.) with an XLR-RCA conversion cable (conversion adapter), etc. -
Page 28: Connecting To The Cdj/Controller Terminals
Connections Connecting to the CDJ/controller terminals You can control DJ software from a multi player if you connect the multi player to the [CDJ/ CONTROLLER] terminals on the unit. Be sure to read the instruction manual for the software. Multi players Use a USB cable for the connection. -
Page 29: Dvs
If you use the unit with DJ software (Serato DJ Pro or rekordbox) and a control disc (special vinyl or CDs with specific control signals), you can control digital music files using a turntable or multi player. • Control discs aren’t included with this unit. You’ll need to buy them separately. •... - Page 30 1 Connect a turntable you want to control [DECK 1] to the [PHONO] terminals for [CH 1], and a turntable you want to control [DECK 2] to the [PHONO] terminals for [CH 2]. 2 Connect the turntable ground wires to the [SIGNAL GND] terminals on the unit.
-
Page 31: Settings In Serato Dj Pro
1 Connect a multi player you want to control [DECK 1] to the [LINE] terminals for [CH 1], and a multi player you want to control [DECK 2] to the [LINE] terminals for [CH 2]. 2 Take USB storage devices which have the control signals saved and connect them to the multi players. - Page 32 Setting up Serato DJ Pro 1 Click [SETUP] on the Serato DJ Pro screen. 2 Select [TURNTABLES] or [CDJS] on the [Audio] tab of the SETUP screen. Checking control signals 1 Start playback of track 1 on the connected turntable or multi player.
- Page 33 Selecting a playback mode Serato DJ Pro supports three playback modes ([ABS], [REL], and [INT]). • For details on the playback modes, refer to the Serato DJ Pro software manual (page 7). 1 Select [ABS], [REL], or [INT] from the pull-down list on the deck pane.
-
Page 34: Playback
Playback Browse section 1. BROWSE knob Displays the browse screen (page 35) if you use the knob when [BROWSE AUTO TRANSITION] is set to [ON] in the Utility settings (page 107). Turn to move the cursor up or down. Press to move the cursor between the crates pane and library pane on the Serato DJ Pro screen. -
Page 35: Browse Screen
Playback LOAD button Loads a selected track to the unit. Press twice to load a track that's loaded to another deck on which you're pressing the [LOAD] button. Playback starts from the same position if you press twice while playing a track and pressing the button on the other deck (Instant Doubles). -
Page 36: Adding A Track To The Library
Playback Swipe a track to the left to load the track to deck 1. Swipe a track to the right to load the track to deck 2. 6. Effect display/MENU button Displays the information for the selected effect. Touch to display the [MENU] screen (page 15). 7. -
Page 37: Loading A Track To The Unit
Playback Loading a track to the unit 1 Press the [BROWSE] knob to move the cursor to the crates pane on the Serato DJ Pro screen. 2 Turn the [BROWSE] knob to select a crate, etc. 3 Press the [BROWSE] knob. The cursor moves to the library pane. -
Page 38: Audio Output
Audio output Follow the procedures below to output and adjust sound. – Outputting sound (page 40) – Adjusting the sound (page 41) – Setting the faders (page 41) To output sound to the [BOOTH] terminals, see Using a booth monitor (page 45). Channel section/master section... - Page 39 Audio output Channel section 1. Input selector switch Selects an input sound source. — [ A,B] : Selects a PC/Mac connected to one of the [USB] ports. — [LINE] : Selects a multi player, etc. connected to the [LINE] terminals. —...
-
Page 40: Outputting Sound
Audio output Master section MASTER LEVEL knob Adjusts the volume for the master sound. CLIP indicator Blinks when excessive volume is output from the [MASTER 1] or [MASTER 2] terminals. Master level indicator Displays the volume level of the master sound output to the [MASTER 1] and [MASTER 2] terminals. -
Page 41: Adjusting The Sound
Audio output Adjusting the master sound volume 1 Turn the [MASTER LEVEL] knob to adjust the volume for the master sound. The master level indicator lights up when the master sound is output. Adjusting the sound 1 Turn the [HI], [MID], and [LOW] knobs to adjust the volume of each band. - Page 42 Audio output CH 1/2 CURVE knob Sets the channel fader curve. — : Steeply raises the volume when the channel fader is moved close to the top position. — : Gradually raises the volume as the channel fader is moved up. —...
- Page 43 Audio output 2. REVERSE switch Turns the crossfader reverse function on and off. 3. CURVE knob Sets the crossfader curve. — : Gradually raises the volume of the sound assigned to the other side as the crossfader is moved from one side (CH 1 or CH 2 side) to the other, and decreases the volume of the sound on the side it is moving away from.
-
Page 44: Monitoring Sound
Monitoring sound Headphones section LEVEL knob Adjusts the volume for the sound output from the [PHONES] terminals. MIXING knob Adjusts the volume balance between the master sound and the channel selected with the headphones cue fader. • Set the knob to [CUE] to monitor only the channel sound, and to [MASTER] to monitor only the master sound. -
Page 45: Booth Section
Monitoring sound 3 Move the headphones cue fader to adjust the volume balance between the CH 1 sound and the CH 2 sound. 4 Turn the [ LEVEL] knob to adjust the volume. Booth section BOOTH LEVEL knob Adjusts the volume for the sound output to a booth monitor. Using a booth monitor 1 Connect a booth monitor to the [BOOTH] terminals. -
Page 46: Microphone
Microphone MIC section MIC switch Turns the microphone on and off. LEVEL knob Adjusts the volume of sound input from the [MIC] terminal. 3. MIC indicator Indicates the microphone sound output as follows. — Off: The microphone is off. — Lights up: The microphone is on. —... -
Page 47: Using A Microphone
Microphone — [ EQ LOW]: -12 dB to +12 dB 6. ECHO knob Adjusts the volume of the echo applied to the microphone sound. Using a microphone 1 Connect a microphone to the [MIC] terminal. Read more: Connecting to the input terminals (page 26) Set the MIC switch to [ON]. -
Page 48: Using The Microphone Echo
Microphone Using the microphone echo 1 Touch [FX SETTING] on the [MENU] screen. The FX setting screen appears. Read more: MENU screen (page 15) 2 Touch [MIC ECHO]. The [MIC ECHO] screen appears. 3 Touch the number of beats you want the microphone echo to last for. -
Page 49: Aux
AUX section LEVEL knob Adjusts the volume for the input sound from an external device. Using AUX 1 Connect an external device to the [AUX] terminal. Read more: Connecting to the input terminals (page 26) 2 Turn the [LEVEL] knob to adjust the volume of the input sound. -
Page 50: Filter
Filter You can apply a filter or an effect to the sound on any channel. Filter section 1. FILTER knob Adjusts a filter or an effect. Using a filter or an effect This section describes an example of how to choose a filter or an effect from the touch screen on the unit. -
Page 51: Effect Types And Settings
Filter 2 Touch [FILTER]. The [FILTER] screen appears. 3 Touch an effect to use. 4 Turn the [FILTER] knob to adjust the effect. Effect types and settings You can adjust the following settings with the knobs or from the [FX SETTING] screen of the [MENU]. - Page 52 Filter Effect/operation Description Outputs filtered white noise mixed with the sound of the NOISE channel. • FILTER: Turn counterclockwise to lower the cut-off frequency for the filter which passes white noise through. Turn clockwise to raise the cut-off frequency for the filter which passes white noise through.
-
Page 53: Beat Fx/Software Fx
Beat FX/software FX The unit includes 6 buttons for the internal effects (Beat FX) and 6 buttons for DJ software effects (software FX). You can customize the assignment of the internal effects on the buttons. FX section 1. BEAT FX SELECT buttons Selects one of the Beat FX. -
Page 54: Using Beat Fx/Software Fx
Beat FX/software FX — [LOCK ON]: Continues applying an effect when you let go of the effect lever and leave it in the [LOCK ON] position. Return the effect lever to the center position to turn the effect off. LEVEL/DEPTH knob (page 55) Adjusts an effect. -
Page 55: Beat Fx Types And Settings
Beat FX/software FX 5 Set the effect lever to [ON] or [LOCK ON]. The selected effect is applied to the sound of the channel on which you’re using the effect lever. • You can set sub parameters for Beat FX on the [MENU] screen. Beat FX types and settings You can adjust the following settings with the buttons and knob or from the [FX SETTING] screen of the [MENU]. - Page 56 Beat FX/software FX Beat FX/operation Description Mutes the input sound and outputs a delay sound several ECHO OUT times while attenuating it. • BEAT Delay time with respect to 1 beat of the BPM (beat fraction): 1/32 to 16 beats •...
- Page 57 Beat FX/software FX Beat FX/operation Description Outputs a delay sound once according to the beat. DELAY • BEAT Delay time with respect to 1 beat of the BPM (beat fraction): 1/32 to 4 beats • LEVEL/DEPTH: Balance between the original sound and the effected sound •...
- Page 58 Beat FX/software FX Beat FX/operation Description Cyclically slows down the playback speed of the input sound VINYL BRAKE gradually according to the beat and then stops playback. • BEAT Cycle of the effect with respect to 1 beat of the BPM (beat fraction): 1/16 to 64 beats •...
- Page 59 Beat FX/software FX Beat FX/operation Description Cyclically changes the cut-off frequency for the high-pass filter HP FILTER according to the beat. • BEAT Moving cycle of the effect with respect to 1 beat of the BPM (beat fraction): 1/16 to 64 beats •...
- Page 60 Beat FX/software FX Beat FX/operation Description Attenuates the input sound gradually and then mutes the KILL sound. • BEAT Attenuation time with respect to 1 beat of the BPM (beat fraction): 1/32 to 64 beats • LEVEL/DEPTH: Balance between the original sound and the effected sound, and attenuation time •...
- Page 61 Beat FX/software FX Beat FX/operation Description Outputs the synth sound as the audio source of the base FADER SYNTH (SINE/SAW/SQUARE) oscillation frequency. • BEAT Base oscillation frequency level: -3 to +3 • LEVEL/DEPTH: Effect volume • Sub parameter: Scale: AUTO SCALE, MAJOR, MINOR, MINOR H, JAPANESE, CHINESE, HAWAIIAN, RYUKYU, 2OCT ANALOG You cannot monitor the effected sound.
-
Page 62: Using Touch Fx
Beat FX/software FX Using Touch FX You can set and control effects using the touch screen. 1 Touch [TOUCH FX] on the [MENU] screen. The Touch FX screen appears. 1. Information display : Displays BPM and the number of beats for a loop. 2. -
Page 63: Using Fx Bank
Beat FX/software FX The selected effect is applied, and the effect value changes according to the point you touch on the screen. Using FX Bank You can save effect settings assigned to the [FILTER] knob and the [BEAT FX SELECT] and [SOFTWARE FX SELECT] buttons to FX Banks, and load the FX Banks when you want to use them. - Page 64 Beat FX/software FX 2 Click [BANK A], [BANK B], [BANK C], or [BANK D] to select an FX Bank to save settings to. 3 Select a filter or an effect to assign to the [FILTER] knob from the [FILTER] pull-down list. Read more: Effect types and settings (page 51) 4 Click [BEAT FX] or [SOFTWARE FX].
- Page 65 Beat FX/software FX 6 Mark the check box of [HOLD PARAMETER] or [SMOOTHING] as necessary. — [HOLD PARAMETER] : Retains the parameters changed after the BANK is called up. — [SMOOTHING] : Gradually returns to the original sound after the effect turns off. 7 Click [SAVE].
- Page 66 Beat FX/software FX 4 Touch [BEAT FX SELECT/SOFTWARE FX SELECT] to set a Beat FX to assign. • If you touch an effect, the detailed setting screen appears. • You can’t change the software effects. Use DJ software to change effects to assign. 5 Touch [SMOOTH ECHO] to set the parameter.
-
Page 67: Using Fx Trigger Mode
Beat FX/software FX • If banks are set in DJ software, the settings are also loaded to the [SOFTWARE FX SELECT] buttons. Loading an FX Bank from the FX setting screen 1 Touch [FX SETTING] on the [MENU] screen. The FX Bank setting screen appears. Read more: MENU screen (page 15) 2 Touch [A], [B], [C], or [D]. -
Page 68: Smooth Echo
Smooth Echo You can use Smooth Echo to easily apply an echo to the sound being played. Smooth Echo section 1. SMOOTH ECHO ON button Turns Smooth Echo on and off. Using Smooth Echo 1 Touch [FX SETTING] on the [MENU] screen. The FX setting screen appears. - Page 69 Smooth Echo 2 Touch [SMOOTH ECHO]. 3 Select a trigger (operation) for the echo effect. — [CROSSFADER]: Applies the echo when the crossfader is moved to the opposite side and the sound is muted. — [CH FADER]: Applies the echo when the sound is muted by the channel fader. —...
- Page 70 Smooth Echo 5 Press the [SMOOTH ECHO ON] button to turn on Smooth Echo. The button lights up when Smooth Echo is turned on. 6 Perform the trigger operation to apply the echo. A delay sound is output several times while attenuating according to the number of beats.
-
Page 71: Loop
Loop You can choose a section of a track to play repeatedly. Loop section 1. AUTO LOOP button Plays a loop of the specified number of beats or Auto Beat Loop. Press while pressing the [SHIFT] button to turn a loop on and off. •... -
Page 72: Using A Loop
Loop Using a loop Setting a loop automatically 1 Press the [AUTO LOOP] button during playback. Loop playback starts from the position where the button is pressed. Setting a loop manually 1 Press the [SHIFT] and [1/2X] buttons at the point where you want to start the loop (loop-in point) during playback. -
Page 73: Using The Performance Pads
Using the Performance Pads You can trigger various functions with the Performance Pads when using the unit with DJ software. Performance Pad section PARAMETER button Switches settings. 2. Pad mode buttons When using the unit with Serato DJ Pro: HOT CUE SAVED LOOP SAMPLER Operation... -
Page 74: Serato Dj Pro
Using the Performance Pads HOT CUE SAVED LOOP SAMPLER Operation ROLL button button button button Press twice while pressing User mode 1 User mode 2 User mode 3 User mode 4 the [SHIFT] button When using the unit with rekordbox: HOT CUE SAVED LOOP SAMPLER... - Page 75 Using the Performance Pads Hot Cue mode You can call up a Hot Cue quickly and start playback by pressing a Performance Pad. • You can set up to 8 Hot Cues per track. 1 Press the [HOT CUE] button. The unit switches to Hot Cue mode.
- Page 76 Using the Performance Pads 2 Press the [PARAMETER ] or [PARAMETER ] button. The numbers of beats assigned to the Performance Pads change as follows each time the button is pressed. — 1/32 to 4 beats — 1/16 to 8 beats —...
- Page 77 Using the Performance Pads Saved Loop mode You can save a loop to a loop slot in Serato DJ Pro and call up a saved loop. 1 Press the [SAVED LOOP] button. The unit switches to Saved Loop mode. 2 Press a Performance Pad during loop playback. Loops are assigned to the loop slots in Serato DJ Pro as follows.
- Page 78 Using the Performance Pads Sampler mode You can start playback of a track loaded in a Sampler slot using a Performance Pad. 1 Display the [SAMPLER] pane on the Serato DJ Pro screen. 2 Press the [SAMPLER] button on the unit. The unit switches to Sampler mode.
- Page 79 Using the Performance Pads • Press the Performance Pad while pressing the [SHIFT] button to stop slot playback. Pitch Play mode Pitch Play is a function of Pitch 'n Time DJ. 1 Press the [HOT CUE] button while pressing the [SHIFT] button.
- Page 80 Using the Performance Pads — Down range: –3 –2 –1 –7 –6 –5 –4 • Press the [PARAMETER ] or [PARAMETER ] button while pressing the [SHIFT] button to shift the pitch range by a semitone. Slicer Loop mode A specified range is applied to the track divided into eight sections. The divided sections are assigned to different Performance Pads.
- Page 81 Using the Performance Pads — 32 beats — 64 beats • Eight sections of a divided domain are assigned to the Performance Pads as follows. Sections 1 to 8: Performance Pads assignment: Section Section Section Section Section Section Section Section 3 Press the [PARAMETER ] or [PARAMETER ] button to set a...
- Page 82 Using the Performance Pads • Playback returns to and continues from the beginning of section 1 if playback reaches the end of a domain. 1 2 3 4 5 6 7 8 Saved Flip mode Serato Flip is a function to record or call up a sequence of such as operation of a Hot Cue. You can save and play a Flip using the Performance Pads on the unit.
- Page 83 Using the Performance Pads Calling up and playing a Flip 1 Press the [SAVED LOOP] button while pressing the [SHIFT] button. The unit switches to Saved Flip mode. 2 Press the Performance Pad assigned with the slot (Flip) you want to play. The Flip is called up and playback starts from the beginning of the Flip.
- Page 84 Using the Performance Pads Scratch Bank mode You can load the sound of a Scratch Bank. 1 Open the [SCRATCH BANK] pane on the Serato DJ Pro screen. 2 Press the [SAMPLER] button while pressing the [SHIFT] button. The unit switches to Scratch Bank mode. 3 Press the Performance Pad assigned with the Scratch Bank you want to load.
- Page 85 Using the Performance Pads • Hot Cues are assigned to the Performance Pads as follows. Hot Cue Hot Cue Hot Cue Hot Cue Hot Cue Hot Cue Hot Cue Hot Cue • Release the Performance Pad to mute the sound. Press the Performance Pad again to start playback of the Hot Cue from the beginning.
- Page 86 Using the Performance Pads • Press the Performance Pad again while pressing the [SHIFT] button to return to the loop-in point and start playback from there. • Press the Performance Pad again to cancel loop playback. Auto Loop mode If you press a Performance Pad, a loop is set with the number of beats assigned to the Performance Pad and loop playback continues even if you release the Performance Pad.
- Page 87 Using the Performance Pads Transport mode You can control a track using the Performance Pads without using a turntable or multi player. In Transport mode, functions are assigned to the Performance Pads as follows. Performance Pad no. Pitch bend Pitch bend Pitch nudge Pitch nudge Temp...
- Page 88 Using the Performance Pads Press Performance Pad 6 while pressing the [SHIFT] button to turn off the sync function. — 7 : Sets, calls up, or plays a temporary cue point. Press during pause to set a temporary cue point. Press during playback to return to a temporary cue point and pause (Back Cue).
-
Page 89: Rekordbox
Using the Performance Pads rekordbox Press the Pad mode buttons ([HOT CUE], [ROLL], [SAVED LOOP], or [SAMPLER]) to switch between modes and use different functions. Hot Cue mode You can call up a Hot Cue quickly and start playback by pressing a Performance Pad. •... - Page 90 Using the Performance Pads • Effects are assigned to the Performance Pads as follows. Effect Effect Effect Effect Effect Effect Effect Effect • Release the Performance Pad to cancel the effect. • Press the [PARAMETER ] or [PARAMETER ] button to switch effects between A to H and I to P.
- Page 91 Using the Performance Pads Sampler mode You can play a track loaded to a Sampler slot using the Performance Pads. Preparation 1 Click the Sampler pane icon on the upper part of the rekordbox screen. The Sampler pane is displayed on the rekordbox screen. 2 Press the [SAMPLER] button on the unit.
- Page 92 Using the Performance Pads Playing a Sampler track 1 Press the [SAMPLER] button. The unit switches to Sampler mode. 2 Press the [PARAMETER ] or [PARAMETER ] button while pressing the [SHIFT] button to switch Sampler Banks. 3 Adjust the Sampler gain on the rekordbox screen. 4 Press a Performance Pad.
- Page 93 Using the Performance Pads Keyboard mode You can change the scale of a Hot Cue using the Performance Pads like a keyboard. 1 Press the [HOT CUE] button while pressing the [SHIFT] button. The unit switches to Keyboard mode. 2 Press the [PARAMETER ] or [PARAMETER ] button to switch the keys to assign to the Performance Pads.
- Page 94 Using the Performance Pads Beat Loop mode If you press a Performance Pad, a loop is set with the number of beats or bars assigned to the Performance Pad, and the loop playback continues even if you release the Performance Pad.
- Page 95 Using the Performance Pads Key Shift mode You can shift the key of a track that’s playing according to the keys assigned to the Performance Pads. 1 Press the [SAMPLER] button while pressing the [SHIFT] button. The unit switches to Key Shift mode. 2 Press the [PARAMETER ] or [PARAMETER ] button to...
-
Page 96: User Mode
User mode You can assign DJ software functions to the Performance Pads on the unit using the MIDI assigning mode in most types of DJ software. • Find out about the MIDI assigning mode of your DJ software in the relevant user manual. Using User modes The unit supports four User modes. - Page 97 User mode Example: When assigning [ ] (PLAY/PAUSE) 4 Press a Performance Pad to assign the selected function to. If the assignment works, the confirmation message appears. • Click [MIDI] to exit MIDI assigning mode. • Switch to the relevant User mode after you’ve finished making settings to use the Serato DJ Pro functions assigned to the Performance Pads.
-
Page 98: Fader Start
Fader Start You can start playback by moving the fader knobs. Using Fader Start To use the Fader Start function, mark the check box of [Fader Start options.] on the [PREFERENCE] tab in Setting Utility or in the Utility settings on the unit. Read more: Changing the settings (page 22) Using Channel Fader Start 1 Set a cue. - Page 99 Fader Start Using Crossfader Start 1 Set a cue. • For details on how to set a cue point, refer to the user manual for your DJ software. • You can set a cue by moving the crossfader all the way to the left or right side while pressing the [SHIFT] button during pause.
-
Page 100: Deck 3/Deck 4
Deck 3/deck 4 You can control deck 3 and deck 4 in your DJ software from the unit. Using deck 3/deck 4 1 Touch [DECK 3] or [DECK 4] on the [MENU] screen. The deck 3 and deck 4 control screen appears. Read more: MENU screen (page 15) 2 Touch the buttons on the screen. - Page 101 Deck 3/deck 4 6. Effect display/MENU button : Displays the information for the selected effect. Touch to display the [MENU] screen. Selecting a mode SCREEN SELECT SIMPLE MODE MASH UP MODE HOT CUE MODE MIXER MODE — [SIMPLE] : Basic mode. •...
- Page 102 Deck 3/deck 4 — [ADVANCED] : When using the unit with Serato DJ Pro: • [DECK MOVE] : Moves a track from deck 2 to deck 3 or from deck 1 to deck 4. • [DUAL DECK] : Turns Dual Deck mode on and you can control two decks (deck 1 and deck 3, or deck 2 and deck 4) at the same time.
-
Page 103: Touch Midi
Touch MIDI You can control MIDI compatible software from the touch screen of the unit. Using Touch MIDI 1 Touch [TOUCH MIDI] on the [MENU] screen. The Touch MIDI screen appears. Read more: MENU screen (page 15) 2 Touch the buttons on the screen. 1. -
Page 104: Settings
Settings Changing the settings You can change the settings of the unit from the Utility menu. If a PC/Mac is connected to the unit when you change the settings, the changed settings are saved to the PC/Mac. The saved settings are applied to the unit the next time the PC/Mac is connected. -
Page 105: Utility Settings
Settings Utility settings PERFORMANCE menu *: Factory setting Setting item Description CROSSFADER Sets the range where sound is not output at both sides of the CROSSFADER CUT crossfader. • Setting values: 0 to 7* to 52 Sets the function to smooth the rapid variation in volume CROSSFADER when you move the crossfader. - Page 106 Settings Setting item Description LOAD OPTIONS Sets whether to move the cursor down after loading a track. LOAD OPTIONS • Setting values: OFF*, ON FADER START Sets the function that’s triggered by Fader Start. FADER START • Setting values: OFF*, CUE, HOT CUE Sets whether to turn on the sync function when Fader Start is triggered.
- Page 107 Settings Setting items Description WAVEFORM DISPLAY OVERLAY Sets whether or not to display the Pad mode name when the Pad mode is switched. PAD MODE DISPLAY • Setting values: OFF, CHANGE*, ALWAYS Sets whether or not to display the number of beats or bars until to the next Hot Cue point.
- Page 108 Settings Setting items Description SCREEN SETTING Sets the brightness of the touch screen. LCD BRIGHTNESS • Setting values: 1, 2, 3*, 4, 5 MIC menu *: Factory setting Setting items Description MIC TALKOVER Sets the talkover mode for the microphone. MIC TALKOVER •...
- Page 109 Settings Setting items Description MIC LIMITER Sets whether or not to use the limiter for the microphone MIC LIMITER for sound input to the master output sound. MASTER • Setting values: OFF*, ON Sets whether or not to use the limiter for the microphone MIC LIMITER for sound input to the sound output to the [BOOTH] terminals.
- Page 110 Settings Setting items Description MASTER OUT Reduces distortion to the sound output from the [MASTER 1] and [MASTER 2] terminals. PEAK LIMITER • Setting values: OFF, ON* Sets the attenuation level for the sound output from the [MASTER 1] and [MASTER 2] terminals. MASTER OUT ATT •...
- Page 111 Settings Setting items Description Launches Setting Utility (page 19). PC UTILITY • Setting values: AUTO, *OFF FACTORY RESET menu Setting items Description Restores the factory settings. FACTORY RESET • Setting values: OK, CANCEL SETTINGS LOCK menu *: Factory setting Setting items Description Sets whether or not to lock the MIC and MIXER menus.
-
Page 112: Replacing The Bumper For The Crossfader
Settings Replacing the bumper for the crossfader Be sure to follow the directions for safe use of the product. Note that if you replace parts of the unit, you do so under your own responsibility. WARNING • Turn the unit off before starting the work. •... - Page 113 Settings 1 Turn the unit off. 2 Remove the seven knobs shown below. Name of part Part SAMPLER VOLUME knob Rotary knob LEVEL knob MIXING knob Fader knob (small) Headphones cue fader Fader knob (large) Channel fader Crossfader Attached by insertion. Pull them out upwards to remove. If it’s difficult to pull them out, wrap them with something that doesn’t slip and pull them out.
- Page 114 Settings Parts Knob Base • Disassemble the fader knobs (large) as follows. 1. Lift the bottom edge of the indicating line with a fine-tipped tool. – Lift the side where the bottom edge of the indicating line extends to the bottom of the knob.
- Page 115 Settings 4 Remove the aluminum panel. 5 Replace the bumper. Parts Fader bumper A (hard) Fader bumper B (soft) Fader bumper C (medium hard) • You can replace the preinstalled fader bumper C with the bumper of your preferred hardness. •...
- Page 116 Settings • After you’ve replaced the bumper, adjust the range where sound is not output at both sides of the crossfader (page 105). • You can fix the fader unit by inserting fader bumper A vertically into the grooves (4 in the diagram above) on both edges of the fader unit as necessary.
- Page 117 Settings • Insert and push the rotary knobs and fader knob (small) straight in to reattach them. • Insert the axis through the center hole on the fader knob (small) to attach it. • Check the orientation of the axes (D cut side) and attach the rotary knobs by aligning them parallel to the axes.
- Page 118 Settings Buying parts • You can buy replacement parts in cases when certain parts are lost or damaged. Part Quantity Rotary knob Fader knob (small) Fader knob (large) (indicating line) Fader knob (large) (knob) Fader knob (large) (base) Screw Fader bumper A Fader bumper B Fader bumper C...
-
Page 119: Specifications
Specifications Main unit weight .................... 5.2 kg (11.5 lbs) Max. dimensions ..........267 mm (W) × 452.2 mm (D) × 107.9 mm (H) (10.5 in. (W) × 17.8 in. (D) × 4.2 in. (H)) Tolerable operating temperature ........+5 °C to +35 °C (+41 °F to +95 °F) Tolerable operating humidity .............5% to 85% (no condensation) Audio Section Sampling rate........................48 kHz... - Page 120 Specifications BOOTH ................+6 dBu/10 kΩ/390 Ω or less PHONES ................. +8 dBu/32 Ω/10 Ω or less Rated output level/load impedance MASTER 1 ....................+25 dBu/10 kΩ MASTER 2 ....................+21 dBu/10 kΩ BOOTH ....................+25 dBu/10 kΩ Crosstalk LINE ........................82 dB Channel equalizer characteristic HI....................-∞...
- Page 121 Specifications CDJ/CONTROLLER terminal USB type A ......................2 sets Power supply ....5 V/500 mA or less USB terminal USB type B ......................2 sets The specifications and design of this product are subject to change without notice.
-
Page 122: Block Diagram
Specifications Block diagram... -
Page 123: Additional Information
Additional information Troubleshooting If you think something is wrong with the unit, check the information below and refer to the [FAQ] for the DJM-S11 at the URL below. pioneerdj.com/support/ • Inspect devices connected with the unit. • The unit may restore proper operation after you turn it off and on. -
Page 124: Trademarks And Registered Trademarks
Additional information Trademarks and registered trademarks • rekordbox™ is a trademark or registered trademark of AlphaTheta Corporation. • Mac and macOS are trademarks of Apple Inc., registered in the U.S. and other countries. • Windows is a registered trademark of Microsoft Corporation in the United States and other countries. - Page 125 Additional information Software license notice The licenses for the open source software used on this player are shown below. For accuracy purposes, here we have included the original texts (in English). Copyright © 2010 Texas Instruments Incorporated - http://www.ti.com/ Redistribution and use in source and binary forms, with or without modification, are permitted provided that the following conditions are met: Redistributions of source code must retain the above copyright notice, this list of conditions and the following disclaimer.
- Page 126 Additional information Cautions on copyrights Recordings you have made are for your personal enjoyment and according to copyright laws may not be used without the consent of the copyright holder. • Music recorded from CDs, etc., is protected by the copyright laws of individual countries and by international treaties.
Need help?
Do you have a question about the DJM-S11 and is the answer not in the manual?
Questions and answers