Table of Contents
Advertisement
Available languages
Available languages
Advertisement
Chapters
Table of Contents

Related Manuals for Viscount Legend ‘70s Artist-W


Summary of Contents for Viscount Legend ‘70s Artist-W
- Page 1 User Manual - EN Manuale Utente - IT Edition: 1.0...
-
Page 3: Table Of Contents
Table of contents TABLE OF CONTENTS IMPORTANT NOTES ................................2 Product Care ..................................2 Notes about this manual ............................... 2 INTRODUCTION ..................................3 Main features ..................................3 FRONT PANEL ..................................5 General description ................................5 Installing modules ................................. 6 Main panel .................................... 8 Common controls ................................ -
Page 4: Important Notes
Important notes IMPORTANT NOTES Product Care Do not apply excessive force to the instrument's structures and controls (knobs, buttons, keyboard etc...). Whenever possible, do not place the instrument close to units that generate strong interference, such as radio - TV sets, monitors, etc ... ... -
Page 5: Introduction
The electric piano sounds are the top achievement of the physical modeling technology, the Viscount PM (Physical Modeling). It consists of mathematical models that represent the physics at work behind the instrument: how it was originally built and how it generates sound. - Page 6 The customised settings can be saved and loaded at will. The software runs on Windows, Mac Os and iOs, and can be downloaded for free from the Viscount website www.viscountinstruments.com.
-
Page 7: Front Panel
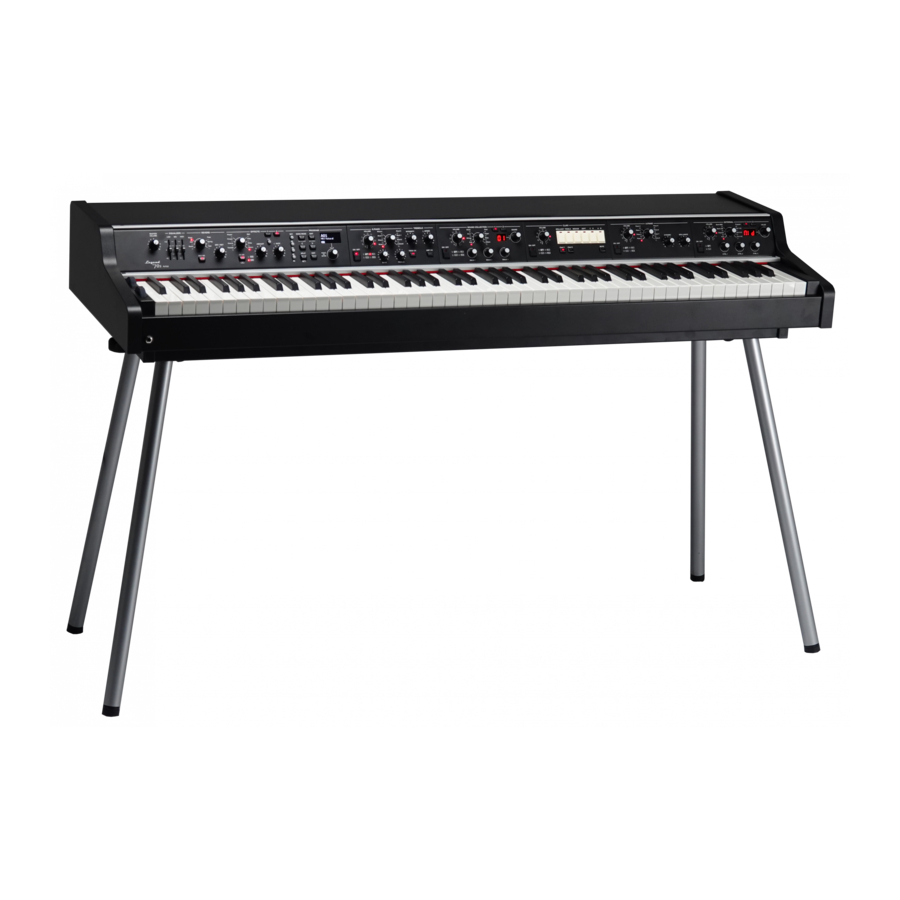
Front panel FRONT PANEL General description The front panel consists of a main section and additional modules ad described on page 3. The image above refers to the Artist-W and Artist models equipped with all modules. The modules are the same for each model. -
Page 8: Installing Modules
Front panel Headphones connector On the left side of the instrument, under the keyboard, you will find a 1/4" jack connector to plug in your headphones. Keep in mind that using headphones at a sufficiently high volume level may cause hearing loss. Connecting headphones does not affect the signal sent to the AUDIO OUT MAIN [L/MONO], [R] and AUX [1], [2] outputs of the rear panel (see page 17). - Page 9 Front panel Fasten the bar to the top of the instrument and to the front panel by using the screws described at point 2. Each time you change the position of the modules, please use the Identify Modules function described on page 58. It is not possible to install two or more modules of the same type.
-
Page 10: Main Panel
Front panel Main panel The main panel is the fixed section of the instrument. Here you can find the general volume, a three-band equalizer section, a reverb section, effect controls and a section that controls all the parameters that appear on the display, i.e. - Page 11 Front panel EFFECT section controls This section includes the main controls of the effects. There are two available, independent effects. They have the same set of controls but different values. When one of the two effects is selected, the control Leds of this section are updated according to the settings of the currently selected effect.
- Page 12 Front panel [FX ON] button. Press this button to switch on / off the selected effect. To assign a module output to the selected effect, press the [FX ON] and the [ON/OFF] buttons simultaneously on that module. The pairing between module and effect is indicated by the [FX 1] and [FX 2] Leds on each module. Leds for the effect settings FX1 and FX2 (page 32, parameter Effects Config).
-
Page 13: Common Controls
The E.Piano module allows the user to customise the electric piano sounds (Rhodes, Wurlitezer and CP80). This module is the state of the art of the Viscount PM technology (Physical Modeling). Thanks to complex algorithms, the instrument can reproduce faithfully the dynamic and physic-acoustic features of the electric piano, recreating the original sound with all its nuances. -
Page 14: A.piano Module
Press the [AMP ON] button for a short while to access the Amp effect parameters. A.PIANO module The A.PIANO module comprises a collection of acoustic piano sounds: grand pianos, baby grand pianos and upright pianos. This module uses the Viscount (High Definition Sampling) technology. -
Page 15: Clavi Module
CLAVI module The CLAVI module is dedicated to one of the most renowned electric pianos of the ’70: the Clavinet. This module applies the Viscount PM technology (Physical Modeling) to reproduce faithfully and precisely the distinctive and brilliant sound of this instrument, the top icon of funky music. -
Page 16: Sound Collection Module
The SOUND COLLECTION module includes a wide array of different sounds, reproducing the most commonly used instruments that all musicians need. Thanks to the Viscount HDS (High Definition Sampling) technology, each instrument has been accurately sampled with several different dynamics, in... -
Page 17: External Module
Front panel Part selection buttons. As described in the introduction, this module is comprised of two different parts. To select a part, so as to access its main parameters through the panel controls, press button [1] or [2]. When a part is selected, the controls’... - Page 18 Front panel Press and hold the knob for a short while to access the module configuration parameters. Part selection buttons These buttons select one of the two module parts. When one of the two parts is selected, the module controls are updated according to the selected part. The blinking light of buttons [1] or [2] indicates that the part, though not currently selected, is active.
-
Page 19: Rear Panel
Rear panel REAR PANEL [AUDIO IN] mini jack. Standard mini jack audio input, stereo, 1/8‛. Use to connect to external devices such as smartphones, tablets or computers. The signal on this input is then sent to the headphones output and to the AUDIO OUT MAIN [L/MONO] and [R] outputs. - Page 20 Rear panel [FOOT CONTROLLER 1] and [FOOT CONTROLLER 2] PEDAL jack. Connect to a foot controller to control a selected function (see FC1 Dest and FC2 Dest parameters, page 28). NOTES ABOUT PEDALS When using Foot switch pedals, the polarity must be set manually (see Sustain Polarity, FS1 Polarity, FS2 Polarity and Progr +/- Polarity, page 56).
-
Page 21: Switching On And Basic Functions
Switching on and basic functions SWITCHING ON AND BASIC FUNCTIONS To switch on the instrument, please follow these simple rules Make sure that the [POWER] switch on the rear panel is set to 0. Make sure that all connected speakers or amplifiers (if any) are switched off. Connect the included power cable to the instrument. -
Page 22: Connecting To Midi Devices
Switching on and basic functions Connecting to a mixer When recording or performing live, it might be AUDIO OUT AUX AUDIO OUT MAIN [1] and [2] jacks [L/MONO] and [R] jacks necessary to connect the instruments to an audio mixer, which then sends the signal to amplifiers or amplified speakers. -
Page 23: Using A Computer
Switching on and basic functions Controlling Legend ‘70s with an external keyboard To play, select and modify the Legend '70s sounds, connect the MIDI OUT terminal of an external MIDI keyboard to the MIDI [IN] connector of Legend '70s. MIDI [IN] connector To play the Legend '70s sounds with an external MIDI OUT... -
Page 24: Connecting Pedals
Switching on and basic functions Connecting pedals Legend ‘70s can be played with several kinds of pedals: foot switches, on-off pedals that can be used to control functions and binary parameters; Half-Damper Sustain pedals that can be used in conjunction with the Half- Damper function, foot controllers for continuous control parameters;... -
Page 25: Using Sounds
Switching on and basic functions Foot controller A foot controller, or expression pedal, allows continuous control of a parameter, unlike a footswitch. Pedals connected to PEDAL [FOOT CONTROLLER 1] and [FOOT CONTROLLER 2] PEDAL FOOT CONTROLLER connectors can be assigned a range of [1] and [2] jacks parameters, such as a Sound volume, tuning, modulation, Wah-Wah and more. - Page 26 Switching on and basic functions Activating and selecting the effect FX1 or FX2 To use the effect FX1 or FX2 follow this procedure: Press the [1] button to select FX1, or press [2] to select FX2. Press [FX ON] to activate the effect. Turn the selection knob to select an effect category.
-
Page 27: Program Mode
Program mode PROGRAM MODE The Program mode is the main operating mode of the instrument. While in this mode, the user can run, select and save a Program. While in Program mode, the display is divided into 4 areas, with the following fields: Program location. -
Page 28: Selecting A Program
Program Mode Selecting a Program To select a Program, use the PROGRAM section of the main panel; otherwise, if the instrument is in Program < > Mode, use the data entry dial beneath the display, the Bank buttons [ ] or the [SET] buttons. Programs can also be selected through the foot switch connected to the PEDAL [PROGRAM + / -] port on the rear panel. -
Page 29: Saving A Program
Program mode Saving a Program After modifying a Program, all changes will be lost as soon as you select another Program or switch off the instrument. To prevent that and make these changes permanent, Programs must be saved. To save a Program, you must assign it a name and select a location, if you don’t want to overwrite the current Program. -
Page 30: Modifying A Program
Modifying a Program MODIFYING A PROGRAM Press the [EDIT] button while in Program Mode to access the current Program's parameters. The main menu EDIT PROGRAM contains all the main sections of a Program, and includes the following fields: Name of the menu. It means that you are on the main page of the menu EDIT PROGRAM. -
Page 31: Common Section
Modifying a Program < > Rotate the data entry dial to modify the parameter value; press the button [ ] or [ ] to scroll through the section's parameters. To leave the submenu and return to the EDIT PROGRAM menu, press [EXIT]. Press [EDIT]/[STORE] to return to the main video page of the Program. -
Page 32: Key Range Section
Modifying a Program Rev Dry/Wet: balance between direct and reverberated signal. Module Par1: control a module parameter (see table below). This function has to be enabled in each module using the Foot Controller 1 and Foot Controller 2 parameters present in the menu of the module concerned. - Page 33 Modifying a Program To define the boundaries of a keyboard zone assigned to a module, move cursor on the line of the desired module through the data entry < > dial or the buttons [ ] and [ ], then press the dial. Clearly, Low Key sets the lower key of the keyboard zone, while Hi Key sets the highest key.
-
Page 34: Effects Section
Modifying a Program EFFECTS section The EFFECTS menu includes the parameters of the EFFECTS section on the main (see page 9). panel The EFFECTS section allows to use two independent effects, that can be recalled through the buttons [1] and [2] on the main . - Page 35 Modifying a Program FX Out Routing Assign FX1 or FX2 an audio output. Values: Main L-R: AUDIO OUT [MAIN L/MONO] and [MAIN R] connectors on the rear panel (stereo signal) Aux1 Mono: AUDIO OUT [AUX 1] connector on the rear panel (mono signal). ...
- Page 36 Modifying a Program Chorus Modulation effect that makes the sound warmer and deeper. Parameter name Description Switch Activate / deactivate effect. [FX ON] Values: OFF, ON FX Config Same function of the parameters described at page 32. FX Out Routing Reverb Send Chours type.
- Page 37 Modifying a Program through the Master Clock parameter on the COMMON section (page 30). Values: 1/1, 1/2D, 1/1T, 1/2, 1/4D, 1/2T, 1/4, 1/8D, 1/4T, 1/8, 1/16D, 1/8T, 1/16, 1/16T, 1/32, 1/64 D : dot T: triplets Feedback Quantity and phase of the signal that is sent back to the effect's input, determining how much the signal is enriched and modified.
- Page 38 Modifying a Program Set the gain (positive value) or attenuation (negative values) of the low frequencies generated by EQ Low Gain the effect. Values: between -12.0 and +12.0 dB Set the gain (positive value) or attenuation (negative values) of the high frequencies generated by EQ High Gain the effect.
- Page 39 Modifying a Program This effect simulates an amplifier. Parameter name Description Switch Activate / deactivate effect. [FX ON] Values: OFF, ON FX Config Same function of the parameters described at page 32. FX Out Routing Reverb Send Type of amplifier. Amp Type Suit76, Wr200, Sweet, Vintage, ’59 Clean, Twin, Small, Twin Punch, Lo-Fi, Values:...
- Page 40 Modifying a Program Synchronisation of the time between repetitions and the metronome tempo, set through the Sync Master Clock parameter of the COMMON function (page 30). Values: OFF, ON EQ Low Gain Set the gain (positive value) or attenuation (negative values) of the low frequencies generated by the effect.
- Page 41 Modifying a Program Mid3 Freq Central frequency of band 3 in the middle frequency range. (solo PEQ5) Values: between 60 and 8000 Hz Mid3 Gain Set the gain (positive value) or attenuation (negative values) of the middle frequencies band 3. (solo PEQ5) Values: between -12.0 and +12.0 dB Mid3 Q...
- Page 42 Modifying a Program Ratio Compress ratio. Values: 1.5:1, 2:1, 3:1, 4:1, 6:1, 8:1, 10:1, 20:1 Attack Attack time: the time it takes for the compression to start, after the signal has crossed the threshold. Values: between 0 and 200 ms Release The time it takes for the compression to end, after the signal has returned below the threshold.
-
Page 43: Reverb Section
Modifying a Program REVERB section Reverb is a sum of the various acoustic reflections of a sound in a space. A great number of factors determine the acoustic effects of a reverberation, such as the size and shape of the ambient, the material of which the walls are made, and much more. -
Page 44: E.piano Section
Modifying a Program E.PIANO section The E.PIANO menu includes all the configuration parameters of the E. PIANO module (page 11). To access this menu, enter the EDIT PROGRAM screen (page 28), place the cursor on the E.PIANO field and press the data entry dial or, alternatively, hold down the sound selection knob of the module for a short while (point 4, page 11). - Page 45 Modifying a Program Velocity Sens Sensitivity of the signal level to the pressure exerted on the keyboard (velocity). When a certain pressure is applied the signal level is increased (positive values) or decreased (negative values). Values: between -5 and +5 Signal level Velocity...
-
Page 46: A.piano Section
Modifying a Program Enable / disable the synchronisation of the Tremolo effect of the E.PIANO module with the Master Trem Sync Clock parameter. When the Tremolo Sync parameter is enabled (Tremolo Sync: ON), the Tremolo modulation frequency is determined by the Master Clock and the Tremolo Speed parameter determines the multiplier factor of the Master Tempo parameter (COMMON section) or of the received MIDI Clock (page 30). -
Page 47: Clavi Section
Modifying a Program CLAVI section The CLAVI menu includes all the configuration parameters of the CLAVI module (described at page 13). To access this menu, enter the EDIT PROGRAM screen (page 28) place the cursor on the CLAVI field and press the data entry dial or, alternatively, hold down either the [Clavi 1] or [Clavi 2] buttons for a short while (point 6, page 14). -
Page 48: Sound Collection Section
Modifying a Program SOUND COLLECTION section The SOUND COLLECTION menu includes all the configuration parameters of the SOUND COLLECTION module (described at page 14). The SOUND COLLECTION module is comprised of two independent parts, that can be recalled through the buttons [1] or [2] on the main panel The screen shows the selected part in the menu heading, represented by the numbers [1] or [2], and the parameter values of the said part. -
Page 49: External Section
Modifying a Program Efx Rate: effect modulation speed. Efx Depth: effect modulation depth. High Bars: signal level of the treble drawbars. Percussion: percussion level (for electromechanical organs). Rotary: enable / disable the Rotary effect, simulating the classic rotating speaker used with electromechanical organs. -
Page 50: Song Mode
Song mode SONG MODE The Song mode allows the user to select 4 Programs to be quickly recalled, regardless of their location in the memory banks and without the need to scroll through locations. To select the Song mode press the [SONG MODE] /[SYSTEM] button: the Led light will turn on and the display will show the last selected Song. -
Page 51: Saving A Song
Song mode panel. < > Hold down [EXIT] and press [ ] or [ ] to select a List. Alternatively, use the LISTS function (page 52). According to the current configuration of the Confirm Program parameter (page 57) a Song (or Program within a Song) can be recalled immediately, or only after the data entry dial is pressed. -
Page 52: Modifying A Song Or List
Modifying a Song or List MODIFYING A SONG OR LIST Press the [EDIT] button while the display is on Song mode to access the programming parameters of the current Song. main EDIT SONG menu provides programming functions of a Song, consisting of the following fields: Name of the menu. -
Page 53: Order Function
Modifying a Song or List ORDER function Use the Order function to move a Song within the current List. To access this function, enter the EDIT SONG page and place the cursor on the ORDER field, then press the data entry dial. The following fields appear on the screen: Function name. -
Page 54: Lists Function
Modifying a Song or List Song number. Displays the number of the Song you will copy. Song name. Shows the name of the Song that will be copied. To copy one or all Songs, follow the procedure: < > Press the buttons [ ] or [ ] to select the List from which you wish to copy a Song. -
Page 55: System Menu
System menu SYSTEM MENU The SYSTEM menu provides the parameters that affect the whole instrument. All changes made on the SYSTEM menu are immediately applied and saved, until modified again or until a Factory Reset is performed. To access the System parameters, press the [SONG MODE]/[SYSTEM] button for a short while. -
Page 56: Keyboard Section
System menu KEYBOARD section The KEYBOARD menu contains the general parameters of the keyboard. To access this menu, enter the SYSTEM page and place the cursor on the KEYBOARD field, then press the dial. Parameter name Description Transpose General instrument transposition by semitones. Values: between -12 and +12 semitones Transposition is also shown on the main video page, in the T field. -
Page 57: Midi Section
System menu Width of the bell-shaped curve of the LOW band filter. The central frequency is defined by the Low Low Q Freq parameter. High values correspond to a narrower curve, so the sound is strongly affected around the central frequency. Low values correspond to a broader curve, so the filter affects a larger band of frequencies, and the sound changes more gradually around the central frequency. -
Page 58: Pedal Setup Section
System menu PEDAL SETUP section The PEDAL SETUP menu provides the parameters to configure the pedals connected to the PEDAL jack on the rear panel. To access this menu, enter the SYSTEM page and place the cursor on the PEDAL SETUP field, then press the data entry dial. -
Page 59: Preferences Section
System menu Functioning mode of the two-switch foot switch connected to PEDAL [PROGRAM + / -]. Prog +/- Type Values: Normal: the right switch is assigned to PROGRAM + function, the left switch to PROGRAM – Inverted: the right switch is assigned to the PROGRAM –... -
Page 60: Utility Menu
Utility menu UTILITY MENU The UTILITY menu provides some useful parameters that affect the whole instrument. The display shows the following fields: Submenu name. Shows that you currently are in the UTILITY menu. Page number. Shows the current page number and the total of pages on the menu (for example ‚1/5‛... -
Page 61: Backup All Function
Utility menu here you will find the module icons for a quick check of the modules positions. If the positioning of each module is correct, press the data entry dial to confirm. The message ‚Allocation Completed!‛ will appear on screen. Press [EXIT] instead to cancel and return to the UTILITY page. If one of the slots has no module installed, during the identification procedure you must select the ‚empty‛... -
Page 62: Factory Reset Function
Utility menu To avoid losing the data on the instrument, first make a backup of the data through the Backup All function (page 59) and only then load the data from the USB drive. FACTORY RESET function The Factory Reset function restores all the original Programs, Songs and system parameters of the instrument's factory settings. - Page 63 Utility menu Updating the instrument's modules It is possible to update not only the operating system, but each single module. When a new update is released, the update file will be made available on the website http://www.viscountinstruments.com. To update a module follow the same procedure described above for the operating system, with one difference: at point turn the data entry dial in order to select the name of the module you wish to update, instead of the Release field.
-
Page 64: Appendix
If a Led light turns on but it is not on this list, then contact the technical support at the e-mail address service@viscount.it. Backup aborted! The system cannot save the backup file to the USB flash drive. - Page 65 (page 60). If you still see the same message again after the update, or if it changes to [Contact service], you need to contact the technical support by writing an email to service@viscount.it indicating the error message and the number that appears on screen.
-
Page 66: Troubleshooting
Appendix Wrong update file! The backup file you are trying to load is not compatible with the instrument. Try downloading the file again from the website www.viscountinstruments.com and copy it to the USB flash drive, then repeat the procedure. Troubleshooting The instrument does not switch on. -
Page 67: List Of Sound Collection Sounds
Appendix Custom, Cry Wah, Gun Wah, UK Wah, Drop Wah, AutoWah-1, AutoWah-2, AutoWah-3, AutoWah-4, Stage T-Wah, Q-Wah, LT-Wah Custom, Short Tail, Long Tail, Neverending, Ping Pong, One Shot, Double Shot, Delay Custom, Mid Boost, Mid Scoop, More Mids, Bass Eq, Ultra Bass Others - PEQ3 Custom, Bright Eq, Dark Eq, AGuit Eq, Piano Eq, Funky Eq Others - PEQ5... - Page 68 Appendix Keys Grand Piano Attack Time Decay Time Release Time Bright Piano Attack Time Decay Time Release Time House Piano Filter Cutoff Attack Time Release Time Electric Grand Attack Time Release Time Efx Send Digital ‘80 Filter Cutoff Release Time Efx Send Mark 73 Filter Cutoff...
- Page 69 Disposal of old Electrical & Electronic Equipment (Applìcable throughout the European Union and other European countries with separate collection programs) Dir. 2002/95/CE, 2002/96/CE e 2003/108/CE This syrnbol, found on your product or on its packaging, indicates that this product should not be treated as household waste when you wish to dispose of it.
- Page 71 Sommario SOMMARIO NOTE IMPORTANTI ................................2 Cura del prodotto .................................. 2 Note riguardanti il manuale ..............................2 INTRODUZIONE ..................................3 Caratteristiche principali ................................ 3 PANNELLO FRONTALE ................................ 5 Descrizione generale ................................5 Installazione dei moduli................................. 6 Pannello principale ................................8 Controlli comuni a tutti i moduli ............................
-
Page 72: Note Importanti
Note importanti NOTE IMPORTANTI Cura del prodotto Non applicate eccessiva forza alle strutture ed ai comandi dello strumento (manopole, pulsanti, tastiera ecc…). Non collocare, quando possibile, lo strumento in prossimità di unità che producano forti interferenze come apparecchi radio – TV, monitor, ecc... ... -
Page 73: Introduzione
Introduzione INTRODUZIONE Caratteristiche principali Legend ‘70s è uno strumento che nasce con l’intento di ricordare nel design gli storici pianoforti elettrici degli anni settanta e allo stesso tempo di fornire al musicista tutte quelle sonorità che hanno caratterizzato la scena musicale di questo fantastico periodo. - Page 74 I suoni di pianoforte elettrico rappresentano la più alta espressione della tecnologia a modelli fisici Viscount PM (Physical Modeling), che permette di generare il suono in base a modelli matematici che tengono conto di come lo strumento originale è realmente costruito ed in che maniera genera il suono.
-
Page 75: Pannello Frontale
Pannello frontale PANNELLO FRONTALE Descrizione generale Il pannello frontale è costituito da una sezione principale e dai moduli installati nello strumento, come descritto a pagina 3. NOTE Il disegno di cui sopra fa riferimento ai modelli Artist-W ed Artist equipaggiati con tutti i moduli. I moduli sono comunque identici per tutti i modelli, con l’unica differenza sul numero di quelli installabili ovvero 5 nei modelli Artist-W ed Artist e 4 nel Compact. -
Page 76: Installazione Dei Moduli
Pannello frontale Connessione cuffie Sulla sinistra, sotto la tastiera, è presente un connettore jack da 1/4" per il collegamento di un set di cuffie. NOTE Al fine di evitare danni all’udito si consiglia di non utilizzare le cuffie con livelli di volume elevati. Il collegamento delle cuffie non ha alcun effetto sui segnali presenti sulle uscite AUDIO OUT MAIN [L/MONO], [R] e AUX [1], [2] presenti nel pannello posteriore (pag. - Page 77 Pannello frontale Riposizionare la barra di copertura sul top e sul pannello frontale e bloccarla con le viti svitate al punto 2. NOTA Ogni qualvolta si modifica la disposizione dei moduli, si consiglia di eseguire la funzione Identify Modules descritta a pagina 59.
-
Page 78: Pannello Principale
Pannello frontale Pannello principale Il pannello principale costituisce la sezione fissa dello strumento, nella quale è possibile trovare il controllo di volume generale, una sezione di equalizzazione a tre bande, una sezione per il controllo del riverbero, una sezione di controllo degli effetti ed una sezione per la programmazione di tutti i parametri visualizzati a display, utilizzati per la regolazione dei suoni, degli effetti e dei parametri di sistema del Legend ‘70s. - Page 79 Pannello frontale Manopola [DRY / WET]. Permette il bilanciamento tra segnale diretto e segnale riverberato. Pulsante [REV ON]. Pulsante di accensione/spegnimento dell’effetto di riverbero. Controlli della sezione EFFECTS La sezione EFFECTS comprende i controlli principali degli effetti dello strumento. Gli effetti disponibili sono due, indipendenti, con lo stesso set di controlli ma ciascuno con i propri valori.
- Page 80 Pannello frontale Manopola [RATE]. Regola la velocità di modulazione dell’effetto selezionato. Per questo controllo è presente un indicatore a Led che lampeggia con frequenza pari alla velocità impostata. Per maggiori informazioni sui parametri regolati da questo controllo consultare il punto 6 di questa sezione o la Sezione Effects (pag. 32). NOTA Il Led della manopola [RATE] rimane inattivo quando l’effetto è...
-
Page 81: Controlli Comuni A Tutti I Moduli
Rhodes, Wurlitzer e di CP80. Questo modulo rappresenta più alta espressione della tecnologia a modelli fisici Viscount PM (Physical Modeling) che, attraverso complessi algoritmi matematici, è in grado di riprodurre con assoluta fedeltà i fenomeni dinamici e fisico-acustici del piano elettrico, restituendo il suono autentico dello strumento originale in tutte le sue sfumature. - Page 82 Pannello frontale che simula il classico effetto modulante, e di Amplificatore che simula l’amplificazione e diffusione del suono con diversi modelli di amplificatore. In aggiunta ai controlli a pannello, sono disponibili numerosi parametri di configurazione e personalizzazione del modulo, accessibili dal menu EDIT PROGRAM (vedi Sezione E.Piano a pag. 42) e dall’applicazione Legend ’70s Editor.
-
Page 83: Modulo A.piano
Il modulo CLAVI è dedicato ai suoni di uno dei più famosi pianoforti elettrici degli anni ’70: il piano Clavinet. Questo modulo utilizza la tecnologia a modelli fisici Viscount PM (Physical Modeling) per riprodurre nei minimi dettagli l’inconfondibile suono brillante e incisivo di questo strumento, icona assoluta della musica funky. -
Page 84: Modulo Sound Collection
Grazie alla tecnologia Viscount HDS (High Definition Sampling), ciascuno degli strumenti è stato accuratamente campionato per i diversi livelli dinamici, in modo da... -
Page 85: Modulo External
Pannello frontale Selettore della tipologia di suono. Utilizzare questo controllo per selezionare la tipologia del suono richiamabile con la manopola descritta al punto 6. Posizione Descrizione Pad sintetizzati. Strings Strumenti ad arco, acustici o sintetizzati. Choir Cori. Brass Ottoni, acustici o sintetizzati. Keys Pianoforti acustici ed elettronici, sintetizzatori, fisarmoniche. - Page 86 Pannello frontale ’70s Editor. Indipendentemente dalla presenza o meno del modulo, tutte le funzionalità di master keyboard dello strumento sono comunque disponibili, in quanto la sezione External è sempre presente nello strumento. In assenza del modulo la configurazione per il controllo dei dispositivi esterni è possibile solamente dal menù EDIT PROGRAM.
-
Page 87: Pannello Posteriore
Pannello posteriore PANNELLO POSTERIORE Mini jack [AUDIO IN]. Ingresso audio mini jack stereo standard da 1/8‛ per il collegamento di dispositivi esterni come smartphone, tablet o computer. Il segnale presente in questo ingresso viene ridistribuito inviato all’uscita cuffie e alle uscite AUDIO OUT MAIN [L/MONO] ed [R] e non viene regolato dalla manopola [MASTER VOLUME] del pannello frontale. - Page 88 Pannello posteriore Jack PEDAL [FOOT SWITCH 1] e [FOOT SWITCH 2]. Collegare a questi connettori foot switch con jack mono per per controllare una funzione assegnabile (vedi parametri FS1 Dest e FS2 Dest a pagina 29). Jack PEDAL [FOOT CONTROLLER 1] e [FOOT CONTROLLER 2]. Collegare a questi connettori foot controller per controllare in modo una funzione assegnabile (vedi parametri FC1 Dest e FC2 Dest a pagina 29).
-
Page 89: Accensione Ed Operazioni Di Base
Accensione ed operazioni di base ACCENSIONE ED OPERAZIONI DI BASE Per l’accensione dello strumento attenersi a queste semplici regole: Accertarsi che l’interruttore [POWER] posto nel pannello posteriore sia in posizione 0. Accertarsi che eventuali amplificatori o altoparlanti amplificati collegati siano spenti. Collegare il cavo di alimentazione in dotazione con lo strumento. -
Page 90: Collegamento Con Dispositivi Midi
Accensione ed operazioni di base Collegamento con mixer Nel caso di una registrazione o di una AUDIO OUT AUX AUDIO OUT MAIN [1] and [2] jacks [L/MONO] and [R] jacks performance dal vivo può essere necessario collegare gli strumenti musicali ad un mixer, le cui uscite vengono dirette agli amplificatori o a diffusori amplificati. -
Page 91: Utilizzo Con Un Computer
Accensione ed operazioni di base Controllo del Legend ‘70s tramite una tastiera esterna Collegando il terminale MIDI OUT di una tastiera MIDI esterna al connettore MIDI [IN] del Legend ‘70s è possibile, tramite la tastiera, suonare, selezionare e modificare i suoni del Legend ‘70s. MIDI [IN] connector NOTA... -
Page 92: Collegamento Dei Pedali
Accensione ed operazioni di base Collegamento dei pedali Con il Legend ‘70s è possibile utilizzare diverse tipologie di pedali: i foot switch, ovvero pedali a pressione del tipo on-off che permettono di controllare funzione e/o parametri a due stati, pedale Sustain Half-Damper per avvalersi della funzione Half-Damper (mezzo pedale) dei pianoforti acustici, foot controller che hanno un controllo continuo del parametro assegnato, triplo pedale per disporre dei classici tre pedali presenti nei pianoforti acustici. -
Page 93: Utilizzo Dei Suoni
Accensione ed operazioni di base Foot controller Un foot controller, o pedale d’espressione, permette di controllare un parametro in maniera continuativa e non a due stati come con un foot switch. Ai pedali collegati ai connettori PEDAL [FOOT CONTROLLER 1] e [FOOT CONTROLLER 2] è PEDAL FOOT CONTROLLER possibile assegnare vari parametri, come per [1] and [2] jacks... - Page 94 Accensione ed operazioni di base Attivazione e selezione dell’effetto FX1 o FX2 Per utilizzare l’effetto FX1 o FX2 procedere come segue: Selezionare l’effetto FX1 premendo il pulsante [1], oppure selezionare l’effetto FX2 premendo il pulsante [2]. Attivare l’effetto premendo il pulsante [FX ON]. Ruotare la manopola di selezione per scegliere la categoria dell’effetto.
-
Page 95: Modalita' Program
Modalità Program MODALITA’ PROGRAM La modalità Program è il modo operativo principale di funzionamento dello strumento, nel quale è possibile eseguire, selezionare e memorizzare un Program. Nella modalità Program il display risulta diviso in 4 aree in cui sono presenti i seguenti campi: Locazione del Program. -
Page 96: Selezione Di Un Program
Modalità Program Selezione di un Program La selezione dei Program può essere effettuata nella sezione PROGRAM del pannello principale, nel caso in < cui lo strumento si trovi in Modalità Program, utilizzando il dial data entry sotto il display, i pulsanti di banco [ ] o i pulsanti [SET]. -
Page 97: Memorizzazione Di Un Program
Modalità Program Memorizzazione di un Program Per rendere definitive le modifiche apportate ad un Program, così da non perderle selezionandone un altro o spegnendo lo strumento, è necessario memorizzare il Program. La procedura di memorizzazione prevede l’assegnazione del nome del Program ed il salvataggio nella locazione desiderata, così da non sovrascrivere quella corrente. -
Page 98: Modifica Di Un Program
Modifica di un Program MODIFICA DI UN PROGRAM Premendo il pulsante [EDIT] in modalità Program è possibile accedere a tutti i parametri di regolazione del Program corrente. Il menù principale di EDIT PROGRAM raccoglie le sezioni principali di un Program ed è composto dai seguenti campi: Nome del menu. -
Page 99: Sezione Common
Modifica di un Program < > Ruotare il dial data entry per modificare il valore del parametro corrente ed utilizzare i pulsanti [ ] o [ ] per scorrere i parametri della sezione. Per abbandonare il sottomenu e tornare al menu EDIT PROGRAM, premere il pulsante [EXIT]. Premere il pulsante [EDIT]/[STORE] per tornare direttamente alla videata principale del Program. -
Page 100: Sezione Key Range
Modifica di un Program Rev Dry/Wet: bilanciamento tra segnale diretto e segnale riverberato. Module Par1: controllo di un parametro del modulo (vedi tabella sottostante). Questa funzione deve essere abilitata in ciascun modulo con i parametri Foot Controller 1 e Foot Controller 2 presenti nel menu del modulo interessato. - Page 101 Modifica di un Program Per definire i limiti della zona di tastiera di un modulo, posizionare < > tramite il dial data entry od i pulsanti [ ] o [ ] il cursore sulla linea del modulo interessato e premere il dial. Come è...
-
Page 102: Sezione Effects
Modifica di un Program Sezione EFFECTS Il menù EFFECTS raccoglie i parametri di configurazione della sezione EFFECTS del principale (descritto a pagina 9). pannello La sezione EFFECTS mette a disposizione due effetti indipendenti, che possono essere richiamati utilizzando i pulsanti [1] o [2] del principale. - Page 103 Modifica di un Program Assegnazione dell’uscita audio di FX1 o di FX2. FX Out Routing Impostazioni: Main L-R: connettori AUDIO OUT [MAIN L/MONO] e [MAIN R] del pannello posteriore (segnale stereo). Aux1 Mono: connettore AUDIO OUT [AUX 1] del pannello posteriore (segnale mono). ...
- Page 104 Modifica di un Program Chorus Effetto di modulazione che rende il suono più ‚corposo‛, caldo e profondo. Nome parametro Descrizione Attivazione / disattivazione dell’effetto. Switch [FX ON] Impostazioni: OFF, ON FX Config Stessa funzione dei parametri descritti a pagina 32. FX Out Routing Reverb Send Tipo di Chorus.
- Page 105 Modifica di un Program metronomico impostato con il parametro Master Clock nella Sezione COMMON (pag. 30). Impostazioni: 1/1, 1/2D, 1/1T, 1/2, 1/4D, 1/2T, 1/4, 1/8D, 1/4T, 1/8, 1/16D, 1/8T, 1/16, 1/16T, 1/32, 1/64 NOTA D (dot): punto di valore T (triplet): terzinato Quantità...
- Page 106 Modifica di un Program Guadagno (valori positivi) o attenuazione (valori negativi) delle basse frequenze del suono in EQ Low Gain uscita all’effetto. Impostazioni: da -12.0 a +12.0 dB EQ High Gain Guadagno (valori positivi) o attenuazione (valori negativi) delle alte frequenze del suono in uscita all’effetto.
- Page 107 Modifica di un Program Effetto per la simulazione di amplificatore. Nome parametro Descrizione Attivazione / disattivazione dell’effetto. Switch [FX ON] Impostazioni: OFF, ON FX Config Stessa funzione dei parametri descritti a pagina 32. FX Out Routing Reverb Send Tipo di amplificatore. Amp Type Suit76, Wr200, Sweet, Vintage, ’59 Clean, Twin, Small, Twin Punch, Lo-Fi, Impostazioni:...
- Page 108 Modifica di un Program Sincronizzazione del tempo tra le ripetizioni con il tempo metronomico impostato con il parametro Sync Master Clock presente nella funzione COMMON (pag. 30). Impostazioni: OFF, ON EQ Low Gain Guadagno (valori positivi) o attenuazione (valori negativi) delle basse frequenze del suono in uscita all’effetto.
- Page 109 Modifica di un Program Mid3 Freq Frequenza centrale della banda 3 delle medie frequenze. (solo PEQ5) Impostazioni: da 60 a 8000 Hz Mid3 Gain Guadagno (valori positivi) o attenuazione (valori negativi) della banda 3 delle medie frequenze. (solo PEQ5) Impostazioni: da da -12.0 a +12.0 dB Mid3 Q Larghezza della banda 3 delle medie frequenze.
- Page 110 Modifica di un Program Others Others Type: Compressor Effetto Compressore tramite il quale limitare e comprimere le dinamiche del segnale. Può essere utilizzato per creare un suono più potente e con un livello più costante o per incrementare il sustain delle note. Nome parametro Descrizione Attivazione / disattivazione dell’effetto.
-
Page 111: Sezione Reverb
Modifica di un Program Sezione REVERB Il riverbero nasce come somma delle varie riflessioni acustiche prodotte da un suono in un ambiente. Un gran numero di fattori determina la risposta acustica di un particolare tipo di riverbero, questi includono le dimensioni e la morfologia dell’ambiente, il materiale con cui sono rivestite le pareti e tanti altri. -
Page 112: Sezione E.piano
Modifica di un Program Sezione E.PIANO Il menù E.PIANO raccoglie i parametri di configurazione del modulo E.PIANO (pag. 11). Per accedere a questo menu, nella videata EDIT PROGRAM (pag. 28) posizionare il cursore sul campo E.PIANO e premere il dial data entry, oppure tenere premuta per qualche istante la manopola di selezione dei suoni del modulo (punto 4 a pagina 12). - Page 113 Modifica di un Program Trasposizione per semitoni del suono generato dal modulo. Note Shift Impostazioni: da -48 a +48 semitoni NOTA Quando viene applicata una trasposizione il Led [ ] del modulo è acceso. Velocity Sens Sensibilità del livello del segnale generato dal modulo in risposta al tocco sulla tastiera (velocity). Applicando una determinata forza, il livello del segnale aumenta per valori positivi del parametro, mentre si riduce per valori negativi.
-
Page 114: Sezione A.piano
Modifica di un Program Attivazione / disattivazione della sincronizzazione dell’effetto Tremolo del modulo E.PIANO al Trem Sync Master Clock. Quando il parametro Tremolo Sync è abilitato (Tremolo Sync: ON), la frequenza di modulazione del Tremolo è regolata dal Master Clock ed il parametro Tremolo Speed determina il fattore moltiplicativo del parametro Master Tempo nella Sezione COMMON o del MIDI Clock ricevuto (pag. -
Page 115: Sezione Clavi
Modifica di un Program Brillantezza del suono. Con un valore pari a 0 si ottiene un suono perfettamente bilanciato. Con Brilliance valori negativi si ottiene un’enfatizzazione dei bassi ed un’attenuazione degli alti, di conseguenza [BRILLIANCE] il suono risulta meno brillante. Con valori positivi si ottiene un’enfatizzazione degli alti ed un’attenuazione dei bassi così... -
Page 116: Sezione Sound Collection
Modifica di un Program Attivazione / disattivazione del filtro smorzatore. Mute Impostazioni: OFF, ON Mute Value Posizione massima del feltro smorzatore (Sliding Damper) che permette di diminuire il tempo di decadimento del suono. Impostazioni: da 30 a 127 Sezione SOUND COLLECTION Il menù... -
Page 117: Sezione External
Modifica di un Program [parametro 1] Parametri principali di generazione sonora del suono selezionato. I tre parametri disponibili dipendono dal suono selezionato e vengono descritti di seguito: [KNOB 1] Attack Time: tempo di attacco del suono, impiegato per raggiungere il massimo livello del [parametro 2] [KNOB 2] segnale dopo aver premuto un tasto della tastiera. - Page 118 Modifica di un Program Stessa funzione dei parametri descritti a pagina 42. Note Shift Pitch Bend Mod.Wheel Sustain Pedal Foot Switch1 Foot Switch2 Foot Control1 Foot Control2 Trasmissione del messaggio di Program Change. La regolazione è fattibile anche con il controllo Program Change [VALUE] del modulo quando il selettore del messaggio/funzione MIDI è...
-
Page 119: Modalita' Song
Modalità Song MODALITA’ SONG La modalità Song permette di selezionare gruppi di 4 Program che possono essere richiamati velocemente, indipendentemente dalla locazione in cui sono salvati, senza la necessità quindi di scorrere tutte le locazioni. E’ possibile selezionare la modalità Song premendo il pulsante [SONG MODE]/[SYSTEM]: il Led si accende a luce fissa ed il display visualizza l’ultima Song selezionata. -
Page 120: Memorizzazione Di Una Song
Modalità Song durante la selezione il display visualizza temporaneamente il nome del nuovo Program nella sezione in cui viene normalmente riportato il nome della Song. E’ altresì possibile selezionare i Program con i pedali collegati alla presa PEDAL [PROGRAM + / -] del pannello posteriore. -
Page 121: Modifica Di Una Song O List
Modifica di una Song o List MODIFICA DI UNA SONG O LIST Premendo il pulsante [EDIT] quando il display visualizza la modalità Song è possibile accedere a tutti i parametri di programmazione della Song corrente. Il menu principale di EDIT SONG raccoglie le funzioni di programmazione di una Song ed è... -
Page 122: Funzione Order
Modifica di una Song o List Funzione ORDER La funzione Order permette di spostare la posizione di una Song all’interno della List corrente. Per accedere a questa funzione, nella videata EDIT SONG posizionare il cursore sul campo ORDER e premere il dial data entry. La videata presenta i seguenti campi: Nome della funzione. -
Page 123: Funzione Lists
Modifica di una Song o List La prima videata riguarda la fase COPY FROM e presenta i seguenti campi: Fase corrente della funzione COPY/PASTE. Indica che ci si trova nella fase Copy From. Numero della List. Indica il numero della List da cui copiare la Song. Numero della Song. -
Page 124: Menu System
Menu System MENU SYSTEM Il menu SYSTEM permette di impostare i parametri che interessano l’intero strumento. Tutte le impostazioni fatte SYSTEM vengono immediatamente eseguite rimangono memorizzate sino ad una nuova modifica o al richiamo di un Factory Reset. Per accedere ai parametri System, tenere premuto per qualche istante il pulsante [SONG MODE]/[SYSTEM], viene visualizzato il menu principale della modalità... -
Page 125: Sezione Keyboard
Menu System Sezione KEYBOARD Il menù KEYBOARD contiene i parametri globali relativi alla tastiera dello strumento. Per accedere a questo menu, nella videata SYSTEM posizionare il cursore sul campo KEYBOARD e premere il dial data entry. Nome parametro Descrizione Transpose Trasposizione generale dello strumento per semitoni. -
Page 126: Sezione Midi
Menu System Impostazioni: da 0.5 a 4.0 NOTA Questo parametro è disponibile solo con Filter Type: Peaking. Mid Freq Frequenza centrale della banda MID. Impostazioni: da 250 a 2500 Hz Mid Q Larghezza della campana del filtro della banda MID la cui frequenza centrale è definita con il parametro Mid Freq. -
Page 127: Sezione Pedal Setup
Menu System Sezione PEDAL SETUP Il menù PEDAL SETUP contiene i parametri di impostazione dei pedali collegati ai jack PEDAL presenti nel pannello posteriore. Per accedere a questo menu, nella videata SYSTEM posizionare il cursore sul campo PEDAL SETUP e premere il dial data entry. Nome parametro Descrizione Sustain Type... -
Page 128: Sezione Preferences
Menu System Modalità di funzionamento del foot switch a due pulsanti collegato al connettore PEDAL Prog +/- Type [PROGRAM + / -]. Impostazioni: Normal: il pulsante destro esegue la funzione PROGRAM +, il pulsante sinistro esegue la – funzione PROGRAM –... -
Page 129: Menu Utility
Menu Utility MENU UTILITY Il menu UTILITY raccoglie alcune funzioni di utilità che interessano l’intero strumento. Il display mostra i seguenti campi: Nome del sottomenu. Indica che ci si trova nel menu UTILITY. Numero della pagina. Indica la pagina corrente visualizzata e il numero totale delle pagine del menu. (ad esempio ‚1/5‛ indica che ci si trova nella prima pagina delle cinque previste). -
Page 130: Funzione Backup All
Menu Utility verifica visuale delle posizioni. Se il posizionamento è corretto premere il dial data entry per confermare, viene visualizzato il messaggio ‚Allocation Completed!‛. Premere invece [EXIT] per annullare e tornare alla videata UTILITY. NOTA Nel caso in cui in uno slot dello strumento non sia installato alcun modulo, durante la procedura di identificazione è necessario selezionare per tale slot il valore ‚empty‛. -
Page 131: Funzione Factory Reset
Menu Utility NOTA Per evitare la perdita dei dati dello strumento, prima di effettuare il caricamento si consiglia di eseguire un backup dei dati nell’unità flash USB tramite la funzione Backup All (pag. 60). Funzione FACTORY RESET La funzione Factory Reset esegue il ripristino di tutti i Program, le Song, i parametri di sistema dello strumento alle impostazioni di fabbrica. - Page 132 Menu Utility Aggiornamento dei moduli installati nello strumento In aggiunta all’aggiornamento del sistema operativo, è previsto anche l’aggiornamento dei singoli moduli installati nello strumento ogni qualvolta sarà reso disponibile file sito http://www.viscountinstruments.com. La procedura di aggiornamento è la medesima di quella del sistema operativo descritta in precedenza, con la differenza che al punto è...
-
Page 133: Appendice
A fianco dei messaggi di errore di seguito riportati viene indicato il Led della manopola per la selezione della categoria di effetto (pag. 9) che viene acceso se il sistema non riesce a visualizzare il messaggio a display. Qualora il Led acceso non sia tra quelli riportati, contattare l’assistenza tecnica all’indirizzo e-mail service@viscount.it. Backup aborted! Il sistema non riesce a salvare nell’unità... - Page 134 USB inserita in quanto lo strumento tenterà un nuovo aggiornamento. Se al termine dello stesso viene di nuovo visualizzato il messaggio di errore, contattare il servizio di assistenza tecnica all’indirizzo service@viscount.it indicando il messaggio di errore ed il numero visualizzato. Update file not detected! – 3 led lampeggianti Nell’unità...
-
Page 135: Risoluzione Ai Problemi Più Comuni
Appendice Wrong format. Newer software is required Il file di backup che si sta tentando di caricare è stato generato con una versione dil sistema operativo più recente di quella attualmente installata nello strumento. Aggiornare il proprio strumento all’ultima versione disponibile. -
Page 136: Lista Dei Suoni Sound Collection
Appendice Custom, Stage Flanger, Stress-me I, Stress-me II, Gentle Flanger, Color Flanger, Dyn Flanger Flanger Custom, Stage Phaser, PH90, Modern Phaser, Deep Phaser, PH Deluxe, Spread Phaser Phaser Custom, Cry Wah, Gun Wah, UK Wah, Drop Wah, AutoWah-1, AutoWah-2, AutoWah-3, AutoWah-4, Stage T-Wah, Q-Wah, LT-Wah Custom, Short Tail, Long Tail, Neverending, Ping Pong, One Shot, Double Shot, Delay... - Page 137 Appendice Keys Grand Piano Attack Time Decay Time Release Time Bright Piano Attack Time Decay Time Release Time House Piano Filter Cutoff Attack Time Release Time Electric Grand Attack Time Release Time Efx Send Digital ‘80 Filter Cutoff Release Time Efx Send Mark 73 Filter Cutoff...
- Page 138 Smaltimento dei rifiuti elettrici ed elettronici (applicabile nell’Unione Europea e negli altri paesi europei con servizio di raccolta differenziata) Ai sensi dell’art. 13 del Decreto legislativo 25 luglio 2005, n. 151 “Attuazione delle Direttive 2002/95/CE, 2002/96/CE e 2003/108/CE” II simbolo presente sul prodotto o sulla sua confezione indica che il prodotto non verrà trattato come rifiuto domestico.
- Page 139 MIDI Informations MIDI INFORMATIONS What is MIDI The MIDI (Musical Instrument Digital Interface) allows instruments of different makes and types to communicate with each other by means of this clearly specified protocol of codes. This makes it possible to create systems of MIDI instruments which offer much better versatility and control than can be achieved with separate instruments.
-
Page 140: Midi Informations
MIDI Informations CONTROL CHANGE These are control messages (often associated to trimmers or pedals) used to add expression to the performance, allowing you to set (and control in real time if necessary) voice parameters such as volume (CC n.7) or the position of the swell pedals (CC n.11), etc. This message contains the following information: Control Change: a controller has been adjusted Controller Number: which controller has been adjusted... - Page 141 MIDI Informations List of MIDI messages transmitted and received by the Legend ‘70s Message Parameter Value Range Message Parameter Value Range Program SOUND COLLECTION Part1 Program selection 1-128 CC 47 0-127 Change Knob2 parameter SOUND COLLECTION Part1 PitchBend Pitch wheel 0-127 CC 48 0-127...
- Page 142 MIDI Informations N.B. Reset All Controllers message sets the following parameters: Pitch Bend = 00 64 Expression (CC 11) = 127 Sustain (CC 64) = Off This message is received only. All Sound Off message mutes all sounds regardless of whether the Sustain pedal is on. This message is received only.
- Page 143 MIDI IMPLEMENTATION CHART Viscount Legend '70s Version: 1.0 Date: 08 Jun. 2020 FUNCTION… TRANSMITTED RECEIVED REMARKS BASIC Default CHANNEL Changed ******** ******** MODE Default Mode 3 Mode 3 Messages ******** ******** Altered ******** ******** NOTE 0÷127 0÷127 NUMBER VELOCITY Note ON...
- Page 146 Viscount International S.p.A. Via Borgo, 68 / 70 – 47836 Mondaino (RN), ITALY Tel: +39-0541-981700 Fax: +39-0541-981052 Website: www.viscountinstruments.com...
Need help?
Do you have a question about the Legend ‘70s Artist-W and is the answer not in the manual?
Questions and answers