Table of Contents
Advertisement
Advertisement
Table of Contents

Subscribe to Our Youtube Channel
Related Manuals for Viscount DB-3


Summary of Contents for Viscount DB-3
- Page 1 DB-3 User Manual...
-
Page 2: Important Safety Instructions
WARNING: READ THIS FIRST! WARNING RISK OF ELECTRIC SHOCK DO NOT OPEN AVIS RISQUE DE CHOC ÉLECTRIQUE NE PAS OUVRIR This symbol is intended to alert the user to the This symbol is intended to alert the user to presence of uninsulated “dangerous voltage” the presence of important operating and within the product’s enclosure that may be of maintenance (servicing) instructions in the... -
Page 3: Table Of Contents
9.2 Regulating the MIDI dynamic value (keyboard version only) ......53 About MIDI ........................54 What is MIDI? ....................... 54 Main MIDI messages transmitted and received by the DB-3 ........ 54 Decimal-exadecimal-binary conversion chart ............55 Detailed MIDI implementation ................56... -
Page 5: Important Notes
DB-3 Drawbar Organ 1. IMPORTANT NOTES 1.1 NOTES ON THE DB-3 LOOKING AFTER THE PRODUCT • Do not apply excessive force to the structures or the controls (knobs, switches, etc.). • Handle the instrument with care during both transport and use. The instrument should be transported in its original packaging or a similar container. -
Page 6: Introduction
These are just some of the characteristics of the electromagnetic organ, which has played an important role in the history of music. The Viscount DB-3 is able to simulate all these characteristics thanks to the new technology known as A.S.T.M. (Advanced Synchronous Tonewheel Modelling). -
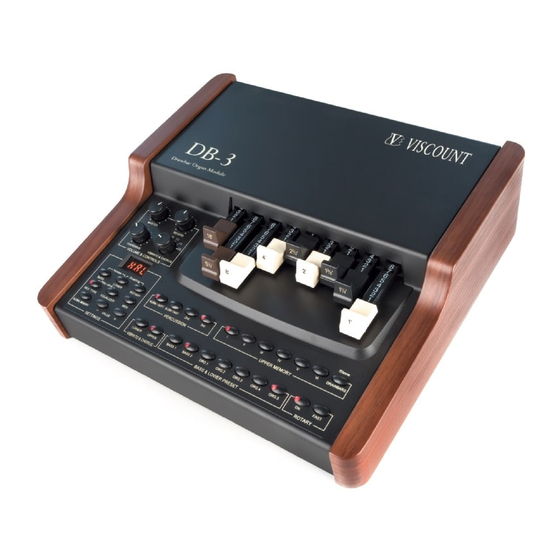
Page 7: Controls And Connectors
DB-3 Drawbar Organ 3. CONTROLS AND CONNECTORS 3.1 THE FRONT PANEL 1. VOLUME & CONTROL Section: this contains four trimmers for control of: [MASTER]: the instrument’s general volume. [REVERB]: the total reverb effect. [OVERDRIVE]: the amount of the distortion effect. - Page 8 DB-3 Drawbar Organ Interpretation of the display pages is easy and intuitive. After selecting a given group of functions using the SETTINGS buttons, you simply press the same button again to scroll on to the next display page. Since the display pages have a cyclic structure, to recall a video page already displayed, just keep pressing the button of the group of functions selected until the page you require appears.
-
Page 9: The Rear Panel
DB-3 Drawbar Organ 3.2 THE REAR PANEL 1. [POWER ] Switch: instrument on/off switch. 2. [AC ADAPTOR] connector: socket for connecting the external power supply adapter supplied with the instrument. 3. PEDAL Jacks: these Jacks allow you to connect the pedals for controlling: [SLOW/FAST]: the speed of the Rotary effect (footswitch pedal). -
Page 10: Connection Examples
DB-3 Drawbar Organ 3.3 CONNECTION EXAMPLES... -
Page 11: Using The Memories And Drawbars
DB-3 Drawbar Organ 4. USING THE MEMORIES AND DRAWBARS 4.1 THE GLOBAL MEMORIES The Global Memories are main memories allowing you to save all the Upper memories and all the instrument’s internal parameters except for the MIDI settings, the [MASTER] volume, and the fine tuning ([PITCH] trimmer on the rear panel). -
Page 12: The Upper Memories
Unlike the Global Memories, in these memories it is only possible to save the drawbar setting. To activate the memory you require, press its button and the DB-3 will recall its contents immediately, and then illuminate the LED button. -
Page 13: Creating A Sound With The Drawbars
The Factory Settings procedure allows you to perform a general reset of the instrument and restore the settings present when it was purchased. To do this, switch on the DB-3 with the VALUE [+] and [-] buttons pressed; the LED of [GLOBAL MEMORY] will start to flash and the display will show: Press [GLOBAL MEMORY] to complete the procedure, or press any other button to annul the Factory Settings function, leaving the instrument’s current settings unchanged (in the... -
Page 14: Setting The Lower And Bass Sections
5. SETTING THE LOWER AND BASS SECTIONS The DB-3 allows you to simulate the two manuals (Upper and Lower) and the pedal board (Bass) of the original electromagnetic organs by dividing the keyboard (the one of the Keyboard version or a Master Keyboard connected to the Expander version) into zones by means of split points. - Page 15 DB-3 Drawbar Organ With this setting you will only be able to play the Bass voices in the keyboard range assigned to the bass. KEYBOARD CONFIGURATION EXAMPLES Use the VALUE [+] and [-] buttons to set the desired mode. The fourth video page (displayed by pressing [BASS] again) allow you to set the split point of the Bass section.
- Page 16 DB-3 Drawbar Organ As for the bass, you can use the display to regulate the volume and the split point of the Lower section. To do this, press the [LOWER] button; the display will show the current volume value: Use the VALUE [+] and [-] buttons to set the value required.
-
Page 17: Percussion
In the original instrument, the sound produced by the 1' drawbar was eliminated when the percussion was activated: the DB-3 also reproduces this feature. For activating the percussion feature, there are two buttons in the PERCUSSION section of the front panel marked [2nd] and [3rd]. -
Page 18: The Effects
In the original electromagnetic organs, the reverb was simulated by means of a special device containing one or more springs. The Reverb effect of the DB-3 allows you to simulate various types of natural reverbs, and the reverb characteristic of this particular instrument. -
Page 19: Overdrive
You will therefore note that the DB-3 effect depends on a large number of factors including the general volume, the level and number of drawbars open, and the number of notes played (at low volumes, a lot of notes have to be played to bring the signal to saturation level). - Page 20 DB-3 Drawbar Organ The parameters on the display also allow you to set the two rotation speeds and the transients, meaning the switch times between low and high speed and vice-versa. To display these parameters, press the [ROTARY] button in the SETTINGS display; the display will show: This first video page allows you to set the low speed (using the VALUE buttons).
-
Page 21: Additional Functions
8.2 ADDING THE INTERNAL NOISES To make the sound of the DB-3 as faithful a reproduction as possible of that of the original electromagnetic organs, you can use the Noise function to add the organ’s internal noise. -
Page 22: Scaling
As for the other effects, the DB-3 also allows emulation of this characteristic. To display the click setting video page, press the [EQUALIZER] button keeping pressed the [REV.TYPE] button:... -
Page 23: Midi
For a more detailed description of the MIDI messages transmitted and received by the DB-3, please consult the “Detailed MIDI Implementation” section on page 56. The first video page displayed allows setting of the MIDI Mode to be used to receive and transmit the messages. - Page 24 DB-3 Drawbar Organ MIDI Mode 3 (Md3): the instrument receives and transmits on three channels (those of the Upper, Lower and Bass sections). In reception, the notes on the channels of the Upper and Lower sections can be received across the entire keyboard range of the DB3, while the Bass section will play up to its maximum permitted range (key B3).
- Page 25 DB-3 Drawbar Organ When the [MIDI] button is pressed again, the video page for setting the Control Mode will be displayed; this is the mode for transmission and reception of MIDI message relating to the operating parameters. The Control Mode can be set as: Sys-Ex (CmS on display): the internal parameters are regulated by means of system exclusive messages.
- Page 26 PC hard disk / floppy disk or in the sequencer’s memory / floppy disk. To reload the data in the DB-3, after opening the file using the MIDI software (in the PC), start reading the file (normally using the PLAY button). The DB-3 will automatically save the data in its internal memory.
-
Page 27: Regulating The Midi Dynamic Value (Keyboard Version Only)
9.2 REGULATING THE MIDI DYNAMIC VALUE (keyboard version only) As in the original electromagnetic organs, the DB-3 generates the sound with fixed dynamic. However, the Key Touch function allows you to select a dynamic curve or value to be transmitted by MIDI, to allow control of any expanders connected. -
Page 28: About Midi
Always use top quality cables for the MIDI connections from and - MIDI IN: By means of this jack, the device to the DB-3. We also advise the use of cables no more than 5 receives the MIDI data emitted by other metres long. -
Page 29: Decimal-Exadecimal-Binary Conversion Chart
To transmit Program Changes from the DB-3, you will be able to select the memories (Global These messages include the BULK DUMP data, i.e. the Memory, Upper Memory, Bass and Lower Presets). -
Page 30: Channel Messages
DB-3 Drawbar Organ DETAILED MIDI IMPLEMENTATION CHANNEL MESSAGES Note On In MIDI Mode 1 this message controls the general volume. In MIDI Mode 2 if this message is received on the Message which is generated when a key is pressed. -
Page 31: System Exclusive Messages
This message controls the Rotary fast / slow speeds. System Exclusive messages control various parameters BnH 1EH vvH of the DB-3. Some parameters are controlled by sys-ex messages only (i.e. Vibrato, Chorus, Percussion, etc...). n=MIDI channel number : 00H – 0FH (ch.1 – ch.16) - Page 32 : Exclusive status : Viscount ID : Viscount ID : drawbars organ ID : drawbars organ ID : DB-3 ID : DB-3 ID : control on panel : control on panel : Reverb Type : Vibrato & Chorus on section...
- Page 33 F0H 31H 30H 02H 01H 02H xxH yyH F7H : Exclusive status : Viscount ID : drawbars organ ID : DB-3 ID : control on panel : Reverb level : first data byte (00H – 01H) : second data byte (00H – 7FH) : EOX •...
-
Page 34: Midi Implementation Chart
DB-3 Drawbar Organ MIDI IMPLEMENTATION CHART Viscount DB-3 Date: 01/11/02 Drawbar Organ Version: 1.0 FUNCTION TRANSMITTED RECOGNIZED REMARKS BASIC DEFAULT 1-16 1-16 CHANNEL CHANGED 1-16 1-16 MODE Default Mode 3 Mode 3 Messages Altered ****** ****** NOTE 36-96 * 0-127... - Page 35 CAUTION! This product contains a lithium battery. There is danger of explosion if battery is incorretly replaced. Replace only with a Maxell CR2032. Replace only with the correct polarity. Discard used battery according to manufacter’s instruction’s. ADVARSEL! Lithiumbatteri – Eksplosjonsfare. Vade utksifting benyttes kun batteri som anbefalt av apparatfabrikanten.
- Page 36 Sales Division: Via Belvedere Fogliense 8, I-47836 Mondaino (RN) Italy tel.+39-0541-981700 - fax +39-0541-869605 - e-mail: viscount@omniway.sm - Internet: www.viscount-organs.com - www.viscount.it Distribution for Italy: TITAN MUSIC S.A. Strada Genghe di Atto, 80 - 47031 Acquaviva – Repubblica di San Marino tel.0549-999164 - fax 0549-999490...
Need help?
Do you have a question about the DB-3 and is the answer not in the manual?
Questions and answers