Table of Contents
Advertisement
Quick Links
Advertisement
Table of Contents

Related Manuals for Johnson Controls FMS-2000C


Summary of Contents for Johnson Controls FMS-2000C
- Page 1 FMS-2000C Critical Environment Controller LIT-12013504 User's Guide August 2020...
- Page 2 Note: The actuator is sold separately. IMPORTANT: Do not install or use this FMS-2000C Critical Environment Controller in or near environments where corrosive substances or vapors could be present. Exposure of the FMS-2000C Critical Environment Controller to corrosive environments may damage the device’s internal components and will void the warranty.
- Page 3 FMS-2000C Critical Environment Controller’s electrical ratings. IMPORTANT: Do not install the FMS-2000C Critical Environment Controller where the maximum temperature exceeds 125°F (52°C). Installing the device where maximum temperatures exceed 125°F (52°C) may cause damage to the FMS-2000C Critical Environment Controller and may void the warranty.
- Page 4 IMPORTANT : Seul le personnel qualifié peut installer et entretenir les produits Johnson Controls. Ces instructions constituent un guide pour ce type de personnel. Suivez attentivement toutes les instructions de ce document et toutes les instructions du FMS-2000C Critical Environment Controller.
- Page 5 Ne dépassez pas les spécifications électriques du FMS-2000C Critical Environment Controller. IMPORTANT : N’installez pas le contrôleur d’environnement critique FMS-2000C où la température maximum dépasse 52 °C (125 °F). Installer l’appareil dans un environnement où la température maximum dépasse 52 °C (125 °F) peut endommager FMS-2000C Critical Environment Controller et peut annuler la garantie.
-
Page 6: Table Of Contents
FMS-2000C Table of contents Introduction ....................................10 Display overview ..................................10 Initial setup ....................................14 Completing the initial setup ..............................14 Configuration ..................................... 15 Global settings ................................... 15 Choosing a unit of measure ..............................15 Choosing a language ................................15 Choosing the device orientation ............................ - Page 7 FMS-2000C Configuring the analog outputs to control pressure ......................27 Specifying the operating mode ............................. 27 Specifying the output range..............................27 Specifying the action mode ..............................27 Mapping the corresponding analog input channel ....................... 27 Setting up limits ..................................27 Configuring analog inputs to measure temperature with a thermistor ................
- Page 8 FMS-2000C Specifying the output signal range for air flow........................37 Adjusting deadband for air flow ............................37 Enabling the alarm and changing the alarm limits for air flow ....................38 Naming the air flow input ..............................38 Configuring the analog inputs for volumetric offset control ....................38 Configuring the analog output for air flow control ........................
- Page 9 Setting the actuator to auto-stroke ..........................55 Overriding relay outputs ............................. 56 Saving settings ..................................56 Restoring settings................................. 56 Resetting the FMS-2000C controller ............................ 56 Resetting the FMS-2000C ..............................56 Restricted user access ................................57 Changing the time and date ..............................57 Adjusting the alarm mode..............................
-
Page 10: Introduction
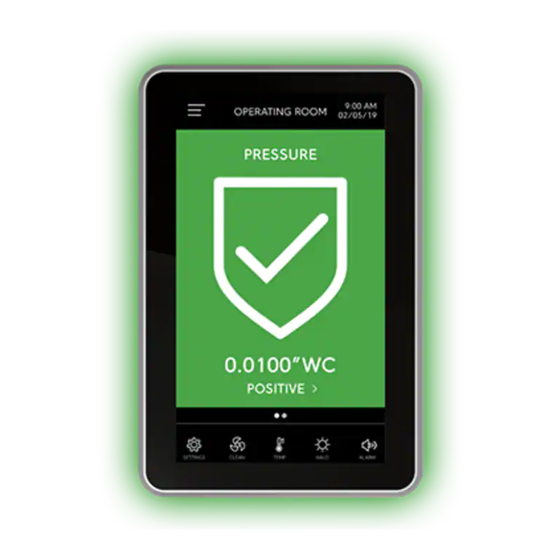
This controller has a displayed air flow resolution down to 0.0001 in. W.C. and instantly updates as conditions change. The FMS-2000C provides maximum room status awareness with color coded visual alarms both on screen and with the 360° Safety Halo illuminated edge, which allows staff to easily monitor spaces down long corridors. - Page 11 FMS-2000C Figure 2: Warning screen Figure 3: Alarm screen Figure 4: Neutral isolation mode Figure 5: Cleaning mode LIT-12013504...
- Page 12 FMS-2000C Figure 6: FMS-2000C Critical Environment Controller network overview Supply Exhaust FMS-2000 Controller Display Supervisory BACnet MS/TP Device Pressure Sensor Temperature Sensor Humidity Sensor Flow Sensor LIT-12013504...
- Page 13 FMS-2000C Table 2: Icon overview Icon Sensor readings Sensor readings in acceptable range Warning or alarm depending on status color Neutral isolation mode Audible alarm Muted alarm Night mode Home screen Start Stop Revert Information Switch is off Switch is on...
-
Page 14: Initial Setup
Tap the Checkmark icon to save the settings. If your FMS-2000C controller came with two sensors, you get the option to set up a primary and a secondary space. To set up the isolation mode for the primary and secondary space, expand Primary and Secondary. Choose from the following options: •... -
Page 15: Configuration
• Documentation Global settings Here you can change settings that impact the entire FMS-2000C Critical Environment Controller. Choosing a unit of measure On the home screen, tap the Settings icon to enter the Settings menu. To view global settings, tap Global. -
Page 16: User Accounts
Setting up users and passwords restricts the use of the FMS-2000C Critical Environment Controller to specific groups of people. This is not mandatory, but if you don’t create users and passwords, anyone can access all functions of the FMS-2000C controller. There are two access levels: admin level users and restricted users. -
Page 17: Creating A Restricted User And Pin Password
If admin users forget their password, they have to complete the following procedure: Contact support and provide them with the device identifier listed on the screen of each FMS-2000C Critical Environment Controller. See Contact information at the end of the User’s Guide for more details. -
Page 18: Network Setup
In the network menu, you can set up the network communications between the FMS-2000C Critical Environment Controller and the facility. Each FMS-2000C controller is set up for BACnet® MS/TP by default. The Metasys N2 network can be enabled on the controller. -
Page 19: Metasys N2 Network Setup
FMS-2000C Metasys N2 network setup The Metasys N2 network can be enabled on the controller. You can adjust the Network address only. Setting the network address for a Metasys N2 network On the Metasys N2 network, you can set up a network address within the valid range of 1 to 255. -
Page 20: Room Setup
If your FMS-2000C Critical Environment Controller includes two or more differential pressure sensors, you can specify the isolation modes for both a primary and a secondary monitored space. In a typical application, the FMS-2000C controller can be configured to monitor and control the differential pressure in an isolation room as well as an adjoining anteroom. The isolation room is the primary monitored space and the anteroom is the secondary monitored space. -
Page 21: Adjusting The Comfort Range For The Secondary Monitored Space
FMS-2000C Adjusting the comfort range for the secondary monitored space On the home screen, tap the Settings icon to enter the Settings menu. To view room settings, tap Room. To view settings for the secondary monitored space, tap Secondary. Tap the Comfort Range arrow and scroll to choose from the following options: •... -
Page 22: Analog I/O
Admin users can set up AI-1 to AI-4, thermistor inputs (TI) TI-1 and TI-2, analog outputs (AO) AO-1 to AO-4 and map analog inputs to the corresponding analog outputs. See Table 4 for more information on which parameter can be configured to which analog input or thermistor. Refer to the FMS-2000C Critical Environment Controller Installation Guide for more information. -
Page 23: Configuring Analog Inputs To Measure Pressure
Configuring analog inputs to measure pressure To configure the FMS-2000C controller for pressure, you can use AI-1, AI-2, AI-3 and AI-4. Analog Input 1 can only be configured for pressure and is pre-configured by the factory. If your FMS-2000C controller came with more than one pressure sensor, AI-2, AI-3 and AI-4 are pre-configured for pressure accordingly. -
Page 24: Specifying The K-Factor
FMS-2000C Specifying the K-Factor The default value for the K-Factor is 1.0, but the manufacturer of the sensor can provide a different K-Factor to serve as a correction factor for the actual output of the sensor. If you do not receive a different K-Factor from the manufacturer, leave the K-Factor at its default value. -
Page 25: Setting Up The Sensor Range
The Zero Calibration and Reset Zero Offset options can be used to reset the zero pressure reading for a specific installation. Once the FMS-2000C controller has been installed completely with any peripheral remote sensor modules, this feature can be used to recalibrate the controller’s zero reading to read accurately with the door to the monitored room left open. -
Page 26: Setting The Alarms For The First Time
Naming the pressure analog input Set the name you want to appear on the home screen for a certain analog input. If you set up the FMS-2000C controller in portrait mode you can have 16 characters. In landscape mode, you can have 12 characters. -
Page 27: Configuring The Analog Outputs To Control Pressure
Refer to the wiring diagrams in the submittal package and the FMS-2000C Critical Environment Controller Installation Guide (LIT-12013508) to map the output correctly. Specifying the operating mode Each of the four analog outputs of the FMS-2000C controller can be configured for the following operating modes: • Direct operating mode •... -
Page 28: Configuring Analog Inputs To Measure Temperature With A Thermistor
Configuring analog inputs to measure temperature with a thermistor The FMS-2000C controller includes two dedicated thermistor inputs for measuring and monitoring resistive temperature sensors, or thermistors. Once you have configured the controller for temperature using the thermistors, you can adjust the temperature setpoint on the home screen by tapping the temperature icon. -
Page 29: Adjusting The Alarm Settings
Naming the thermistor inputs Set up a name for the thermistor inputs you want to appear on the home screen. If your FMS-2000C controller is in portrait mode, you can have up to 16 characters. If your FMS-2000C controller is in landscape mode, you can have 12 characters. -
Page 30: Configuring The Analog Input For Use With An External Thermostat
Naming an external thermostat Set up a name for the external thermostat that you want to appear on the home screen. If your FMS-2000C controller is in portrait mode, you can have up to 16 characters. If your FMS-2000C controller is in landscape mode, you can have 12 characters. -
Page 31: Adjusting The Temperature Offset For The Thermistor Inputs
Naming the thermistor inputs Set up a name for the thermistor inputs you want to appear on the home screen. If your FMS-2000C display is in portrait mode, you can have up to 16 characters. If your FMS-2000C display is in landscape mode, you can have 12 characters. -
Page 32: Specifying The Minimum Temperature Input
Set up a name for the analog input configured for precision temperature you want to appear on the home screen. If your FMS-2000C controller is in portrait mode, you can have up to 16 characters. If your FMS-2000C controller is in landscape mode, you can have 12 characters. -
Page 33: Configuring The Analog Output For Temperature Control
After you have set up the analog inputs for temperature, map them to the corresponding analog output. Use AO-3 for air supply. Setting up the operating mode for temperature control Each of the four analog outputs of the FMS-2000C controller can be configured for the following operating modes: •... -
Page 34: Configuring Analog Inputs To Measure Humidity
Naming the humidity input Set up a name for the analog input you want to appear on the home screen. If your FMS-2000C controller is in portrait mode, you can have up to 16 characters. If your FMS-2000C controller is in landscape mode, you can have 12 characters. -
Page 35: Configuring The Analog Output For Humidity Control
Changing the operating mode for humidity control Each of the four analog outputs of the FMS-2000C controller can be configured for the following operating modes: • Direct operating mode •... -
Page 36: Configuring The Analog Input To Measure Air Flow
FMS-2000C Configuring the analog input to measure air flow You can calculate and display the air change rate or display room cfm in AI-2, AI-3 and AI-4 with either a DP transmitter or flow sensor. In AI-2 only, if you choose to calculate the air changes per hour, you can also select setpoints based on different modes of occupation. -
Page 37: Specifying The K-Factor To Measure Air Flow
FMS-2000C Specifying the K-Factor to measure air flow The default value for the K-Factor is 1.0, but the manufacturer of the sensor can provide a different K-Factor to serve as a correction factor for the actual output of the sensor. If you do not receive a different K-Factor from the manufacturer, leave the K-Factor at its default value. -
Page 38: Enabling The Alarm And Changing The Alarm Limits For Air Flow
Naming the air flow input Set up a name for the analog input you want to appear on the home screen. If your FMS-2000C controller is in portrait mode, you can have up to 16 characters. If your FMS-2000C controller is in landscape mode, you can have 12 characters. -
Page 39: Setting The Input Signal Range For Air Flow Control
FMS-2000C Setting the input signal range for air flow control On the home screen, tap the Settings icon to enter the Settings menu. To view analog input settings, tap Analog I/O. To find the analog output you want to adjust, swipe left. -
Page 40: Specifying The K-Factor For Co
Set up a name for the analog input you want to appear on the home screen. If your FMS-2000C controller is in portrait mode, you can have up to 16 characters. If your FMS-2000C controller is in landscape mode, you can have 12 characters. -
Page 41: Specifying The Action Mode For Co Control
FMS-2000C Specifying the action mode for CO control The action mode determines the polarity of the output based on sensor input. To specify the action mode, complete the following steps: On the home screen, tap the Settings icon to enter the Settings menu. -
Page 42: Digital Inputs
Setting up a delay To eliminate all unnecessary movement of the actuator when the door is open, you can monitor the door switch with the FMS-2000C controller. This greatly extends the life of the actuator, while also suppressing all nuisance audible alarms. The door switch delay specifies the amount of time the FMS-2000C controller waits before resuming actuator control. -
Page 43: Configuring The Switch Type
FMS-2000C Configuring the switch type On the home screen, tap the Settings icon to enter the Settings menu. To view digital input settings, tap Digital Input. To find the digital input you want to configure the override switch to, swipe left. -
Page 44: Configuring The Switch Type
FMS-2000C Configuring the switch type On the home screen, tap the Settings icon to enter the Settings menu. To view digital input settings, tap Digital Input. To find the digital input you want to configure the flow switch to, swipe left. -
Page 45: Relays
Configuring the high and low setpoints When using the setpoint trigger mode, the FMS-2000C controller has to be in either positive or negative isolation mode in order to enter the high and low relay setpoints. If the unit is in neutral isolation mode, then setpoint entry is not available. The high setpoint determines the threshold at which relay gets activated if in direct acting mode, or gets deactivated if in reverse acting mode. -
Page 46: Configuring The Action Mode
FMS-2000C Configuring the action mode In direct acting mode, the alarm relay activates when the sensor input exceeds the high setpoint and deactivates when the sensor input falls below the low setpoint. In reverse acting mode, the alarm relay activates when the sensor input falls below the low setpoint and deactivates when the sensor input exceeds the high setpoint. -
Page 47: Configuring The Trigger Mode For Occupancy Mode
To confirm the new setting, collapse Action Mode. Setting up a delay The relay delay specifies the amount of time the FMS-2000C controller waits before activating or deactivating the relay contacts based on the action mode. To set up a delay for the occupancy mode, complete the following steps: On the home screen, tap the Settings icon to enter the Settings menu. -
Page 48: Setting Up The Derivative Constant
FMS-2000C Setting up the derivative constant To view PID settings, tap PID Loop. To find the PID loop setup you want to adjust the derivative gain for, swipe left. On the PID LOOP SETUP screen, expand Derivative and move the slider to set the derivative gain. Set the derivative constant to a default of zero for most applications. -
Page 49: Display
FMS-2000C Display On the Display screen you can adjust the following: • 360° Safety Halo • Viewing mode • Screen brightness • Device name Switching on and adjusting the brightness of the 360° Safety Halo Once you have set up the 360° Safety Halo, restricted users can adjust the settings from both the user menu and the quick access 360°... -
Page 50: Double View
FMS-2000C Figure 8: Single view primary screen Figure 9: Single view secondary screen Double view In double view, you can display the status and sensor readings for two parameters. Use this view for applications that have an isolation room and an anteroom where both spaces have an isolation mode quick link. -
Page 51: Triple View
FMS-2000C Triple view In triple view, you can display the status and sensor readings for three parameters. You can use this view for hospital applications to see pressure, temperature and humidity at the same time. Figure 11: Triple view Quad View In quad view, you can display the status and sensor readings for four parameters. -
Page 52: Setting The Display For Single View Mode
FMS-2000C Setting the display for single view mode On the home screen, tap the Settings icon to enter the Settings menu. To view display settings, tap Display. To view the different viewing modes, tap the Viewing Mode arrow. Tap Single View and the Arrow icon to proceed. -
Page 53: Alarms
To help with troubleshooting, use the real-time view screens to see real time conditions. In this view, you can see the real-time conditions of each of the resources configured to the FMS-2000C controller. This includes the analog input values and their actual voltages, the analog outputs in percentage, the analog input and output pairs along with the corresponding setpoint, the digital inputs, the digital outputs, the alarm statuses, and the network variables. -
Page 54: Adjusting The Pid Loop For Analog Output 1 In Real-Time View
FMS-2000C Adjusting the PID loop for analog output 1 in real-time view On the home screen, tap the Settings icon. On the SETTINGS screen, scroll down and tap Diagnostics. On the DIAGNOSTICS screen, tap the Real-Time View arrow. On the Real-Time View screen, tap the Analog I/O Pairs arrow. -
Page 55: Overriding And Locking Analog Outputs
FMS-2000C Overriding and locking analog outputs Control the analog outputs manually to help verify the correct operation or allocation of the controller resources. For example, set an analog output used to control an air flow damper to a specific percentage while manually adjusting the damper. Any analog output you override remains locked until you unlock it. -
Page 56: Overriding Relay Outputs
To confirm your choice, tap the Checkmark icon. Resetting the FMS-2000C controller To perform a soft reset of the FMS-2000C controller, complete the following steps: On the home screen, tap the Settings icon. On the SETTINGS screen, scroll down and tap Diagnostics. -
Page 57: Restricted User Access
FMS-2000C Restricted user access Restricted level users have access to the user menu and the quick links on the home screen for isolation mode, cleaning mode, temperature, 360° Safety Halo, and alarm mode. In the user menu, restricted level users can make the following basic adjustments: •... -
Page 58: Switching On And Adjusting The Brightness Of The 360° Safety Halo
To confirm your settings, tap the Checkmark icon. Adjusting the temperature If the FMS-2000C controller controls temperature, you can adjust the temperature for the monitored rooms within the set comfort range. If you need to adjust the temperature outside this range, consult your facility manager. -
Page 59: Changing The Occupancy State For The Primary Space
FMS-2000C Changing the occupancy state for the primary space Changing the occupancy state for the monitored spaces can help save energy by reducing the temperature and air changes when the room is unoccupied. On the home screen, tap the User Menu icon. -
Page 60: Upgrading An Existing Fms-1655 Room Pressure Controller Display
• BACnet MS/TP trunk wiring needs to be relocated to the terminals at the back of the FMS-2000C controller display. This is optional but updates to the latest BACnet/MSTP revision. See the FMS-2000C Critical Environment Controller Installation Guide for more information. -
Page 61: Technical Specifications
FMS-2000C Technical specifications Intended use Indoor use Overvoltage category Altitude Up to 2000 m Pressure range ± 0.2500 in. W.C. Alarm range ± 0.2500 in. W.C. Display range ± 0.2500 in. W.C. Accuracy ± 0.5% full scale Air flow sensor type... -
Page 62: Cleaning The Display
Contact Johnson Controls: www.johnsoncontrols.com/contact-us Building Technologies & Solutions Headquarters: Milwaukee, Wisconsin, USA Branch Offices: Principal Cities World-wide © Copyright 2020 Johnson Controls. All specifications and other information shown were current as of document revision and are subject to change without notice. www.johnsoncontrols.com...
Need help?
Do you have a question about the FMS-2000C and is the answer not in the manual?
Questions and answers