Graco XM PFP Setup & Operation
Plural-component sprayer
Hide thumbs
Also See for XM PFP:
- Repair parts (86 pages) ,
- Instructions - parts manual (22 pages) ,
- Instructions-parts list manual (14 pages)
Table of Contents
Advertisement
Setup - Operation
™
XM
PFP
Plural-Component Sprayer
For spraying two-component passive fire protection (PFP) intumescent epoxies.
For professional use only.
Important Safety Instructions
Read all warnings and instructions in this
manual and in all related manuals before
using this equipment. Save all instructions.
See page 3 for model information, including
maximum working pressure and approvals.
3A2776K
EN
Advertisement
Table of Contents

Related Manuals for Graco XM PFP


Summary of Contents for Graco XM PFP
- Page 1 Setup - Operation ™ 3A2776K Plural-Component Sprayer For spraying two-component passive fire protection (PFP) intumescent epoxies. For professional use only. Important Safety Instructions Read all warnings and instructions in this manual and in all related manuals before using this equipment. Save all instructions. See page 3 for model information, including maximum working pressure and approvals.
-
Page 2: Table Of Contents
Adjust Ratio Set Point ....38 Graco Information ......100... -
Page 3: Models
Models Models Ratio System Series Location Range Approvals Not for use in explosive atmospheres or hazardous locations. 1:1 to 24W626 1.5:1 Non-Hazardous 1.5:1 to 262869 9902471 Certified to CAN/CSA C22.2 No. 88 Conforms to UL 499 1:1 to 262945 1.5:1 9902471 Certified to CAN/CSA C22.2 No. -
Page 4: Related Manuals
Related Manuals Manuals are available at www.graco.com. Component manuals in English: Manual Description 3A2989 XM PFP Repair 3A2988 XM PFP Mix Manifold Instructions - Parts ™ 3A2799 Spray Gun Heaters 309524 ® Viscon HP High Pressure Fluid Heater Instructions - Parts... -
Page 5: Warnings
• For information on the required dimensions of the flameproof joints contact the holder of this certifi- cate (Graco Inc.); Flame-path joints are not intended to be repaired. • Special fasteners for securing equipments covers on the flameproof heaters shall have a minimum yield strength of 1,100 MPa and be corrosion resistant and sized M8 x 1.25 x 30. - Page 6 Warnings WARNING SKIN INJECTION HAZARD High-pressure fluid from gun, hose leaks, or ruptured components will pierce skin. This may look like just a cut, but it is a serious injury that can result in amputation. Get immediate surgical treatment. • Do not spray without tip guard and trigger guard installed.
- Page 7 Warnings WARNING EQUIPMENT MISUSE HAZARD Misuse can cause death or serious injury. • Do not operate the unit when fatigued or under the influence of drugs or alcohol. • Do not exceed the maximum working pressure or temperature rating of the lowest rated system component.
-
Page 8: Keep Components A And B Separate
Warnings Keep Components A and B Changing Materials Separate NOTICE Changing the material types used in your equipment requires special attention to avoid equipment damage and downtime. Cross-contamination can result in cured material in • When changing materials, flush the equipment fluid lines which could cause serious injury or damage multiple times to ensure it is thoroughly clean. -
Page 9: Component Identification
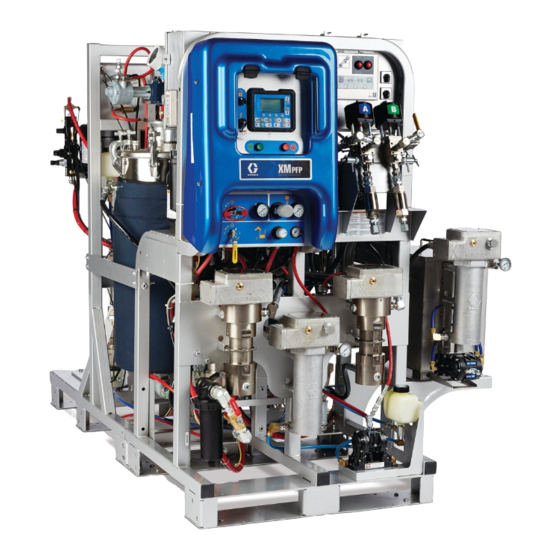
Component Identification Component Identification Typical Setup (Front View) E, F Ref. Description Ref. Description Feed Pump Frame Recirculation Control Valve Fluid Control Assembly (see page 11) Pressure Tank, Double-Wall Temperature Conditioned User Interface (see page 15) Remote Mix Manifold Metering Pumps Control On and Off Buttons Static Mixer Assembly Main Air Supply Shutoff Valve, 1 in. - Page 10 Component Identification Typical Setup (Back View) Hazardous Location Models only X (located between metering pumps, not visible in current view) D1, A1 C1, A1 Ref. Description Ref. Description Heated Tank Circulation Components (uses a Viscon) Air Motor ™ High Pressure Fluid Metering Pump Supply Bottle and Bracket Flush Pump (Merkur Pump) Heated Fluid Circulation Pump for Hose Bundle...
- Page 11 Component Identification Fluid Control Assembly ti19928a AA Dosing Valve AC Recirculation Valve AE Sampling Valve AG Outlet Check Valve AJ Hose Connection (Model 262869) - A side: 3/4 npt(m); B side: 1/2 npt(m) Hose Connection (Model 24W626) - A side: 3/4 npt(m); B side 3/4 npt(m) AL Pressure Sensor 3A2776K...
- Page 12 Component Identification Main Power and Heater Controls ti26689a Non-Hazardous Location System Hazardous Location System Hazardous Location System BA Main Power ON/OFF Switch (non hazardous location) BD Optional Heated Water Flush Tank Accessory ON/OFF BB A and B Tank Water Heat ON/OFF Switch Switch (only used if the water heater accessory has been added to the machine) (standard on hazardous location models...
- Page 13 Component Identification Sprayer and Flush Pump Air Controls r_XM1A00_312359_313289_14A CA Metering Pump Air On/Off Control (non hazardous loca- CC Inlet Air Pressure Gauge tion) CD Metering Pump Air Regulator Main Power On/Off Switch (hazardous location), see Main CE Metering Pump Air Regulator Gauge Power and Heater Controls, page 12 CF Flush Pump Air Gauge CB Flush Pump Air On/Off Control...
- Page 14 Component Identification Feed Module Air Controls FEED PUMP BYPASS ti20127a NOTE: Both valves shown open . 6: Supply Controls Feed Pump Bypass Button CP Tank Air Pressure Regulator CR Tank Air Pressure Gauge Use the feed pump bypass button (CU) to manually run CS Tank Air Supply Valve the feed pump when the automatic tank filling function is CT Agitator and Heated Water Circulation On/Off Valve...
-
Page 15: User Interface
Component Identification User Interface NOTICE To prevent damage to soft key buttons, do not press the buttons with sharp objects such as pens, plastic cards, or fingernails. ti13365a . 7: User Interface Buttons LEDs Ref. Button Function There are four types of LEDs on the display. Ref. - Page 16 Component Identification User Interface Display Main Display Screen Components NOTE: For detailed screens information, see Appendix A - User Interface Display beginning on page 67. The following figure calls out the navigational, status, and general informational components of each display screen. The system ratio mode shows if the mix ratio target is by volume or weight .
-
Page 17: Setup
The machine is shipped on two separate pallets, one Configuration Options with the XM PFP and one with the two feed modules. The system can be laid out two ways: Each pallet is wrapped in heavy cardboard with a lid •... - Page 18 Setup Connect Modules . 11. These are not used in the side-by-side module configuration. Regardless of the chosen module configuration, the A feed module must be on the left and the B feed module must be on the right when looking at the front of the system module.
-
Page 19: Grounding
Power must be connected by a qualified electrician and comply with all local codes and regulations. Hazardous Location Models Graco does not supply junction box power supply cords. 200-240 VAC, 3 Phase Delta, Hazardous Location: Use the following chart to determine which power cord Use a screwdriver to connect the three power leads to your system requires. -
Page 20: Set Power Jumpers
250 scfm (7.1 m /min) maximum. Available fluid pressure and flow rate are directly related to available air volume. A typical single gun XM PFP application will use 125 to 175 scfm (3.5 to 5.0 m /min). Dosing valves are operated by air. The sprayer will not operate correctly if the inlet air pressure drops below 80 psi (552 kPa, 5.5 bar) while spraying. -
Page 21: Connect Feed Module Lines To Sprayer Module
Setup Connect Feed Module Lines to a. Connect the red 1/2 in. air hose to the swivel union. See the ‘a’ in F . 15. Sprayer Module 1. Connect Modules, page 18. 2. Connect the large diameter green hose from each tank bottom outlet to the respective metering pump inlet. - Page 22 Setup e. For Non-Hazardous Location Models, For Hazardous Location Models, Connect heater Connect heater power cables (e) for the tank power cables (e) for the tanks heater the flush heater to heater and the flush heater to the terminal the terminal blocks. See F .
-
Page 23: Install Level Sensor Probes
4. Feed the rod into the tank and screw the threaded end up into the sensor head. . 18 Level Sensor Calibration Level sensors are factory set to work with these tanks. Calibration is not necessary unless replacing a sensor. See repair manual for the XM PFP (3A2989). 3A2776K... -
Page 24: Connect The Fluid Hose Bundle To The System
Setup Connect the Fluid Hose Bundle 2. Connect the short purple flush hose from the flush pump to the 1/4 npsm hose in the bundle. Use the to the System 1/4 in. nipple included with the hose bundle to connect the hoses. See F . -
Page 25: Connect The Fluid Hose Bundle To The Mix Manifold
Setup Connect the Fluid Hose Bundle a. Cut the temperature sensor loose from the tie wrap. to the Mix Manifold b. Insert the sensor down inside the hose bundle 1. Unroll the hose bundle out to the spray area. so it is buried in the insulation and up against the fluid hoses. -
Page 26: Connect The Mix Manifold To The Gun
Setup Connect the Mix Manifold to the 6. Connect 1/2 x 3/8 nipple. 7. Connect swivel. The following parts are supplied loose. Connect them to 8. Connect gun (T). the mix manifold as follows. See F . 24. Connect Tank Heat Circulation 1. - Page 27 Setup Side By Side Configuration See Front to Back Configuration, F . 4, page 12. . 25: Heated Fluid Diagram For Tank Heat 3A2776K...
- Page 28 Setup Front to Back Configuration . 26: Heated Fluid Diagram For Tank Heat (Hazardous Location Shown) 3A2776K...
- Page 29 Setup Prime Heated Fluid Circulation System Continued Hose Bundle Heating System 3. Adjust the silver knob located just above the Feed Module Air Controls. When looking at the Feed 1. Add a 50% water, 50% glycol anti-freeze mix to the Module Air Controls, the knob will be visible just small translucent tank located at the bottom right above them.
-
Page 30: Initial Startup
Initial Startup Initial Startup b. Open the main power switch (CA). After approximately 5 seconds the left indicator light on the purge controller will turn green. c. While the system is in the purge sequence, wait approximately 3 minutes until the right indicator light turns green. - Page 31 Initial Startup Load Machine (First Time) NOTE: If adding flush solvent, remove the platen from the feed pump by loosening the two setscrews and the 6. Close both feed system air controls ball valves then air tube. Drop the feed pump directly into the pail. open the brass valve on the tank lid air assembly.
- Page 32 Initial Startup h. Install pail of material beneath feed pump n. To lift the platen out of the pail, press the platen. blow-off valve (DD) then lift the director valve. The feed pump will push pressurized air into the pail to remove it from the platen. Do not let the pail lift off of the frame.
- Page 33 Initial Startup 11. Open the circulation valves. 15. At the main run (fluid control) screen, press enter manual pump run mode. 16. Press repeatedly to select Metering Pump . Press . Slowly turn metering pump air regulator (CD) clockwise to increase air pressure 12.
- Page 34 Initial Startup 18. Back out the tank air pressure regulator (CP) on the b. With a waste container beneath the valve, open feed system air controls and open the brass valve the A sampling valve slowly until clean material on the tank lid. dispenses then close the sampling valve.
- Page 35 Initial Startup c. Open the A side mix manifold inlet ball valve. Repeat for the B material line. NOTE: Now all of the material lines are primed except d. Press repeatedly to set to Press for the section from the mix manifold to the gun. Slowly turn metering pump air regulator (CD) 25.
-
Page 36: Prime Flush Pump
After water begins dispensing from the gun, turn the water heater knob to #6. 1. Turn main power switch ON and verify the XM PFP air supply ball valve is open. b. Turn the water heater power switch (BD) on the 2. - Page 37 Prime Flush Pump 8. Open the flush ball valves. 11. Continue to dispense until all air is purged. ti20110a TI1953a 12. Close flush pump air valve (CB) to stop pump then trigger gun into grounded pail to relieve pressure. 9. Disengage trigger lock and trigger gun into a Engage gun trigger lock.
-
Page 38: Adjust Ratio And System Settings
Adjust Ratio and System Settings Adjust Ratio and System 4. Change all settings in the user-interface to the desired values. See Appendix A - User Interface Settings Display on page 67 for detailed screens information, including navigation and instructions. High mix or viscosity ratio (greater than 3:1) materials Verify Desired Ratio Mode may require adding restriction to the B side outlet. - Page 39 Temperature Settings A and B Material Temperature Hose Bundle Temperature There is one Viscon HF 5400 watt heater for heating Set the desired hose bundle temperature on the supply each material while in circulation or while dispensing. screen. These heaters are digitally controlled to your specific setpoint temperature.
-
Page 40: Spray
2. Verify that the metering pump regulator (CD) is turned counterclockwise to 0 psi. 3. For non-hazardous location models: Turn the main power switch (BA) ON and verify the XM PFP air supply ball valve (E) is open. Open the pump air valve (CA). - Page 41 Spray 9. Open recirculation valves. 13. Use metering pump air regulator (CD) to slowly increase the air pressure to the metering pumps until the enabled pump(s) begin running slowly. For Hazardous Location Models: the system on/off valve is already open. 10.
- Page 42 Spray 21. Close recirculation valves. 17. If desired, press to enable automatic tank filling. See page 83 for automatic tank filling details. 18. Run the metering pumps until the material has reached the desired temperature. NOTE: If you circulate the A side metering pump at pressures greater than 3000 psi (21 MPa, 210 bar), an advisory is issued and the yellow LED on the display illuminates.
- Page 43 Spray 32. Perform the Mix and Integration Tests on page 53. 28. Disengage trigger lock and trigger gun into a grounded metal pail. Use a metal pail lid with a hole When necessary, engage trigger lock (1) then install to dispense through to avoid splashing. the tip (2) on gun.
-
Page 44: Flush Mixed Material
Flush Mixed Material Flush Mixed Material 6. Open one of the flush ball valves on the mix manifold. 7. Disengage trigger lock and trigger gun into a grounded pail. Use a pail lid with a hole to dispense through. Seal around hole and gun with a rag to prevent splash back. -
Page 45: Park Metering Pump Rods
Park Metering Pump Rods 13. Close flush ball valves. 2. Open fluid recirculation valves. ti20095a ti20095a 3. Close mix manifold material ball valves. 14. Use a rag and solvent to clean spray tip then reinstall on gun. 15. Remove the static mixer. Clean the mix element then re-install the mixer. -
Page 46: Pressure Relief Procedure
Pressure Relief Procedure Pressure Relief Procedure 4. Slide the feed pump air supply valve (DF) and Important Safety Instructions director valve air supply valve (DA) to the OFF position. Read all warnings and instructions in this manual before using the equipment. Save these instructions. - Page 47 Pressure Relief Procedure 6. Open mix manifold ball valves. 9. Hold a metal part of the gun firmly to a grounded metal pail. Trigger gun to relieve pressure in material hoses. Use a pail lid with a hole to dispense through.
-
Page 48: System Verification
System Verification System Verification NOTE: Material hoses from the system to the mix manifold must be filled with material and pressurized for testing to be successful. NOTE: Each sampling valve must be primed prior to Pump and Metering Test and beginning this procedure to ensure best accuracy. - Page 49 NOTE: These instructions show running the system e. Close sampling valve A (AE). with ratio control by weight, which is standard and preferred for XM PFP systems. To control ratio by 6. Dispense fluid B as follows: volume, see Test Screens (page 78).
-
Page 50: Batch Dispense Or Ratio Test
This test dispenses a calculated volume of each fluid based on ratio. The two fluids combined equal the batch size selected. Graco recommends running the following tests daily prior to spraying on the production surface. Follow this procedure to dispense a batch (into one container) for touch-up work or to verify the dispensed ratio (use separate containers for fluids A and B). - Page 51 System Verification a. Batch dispense: move container under 5. Select to run batch dispense test. sampling valve B (AF). Ratio check: place clean container under sampling valve B (AF). 6. Adjust dispense amounts from 500 ml to 2000 ml (in 250 ml increments) by pressing to open the drop-down box.
-
Page 52: Down Stream Valve Leak Test
System Verification If the test passes, the “X” will disappear in the top right 1. Close both mix manifold valves downstream of the corner and Spray Mode can be used. The system is now dosing valves. calibrated for use. 2. Close recirculation valves (AC, AD). 3. -
Page 53: Mix And Integration Tests
System Verification Mix and Integration Tests Trigger and de-trigger at typical intervals for the application. Do not overlap or cross over your spray pattern. Use the following tests to check for proper mix and integration. Check curing at various time intervals, listed on the Butterfly Test material data sheet. -
Page 54: Empty And Flush Entire System
Empty and Flush Entire System Empty and Flush Entire System a. With director valve (DC) in the neutral position and the RAM air regulator (DB) backed out, slide main air slider valve (DA) ON. To avoid fire and explosion: • Flush equipment only in a well-ventilated area •... - Page 55 Empty and Flush Entire System 6. Empty the A material tank: a. Close the A side mix manifold inlet ball valve. The tank lid assembly is heavy. To prevent crushing b. Disconnect the A material hose from the mix your fingers if the tank lid is accidentally dropped, manifold at the fitting between the ball valve and exercise caution while lifting the tank lid.
- Page 56 Empty and Flush Entire System b. Remove the platen from the A side feed pump to stop the metering pump. Back out the by loosening the two setscrews and the air tube. air pressure regulator. c. Place a pail of solvent under the feed pump e.
-
Page 57: Prepare Level Sensor For Shipping
Prepare Level Sensor for Shipping Prepare Level Sensor for 2. Use a pliers to grasp the flat on the rod and unscrew it out of the sensor head. Shipping 3. Pull the probe up out of the tank and tape it to the square tube frame securely to prevent vibration. -
Page 58: Download Data From Usb
Data Log 4 1. Insert USB flash drive into USB port (DR). Use only Graco-recommended USB flash drives; see The data log records (every 120 seconds) all data that Recommended USB Flash Drives, page 84. occurs during spray mode over a two year period. This... - Page 59 Explorer. ® text editor or Microsoft Word. 7. Open Graco folder. NOTE: All USB logs are saved in Unicode (UTF-16) format. If opening the log file in Microsoft Word, select 8. Open sprayer folder. If downloading data from more Unicode encoding.
-
Page 60: Maintenance
Once a week check, clean, and replace (if needed) the 10W-30 detergent following filters. oil. • Main air inlet manifold filter; see XM PFP Repair - Clean the system Parts manual 3A2989, Replace Air Filter Element Yearly or When Changing Disassemble and section, for instructions. -
Page 61: Clean The System
Maintenance Clean the System 6. Turn main power switch OFF. Non-Hazardous 1. Ensure all equipment is grounded. See Grounding, Hazardous Location page 19. Location 2. Ensure the area where the sprayer will be cleaned is well ventilated and remove all ignition sources. 7. -
Page 62: Troubleshooting Information
Unbalanced hose sizes filter/regulator behind the air panel is clean. can cause off-ratio slugs at the mix manifold during pressure and/or flow transitions. See XM PFP Mix • Check that the main inlet air filter is clean. - Page 63 Check for 24 Vdc on J1, pins 2 and 3, of or USB module. power supply. See Electrical Schematics in the XM PFP repair manual. If there is not 24 Vdc, replace power supply mod- ule. See XM PFP repair manual.
- Page 64 PFP repair manual. Air pilot valve(s) to motor stuck. Replace valve(s). See XM PFP repair manual. Metering valve(s) not opening. Service or replace valve(s). See XM PFP repair manual. Air motor stalled. See manual 3A5423. See Appendix A - User Interface Dis-...
- Page 65 Allow ice to melt. Dry the compressed air. Heat the compressed air. Use a smaller tip and lower flow rate. Metering pump is binding. Repair lower. See XM PFP repair man- ual. Air supply relief valve opens. Air regulator set too high.
- Page 66 Troubleshooting Information Problem Cause Solution Purge Controller right indicator does not Leak in purge box or inadequate air sup- Check purge box for leaks. turn green. (Hazardous Location Models) ply. Make sure all cable glands are tight, sensor and CAN cable glands include a rubber grommet.
-
Page 67: Appendix A - User Interface Display
Appendix A - User Interface Display Appendix A - User Interface Display The user interface display is divided into three main view dispense totals functions: Setup, Command, and Automatic. view alarms diagnose alarms Setup Mode Screens (key to right) clear alarms set and view A heater, B heater, and hose Use these screens to: bundle temperatures... - Page 68 Appendix A - User Interface Display Setup Mode Screens To enter the Setup Mode screens, turn the setup key lock (DJ) to the right. The key cannot be removed when in . 7 on page 15. Some setup screens can be disabled, see Enable Setup Screens on page 72. Setup Mode.
- Page 69 Appendix A - User Interface Display Home Setup Screens (Key Switch On) Home .Software Versions Home is the first screen that displays in Setup mode. It This screen displays the versions and part number of shows the current metering pump ratio and enables the system components.
- Page 70 Appendix A - User Interface Display System Setup Screens Potlife/Hose Length System Setup enables users to configure system settings for fluid control and operator interaction. Refer to the following table for details. Some system settings must be enabled from the Enable Setup screens before users can change or set configurations.
- Page 71 (top number) is displayed but cannot be changed on this screen. See Home screen, on page 69, to change the ratio by weight. Graco recommends leaving all of the settings on this screen at the factory defaults. This screen can be used to adjust tank level settings.
- Page 72 Appendix A - User Interface Display Enable Setup Screens Icon Function Enable or disable dosing valve Use these screens to enable and disable functions, maintenance setup screen. screens, and USB download log files. Checked boxes indicate the function, screen, or log file is enabled. Refer Enable or disable incoming air filter to the following table for details.
- Page 73 Appendix A - User Interface Display Maintenance Setup Screens Enable Setup Screen 2 (Shown with factory default settings.) Use these screens to set maintenance setpoint amounts for pumps and dosing valves. The maintenance setup 2 screen enables users to schedule the number of days between changing the main incoming air filter before a reminder advisory will sound.
- Page 74 Appendix A - User Interface Display User Limits Setup Screens Process Pressure Limits (for spray mode) Use these screens to set and adjust pressure and temperature limits for both metering pumps, including limits that will issue advisories and alarms. Refer to the following table for details.
- Page 75 Appendix A - User Interface Display Operator Command Mode Screens To enter the Operator Command Functions screens, turn the setup key lock (DJ) to the left. See F . 7 on page 15. Operator Command Mode Screens Navigation Diagram 3A2776K...
- Page 76 Appendix A - User Interface Display Run (Fluid Control) Screens This screen remains blank until a mode is selected. Run (fluid control) is the first screen displayed at power on. It enables users to spray material, and operate and park metering pumps. Run consists of two screens: power on/enter and ratio mode.
- Page 77 Appendix A - User Interface Display Park Mode Press three times to display volume and weight Users must be in this mode to park the metering pump ratio targets. The weight ratio target is only displayed in fluid rods to the bottom of their stroke. Press the button weight mode.
-
Page 78: Test Screens
Appendix A - User Interface Display Test Screens Confirm Pump and Metering Test Use this screen to run batch dispense tests, pump tests, and down stream valve leak tests. This screen displays when the pump test completes without error. There are three variations that affect how Icon Function the screen is used. - Page 79 Appendix A - User Interface Display Ratio by Weight Mode Confirm Batch Dispense Test This screen displays two boxes where the A and B This screen displays when the batch dispense test sample weights are entered to calibrate the machine to completes without error.
- Page 80 Appendix A - User Interface Display Ratio by Weight Mode Down Stream Valve Leak Test Enter the weights of each dispensed material in the Use this screen to test for closed or worn valves down respective input boxes on this screen. The weights must stream of the A and B dosing control valves.
-
Page 81: Information Screens
Appendix A - User Interface Display Information Screens Use this screen to view alarm diagnostic information, Icon Function alarm logs, and pump batch and grand totals. These Go to Alarm log. Use up and down arrows screens also enable users to view maintenance to scroll through list of the past 16 errors. - Page 82 Appendix A - User Interface Display Totalizers and Job Number Change Job Number Use this screen view the grand and batch totals for each 1. Press to highlight the first digit. Press pump and both pumps combined. The units of measurement are displayed on the bottom of the screen to change the number and press and displayed in the units of measurement selected...
- Page 83 Appendix A - User Interface Display Supply Screen This screen also displays the current volume of each tank and the current temperature measured at each fluid heater, at the hoses, and in each tank. Icon Function Turn on and off automatic tank filling Turn on and off the A fluid heater Turn on and off the B fluid heater Use these screens to turn on and off automatic tank...
- Page 84 Appendix A - User Interface Display Automatically Displayed Screens Potlife Screen The log selected for current download is displayed in the single box next to the USB icon. The other available This screen automatically displays when a potlife logs are displayed in the boxes on the right side of the advisory occurs.
-
Page 85: Appendix B - Alarms
Appendix B - Alarms Appendix B - Alarms Alarms Overview side dosing valve is off. Optimizing the restriction of the system will keep this value small and ensure the material is mixed well. View Alarms The center of the screen shows linear sensor vertical When an alarm occurs the alarm information screen bar graphs and reed switch information. - Page 86 Appendix B - Alarms Alarm Code Key Use the following table as a quick guide to determine alarm code meaning. Digit 1 Digit 2 Digit 3 Digit 4 Code Event Code Mode (Char 2) Code Location (Char 3) Code Zone (Char 4) Current Low Alarm Material A...
- Page 87 Appendix B - Alarms Possible Alarms by Mode The following table outlines the alarms that you may receive while operating the system. The alarms are categorized according to each mode. Mode Control Logic Alarms Spray Dosing valves close for startup test; green light blinks. P1AX If fluid pressure is under 1000 psi (7 MPa, 70 bar), STOP.
- Page 88 Appendix B - Alarms Mode Control Logic Alarms Batch User selects total volume desired. Dispense Test Open A dosing valve, turn on blue light, user opens sampling valve, turn off blue light when complete. Open B dosing valve, turn on blue light, user opens sampling valve, turn off blue light when complete.
- Page 89 Temperature Control Module is Replace module. bad. CACP Display Has No Signal Always No display communication signal. Check cable connections. Replace display. See XM PFP Repair manual. Machine powered down in spray Press stop button before turning off mode. power. 3A2776K...
- Page 90 Fluid Pressure On Up Stroke Test packings, or dosing valve are not page 62. Recheck. Remove, clean, Only. holding fluid pressure. and repair lower. See XM PFP repair manual. DGAX Pump Did Not Stall Against Pump Pump inlet check or dose valve is Remove inlet housing &...
- Page 91 Appendix B - Alarms Alarm When Code Alarm Problem Active Cause Solution F6AJ A Air Motor Linear Sensor Always System ran out of fluid. Add fluid to the system. Jump Advisory. Linear sensor is bad. Replace linear sensor. F6AK A Air Motor Reed Switch Always Reed switch does not see the air Replace air motor reed switch...
- Page 92 Allow ice to melt. Dry to B Pump Pressure. compressed air. Heat compressed air. Use a smaller tip. A pump is binding. Repair lower. See XM PFP repair manual. A motor is binding. Repair air motor. See XM PFP repair manual. P9BX...
- Page 93 Clean filter. See manual 311762. Use alternate 30 mesh screen. See manual 311762 for part number. Inlet air dropping below 80 psi Check air filters. See XM PFP (0.55 MPa, 5.5 bar) while spraying. repair manual. B dosing valve not closing Use larger air hose.
- Page 94 Spray Dosing valve is operating near high Balance A and B fluid hoses. See Optimized. or low timing limits. XM PFP Mix Manifold manual. Or change ‘B’ restriction. Check Restriction screen. Run the Pump and Metering Test R5DX Uncalibrated system in Spray System was not calibrated.
- Page 95 Heater circuit breaker is off Turn on heater circuit breaker. V2MX Voltage Low Control Always Voltage dropping below 9 Vdc from Change air filter in control filter Advisory power supply. regulator. See XM PFP repair manual. Check voltage on information screen. 3A2776K...
- Page 96 Appendix B - Alarms Alarm When Code Alarm Problem Active Cause Solution V4IT High Voltage CAN Always 24 VDC power supply. Check voltage of power supply. Voltage should be 23-25 VDC. If out of tolerance, adjust or replace power supply. V4MA A/B Material Heater High Always...
- Page 97 Appendix B - Alarms Dimensions Min: 70.5 in. (179 cm) Max: 84 in. (213 cm) 76 in. 52 in. (193 cm) (132 cm) Min: 70.5 in. (179 cm) Max: 84 in. (213 cm) 104 in. (264 cm) 38 in. (96.5 cm) 3A2776K...
-
Page 98: Technical Specifications
Technical Specifications Technical Specifications XM PFP Metric Ratio Tolerance Range (before alarm) +/- 5% Maximum Flow Rate (measured with oil) 3 gallons per minute 13.6 liters per minute Handles mastic materials which are loaded into heated tanks with Fluid Viscosity Range... - Page 99 Technical Specifications XM PFP Metric Wetted Parts Suction Tube (Flush) Aluminum Tanks Stainless Steel Flush Pump Carbide, PTFE, stainless steel, UHMWPE Hoses Nylon Carbon steel, alloy steel, stainless steel, zinc and nickel plating, A and B Metering and Feed Pumps...
-
Page 100: Graco Standard Warranty
With the exception of any special, extended, or limited warranty published by Graco, Graco will, for a period of twelve months from the date of sale, repair or replace any part of the equipment determined by Graco to be defective.
Need help?
Do you have a question about the XM PFP and is the answer not in the manual?
Questions and answers