
Subscribe to Our Youtube Channel
Related Manuals for Kane 456


Summary of Contents for Kane 456
- Page 1 KANE456 Flue Gas Analyser with direct CO measurement Stock No: 19738-2 February 2017 © Kane International Ltd...
-
Page 2: Table Of Contents
CONTENTS Page No: KANE456 Overview ANALYSER LAYOUT & FEATURES 1. BATTERIES 2. BEFORE USING THE ANALYSER EVERY TIME FRESH AIR PURGE STATUS DISPLAY 3. USING THE FOUR FUNCTION BUTTONS 10-11 4. USING THE ANALYSER 12-21 COMBUSTION TEST 12-14 COMMISSIONING TEST PRESSURE/TEMPERATURE TESTS 16-17 LET BY AND TIGHTNESS... - Page 3 11. ONLINE BOOKING PROCEDURE 37-39 12. ANALYSER ANNUAL SERVICE & RECERTIFY 40-43 12.1 SERVICE – CALIBRATE – RECERTIFY 40-41 12.2 RETURNING YOUR ANALYSER TO KANE 12.3 WHERE TO SEND YOUR ANALYSER 13. COLD WEATHER PRECAUTIONS 14. ANALYSER SPECIFICATION 44-45 15. ELECTROMAGNETIC COMPATIBILITY 16.
-
Page 4: Kane456 Overview
Two lines of 20 characters can be added to the header of printouts. Printouts can be made on the optional Kane IRP printers with ‘fast print’ capability using the IRP2 printer. Alternatively the analyser can be equipped with optional wireless communications to either Android or Apple devices. -
Page 5: Analyser Layout & Features
ANALYSER LAYOUT & FEATURES Tasklight and infra-red emitter Battery Compartment (behind rubber cover) Menu controls Function Scroll up/down buttons x 4 Enter Particle Filter Rotary Switch Water Trap “Battery Charging” indicator Flue Gas Inlet Page 5... - Page 6 Page 6...
-
Page 7: Batteries
BATTERIES Battery Type This analyser has been designed for use with disposable alkaline batteries or rechargeable Nickel Metal Hydride (NiMH) batteries. No other battery types are recommended. WARNING The battery charger unit must only be used when NiMH batteries are fitted. Do not mix NiMH cells of different capacities or from different manufacturers. -
Page 8: Before Using The Analyser Every Time
BEFORE USING THE ANALYSER EVERY TIME: Check the water trap is empty and the particle filter is not dirty: To empty water trap, unscrew the red screw plug and re-tighten once it is empty. To change the particle filter, remove protective rubber cover, slide the water trap unit from the analyser, remove the particle filter from its spigot and replace. -
Page 9: Status Display
2.2 STATUS DISPLAY Select “Status” on the dial to view the following: NAT GAS → Current fuel selection 14:56:29 → Current time. Can be re-set via the “Menu” 11/03/06 Current date. Can be re-set via the “Menu” → 23.8C Ambient temperature of the analyser →... -
Page 10: Using The Four Function Buttons
3. USING THE FOUR FUNCTION BUTTONS: Switching ON Rotate the dial to the mode you want to use before switching on. the Analyser This may eliminate the need for a full countdown in some of the modes and save you time. Press button to switch the unit ON. - Page 11 Switching The analyser normally operates with the pump on. PUMP on / off Press to switch the pump off and on. When the pump is switched off “-PO-" is displayed instead of the , CO & CO readings. The analyser also displays "PUMP OFF" on the top line approx every 40 seconds.
-
Page 12: Using The Analyser
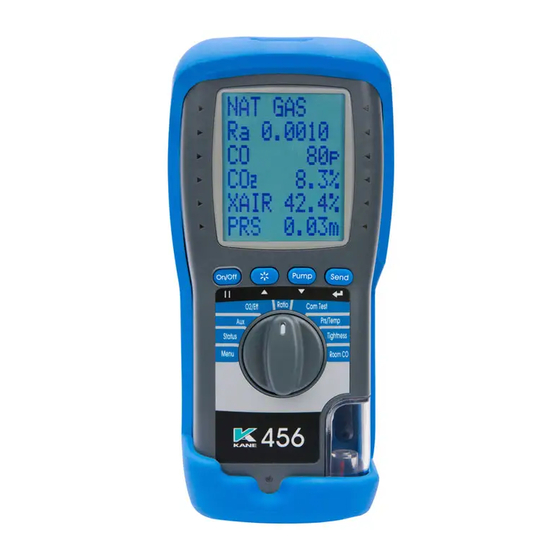
USING THE ANALYSER: 4.1 COMBUSTION TESTS: Insert the tip of the flue probe into the centre of the flue. The readings will stabilise within 60 seconds assuming the boiler conditions are stable. The rotary switch can be used to display the following information: RATIO Display NAT GAS →... - Page 13 O2/EFF display NAT GAS → Fuel type 9.8% Oxygen (%) left after combustion. Should be → 20.9% ± 0.3% in fresh air. 81.1% → Gross efficiency 145.1C → Flue temperature ( Inlet temperature ( C). Normally set by flue 5.4C →...
- Page 14 Viewing / printing overview The side lights on the display point to the active line. to change the pointer. Press to select a line. The side lights now flash. to scroll or change the selected line. Press to exit a line. To view / print a logged report Select MENU / REPORT / COMBUSTION / VIEW.
-
Page 15: Commissioning Test
4.2 COMMISSIONING TEST The Commissioning Test is based on TB143 Rotate the dial to to COM TEST position and follow the instructions on the screen TEST 1 check the boiler at Max Gas rate. The boiler is switched on at Max rate. The analyser is first zeroed in fresh air. -
Page 16: Pressure/Temperature Tests
4.3 PRESSURE/TEMPERATURE TESTING Select “Prs/Temp”. The pump stops automatically. Press to auto- zero the pressure sensor. Using the black connectors and manometer hose, connect to P1 for single pressure or P1 and P2 for differential pressure. PRS/TEMP display Normal response or smoothed (damped) PRS 0.01m →... - Page 17 If using larger bore tubing when performing pressure tests: Push ‘orange’ tube over the rim of the spigot to ensure a gas tight seal. This may not produce a gas tight seal. Page 17...
-
Page 18: Let By And Tightness
4.4 LET-BY & TIGHTNESS TESTING Select “Tightness”. The pump stops automatically. Press to auto- zero the pressure sensor. Connect from the test point to P1 using a black connector and manometer hose. The display shows “LET BY?”. Use to select YES or NO. If YES is selected set the let-by pressure then press to start the let-by test. - Page 19 TIGHTNESS → PR1 20.01m → Pressure at start of tightness test. PR2 20.01m → Real time pressure reading. Tightness default time is 2 minutes. Can be TIME → changed via “Menu”. When complete the display will show: The tightness test is automatically stored in →...
-
Page 20: Room Co Test
4.5 ROOM CO TESTING Select “Room CO” to measure and record CO readings for up to 30 minutes. SELECT → ROOM CO → TEST TYPE → GENERAL → to select the test type from the following: TEST TYPES GENERAL: 15 minute test with results LIMIT = 10ppm stored every minute ALARM = 30 ppm... - Page 21 ROOM CO display ROOM CO readings are recorded every minute for → up to 30 minutes. → Real time CO reading (ppm). Test 00 = initial CO test in series. TEST → Test 30 = maximum of 30 tests in series. The CO test series is automatically stored in →...
- Page 22 ROOM → → TEST → → PASS → PRINT → With no LEDs flashing Use the keys to move the lit LEDs to the line you want. You can change the LOG number and the TEST number so that you can view individual test results.
-
Page 23: Kane456 Printouts
PRINTOUTS COMBUSTION COMMISSION TEST PRS/TEMP KANE456 SW19392 V0.12 KANE456 SW19392 V0.12 KANE456 SW19392 V0.12 YOUR COMPANY NAME & YOUR COMPANY NAME & YOUR COMPANY NAME & PHONE NUMBER HERE PHONE NUMBER HERE PHONE NUMBER HERE SERIAL NO. 9876543210 SERIAL NO. 9876543210 SERIAL NO. - Page 24 SWEEP TEST TYPE C SEALED TIGHTNESS TEST APPLIANCE KANE456 SW19392 V0.12 KANE456 SW19392 V0.12 KANE456 SW19392 V0.12 YOUR COMPANY NAME & YOUR COMPANY NAME & YOUR COMPANY NAME & PHONE NUMBER HERE PHONE NUMBER HERE PHONE NUMBER HERE SERIAL NO. 9876543210 SERIAL NO.
- Page 25 KANE456 SW19392 V0.12 YOUR COMPANY NAME & PHONE NUMBER HERE SERIAL NO. 9876543210 LOG NO. DATE 19/01/16 TIME 09:46:53 CAL DUE ON 18/12/16 FUEL TYPE LIGHT OIL 0.53 CO(n) 02++ CO/CO2 0.0000 20.2 FLUE -N/F- INLET -N/F- CUSTOMER APPLIANCE REFERENCE Page 25...
-
Page 26: Using The Menu
USING THE MENU Select “Menu” on the rotary switch and navigate using the function buttons: = Scroll up = Scroll down = Enter NOTE: To EXIT the MENU at any time simply move the rotary switch to any position other than “Menu”. Any changes that have not been “entered”... - Page 27 NOTE: To EXIT the MENU at any time simply move the rotary switch to any position other than “Menu”. Any changes that have not been “entered” will be ignored. MENU OPTIONS / COMMENTS MENU NAT GAS, PROPANE, BUTANE, LPG, LIGHT OIL, UNITS Fuel Type PELLETS...
- Page 28 MENU SUB MENU OPTIONS / COMMENTS OFF = normal response. PRESSURE FILTER ON = slower (damped) response LOW = e.g. 0.01mbar resolution. RESOLUTION HIGH = displays to an extra decimal place UNITS mbar, Pa, PSI, mmHg, hPa, InH LET BY = Set duration of let-by test in minutes. Default = 1 minute STABIL’N = Set duration of stabilisation in minutes.
- Page 29 MENU SUB MENU OPTIONS / COMMENTS Stored AUX tests REPORT VIEW, DEL ALL, BACK Stored combustion tests: COMBUSTION VIEW, DEL ALL, BACK Stored commission tests: COMMISSION VIEW, DEL ALL, BACK Stored pressure tests: PRS/TEMP VIEW, DEL ALL, BACK Stored tightness tests: TIGHTN’S VIEW, DEL ALL, BACK Stored room CO tests:...
-
Page 30: Using The Kane456 As A Thermometer Or Pressure Meter
6. USING THE KANE456 AS A THERMOMETER OR PRESSURE METER Rotate the dial to the PRS/TEMP position. The display will show: 0.00m → Real time pressure reading. mbar 21.3C Use the T1 connection for the flow → temperature sensor. 21.3C Use the T2 connection for the return →... - Page 31 If using larger bore tubing when performing pressure tests: Push ‘orange’ tube over the rim of the spigot to ensure a gas tight seal. This may not produce a gas tight seal. Page 31...
-
Page 32: Measuring Flue Gases
7. MEASURING FLUE GASES After the countdown is finished and the analyser is correctly set up, put its flue probe into the appliance’s sampling point. The tip of the probe should be at the centre of the flue. Use the flue probe’s depth stop cone to set the position. With balanced flues, make sure the probe is positioned far enough into the flue so no air can ‘back flush’... -
Page 33: Analyser Problem Solving
8. ANALYSER PROBLEM SOLVING If any problems are not solved with these solutions, contact us or an authorized repair center. Fault symptom Causes / Solutions • Oxygen too high • Air leaking into probe, tubing, water trap, connectors or internal to analyser. •... -
Page 34: Frequently Asked Questions
9. FREQUENTLY ASKED QUESTIONS What is the countdown time on a KANE456 There are three levels of countdown (aka fresh air purge) on a KANE456. From first switch on if ‘cold’ (more than 5 C from the temperature at which calibrated) = 90 secs. -
Page 35: Kane Dashboard
10. KANE DASHBOARD We really want you to register your Kane analyser at www.kane.co.uk to create your dashboard - your personal online analyser portal Benefits include: An automatic reminder when it's time to Service - Calibrate – Recertify Our new simple online booking in procedure ensures you receive the fastest turnaround times possible Easy access to your analyser's calibration certificates &... - Page 36 An out of calibration analyser may mean your combustion reports are invalid. Page 36...
-
Page 37: Online Booking Procedure
11. ONLINE BOOKING PROCEDURE @ www.kane.co.uk To organise your Kane analyser’s Service & Recertification online it must be registered. To register, click If you have already registered, click to sign in From your dashboard, click for the analyser you wish to organise Service &... - Page 38 Book your service/recertification & order any additional spare parts you need Once happy with your order just confirm & pay Page 38...
- Page 39 See your order & print out the return to Kane label Don’t forget to put the label on your package and send it to us Page 39...
-
Page 40: Analyser Annual Service & Recertify
Fixed prices ensure you know the full cost of ownership before you buy. Flue Gas Analysers will drift out of calibration over time – only Kane can adjust them back to the manufacturers' specification & return them as accurate as when they were purchased. - Page 41 Service - Calibrate - Recertify & Repair Kane analysers You can organise your Kane analyser’s Service & Recertification online via your Dashboard on www.kane.co.uk, send it or call us to arrange a pre-booked while-you-wait service, saving you time &...
-
Page 42: Returning Your Analyser To Kane
Before sealing your package, please ensure you followed our procedure above & have clearly marked your box for the Kane Service Team If you do not have an account with a courier company, take your package to your local Post Office –... -
Page 43: Where To Send Your Analyser
12.3 WHERE TO SEND YOUR ANALYSER Northern Customer Service Southern & International Customer Service Kane International Ltd Kane International Ltd Gibfield Park Avenue Kane House, 11 Bessemer Road Atherton, Welwyn Garden City Manchester Hertfordshire M46 0SY, UK AL7 1GF, UK... -
Page 44: Analyser Specification
14. ANALYSER SPECIFICATION (NOTE: MAY BE SUBJECT TO CHANGE) Parameter Range Resolution Accuracy Temp Measurement Flue Temperature 0-600 +2.0 +0.3% reading Inlet Temperature 0-50 +1.0 (Internal sensor) +0.3% reading Inlet Temperature 0-600 +2.0 (External sensor) +0.3% reading Flue Gas Measurement Oxygen 0-21% 0.1%... - Page 45 C to +45 10% to 90% RH non-condensing Ambient Operating Range 4 AA cells Battery Type / Life >8 hours using Alkaline AA cells 220v charger, for NiMH batteries only Chargers (optional) 12v in vehicle charger, for NiMH batteries only Dimensions 0.8kg handset with protective rubber cover Weight:...
-
Page 46: Electromagnetic Compatibility
If not acceptable, adjust the analyser’s position to minimize interference or switch off, if possible, the offending equipment during your test. At the time of writing this manual (January 2016) Kane International Ltd are not aware of any field based situation where such interference has occurred and this advice is only given to satisfy the requirements of the Directive. -
Page 47: En50379 Regulated Instructions
17. EN 50379 REGULATED INSTRUCTIONS EN 50379 Section 4.3.2 “Instructions” defines a number of specific points that must be included in the relevant instruction manuals. The paragraph numbering below relates to that section of EN 50379. The KANE456 is compliant the EN 50379 Part 2 and Part 3. The KANE456 is intended to be used with the following fuels: Natural gas Light oil (28/35 sec) - Page 48 Some commonly occurring materials, vapour or gases may affect the operation of the KANE456 in the long or the short term though in normal use Kane International Ltd is not aware of any specific issues that have affected the product. The following list is included to satisfy the stated requirements of...
- Page 49 The particle filter should be checked at least on a daily basis when using ‘clean’ fuels and more often when using liquid or solid fuels. Detailed instructions regarding the changing of the filter and the emptying of the water trap are given in Section 2 of this manual. WARNING! When using a KANE456 to test an appliance a full visual inspection of the appliance, in accordance with its manufacturer’s instructions, must also be...
-
Page 50: Appendix 1 - Main Parameters
Appendix 1 - Main Parameter: Here are the legends used and what they mean: Oxygen (Calculated) reading in percentage (%) CO : Carbon monoxide (Measured) reading displayed in ppm (parts per million). If ‘- - - -’ is displayed there is a fault with the CO sensor or the instrument has not set to zero correctly. -
Page 51: Pressure Units
PRS : Pressure reading, either single point or differential. BAT : Displays the Battery power available. Readings may be affected if used with low power batteries. DATE : Date shown as day, month and year, DD/MM/YY. Date is recorded when each combustion test is printed or stored. TIME : The time shown is expressed in “Military”... - Page 52 SYMBOLS used on the display Pressure CO/CO XAIR Excess Air Flue temperature Inlet temperature ∆T Nett temperature / Differential temperature Gross efficiency EfCG Gross condensing Efficiency Nett efficiency EfCN Nett condensing efficiency - PO - Pump off ‘O2++% Calculated oxygen greater than 18% so calculation is disabled Temperature input not fitted Number of days left before recalibration is due Battery level symbol...
-
Page 53: No) Sensor
ADDENDUM Instructions for KANE456 analysers fitted with optional Nitric Oxide (NO) sensors Page 53... - Page 54 DISPLAYING THE NO READING Select “Menu” on the rotary switch and navigate using the function buttons: = Scroll up = Scroll down = Enter Select SCREEN and then select AUX Choose a line to display the required readings as below AUX display The AUX (auxillary) display can be 0.00...
- Page 55 The display will show LINE Press and a third line will appear. to navigate to the desired parameter to be displayed on line 1. Press to select the parameter for Line 1 and repeat the process to select the display parameter for all four lines and then EXIT Rotate the dial from MENU to AUX to display all your chosen settings.
- Page 56 NITRIC OXIDE SENSOR SPECIFICATION Gas Measurement Resolution Accuracy Range Nitric Oxide (NO) 1ppm + 2ppm <30ppm 0 to 100 ppm +5ppm <100ppm +5% reading >100ppm Overrange to 1500 ppm *1 Using dry gases at STP Page 56...
-
Page 57: Product Registration
PRODUCT REGISTRATION Please register your Kane analyser at www.kane.co.uk or complete, detach and return to: Kane International Ltd, Kane House, 11 Bessemer Road, Welwyn Garden City, Hertfordshire, AL7 1GF Your Details Name: Job Title: Company Name: Company Address 1: Address 2:... - Page 58 Why did you buy a Kane Product? (Select all that apply) Kane Brand Previous Owner Dealer Recommendation Our Fixed Price Servicing Programme Made in the UK Value for Money Not your Decision Other: What brand was your previous analyser? time purchase...
- Page 59 Page 59...
- Page 60 Thank you for buying this analyser. Before use, please register on our website www.kane.co.uk Scan the QR code to go directly to Register your Product on-line or complete, detach and return the Product Registration form in this manual. Page 60...
Need help?
Do you have a question about the 456 and is the answer not in the manual?
Questions and answers