Table of Contents
Advertisement
Quick Links
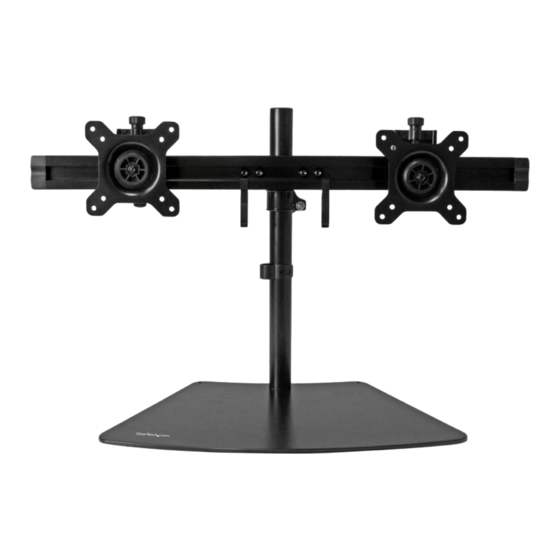
Desk Stand for Dual Monitors
ARMBARDUO
FR: Guide de l'utilisateur - fr.startech.com
DE: Bedienungsanleitung - de.startech.com
ES: Guía del usuario - es.startech.com
NL: Gebruiksaanwijzing - nl.startech.com
PT: Guia do usuário - pt.startech.com
IT: Guida per l'uso - it.startech.com
For the latest information, technical specifications, and support for
this product, please visit www.startech.com/ARMBARDUO.
Manual Revision: 12/17/2018
*actual product may vary from photos
Advertisement
Table of Contents

Subscribe to Our Youtube Channel
Related Manuals for StarTech.com 8STARMBARDUO


Summary of Contents for StarTech.com 8STARMBARDUO
- Page 1 Desk Stand for Dual Monitors ARMBARDUO *actual product may vary from photos FR: Guide de l’utilisateur - fr.startech.com DE: Bedienungsanleitung - de.startech.com ES: Guía del usuario - es.startech.com NL: Gebruiksaanwijzing - nl.startech.com PT: Guia do usuário - pt.startech.com IT: Guida per l’uso - it.startech.com For the latest information, technical specifications, and support for this product, please visit www.startech.com/ARMBARDUO.
-
Page 2: Table Of Contents
Table of Contents Introduction ....................1 Packaging content ............................ 1 Product diagram ..................2 Rear view ..............................2 Assembly ....................3 Assemble the base ............................ 3 Attach the crossbar ..........................4 Attach the monitors ..........................5 Adjusting the Monitors .................7 Tilt Adjustment ............................7 Swivel Adjustment ............................ -
Page 3: Introduction
Introduction Use the ARMBARDUO to mount two LCD or LED monitors up to 24 inches in size on a single base and save space. The included cable-management clips make it easy to route your cables and help to keep your area clear of cables. Packaging content Cable-management clip (pole) -
Page 4: Product Diagram
Product diagram Rear view VESA monitor mount Crossbar Monitor (not included) Cable-management clip (pole) Height-adjustment ring Cable-management Pole clip (crossbar) Baseplate Instruction manual... -
Page 5: Assembly
Assembly Warning! Make sure that all of the hardware is assembled securely and checked for stability before you load the monitors. Assemble the base 1. Insert the three M6x15 mm screws (3) through the three holes in the baseplate (2) and into the pole (1) (figure 1). -
Page 6: Attach The Crossbar
Attach the crossbar 1. Slide the height-adjustment ring (6) down the pole (1) to the height that you want the monitors to be at. 2. Press the lever on the height-adjustment ring to tighten it and prevent it from sliding down the pole. 3. -
Page 7: Attach The Monitors
Attach the monitors Warning! The ARMBARDUO is designed to display two monitors between 15 and 24 inches in size. The maximum weight capacity of the ARMBARDUO is a total of 35.2 lb. (16 kg), with each monitor mount able to hold 17.6 lb. (8 kg). To prevent scratching during the installation process, you should handle the surface of the monitors with care. - Page 8 figure 6 Thumbscrew Thumbscrew 5. Do one of the following: • To install monitors that have a flush installation surface, insert four of the M4x12 mm screws (9) through the VESA monitor mount (8) and into the mounting holes on the back of the monitor. Use a Phillips screwdriver to tighten the screws (figure 7).
-
Page 9: Adjusting The Monitors
Adjusting the Monitors Tilt Adjustment The Monitors can be tilted to commodate different viewing angels (15 degrees downward or upward). • Place both of your hands on either side of the Monitor and apply light pressure either downward or upward. The Monitor will tilt to a maximum of 15 degrees in either direction. -
Page 10: Route The Cables
Route the cables The ARMBARDUO comes with cable-management clips that you can use to direct the monitor cables along the crossbar and down the pole so that they are out of your way. Make sure that the cables that you’re routing are unplugged before you complete the following steps. - Page 11 3. Hold the cables against the pole and snap the cable-management clip (pole) (4) over the ca bles and onto the pole. You can place the cable management clip on the front or the back of the pole, depending on your preference. Instruction manual...
-
Page 12: Technical Support
Limitation of Liability In no event shall the liability of StarTech.com Ltd. and StarTech.com USA LLP (or their officers, directors, employees or agents) for any damages (whether direct or indirect, special, punitive, incidental, consequential, or otherwise), loss of profits, loss of business, or any pecuniary loss, arising out of or related to the use of the product exceed the actual price paid for the product. - Page 13 StarTech.com is an ISO 9001 Registered manufacturer of connectivity and technology parts. StarTech.com was founded in 1985 and has operations in the United States, Canada, the United Kingdom and Taiwan servicing a worldwide market.
Need help?
Do you have a question about the 8STARMBARDUO and is the answer not in the manual?
Questions and answers