Table of Contents
Advertisement
Quick Links
Quad-Monitor Stand
ARMBARQUAD
FR: Guide de l'utilisateur - fr.startech.com
DE: Bedienungsanleitung - de.startech.com
ES: Guía del usuario - es.startech.com
NL: Gebruiksaanwijzing - nl.startech.com
PT: Guia do usuário - pt.startech.com
IT: Guida per l'uso - it.startech.com
For the latest information, technical specifications, and support for
this product, please visit www.StarTech.com/ARMBARQUAD.
Manual Revision: 12/04/2018
*actual product may vary from photos
Advertisement
Table of Contents

Subscribe to Our Youtube Channel
Related Manuals for StarTech.com ARMBARQUAD


Summary of Contents for StarTech.com ARMBARQUAD
- Page 1 Quad-Monitor Stand ARMBARQUAD *actual product may vary from photos FR: Guide de l’utilisateur - fr.startech.com DE: Bedienungsanleitung - de.startech.com ES: Guía del usuario - es.startech.com NL: Gebruiksaanwijzing - nl.startech.com PT: Guia do usuário - pt.startech.com IT: Guida per l’uso - it.startech.com For the latest information, technical specifications, and support for this product, please visit www.StarTech.com/ARMBARQUAD.
- Page 2 StarTech.com. Where they occur these references are for illustrative purposes only and do not represent an endorsement of a product or service by StarTech.com, or an endorsement of the product(s) to which this manual applies by the third-party company in question. Regardless of any direct acknowledgement elsewhere in the body of this document, StarTech.com hereby...
- Page 3 注意 Warning statements Make sure to assemble this product according to the instructions. Failure to do so might result in 必ず取扱説明書に従って本製品の組み立てを行って下さい。 取り扱いを誤った場合に、 傷害を負う恐れ personal injury or property damage. や物的損害が発生する恐れがあります。 Make sure that the weight of the monitor doesn’t exceed the weight capacity of this product. If you exceed the weight capacity, you might experience personal injury or damage to the equipment.
-
Page 4: Table Of Contents
Table of Contents Warnings ..............................i Introduction ....................1 Product diagram ............................1 Technical specifications .......................... 2 Package contents ............................3 Requirements ............................. 5 Assembly ....................6 Assemble the lower pole ........................6 Attach a crossbar ............................7 Attach the upper pole ..........................8 Attach the second crossbar ........................ -
Page 5: Introduction
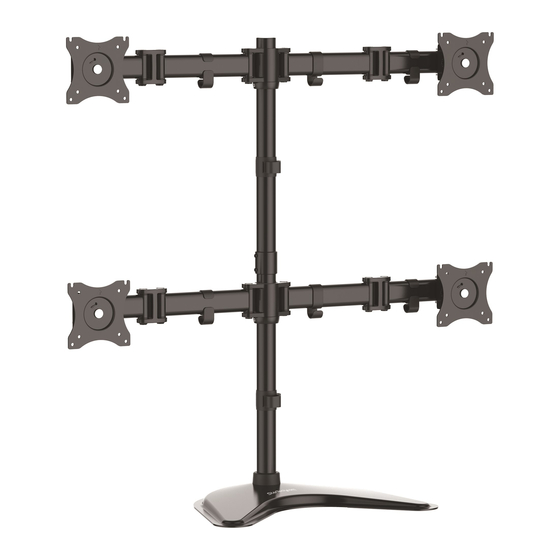
Introduction Product diagram VESA monitor mount VESA monitor mount Crossbar Cable-management clip Cable-management clips Upper pole VESA monitor mount VESA monitor mount Crossbar Pole connector Cable-management clip Cable-management clips Lower pole Baseplate Instruction manual... -
Page 6: Technical Specifications
Technical specifications Type of measurement Measurement VESA mounting hole pattern 75x75 100x100 Weight capacity Up to 8 kg (17.6 lb.) per monitor mount Tilt +450 to -450 Screen size Between 330 mm and 686 mm (13 in. and 27 in.) Rotate 3600 Swivel... -
Page 7: Package Contents
Package contents Baseplate Crossbars Qty: One Qty: Two Lower pole Upper pole Qty: One Qty: One Pole connector Cable-management clips Qty: One Qty: Two Instruction manual... - Page 8 3 mm hex key Qty: One Qty: One 5 mm hex key 6 mm hex key Qty: One Qty: One M4x12 mm screws M5x12 mm screws Qty: Sixteen Qty: Sixteen Instruction manual...
-
Page 9: Requirements
Qty: Sixteen Qty: One Requirements • Four monitors or displays that are compatible with one of the mounting hole patterns that ARMBARQUAD supports • A Phillips screwdriver Requirements are subject to change. For the latest requirements, please visit www.StarTech.com/ARMBARQUAD. Instruction manual... -
Page 10: Assembly
Assembly Warning! Make sure that the combined weight of the monitors does not exceed the weight capacity of this product. If you exceed the weight capacity, you might experience personal injury or damage to the product. This product can support the following weight: 8 kg (17.6 lb.) per monitor mount. Assemble the lower pole 1. -
Page 11: Attach A Crossbar
Attach a crossbar 1. Use the 3 mm hex key to loosen the screw in the side of the collar on the lower pole, and raise or lower the collar on the pole. 2. When the collar is at the desired height, use the 3 mm hex key to tighten the screw in the side of the collar. -
Page 12: Attach The Upper Pole
4. Use the 5 mm hex key to tighten the screw at the back of the crossbar. (figure 5) figure 5 5 mm hex key Crossbar Attach the upper pole 1. Screw the pole connector onto the lower pole. 2. Thread the other cable-management clip onto the upper pole. 3. -
Page 13: Attach The Second Crossbar
4. Use the 3 mm hex key to tighten the two screws in the side of the pole connector. (figure 7) figure 7 3 mm hex key Pole connector Attach the second crossbar 1. Use the 3 mm hex key to loosen the screw in the side of the collar on the upper pole, and raise or lower the collar on the pole. - Page 14 3. Slide the other crossbar down the pole so that it sits against the collar. (figure 9) figure 9 Crossbar Collar Upper pole 4. Use the 5 mm hex key to tighten the screw at the back of the crossbar. (figure 10) figure 10 5 mm hex key Crossbar...
-
Page 15: Attach Monitors To The Crossbars
A second person is required to keep the ARMBARQUAD upright as you attach the monitors. ARMBARQUAD is designed to be used with monitors that are the same size and weight. If you attach monitors that are different sizes and weights to the ARMBARQUAD, you do so at your own risk. - Page 16 3. Carefully hook the screws into the top two slots on the VESA monitor mount on the crossbar. (figure 12) figure 12 M4x12 mm screw M5x12 mm screw VESA monitor mount Crossbar 4. Use a Phillips screwdriver to tighten the screws. (figure 13) Caution! If the crossbar starts to slip down the pole when you add the weight of the monitor, remove the monitor and use the 5 mm hex key to tighten the screw in the back of the crossbar.
- Page 17 M5x12 mm screw Use the 75x75 VESA mounting hole pattern to attach a monitor To accommodate different monitor sizes, the ARMBARQUAD comes with two sets of screws that are different lengths and diameters. To select the appropriate screws for the type of monitor that you’re using, complete the following: •...
- Page 18 2. While someone holds the monitor in place, insert the M4x12 mm screws or M5x12 mm screws through the washers, the mounting holes in the VESA monitor mount, and into the back of the monitor. (figure 15) 3. Use a Phillips screwdriver to tighten the screws. Caution! If the crossbar starts to slip down the pole when you add the weight of the monitor, remove the monitor and use the 5 mm hex key to tighten the screw in the back of the crossbar.
-
Page 19: Adjust The Tilt Angle Of Your Monitor
Adjust the tilt angle of your monitor 1. To change the angle that the monitor is tilted at, use the 6 mm hex key to loosen the screw in the side of the VESA monitor mount. 2. Position the monitor at the angle that works best for you. 3. -
Page 20: Tipping Hazard Warning
ARMBARQUAD can become unstable. If you adjust the position of the monitors, you do so at your own risk, and you should exercise caution and test the stability of the ARMBARQUAD before you use it in the adjusted configuration. (figure 18) - Page 21 • To raise or lower the left and right monitors minutely, use the adjustment screws located on the top of the VESA monitor mounts. (figure 20) Adjustment screw VESA monitor mount Instruction manual...
-
Page 22: Technical Support
Limitation of liability In no event shall the liability of StarTech.com Ltd. and StarTech.com USA LLP (or their officers, directors, employees or agents) for any damages (whether direct or indirect, special, punitive, incidental, consequential, or otherwise), loss of profits, loss of business, or any pecuniary loss, arising out of or related to the use of the product exceed the actual price paid for the product. - Page 23 StarTech.com is an ISO 9001 Registered manufacturer of connectivity and technology parts. StarTech.com was founded in 1985 and has operations in the United States, Canada, the United Kingdom and Taiwan servicing a worldwide market.
Need help?
Do you have a question about the ARMBARQUAD and is the answer not in the manual?
Questions and answers