Table of Contents
Advertisement
Quick Links
Advertisement
Table of Contents

Subscribe to Our Youtube Channel
Summary of Contents for ZeeVee ZyPer
- Page 1 ZyPer Management Platform User Manual Updated, January 2018 API Release 1.7x...
- Page 2 Safety Instructions Read these instructions. Keep these instructions. Heed all warnings. Follow all instructions. Do not use this product near water. Clean only with a dry cloth. Do not block any ventilation openings. Install in accordance with the manufacturer’s instructions. Do not install or place this product near any heat sources such as radiators, heat registers, stoves, or other apparatus (including amplifiers) that produce heat.
- Page 3 Operating Notes • The Management Platform includes the Maestro Z web interface. The following browsers are supported: ► Google Chrome version 40 or greater • Refer to the Support page on the ZeeVee web site to download the latest firmware.
- Page 4 Contacting ZeeVee Support Contact us for installation and technical support, repairs, and warranty service: +1 (877) 4-ZEEVEE (1.877.493.3833) support@zeevee.com Representatives are available from 9:00 AM to 6:00 PM, Monday through Friday (USA East Coat Time). Sales North America: +1 (347) 851-7364 Phone sales@zeevee.com...
- Page 5 Features and Package Contents Features • Pre-configured Linux O/S is maintenance-free and includes upgrades and support. • Plug & Play operation will discover and enable labeling and control of any number of ZyPer4K, ZyPerUHD or ZyPerHD encoders and decoders. • Interface allows the independent routing of video, audio and control signals.
-
Page 6: Table Of Contents
Contents Getting Started Panel Descriptions ......................2 Rear View ......................2 Top View .......................3 Front View ......................4 Installation ........................5 Using Windows® ....................5 Using OS X® ......................5 Sample Application Diagram ................6 Management Platform Login ..................7 Network Configuration ....................8 Fixed Mapping using DHCP ..................8 Static IP Configuration ..................9 Basic Operation Accessing Maestro Z....................12... - Page 7 Contents Advanced Operation Linux Server Management .................52 Accessing Linux using SSH ................52 Changing the Management Platform Password ........53 Accessing the API ....................54 Using Telnet ....................54 Getting Help ....................54 Setting the Time Zone ................55 EDID Management ....................56 Auto EDID Mode ..................56 Using Custom EDID Data ................56 Using AJAX/JSON ....................58 Login Authentication ...................58...
- Page 8 Getting Started...
-
Page 9: Getting Started
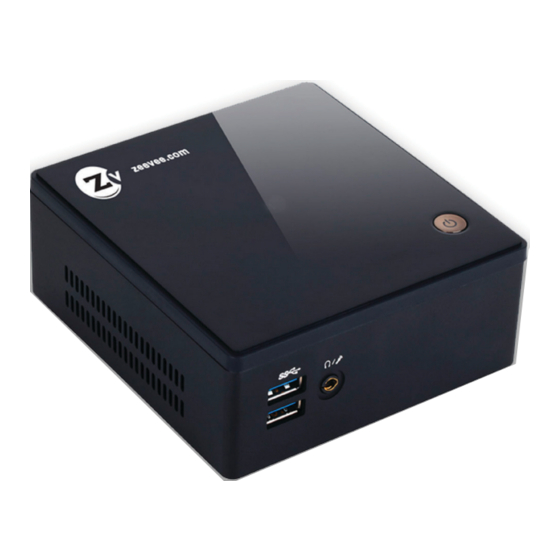
Getting Started Panel Descriptions Rear View ZyPerMP ZyPer Management Platform Name Description Security port This port accepts a standard computer laptop locking connector. Power receptacle Connect the included power supply to this power receptacle. HDMI Connect an HDMI cable from this port on the Management Platform to an HD display. -
Page 10: Top View
Getting Started Top View ZyPerMP ZyPer Management Platform Intelligent IP Distribution Power On/Off Name Description Power On/Off Press this button to manually power-off the Management Platform. When the Management Platform is connected to a power source, it will automatically power- on. -
Page 11: Front View
Getting Started Front View Intelligent IP Distribution Power On/Off Name Description USB port Connect up to two USB 3.0 devices, such as a keyboard and mouse, to these USB ports. Headphone / Mic jack Not used. -
Page 12: Installation
Connect an Ethernet cable from the ZyPer Management Platform to a switch that is on the same LAN that will be hosting the ZyPer devices. Although the ZyPer Management Platform can be connected anywhere on the LAN, it is recommended that it is connected to the primary switch where the ZyPer endpoints are connected. -
Page 13: Sample Application Diagram
Getting Started Open a web browser and enter the IP address of the ZyPer Management Platform. The login screen for the Maestro Z will be displayed. Enter admin for both the Username and Password fields. Management Platform Login (page 7) for more information. -
Page 14: Management Platform Login
After entering the login name, the password prompt will be displayed. zyper login: zyper Password: Enter the password. The default password is zyper. Note that the password will not be echoed to the screen. Once the password is entered, the screen will appear similar to the following:... -
Page 15: Network Configuration
MAC address of the Management Platform. Refer to API Command Listing (page 61) a full listing of available commands. Reboot the Management Platform, using the following command, to use the new IP address. zyper@zyper:~$ sudo reboot... -
Page 16: Static Ip Configuration
At the prompt, launch the Emacs editor using the following command. zyper@zyper:~$ sudo emacs /etc/network/interfaces Enter the password. The default password is zyper. The password will not be echoed to the screen. zyper@zyper:~$ sudo emacs /etc/network/interfaces [sudo] password for zyper: Once the correct password is entered, the screen will display the Emacs editor. - Page 17 Getting Started Save the file and exit the Emacs editor. (Ctrl+x then Crtl+c) When prompted to save changes type y Reboot the Management Platform using the following command. zyper@zyper:~$ sudo reboot...
-
Page 18: Basic Operation
Basic Operation... -
Page 19: Accessing Maestro Z
Basic Operation Accessing Maestro Z Open a web browser and enter the IP address of the Management Platform. The login screen for Maestro Z will be displayed. Enter the required information in the Username and Password fields. The default username and password is admin. The username and password are case-sensitive. The “admin”... -
Page 20: Home Page
Basic Operation Home Page The Home page of the Maestro Z displays all available Sources, Displays, Walls, Zones, Multiviews, Server Info, Users, Roles, Logs and Help. Login to the Maestro Z. Refer to Accessing Maestro Z (page 12) for more informa- tion. -
Page 21: Device Status Indicators
Basic Operation Device Status Indicators Each Source and Display contains a status indicator border color, displaying current information about the device. This is particularly useful for devices that may be in a separate part of a building or several miles away. Meaning Indicator Color Green... - Page 22 Basic Operation Meaning Indicator Color Error The Ethernet cable is disconnected between the switch and the encoder / decoder. The encoder / decoder may not be powered.
-
Page 23: Displaying Devices By Status
Basic Operation Displaying Devices By Status Both the Sources and Displays window contain a Filter by status option. There are check boxes to filter by Status (Green, Yellow, Red), Device Type (4K, UHD or HD), USB (Present, Not present) There is also an option to filter Sources or Displays by name. Click the Filter Icon. -
Page 24: Displaying Devices By Name
Basic Operation Displaying Devices By Name Both the Sources and Displays windows contain a Filter by name field. Use this field to enter the name of the desired device(s) to be displayed. As text is entered, the interface automatically begins a search of the current string for each recognized device. -
Page 25: Joining Encoders To Decoders
Basic Operation Joining Encoders to Decoders “Joining” is the process of assigning an encoder (source) to a decoder (display) or a video wall. Before starting the join process, we recommend that you configure the encoder and decoder settings. Refer to Configuring Encoders and Decoders (page 20). -
Page 26: Unlinking Encoders And Decoders
Basic Operation Unlinking Encoders and Decoders As mentioned earlier, joining an encoder with a decoder that is already joined, will replace the previous join operation. However, there may be situations where you want to completely remove any source from being shown on a display. To do this, use the Disconnect AV feature or Disconnect Joins. -
Page 27: Source Config Page
Basic Operation Source Config Page Configuring Encoders and Decoders When an encoder or decoder is connected to the network, the Management Platform identifies each unit by its MAC address. This is the default setting. However, when dealing with several units, it is much easier to identify a unit by a string name. It is also possible to assign a preset image to each icon, set the network mode, RS232 settings, and more. - Page 28 Basic Operation Left-click the desired encoder name to display the context menu. In the example below,we will select the encoder named “Airshow4K”. A menu will appear with options for Summary, ID, Status,Config and Actions. Selecting the ID option will allow you to manually give the Source a name. Enter a description for the source in the Name field.
- Page 29 Basic Operation Each encoder and decoder must have a unique name. Duplicate names are prohibited. It should be noted that assigning a name to an encoder does not actually replace the MAC address. The Name field provides a descriptive identifier, rather than a MAC address. Click the Config-Icon drop-down list to select the desired icon for this source.
- Page 30 Basic Operation The Manufacturer, Model, and Serial Number can also be assigned using the following commands, respectively. See API Command Listing (page 61) for more information. ► set device source-display manufacturer ► set device source-display model ► set device source-display serialNumber 10.
- Page 31 Basic Operation 13. Use the Baudrate section of Config to configure the RS232 settings for the control device, such as an automation control system. Click the Baudrate drop-down list to select the desired baud rate of the control device. The Device IP settings can also be assigned using the set device ip dhcp and set device ip static commands.
- Page 32 Basic Operation Encoder and Decoder Status Information You can obtain status information about an encoder and its source at any time, from the Source Config page. Login to the Maestro Z. Refer to Accessing Maestro Z (page 12) for more information.
-
Page 33: Deleting An Encoder Or Decoder
Basic Operation Deleting an Encode or Decoder If an encoder or decoder is disconnected from the network, the Management Platform will continue to display the encoder within the Maestro Z until it is removed. Note that; reconnecting the encoder will cause it to once again be displayed in the Maestro Z. Login to the Maestro Z. - Page 34 Basic Operation Click the Delete button. The following prompt will be displayed when deleting a source. Click the Delete button to confirm the operation. Click the Cancel button to cancel the operation. Decoders are deleted in exactly the same manner as Encoders.
-
Page 35: Creating Video Walls
Basic Operation Creating Video Walls One of the purposes of the Management Platform is to create and manage video walls. A video wall is a collection of displays or projectors arranged in a square or rectangular fashion. The source is then “mapped” to each display, thereby creating one large display from multiple, smaller displays. - Page 36 Basic Operation This will bring up the wall Editor. Enter the number of display columns in the Number of Columns field. Enter the number of display rows in the Number of Rows field. In this example, we have arranged our displays in two rows and two columns.
- Page 37 Basic Operation Drag Displays from the Display pane into the Editor to populate the wall. Provide a name for the new video wall in the Name field. Values in this field cannot contain spaces. Since more than one video wall can be created, always be sure to provide a descriptive name.
-
Page 38: Bezel Compensation
In the illustration on the left, we have a 2x2 video wall without bezel compensation. Note the ZeeVee logo is not aligned correctly across all four displays. On the right, bezel compensation is used to fix the issue. - Page 39 Basic Operation The video wall editor will come back up onto the screen. Enter the desired values, in pixels, for each bezel field: Bezel Top, Bezel Bottom, Bezel Left, Bezel Right. Once the desired values have been entered, click the Update button. This will save the new settings.
-
Page 40: Creating A Multiview Screen
Commands Creating a Multiview Screen One of the purposes of the Management Platform is to create and manage multiview screens. A multiview screen is a collection of sources arranged on a single display. There can be up to 9 sources displayed on a single display in a variety of preset patterns. Note: Only the ZyPer4K versions with the HDMI 2.0 feature support multiview screens. - Page 41 Commands Click on the Patterns button in the lower right corner to bring up a list of pre-defined pat- terns. After selecting a pattern you will see the grid fill in with the places to drag sources.
- Page 42 Commands Drag sources into the various locations. Note: The same source can be dragged into muliple windows as long as the windows are the same size. Dragging a source onto differnent size windows is NOT supported.
- Page 43 Commands If desired, assign Audio from one of the Sources. This is done by clicking on one of the small Audio symbols in the top center of each Window. Note that only audio from one source is supported. Give the Multiview a name and press the Save button. 10.
-
Page 44: Creating Zones
Basic Operation Creating Zones In many installations, displays are placed in more than one room. These rooms are often referred to as zones. Creating a Zone, using the Management Platform, allows you to organize these displays in a group. Video Walls can also be added to Zones. Login to the Maestro Z. - Page 45 Basic Operation This will open the Zones Editor. Drag Display and Video Walls into the Zone from the Displays or Walls windows. Continue adding the desired displays (or video walls) to the drop-pane. Provide a name for the Zone. If a custom name is used, it must not contain spaces. In this example, we will call our Zone, “ConferenceRm”, since our displays are installed in a conference room.
- Page 46 Basic Operation Click the Create button to save the Zone. Close the editor window to exit without sav- ing changes. The new Zone will appear under the Zones window. Zones are deleted by clicking on the small Trash Can icon. The user will be prompted to confirm deletion.
-
Page 47: Server Functions Page
Basic Operation Server Functions Page The majority of this page is used to display general information about the Management Platform. In addition, this page provides controls for setting the EDID mode and rebooting or restarting the server. Server firmware can also be updated from this window. Server Information This section provides information about the Management Platform, such as the host name, IP address, MAC address, version, serial number, uptime duration, and free memory. -
Page 48: Setting The Edid Mode
Basic Operation Setting the EDID Mode By default, Auto EDID mode is enabled. This means that the Management Platform will compare the encoder EDID with the decoder EDID. If they are different, then the EDID from the decoder (sink) will be used by the encoder (source). Setting the EDID Mode affects all join modes: fast-switched, genlocked, and video-wall. -
Page 49: Server Reboot, Restart, And Shutdown
Click the desired button under Server Functions. ► Restart Restarts the server. Linux is not restarted. ► Reboot Linux is rebooted. Shut Down ► Shuts down the Management Server. ► Trouble Report Generates a trouble report than can be provide to ZeeVee support. - Page 50 Click the Server tab at the left of the page. Scroll down to the License option.. Here you can enter a new license key as provided by ZeeVee to increase the limit on the number of endpoints. (Please contact ZeeVee support for additional information) Please see the Appendix of this document for information on updating the Server Soft- ware.
-
Page 51: Help Page
Basic Operation Help Page The Help page provides a help reference for each page within the Maestro Z. Login to the Maestro Z. Refer to Accessing Maestro Z (page 12) for more informa- tion. Click the Help tab at the left of the page. The Management Platform Help window will be displayed. -
Page 52: Users And Roles Pages
Commands Users and Roles Pages The Users page provides the ability to create additional users beyond the Administrator and in conjuction with the Roles page assign different access/abilities to each user. Login to the Maestro Z. Refer to Accessing Maestro Z (page 12) for more informa- tion. - Page 53 Commands Enter the new password on both the “Password” and “Password Validation” lines and then hit the “Save” button in the lower right corner. It is recommended to record this new password in a secure location.
-
Page 54: Adding A New User
Commands Adding a New User To create a new user click on the “ ” symbol in the Users window. The screen shown below will appear. Enter the Full Name, User ID and Password for the new user. You can keep this password or force the user to generate a new password the first time they login by clicking the “Force password change on next sign in”... -
Page 55: Adding Or Editing A New Role
Commands Adding or Editing a Role To create a new role click on the “ ” symbol in the Roles window. The screen shown below will appear. In the General tab enter the Role Name. In the example below the name is “Junior Admin”. - Page 56 Commands There are 10 categories that can be assigined different levels of access within the Permissions tab. Sources, Displays, Zones, Walls, Multiview, Logs, Help, Users, Roles and Server. Most categories have 2 or 3 levels of access: View: User is allowed to access the designated tab within MaestroZ Config: User is allowed to alter or create new configurations within the designated tab.
- Page 57 Commands You need to have both the Users and Roles windows visible to assign a User with a set of Roles / Permissions. Open the Users tab in the Roles window and drag a specific User from the User window over. (Drag the “person” icon located to the far left next to user ID) Be sure to Save any updates.
-
Page 58: Advanced Operation
Advanced Operation... -
Page 59: Linux Server Management
This includes the installation of third-party Linux software packages. Accessing Linux using SSH Use the following command on a MAC or other Linux system. Andrews-MacBook-Pro:~Andrew$ ssh zyper.local -l zyper zyper@zyper.local’s password: When entering the password, it will not be echoed to the screen. -
Page 60: Changing The Management Platform Password
Advanced Operation Changing the Management Platform Password To change the ZyPer account password, use the passwd command, as shown below. Note that passwords are not echoed to the screen. zyper@zyper:~$ passwd Changing password for zyper. (current) UNIX password: Enter new UNIX password:... -
Page 61: Accessing The Api
192.168.1.6 Instead of specifying the IP address of the Management Platform, the following identifier can also be used: zyper.local Example: telnet zyper.local Telnet will use port 23 by default and once connected, the API prompt will be displayed:... -
Page 62: Setting The Time Zone
The time zone must be specified in POSIX format and is case-sensitive. Refer to the following link for more information: http://wikipedia.org/wiki/List_of_tz_database_time_zones. Zyper$ set server timezone America/New_York Success Zyper$ Use the show server info command to verify the correct time zone has been set. -
Page 63: Edid Management
In such a case, follow the steps below to save and load a custom EDID to the Management Platform. Telnet to the Management Platform. zyper@zyper:~$ telnet 192.168.1.6 Disable Auto EDID mode by entering the following command: zyper$ set server auto-edid-mode disabled... - Page 64 EDID in standard ASCII text. These files must remain in this directory when disabling Auto EDID mode. To force a ZyPer encoder to use the saved EDID you need to have the MP load the binary EDID file onto the desired encoder.
-
Page 65: Using Ajax/Json
“userToken”. This cookie will expire one hour after the last AJAX command is received by the server. After the cookie expires, all other AJAX requests will result in a failed authentication until rcLogin.php is called again. The following code excerpt is from the zyperLogin() function within zyper.html: xmlhttp=new XMLHttpRequest(); xmlhttp.onreadystatechange = function(){ if (xmlhttp.readyState == 4 &&... -
Page 66: Command Request / Response
Advanced Operation Command Request / Response The following code excerpt sends an AJAX request to list all ZyPer encoders and decoders: function zt(){ xmlhttp = new XMLHttpRequest(); xmlhttp.open(“POST”, url, true); xmlhttp.setRequestHeader(“Content-Type”, “application/x-www-form- urlencoded”); xmlhttp.onreadystatechange = function(){ if (xmlhttp.readyState == 4 && xmlhttp.status == 200){ procResp(xmlhttp.responseText);... - Page 67 Advanced Operation The JavaScript object that is returned is: var jsObj = { status: true | false; responses: [ {error: “errorText”, warning: “warningText”, text: [ { param1: “val1”, parmN: “paramN” } ] The return value is an object that contains two members: status and responses. If the status member is not equal to “Success”, then the responses member is not valid.
-
Page 68: Api Command Listing
Advanced Operation API Command Listing Command Description create multiview Creates a new multiview display (ZyPer4K only) create video-wall Creates an empty 2x2 video wall. delete all-configuration Deletes all encoder/decoder and server information from the Management Platform delete device Deletes the specified encoder or decoder from the Management Platform database. - Page 69 Advanced Operation Command Description set encoder analog-audio-out Sets the source of Analog audio output source for specified encoder (ZyPer4K and ZyPerUHD only) set encoder hdcp-mode Sets the hdcp compatibility at the encoder side set decoder display-mode Sets default decoder output to crop, stretch or box set decoder display-size Set decoder output size to auto or manual...
- Page 70 Advanced Operation Command Description set device usb-filter Allows restrictions to USB use on selected device (ZyPer4K only) set device video-port Selects active input port for ZyPer4K units with multiple inputs (ZyPer4K only) set multiview Assigns source to a position and size within a multiview display (ZyPer4K only) set multiview audio-source...
- Page 71 Commands Command Description show device capabilities Shows detailed capabilities of specified device or devices show device config Shows detailed configuration information for specified device or devices show device connections Shows encoder connections to decoders show device status Provides detailed status informatoin for specified device or devices show multiviews config Lists all created multiviews with source,...
- Page 72 Commands create multiview Creates an empty multiview display. (ZyPer4K only) Once created, the new multiview will be listed under the Multiview menu within the built-in Maestro Z. Use the set multiview command to set a source encoder to a specified location and size within the multiview.
- Page 73 Advanced Operation create video-wall Creates an empty 2x2 video wall. Once created, the new video wall will be listed under the Display Config menu within the built-in Maestro Z. Use the set video-wall-encoder command to assign a source encoder to the wall.
- Page 74 Parameters action Type: STRING Supply one of the following arguments before executing this command. argument Description reboot Unit is automatically rebooted restart The ZyPer server service is restarted shutdown Unit is shutdown Example delete all-configuration restart Related Commands factory-defaults device...
- Page 75 Advanced Operation delete device Deletes the specified device from the Management Platform database. Note that if the deleted device remains on the network, then it will be rediscovered by the Management Platform and reposted to the database. To permanently remove a device from the database, physically disconnected it and execute the delete device command.
- Page 76 Commands delete multiview Deletes the specified multiview from the database on the Management Platform. (ZyPer4K only) Syntax delete multiview name Parameters name Type: STRING The name of the multiview. Names are case-sensitive. Example delete multiview myMultiview Success Related Commands create video-wallmultiview delete multiview-window set video-wallmultiview set video-wall-decodermultiview audio-source window number...
- Page 77 Commands delete multiview-window Deletes the specified window from an existing multiview. (ZyPer4K only) Syntax delete multiview-window name window arg Parameters name Type: STRING The name of the multiview. Names are case-sensitive. Type: INTEGER Window number to remove. Integer range from 1 to 9 Example delete multiview-window myMultiview window 5 Success...
- Page 78 Advanced Operation delete video-wall Deletes the specified video wall from the database on the Management Platform. Syntax delete video-wall name Parameters name Type: STRING The name of the video wall. Names are case-sensitive. Example delete video-wall myWall Success Related Commands create video-wall set video-wall set video-wall-decoder...
- Page 79 Advanced Operation factory-defaults device Set the specified device to the factory-default settings. Syntax factory-defaults device id Parameters Type: STRING or MAC Address The name or MAC address of the device. String names are case-sensitive. Example factory-defaults device Airshow Success factory-defaults device 0:1e:c0:f6:a8:c3 Success Related Commands delete all-configuration...
- Page 80 Advanced Operation flash-leds Physically identifies the specified device on the network. When this command is executed, the fiber LED indicators on the device will flash for 5 seconds. Syntax flash-leds id Parameters Type: STRING or MAC Address The name or MAC address of the device. String names are case-sensitive. Example flash-leds myEncoder Success...
- Page 81 Advanced Operation join Joins the specified decoder (display) with the specified encoder (source). The mode parameter must be specified and defines the type of join to execute. ► analog-audio Embeds audio stream from the encoder on the output of the decoder. The audio can be from the HDMI input or from the (analog) Audio jack on the encoder.
- Page 82 Advanced Operation mode Type: STRING Supply one of the following arguments before executing this command. argument Description analog-audio Embed audio from the specified encoder fast-switched Join in “fast-switched” mode genlocked Low-latency join mode (ZyPer4K only) genlocked- Low-latency with scale up/down (ZyPer4K only) scaled hdmi-downmix-...
- Page 83 Advanced Operation load encoder-edid Uploads an EDID file to the specified encoder. Syntax load encoder-edid enc file Parameters Type: STRING or MAC Address The name or MAC address of the encoder. String names are case-sensitive. file Type: STRING The name of the file to load. Example load encoder-edid myEncoder myEDID.bin Success...
- Page 84 Commands redundancy switchover If there is an active slave, this command causes the existing master to become the slave and the existing slave to become the master. The server does not restart or re-initialize any other state, including any existing video and audio connections. The IP address that is always assigned to the master.
- Page 85 Advanced Operation restart device Restarts the specified device. Syntax restart device id Parameters Type: STRING or MAC Address The name or MAC address of the device. String names are case-sensitive. Example restart device myEncoder2 Success restart device 0:1e:c0:f6:cb:76 Success Related Commands restart server restore device...
- Page 86 Advanced Operation restart server Restarts the server. Linux is not restarted. Syntax restart server Parameters none Example restart server Success Related Commands restart device...
- Page 87 Commands restore device Delete all the config settings for specified device and restore it based on the information stored in the database. Syntax restore device id Parameters Type: STRING or MAC Address The name or MAC address of the device. String names are case-sensitive. Example restore device myEncoder2 Success...
- Page 88 Advanced Operation save device-edid Saves the EDID of the downstream sink to the srv/ftp/files folder on the Management Server. Executing this command will generate two file types: .bin and .txt. The .bin file is the EDID is standard format. The .txt file is the decoded EDID data. Using Custom EDID Data (page 56) for more information on using this command.
- Page 89 Advanced Operation script Executes the specified script. The script must exist in the /srv/ftp/files folder. Use the optional loop argument to place the script in a loop. The script will continue running until a key is pressed on the keyboard. Syntax script file [loop] Parameters...
- Page 90 Advanced Operation send Sends an IR or RS232 string to the specified device. Use the type parameter to specify an IR or RS232 code. Syntax send id type text Parameters Type: STRING or MAC Address The name or MAC address of the device. type Type: STRING Specifies IR or RS232 command...
- Page 91 Advanced Operation Example send myDecoder2 ir 0000006900000015005f001700300017003000170030001 700300017001700170030001700170017001700170030001700170017003000170 030001700170017003000170017001700170017001700170030001700300017003 00200 Success send myDecoder2 rs232 ZeeVee_support_is_the_greatest\r\n Success Related Commands set device rs232...
- Page 92 Commands set encoder analog-audio-out Sets the analog audio output source type for the specified encoder. (ZyPer4K and ZyPerUHD only) Syntax set encoder id mode type Parameters Type: STRING or MAC Address The name or MAC address of the encoder. String names are case-sensitive. mode Type: STRING The audio output to use.
- Page 93 Commands set encoder hdcp-mode Sets the hdcp mode for the specified encoder. Syntax set encoder id mode type Parameters Type: STRING or MAC Address The name or MAC address of the encoder. String names are case-sensitive. mode Type: STRING The hdcp mode to use argument Description hdcp-mode...
- Page 94 Advanced Operation set decoder Sets the audio output type and video timing details for the specified decoder. Syntax set decoder id mode type Parameters Type: STRING or MAC Address The name or MAC address of the decoder. String names are case-sensitive. mode Type: STRING argument...
- Page 95 Commands The audio mode (analog out or HDMI out). argument Description source analog Uses the audio output created with the join command. source hdmi Uses the HDMI stream (HDMI audio-out only) source none No audio output source hdmi- Uses the HDMI-downmix stream. downmix Display timing, aspect ratio, mode, size.
- Page 96 Commands Example command on the API: Zyper$ set decoder DF-BR1 display-size width 1280 height 720 fps 60 Command Description: Output display size determined by received EDID Command Syntax set decoder <Decoder_Name or MAC> display-size auto The command causes the decoder to set output display size to the “preferred”...
- Page 97 Commands set device ethernet-management-port Enables or disables the 1Gb Utility Ethernet port on the specified encoder or decoder. (ZyPer4K only) Syntax set device id ethernet-management-port arg Parameters Type: STRING or MAC Address The name or MAC address of the device. String names are case-sensitive. Type: STRING Supply one of the following arguments.
- Page 98 Advanced Operation set device general name Sets the name for the specified encoder or decoder. Syntax set device id general name str Parameters Type: STRING or MAC Address The name or MAC address of the device. String names are case-sensitive. Type: STRING The name for the device.
- Page 99 Advanced Operation set device ip Sets DHCP mode for the specified device. (ZyPer4K only) Syntax set device id ip arg Parameters Type: STRING or MAC Address The name or MAC address of the decoder. String names are case-sensitive. Type: STRING Supply one of the following arguments.
- Page 100 Advanced Operation set device ip static Sets static mode for the specified device. The IP address, subnet mask, and gateway must be supplied. (ZyPer4K only) Syntax set device id ip static addr mask gatew Parameters Type: STRING or MAC Address The name or MAC address of the decoder.
- Page 101 Advanced Operation Related Commands set device analog-audio mode set device general name set device gig-ethernet-port mode set device ip set device ip static set device rs232 set device source-display iconImageName set device source-display location set device source-display manufacturer set device source-display model set device source-display serialNumber...
- Page 102 Advanced Operation set device rs232 Sets the RS232 settings for the specified device. Syntax set device id rs232 baud data stop parity Parameters Type: STRING or MAC Address The name or MAC address of the device. String names are case-sensitive. baud Type: INTEGER The baud rate for the device.
- Page 103 Advanced Operation stop Type: INTEGER The stop bit setting for the device. Supply one of the following values from the table below. argument 1-stop 2-stop parity Type: STRING The parity setting for the device. Supply one of the following values from the table below.
- Page 104 Commands set device send-ip-mcast-range Sets allowable range of multicast addresses for selected devices. (ZyPer4K only) Syntax set device id send-ip-mcast-range first:ip last:ip Parameters Type: STRING or MAC Address The name or MAC address of the encoder. String names are case-sensitive. Can all use “all”...
- Page 105 Advanced Operation set device source-display iconImageName Assigns an icon to the desired device. The icon will be displayed within the Maestro Z to identify the device. Syntax set device id source-display iconImageName fname Parameters Type: STRING or MAC Address The name or MAC address of the encoder or decoder. String names are case-sensitive.
- Page 106 Advanced Operation Example set device DVD-Wildlife source-display iconImageName HDDVD.png Success Related Commands set device analog-audio mode set device general name set device gig-ethernet-port mode set device ip set device ip static set device rs232 set device source-display location set device source-display manufacturer set device source-display model set device source-display serialNumber...
- Page 107 Advanced Operation set device source-display location Assigns a location description for the specified device. Syntax set device id source-display location loc Parameters Type: STRING or MAC Address The name or MAC address of the device. String names are case-sensitive. Type: STRING The location description of the device (e.g.
- Page 108 Advanced Operation set device source-display manufacturer Assigns a manufacturer description for the specified device. Syntax set device id source-display manufacturer mfg Parameters Type: STRING or MAC Address The name or MAC address of the device. String names are case-sensitive. Type: STRING The manufacturer description of the device (e.g.
- Page 109 Advanced Operation set device source-display model Assigns a model description for the specified device. Syntax set device id source-display model model Parameters Type: STRING or MAC Address The name or MAC address of the device. String names are case-sensitive. model Type: STRING The manufacturer’s model numberof the device.
- Page 110 Advanced Operation set device source-display serialNumber Assigns the manufacturer serial number for the specified device. Syntax set device id source-display serialNumber serial Parameters Type: STRING or MAC Address The name or MAC address of the device. String names are case-sensitive. serial Type: STRING The manufacturer serial number of the device.
- Page 111 Commands set device usb-filter Allows restrictions to USB use on selected device. (ZyPer4K only) Syntax set device id usb-filter arg Parameters Type: STRING or MAC Address The name or MAC address of the encoder or decoder. String names are case sensitive Type: STRING Supply one of the following arguments.
- Page 112 Use the SDI input port component Use component input. (Requires ZeeVee Hydra cable) composite Use composite input (Requires ZeeVee Hydra cable) s-video Use s-video input (Audio not supported) Use vga input. (Requires ZeeVee VGA cable) Example set device myEncoder1 video-port display-port...
- Page 113 Commands set multiview Assigns source to a position and size within a multiview display. (ZyPer4K only) Syntax set multiview id window-number wn encoder-name enc position-x posx position-y posy size-x sx size-y sy layer ly Parameters Type: STRING Name of previously created multiview. String names are case-sensitive. Type: Integer Window number within the multiview (1-9) Type: STRING or MAC Address...
- Page 114 Commands Type: Integer Window Layer. Value from 1-9 with layer 1 being the top layer and 9 being the bottom. Example set multiview myMview1 window-number 9 encoder-name myEnc1 position-x 50 position-y 50 size-x 25 size-y 25 layer 3 Related Commands create multiview delete video-wallmultiview delete multiview-window...
- Page 115 Commands set multiview audio-source window number Selects the input source to provide Audio for multiview display. (ZyPer4K only) Syntax set multiview id audio-source window number arg Parameters Type: STRING Name of previously created multiview. String names are case-sensitive. Type: STRING / Integer Supply one of the following arguments.
- Page 116 Advanced Operation set responses rs232-term-chars Specifies the termination character for an RS232 string. The default string is “\n\r”. Any character in the termination string causes the response-string to terminate and be placed into the response-string ring buffer. This string is optional. If it is not specifed, then the string is empty and each low-level response is handled as a separate response.
- Page 117 Advanced Operation set server api-password Sets the password for Telnet. If a password is not provided, then the current password will be deleted. In this case, no password prompt will be displayed. Note that Maestro Z will always display both the Username and Password fields. The username and password for Maestro Z are both admin.
- Page 118 Advanced Operation set server auto-edid-mode Sets the EDID mode for the Management Platform. By default, Auto-EDID mode is enabled. Syntax set server auto-edid-mode mode Parameters mode Type: STRING Supply one of the following arguments. argument Description disabled Disables auto-EDID mode. enabled Enables Auto EDID mode.
- Page 119 Sets the license for the Management Platform. This controls the maximum number of endpoints supported by the Magement Platform Syntax set server license key Parameters Type: STRING License key obtained from ZeeVee that sets maximum number of endpoints Example set server license QDZV-AYYA-0048-303D-5C0E-BD5D-56AA-154D-976C- BCE3-BAC4 Success Related Commands...
- Page 120 Commands set server redundancy Sets a virtaul IP address and Mask for the Master and Slave Management Platforms in the system. (See Appendix for additional Redundancy Configuration Instructions) Syntax set server redundancy serv_id virtual-ip address IP_Address Mask Parameters serv_id Type: STRING The servers to apply Virtual-ID to.
- Page 121 Commands set server redundancy 192.168.1.202 preferred-master false preferred-slave true Success...
- Page 122 Advanced Operation set server timezone Sets the time zone for the Management Platform. The time zone must be specified in POSIX format. Syntax set server timezone zone Parameters zone Type: STRING The time zone in POSIX format. Example set server timezone America/New_York Success Related Commands set server api-password...
- Page 123 Advanced Operation set video-wall Changes the size of the specified video wall and bezel parameters. Bezel values are measured in pixels. Setting bezel values will affect a resolution change to the display. If the resolution is not supported by the display, then the display will have no picture.
- Page 124 Advanced Operation Note: Bezel adjustment only supported on ZyPer4K Example set video-wall myVideoWall 4 4 10 10 15 15 Success Related Commands create video-wall set video-wall-decoder set video-wall-encoder show video-walls...
- Page 125 Advanced Operation set video-wall-decoder Assigns the specified decoder, to the desired row and column, on the specified video wall. Syntax set video-wall-decoder id wall row col Parameters Type: STRING or MAC Address The name or MAC address of the decoder. String names are case-sensitive. If none is passed as the argument, then any existing display is disconnected from that position in the video wall.
- Page 126 Advanced Operation set video-wall-encoder Assigns the specified encoder to the desired video wall. Syntax set video-wall-encoder id wall Parameters Type: STRING or MAC Address The name or MAC address of the encoder. String names are case-sensitive. If none is passed as the argument, then the display is disconnected from that position in the video wall.
- Page 127 Commands show device capabilities Displays device capabilities for the specified device(s). Syntax show device capabilities id select [since] Parameters Type: STRING or MAC Address The identifier of the device. Either the full or portion of a string name or MAC address can be supplied.
- Page 128 Commands Example show device capabilities myEnc1 since 20 device(d8:80:39:9a:e6:d); device.CapabilitiesVersion; values=1 device.streams-supported; values=video:video-scaled:analog- audio:hdmi-downmix-audio device.stream-mode-settable; values=video:video-scaled:analog- audio:hdmi-downmix-audio device.stream-mcast-settable; values=video:analog-audio:hdmi- downmix-audio device.join-video; values=multiview:genlocked:fast-switched device.video-port; values=hdmi device.hdmi-status; values=link:hdcp:resolution:fps device.join-audio; values=analog:hdmi-downmix-audio device.hdmi-audio-source; values=analog:hdmi:hdmi-downmix device.analog-audio-source; values=none:analog:hdmi-downmix device.encoder-analog-audio-source; values=none:hdmi-downmix device.ir; values=device:server device.rs232; values=device:server device.video-wall; values=maxSize(5):bezelsSupported device.send-multicasts;...
- Page 129 Advanced Operation show device config Displays device information for the specified device(s). Syntax show device config id select [since] Parameters Type: STRING or MAC Address The identifier of the device. Either the full or portion of a string name or MAC address can be supplied.
- Page 130 Advanced Operation Example show device config USA4K since 20 device(d8:80:39:9a:e6:d); device.gen; model=Zyper4K, type=encoder, name=USA4K, state=Up, lastChangeId=12627 device.gen; firmware=3.1.3 device.gen; ethernet-management-port-mode=enabled device.ports; video-port=hdmi device.ip; mode=dhcp, address=172.16.6.33, mask=255.255.255.0, gateway=172.16.6.1 device.rs232; sendingToMacOrIp=none(0.0.0.0), terminationChars=\ n\r, baudrate=57600, dataBit=8, stop_Bit=1, parity=none device.ir; sendingToMacOrIp=none(0.0.0.0) device.source; iconImageName=GenericVideoSource , manufacturer=Unknown, model=Unknown, location=Unknown, serialNumber=Unknown device.audioOutSourceType;...
- Page 131 Commands show device connections Shows encoder connections to decoders Syntax show device connections Parameters none Example show device connections encoder.GalapogosHD; BotLeftHD encoder.RaptorsHD; SamsungHD encoder.MuralsHD; BotRightHD encoder.Soccer4K; TopRight, BotLeft Success Related Commands show device status show device capabilities show device config...
- Page 132 Advanced Operation show device status Displays status information for the specified device(s). This command functions the same as the show device config command. Syntax show device status id [since] Parameters Type: STRING or MAC Address The identifier of the device. Either the full or portion of a string name or MAC address can be supplied.
- Page 133 Advanced Operation Example show device status USA4K since 20 device(d8:80:39:9a:e6:d); device.gen; model=Zyper4K, type=encoder, name=USA4K, state=Up, uptime=1d:4h:36m:37s, lastChangeId=5285 device.firmwareUpdate; status=idle, loadingFile=none, percentComplete=0 device.hdmiInput; cableConnected=connected, hdcp=inactive, hdcp- version=NONE, hdmi-2.0=yes, horizontalSize=3840, verticalSize=2160, fps=30.00, interlaced=no device.hdmiData; color=YUV_4:4:4, bits-per-pixel=8, datarateMbps=615 device.edid; status=valid device.autoEdid; decoder-name=not-enabled lastChangeIdMax(109978); Success Related Commands show device config...
- Page 134 Commands show multiviews config Shows configuration information on all multiview displays. (ZyPer4K only) Syntax show multiviews config Parameters none Example show multiviews config multiview(Ltest1); multiview.audio; sourceWindow=none; multiview.window1; encoder-name=Airshow4K, percentPosX=40, percentPosY=5, percentSizeX=55, percentSizeY=55, layer=1; multiview.window2; encoder-name=Soccer4K, percentPosX=5, percentPosY=5, percentSizeX=30, percentSizeY=30, layer=1; multiview.window3;...
- Page 135 Commands percentPosY=65, percentSizeX=30, percentSizeY=30, layer=1; multiview.window4; encoder-name=Soccer4K, percentPosX=65, percentPosY=65, percentSizeX=30, percentSizeY=30, layer=1; multiview.window5; encoder-name=USA4K, percentPosX=5, percentPosY=35, percentSizeX=30, percentSizeY=30, layer=1; multiview.window6; encoder-name=Airshow4K, percentPosX=35, percentPosY=5, percentSizeX=60, percentSizeY=60, layer=1; Success Related Commands create multiview delete video-wallmultiview delete multiview-window set device rs232multiview show multiviews status...
- Page 136 Commands show multiviews status Shows status information for all multiview displays. (ZyPer4K only) Syntax show multiviews status Parameters none Example show multiviews config multiview(Ltest1); multiview.audio; sourceWindow=none; multiview.window1; encoder-name=Airshow4K, percentPosX=40, percentPosY=5, percentSizeX=55, percentSizeY=55, layer=1; multiview.window2; encoder-name=Soccer4K, percentPosX=5, percentPosY=5, percentSizeX=30, percentSizeY=30, layer=1; multiview.window3;...
- Page 137 Commands percentPosY=65, percentSizeX=30, percentSizeY=30, layer=1; multiview.window4; encoder-name=Soccer4K, percentPosX=65, percentPosY=65, percentSizeX=30, percentSizeY=30, layer=1; multiview.window5; encoder-name=USA4K, percentPosX=5, percentPosY=35, percentSizeX=30, percentSizeY=30, layer=1; multiview.window6; encoder-name=Airshow4K, percentPosX=35, percentPosY=5, percentSizeX=60, percentSizeY=60, layer=1; Success Related Commands create multiview delete video-wallmultiview delete multiview-window set device rs232multiview show multiviews config...
- Page 138 Advanced Operation show responses Displays response strings from the specified device. Syntax show responses id type param3 Parameters Type: STRING or MAC Address The name or MAC address of the device. String names are case-sensitive. type Type: STRING Supply one of the following arguments. argument Description Displays IR response strings.
- Page 139 Advanced Operation Example show responses 0:1e:c0:f6:b0:8a rs232 since 10 lastChangeId(0); Success show responses 0:1e:c0:f6:b0:8a ir last-change-id lastChangeId(0); Success show responses 0:1e:c0:f6:b0:8a ir last lastChangeId(0); Success show responses Dec rs232 last device(34:1b:22:80:57:f8); device.rs232Response.7; string=”Yes ZeeVee Support is the Greatest\r\n” lastChangeId(7); Success...
- Page 140 Advanced Operation show server config Displays configuration information for the Management Platform. Syntax show server config Parameters none Example show server config server(172.16.6.46); server.gen; autoEdidMode=disabled server.multicast; startLSB:1 Success Related Commands show server info...
- Page 141 Displays information for the Management Platform, including IP settings, uptime, and license level. Syntax show server info Parameters none Example show server info server(192.168.1.8); server.gen; hostname=zyper.local, version=1.0.29760, macAddress=40:8d:5c:32:45:d5, serialNumber=ZZMPFB408d5c3245d5A, uptime=0d:7h:49m:53s, freeMem=6.780GB server.time; time=Tue Feb 9 19:04:55 2016, timezone=America/ New_York server.license; limit=unlimited, devicesExceeded=0 Success Related Commands...
- Page 142 Advanced Operation show server redundancy Displays information about master and slave Management Platforms Syntax show server redundancy Parameters none Example show server redundancy server(192.168.1.201); server.status; state=slave, version=1.7.1.33348, wasMaster=true, wasSlave=true server.config; preferredMaster=true, preferredSlave=false server.virtualIp; address=192.168.1.206, mask=255.255.255.0 server.slaveStatus; dbRunning=Yes, dbRunningState=Slave has read all relay log;...
- Page 143 Commands show video-walls Displays all video walls that have been created and all associated information. Syntax show video-walls Parameters none Example show video-walls videoWall(myWall); videoWall.gen; videoSourceMac=0:1e:c0:f6:a8:c3, numDisplayRows=4, numDisplayCols=4 videoWall.bezel; top=0, bottom=0, left=0, right=0 videoWall.decodersRow1; col1=none, col2=none, col3=none, col4=none; videoWall.decodersRow2; col1=none, col2=none, col3=none, col4=none;...
- Page 144 Advanced Operation shutdown server Performs a shutdown of the Management Platform. Syntax shutdown server Parameters none Example shutdown server Success Connection closed by foreign host. Related Commands restart server...
- Page 145 Advanced Operation sleep Specifies a sleep duration in milliseconds. This command is sometime required when executing a series of commands within a web page, using AJAX. Often times, a pause must occur in order for a device or the Management Platform to change states before another command is executed.
- Page 146 Commands start encoder Used to start a specific encoder multicast stream. This command only has affect if at least one decoder has been “joined” to the encoder and the “encoder stop” command has been used to override the enabling of the encoder stream. In effect, this command removes a previously entered “encoder stop”...
- Page 147 Commands stop encoder Used to stop a specific encoder multicast stream. This command only has affect if at least one decoder has been “joined” to the encoder. In effect, this command overrides any existing “join” command – either present or future. When stopping a “scaled-video”...
- Page 148 Advanced Operation switch This command is used in conjunction with the IR and RS232 switching commands. Both the rs232 and the ir argument specify unidirectional connection between two devices. When switching data to the server, use the show responses command to retrieve the data.
- Page 149 Advanced Operation trouble-report Generates capture logs and system state information and is used by the ZeeVee support team for troubleshooting purposes. This file is in .tgz format and is written to the /srv/ftp/files folder on the Management Platform. Syntax trouble-report...
- Page 150 Advanced Operation update server Updates the Management Platform software. The server software file uses the .zyper extension. Refer to Updating the Software (page 145) for more information on using this command. Syntax update server file Parameters file Type: STRING The full filename of the software file.
-
Page 151: 4 Appendix
Appendix... -
Page 152: Updating The Software
Using Mac OS X Make sure the Management Platform is powered and is working correctly. Download the latest software from the ZeeVee website. Make note of the location of where the software was downloaded. Launch the Terminal app, found under the Applications > Utilities folder. By default, the current directory will be the Home directory. -
Page 153: Using Mac Os X
Make sure to replace [version] with the version of the filename you are using. For example: ftp> put update_nuc_1.7.1.33348.zyper Press the [ENTER] key. Information similar to the following will be displayed. local: update_nuc_1.07.1.33348.zyper remote: update_ nuc_1.7.1.33348.zyper 229 Entering Extended Passive Mode (|||35257|). 150 Ok to send data. -
Page 154: Using Windows
Using Windows Make sure the Management Platform is powered and is working correctly. Download the latest software from the ZeeVee website. Make note of the location of where the software was downloaded. Open Windows Explorer and enter the IP address of the Management Platform using the FTP protocol. -
Page 155: Using Mastroz
Commands Using MaestroZ Make sure the Management Platform is powered and is working correctly. Download the latest software from the ZeeVee website. Make note of the location of where the software was downloaded. Login to the Maestro Z. Refer to... -
Page 156: Redundancy Configuration Instructions
Commands Redundancy Configuration Instructions To configure redundancy, follow the steps below. The secondary server must be running for the redundancy fields to be visible in MaestroZ or the API. Configuring redundancy through the API Configuring the IP Address Login to the main ZMP, or Master through telnet. Issue the “set server redundancy all-servers”... - Page 157 Commands Virtual IP: The IP address that the Master and Slave servers will use. This IP address must be unique and available on the network as it will be used for telnet access for the API as well as MaestroZ. Virtual Mask: The subnet mask for the virtual interface, must be correct for the IP address listed above and not it should not conflict with the main eth0 interface.
- Page 158 Commands Virtual interface on the ZMP. Below is an example of the output of the “ifconfig” from the ZMP showing the virtual IP configured on the current master server. eth0 Link encap:Ethernet HWaddr 40:8d:5c:32:46:0e inet addr:172.16.5.240 Bcast:172.16.5.255 Mask:255.255.255.0 UP BROADCAST RUNNING MULTICAST MTU:1500 Metric:1 RX bytes:36015816 (36.0 MB) TX bytes:31515642 (31.5 MB) eth0:ZMP Link encap:Ethernet HWaddr 40:8d:5c:32:46:0e inet addr:172.16.5.239 Bcast:0.0.0.0 Mask:255.255.255.0...
-
Page 159: Hardware Specifications
Appendix Hardware Specifications • Intel® Celeron® Processor 3205U Operating System • Linux Ubuntu 14.04 Internal Storage • 64 GB SSD Graphics • Intel® HD Graphics • Gigabit LAN (Realtek RTL8111G) Internal Memory • 8 GB Power Supply • Input: 100 ~ 240 V AC •... - Page 160 North America: +1 (347) 851-7364 • sales@zeevee.com International: +1 (347) 851-7364 • sales@zeevee.com EMEA: +44 1494 956677 • EMEAsales@zeevee.com BOSTON | DENVER | LONDON www.zeevee.com...
Need help?
Do you have a question about the ZyPer and is the answer not in the manual?
Questions and answers