Table of Contents
Advertisement
Advertisement
Table of Contents

Related Manuals for Dentsply Sirona Ankylos Balance C


Summary of Contents for Dentsply Sirona Ankylos Balance C
- Page 1 Ankylos® Laboratory Manual...
- Page 2 To improve readability for our customers, Dentsply Sirona Implants does not use ® or ™ in body copy. However, Dentsply Sirona Implants does not waive any right to the trademark and nothing herein shall be interpreted to the contrary.
-
Page 3: Table Of Contents
Ankylos® CONTENTS Treatment planning Aspects of treatment planning Conventional treatment planning Computer-guided treatment planning Prosthetic concept The prosthetic principle of Ankylos Ankylos prosthetics navigator Solutions for single-tooth restoration Solutions for larger tooth gaps Solutions for the edentulous jaw Basic guidelines for soft tissue management Ankylos®... -
Page 4: Treatment Planning Aspects Of Treatment Planning
Treatment planning Aspects of treatment planning Precise planning for any implantological procedure in close coordination between practitioners and laboratory is the basic prerequisite for lasting therapeutic success. All suitable measures and alternatives that will fulfill the expectations of the patient in terms of function and esthetics of the implant prosthetic rehabilitation should be stipulated in the planning. - Page 5 The basis of treatment planning is always a thorough discussion with the patient with a view towards determining the wishes and perceptions of the patient, excluding contraindications and clarifying matters thoroughly with the patient. Next, a complete general and specific medical history is taken and an intraoral diagnostic assessment is made with an analysis of the initial anatomical situation.
-
Page 6: Conventional Treatment Planning
Treatment planning Conventional treatment planning Preprosthetic planning Grafted regions must be confirmed to have completely regenerated to a mechanically stable state before Preprosthetic planning with the dental technician preparation. is the most important factor for the esthetic and functional success of the implant procedure. Planned prosthetic measures must be checked to ensure that they can actually be implemented with appropriate surgical procedures. -
Page 7: Computer-Guided Treatment Planning
Dentsply Sirona Implants offers a complete solution for digital treatment planning and full-guided implant placement based on the world-renowned Simplant software. -
Page 10: Prosthetic Concept
Prosthetic concept The prosthetic principle of Ankylos® Indexing option Based on the friction-locked and keyed TissueCare connection, the Ankylos system concept also facili- tates high flexibility in placing the abutments in the Regardless of which implant is placed, abutments implant. The abutments with tapered connection from the Ankylos Balance Anterior and Regular geometry (C/) can be freely turned in the implant and, prosthetics... -
Page 11: Ankylos Prosthetics Navigator
Ankylos® prosthetics navigator Depending on the indication and the type of Hence, prosthetically, the best functional and esthetic prosthetic restoration intended, the Ankylos solution is realized for each individual case. system offers different options for fabricating the suprastructure. Since all abutments are Detailed directions for selecting the most suitable freely combinable a decision for the prosthetic prosthetic procedure for the individual case can be... - Page 12 Prosthetic concept Solutions for single-tooth replacement For the replacement of single teeth with implant- Select the most suitable solution for the individual supported single crowns, the Ankylos system has a case based on the following overview. Both, pre- wide selection of prosthetic options for fabricating fabricated abutments for conventionally fabricated naturally and esthetically pleasing restorations with prosthetics as well as patient-specifically planned and...
- Page 13 Your Ankylos Standard C/ regions. dental laboratory will abutments. coordinate the process and elaborate the crown just as usual. Directions: see page 20 ff. corresponding to Directions: see page 84 ff. Ankylos Balance C/ or /X...
-
Page 14: Solutions For Larger Tooth Gaps
Prosthetic concept Solutions for larger tooth gaps Ankylos also provides a large range of options for As well as a bridge, in these cases, restoration is also restoration in larger edentulous gaps and free- possible using single crowns following a tooth-by- ends –... - Page 15 CAD/CAM prosthetics for Bridges / anterior and posterior region Simple: Patient-specific and Individual by CAD design: Ankylos Balance highly esthetic: Ankylos Ankylos Balance Base TitaniumBase C/ or /X Abutment C/ with Base Abutment C/ Atlantis bar The Ankylos Titanium- With patient-specific, If straightforward and efficient fabrication of Base allows for...
-
Page 16: Solutions For The Edentulous Jaw
Prosthetic concept Solutions for the edentulous jaw With Ankylos, the edentulous jaw can be restored Here, too, there are several options for both methods – either using an implant-supported bridge (fixed) or a from straightforward, standardized solutions right up removable overdenture anchored to the implant. to customized premium restorations designed using the CAD/CAM process. - Page 17 Conventionally and CAD/CAM-fabricated solutions for Overdentures (removable) Functional: Prefabricated Simply flexible: Simple: Ankylos Balance Base with immediate Ankylos Locator C/ Ankylos Snap restoration option: Attachment C/ Abutment C/ Ankylos SynCone C/ Ankylos SynCone C/ With the Ankylos Ankylos Snap Attach- A simple option for the fabrication of functional abutments facilitate...
-
Page 18: Basic Guidelines For Soft Tissue Management
Prosthetic concept Basic guidelines for soft tissue management with Ankylos® Free from micro-movement and conceived for The advantages of this specific connection geometry bacteria tightness, the Ankylos TissueCare connection however only become effective, if the procedure of ensures stable tissues on the long term. soft tissue contouring complies with the following guidelines. - Page 19 Gingiva former and final abutment should be selected in correspondence of prosthetic range and gingiva height. Therefore, please make sure to use the components indicated for the respective prosthetic range in the following chapters. Gingiva formers must be sterilized before use. Naturally beautiful teeth, even after many years Irritation-free, healthy soft tissues...
- Page 20 Balance C/ or /X Ankylos Balance Anterior C/ and /X abutments are The prosthetic abutments of the Balance range outstandingly suitable for your patients’ restorations are available as freely positionable with tapered using single crowns and bridges optimally adjusted to connection geometry (C/), Ankylos Balance Anterior periimplant conditions.
- Page 21 * Available at: www.atlantisweborder.com 1 – 5 | Replacement of an upper incisor with Ankylos Balance Anterior C/ (Photos: Dentsply Sirona Implants). 6 – 10 | Replacement of a lateral incisor with Ankylos Cercon Balance C/ (courtesy of Carsten Fischer, MDT, Frankfurt, Germany).
-
Page 22: Ankylos® Balance C/ Or /X
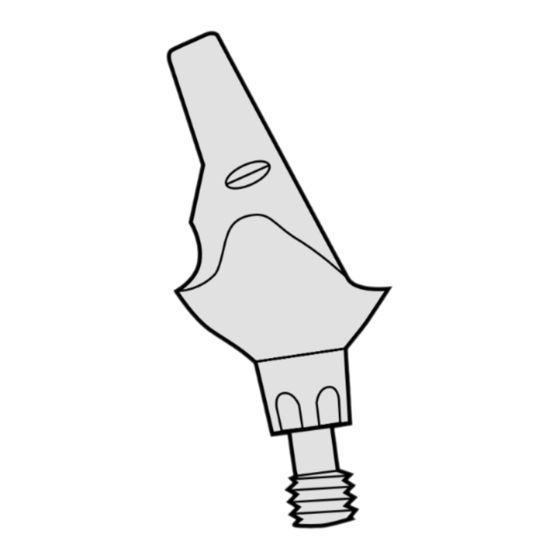
Ø 5.5 Ø 7.0 0° 15° GH 1.5 GH 3.0 Ankylos Balance C/ transfer post with Ankylos /X transfer Dimensions of the Ankylos Balance Anterior C/ and /X abutment screw (left) and Ankylos Balance C/ posts PickUp and as well as of the Cercon Balance C/ abutment [mm]... - Page 24 Ankylos Balance C/ transfer posts PickUp (open tray) position. In this case the indexed Ankylos C/X or reposition. The Ankylos Balance C/ implant analogs implant analogs are used.
- Page 25 Do not damage the straining screw during grinding. Ensure an adequate wall thickness also, and an adequate abutment height for cemented suprastructures. Do not grind the lateral thread hole, particularly in screw-retained suprastructures. To avoid stripping the straining screw, use the blue laboratory screwdriver with torque (10 Ncm).
- Page 26 Balance C/ or /X | Crowns and bridges Step-by-step: Crowns and bridges with Ankylos® Balance Anterior C/ or /X Both cemented and laterally screw-retained suprastructures can be prepared on Ankylos Balance Anterior C/ and /X abutments. Ankylos Balance Anterior C/ Ankylos Balance Anterior /X Cemented suprastructure on Screw-retained suprastructure on...
- Page 28 Ankylos Balance Anterior C/ or /X titanium tray) or repositioning post with the C/ marking. alloy abutments or on Ankylos Cercon Balance C/ Ankylos Balance C/ implant analogs are fixed in these. abutments is planned, the patient impression is Ankylos Cercon Balance C/...
- Page 29 Do not damage the straining screw during grinding. Ensure an adequate wall thickness of at least 0.5 mm and for cemented suprastructures an adequate abutment height. Do not grind the lateral thread hole, particularly in screw-retained suprastructures. Due to its construction with a central straining screw, the Ankylos Cercon Balance C/ abutment is not suitable for direct firing.
- Page 30 Regular C/ or /X The Ankylos Regular C/ or /X prosthetic range Choose between two options: enables the fabrication of functionally and esthetically the tapered TissueCare connection, with freely appealing reconstructions for edentulous gaps and positionable components, or components with free ends with single crowns or an implant-supported the tapered TissueCare connection and additional bridge.
-
Page 31: Ankylos® Regular C/ Or /X
Crowns and bridges on Ankylos® Regular C/ or /X Classic Ankylos® Regular C/ or /X procedure CAD/CAM prosthetic solutions • For esthetically demanding results As an individual alternative to the prefabricated • Transfer the implant position for the Ankylos Regular C/ and /X abutments, two solutions laboratory with the transfer post for patient-specific CAD/CAM-fabricated abutments •... - Page 32 Regular C/ or /X Prosthetic components Ankylos® Regular C/ or /X All prosthetic Ankylos C/X components are laser- • Components with the “/X” mark are indexed. The marked to indicate their use: index is used to position the abutment components •...
- Page 33 Patient-specific Atlantis abutments As an alternative to the prefabricated Ankylos Regular C/ or /X abutments, patient-specific Atlantis abutments can be used. For more information see page 39. Angulations and head heights Gingival heights and diameters Ø 5.7 Ø 5.7 Ø 5.7 Ø...
- Page 34 Regular C/ or /X | Crowns and bridges Prosthetic components for Ankylos® Regular C/ or /X Simplified procedure on abutment level The Ankylos Regular C/X 3-in-1 cap is a quick and easy option for fabricating a prosthetic restoration using unground Ankylos Regular C/ or /X abutments on the abutment level.
- Page 35 Step-by-step: Preparing the cast Regardless of whether you are planning a prosthetic They are fixed in the Ankylos Regular C/X implant restoration on indexed Ankylos Regular /X abutments analog. As an alternative the impression can be or on the freely positionable Ankylos Regular C/ made with Ankylos C/ transfer posts.
- Page 36 Regular C/ or /X | Crowns and bridges Step-by-step: Crowns and bridges, cemented or laterally screw-retained Depending on the proposed protocol indexed Ankylos Regular /X abutments or freely positionable Regular C/ abutments are selected according to the required gingival margin and angulation. Ankylos Regular C/ Ankylos Regular /X Placing the Ankylos Regular /X...
- Page 37 Do not damage the straining screw when grinding. Make sure that an adequate wall thickness of minimum 0.5 mm is retained, and make sure that the abutment height is adequate for cemented suprastructures. Do not grind the lateral threaded hole any thinner particularly with screw-retained suprastructures.
- Page 38 Regular C/ or /X | Crowns and bridges Step-by-step: Crowns and bridges, cemented or laterally screw-retained Crowns and bridges are fabricated on Ankylos Regular /X or Regular C/ abutments using the same procedure. Suprastructures can be cemented-in and laterally screw-retained. Ankylos Regular C/ Ankylos Regular /X Ankylos Regular /X and C/...
- Page 39 For crowns on Ankylos Regular C/ abutments the transfer key must be given to the dentist with the finished crown. Patient-specific Atlantis abutments Along with the use of pre- fabricated Ankylos Regular C/ or /X abutments, patient-specific Atlantis CAD/CAM abutments are available.
- Page 40 Regular C/ or /X | Crowns and bridges Step-by-step: Simplified procedure on the abutment level In contrast to the procedure described above, where The impression is taken using Ankylos Regular C/X the prosthetic abutments are selected by the dental 3-in-1 caps, which remain in the impression. Ankylos laboratory in cooperation with the practitioner, the Regular C/X abutment analogs are fixed in the caps.
- Page 41 Wax-up with the Ankylos Cemented suprastructure on Regular C/X 3-in-1 cap Ankylos Regular /X and C/ abutment For cemented suprastructures, The Ankylos Regular C/X 3-in-1 cap can also be used as a wax-up wax up crown or bridge on the coping.
- Page 42 Balance Base Abutment C/ With the Ankylos Balance Base Abutment C/ you Rotationally symmetrical Ankylos Balance Base will be able to provide your edentulous and partially Abutments made of titanium alloy Ti6AlV are available edentulous patients with screw-retained bridges and with tapered connection geometry.
- Page 44 • On the abutment level with the patient’s early incorporation of the abutments Retention copings for impression on abutment From left to right: Ankylos Balance C/ level for Balance Base Abutment narrow (left) implant analog, Ankylos analog for Balance and Balance Base Abutment (right)
- Page 45 Ø 4.2 15°...
- Page 46 Balance Base Abutment C/ Prosthetic components Balance Base Abutment C/ Prefabricated copings are available for the easy preparation of prosthetic restorations on the Ankylos Balance Base Abutment C/ narrow without the need for changing components in the patient‘s mouth. Prefabricated copings for Ankylos Balance Base Abutment narrow and Balance Base Abutment: retention copings (left), gold copings (center) and wax-up copings (right) Prosthetic restoration Ankylos Retention Coping for...
- Page 47 Titanium coping and fixation screws for From left to right: Ankylos insert for Ankylos finisher for elaboration of the Balance Base Abutment C/ narrow: prosthetic ratchet 1.8 mm hex, Ankylos prosthetic restoration Ankylos M 1.6 mm occlusal hex fixation 1.0 mm hex laboratory screwdriver and screws, short, long, extra long and 19 mm Ankylos screwdriver handle Instruments...
- Page 48 The level with Ankylos Balance transfer posts PickUp components are attached onto Ankylos Balance C/ (open tray) or repositioning technique with the C/ implant analogs. The model is then fabricated as usual.
- Page 49 Casting the model after taking the impression with the retention coping As an alternative, an impression of the abutment will have already been fitted into the patient’s mouth. position can be taken, using the Ankylos retention The model is made using Ankylos analogs (Balance coping for Base Abutment or Base Abutment narrow.
- Page 50 Balance Base Abutment C/ | Bar-supported overdentures Step-by-step: Conventionally laboratory-fabricated bar restoration (soldered) For the fabrication of soldered bars, it is necessary to produce a soldering model for attaching the bar during soldering. Ankylos soldering posts (for Balance Base Abutment) or analogs (for the Base Abutment narrow) are used in the soldering model.
- Page 51 Fabrication of the soldering model Try-in on the model Fabricate the soldering model The soldered structure is pickled in using investment compound. The the Neacid pickling unit, checked soldering model should be kept as for accuracy of fit on the master small as possible.
- Page 52 Balance Base Abutment C/ | Bar-supported overdentures Step-by-step: Conventionally laboratory-fabricated bar restoration After the bar construction has been completed, the prosthesis is fabricated. Bar – laser-welded Bar – soldered Wax-up Adjust the bar slides Splinting before completion Wax up the teeth over the gold Trim the activatable bar slides Splint the bar construction, leaving copings and bars, then check fit.
- Page 53 Please note the following directions for dental alloys: Side effects: Both allergies to the metals in the alloys and electrochemical paresthesias may occur. Instances of systemic side effects of metals in the alloy have been reported. Interaction: Avoid occlusal and approximal contact of different types of alloy.
- Page 54 Fixing the implant analogs Casting the model Screw in the Ankylos Balance Base Abutments C/ Screw the Ankylos Balance C/ Fabricate the model using dental Screw Ankylos Balance Base stone class IV. Here, ensure an Abutments C/ into the implant...
- Page 55 1.0 mm Hex Attaching the wax-up copings Adjusting the wax-up copings Attach the Ankylos wax-up Mark the model height on the copings for the Balance Base screw channel. Using a thin cutting Abutment C/ or Balance Base disk, trim the screw channel and Abutment C/ narrow by using the check the height of the occlusion.
-
Page 56: On Ankylos Balance Base Abutment C
Balance Base Abutment C/ | Bridges Step-by-step: Conventionally laboratory-fabricated bridge (screw-retained) Wax-up Elaborationg the framework Wax up and invest the bridge as Finishers are available for Use the Ankylos finisher for taper usual. Ensure adequate interdental elaborating the inner surface of the oclusal retention screw to remove rough areas in the screw channel. - Page 57 Veneering Veneer the bridge as usual and The original abutments as well check the interdental spaces are as the suprastructure are handed adequate for hygienic capability. over to the practice. New fixation screws should always be used to fit the Ankylos Balance Base Abutments into the mouth: order no.
- Page 60 Balance Base Abutment C/ | CAD/CAM suprastructures Step-by-step: Impressions and model casting for CAD/CAM restorations A precise stone model made in the laboratory, which This should take place over several consultations and reproduces the clinical situation exactly, is crucial in close cooperation with the laboratory. To better for the perfect fit of a CAD/CAM-fabricated implant illustrate the closely linked working steps between the suprastructure, even at the first fitting.
- Page 61 It is from this second impression of the intraoral splint that the laboratory fabricates the master cast, and on it, the wax-up. Dental practice Second consultation: Splint impression Fabrication of primary splint Intraoral splinting of the synthetic elements The practitioner attaches the The impression is then taken on Retention copings matching the diameter of the abutment are used...
- Page 62 Balance Base Abutment C/ | CAD/CAM suprastructures Step-by-step: Impressions and model casting for CAD/CAM restorations Dental laboratory In the dental laboratory: Producing the master cast Wax-up Preparing the transfer key The laboratory produces the A wax mock-up with tailored teeth A transfer key is again manu- is made on the master cast.
- Page 63 Dental practice Sheffield Test The Sheffield Test facilitates a simple check of the fit of a primary splinted mesiostructure on implants. After the structure has been positioned, each fixation screw is tightened separately while the other screws are not screwed in. Thus, the structure is only attached to one implant each time.
- Page 65 Planning the CAM milling strategy Milling the structure Processing in the dental laboratory After approval of the supra- Then, depending on the material After delivery of the milled structure design, the Atlantis guidelines, the titanium or cobalt- structure, the dental laboratory chrome construction is milled fabricates the bar prosthesis or engineers develop an individual...
- Page 66 SynCone® C/ A metal-reinforced prosthesis on Ankylos SynCone C/ 5° For the patient, the maximum possible reduction of tapered crowns is an innovative solution for providing the prosthetic body provides highest wearing comfort the prosthesis with a tension-free fit (passive fit). and excellent hygienic capability.
- Page 68 SynCone® C/ The tapered crown principle The synergy of the two tapers Ankylos SynCone transfers the clinically proven stability of the tapered abutment connection to the abutment-prosthesis connection. This second The tapered TissueCare connection allows for free tapered connection ensures that the final restoration 360°...
- Page 69 30° GH 1.5 GH 3.0 GH 4.5 Ankylos Balance C/ transfer post Ankylos SynCone C/ Dimensions Ankylos SynCone C/ abutment [mm] with screw and Ankylos Balance C/ abutment 5°, straight and repositioning post angled, cover screw for straight abutment Impressions...
-
Page 70: Ankylos® Syncone® C
SynCone® C/ Ankylos tapered cap Degulor for SynCone with Ankylos labratory screwdriver 1.0 mm hex (left) and without retention (right), parallelization (left) and insertion key for angled Standard gauge, titanium cap for SynCone 5° abutments (right) Prosthetic restoration Instruments Ankylos Tapered Cap Degulor Parallelization Gauge for Ankylos Laboratory Screwdriver for SynCone... - Page 71 Step-by-step: Immediate restoration with long-term temporary In case of an existing prosthesis with optimal fit and The polymerization of the caps needed for attaching occlusion, a patient can be restored immediately with the prosthesis is performed chairside. Then the a temporary prosthesis placed on four interforaminal prosthesis is finished as a long-term temporary.
- Page 72 Please continue directly with the using Ankylos Balance C/ fabrication of the framework, see components according to page 76. the protocol for submerged healing.
- Page 73 Casting the model after submerged healing If a prosthesis is fabricated following submerged These are fixed in the Ankylos Balance C/ implant healing, the components of the Ankylos Balance analog. C/ prosthetic range, that is the PickUp (open tray) or repositioning transfer posts, are used for the impression.
- Page 74 SynCone caps, merged healing or after impression taking using the as the abutments have already been incorporated in components of the Ankylos Balance C/ prosthetics the patient’s mouth. In this case, commence directly range, the Ankylos SynCone abutments are now with the fabrication of the framework, as described selected and positioned.
- Page 75 Only SynCone abutments with the same tapered angle may be used in a prosthesis. The prerequisite for a successful application of the SynCone concept is the common direction of insertion of the SynCone abutments. Screw-retention of the abutments, Marking the abutments Transfer key closing the screw channel Following parallelization, screw...
- Page 76 SynCone® C/ | Overdenture on tapered crowns Step-by-step: Fabrication of the metal framework Regardless of whether the prosthesis is fabricated following submerged healing or after immediate loading on Ankylos SynCone abutments already in situ in the patient’s mouth, all further steps for fabricating the framework and finishing the prosthesis are identical.
- Page 77 Finishing the framework Check of stability and fit Preparations for intraoral bonding After casting, devest and finish The stability of the metal frame- The exterior of the tapered caps is roughened by abrasive blasting the framework. Small windows for work is checked by applying checking the fit of the caps are pressure on both sides of the with aluminum oxide in preparation...
- Page 78 SynCone® C/ | Overdenture on tapered crowns Step-by-step: Finishing and delivery of the prosthesis After intraoral bonding of the tapered caps and the The SynCone abutments always remain in the patient’s metal framework, the dentist is to perform a bite mouth.
- Page 79 Completing the prosthesis Position the teeth and after fitting, Since the prosthesis is now The finished prosthesis is sent to finish the prosthesis with cold- mounted purely on implants, the the dental practice for delivery on margins of the prosthesis are the Ankylos SynCone abutments curing resin.
-
Page 80: Overdentures On Ankylos Syncone C
Snap Attachment Overdentures on Ankylos® Snap Attachments C/ Ankylos Snap Attachments C/ are used to attach Ankylos Snap Attachments are available with tapered overdentures in the edentulous mandible simply and implant connection geometry only. economically. An existing prosthesis can be directly attached at the chairside or an overdenture is fabricated in the laboratory. - Page 81 Activator and deactivator for Ankylos Snap Attachment C/ Instruments Activator / Deactivator • For adjusting the prosthesis seat of prostheses mounted on snap attachments • Increases or reduces the friction of the Ankylos Snap Attachment C/ matrix...
- Page 82 Snap Attachment C/ | Attachment-retained overdentures Step-by-step: Overdentures on Ankylos® Snap Attachments C/ Attaching an overdenture on two implants in the The impression for a restoration fabricated in the mandible by means of the snap attachment is a very laboratory is made directly using the attachment straightforward and economical restoration option head.
- Page 83 Only the activator or deactivator should be used to adjust the friction. Never bend the matrix lamellae individually with a blade or similar. The resulting uneven strain will cause matrix breakage. Remove the silicone ring after Should the prosthesis be seated Delicate prostheses can be polymerization and check the too firmly or too loosely on the...
- Page 84 Standard C/ The Ankylos Standard C/ prosthetics range is Ankylos Standard C/ prosthetic abutments are only an option for straightforward and economical available with the tapered connection geometry reconstruction of edentulous gaps, free ends and without indexing. edentulous jaws with single crowns, bridges and bar-supported prostheses.
- Page 85 • The impression of the abutment position for the laboratory is taken via the cap • Straightforward provision of a temporary denture for the patient 1 – 5 | Laterally screw-retained crown on Ankylos Standard C/. 6 – 8 | Bridge on two Ankylos Standard C/ abutments (Dentsply Sirona Implants).
-
Page 86: Ankylos Standard C
Standard C/ Prosthetic components Ankylos® Standard C/ All Ankylos Standard C/ components are laser marked according to their use with the “C/” for “Cone“ marking. Gingival heights GH 1.5 GH 3.0 GH 4.5 GH 6.0 Ankylos Standard C/ abutment, straight, Ankylos Standard C/ abutment, angled, Dimensions Ankylos Standard C/ abutment diameter a (above) and b (below) - Page 87 Head diameter Angulations and head heights Ø a 3.3 Ø b 4.5 0° 0° 15° 15° Ankylos Standard Ankylos Standard laboratory analogs, transfer caps one-piece (left) and two-piece (right) Impressions Model fabrication Ankylos Standard Transfer Cap Ankylos Standard Laboratory • For transferring the position of Analog •...
- Page 88 Standard C/ Prosthetic components Ankylos® Standard C/ Various prefabricated caps are available for the laboratory for straightforward fabrication of crowns, bridges and bar-supported prostheses on Ankylos Standard C/ abutments. Ankylos Standard wax-up copings Ankylos Standard Degunorm gold copings Ankylos Fixation Screws for single crowns (white, above) and bridges (gray, below) Prosthetic restoration...
- Page 89 Ankylos M 1 x 0.2 lateral hexagon retaining Ankylos 1.0 mm hex laboratory screwdriver Ankylos Finisher screw with sleeve for retaining screw lateral (above) and handle for easier handling of the hexagon prosthetic components Instruments Ankylos M 1 x 0.2 Lateral Hexagon Ankylos Laboratory Ankylos 1.6 mm Blade Retaining Screw...
- Page 90 Standard C/ | Crowns, bridges, bar-supported overdentures Step-by-step: Fabricating the model for purely implant-supported restorations The impression for suprastructures on Ankylos The abutments remain in the mouth after the Standard C/ abutments is taken using an Ankylos impression is taken using the repositioning technique. Standard transfer cap over the Ankylos Standard On straight abutments, an open tray impression can C/ abutments already incorporated in the patient’s...
- Page 91 Model Option: Shortening two-piece laboratory Two-piece laboratory analogs analogs The geometry and the occlusal or As an alternative, two-piece For fabricating a saw-cut model, the analog sleeves can be lateral thread of the laboratory laboratory analogs can also be analog match the original used.
- Page 92 Standard C/ | Crowns and bridges Step-by-step: Fabricating the model for tooth-/implant-supported restorations Ankylos Standard C/ abutments enable the incorporation of prepared teeth into the suprastructure. Here, the following directions for fabricating the model should be observed. Repositioning the laboratory Mucosa mask Sawing the model analog (one-piece or two-piece)
- Page 93 Step-by-step: Crown or bridge, cemented Implant-supported crowns and bridges on Ankylos edentulous gap with a bridge. The same steps are Standard C/ abutments can both be cemented and performed in the procedure for fabricating a single screw-retained. The fabrication of the suprastructure crown.
- Page 94 Standard C/ | Crowns and bridges Step-by-step: Crown or bridge, occlusally screw-retained Suprastructures are screw-retained occlusally on straight Ankylos Standard C/ abutments, and laterally on angled abutments. Screw-retained suprastructure Mount the wax-up copings Shorten the wax-up screws Depending on the screw-retention with wax-up screws (order no.
- Page 95 Wax up the bridge framework and Invest the wax-up as usual. Too The wax-up screw is used to create a cylindrical channel for small an investment compound protect the screw channel while expansion should not be selected the ceramic material is applied. the later retaining screw by using the wax-up screw.
- Page 96 Standard C/ | Crowns and bridges Step-by-step: Crown or bridge, laterally screw-retained The following example shows the somewhat more As a rule, single crowns are cemented on the elaborate fabrication of a laterally screw-retained abutments. In this case, the procedure also single tooth restoration on an angled Ankylos corresponds with that for fabricating bridges.
- Page 97 Fabricating the model and Veneering the framework Waxing up and fabricating the Veneer and polish the crown as usual. Interdental spaces are framework are in accordance with the current dental method. designed for hygienic capability. Observe the processing directions The occlusal contact should be for cast-on sections for dental only minimal.
- Page 98 Standard C/ | Bar-supported overdentures Step-by-step: Bar restoration (laser-welded or soldered) The Ankylos Standard C/ prosthetics range also enables the straightforward fabrication of removable overdentures on bars. Fabricating the model Attaching the gold copings Adjusting the Bars Fabricate the model with Ankylos Depending on the scheduled Fit the bars into the spaces Standard implant analogs as...
- Page 99 Bar – laser-welded or soldered Laser-welded or soldered bars are fabricated as described on pages 47 ff, for the Ankylos Balance Base Abutment. Likewise, the fabrication of the prosthesis.
- Page 100 About Dentsply Sirona Implants About Dentsply Sirona Dentsply Sirona Implants offers comprehensive solutions Dentsply Sirona is the world’s largest manufacturer of for all phases of implant therapy, including Ankylos®, professional dental products and technologies, with a 130-year Astra Tech Implant System® and Xive® implant lines, digital history of innovation and service to the dental industry and technologies, such as Atlantis®...
Need help?
Do you have a question about the Ankylos Balance C and is the answer not in the manual?
Questions and answers