Dentsply Sirona SINIUS Brief Operating Instructions
Hide thumbs
Also See for SINIUS:
- Installation instructions manual (152 pages) ,
- Operating instructions manual (300 pages) ,
- Service manual (178 pages)
Table of Contents
Advertisement
Quick Links
Advertisement
Table of Contents

Related Manuals for Dentsply Sirona SINIUS


Summary of Contents for Dentsply Sirona SINIUS
- Page 1 SINIUS Brief operating instructions...
-
Page 2: Table Of Contents
Treatment Center and the Instruments". ® Your SINIUS team * Table of contents SINIUS overview ..............3 SINIUS CS overview ............. 4 SINIUS TS overview ............. 5 Power switch ................6 Main switch ................6 EasyTouch user interface ..........7 Touchscreen ................8 Start program ................. -
Page 3: Sinius Overview
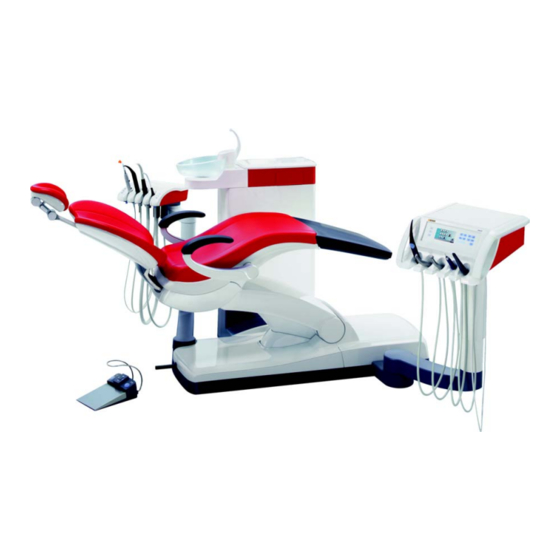
SINIUS overview A Patient chair* Assistant element Headrest Water unit C Foot control G Power switch and external device connection D Dentist element * Maximum load from patient and accessories: 165kg Dentist element instruments Position 1 Positions Position 4 Position 5... -
Page 4: Sinius Cs Overview
SINIUS CS overview A Patient chair* Assistant element Headrest Water unit C Foot control G Power switch and external device connection D Dentist element * Maximum load from patient and accessories:: 165kg Dentist element instruments Position 1 Positions 2, 3... -
Page 5: Sinius Ts Overview
SINIUS TS overview A Patient chair* Assistant element Headrest Water unit C Foot control G Power switch and external device connection D Dentist element * Maximum load from patient and accessories:: 165kg Dentist element instruments Position 1 Positions Position 4... -
Page 6: Power Switch
Then release the key. The treatment center then shuts down and switches itself to the standby mode. The LED of the main switch goes out on the dentist element. Dentsply Sirona... -
Page 7: Easytouch User Interface
EasyTouch user interface SINIUS and SINIUS TS SINIUS CS A Fixed keys (membrane keyboard) Touchscreen (pressure-sensitive user interface)* C Fixed keys (membrane keyboard) D Main switch * The illustration shows the Standard Start program operating mode Dentsply Sirona... -
Page 8: Touchscreen
If a function key is pressed and held (> 2 s), the corresponding settings screen appears. This screen is superimposed on the current screen. The screen located in the back- Dentsply Sirona... -
Page 9: Start Program
Move headrest in/out function keys are displayed on the screen. All other chair functions are listed sepa- rately on the Manual chair adjustment screen. This screen is accessed by pressing Manual chair adjustment key. Dentsply Sirona... - Page 10 It is not necessary to switch between the Start and Instrument programs. This makes the operation of the dental treatment center similar to other Dentsply Sirona dental treatment centers that are operated without a touchscreen. You can set the operating mode you would...
- Page 11 External HF surgery unit Activation of the protection against inter- ference caused by an external HF unit Apex measurement with file clamp Activation of the ApexLocator for manual measurement with the file clamp, showing the distance display Dentsply Sirona...
-
Page 12: Instrument Program
Memory key (SaveMode) After an instrument is deposited in its holder, the settings made in the instrument program are saved only if the Memory is first pressed and held >2 sec. Dentsply Sirona... - Page 13 A signal sounds as confirma- tion. Further settings such as activation of the coolant or Endo mode are also saved on the quick setting key. The settings can be recalled by touching the respective quick setting key. Dentsply Sirona...
- Page 14 Boost function Increases the intensity of the SIROSONIC TL ultrasonic handpiece during treatment in 20 steps in reference to the final value Endo function Activates the endodontics function of the SIROSONIC TL ultrasonic handpiece (power limit) Dentsply Sirona...
- Page 15 Regulates the instrument up to the maximum set speed or intensity depending on the position of the foot control pedal. Apex acoustic signals Switches the apex acoustic signals on and Apex distance acoustic signals Switches the apex distance acoustic signals on or off Dentsply Sirona...
-
Page 16: Sivision Program
PC (standalone solution). In these cases, SI Video serves as a video application for the camera. Starting PC communication All PC applications which were started from the treatment center have been terminated. SIUCOM plus has been started, e.g. via Autostart. Dentsply Sirona... - Page 17 The keys displayed on the touchscreen and their arrangement are preconfigured at the factory. The configuration can, however, be individually customized - see "Installation and configuration of SIUCOM plus / SIVISION connect". You can also define Dentsply Sirona...
- Page 18 Sharpen image view layout Full frame Undo Zoom in/out Restore orig- inal image Rotate image Close current 90° left/right media window Rotate image Close all media 180° windows Media Player Previous/next Mute title Stop playback Adjust volume Start/interrupt playback Dentsply Sirona...
-
Page 19: Fixed Keys Of Dentist Element
Select whether the time loop and the acoustic signal should be activated/ deactivated for the selected timer. Touch the Time loop and/or Acoustic signal key. If a function is switched on, the corre- sponding key is highlighted orange. Dentsply Sirona... - Page 20 For the LEDview, the light as well as the distance from which the no-touch sensor should react to move- ments can be adjusted. In the LEDview Plus, the color temperature of the light can also be adjusted. Dentsply Sirona...
- Page 21 Starts the flushing of the cuspidor bowl. If the Flushing key is pressed >2 s, the Flushing Time settings screen appears. Set the flushing time with the + and – keys. Touch the Link flushing to mouth rinsing position S key. Dentsply Sirona...
- Page 22 Used for individual configuration of the treatment center by the user and for reading out messages by the service engi- neer. When an instrument is removed from the holder, this key opens the corresponding setup program, e.g. to set water tempering of SPRAYVIT. Dentsply Sirona...
-
Page 23: Setup Programs
EasyTouch user interface Switch the key sound on/off Calibrate the touchscreen Adjusting the touchscreen brightness Date and time Set the date Set the time Switch to 12 or 24 hour display Dentsply Sirona... - Page 24 Adjust temperature of the tumbler heater Link tumbler heater to chair programs Instruments Pre-select how instrument settings are to be saved Switch afterblow on/off Show/hide the key for the external HF surgical unit Set spray temperature Dentsply Sirona...
- Page 25 DHCP (Dynamic Host Configuration Protocol). The network configuration is described in detail in the "SINIUS installation instruc- tions". Service domain The Service domain is intended to be used only by service engineers.
-
Page 26: Cursor Control
X-ray image viewer, the operating light, or cuspidor flushing. The cursor position will not change for functions that are operated by permanent shifting of the 4-way foot control plate, e.g., manual chair adjustment. Dentsply Sirona... - Page 27 The speed or intensity is then set by actuating the 4-way foot control plate to the left or right briefly (values on quick setting keys) or for a longer time (intermediate values). Dentsply Sirona...
-
Page 28: Programming Chair Programs
Switch the operating light on or off (this is set during programming). Press and hold (>2 s) the desired program key (S, 0, 1 or 2). An acoustic signal sounds. Your settings are now stored under the desired program key. Dentsply Sirona... -
Page 29: Assistant Element
• Switch the X-ray viewer or the white screen function on the SIVISION monitor on/off or • Control the bell or hash relay as a key or a switch Freely available relay 230 V, 6 A (connected by service engineer) Dentsply Sirona... -
Page 30: Foot Control
The chair moves to mouth rinsing posi- tion S. Spray, air or NaCl on/off An instrument (motor, turbine, SIRO- SONIC TL) is removed. Press the left button. Spray, air or NaCl is switched on/off. Dentsply Sirona... - Page 31 (> 2 s). An acoustic signal sounds. The following message appears on the touch screen: Confirm registration with the OK button. The message is hidden. The wireless foot control is assigned to the treatment center. Dentsply Sirona...
-
Page 32: 4-Way Foot Control
WARNING: Due to the lack of suction flow, fluid may run back out of the spray aspi- rator and into the patient's mouth. Always remove the spray aspirator from the patient's mouth before switching it off. Dentsply Sirona... -
Page 33: Headrest Switches
Tilting the headrest via quick mechan- ical adjustment Hold the headrest securely in place before unlocking it. Press buttons together. The headrest is thus disconnected from the motor drive and can be tilted manu- ally. Dentsply Sirona... -
Page 34: Sirocam Af/Af + Intraoral Camera
The PC is in operation and the SIVISION connect or SIUCOM plus PC application is started. Remove the intraoral camera from the holder. The SIVISION dialog is displayed on the touchscreen. SIDEXIS is started and the live image appears on the SIVISION monitor. Dentsply Sirona... - Page 35 Images stored on the PC can be redis- played and processed on the SIVISION monitor. To do this, use the keys for controlling SIDEXIS located on the touch- screen of the treatment center (see "Communication with SIDEXIS" [ 18]). Dentsply Sirona...
- Page 36 The live image is again displayed on the SIVISION monitor. In the treatment center setup, you can configure whether the camera image can be focused using the foot control, see "Switch the foot control function for intra- Dentsply Sirona...
- Page 37 Press the right button of the foot control. Or touch the Quad image key on the touchscreen. The mode changes between quad and single image. Dentsply Sirona...
- Page 38 Quad image Display quad image or single image. Up to four single images are simultaneously displayed on the SIVISION monitor in quad image mode. Deleting images All generated still images are deleted. Dentsply Sirona...
-
Page 39: Sprayvit M
Start sub-screen. Touch the Instrument light SPRAYVIT key. When the key is highlighted orange, the instrument light at the SPRAYVIT M is turned on if it is the only instrument to have been removed. Dentsply Sirona... - Page 40 Setup fixed key >2 s. Touch the Water temperature key. If the key is highlighted orange, the water tempering function is activated. Use the – and + keys to set the water temperature. Dentsply Sirona...
-
Page 41: Sirosonic Tl
The intensity can be set only from 1e to 5e. The SIROSONIC TL scaler is removed from its holder. The Ultrasonic screen appears on the touchscreen. Dentsply Sirona... - Page 42 The key is highlighted orange. Instead of the ultrasonic intensity values, the touchscreen displays the endodontic intensity values. Please note that the endodontics intensity values of 1e to 5e do not match the values of 1 to 5 in the scaler mode. Dentsply Sirona...
-
Page 43: Mini L.e.d
The mini LED operates at full power for 10 seconds. Pulse curing mode The mini LED runs at full power in "Pulse" mode (1 s on, 0.25 s off). "Soft start" mode Soft start in 10 s, then full power for 10 s Dentsply Sirona... -
Page 44: Implantology And Endodontic Treatments
BL, BL ISO C, or BL Implant motor. The basic functionality of the treatment functions is described below. For more information, please refer to your complete SINIUS Operating Instructions. Treatment selection The Start program is displayed on the touchscreen. Touch the Treatment key. - Page 45 Motor program when the bur drive assigned to the selected treatment is removed from its holder. In order for the Motor program to be displayed again the next time the bur drive Dentsply Sirona...
- Page 46 The torque is displayed in the second line in Ncm (Newton centimeters). Setting the direction of rotation Touch the CCW Rotation key on the touchscreen. For counterclockwise rotation: The CCW rotation key is highlighted orange and an orange CCW arrow appears. Coun- Dentsply Sirona...
- Page 47 Select the required implantology work step. Touch the previous step next step key. The selected work step is displayed on the touchscreen. The settings saved in the work step are preset. Dentsply Sirona...
- Page 48 For counterclockwise rotation: The CCW rotation key is highlighted orange and an orange CCW arrow appears. Coun- terclockwise rotation is performed without torque limitation. For clockwise rotation: The CCW rota- tion key turns gray and the orange CCW rotation arrow disappears. Dentsply Sirona...
-
Page 49: Apexlocator
Distance display in the Endodontics program • For measurement during treatment with the motor, without electronic torque limi- tation Distance display in the Motor program • For manual measurement using a file clamp Distance display in the Start sub-screen Dentsply Sirona... - Page 50 The tip of the root canal file has pierced the physiological apex. The instrument over- shoot is displayed. In addition to the graphical distance display on the touchscreen, the position of the file in the root canal can also be indi- cated as an acoustic signal. Dentsply Sirona...
- Page 51 Activate the bur using the foot pedal. The measured root canal depth is displayed by a colored bar in the distance display. For more details, please refer to your complete SINIUS Operating Instructions. Dentsply Sirona...
- Page 52 Dentsply Sirona Sirona Dental Systems GmbH Fabrikstrasse 31 64625 Bensheim Germany dentsplysirona.com...
Need help?
Do you have a question about the SINIUS and is the answer not in the manual?
Questions and answers