Table of Contents
Advertisement
Advertisement
Table of Contents

Related Manuals for Segway PT x2


Summary of Contents for Segway PT x2
- Page 3 Reference Manual Segway ® i2, x2...
- Page 4 Segway Inc. Failure of a mark to appear in this guide does not mean that Segway Inc. does not use the mark, nor does it mean that the product is not actively marketed or is not significant within its relevant market.
-
Page 5: Table Of Contents
Dynamic Weight Limits .......8 Minimum Weight Limit ........9 Handlebar Cargo ........9 Structural Weight Limits ......10 Maximizing Range..........11 2 Getting to Know Your Segway PT How the Segway PT Works........13 Segway PT Components and Subsystems ....16 InfoKey Controller ..........19 InfoKey Controller Buttons ......19 InfoKey Controller Display Area ....20... - Page 6 Replacing Batteries ..........77 Replacing Batteries in Pairs ......77 Transporting and Shipping Batteries ......78 Shipping Li-ion Batteries ........79 5 Operating and Maintaining Your Segway PT Lifting Your Segway PT ..........82 Maintaining Tires and Wheels ........84 Checking the Tire/Wheel Assembly ....84 Checking Tire Inflation Pressure ......84 Cleaning Your Segway PT ........86...
- Page 7 Segway PT Will Not Enter Balance Mode..123 The LeanSteer Frame Slips or is Off-Center..124 Tire/Wheel Assembly is Loose and Wobbles.125 Segway PT Pulls To One Side When Riding .126 Tire is Flat or Will Not Hold Air .......127 Safety Shutdown At Building Entrance ..127 The Segway PT Will Not Power Down...128...
- Page 8 A Contact and Legal Information Report All Incidents ..........137 How to Reach Us..........137 California Warning ..........137 Obey All Laws and Regulations......138 Limited Warranty ..........138 Radio Frequency Interference ......138 Canadian ICES-003 ........139 European Directives........139 Other Standards..........140 Patent Information ..........141 Index .................143 viii...
-
Page 9: Preface
Congratulations on the purchase of your new Segway Personal Transporter (PT)! The Segway PT is the standard term used to refer to the self- balancing Segway products described in this manual. Each Segway PT model (i2 or x2) is different, but the fundamentals found in this manual apply to both models. -
Page 10: The Risk Of Injury
Segway PT safely. WARNING! RISK OF DEATH OR SERIOUS INJURY Whenever you ride the Segway PT, you risk death or serious injury from loss of control, collisions, and falls. To reduce risk of injury, you must read and follow all instructions and... -
Page 11: Before You Begin
Before you begin, it may be necessary to assemble your Segway PT. The Batteries should be charged for 12 hours. To assemble the Segway PT and charge the Batteries for the first time, refer to the Segway PT Getting Started Manual. -
Page 12: Conventions
Warns you about actions that may WARNING! result in personal injury. Cautions you about actions that may CAUTION result in operational issues or physical damage to the Segway PT. Identifies important points, helpful NOTE: hints, special circumstances, or alternative methods. Indicates a reference to another section of this document or to the Getting Started Manual. -
Page 13: Introduction
Detailed specifications and operating limits of the Segway PT. Recording Serial Numbers Record the unique serial numbers for both the Segway PT and the InfoKey Controller. Store this information in a secure location, separate from your Segway PT in case you need to order a replacement InfoKey Controller. -
Page 14: Segway Pt Serial Number
Segway PT Serial Number To record the Segway PT Serial Number: Stand behind the Segway PT and lift the back edge of the right Mat to expose the bar code label. Locate the serial number on the left side of the label. The serial number is a 12-digit number beginning with “0”... -
Page 15: Infokey Controller Serial Number
InfoKey Controller Serial Number To record the InfoKey Controller serial number: Locate the serial number beginning with S/N, on the back of your InfoKey Controller (located under the trim ring) (see Figure 2). Serial Number Location Figure 2. Location of InfoKey Controller Serial Number Record the InfoKey Controller serial number. -
Page 16: Segway Pt Model Descriptions
Segway PT Model Descriptions Table 1 lists the Segway PT models described in this manual. Table 1. Segway PT Model Descriptions Model Name Description The i2 model is optimized for indoor/outdoor use in a wide variety of environments. The x2 model is optimized for outdoor use. -
Page 17: Segway Pt Specifications
Segway PT Specifications Table 2 shows the specifications for the Segway PT models described in this manual. Table 2. Segway Specifications Model Specification Rider Weight and Cargo Limits* Max. Payload (Rider Plus all 260 lbs 260 lbs Cargo) 117 kg 117 kg Min. - Page 18 Tire Diameter 19 in 21 in 48.3 cm 53.3 cm Tire Type Standard All-terrain InfoKey Controller Battery CR2430 replacement batteries are available at Electronics stores. A spare InfoKey Controller battery ships with your new Segway PT, stored beneath the Console Trim.
- Page 19 * See “Weight Limits for Riders and Cargo” on page 8 for more information on weight limits. ** See “Maximizing Range” on page 11 for information on maximizing the distance you can travel on your Segway PT, and factors that can increase or reduce your range.
-
Page 20: Operating Limits
It is important that you familiarize yourself with the operating limits of the Segway PT. These limits are set to maximize rider safety while reducing the risk of damage to the Segway PT. The Segway PT will perform better when you observe these limits. -
Page 21: Minimum Weight Limit
The Segway PT monitors the amount of power being used and will activate safety alerts when it senses excessive power demands. It is important that you learn to anticipate and recognize when the Segway PT is reaching the limits of performance. -
Page 22: Structural Weight Limits
Structural Weight Limits Exceeding the maximum weight limit increases the risk of damage to the Segway PT. Heavier payloads place greater stress on the Segway PT. Several factors affect the loads transmitted to the Segway PT: Skill level of the rider. -
Page 23: Maximizing Range
Maximizing Range Maximum range distances are provided in Table 2 on page 5. The range of your Segway PT is affected by many variables, including: Terrain: Riding on smooth, flat terrain improves range, and riding on hilly terrain and unpaved surfaces reduces range. -
Page 25: Getting To Know Your Segway Pt
The Segway PT works like the human body. When walking, if you lean forward, you take a step forward to keep your balance. If you lean back, you step back. On a Segway PT when you lean forward or back the machine powers the Wheels in the direction that you lean. - Page 26 Wheels to keep them underneath you. See Figure 3. Figure 3. How the Seqway PT Works - Leaning Forward and Back When you pivot the LeanSteer Frame left, the Segway PT turns left. When you pivot the LeanSteer Frame right, the Segway PT turns right.
- Page 27 Figure 4. How Segway PT Works - Turning The Segway PT’s dynamic stabilization technology balances forward and backward but not side-to-side. If you tip the Segway PT onto one Wheel, it will not dynamically bring itself underneath you and it could fall over.
-
Page 28: Segway Pt Components And Subsystems
Mats Powerbase Batteries The Segway PT has been designed with concern for the safety of the rider and those who may be nearby. Redundant subsystems maintain controlled operation of the Segway PT in the unlikely event of a component failure. If one component in a subsystem fails, the other component continues to operate, allowing you to come to a complete and safe stop before stepping off. - Page 29 Never attempt to stand on a Segway PT without the LeanSteer Frame attached and secured. Using your Segway PT without all parts properly installed could damage your Segway PT and result in serious injury from loss of control, collisions, and falls. WARNING! Do not modify the Segway PT.
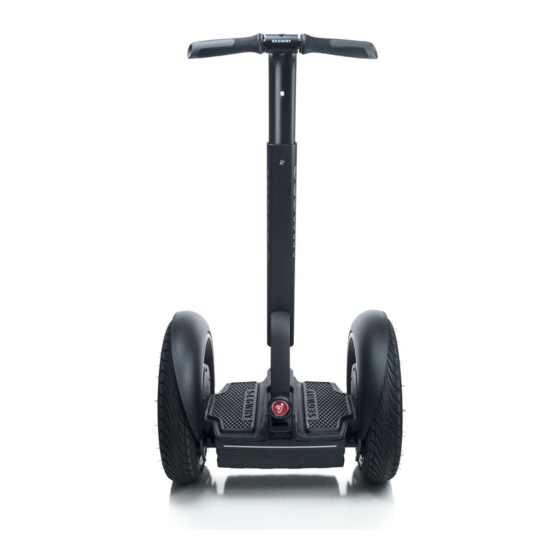
- Page 30 InfoKey Controller Handlebar in Dock LeanSteer Frame Console with Console Trim Charge and Balance Indicator Lights Fender Tire/Wheel Mats Assembly Powerbase with Batteries Figure 5. Segway Components...
-
Page 31: Infokey Controller
InfoKey Controller You use the InfoKey Controller to operate and monitor your Segway PT. The InfoKey Controller has four buttons around the outer edge and a display in the center. The InfoKey Controller must be within 15-ft. (5m) in order to communicate with your Segway PT. -
Page 32: Infokey Controller Display Area
The Display Area provides status information such as messages and warnings. Figure 7 shows icons and data that display on the InfoKey Controller. Information Display Warning Icon (time, distance, speed, etc.) Wrench Icon (Service) Segway PT Battery Gauge InfoKey Face Icons Controller Low Battery Icon Security... - Page 33 Table 3. InfoKey Controller Buttons and Icons Control Description Buttons Power/Standby button Allows you to power the Segway PT on and off and switch from Balance Mode to Standby Mode. Beginner button Allows you to toggle the Beginner Setting on and off and illuminate the Backlight.
- Page 34 Information Display Displays time, date, speed, average speed, trip distance and odometer. Wrench icon Indicates a system fault on the Segway PT that requires service. Face icons A series of face icons display to indicate status. For example, you may see a happy face, sad face, or neutral face.
- Page 35 Detect Error icons will be displayed. The Rider Detect Error icons display in Standby Mode if you attempt to step onto a Segway PT that is not ready to ride. Rider Detect Error icons display at startup if there is any weight on the Mats.
-
Page 36: Power/Standby Button Functions
To power on, tap the Power/Standby button. To power off, press the Power/Standby button for 2 seconds. The Segway PT will only power off when no Rider Detect Sensors are depressed (when there is no weight on the Mats). Switching to Standby Mode from Balance Mode Ensure the Segway PT is powered on and in Balance Mode. -
Page 37: Beginner Button Functions
Beginner button. The Beginner icon will show in the Display. The Segway PT will only accept these commands when no Rider Detect Sensors are depressed (when there is no weight on the Mats). See “Configuring and Locking the Beginner Setting” on page 31 for more information. -
Page 38: Information Display Button Functions
“0”s. Odometer The speed/distance format does not flash, and shows total distance traveled on the Segway PT. NOTE: When you replace or reseat the InfoKey Battery, all information will revert to the default setting. Trip distance and average speed will... - Page 39 Setting and Resetting Information The following procedures are covered in this section: Setting time format, hour and minute Setting speed/distance format, date format, year, month, and day Resetting average speed Resetting trip distance Setting Time Format, Hour, and Minute Set Time Format (12- or 24-hour Clock) Tap the Information Display button until the time displays.
- Page 40 Setting Speed/Distance Format, Date Format, Year, Month, and Set Speed/Distance Format (MI or KM) Tap the Information Display button until you see the month/day or day/month alternating with the year. Press and hold the Information Display button until the MI/H or KM/H shows in the display.
- Page 41 Set Day Select the day by tapping the Security button until the desired day is displayed. Press and hold the Security button to fast-advance days. Tap the Information Display button to confirm speed/distance format, date format, year, month, and day. These are now set. Resetting Average Speed Tap the Information Display button until you see the average speed (“MI/h”...
-
Page 42: Security Button Functions
The Security Function includes an alarm and a mechanism that makes it difficult to move your Segway PT and discourages tampering. The best way to deter theft of your Segway PT is to keep it in a secure indoor location with the InfoKey Controller stored separately. -
Page 43: Button Combination Functions
InfoKey Controller buttons. Configuring and Locking the Beginner Setting For your first ride, the Segway PT is set to operate exclusively with the Beginner Setting enabled. If the Beginner icon (turtle) does not display, do NOT ride the Segway PT until you enable the Beginner Setting. - Page 44 The rider should stand on the Mats with the Segway PT remaining stationary. The spotter should firmly hold the Segway PT, ready to keep it steady and stationary when the Safety Shutdown begins. A third person should hold the InfoKey Controller, and confirm...
- Page 45 Figure 8. InfoKey Controller Display During a Training Safety Shutdown The spotter must continue holding the Segway PT so it does not move. The rider must step off the Segway PT before 10 seconds elapse.The rider has approximately 10 seconds from the start of a Safety Shutdown to come to a controlled stop and step off.
-
Page 46: Leansteer Frame/Handlebar Assembly
Segway PT. If you lean to the left while holding the Handlebar, the LeanSteer Frame pivots and the Segway PT turns left. If you lean to the right while holding the handlebar, the LeanSteer Frame pivots and the Segway PT turns right. -
Page 47: Mats
Mats Your Segway PT comes with two Mats installed to the right and left of the Console. These Mats protect the Rider Detect Sensors located beneath them, as well as provide a comfortable surface on which to stand. Mats should be secured in place prior to riding. - Page 48 Balance Indicator lights Charge Indicator lights Console Figure 9. Console and Indicator Lights...
- Page 49 Balance Indicator Lights Five Balance Indicator lights are located on the Console. These lights provide visual feedback about the balancing status of the Segway PT, and help the rider determine when it is safe to step onto the Mats. See Figure 10.
- Page 50 Red Balance Indicator lights indicate that the Powerbase or LeanSteer Frame are tilted, and the Segway PT is not ready to be stepped on: One red left or right Balance Indicator light. Pivot the LeanSteer Frame in the opposite direction of the red...
- Page 51 One green Balance Indicator light in the center. The Segway PT is in Standby Mode, ready for the rider to step Five green Balance Indicator lights pulsing. The Segway PT is in Riderless Balance Mode, ready for the rider to step on.
- Page 52 Battery Charge Indicator Lights Two Charge Indicator lights on the Console indicate the charge status of the Batteries when the Segway PT is plugged in. The front Charge Indicator light corresponds to the front Battery and the rear Charge Indicator light corresponds to the rear Battery. (See Figure 11).
-
Page 53: Understanding The Rider Detect Sensors
Beginner Setting is enabled or not. Once your feet are properly positioned again, the Segway PT regains full performance. If the Segway PT is moved too quickly while in Balance Mode and none of the Rider Detect Sensors are depressed, the Segway PT will give the Stick Shake Warning before exiting Balance Mode and transitioning to Standby Mode. - Page 54 Never place anything on the Mats, except your feet. Doing so could interfere with the Rider Detect Sensors and allow the Segway PT to travel on its own, risking running into a person or property, and causing injury or damage.
-
Page 55: Controller Boards
Motors that turn the Wheels. If the system senses a malfunction in a critical component or a Battery that is depleted beyond its safe limit, the Segway PT will perform a Safety Shutdown. For more information on Safety Shutdown, see “Safety... -
Page 56: Motors
Each Motor is wound as two separate electrical circuits, capable of independent operation, acting as one mechanical entity. If either winding in a Motor fails, the Segway PT will perform a Safety Shutdown. For more information on Safety Shutdown, see “Safety... -
Page 57: Balance Sensor Assembly
Assembly sends information about the Segway PT’s orientation to the Controller Boards. All sensors are constantly monitored by the Segway PT to ensure each is operating correctly. If one of these sensors fail, the Segway PT will perform a Safety Shutdown. -
Page 58: Batteries
The Batteries are interchangeable and can each be installed in either the front or rear of the Powerbase. For the Segway PT to operate, both Batteries must be installed, and both must be Li-ion Batteries. If one Battery fails or is depleted beyond its safe limit, the Segway PT will perform a Safety Shutdown. -
Page 59: Understanding The Safety Alerts
Chapter 3: Understanding the Safety Alerts This chapter describes the Segway PT’s safety alerts. The safety alerts include: Speed Limiter Stick Shake Warning Safety Shutdown It is important that you recognize these alerts and know how to respond appropriately before you ride your Segway PT. -
Page 60: Speed Limiter
Speed Limiter will push the Handlebar back to slow you down. (see Figure 16). Figure 16. Speed Limiter The Segway PT’s Speed Limiter is an alert that you are moving too fast! When the Speed Limiter pushes the Handlebar back, stop leaning forward and slow down. Always leave a gap between yourself and the Handlebar as shown in Figure 17. - Page 61 Low Battery charge Batteries that are too hot or too cold Riding down a hill with fully charged Batteries Because of regenerative charging, if the Batteries are fully charged, the Segway PT will activate the Speed Limiter to avoid overcharging.
- Page 62 InfoKey Controller. This table also describes the error that has occurred and the recommended action you should take. Table 5. Speed Limiter (Display Icon and Recommended Action) Display Icon Description Recommended Action The Segway PT is When the Speed operating at Limiter pushes the reduced Handlebar back, performance levels...
-
Page 63: Stick Shake Warning
Stick Shake Warning One of the ways that the Segway PT notifies you when you are at risk of falling is by shaking the Handlebar and making growling noises. This is called the Stick Shake Warning. The Stick Shake Warning can... -
Page 64: Rider On
Shake Warning also occurs if you ride backward too fast or if you try to step on the Segway PT when it is not ready to balance. The Stick Shake Warning is more likely to occur when your Batteries are low, cold, heavily used, or poorly maintained because there is less energy available to keep you balanced. - Page 65 If on a slope, too much power. turn perpendicular to the slope, step off, and walk your Segway PT in Riderless Balance Mode. Riding against an obstruction Stop pushing against the such as a door frame or curb that obstruction.
-
Page 66: Rider Off
Balance Mode is when the Segway PT is in Balance mode without a rider standing on the Powerbase. The Stick Shake Warning also occurs if the Wheels spin as you pull the Segway PT over a curb or up stairs. -
Page 67: Safety Shutdown
Safety Shutdown If the Segway PT detects a fault in any of its redundant systems or a Battery is depleted beyond its safe limit, it performs a Safety Shutdown (see Figure 19). Figure 19. Safety Shutdown When a Safety Shutdown occurs, the Segway PT automatically... - Page 68 You have approximately 10 seconds from the start of a Safety Shutdown to come to a controlled stop and step off. After 10 seconds, the Segway PT will immediately shut down when the Wheels reach zero speed. If a Safety Shutdown occurs: Immediately come to a controlled stop.
- Page 69 WARNING! Never restart and ride your Segway PT after it has indicated an empty Battery condition or performed Safety Shutdown due to low Battery. The Segway PT may not have enough power to keep you balanced, especially if you demand a lot of power at once.
- Page 70 Immediately speed before come to a shutdown (full controlled stop. Segway PT Battery Carefully step off charge level shown). one foot at a time. You have approximately 10 seconds from the start of the Safety...
-
Page 71: Empty Battery Condition
The Segway PT notifies you of a pending empty Battery condition before starting a Safety Shutdown. An unhappy face icon displays on the InfoKey Controller, the Segway PT’s speed is limited, and the Segway PT emits a warning tone. Whenever the Segway PT notifies you of a pending empty Battery condition, come to a controlled stop and safely step off of the Segway PT before the Safety Shutdown begins. - Page 72 NOTE: In some cases, old, cold, heavily used, or poorly maintained Batteries may develop a high resistance condition. This can cause a pending empty Battery condition to occur even if the Batteries were recently charged.
-
Page 73: Using The Batteries
Chapter 4: Using the Batteries This chapter describes: Charging the Segway PT Batteries. Maintaining your Segway PT Batteries. Safety rules. Specifications. Battery Safety WARNING! For your safety and the safety of others, and to maximize Battery life and performance, follow the instructions in this... - Page 74 Unplug and disconnect your Segway PT from AC power before removing or installing Batteries or performing any service. It is hazardous to work on any part of your Segway PT when it is plugged into AC power. You risk serious bodily injury from electric shock as well as damage to your Segway PT.
-
Page 75: Specifications For The Batteries
Battery Pack Weight (pair) 22.7 lbs (10.3 kg) NOTE: If you use, charge, or store your Segway PT Batteries outside the limits specified, you may void the limited warranty, damage your Batteries, and/or experience reduced range and ineffective Battery charging. -
Page 76: Charging Your Batteries
Charging Your Batteries To maximize the performance of your Segway PT Batteries, fully charge your Batteries for at least 12 hours, once a month, or after every 12 hours of operation—whichever comes first. Charge your Batteries only when they are within the specified charging temperature range For more information, see “Specifications for the... - Page 77 To charge the Batteries: Put your Segway PT in a clean, dry place, within the recommended charging temperature range. Open the Charge Port on the back of your Segway PT’s Console (see Figure 20). Charge Port Figure 20. Open the Charge Port Verify that the Charge Port, Power Cord and AC Power outlet are clean, dry, and free of debris.
- Page 78 Plug one end of the Power Cord (provided with your Segway PT) into a grounded AC outlet (100 V~ to 240 V~; 50 Hz or 60 Hz). The Power Cord should be properly grounded (see Figure 21). Figure 21. Plug Power Cord into Charge Port...
- Page 79 NOTE: The Segway PT’s charging system is automatically controlled to prevent overcharging. Plug your Segway PT into a grounded AC power outlet when it is not in use, even if you do not plan to use it for an extended period of time.
-
Page 80: Unplugging The Segway Pt
Unplugging the Segway PT When you are ready to use your Segway PT, remove the Power Cord, then close the Charge Port Cover as follows: Disconnect the Power Cord from the Charge Port on the Segway PT. Disconnect the Power Cord from the grounded AC outlet. -
Page 81: Battery Charge Indicator Lights
Battery Charge Indicator Lights Two Charge Indicator lights on the Console indicate the charge status of the Batteries when the Segway PT is plugged in. The front Charge Indicator light corresponds to the front Battery and the rear Charge Indicator light corresponds to the rear Battery (see Figure 23). -
Page 82: Charging Failures
If these actions fail to resolve the problem, contact an Authorized Segway Dealer or Distributor. Regenerative Braking The Segway PT has a regenerative braking system that charges the Batteries when descending a hill or slowing down. When you ride down a hill, you may notice an increase in the Battery charge level. -
Page 83: Reading The Battery Charge Level Display
Figure 24. InfoKey Controller Display with Battery Charge Being Depleted The more charge the Batteries contain, the more horizontal bars are shown. If the Battery charge level is very low, the Segway PT will notify you of a pending empty Battery condition prior to initiating Safety Shutdown. -
Page 84: Surface Charge (Partial Charge)
Surface Charge (Partial Charge) Whenever you do not fully charge the Segway PT’s Batteries, surface charge or partial charge may affect the accuracy of the Battery charge level display, causing it to show a higher charge level than actually exists. - Page 85 Battery condition and the amount of charge remaining. WARNING! Do not ride your Segway PT to full Battery depletion. To safely discharge Batteries below the bottom bar, you should leave your Segway PT powered on in Balance Mode leaning against a wall in a secure location.
-
Page 86: How Temperature Affects Performance
The Batteries will run at the highest efficiency when you operate them nearest the center of the recommended operating temperature range. If the Batteries on your Segway PT become too hot or too cold while riding, the Segway PT may activate a safety alert. - Page 87 Table 11 shows the InfoKey Controller icon that displays when your Segway PT Batteries become too hot or too cold. Table 11. Riding in Hot and Cold Temperatures (Icon and Recommended Action) Display Icon Description Recommended Action Speed Limiter or...
-
Page 88: Charging In Hot Or Cold Temperatures
Charging in Hot or Cold Temperatures Your Batteries should be within the recommended charging temperature range prior to and during charging. For the recommended Battery charging temperature range, see “Temperature Ranges” on page 63. The Batteries will charge most efficiently when they are nearest the center of the recommended charging temperature range. -
Page 89: Replacing Batteries
PT is designed to operate only at the level allowed by the lower- energy Battery. Redundancy is a critical safety feature built into the Segway PT that also applies to the Batteries. Therefore, you should replace Batteries in pairs (except for the unusual situation where a Bat- tery is replaced because of damage or defect and the other Bat- tery is relatively new). -
Page 90: Transporting And Shipping Batteries
Transporting and Shipping Batteries If you are transporting your Segway PT, protect the Batteries to avoid damage during shipment. Do not expose the Batteries to direct heat or moisture, and avoid heavy vibration during transportation. WARNING! Do not use or transport a Battery if the casing breaks open, leaks any substance, becomes excessively hot, or if you detect an unusual odor. -
Page 91: Shipping Li-Ion Batteries
Shipping Li-ion Batteries This section provides guidelines for shipping your Segway PT and the associated Batteries. Table 12 lists the shipping methods allowed for Li-ion Batteries WARNING! Li-ion Batteries are considered Hazardous Materials under shipping regulations. Comply with all local, federal and individual country laws when transporting the Segway PT Batteries. - Page 92 If you need to arrange air shipment of your Segway PT with Li-ion Batteries installed, or if you need to arrange shipment of your Li-ion Batteries separate from the Segway PT by any means of transport, contact Segway or an Authorized Segway Dealer or Distributor for...
-
Page 93: Operating And Maintaining Your Segway Pt
General maintenance procedures related to your Segway PT. Important operating tips. WARNING! Before you perform any of the following procedures, verify that the Segway PT is powered off and unplugged. It is not safe to perform these procedure while the Segway PT is powered on or charging. -
Page 94: Lifting Your Segway Pt
Make sure the Segway PT is unplugged and powered off. Select firm, non-moving lifting points such as the Powerbase or lower cargo frames if provided. Lift the Segway PT with your legs, not your back. See Figure 25. Lifting the i2 Lifting the x2... - Page 95 WARNING! Watch Your Fingers! Never lift the Segway PT by its Tires, Fenders, or Wheels because your hands or fingers could become caught between the Tire and the Fender, resulting in injury.
-
Page 96: Maintaining Tires And Wheels
Maintaining Tires and Wheels To ensure safe and efficient operation of your Segway PT, be sure to check Tires and Wheels regularly, especially if you have recently performed service on a Tire/Wheel Assembly. Checking the Tire/Wheel Assembly To check the Tires and Wheels: Make sure the Segway PT is unplugged and powered off. - Page 97 Lower pressure reduces range and increases risk of damage to the Tire/ Wheel Assembly. Unequal pressure causes the Segway PT to turn in the direction of the lower pressure tire.
-
Page 98: Cleaning Your Segway Pt
To clean your Segway PT: Make sure the Segway PT is unplugged and powered off. Always close the Charge Port Cover after charging, and prior to cleaning. Gently clean your Segway PT with soap and water and a soft cloth. -
Page 99: Avoid Submerging Your Segway Pt
(when riding, storing, or transporting the Segway PT). CAUTION Do not use a power washer or high pressure hose to clean your Segway PT. Use of these devices could force water into components that must stay dry. Do not allow water to get into the Charge Port. -
Page 100: Storing Your Segway Pt
Batteries only when they are within the specified charging temperature range. Store your Segway PT (and its Batteries) indoors, in a place that is free of moisture, humidity, and temperature extremes. Even if you will not be using your Segway PT for an extended period of time, you should leave it plugged into AC power. -
Page 101: Servicing Your Segway Pt
Segway PT This chapter describes how to service your Segway PT. General Information WARNING! Always shut down your Segway PT and unplug the AC Power Cord before performing any maintenance or installing any part or accessory. WARNING! Do not attempt to open the Powerbase or Console. There are no user-serviceable parts inside. -
Page 102: Parts Diagram
Parts Diagram Figure 27 shows a parts diagram for the Segway PT (models i2, x2). i2 Exploded View x2 Exploded View Figure 27. Parts Diagram for Segway PT (models i2, x2) -
Page 103: Replacing Parts
If you have a question on parts or replacements, please contact an Authorized Segway Dealer or Distributor. For a list of Dealers and Distributors, visit www.segway.com. Replacing Parts If a part breaks or needs replacement, contact an Authorized Segway Dealer or Distributor. Certain parts are user-replaceable. Use only Segway-provided replacement parts and fasteners. -
Page 104: Service Procedures
Use the following procedures when instructed to do so by the Troubleshooting section of this Reference Manual. The tools provided with your Segway PT are intended to assist with these procedures. However, additional tools, such as a torque wrench, will be necessary... -
Page 105: Removing The Leansteer Frame
Tool Required: 5mm hex wrench. To remove the LeanSteer Frame from the base: Make sure the Segway PT is unplugged and powered off. Using a 5mm hex wrench, remove the fastener holding the LeanSteer Frame in place. See Figure 28. - Page 106 Lean the LeanSteer Frame all the way to the left and right until the LeanSteer Frame is loose. You may hear and feel a click when the Wedge Clamp Assembly releases from the Pivot Base Assembly. See Figure 29. Figure 29. Releasing the Handlebar/LeanSteer Frame from the Pivot Base Assembly...
- Page 107 Slide the LeanSteer Frame away from the Pivot Base Assembly as shown in Figure 30. Sliding the LeanSteer Frame away from the Pivot Base Assembly should require minimal force. Figure 30. Remove the Handlebar/LeanSteer Frame from the Pivot Base Assembly If the Wedge Clamps fall out or are removed during this procedure, put them aside in a safe place as you will need them to reattach the LeanSteer Frame to the Powerbase.
-
Page 108: Attaching The Leansteer Frame
Attaching the LeanSteer Frame Tool Required: Torque wrench with 5mm bit. To attach the LeanSteer Frame to the Powerbase: Make sure the Segway PT is unplugged and powered off. Slide the LeanSteer Frame onto the Pivot Base Assembly, as shown in Figure 31:... - Page 109 Prior to tightening the fastener, visually check that the Handlebar is straight and centered. If it is not straight and centered, adjust the LeanSteer Frame to straighten and center it. Tighten the fastener to 11.0 N-m (8.1 ft-lbf). See Figure 32. Figure 32.
-
Page 110: Removing The Handlebar
Tool Required: 3mm hex wrench. To remove the Handlebar from the LeanSteer Frame: Make sure the Segway PT is unplugged and powered off. Using the 3mm hex wrench, remove the 3 fasteners that secure the Handlebar Clamp to the LeanSteer Frame. -
Page 111: Attaching The Handlebar
Tool Required: Torque wrench with 3mm bit. To attach the Handlebar to the LeanSteer Frame: Make sure the Segway PT is unplugged and powered off. Align the Handlebar in place against the LeanSteer Frame using the alignment guides. See Figure 34. -
Page 112: Removing The Batteries
Removing the Batteries Tool Required: 3mm hex wrench. WARNING! Before you begin, verify that the Segway PT is powered off and unplugged. It is not safe to perform this procedure while the Segway PT is powered on or charging. The cells within the Batteries contain toxic substances. Do not attempt to open Batteries. - Page 113 To remove the Batteries: Make sure the Segway PT is unplugged and powered off. Tip the Segway PT onto its side so that the Wheel lies flat against a smooth clean surface. See Figure 35. Using the 3mm hex wrench, remove the fasteners which hold the Batteries in place (4 per Battery).
-
Page 114: Reattaching The Batteries
Reattaching the Batteries Tool Required: Torque wrench with 3mm bit. WARNING! Before you begin, verify that the Segway PT is unplugged. It is not safe to perform this procedure while the Segway PT is connected to AC power. The cells within the Batteries contain toxic substances. Do not attempt to open Batteries. - Page 115 Make sure the Segway PT is unplugged and powered off. Reseat one of the Batteries on the Powerbase with curved edge facing out, as shown in Figure 36. Figure 36. Reattaching the Batteries Ensure the Battery is aligned straight against the edge of the Powerbase trim, and there are no uneven gaps.
-
Page 116: Checking Tire Inflation Pressure
Make sure the Segway PT is unplugged and powered off. Tip the Segway PT onto its side, making sure the Tire to be checked is on the ground. See Figure 37. Figure 37. Check Tire Inflation Pressure... - Page 117 Tire inflation pressure. WARNING! Inflate Tires to the correct pressure, as stated in the “Segway Specifications” on page 5. Overinflating or under inflating Tires can increase your risk of traction loss, resulting in injury and...
-
Page 118: Removing The Tire/Wheel Assembly
Make sure the Segway PT is unplugged and powered off. Figure 38. Removing Tire/Wheel Assembly Tip the Segway PT onto its side so the Wheel you want to remove is facing up, and the other Wheel rests against a clean, smooth surface. -
Page 119: Installing The Tire/Wheel Assembly
Make sure the Segway PT is unplugged and powered off. Figure 39. Reseating Tire/Wheel Assembly Tip the Segway PT onto its side so the Wheel you want to remove is facing up, and the other Wheel rests against a clean, smooth surface. -
Page 120: Removing/Installing The Fenders
Tools Required: T15 six-lobe wrench, Torque wrench with T15 six- lobe bit. To remove the Fenders (see Figure 40): Make sure the Segway PT is unplugged and powered off. Remove the Tire/Wheel Assembly. For more information, see “Removing the Tire/ Wheel Assembly”... -
Page 121: Removing/Installing The Mats
Removing/Installing the Mats Tools Required: None. To remove a Mat: Make sure the Segway PT is unplugged and powered off. Lift the Mat off the Powerbase. To install a Mat: Make sure the Segway PT is unplugged and powered off. -
Page 122: Replacing The Infokey Controller Battery
Replacing the InfoKey Controller Battery Tool Required: Coin or Flathead Screwdriver. To replace or reseat the InfoKey Controller battery: Remove the InfoKey Controller from the Dock and unscrew the InfoKey Controller Dock Adapter. For more information, see “Docking/Undocking the InfoKey Controller” on page 116. Using a coin or a flathead screwdriver, unscrew the back cover of the InfoKey Controller. - Page 123 CR2430. CR2430 replacement batteries are available at Electronics stores. NOTE: A spare InfoKey Controller battery ships with your new Segway PT, stored beneath the Console Trim. If you use this spare, you should replace it as soon as possible, as you cannot operate your Segway PT without a functioning InfoKey Controller.
-
Page 124: Removing/Replacing The Console Trim
Removing/Replacing the Console Trim Tool Required: None To remove or replace the Console Trim: Make sure the Segway PT is unplugged and powered off. Pull up on the rigid plastic Console Trim located on the Console and between the Mats. See Figure 43. -
Page 125: Installing/Removing The Infokey Controller Dock113
Tool Required: 3mm hex wrench, Torque wrench with 3mm bit. To install the InfoKey Controller Dock: Make sure the Segway PT is unplugged and powered off. Place the InfoKey Controller Dock against the upper LeanSteer Frame with the Release Tab oriented at the bottom, as shown in Figure 44. - Page 126 To remove the InfoKey Controller Dock: Make sure the Segway PT is unplugged and powered off. Using a 3mm hex wrench, remove the fastener which holds the InfoKey Controller Dock to the LeanSteer Frame. Remove the InfoKey Controller Dock. Figure 44. Installing or Removing the InfoKey Controller Dock...
-
Page 127: Installing/Removing The Dock Adapter
Installing/Removing the Dock Adapter Tool Required: None. To install the InfoKey Controller Dock Adapter, screw the adapter to the underside of the InfoKey Controller. When installed properly, the Dock Adapter should snap into place when screwed on. To remove the InfoKey Controller Dock Adapter, unscrew the adapter from the underside of the InfoKey Controller. -
Page 128: Docking/Undocking The Infokey Controller
Docking/Undocking the InfoKey Controller Tool Required: None. To Dock the InfoKey Controller: Make sure the InfoKey Controller Dock Adapter is installed. For more information, see “Installing/Removing the Dock Adapter” on page 115. Slide the InfoKey Controller up into the InfoKey Controller Dock as shown in Figure 45. - Page 129 To Undock the InfoKey Controller: Press the Release Tab at the bottom of the InfoKey Controller Dock. Slide the InfoKey Controller out of the InfoKey Controller Dock as shown in Figure 46. Figure 46. Undocking the InfoKey Controller...
-
Page 131: Troubleshooting The Segway Pt
Authorized Segway Dealer or Distributor, or Segway Customer Care. This chapter provides lists of problems and recommended actions. WARNING! Always shut down your Segway PT and unplug the AC Power Cord before performing any maintenance or installing any part or accessory. - Page 132 The LeanSteer Frame slips or is page 124 off-center. The Tire/Wheel Assembly is page 125 loose and wobbles. The Segway PT pulls to one side page 126 when riding. A Tire is flat or will not maintain page 127 inflation pressure.
- Page 133 If, after reviewing the troubleshooting procedures and the InfoKey Controller icons, you are still unable to resolve the problem, contact an Authorized Segway Dealer or Distributor, or Segway Customer Care. For a list of Authorized Dealers and Distributors, visit www.segway.com.
-
Page 134: Segway Pt Will Not Power On
Segway PT Will Not Power On Your Segway PT will not power on when you press the InfoKey Controller Power/Standby button. The procedure below will help you determine if you are standing in range for the InfoKey Controller to communicate with the Segway PT, whether the InfoKey Controller Battery needs replacement, whether your Segway PT needs to be “reset”... -
Page 135: Segway Pt Will Not Enter Balance Mode
InfoKey Controller display. If the Segway PT still will not enter Balance Mode, identify the error icon on the InfoKey Controller, and attempt to clear the fault following the recommended actions in “Startup Error... -
Page 136: The Leansteer Frame Slips Or Is Off-Center
The LeanSteer Frame Slips or is Off-Center When you move the LeanSteer Frame, it slips on the Pivot Base Assembly, or the LeanSteer Frame is off-center and will not return to center. You should review the following service procedures prior to troubleshooting this problem for important instructions and torque values. -
Page 137: Tire/Wheel Assembly Is Loose And Wobbles
Tire/Wheel Assembly is Loose and Wobbles The Tire/Wheel assembly is not secure. It appears to be loose and wobbles. You should review the following service procedures prior to troubleshooting this problem for important instructions and torque values. “Removing the Tire/Wheel Assembly” on page 106 “Installing the Tire/Wheel Assembly”... -
Page 138: Segway Pt Pulls To One Side When Riding
Segway PT Pulls To One Side When Riding Your Segway PT pulls to one side when you are riding. You should review the following service procedure prior to troubleshooting this problem for important instructions: “Checking Tire Inflation Pressure” on page 104. -
Page 139: Tire Is Flat Or Will Not Hold Air
Tire is Flat or Will Not Hold Air One of the Tires on your Segway PT is flat or will not hold air. You should review the following service procedure prior to troubleshooting this problem for important instructions: “Checking Tire Inflation Pressure” on page 104. -
Page 140: The Segway Pt Will Not Power Down
The Segway PT Will Not Power Down Your Segway PT will not power down when you press and hold the Power/Standby button on the InfoKey Controller. You should review the following service procedure prior to troubleshooting this problem for important instructions “Removing/Installing the Mats”... - Page 141 Handlebar until you hear the Stick Shake Warn- ing and feel the Segway PT switch out of Balance Mode, into Standby Mode. Leave your Segway PT in a secure location for 15 minutes until it automatically powers down. Install a new InfoKey Controller Battery.
-
Page 142: Diagnosing Errors With Infokey Controller Icons
Startup Error Conditions If you attempt to power on the Segway PT and an error condition occurs that prevents the Segway PT from powering on and entering Standby Mode, the icons shown in Table 14 will appear on the InfoKey Controller. - Page 143 Display Icon Description Recommended Action The Segway PT is Unplug the Power plugged in. Cord. If the Segway PT has powered off, power on again. The charge in the Charge the Batteries, Segway PT Batteries is and then attempt to too low to allow safe power on.
-
Page 144: Balance Mode Error Conditions
Balance Mode Error Conditions If you unsuccessfully attempt to enter Balance Mode and step onto the Mat, the icon shown in Table 15 will appear on the InfoKey Controller. To clear this condition, follow the instructions in the Recommended Action column of Table 15. Table 15. -
Page 145: Reduced Performance Levels
Reduced Performance Levels When the Segway PT is operating at reduced performance levels due to an error condition, the icon shown in Table 16 will appear on the InfoKey Controller. (See “Speed Limiter” on page 48 for a list of the conditions that cause reduced performance.) -
Page 146: Critical Faults While Riding
Critical Faults While Riding During normal riding, if the Segway PT detects a fault in any of its redundant subsystems, the icon shown in Table 17 will appear on the InfoKey Controller. When such a fault is detected, the Segway PT performs a Safety Shutdown. -
Page 147: Pitch Or Roll Angle Exceeded
Pitch or Roll Angle Exceeded If the Segway PT shuts down because a forward/backward (pitch), or side (roll) tilt limit was exceeded, or no Rider Detect sensors were depressed while the Segway PT was moving at speed, the icon shown in Table 18 will appear on the InfoKey Controller. -
Page 148: System Faults
If the Segway PT detects a hardware fault, the icons shown in Table 19 will appear on the InfoKey Controller. The Segway PT cannot be used until the fault is cleared. To attempt clear system faults, follow the instructions in the Recommended Action column of Table 19. -
Page 149: A Contact And Legal Information
If you or any other user of your Segway PT is involved in an accident, or if your Segway PT performs in a way that you do not intend or in a way that it is not supposed to, contact Segway Customer Care by telephone at 866.4SEGWAY (866.473.4929), or by email at... -
Page 150: Obey All Laws And Regulations
If the Segway PT does cause harmful interference to radio or television reception, which can be determined by turning the Segway PT off and on, the user is encouraged to try and correct the interference by one or more of the following... -
Page 151: Canadian Ices-003
Reorient or relocate the receiving antenna. Increase the distance between the Segway PT and the receiver. Connect the Segway PT into an outlet on a circuit different from that to which the receiver is connected. Consult the dealer or an experienced radio/TV technician for help. -
Page 152: Other Standards
Other Standards The Segway PT also complies under the applicable sections of the following: IEC 60950-00; CAN/CSA C22.2 No. 60950-01-03; UL 60950; UL Standard for Safety for Motor-Operated Appliances, UL 73; Motor- Operated Appliances (Household and Commercial), CAN/CSA-C22.2 No. 68-92; Degrees of Protection Provided by Enclosures (IP Code) IEC 60529;... -
Page 153: Patent Information
Patent Information The Segway PT is covered by US and foreign patents, including one or more of the following: US Patent numbers (issued): 5,701,965; 5,791,425; 5,794,730; 5,971,091; 5,975,225; 6,223,104; 6,288,505; 6,302,230; 6,332,103; 6,357,544; 6,367,817; 6,405,816; 6,408,240; 6,415,879; 6,435,535; 6,443,250; 6,538,411; 6,543,564; 6,553,271; 6,561,294; 6,571,892;... - Page 154 54721; 00/61426; 00/73101; 00/74623; 00/75001; 01/02920; 01/ 064502; /01/15962; 01/42077; 02/030730; 02/068219; 2003/103559; 03/105967; 2003/106250; 2004/007233; 2004/007264; 2004/075804; 2004/078603; 2005/009828. Additional US and foreign patent applications are pending. Segway Inc. manufactures and sells Segway PTs under a license from DEKA Products Limited Partnership.
-
Page 155: Index
Index Checking Tire inflation pressure 104 Accessories 91 Cleaning your Segway PT 86 Attaching Console 35 the Handlebar 99 Console Trim 40 the LeanSteer Frame 96 Controller Boards 43 Conventions xii Critical error 134 Balance Indicator lights 37 Critical faults when riding 134... - Page 156 Redundant subsystems 16 attaching 96 Regenerative braking 70 LeanSteer Frame/Handlebar As- Removing sembly 16 Batteries 100 Lifting Your Segway PT 82 Fenders 108 Handlebar 98 LeanSteer Frame 93 Maintaining Tires and Wheels 84 Mats 109 Mats 16 Tire/Wheel assembly 106...
- Page 157 Security button 21 Traction 87 Security icon 22 Transporting and shipping Bat- Segway PT teries 78 components 16 Transporting your Segway PT 78 how it works 14 Troubleshooting 119 serial number 2 flat tire 126 specifications 5 LeanSteer Frame 124...
Need help?
Do you have a question about the PT x2 and is the answer not in the manual?
Questions and answers
im trying to i.d the starter device you insert to power on my pt
i am trying id the part that you insert to the left of the infokey
The starter device used to power on the Segway PT x2 is the InfoKey Controller.
This answer is automatically generated