Table of Contents
Advertisement
Advertisement
Table of Contents

Related Manuals for Nagra Seven


Summary of Contents for Nagra Seven
- Page 1 EFERENCE ANUAL PERATING NSTRUCTIONS (Software version V 1.50) Seven NAGRA Audio Technology Switzerland SA, Chemin de l’Orio 30A, 1032 Romanel-sur-Lausanne, Switzerland. Tel :+41 21 643 7240 Web : www.nagraaudio.com e-mail: audio_pro@nagraaudio.com...
-
Page 2: Guarantee, Warranty
AUDIO TECHNOLOGY SWITZERLAND certifies that this instrument was thoroughly inspected and tested prior to leaving our factory and is in accordance with the data given in the accompanying test sheet. We guarantee the Nagra Seven and products of our own manufacture against any defect arising from faulty manufacture for a period of TWO years from the date of delivery. -
Page 3: About This Manual
GUARANTEE / WARRANTY Page 1 ABOUT THIS MANUAL Page 2 Page 3 INTRODUCTION TO THE NAGRA Seven Battery packs, Fuses, Mains powering, Charging Power Page 4 Chapter I The “POWER”... - Page 4 Introduction The NAGRA Seven is a 2-track, 24-bit digital recorder offering sampling frequencies up to 192kHz, with analog and digital inputs and outputs on XLR connectors, and AES 42-ready for digital microphone applications. Standard features include full iXML metadata, USB 2.0 and Ethernet ports, and a docking battery pack.
-
Page 5: Charging Times
ON. No harm will be caused to the lithium packs if the external charger is left connected as they cannot be “Overcharged”. Charger ON / OFF switch Removable battery box for “AA” size cells Some approximate times are shown below using the Nagra charger and supplied power supply: Battery type Capacity Approx. Running time (with 2... -
Page 6: Power Indication
50/60Hz supply with a rated output of 15V 2A. The Nagra Seven can be operated while the mains power is connected to the battery box on the rear of the machine without danger, and it will supply enough energy to power the recorder and recharge the attached pack at the same time. -
Page 7: Time Code And Real Time Clock (Rtc) Powering
Lithium-Polymer battery packs will last for between 500 and 1’000 charge cycles before being replaced, which if correctly cared for, in the case of a Nagra Seven would represents about 5 years or so of normal operation. However there are some important points to be made concerning the “housekeeping” of such packs, to guarantee their best performance. -
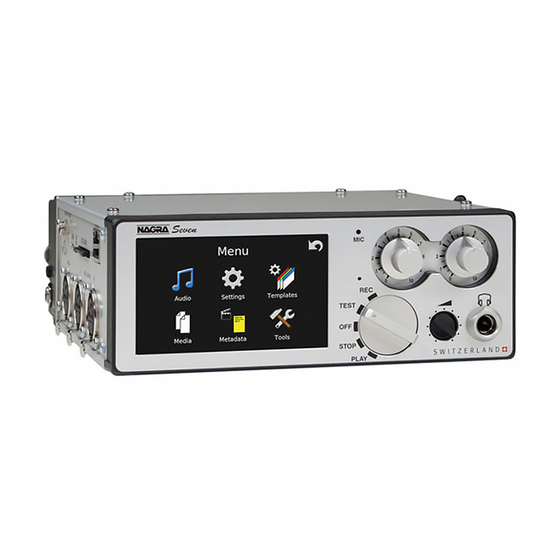
Page 8: Main Display Screen
The OPERATIONAL FRONT PANEL Main Display Screen The Nagra Seven uses a 3.5” color TFT touchscreen display. Its resolution is of 270 dpi giving precise definition and excellent resolution (a standard computer screen generally has a resolution of around 70 dpi). - Page 9 TEST: In this position all the circuits are powered allowing recording levels, audio monitoring adjustments, menu verification and alteration. This can be considered as a "stand-by before record" position. If the Pre-record function is active the REC led flashes and some menu alterations are prohibited.
- Page 10 Headphone connector and level control The headphone output is a 6.35mm stereo jack connector and its level is adjusted using the pot. The headphone output level can be digitally boosted in the menu mode if required by 6 or 12 dB. Pressing the headphone volume button will temporarily set the headphone output to mono monitoring.
- Page 11 SD Flash card Slot This slot permits the use of removable SD memory cards. The Nagra Seven will accept SD, SD-HC (4 – 32 GB) and SD-XC (32+ GB) type cards.To remove the SD card, press directly on the end of the card and it will eject.
-
Page 12: Ethernet Connector
The Micro USB connector is of the A/B style, and serves not only as a slave port, allowing the Seven to be connected to a computer and appear as an external device, but via the appropriate adapter (Part number 20 70119 000) it can be used as a host port and can accept an external device such as a keyboard, mouse or a USB thumb drive. -
Page 13: Aes Output Connector
RIGHT OUTPUT SIDE PANEL The right side panel of the recorder is different depending on the version of the recorder. There is one panel for the standard version without any internal options, another for the time code version and a third one for the ISDN version, both of the latter two are also available with the 3G / WiFi option. -
Page 14: Time Code Lemo Connector
The two BNC connectors form part of the TC option and are the standard external word clock refernce connectors for locking the Nagra to an external reference and for supplying such a reference to other equipment. Other reference signals such as PAL / NTSC video, HDTV references are also fed to the recorder through the WCK IN connector, in video applications. -
Page 15: Battery Packs
The BACK and POWER Rear view of the Nagra Seven showing the battery connector and battery fixing threads. Serial number The serial number, located on a sticker on the rear panel of the recorder is also burned into the internal memory of the recorder and cannot be altered or erased. - Page 16 Operational section PART 1 – HOME SCREEN AND MENUS The screen or display of the Nagra Seven is the main user interface and has the following tasks: Display operational information to the user Display and modify the parameters of the recorder (Menus)
-
Page 17: The Main Screen
The available displays depend on the options installed in the machine. The example below shows the home screen of a NON-TC Nagra Seven, where the “Counter and settings” display selection has been chosen. Current time (RTC) - Page 18 Display Screen Information Current time: Shown in HH:MM:SS format. The internal clock is set in the menu mode. This is independent of time code (if fitted). This data will be used for the time information of a recorded index. Media / folder: Shows where the recordings will be stored.
- Page 19 2 rightmost buttons are configurable. In the TEST/REC position all seven positions are programmable. This system has been adopted to allow the user to program the desired buttons that are to be used frequently during recording, for example Slate mic ON/OFF or MARK etc.
- Page 20 The possible Transport / Action buttons are: Normal playback in PLAY or STOP. Pause at the current point during play Search forward at 4x nominal speed while in playback or Fast Forward at 128x when in STOP mode. Skip to next take Search backwards at 4x nominal speed while in playback or Fast Rewind at 128x when in STOP mode.
- Page 21 Shortcuts Depending on the installed options a different number of shortcuts can be shown on the main screen. Pressing the MORE key will display the remaining choices. The displayed icons can be programmed depending on the position of the main function selector. Access to all the menus of the machine is gained by pressing the key.
- Page 22 Slate: Activates the slate microphone. It can be programmed to toggle mode also. This icon will turn blue whenever the internal slate microphone is active. Filters: Access internal programmable digital filters. Alc/Lim: Access to the Automatic level control and audio limiters programming. Outputs: Access to the audio headphone and loudspeaker outputs programming.
- Page 23 Places a mark (pointer) in the audio file when pressed Restart a take with the same index number Seamlessly create a new index while recording. Each of the topics shown here is covered in detail in the MENU section of this manual, along with all the other menu-driven features.
-
Page 24: Menu Mode
Holding the reverse arrow will jump all the way back to the main display screen. Screen lock The display of the Nagra Seven can be voluntarily locked by the user at any time to avoid accidental alteration of settings while in operation. To lock the display, simply press and hold the icon for 2 seconds and the message SCREEN LOCKED will appear on the top of the display. -
Page 25: Audio Menu
PART 2 - The AUDIO Audio Menu The Audio menu is used to set the parameters of all audio related aspects of the Nagra Seven. Inputs Will enter the inputs of the audio menu, giving access to all the parameters related to the analog and digital audio inputs of the recorder. -
Page 26: Analog Input Selection
Analog inputs This screen programs the analog inputs. For each input, the type of source signal (Mic. or Line) can be selected, and +48V Phantom powering, phase inversion, filters and ALC/LIM can also be chosen. If the limiters are ganged (Linked) then if one limiter is activated due to a strong signal then the other channel will activate simultaneously as well. - Page 27 Analog levels screen For each input, the current microphone input levels in dBSPL, or Line input level in dBu can be displayed. If they are assigned to the pots, then the up/down keys are inactive. If they are not assigned to a pot then the levels can be adjusted using the buttons.
-
Page 28: Slate Microphone
The AES screen gives the possibility to choose between AES 3 or AES 42. The AES 42 is the AES format for digital microphones. The Nagra Seven will supply the 10V power for the digital microphones (known as mode 1), but does not run the entire protocol to control the microphones dynamically (mode 2). - Page 29 Filters The Nagra Seven is equipped with fully programmable internal digital filters. These filters can be programmed for each microphone input independently. The frequency of the filter, from 30 Hz to 300 Hz and the slope of either 12 or 24 dB/Octave and the headroom, from 0 to 42 dB can be programmed using the settings window.
- Page 30 ALC / LIM. The Nagra Seven is equipped with a very sophisticated, fully programmable internal audio control system that can be set as an audio limiter or ALC, or any combination between the two. It is an entirely new approach that allows the user to adjust the parameters exactly as desired. The different parameters of the system, such as the headroom, target, attack, release and ratio can all be set with dropdown menus from the settings window.
-
Page 31: Outputs Menu
The operating position is indicated in the form of a graphic display and the values are displayed to the right of the graph. A detailed explanation of the operational principals of the ALC/LIMITER system of the Nagra Seven is covered in Annex V found at the end of this manual. -
Page 32: Monitoring Menu
Monitoring Menu For the monitoring section, an additional headphone boost can be added to increase the headphone output level. The M/S decoder can be turned ON or OFF. The M/S decoder will only decode the headphone output into a L/R signal and will have no effect on the recording or the line outputs. The level of the Beep signal can also be adjusted in this menu. -
Page 33: Meters Menu
Meters Menu The meters screen gives access to three different settings concerning the fuel gauge metering displays. Modulometers This menu allows two critical parameters of the bar-graph modulometers to be adjusted. The point at which the horizontal bar-graph display changes color from green to yellow, and from yellow to red as well as the overall range of the scales, can be set in this menu. - Page 34 Level pop-up The Level pop-up menu allows the user to program the indications shown on the blue “fuel gauge” pop-up display which is indicated when the level pots are adjusted. The microphone display scale menu allows adjustment of the scale of the level indication so that it will correspond to the actual dBSPL value according to the specific sensitivity of the microphone being used.
- Page 35 Pot. Assign Menu Access to the assignment of the input pots and the headphone pot. It also gives access to the switch attribution of the headphone pot switch. Pot. assignment: The main level pots can be attributed to MIC or LINE, both or neither as required. Allows the pots to be ganged together so that turning the left pot will control both Pot.
-
Page 36: Part 3 - The Settings
Part 3 – THE SETTINGS Settings Menu The settings menu accesses various features of the recorder, which will all be stored in the templates (if used) and is broken into 5 categories: General, File format, Pot. assign, Display and Icon selection. Each is explained below: General settings The “General settings”... - Page 37 Selection Signal explanation MASTER Machine is set to be “master”, all clocks are synchronised using the internal stratum III high stability crystal. MASTER +0.1%* As for master but accelerated by 0.1% for NTSC applications. (Sampling frequency will be increased by 0.1% i.e. 48’000Hz becomes 48’048 Hz) MASTER -0.1%* As for master but slowed down by 0.1% for NTSC applications.
- Page 38 A file can be named using a computer, but In all cases, the last 3 positions “XXX” must be a numerical value otherwise the file will not be recognized by the Nagra. The “X” symbols in the examples correspond to the index number in numeric digits from 0 to 9.
- Page 39 Max file size The Nagra Seven records audio using the standard FAT 32 (File Allocation Table) file format that allows the audio files to be read by either MAC or PC. The FAT system limits any file to a maximum size of 4 GB although many computer programs will not accept audio files larger than 2 GB.
- Page 40 Display The display menu gives access to the operation parameters of the screen, rather than what is actually displayed. Brightness: Screen intensity 25, 50, 75 and 100% Dimmer after: Delay before the display switches to low power mode. This can be set to 30s, 1min, 3 min, 5 min or never.
-
Page 41: Icon Selection
Icon selection The Nagra Seven offers programmable shortcuts which will put different icons on the main display for rapid access to different user definable features of the recorder. Different displays can be adapted for the PLAY / STOP and TEST / REC positions of the main selector. Checking the “More” button will allow the 6 additional icons to be displayed on the main display. -
Page 42: Part 4 - The Templates
Part 4 – THE TEMPLATES It is important to understand that a template is a set of predefined settings that can be rapidly stored or recalled by the user to set the recorder to a pre-defined operating mode. They are NOT “Profiles”. - Page 43 Limiters 1+2 On/Off Line input 1+2 level settings Line output gain selection Loudspeaker mode Maximum file size Microphone input +48V On/Off Microphone input 1+2 level setting Microphone input 1+2 phase Microphone sensitivity 1+2 Modulometer settings Monitoring boost setting Monitoring level / format M/S monitoring On/Off Potentiometer assignment selection Potentiometer ganging selection...
-
Page 44: Part 5 - The Media
Part 5 – THE MEDIA Media Menu The MEDIA menu gives access to all the file and storage components of the machine. This section is broken into 5 sub-divisions covering the Directory, Folder, Drive, Copy Status and Auto copy. Each of which is covered in detail below. - Page 45 Folders The “Folders” is the location where the audio files recorded are to be stored. Folders, otherwise known as “Directories” can be located on either the internal Flash card of the recorder or on the extractible SD card or USB. Information about the size and number of files within the currently displayed folder is clearly shown. The drive, upon which the current working folder is located is also indicated.
- Page 46 Drives Location of the internal 16 GB micro SD card when the top of the machine is removed. The Micro SD card Is located just below the circuit board and is removed By simply pulling it gently away from the circuit. The drives window gives information about the connected media.
-
Page 47: Copy Manager Commands
The copy list is empty, no copies are running, no errors on previous copy. COPYING: The copy process is running. The Nagra Seven is in record mode and the current copy destination is the SUSPENDED: same drive as the working folder (copy will always go to the other drive). The copy is suspended to avoid file fragmentation on the disk and to guarantee a reliable remaining recording time. - Page 48 The next function is available when the power to the Nagra Seven was lost prior to finishing a copy. This is the only function possible in this case.
-
Page 49: Copy Error Messages
Copy error messages While a copy is running in the background, you may be alerted by the error message “Copy Error” on the main display. This tells you that copy process has stopped and needs your intervention. The copy manager screen will give you an explanation of the reason for the error. - Page 50 Auto Copy The Auto copy feature can also be considered as an automatic back-up of the current recordings, and once activated, requires no further user input. This will enable the automatic copying of all recordings, into a folder bearing the same name as the current working folder on the working drive. This folder will be automatically created on the destination media.
- Page 51 (FTP, VOIP, Speech, data…..) CONTACTS Opens the internal phone book where contact information can be stored for quick access. The contacts feature is common to all communication methods of the NAGRA. Chapter IV June 2014...
- Page 52 Adding a new contact: Up to a total of 8 Phone and 8 VOIP contacts can be stored in the memory. Chapter IV June 2014...
- Page 53 In the DHCP mode, all the settings are automatically provided to the Nagra Seven from the router. If there is no DHCP server on the LAN then the settings can be programmed manually, then selecting the “Static”...
- Page 54 F.T.P. Transmission To send audio files by F.T.P. the correct interface needs to be chosen (Ethernet, WiFi GSM /3G). Once the desired interface has been chosen select FTP for the “mode” and then press the settings button. FTP settings: Once the settings are correct a file can be sent by FTP.
- Page 55 The FTP upload window will open and the file transfer will begin to the pre-defined FTP server. Pressing the OPT button allows a selection of self-explanatory FTP operational options to be selected. Chapter IV September 2014...
-
Page 56: Metadata Menu
Part 7 – THE METADATA Metadata Menu Metadata is additional user information attached to a BWF file, it has been defined by the internationally accepted iXML metadata standard, and the NAGRA Seven conforms to this accepted norm. Generic metadata screen Current metadata screen The “Generic”... -
Page 57: False Start
Note: The Pick-up scene tag is not a formal iXML flag and is simply added by the Nagra Seven to the end of the scene name. If the scene name already consists of 12 characters then the last two characters will be replaced by “-P”... -
Page 58: Data Entry
If a USB keyboard is connected to the Nagra Seven then this screen does not open, the external keyboard is automatically active, and can be used for all data entry. Functions available on the USB keyboard are covered in the ANNEX VI at the end of this manual. -
Page 59: Tools Menu
Tools Menu Various features are available that do not directly affect the audio work in progress, but give access to less critical features of the Nagra Seven. Reformat The reformat menu allows the user to reformat either the internal Micro SD memory card or an external media. -
Page 60: Machine Name
Miscellaneous Several additional features, used to adapt the user environment or assist the easier use of the Nagra Seven can be programmed on this screen. Machine name The name chosen in this menu will be used in the file name if one of the “machine name” file naming options is selected. -
Page 61: Lock Settings
Pressing the DEFAULT settings button will reset all parameters of the Nagra Seven back to their original factory default setting and will also erase any templates stored in the recorder. - Page 62 These keys allow the user to save the entire current settings (Configuration) of every parameter of the Nagra, as a file onto the SD card. This can then be put into another machine and the identical setting stored into the second machine, by clicking on the “load”...
-
Page 63: Installing Software Options
To install a software option, select the option to be installed then insert the 8 hexadecimal digits (provided by your local Nagra dealer, into the four boxes. They are in pairs for example: E1 F8 21 B7 Once complete press the ADD key and the internal option will be activated. - Page 64 The EXTRAS Overview The Nagra Seven can be equipped with various optional extras, to adapt it to many different working environments (Broadcast, film/TV, music etc). Some of the options are physical boards that are installed inside the machine and others are software options that are activated through the introduction of access codes supplied from the factory.
-
Page 65: Time Code In Digital Recorders
TIMECODE (Hardware option part number 70 19185 000) The Nagra Seven can be equipped with an internal time code system. The time code system in the Nagra Seven corresponds to all the internationally recognized formats defined by the SMPTE and EBU. This manual does not cover the generalities of the time code format as this is covered in detail in many other publications. - Page 66 The time code system of the Nagra Seven is able to follow variations in the external clock of up to ±4% When using an external clock this coherence will remain perfect as long as the machine is still powered.
-
Page 67: Time Code Pull-Up / Down
Note: Seven does NOT ask for the date and time to be set by the user (Not TC date and time) then this guarantees that the TC is still accurate as both the TC and RTC use the same crystal. - Page 68 -0.1% and the time code to 30 ND If the audio track to be played back was initially recorded at 95.904 kHz and the Nagra Seven is slaved from a 95.904 external clock, you should set the Nagra to “ext. 96” kHz and the time code to 30 ND (the time code will run at the external frequency speed) If the audio track to be played back was initially recorded at 96 KHz (trans-sampled from 95.904 kHz to 96.000...
-
Page 69: Time Code Recording
DD.MM.YY.xx or the “Free” format of xx.xx.xx.xx The time code is displayed on the main screen of the Nagra. If the main function selector is in the TEST (pre- record) position then the time code and user bits which are displayed on the screen are the values that are to be recorded. -
Page 70: Time Code Menu
The Nagra Seven will record TC from the internal generator. External: The Nagra Seven will record TC from an external source. Assemble: If Assemble is selected each time the machine is put into REC mode a full time code assemble will be performed. This is done by calculating the time code value of the sample following the last sample of the previous index. -
Page 71: User Mode
Time entry To enter a new time, press on the time portion on the screen and a keypad will appear. Enter the correct time data in the Hour, Minute and Second windows then press the “OK” key and the time code starts running. User bits entry Entering the user bits and or date is made in the same way as for the time. - Page 72 Set from Ext. / RTC Selecting set from Ext. and pressing the Ext button sets the internal time code generator of the Nagra Seven to the external time code signal connected to the LEMO connector. Selecting RTC and pressing the Ext button will set the time code hours, minutes and seconds from the internal real time clock of the recorder, allowing a very rapid TC setting.
- Page 73 SIP address which is similar to an e-mail address (e.g. Nagra@sipserver.com). Each device is thus known by the server which allows others to locate it by contacting the SIP server using the SIP protocol, and to subsequently set-up an audio connection between the two parties.
- Page 74 Method 1: (Preferable choice) is a direct audio communication between devices without going through a dedicated SIP server. A SIP server is required to initially establish the connection but is subsequently bypassed once the connection is made. The direct audio connection using the RTP protocol induces lower delays since the data does not pass through a relay point.
- Page 75 This name is given by the SIP provider Password: Provided by the SIP provider Server: Name of the chosen SIP server. If this is left blank, the Nagra does not connect Seven to a SIP server and only direct connections are possible.
- Page 76 This is a prioritized list of available communication compressions. During connection setup the common compression with the highest priority of both parties is selected. To force a compression all fields except one can be left empty. Compression 1: Compression 2: Compression 3: Compression 4: Auth.
- Page 77 (That you can store in the contacts of the Nagra). The advantage of a SIP server is that the correspondent is logged in (each time he goes on-line) and is therefore sure to communicate with his own IP address rather than changing from each location (From home, work etc).
- Page 78 VoIP transmission screen / details: The transmission screen shows basic information regarding the network connection (local network connection type and its quality) in the top left corner. In case of an established communication the SIP symbol shows an overall audio link quality from 0 to 5 bars. On the third line, the own SIP identity is shown.
- Page 79 I.S.D.N. (R.N.I.S) (Hardware option part number 71 19186 000) The Nagra Seven can be equipped with an internal I.S.D.N (R.N.I.S.) transmission codec system for communication via a digital telephone system. The features offered are very complete and allow many different communication possibilities which are all explained in the following pages.
- Page 80 I.S.D.N. OPERATION Communication using I.S.D.N. can involve various different operations such as making a call, receiving an incoming call, mixing live audio with a previously recorded file, recording a communication etc. so to simplify matters, the various different screens and their operations are explained on the following pages which should cover all areas.
- Page 81 I.S.D.N. screen When I.S.D.N. is selected and OK is pressed in the transmission screen the principal I.S.D.N. screen will be shown. It offers several options described below: Opens the directory of the current working folder allowing a play list to be selected for transmission over the I.S.D.N.
- Page 82 Opens the dial mode window allowing the user to set the recorder to accept incoming I.S.D.N. call, wait for an incoming call and answer automatically or to allow a number to be dialed. The REC key is inactive (grey) until the I.S.D.N. connection has been made and the unit is in the “On-Line”...
-
Page 83: Incoming Calls
Incoming calls When an incoming call is detected, the ring-tone can be heard in the headphones, and the following screen will be displayed. It indicates the number of the caller and permits the user to accept or refuse the call. Play list Files can be selected individually to be transmitted from the directory listing or they can be added to the play list. -
Page 84: Automatic Answer
Once the transmission of the file(s) is complete it will hang-up, and remain in the Auto Answer mode ready to reply to the next incoming call. If no file has been selected, the Nagra will answer and remain on line until the communication is ended. - Page 85 (Hardware option part number 71 19187 000) The Nagra Seven can be equipped with an internal WiFi /3G (GSM) communication option which is inserted into the second slot under the lower panel of the recorder. The features offers the possibility to either FTP files or use VoIP via the on-board WiFi if a network is available or alternatively to use the standard GSM network in 3G mode.
- Page 86 This is the PIN number of the SIM card inserted into the slot on the circuit board inside the Nagra. For the Provider portion, this should be left blank for automatic provider detection. If a specific provider is known it can be entered here.
-
Page 87: Wifi Operation
WiFi operation If a WiFi connection is to be created using the WiFi / 3G option then the network settings for the WiFi operation need to be configured as for the other transmission modes. The available options will appear automatically in the transmission menu. In the WiFi mode, both FTP and VoIP (if option is installed) are possible. - Page 88 The scissors icon is used to open the audio editor. If the icon is not present in the icons menu then the option is not installed on the recorder. Please contact your nearest Nagra dealer to install the option.
- Page 89 Pressing on Open Project will open the following screen: When OK is selected the main editing screen (below) will be opened. Overall description of the editing screen: Current take number being edited / time from start of take Audio to be edited Time with respect to start of source material...
-
Page 90: Edit Controls
Edit controls All features of the editor are controlled either with the touchscreen or by means of the two level potentiometers. In the edit mode, the left pot is used to advance or reverse the audio up to 1x nominal speed depending on the angular rotation of the pot. - Page 91 When the source audio is highlighted, this will jump to the previous mark. General information about editing Audio editing on the Nagra Seven can be made in two different manners. The first method involves a complete piece of audio source recording, and portions of sound are to be removed, such as silent periods, to obtain a shortened yet concise adaptation of the original.
- Page 92 Press the “ALL” button to select the entire audio take to the lower editing track and the following display will be shown. On the lower graphic, the end of the copied source file can be seen on the left side of the display. It is now possible to join the next piece of audio to this if desired, but in this example, only unwanted parts of audio are to be removed from the file using the...
- Page 93 Both edit points are shown and the portion between them can be deleted. Trimming of the edit points is possible to accurately locate the exact cut point. To move to either point press the appropriate skip key. Pressing the DEL button will now remove the portion of audio located between the left and right edit points.
- Page 94 Edit method 2: Creating a new edit by assembling audio portions: In this method, a new edited audio track is being created by taking either entire source tracks and adding the together (end-to-end) or inserting different portions of audio at a specific point in the edit track. Start the editor function by pressing the scissors on the main display.
- Page 95 All the edit points can now be adjusted or “Trimmed” by selecting the desired point and then using the trim function. Trimming of the left edit point Trimming of the right edit point The PLAY key can be used to listen to either of the tracks at any time. The GOTO function can be used to quickly locate a specific section of audio in a long recording.
- Page 96 You have put the Nagra Seven in power off and it has not yet finished to copy, this is not really an error message in this case. (see copy section).
- Page 97 “Directory nearly full” Will be displayed when the Nagra Seven is set to pre-record / record for the 995 file in the current working folder. Delete unnecessary folders / indexes on your destination media. (Maximum allowed number of entries is 999) “Disk nearly full”...
-
Page 98: Specifications
CHAPTER VI SPECIFICATIONS Recording Data storage medium 16 GB Internal micro SD card (user expandable) Removable media SD card (Hot Swappable) Disk format FAT 16 / 32 Recording Method Linear digital PCM (optional MPEG 1 layer II) File type 16 / 24 bit Broadcast Wave File BWF (WAV) with iXML, AES 31 compatible A/D &... -
Page 99: Annex I Alc / Limiter Detailed Explanations
The headroom of the ALC/LIM and the headroom of the filters are same; the Nagra Seven simply uses the larger of the two. In other words, if the headroom for the limiter is set to 18 dB, and a filter is subsequently selected with a headroom of 24 dB, then the limiter will be active at 24 dB rather than 18 dB. - Page 100 You have the choice whether to control this gain with the potentiometer or by specifying a fixed value. When using as limiter, it is probably preferable to use the potentiometer for control. The control will act on the microphone preamplifier gain as if the limiter were not switched on, except there will be the headroom offset subtracted.
-
Page 101: Recording Times
ANNEX II RECORDING TIMES Recording durations of audio files on the Nagra Seven depend on different criteria such as bit depth and sampling frequency selected for the recording. Below is a small table indicating the recording times available on the internal Micro SD card, as well as on a 4GB removable SD card, from which you can calculate the respective times for any other card sizes. -
Page 102: Ixml Metadata Implementation
ANNEX III iXML Metadata implementation The Nagra Seven records Broadcast Wave Files which include the iXML metadata in the header chunk. This information will be ignored by equipment not able to interpret the data. The table below shows the implementation of the data within the Nagra Seven. -
Page 103: Firmware Updates
Firstly, copy the file named Nseven_0100_xxx.nbu from our web site to the root directory of an SD card. This can be done while the Nagra Seven is connected to the PC with a USB cable, simply save the file directly to the EXTERNAL SD card of the machine (Do not save it to the internal micro SD card). - Page 104 ANNEX V Explanations of some important “Cyber terms” Dynamic Host Configuration Protocol (DHCP) is a network application protocol used by devices (DHCP clients) to obtain configuration information for operation in an Internet Protocol network. This protocol reduces system administration workload, allowing devices to be added to the network with little or no manual intervention. Domain Name System (DNS) is a hierarchical naming system for computers, services, or any resource participating in the Internet.
- Page 105 regarded as the primary standard for audio/video transport in IP networks and is used with an associated profile and payload format. Real Time Control Protocol (RTCP) is a sister protocol to the Real Time Transport Protocol, The primary function of RTCP is to gather statistics on quality aspects of the media distribution during a session and transmit this data to the session media source and other session participants Session Initiation Protocol (SIP) is a signaling communications protocol, widely used for controlling multimedia...
- Page 106 ANNEX VI USB keyboard functions « REW FF » Del MK Rec - F Search Search ι« « 4x 4x » »ι PLAY STOP MARK Gen Out Pre-Rec Ctrl Ctrl When an external keyboard is connected to the USB port, in addition to being able to type text, many of the machines functions can be directly accessed from the function keys.
-
Page 107: Declaration Of Conformity Ce
DECLARATION DE CONFORMITE CE DECLARATION OF CONFORMITY CE FABRICANT: AUDIO TECHNOLOGY SWITZERLAND S.A., 1032 Romanel SUISSE MANUFACTURER: NAGRAVISION S.A. KUDELSKI GROUP, 1033 Cheseaux, SWITZERLAND APPAREIL : Nagra Seven MODEL: Nagra Seven NORMES APPLICABLES : APPLICABLE NORMS: Champ électromagnétique rayonné EN 55022 Cl. B Radiated electromagnetic field EN 55022 Cl. -
Page 108: Index
Index Date and time, 58 Declaration of conformity, 106 Aes input connector, 10 Default settings, 60 Aes output connector, 12 Delay, 99 Aes screen, 27 Delete folder, 44 Alc / limiter detailed explanations, 98 Delete index, 43 Alc/lim icon, 21 Dial mode, 81 Analog input selection, 25 Digital input connector, 10... - Page 109 Main function selector, 7 Main screen, 16 Ganging of input potentiometers, 34 Mains power, 5 Gsm / 3g connection, 85 Mark, 18 Gsm settings:, 85 Media / folder, 17 Guarantee, 1 Media icon, 20 Media menu, 43 Menu mode, 23 Headphone connector, 9 Metadata icon, 21 Headphone level control, 9...
- Page 110 Remaining time, 17 Time code icon, 21 Remove marks, 43 Time code in digital recorders, 64 Rename folder, 44 Time code jam sync, 69 Renumber, 43 Time code lemo connector, 13 Rtp port range, 76 Time code menu, 69 Time code playback, 66 Time code pull-up / down in ntsc, 66 Time code recording, 68 Sample frequency selection, 35...
Need help?
Do you have a question about the Seven and is the answer not in the manual?
Questions and answers