
Related Manuals for AMT Datasouth Fastmark M5e


Summary of Contents for AMT Datasouth Fastmark M5e
- Page 1 Fastmark M5e Thermal Barcode Printer (Direct & Transfer) User’s Guide © March 2016 AMT Datasouth Corp. Document # 121038...
-
Page 2: Copyright Declaration
Information in this manual is subject to change without notice and does not represent a commitment on the part of AMT Datasouth Corporation. No part of this manual may be reproduced or transmitted in any form by any means, for any purpose other than the purchaser’s personal use, without the expressed written permission of AMT Datasouth... -
Page 3: Table Of Contents
Table of Contents User Caution........................5 Packaging ........................6 Unpacking the printer ............................ 6 Removing protective material ........................6 Introduction ........................7 Product ................................7 Printer Overview ......................8 Front view ..............................8 Interior view ..............................9 Rear view ..............................10 Operator Controls ...................... - Page 4 Table of Contents LCD Menu Function ..................... 35 Entering the menu ............................35 Main menu overview ............................ 36 TSPL2 ................................37 ZPL2 ................................39 Sensors ................................ 42 Interface ............................... 43 Ethernet ............................... 44 Bluetooth ..............................45 WiFi ................................45 File Manager ..............................46 Diagnostics ..............................
-
Page 5: User Caution
Operational safety User Caution CAUTION Refer to the product label (bottom of Mechanical and electrical repairs printer) and verify your power source should be conducted by qualified exactly meets those requirements. service personnel. Do not use this product near heat or Unplug this product from the power water. -
Page 6: Packaging
Packaging Unpacking the printer M5e Printer CD ROM USB Cable AC Power Cord Quick Start Guide Power Adapter Removing protective material Open the packing box, remove the printer. Open right cover and remove foam block from printhead assembly. Remove paper between printhead and platen. -
Page 7: Introduction
Product Thank you for purchasing your AMT Datasouth bar code printer. The Fastmark M5e series of thermal transfer desktop barcode printer, label printer with its new, smaller footprint, offers the high performance that customers have come to expect from AMT Datasouth. Durable, reliable and fast, the Fastmark... -
Page 8: Printer Overview
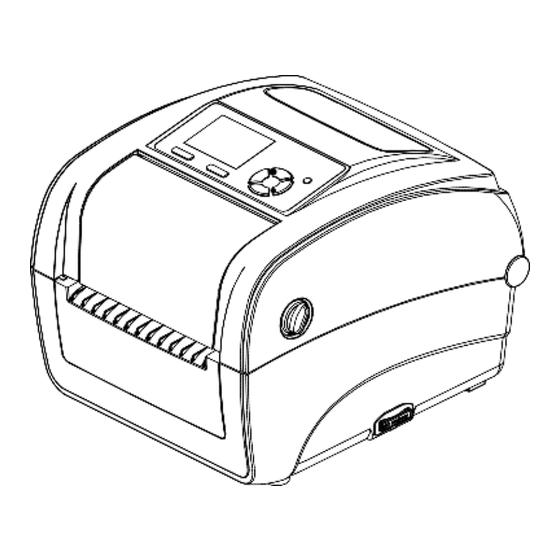
Printer Overview Front view LCD display Ribbon access cover Menu button Top cover lever Feed button *SD card socket LED indicator Paper exit chute Navigation button SD card spec SD card capacity Approved SD card manufacturer V2.0 SDHC CLASS 4 2 GB Transcend V2.0 SDHC CLASS 4... -
Page 9: Interior View
Interior view Ribbon rewind hub Ribbon supply hub Ribbon rewind gear Top cover support Gap sensor (receiver) Media guide adjustment button Media holder Media guides Media holder locking switch Black mark sensor Gap sensor (transmitter) Platen roller Print head - 9 -... -
Page 10: Rear View
Rear view Ethernet interface USB interface USB host interface RS-232C interface Power jack socket Power switch External label entrance chute The interface picture here is for reference only. Please refer to the product specification for the interfaces availability. - 10 -... -
Page 11: Operator Controls
Operator Controls LED indication LED Color Description Green/ Solid This illuminates that the power is on and the device is ready to use. This illuminates that the system is downloading data from PC to memory or the Green/ Flash printer is paused. Amber This illuminates that the system is clearing data from printer. -
Page 12: Installation
Installation Setting up the printer Place the printer on a flat, secure surface. Make sure the power switch is off. Connect the printer to the computer with the provided USB cable. Plug the AC power cord (female connector) into the power supply socket. -
Page 13: Open/Closing The Top Cover
Open/Closing the top cover Open the printer’s top cover by pulling the top cover open levers located on each side of the printer and lifting the top cover to the maximum open angle. A top cover support at the rear of the printer will engage with lower inner cover to hold the printer top cover open. -
Page 14: Loading The Ribbon
Loading the ribbon Open the printer’s top cover by pulling the top cover open levers located on each side of the printer and lifting the top cover to the maximum open angle. Open the ribbon access cover and the media cover. Note: 1. - Page 15 Insert the paper core right side onto the rewind hub. Align the notches on the left side and mount onto the spokes. Stick the ribbon onto the ribbon rewind paper core. Additional tape may be required. Turn the ribbon rewind gear until the ribbon plastic leader is thoroughly wound and the black section of the ribbon covers the print head.
-
Page 16: Loading Path For Ribbon
Close the ribbon access cover and the top cover. Loading path for ribbon Ribbon rewind roll Ribbon supply roll - 16 -... -
Page 17: Loading The Media
Loading the media Open the printer top cover by pulling the tabs located on each side towards the front of the printer then lift the top cover to the maximum open angle. Separate and hold open the media holders. Place the roll between the holders and close them onto the core. - Page 18 Press down the media holder lock switch to hold the label roll firmly. PUSH Place the paper, print side face up, through the media sensor and place the label leading edge onto the platen roller. Move the media guides to fit the label width by turning the guide adjuster knob.
-
Page 19: Loading Path For Media
Use “Diagnostic Tool” or LCD menu function to set the media sensor type and calibrate the selected sensor. Note: Please calibrate the gap/black mark sensor when changing media. Please refer to the diagnostic utility quick start guide for more information. -
Page 20: External Label Roll Installation
External label roll installation Attach the external paper roll mount on the bottom of the printer. Insert a 3” label spindle into a paper roll. And install it onto the external paper roll mount. Open the printer’s top cover and separate the media holders to fit the media width. - Page 21 Feed the media through the rear external label entrance chute. Place the label print side facing up through the media sensor. Place the label leading edge onto the platen roller. Move the media guides to fit the label width by turning the guide adjuster knob.
-
Page 22: Loading Media In Peel-Off Mode (Option)
Loading media in Peel-off mode (option) Use “Diagnostic Tool” or LCD menu function to set the media sensor type and calibrate the selected sensor. Note: Please calibrate the gap/black mark sensor before loading media in peel-off mode to avoid label jamming. ... -
Page 23: Loading Media With Cutter (Option)
Disengage the top cover support to close the top cover. Printer is ready for peel-off mode. Press the FEED button to test. Note: This peel-off module is supported for the thermal/ plain label only. Loading media with cutter (option) Lead the media through the cutter paper opening. -
Page 24: Pal Tm Print And Program Overview
Print and Program overview Printers featuring PAL Print and Program utility can be used in several ways in any given environment. This section describes 3 common ways this advanced capability is used. For help and assistance determining the best way to use this utility in your situation, please consult your sales representative. -
Page 25: Standalone/Downtime Applications
Using a PAL Print and Program capable printer solves this problem. In this case a PAL program is written which interprets a data stream normally sent to the legacy device being replaced. This program is stored on the printer and is automatically executed each time the printer is powered on. - Page 26 Examples of these advanced capabilities are: Ability to operate on line from host or off line in stand-alone mode Ability to range check user input Ability to combine data from multiple fields into a single bar code Ability to access database stored in printer ...
-
Page 27: Power-On Utilities
Power-on Utilities There are six power-on utilities to set up and test printer hardware. These utilities are activated by pressing the FEED button, turning on the printer power simultaneously, and then releasing the button at different status of LED. Please follow the steps below for different power-on utilities: Turn off the printer power switch. -
Page 28: Ribbon And Gap/Black Mark Sensor Calibration
Ribbon and Gap/Black Mark sensor calibration Gap/black mark sensor sensitivity should be calibrated at the following conditions: A brand new printer Change label stock Printer initialization Please follow the steps below to calibrate the ribbon and gap/black mark sensor: Turn OFF the power switch Hold on the button then turn on the power switch Release the button when the LED becomes and blinking. -
Page 29: Gap/Black Mark Calibration, Self-Test And Dump Mode
Gap/Black Mark calibration, Self-test and Dump mode While calibrate the gap/black mark sensor, the printer will measure the label length, print the internal configuration (self-test) on label and then enter the dump mode. To calibrate gap or black mark sensor, depends on the sensor setting in the last print job. -
Page 30: Self-Test
Self-test Self-test is printed by executing gap/black mark sensor calibration. Model name F/W version Firmware checksum Printer S/N Configuration file System date System time Printed mileage (meter) Cutting counter Print speed (inch/sec) Print darkness Label size (inch) Gap distance (inch) Gap/black mark sensitivity Code page Country code... -
Page 31: Dump Mode
Number of download files & available memory space Print head check pattern Dump mode The printer will enter dump mode after printing the printer configuration. In the dump mode, all characters will be printed in 2 columns as following. The left side characters are received from your system and right side data are the corresponding hexadecimal value of the characters. -
Page 32: Printer Initialization
Printer initialization Printer initialization is used to clear DRAM and restore printer settings to defaults. The only one exception is ribbon sensitivity, which will note be restored to default. Turn OFF the power switch Hold on the button then turn ON the power switch Release the button when the LED becomes green and blinking. -
Page 33: Setting Black Mark Sensing + Calibration
Setting Black Mark sensing + calibration Turn OFF the power switch Hold on the button then turn ON the power switch Release the button when the LED becomes green/amber and blinking. (Any green/amber will do during the 5 blinks) The LED color will change in the following order: ... -
Page 34: Skip Auto.bas
Skip AUTO.BAS PAL programming language allows user to download an auto execution file to flash memory. The printer will run the AUTO.BAS program immediately when turning on printer power. The AUTO.BAS program can be interrupted without running the program by the power-on utility. Turn OFF the power switch Hold on the button then turn ON the power switch Release the button when the LED becomes... -
Page 35: Lcd Menu Function
Press the “Menu” button to enter the main menu. Use the “Cross” button to select the item on main menu. The selected item will turn red. Press the “Feed” button to enter the setting list. Fastmark M5e - 35 -... -
Page 36: Main Menu Overview
Main menu overview There are 8 categories for the main menu. You can easily set the settings of printer without connecting the computer. Please refer to following sections for more details. CARD - 36 -... -
Page 37: Tspl2
TSPL2 Description Item Default Use this item to setup print speed. Each increase or decrease Speed is 1 inch per second. Available setting is from 4 to 12. Use this option to setup print darkness. The available setting is Density from 0 to 15, and the step is 1. - Page 38 This item is used to set the print mode. There are 5 modes as listed below: Printer Description Mode Batch None Next label top of form is aligned to the print head Print mode burn line location. (Tear Off Mode) Mode Batch Mode Once image is printed completely, label gap/black...
-
Page 39: Zpl2
ZPL2 - 39 -... - Page 40 Item Description Default Use this item to setup print darkness. The available Darkness setting is from 0 to 30, incremented by 1. You may need to adjust your density based on selected media. Use this item to setup print speed. Each increase or Print Speed decrease is 1 ips.
- Page 41 This option is used to set the media action when you turn on the printer. Selections Description Media Power Feed Printer will advance one label Motion Printer will calibrate the sensor levels, Calibration determine length and feed label Printer will determine length and feed Length label No Motion...
-
Page 42: Sensors
Sensors This option is used to calibrate the selected sensor. We recommend sensor calibration when changing media and before printing. Item Description Default This option is used to set the media sensor type and Auto calibrate the selected sensor automatically. Printer will feed 2 to 3 gap labels to calibrate the sensor sensitivity Calibration automatically. -
Page 43: Interface
Interface This option is used to set the printer interface settings. Serial Item Description Default Baud Rate 9600 This item is used to set the RS-232 baud rate. Parity None This item is used to set the RS-232 parity. Data Bits This item is used to set the RS-232 Data Bits. -
Page 44: Ethernet
Ethernet Use this menu option is to configure the internal Ethernet, verify status, and reset the module. Item Description Default Use this menu to check the Ethernet IP address Status and MAC setting status. This item is used to turn ON or OFF the DHCP DHCP (Dynamic Host Configuration Protocol) network protocol. -
Page 45: Bluetooth
Bluetooth This option is used to set the printer Bluetooth settings. Bluetooth Name Menu Bluetooth Interface Bluetooth PIN code Item Description Default Bluetooth This item is used to set the local name for Bluetooth. BT-SPP Name Bluetooth PIN This item is used to set the local PIN code for 0000 Code Bluetooth. -
Page 46: File Manager
File Manager This feature is used to check the printer’s available memory and file list. Item Description Use this menu to show, delete and run (.BAS) files saved in the printer DRAM DRAM memory. Use this menu to show, delete and run (.BAS) files saved in the printer FLASH Flash memory. -
Page 47: Diagnostics
Diagnostics Print Configuration This feature prints the current printer configuration. Self-test printout Model name F/W version Firmware checksum Printer S/N TSC configuration file System date System time Printed mileage (meter) Cutting counter Print speed (inch/sec) Print darkness Label size (inch) Gap distance (inch) Gap/black mark sensor intension... - Page 48 ZPL setting information Print darkness Print speed (inch/sec) Label size Control prefix Format prefix Delimiter prefix Printer power up motion Printer head close motion Note: ® ZPL is a Zebra language emulation. RS232 serial port configuration Numbers of download files Total &...
- Page 49 Dump Mode Captures the data from the communications port and prints out the data received by the printer. In the dump mode, all characters will be printed in 2 columns. The left side characters are received from your system and right side data are the corresponding hexadecimal value of the characters.
-
Page 50: Advanced
Display This feature verifies the display. Sensor This feature verifies the sensor setting. Advanced This feature is used to set the printer advanced settings. Item Description Display This item is used to adjust the brightness for display. Brightness Date & Time This item is used to setup the display date and time. -
Page 51: Service
Service This feature is used to restore printer settings to factory defaults. Item Description Initialization This feature is used to restore printer default settings. Printer This feature is used verify the printer serial number, printed Information mileage(m), labels(pcs.) and cutting counter. - 51 -... -
Page 52: Diagnostic Tool
Diagnostic Tool The Diagnostic Utility is a toolbox that allows users to explore the printer's settings and status; change printer settings; download graphics, fonts, and firmware; create printer bitmap fonts; and to send additional commands to the printer. Using this convenient tool, you can explore the printer status and settings and troubleshoot the printer. -
Page 53: Using Printer Function
Using Printer Function Select the PC interface connected to the bar code printer. Click the “Function” button for settings. The detail functions in the Printer Function Group are listed as below. Function Description Calibrate the sensor specified in the Printer Calibrate Sensor Setup group media sensor field Setup the IP address, subnet mask, gateway for... -
Page 54: Using Usb Interface To Setup Ethernet Interface
Using USB interface to setup Ethernet interface Connect the USB cable between the computer and the printer. Turn on the printer power. Start the Diagnostic Utility by double clicking on the icon. The Diagnostic Utility default interface setting is USB. If the USB interface is connected to the printer, no other settings need to be changed in the interface field. -
Page 55: Using Rs-232 Interface To Setup Ethernet Interface
Using RS-232 interface to setup Ethernet interface Connect the computer and the printer with a RS-232 cable. Turn on the printer power. Start the Diagnostic Utility by double clicking on the icon. Select “COM” as interface then click on the “Setup” button to select the serial port baud rate, parity check, data bits, stop bit and flow control parameters. -
Page 56: Using Ethernet Interface To Setup Ethernet Interface
Using Ethernet interface to setup Ethernet interface Connect the computer and the printer to the LAN. Turn on the printer power. Start the Diagnostic Utility by double clicking on the icon. Select “Ethernet” as the interface then click on the “Setup” button to setup the IP address, subnet mask and gateway for the on board Ethernet. - Page 57 Click “Exit” button to exit and go back to Diagnostic Tool main screen. Factory Default button This function will reset the IP address, subnet mask and gateway parameters obtained by DHCP and reset the printer name. Web setup button While using the Diagnostic Utility to setup the printer, you can also explore and configure the printer settings and status or update the firmware within the IE or Firefox web browser.
-
Page 58: Troubleshooting
Troubleshooting Common problems The following guide lists the most common problems that may be encountered when operating this bar code printer. If the printer still does not function after all suggested solutions have been invoked, please contact the Customer Service Department of your purchased reseller or distributor for assistance. - Page 59 * Running out of label. * Supply a new label roll. * Please refer to the steps in user’s * The label is installed No Paper incorrectly. manual to reinstall the label roll. * Gap/black mark sensor * Calibrate the gap/black mark is not calibrated.
- Page 60 Missing print on the left * Wrong label size setup. * Set the correct label size. or right side of label Gray line on the blank * The print head is dirty. * Clean the print head. label * The platen roller is dirty. * Clean the platen roller.
- Page 61 * Calibrate the sensor sensitivity. * Media sensor sensitivity * Set the correct label size and gap is not set properly. size. * Label size is incorrect. * Press [MENU] [SELECT] * The parameter Shift Y in x3[DOWN]x6 [SELECT] to Incorrect small label the LCD menu is print position...
-
Page 62: Maintenance
Maintenance Tools and methods Printer Method Interval Always turn off the printer before Clean the print head when changing cleaning the print head. a new label roll Allow the print head to cool for a minimum of one minute. Use a (Head cleaner pen) or cotton swab and isopropyl Alcohol to clean the print head surface. -
Page 63: Product Specifications
Product Specifications Standard features Standard product features ○ Thermal transfer/ or direct thermal ○ 6 operating buttons and 1 LED with 3 colors ○ 320 x 240 TFT LCD (UI of operating menu) 32-bit RISC high performance processor (Atmel ○ 9G25/ 400 MHz) ○... -
Page 64: Bar Code Symbologies & Graphics
Bar code symbologies & graphics Supported bar codes Supported images 1D bar code 2D bar code BITMAP, BMP, Code128 CODABLOCK PCX (Max. 256 subsets A.B.C, F mode, colors graphics) Code128UCC, DataMatrix, EAN128, Maxicode, Interleave 2 of PDF-417, 5, Code 39, Aztec, Code 93, EAN- MicroPDF417,... -
Page 65: Printer Optional Features
Printer optional features The printer offers the following optional features User Dealer Factory Product option features option option option Peel-off kit ○ Regular cutter (full cut guillotine cutter) Paper thickness: 0.06~ 0.19 mm Paper length: 1” ~ max. length ○ Max. -
Page 66: General Specifications
General specifications General specifications Physical dimensions 7.9” (W) x 7.5” (H) x 10.2” (D) Weight 5.0 lbs Mechanism Clamshell with Double-walled plastic External universal switching power supply • Input: AC 100-240V/ 2.5A, 50-60 Hz Power • Output: DC 24V/ 3.75A, 90W Operation: 5 ~ 40˚C (41 ~ 104˚F), 25~85% non-condensing Environmental Storage: -40 ~ 60 ˚C (-40 ~ 140˚F), 10~90% non-condensing... -
Page 67: Ribbon Specifications
Ribbon specifications Ribbon specifications Ribbon outside diameter Max. 1.5” OD Ribbon length 120 yards 0.5” ID core Ribbon core inside diameter Ribbon width 1.5” ~4.3” Ribbon wound type Ink coated outside wound Media specifications Media specifications Max. 5” OD Media roll capacity 1”... - Page 68 Corporate Headquarters Manufacturing/Service 803 Camarillo Springs Road, Suite-D 5033 Sirona Drive, Suite-800 Camarillo, CA 93012 Charlotte, NC 28273 TEL: 800.215.9192 TEL: 800.476.2120 - 68 - FAX: 805.484.5282 FAX: 704.525.6104 Web site: www.AMTDatasouth.com...
Need help?
Do you have a question about the Fastmark M5e and is the answer not in the manual?
Questions and answers