
Subscribe to Our Youtube Channel
Related Manuals for L-Acoustics kudo multi-mode wst


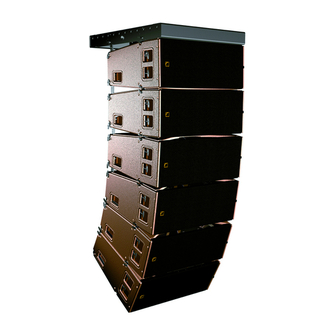
Summary of Contents for L-Acoustics kudo multi-mode wst
- Page 1 ® KUDO ® Multi-Mode WST System ® KUDO ® Système Multi-Mode WST VERSION 1.0 RIGGING PROCEDURES PROCÉDURES D’ACCROCHAGE w w w . l - a c o u s t i c s . c o m...
- Page 2 w w w . l - a c o u s t i c s . c o m...
-
Page 3: Safety Warnings
1. Read this manual 2. Heed all safety warnings 3. Follow all instructions 4. The user should never incorporate equipment or accessories not approved by L-ACOUSTICS ® Personnel qualification Installation and set-up should only be carried out by qualified personnel that are familiar with the rigging techniques and safety recommendations outlined in this manual. - Page 4 WARNING 11. Local regulations Some countries require higher Ultimate Strength Safety Factors and specific rigging approvals. It is the user responsibility to ensure that any overhead suspension of L-ACOUSTICS ® systems has been made in accordance with all applicable local regulations.
-
Page 5: Ec Declaration Of Conformity
Reselling of the product is only possible if the user manual is available. Any changes made to the product have to be documented in writing and passed on to the buyer in the event of resale. IMPORTANT EC declaration of conformity L-ACOUSTICS ® 13 rue Levacher Cintrat Parc de la Fontaine de Jouvence... -
Page 6: Table Of Contents
SYSTEM Rigging Procedures VERSION 1.0 CONTENTS SAFETY WARNINGS Symbol description ............................... 1 Important safety instructions ..........................1 EC declaration of conformity..........................3 CONTENTS INTRODUCTION Welcome to L-ACOUSTICS ® ..........................5 Unpacking ................................5 KUDO ® SYSTEM KUDO ® RIGGING COMPONENTS KBUMP rigging structure and KJACK rigging accessories.................. -
Page 7: Introduction
In order to obtain the address of the nearest distributor go to the internet website @ www.l-acoustics.com. Unpacking Carefully open the shipping carton and check the product for any noticeable damage. Each L-ACOUSTICS ® product is tested and inspected before leaving the factory and should arrive in perfect condition. -
Page 8: Kudo ® System
SOUNDVISION software to verify that safe system setup safety limits apply. A detailed description on the use of the SOUNDVISION software is beyond the scope of this manual. Please refer to the appropriate documentation, also available on the L-ACOUSTICS ®... -
Page 9: Kudo Rigging Components
KBUMP rigging structure and KJACK rigging accessories ® ® The L-ACOUSTICS KBUMP rigging structure has been exclusively designed to fly or stack the L-ACOUSTICS KUDO ® enclosures as a variable-curvature, vertical line source array. Figure 3: KBUMP with two shackles The KBUMP is supplied with two 22-shackles (Figure 3) that can support up to 2000 kg / 4409 lb. - Page 10 ® KUDO ® MULTI-MODE WST SYSTEM Rigging Procedures VERSION 1.0 ® Figure 4: KBUMP and KJACK elements for stacking a KUDO array KBUMP can also be used as a horizontal or tilted ground stacking platform using two complimentary KJACK accessories (Figure 4).
-
Page 11: Klift Rigging Accessory
KLIFT rigging accessory The L-ACOUSTICS ® KLIFT rigging accessory has been exclusively designed to fly the L-ACOUSTICS ® KUDO ® enclosures as a 10°-constant curvature, horizontal line source array. The KLIFT is supplied with one 18-shackle (Figure 5) that can support up to 1250 kg / 2756 lb. with an Ultimate Strength Safety Factor of 5:1. -
Page 12: Installation
INSTALLATION Flying a vertical line source array (using KBUMP) ® Before installation, in order to position and correctly place the array the user should use L-ACOUSTICS SOUNDVISION software to determine: • Correct hole position of the shackles on the KBUMP •... - Page 13 2. On each KUDO ® enclosure, adjust the K-LOUVER ® panels (see the ‘‘KUDO ® ’’ user manual). 3. On each KUDO ® enclosure, remove the 8 BLP. ® 4. On both sides of each KUDO enclosure, push forward the rotating arm tab (accessible in the handle pocket) and secure the front rigging point using the corresponding BLP.
- Page 14 ® KUDO ® MULTI-MODE WST SYSTEM Rigging Procedures VERSION 1.0 7. On both sides of the first KUDO ® enclosure, select the 5° angle (the top enclosure will be parallel to the KBUMP). Figure 10: First enclosure 5° angle setting 8.
-
Page 15: Flying The Kudo ® Array In The Vertical Position
11. For each KUDO ® enclosure, remove both dolly board BLP by pulling on both lanyards. Figure 12: Pulling on the dolly board BLP lanyards ® ® 12. On each KUDO enclosure, connect the loudspeaker cables (refer to the ‘‘KUDO ’’... - Page 16 ® KUDO ® MULTI-MODE WST SYSTEM Rigging Procedures VERSION 1.0 Select the desired angle between KUDO ® #1 and #2 (the rotating arms slide freely between the enclosures). Figure 14: Selecting the angle between KUDO ® #1 and #2 ® Raise the system to lift KUDO #2 into position.
-
Page 17: Taking Down The Array
Secure KUDO ® #2 to KUDO ® #1 by attaching both BLP to both front rigging points. ® ® Figure 16: Securing KUDO #2 to KUDO Repeat steps 2 through 4 for all KUDO ® enclosures. Arrange / stack the dolly boards. 6.1.3 Taking down the array 1. - Page 18 ® KUDO ® MULTI-MODE WST SYSTEM Rigging Procedures VERSION 1.0 2. Lower the system so as to land the bottom enclosure on its dolly board, attach both BLP. 3. Remove both rear angle selection BLP on the bottom enclosure (both rear inter-enclosure BLP remain attached). Figure 18: Removing both rear angle selection BLP 4.
-
Page 19: Ground Stacking A Vertical Line Source Array (Using Kbump And Kjackx2)
Ground stacking a vertical line source array (using KBUMP and KJACKx2) Before installation, in order to position and correctly place the array the user should use L-ACOUSTICS ® SOUNDVISION software to determine: • Number of KUDO ® enclosures • Angle between KBUMP and ground •... - Page 20 ® KUDO ® MULTI-MODE WST SYSTEM Rigging Procedures VERSION 1.0 ® 2. On each KUDO ® enclosure, adjust the K-LOUVER panels to the desired settings (see the ‘‘KUDO ® ’’ user manual). 3. On each KUDO ® enclosure, remove the 8 BLP. 4.
- Page 21 Select the angle between the bottom KUDO ® and the KBUMP. Note: Selecting the 5° angle sets the bottom KUDO ® site angle parallel to the KBUMP (see also section 5.1). Figure 23: Selecting the first enclosure angle 7. a. Place the KBUMP in position by aligning the stop tabs with the bottom KUDO ®...
- Page 22 ® KUDO ® MULTI-MODE WST SYSTEM Rigging Procedures VERSION 1.0 8. On each KUDO ® enclosure, pre-select the inter-enclosure angle based on SOUNDVISION simulation results. Figure 25: Pre-selecting inter-enclosure angles 9. For each KJACK: a. Align the U-bracket with the KBUMP holes (threaded insert oriented downwards). b.
- Page 23 10. Lift / rotate the stack. ® A minimum of 2 people are required to lift a stack of 3 KUDO enclosures. A minimum of 3 people are required to lift a stack of 4 or more KUDO ® enclosures. Take care to avoid mechanical shock when landing the stack.
- Page 24 ® KUDO ® MULTI-MODE WST SYSTEM Rigging Procedures VERSION 1.0 12. On each KUDO ® enclosure, remove the dolly board by pulling on the captive BLP lanyards. Figure 29: Pulling on the captive BLP lanyards 13. a. Slightly raise the stack and place one support base in position. b.
-
Page 25: Disassembling The Ground Stacked Array
14. Set the KBUMP site angle (with reference to SOUNDVISION simulations) by screwing both KJACK accessories (see section 5.1). Figure 31: Setting the KBUMP site angle 15. Secure the system using ratchet straps or any applicable materials. 6.2.2 Disassembling the ground stacked array 1. - Page 26 ® KUDO ® MULTI-MODE WST SYSTEM Rigging Procedures VERSION 1.0 3. On each KUDO ® enclosure, place the dolly board by attaching both captive BLP. Figure 33: Installing the dolly boards 4. Lift / rotate the stack. A minimum of 3 people are required to lift a stack of 3 KUDO ®...
-
Page 27: Flying A Horizontal Line Source Array (Using Klift)
Flying a horizontal line source array (using KLIFT) Before installation, in order to position and correctly place the array the user should use L-ACOUSTICS ® SOUNDVISION software to determine: • Correct hole position of the shackle on the KLIFT •... -
Page 28: Disassembling
® KUDO ® MULTI-MODE WST SYSTEM Rigging Procedures VERSION 1.0 3. Install a second KUDO ® enclosure and physically secure 4. Secure the 18-shackle to the KLIFT at the it to the first one using two BLP. chosen location (see appendix 9.2). ®... -
Page 29: Care And Maintenance
CARE AND MAINTENANCE ® The components for assembling the KUDO system are as follows: • KBUMP rigging structure, 22-shackles, and ball locking pins. • KLIFT rigging accessory and 18-shackle. • KJACKx2 rigging accessories. • Rotating arms, ball locking pins, and rigging points on each KUDO ®... -
Page 30: Specifications
Complementary accessories KJACK wheel-handled threaded rods for stacking a vertical array (available as an option) 2 shackles with 22 mm/0.87 in. screw pin Installation safety limits are specified in the SOUNDVISION software which is designed to help with L-ACOUSTICS ®... -
Page 31: Appendix
APPENDIX KBUMP rigging points Up to 21 KUDO ® can be flown as a vertical line source array using the KBUMP rigging structure. The hole numbering convention for KBUMP is shown in Figure 40. Note: KBUMP should be installed with the serial number tag oriented towards the rear of the array. Rear Serial Side bar... -
Page 32: Klift Site Angle Setting
® KUDO ® MULTI-MODE WST SYSTEM Rigging Procedures VERSION 1.0 KLIFT site angle setting When flying a horizontal KUDO ® array underneath one or two KLIFT rigging accessories, the site angle is set by securing the 18-shackle into one of the 12 pick point holes numbered below: Rear Serial number... - Page 33 1. Lire le présent manuel 2. Suivre les consignes de sécurité 3. Suivre les instructions 4. N’utiliser en aucun cas des équipements ou accessoires non approuvés par L-ACOUSTICS ® Qualification du personnel L’installation du système doit être effectuée par un personnel qualifié et formé aux techniques d’accrochage et consignes de sécurité...
- Page 34 Certains pays imposent des Coefficients de Sécurité à la Rupture supérieurs et une règlementation spécifique pour l’installation en hauteur. Il est de la responsabilité de l’utilisateur de s’assurer que ® tout levage d’un système L-ACOUSTICS soit réalisé dans le strict respect de la règlementation locale en vigueur.
- Page 35 La revente du produit n’est possible qu’accompagnée du présent manuel. Toute modification du produit doit être consignée dans ce manuel en cas de revente. IMPORTANT Déclaration de conformité CE L-ACOUSTICS 13 rue Levacher Cintrat Parc de la Fontaine de Jouvence 91462 Marcoussis Cedex France Déclare que les produits suivants :...
- Page 36 VERSION 1.0 SOMMAIRE DÉCLARATIONS DE SÉCURITÉ Symboles utilisés ..............................1 Consignes de sécurité importantes........................1 Déclaration de conformité CE..........................3 SOMMAIRE INTRODUCTION Bienvenue chez L-ACOUSTICS ® ......................... 5 Déballage du produit ............................5 SYSTÈME KUDO ® ÉLÉMENTS D’ACCROCHAGE DU KUDO ®...
-
Page 37: Introduction
Si le produit nécessite une réparation ou pour tout renseignement sur la garantie, contacter un distributeur agréé. Les coordonnées du distributeur le plus proche sont disponibles sur le site internet www.l-acoustics.com. Déballage du produit Dès réception, inspecter soigneusement le produit afin de détecter un éventuel défaut. -
Page 38: Système Kudo
LA NETWORK MANAGER SOUNDVISION Figure 2 : Eléments constitutifs du système KUDO ® Chaque configuration devrait être préalablement modélisée dans l’application L-ACOUSTICS ® SOUNDVISION pour en vérifier la conformité mécanique. La description complète de l’application SOUNDVISION dépasse l’objectif du présent manuel. Pour une information détaillée se référer à la documentation appropriée téléchargeable du site internet www.l-acoustics.com. -
Page 39: Éléments D'accrochage Du Kudo
ÉLÉMENTS D’ACCROCHAGE DU KUDO ® Éléments d’accrochage KBUMP et KJACK ® La structure d’accrochage L-ACOUSTICS KBUMP est exclusivement dédiée à l’accrochage ou posage des enceintes L-ACOUSTICS ® KUDO ® en ligne source verticale à courbure variable. Figure 3 : Le KBUMP et ses deux manilles Le KBUMP est fourni avec deux manilles 22 (Figure 3) pouvant supporter chacune une masse totale de 2000 kg/4409 lb. - Page 40 ® KUDO ® SYSTEME MULTI-MODE WST Procédures d’Accrochage VERSION 1.0 ® Figure 4 : Éléments KBUMP et KJACK pour poser une ligne source KUDO verticale KBUMP peut également servir de plateforme horizontale ou anglée pour poser au sol une ligne source KUDO ®...
-
Page 41: Accessoire D'accrochage Klift
Accessoire d’accrochage KLIFT L’accessoire L-ACOUSTICS ® KLIFT est exclusivement dédié au levage des enceintes L-ACOUSTICS ® KUDO ® ligne source horizontale à courbure constante de 10°. Le KLIFT est fourni avec une manille 18 (Figure 5) pouvant supporter une masse totale de 1250 kg / 2756 lb. avec un Coefficient de Sécurité... -
Page 42: Installation
INSTALLATION Levage d’une ligne source verticale (avec la structure KBUMP) ® Avant l’installation l’utilisateur peut modéliser la configuration du système à l’aide du logiciel L-ACOUSTICS SOUNDVISION. Ce dernier fournit les données suivantes : • Position de la manille de suspension sur le KBUMP •... - Page 43 Sur chaque KUDO ® , ajuster les déflecteurs K-LOUVER ® (voir le manuel utilisateur ‘‘KUDO ® ’’). Sur chaque KUDO ® , ôter les 8 GVB. ® Sur les deux côtés de chaque KUDO , sortir le pion du bras rotatif (accessible par l’intérieur de la poignée) et l’attacher avec la GVB correspondante.
- Page 44 ® KUDO ® SYSTEME MULTI-MODE WST Procédures d’Accrochage VERSION 1.0 Sur les deux côtés du premier KUDO ® , sélectionner l’angle 5° (l’enceinte sera parallèle au KBUMP). Figure 10 : Sélection de l’angle 5° sur la première enceinte Sur le KBUMP, vérifier que les 4 GVB sont enclenchées dans leurs logements internes. a.
-
Page 45: Levage
11. Sur chaque KUDO ® , ôter les 2 GVB du plateau à roulettes en tirant sur leurs élingues. Figure 12 : Séparation des GVB du plateau à roulettes 12. Sur chaque KUDO ® , connecter les câbles haut-parleur (voir le manuel utilisateur ‘‘KUDO ®... - Page 46 ® KUDO ® SYSTEME MULTI-MODE WST Procédures d’Accrochage VERSION 1.0 Sélectionner l’angle désiré entre les KUDO ® n°1 et n°2 (les bras rotatifs translatent librement entre les enceintes). Figure 14 : Sélection de l’angle entre les KUDO ® n°1 et n°2 ®...
-
Page 47: Démontage
Solidariser l’avant du KUDO ® n°2 au KUDO ® n°1 en utilisant les deux GVB dédiées. ® ® Figure 16 : Solidarisation du KUDO n°2 au KUDO n°1 Répéter les étapes 2 à 4 pour tous les KUDO ® Empiler les plateaux à roulettes. 6.1.3 Démontage Ôter les deux GVB avant inférieures de l’avant-dernier KUDO... - Page 48 ® KUDO ® SYSTEME MULTI-MODE WST Procédures d’Accrochage VERSION 1.0 Descendre le système jusqu’à poser la dernière enceinte sur son plateau à roulettes, et attacher les deux GVB de ce dernier. ® Ôter les deux GVB de sélection angulaire sur le dernier KUDO (les deux autres GVB de fixation de la barre angulaire restent attachées).
-
Page 49: Posage D'une Ligne Source Verticale (Avec Les Éléments Kbump Et Kjack)
Posage d’une ligne source verticale (avec les éléments KBUMP et KJACK) Avant l’installation l’utilisateur peut modéliser la configuration du système à l’aide du logiciel L-ACOUSTICS ® SOUNDVISION. Ce dernier fournit les données suivantes : • Nombre d’enceintes KUDO ® •... - Page 50 ® KUDO ® SYSTEME MULTI-MODE WST Procédures d’Accrochage VERSION 1.0 ® 2. Sur chaque KUDO ® , ajuster les déflecteurs K-LOUVER (voir le manuel utilisateur ‘‘KUDO ® ’’). 3. Sur chaque KUDO ® , ôter les 8 GVB. Sur les deux côtés de chaque KUDO ®...
- Page 51 6. Sélectionner l’angle entre le premier KUDO ® et le KBUMP. Note : L’angle 5° positionne le premier KUDO ® parallèlement au KBUMP (voir aussi la section 5.1). Figure 23 : Sélection de l’angle du premier KUDO ® 7. a. Positionner le KBUMP en posant ses deux équerres d’arrêt sur les deux pions du premier KUDO ®...
- Page 52 ® KUDO ® SYSTEME MULTI-MODE WST Procédures d’Accrochage VERSION 1.0 8. Sur chaque KUDO ® , sélectionner l’angle prévu par le logiciel SOUNDVISION. Figure 25 : Sélection de l’angle 9. Pour chaque KJACK : a. Aligner l’étrier avec les perçages du KBUMP (l’insert fileté orienté à l’opposé des enceintes). b.
- Page 53 10. Faire pivoter le système en position verticale. Faire pivoter un système de 3 KUDO ® nécessite l’intervention de 2 personnes au minimum. Faire pivoter un système de 4 KUDO ® ou plus nécessite l’intervention de 3 personnes au minimum. Éviter les chocs mécaniques pendant l’opération.
- Page 54 ® KUDO ® SYSTEME MULTI-MODE WST Procédures d’Accrochage VERSION 1.0 12. Sur chaque KUDO ® , ôter le plateau à roulettes en tirant sur les élingues des 2 GVB. Figure 29 : Séparation des GVB des plateaux à roulettes 13. a. Soulever légèrement le système et placer l’un des supports sous sa tige filetée. b.
-
Page 55: Démontage
14. Régler l’angle de site du KBUMP (prévu dans le logiciel SOUNDVISION) en vissant les deux accessoires KJACK. (voir la section 5.1). Figure 31 : Réglage de l’angle de site du KBUMP 15. Arrimer le système à l’aide de sangles à rochet ou tout autre moyen approprié. 6.2.2 Démontage 1. - Page 56 ® KUDO ® SYSTEME MULTI-MODE WST Procédures d’Accrochage VERSION 1.0 3. Sur chaque KUDO ® , installer le plateau à roulettes en attachant les 2 GVB correspondantes. Figure 33 : Installation des plateaux à roulettes 4. Faire pivoter le système en position horizontale. Faire pivoter un système de 3 KUDO ®...
-
Page 57: Levage D'une Ligne Source Horizontale (Avec L'accessoire Klift)
Levage d’une ligne source horizontale (avec l’accessoire KLIFT) Avant l’installation l’utilisateur peut modéliser la configuration du système à l’aide du logiciel L-ACOUSTICS ® SOUNDVISION. Ce dernier fournit les données suivantes : • Positionnement de la manille de suspension sur le KLIFT •... -
Page 58: Démontage
® KUDO ® SYSTEME MULTI-MODE WST Procédures d’Accrochage VERSION 1.0 Disposer une seconde enceinte KUDO ® et la solidariser Accrocher la manille 18 dans le logement à la première en utilisant 2 GVB. adéquat de l’accessoire KLIFT (voir l’annexe 9.2). Figure 37 : Solidarisation du KUDO ®... -
Page 59: Entretien Et Maintenance
ENTRETIEN ET MAINTENANCE ® Le dispositif d’accrochage du système KUDO est constitué des éléments suivants : • Structure d’accrochage KBUMP, ‘‘manilles 22’’, et goupilles de verrouillage à billes. • Accessoire d’accrochage KLIFT et ‘‘manilles 18’’. • Accessoire d’accrochage KJACK. • Bras rotatifs, goupilles de verrouillage à... -
Page 60: Spécifications Techniques
Acier, revêtement poudre époxy noire Accessoires complémentaires Supports KJACK pour poser une ligne source verticale (disponibles en option) 2 manilles avec axe fileté de 22 mm/0.87 in. Les limites d’utilisation sont indiquées dans SOUNDVISION, logiciel d’aide à l’exploitation des produits L-ACOUSTICS ® Référence KLIFT... -
Page 61: Annexes
ANNEXES Points d’accrochage du KBUMP ® Il est possible de lever jusqu’à 21 enceintes KUDO sous la structure d’accrochage KBUMP. La numérotation des points d’accrochage est donnée en Figure 40. Note : Le KBUMP doit être installé de sorte que la platine portant le numéro de série soit orientée vers l’arrière de la ligne source. -
Page 62: Réglage De L'angle De Site Du Klift
® KUDO ® SYSTEME MULTI-MODE WST Procédures d’Accrochage VERSION 1.0 Réglage de l’angle de site du KLIFT Lors du levage d’une ligne source KUDO ® horizontale avec un ou deux accessoires KLIFT, l’angle de site est fixé en insérant la manille 18 dans l’un des logements 1 à 12 représentés dans la figure ci-dessous : Arrière Platine et numéro de série Avant... - Page 63 w w w . l - a c o u s t i c s . c o m...
- Page 64 Document Reference: KUDO_RM_ML_1.0 _________________ © Copyright 2007 by L-ACOUSTICS ® Parc de la Fontaine de Jouvence, 91462 Marcoussis cedex, France _________________ Distribution date: December 26 , 2007 w w w . l - a c o u s t i c s . c o m...
Need help?
Do you have a question about the kudo multi-mode wst and is the answer not in the manual?
Questions and answers