VIA Technologies VB7009 User Manual
Mini-itx embedded board
Hide thumbs
Also See for VB7009:
- User manual (124 pages) ,
- User manual (117 pages) ,
- User manual (129 pages)
Table of Contents
Advertisement
Quick Links
Advertisement
Table of Contents

Related Manuals for VIA Technologies VB7009


Summary of Contents for VIA Technologies VB7009
- Page 1 USER MANUAL VB7009 Mini-ITX embedded board 1.18-04222016-102500...
-
Page 2: Regulatory Compliance
The information provided in this document is believed to be accurate and reliable as of the publication date of this document. However, VIA Technologies assumes no responsibility for the use or misuse of the information (including use or connection of extra device/equipment/add-on card) in this document and for any patent infringements that may arise from the use of this document. - Page 3 Battery Recycling and Disposal Only use the appropriate battery specified for this product. Do not re-use, recharge, or reheat an old battery. Do not attempt to force open the battery. Do not discard used batteries with regular trash. Discard used batteries according to local regulations. Safety Precautions Always read the safety instructions carefully.
- Page 4 1 x SATA cable VB7009 VB7009 VB7009 VB7009- - - - 12XC 12XC 12XC 12XC 1 x VB7009 embedded board (with NanoX2 1.2 GHz NanoBGA2 processor) 1 x I/O bracket 1 x SATA cable VB7009 VB7009 VB7009 VB7009- - - - 12QCE 12QCE...
-
Page 5: Table Of Contents
VB7009 VB7009 VB7009 VB7009 User Manual User Manual User Manual User Manual Table of Contents 1. 1. 1. 1. Product Overview Product Overview Product Overview Product Overview .............................................................................................................. - Page 6 6.2. Control Keys..................................... 50 6.3. Navigating the BIOS Menus ..............................51 6.4. Getting Help..................................... 51 6.5. Main Menu (BIOS for VB7009-16/VB7009-10E/VB7009-12XC)..................52 6.5.1. Standard CMOS Features ..............................52 6.5.2. Advanced BIOS Features..............................52 6.5.3. Advanced Chipset Features ............................. 52 6.5.4.
- Page 7 VB7009 VB7009 VB7009 VB7009 User Manual User Manual User Manual User Manual 6.11.1. LCD Clock Source Control .............................. 61 6.11.2. LCD Backlight Control ..............................61 6.12. PCIE Bus Control ..................................62 6.12.1. PCIE Root Port..................................62 6.12.2. PCIE Target Link Speed..............................62 6.12.3.
- Page 8 Load Optimized Defaults ..............................77 6.26 Set Supervisor/User Password.............................. 78 6.27 Save & Exit Setup ..................................79 6.28 Exit Without Saving................................. 80 6.29 Main Menu (BIOS for VB7009-12QCE) ..........................81 6.29.1 AMIBIOS....................................81 6.29.2 Processor....................................81 6.29.3 System Memory .................................. 81 6.29.4 System Time ..................................
- Page 9 A.1.7. Network Access <Single LAN> – Gigabit Ethernet File Transmitting................106 A.1.8. Network Access <Dual LAN> – Gigabit Ethernet File Transmitting .................. 106 A.2. VB7009-10E ....................................107 A.2.1. System Idle – Windows 7 32-bit ............................107 A.2.2. S3 Status – Windows 7 Sleep............................. 107 A.2.3.
- Page 10 Figure 44: Suggested minimum internal chassis ceiling height......................48 Figure 45: Suggested keepout areas ................................ 49 Figure 46: Illustration of the Main menu screen (for VB7009-16/VB7009-10E/VB7009-12XC) ..........52 Figure 47: Illustration of the Standard CMOS Features screen......................54 Figure 48: Illustration of the IDE Channel 0 Master screen ........................ 55...
- Page 11 Figure 69: Illustration of the Save & Exit Setup screen........................79 Figure 70: Illustration of the Exit Without Saving screen ........................80 Figure 71: Illustration of the Main menu screen (for VB7009-12QCE) .................... 81 Figure 72: Illustration of the Advanced Settings screen........................82 Figure 73: Illustration of the CPU Configuration screen........................
- Page 12 Table 31: SATA DOM voltage select jumper settings ........................39 Table 32: LVDS power select jumper settings ............................40 Table 33: Backlight power select jumper settings ..........................41 Table 34: Serial port addresses and IRQs .............................. 85 Table 35: VB7009 mating connector vendor lists ..........................116...
-
Page 13: Product Overview
CoolStream technology. The VIA VB7009 has one 1066 MHz DDR3 DIMM slot that supports up to 4 GB memory size. The VIA VB7009 provides support for high fidelity audio with its included VIA VT1708S High Definition Audio codec. In addition it supports two SATA 3Gb/s storage devices. -
Page 14: Via Vx900 Chipset
The VIA VB7009 enables companies to slowly roll out upgrades as necessary instead of having to replace everything all at once. This ensures that companies using the VB7009 obtain the maximum benefits from its past investments in PCI expansion cards. -
Page 15: Product Specifications
1.0 GHz NanoBGA2 (for VB7009-10E SKU Supports 400MHz Front Side Bus 21 x 21 mm FCBGA VIA Nano X2 1.2 GHz NanoBGA2 (for VB7009-12XC SKU Supports 800MHz Front Side Bus 21 x 21 mm FCBGA VIA Eden X4 1.2 GHz NanoBGA2 (for VB7009-12QCE SKU ... - Page 16 1 x System fan connector 3 x COM pin headers by F81865-I, with 5V/12V select (available only for VB7009-16 & VB7009-10E) 5 x COM pin headers by F81865-I, with 5V/12V select (available only for VB7009-12XC & VB7009-12QCE) ...
- Page 17 Notes: Notes: 1. The VB7009-16 and VB7009-12XC SKUs use heatsink with fan. 2. The VB7009-10E and VB7009-12QCE SKUs use heatsink. 3. As the operating temperature provided in the specifications is a result of the test performed in VIA’s chamber, a number of variables can influence this result.
-
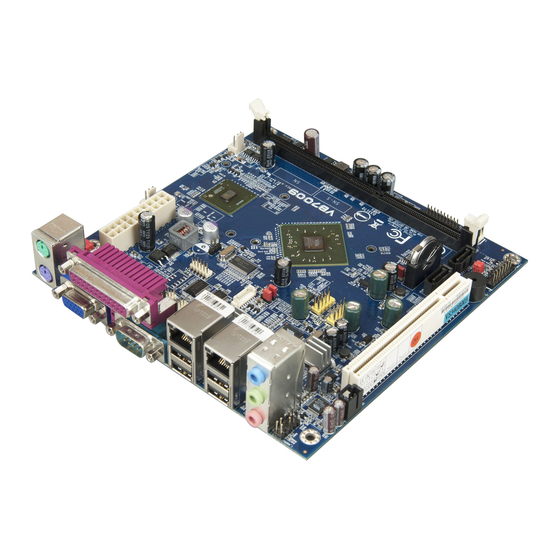
Page 18: Layout Diagram
: Layout diagram of the VB7009 mainboard (top view) : Layout diagram of the VB7009 mainboard (top view) Note: Note: Note: Note: The additional COM pin headers labeled as “COM5” and “COM6” are available only in VB7009-12XC & VB7009-12QCE SKU. -
Page 19: Product Dimensions
Figure Figure Figure Figure 2 2 2 2 : Mounting holes and dimensions of the VB7009 mainboard : Mounting holes and dimensions of the VB7009 mainboard : Mounting holes and dimensions of the VB7009 mainboard : Mounting holes and dimensions of the VB7009 mainboard 31.50 mm... -
Page 20: Height Distribution
Height: 35.00 mm Height: 34.60 mm Figure Figure Figure Figure 4 4 4 4 : Height distribution of the VB7009 mainboard : Height distribution of the VB7009 mainboard : Height distribution of the VB7009 mainboard : Height distribution of the VB7009 mainboard... -
Page 21: I/O Interface I/O Interface
I/O Interface I/O Interface I/O Interface The VIA VB7009 has a wide selection of interfaces integrated into the board. It includes a selection of frequently used ports as part of the external I/O coastline. 2.1. External I/O Ports PS2 Mouse port... -
Page 22: Ps/2 Port
VB7009 VB7009 VB7009 VB7009 User Manual User Manual User Manual User Manual 2.1.1. PS/2 Port The mainboard has two integrated PS/2 ports for keyboard and mouse. Each port is using the 6-pin Mini-DIN connector. The color purple is use for a PS/2 keyboard while the color green is use for a PS/2 mouse. -
Page 23: Vga Port
VB7009 VB7009 VB7009 VB7009 User Manual User Manual User Manual User Manual 2.1.2. VGA Port The integrated 15-pin VGA port uses a female DE-15 connector. The VGA port is for connecting to analog displays. The pinout of the VGA port is shown below. -
Page 24: Com Port
VB7009 VB7009 VB7009 VB7009 User Manual User Manual User Manual User Manual 2.1.3. COM Port The integrated 9-pin COM port uses a male DE-9 connector. The COM (COM1) port supports the RS-232 standard. The pinout of the COM port is shown below. -
Page 25: Parallel Port
VB7009 VB7009 VB7009 VB7009 User Manual User Manual User Manual User Manual 2.1.4. Parallel Port The integrated 25-pin parallel port uses a female DB-25 connector. A parallel port is a standard printer port that supports Enhanced Parallel Port (EPP) and Extended Capabilities Parallel Port (ECP) modes. -
Page 26: Rj45 Lan Port: Gigabit Ethernet
VB7009 VB7009 VB7009 VB7009 User Manual User Manual User Manual User Manual 2.1.5. RJ45 LAN port: Gigabit Ethernet The two integrated 8-pin Gigabit Ethernet ports are using an 8 Position 8 Contact (8P8C) receptacle connector (commonly referred to as RJ45). The Gigabit Ethernet ports are controlled by VIA Gigabit Ethernet controller. -
Page 27: Usb 2.0 Port
VB7009 VB7009 VB7009 VB7009 User Manual User Manual User Manual User Manual 2.1.6. USB 2.0 Port There are four integrated USB 2.0 ports located below the two RJ45 LAN port at the external I/O panel. The USB 2.0 interface port gives complete Plug and Play and hot swap capability for external devices and it complies with USB UHCI, rev. -
Page 28: Audio Ports
VB7009 VB7009 VB7009 VB7009 User Manual User Manual User Manual User Manual 2.1.7. Audio Ports There are three audio jack receptacles integrated into a single stack on the I/O coastline. Each receptacle can fit a 3.5 mm Tip Ring Sleeve (TRS) connector to enable connections to Line-Out Line-In, and MIC-in. -
Page 29: Onboard Connectors
VB7009 VB7009 VB7009 VB7009 User Manual User Manual User Manual User Manual 2.2. Onboard Connectors 2.2.1. ATX Power Connector The mainboard has a 20-pin ATX power connector onboard. The ATX power connector is labeled as “ATX_POWER1”. The pinout of the ATX power connector is shown below. -
Page 30: Cmos Battery Slot
VB7009 VB7009 VB7009 VB7009 User Manual User Manual User Manual User Manual 2.2.2. CMOS Battery Slot The mainboard is equipped with a CMOS battery slot, which is compatible with CR2032 coin batteries. The CMOS battery slot is labeled as “BAT2”. When inserting a CR2032 coin battery, be sure that the positive side is facing the locking clip. -
Page 31: Front Panel Pin Header
VB7009 VB7009 VB7009 VB7009 User Manual User Manual User Manual User Manual 2.2.3. Front Panel Pin Header The front panel pin header consists of 15 pins in a 16-pin block. Pin 15 is keyed. The front panel pin header is labeled as “F_PANEL1”. It provides access to system LEDs, power, reset, system speaker and HDD LED. -
Page 32: Front Audio Pin Header
VB7009 VB7009 VB7009 VB7009 User Manual User Manual User Manual User Manual 2.2.4. Front Audio Pin Header In addition to the TRS audio jacks on the external I/O coastline, the mainboard has a pin header for Line-Out and MIC-In. The pin header is labeled as “F_AUDIO1”. The pinout of the pin header is shown below. -
Page 33: Smbus Pin Header
VB7009 VB7009 VB7009 VB7009 User Manual User Manual User Manual User Manual 2.2.5. SMBus Pin Header The SMBus pin header consists of three pins that allow connecting the SMBus devices. Devices communicate with a SMBus host and/or other SMBus devices using the SMBus interface. It is labeled as “SMBUS1”. -
Page 34: Cpu And System Fan Connectors
VB7009 VB7009 VB7009 VB7009 User Manual User Manual User Manual User Manual 2.2.6. CPU and System Fan Connectors There are two fan connectors on board: one for the CPU and one for the chassis. The fan connector for the CPU is labeled as “CPUFAN1” and the fan connector for the system is labeled as “SYSFAN1”. -
Page 35: Sata Connectors
VB7009 VB7009 VB7009 VB7009 User Manual User Manual User Manual User Manual 2.2.7. SATA Connectors The two SATA connectors on board can support up to 3 Gb/s transfer speeds, enabling fast data file transfer with independent DMA operation. The SATA connectors are labeled as “SATA1” and “SATA2”. -
Page 36: Usb 2.0 Pin Headers
VB7009 VB7009 VB7009 VB7009 User Manual User Manual User Manual User Manual 2.2.8. USB 2.0 Pin Headers The mainboard has two USB 2.0 pin headers blocks that support up to four USB 2.0 ports. The pin header blocks are labeled as USB_4, and “USB_5”. The pinout of the USB pin headers are shown below. -
Page 37: Com Pin Headers
COM3 and COM4” are available in VB7009-16 and VB7009-10E SKUs, while the additional “COM5” and “COM6” pin headers are offered only by VB7009-12XC & VB7009-12QCE SKU. All the COM pin headers can support +5V or +12V. See page 36 for details on setting the voltage. The pinout of the COM pin headers are shown below. -
Page 38: Ps/2 Keyboard And Mouse Pin Header
VB7009 VB7009 VB7009 VB7009 User Manual User Manual User Manual User Manual 2.2.10. PS/2 Keyboard and Mouse Pin Header The mainboard has a pin header for PS/2 keyboard and mouse. The pin header is labeled as “JKB/MS1”. The pinout of the pin header is shown below. -
Page 39: Lvds Connector
VB7009 VB7009 VB7009 VB7009 User Manual User Manual User Manual User Manual 2.2.11. LVDS Connector The mainboard has one 40-pin LVDS connector on the bottom side. It can support one dual- channel LVDS or one single-channel LVDS. The LVDS connector is labeled as “PANEL_CONN1”. - Page 40 VB7009 VB7009 VB7009 VB7009 User Manual User Manual User Manual User Manual Signal Signal Signal Signal Signal Signal Signal Signal PVDD PVDD -A0_L A0_L -A1_L A1_L -A2_L A2_L -CLK1_L CLK1_L -A3_L A3_L SPCLK1 SPD1 Table Table 20 20: LVDS connector pinout (single...
-
Page 41: Inverter Connector
VB7009 VB7009 VB7009 VB7009 User Manual User Manual User Manual User Manual 2.2.12. Inverter Connector The mainboard has one Inverter connector on the bottom side. The Inverter connector is labeled as “INVERTER1”. The pinout of the connector is shown below. -
Page 42: Spdif Connector
VB7009 VB7009 VB7009 VB7009 User Manual User Manual User Manual User Manual 2.2.13. SPDIF Connector The mainboard has one 3-pin SPDIF (Sony Philips Digital Interface) connector. The SPDIF output provides digital audio to external speakers or compressed AC3 data to an external Dolby Digital Decoder. -
Page 43: Spi Pin Header
VB7009 VB7009 VB7009 VB7009 User Manual User Manual User Manual User Manual 2.2.14. SPI Pin Header The mainboard has one 8-pin SPI pin header. The SPI (Serial Peripheral Interface) pin-header is used to connect to the SPI BIOS programming fixture. The pin header is labeled as “SPI1”. The pinout of the pin header is shown below. -
Page 44: Lpc Pin Header
VB7009 VB7009 VB7009 VB7009 User Manual User Manual User Manual User Manual 2.2.15. LPC Pin Header The mainboard has one LPC pin header for connecting LPC devices. The pin header is labeled as “LPC1”. The pinout of the pin header is shown below. -
Page 45: Digital I/O Pin Header
VB7009 VB7009 VB7009 VB7009 User Manual User Manual User Manual User Manual 2.2.16. Digital I/O Pin Header The onboard Digital I/O pin header supports up to four GPO and four GPI signals. The pin header is labeled as “DIO1”. The pinout of the pin headers are shown below. -
Page 46: Temperature Sensor Pin Header
VB7009 VB7009 VB7009 VB7009 User Manual User Manual User Manual User Manual 2.2.17. Temperature Sensor Pin Header The mainboard supports a pin header (3-pin) that allows the connection of a temperature sensor cable for detecting the system’s internal air temperature. The temperature reading can be seen in the BIOS Setup Utility. -
Page 47: Jumpers
VB7009 VB7009 VB7009 VB7009 User Manual User Manual User Manual User Manual 3. 3. 3. 3. Jumpers Jumpers Jumpers Jumpers 3.1. Clear CMOS Jumper The onboard CMOS RAM stores system configuration data and has an onboard battery power supply. To reset the CMOS settings, set the jumper on pins 2 and 3 while the system is off. Return the jumper to pins 1 and 2 afterwards. -
Page 48: Com Voltage Select Jumpers
VB7009 VB7009 VB7009 VB7009 User Manual User Manual User Manual User Manual 3.2. COM Voltage Select Jumpers Each of the additional COM ports (available through the onboard COM pin headers, see page 25) can support both +5V and +12V. COM2 has its own pin header block. COM3 and COM4 share a single pin header block. -
Page 49: Com3 And Com4 Voltage Select Jumper
VB7009 VB7009 VB7009 VB7009 User Manual User Manual User Manual User Manual 3.2.2. COM3 and COM4 Voltage Select Jumper The voltage for COM3 and COM4 is controlled by the jumper labeled as “J13”. Refer to Figure 32 for the location of the jumper. -
Page 50: Com5 And Com6 Voltage Select Jumper
VB7009 VB7009 VB7009 VB7009 User Manual User Manual User Manual User Manual 3.2.3. COM5 and COM6 Voltage Select Jumper The voltage for COM5 and COM6 is controlled by the jumper labeled as “J14”. Refer to Figure 33 for the location of the jumper. -
Page 51: Sata Dom Voltage Select Jumper
VB7009 VB7009 VB7009 VB7009 User Manual User Manual User Manual User Manual 3.3. SATA DOM Voltage Select Jumper The SATA connectors (see page 23) can be used to support Disk-on-Module (DOM) flash drives. When the jumpers are set, +5V will be delivered to the 7 pin of the SATA connectors. -
Page 52: Panel Power Select Jumper
VB7009 VB7009 VB7009 VB7009 User Manual User Manual User Manual User Manual 3.4. Panel Power Select Jumper The mainboard has a jumper that controls the voltage delivered to the LVDS panel connector. The jumper is labeled as “PVDD1”. The jumper settings are shown below. -
Page 53: Backlight Power Select Jumper
VB7009 VB7009 VB7009 VB7009 User Manual User Manual User Manual User Manual 3.5. Backlight Power Select Jumper The mainboard has a jumper that controls the input voltage delivered to the LVDS inverter connector. The jumper is labeled as “IVDD_SEL1”. The jumper settings are shown below. -
Page 54: Expansion Slots Expansion Slots
VB7009 VB7009 VB7009 VB7009 User Manual User Manual User Manual User Manual 4. 4. 4. 4. Expansion Slots Expansion Slots Expansion Slots Expansion Slots 4.1. DDR3 Memory Slots The mainboard provide one DDR3 DIMM memory slot. The memory slot can accommodate up to 4 GB of 1066 MHz memory. -
Page 55: Installing A Memory Module
VB7009 VB7009 VB7009 VB7009 User Manual User Manual User Manual User Manual 4.1.1. Installing a Memory Module Step 1 Step 1 Step 1 Step 1 Disengage the locking mechanism at both ends of the DIMM slot by pressing the retaining clips outward. - Page 56 VB7009 VB7009 VB7009 VB7009 User Manual User Manual User Manual User Manual Step Step Step Step 3 3 3 3 Insert the DIMM memory module into the slot and push down at both ends until the locking clips lock the DIMM memory module into place.
-
Page 57: Removing A Memory Module
VB7009 VB7009 VB7009 VB7009 User Manual User Manual User Manual User Manual 4.1.2. Removing a Memory Module Step 1 Step 1 Step 1 Step 1 To disengage the locking clips, push outward the locking clips on both ends of memory slot. When the locking clips have cleared, the DIMM memory module will automatically pop up. -
Page 58: Pci Slot
VB7009 VB7009 VB7009 VB7009 User Manual User Manual User Manual User Manual 4.1.3. PCI Slot The onboard PCI slot, labeled as “PCI_SLOT1”, supports 5V 32-bit PCI cards. It is not compatible with PCI cards requiring 3.3V signaling. The location of the PCI slot is shown below. -
Page 59: Hardware Installation Hardware Installation
Hardware Installation 5.1. Installing into a Chassis The VB7009 can be fitted into any chassis that has the mounting holes for compatible with the standard Mini-ITX mounting hole locations. Additionally, the chassis must meet the minimum height requirements for specified areas of the mainboard. If a riser card module is being used, the chassis will need to accommodate the additional space requirements. -
Page 60: Suggested Minimum Chassis Height
VB7009 VB7009 VB7009 VB7009 User Manual User Manual User Manual User Manual 5.1.2. Suggested minimum chassis height The figure below shows the suggested minimum height requirements for the internal space of the chassis. It is not necessary for the internal ceiling to be evenly flat. What is required is that the internal ceiling height must be strictly observed for each section that is highlighted. -
Page 61: Suggested Keepout Areas
VB7009 VB7009 VB7009 VB7009 User Manual User Manual User Manual User Manual 5.1.3. Suggested keepout areas The figure below shows the areas of the mainboard that is highly suggested to leave unobstructed. Keep out area Figure Figure Figure Figure 45... -
Page 62: Bios Setup Utility
VB7009 VB7009 VB7009 VB7009 User Manual User Manual User Manual User Manual 6. 6. 6. 6. BIOS Setup Utility BIOS Setup Utility BIOS Setup Utility BIOS Setup Utility 6.1. Entering the BIOS Setup Utility Power on the computer and press Delete... -
Page 63: Navigating The Bios Menus
VB7009 VB7009 VB7009 VB7009 User Manual User Manual User Manual User Manual 6.3. Navigating the BIOS Menus The main menu displays all the BIOS setup categories. Use the <Left Left Left>/<Right Left Right Right> and <Up Right Up>/<Down Down Down>... -
Page 64: Main Menu (Bios For Vb7009-16/Vb7009-10E/Vb7009-12Xc)
46 46 46: Illustration of the Main menu screen : Illustration of the Main menu screen : Illustration of the Main menu screen (for VB7009 : Illustration of the Main menu screen (for VB7009 (for VB7009- - - - 16/VB7009... -
Page 65: Set Supervisor Password
VB7009 VB7009 VB7009 VB7009 User Manual User Manual User Manual User Manual 6.5.10. Set Supervisor Password Use this menu option to set the BIOS supervisor password. 6.5.11. Set User Password Use this menu option to set the BIOS user password. -
Page 66: Standard Cmos Features
VB7009 VB7009 VB7009 VB7009 User Manual User Manual User Manual User Manual 6.6. Standard CMOS Features Phoenix - AwardBIOS CMOS Setup Utility Standard CMOS Features Item Help Date (mm:dd:yy) Mon, Sept 26 2011 Time (hh:mm:ss) 3 : 17 : 8... -
Page 67: Ide Channels
VB7009 VB7009 VB7009 VB7009 User Manual User Manual User Manual User Manual 6.7. IDE Channels Channel 0 Master Channel 0 Master Channel 0 Master Channel 0 Master Phoenix - AwardBIOS CMOS Setup Utility IDE Channel 0 Master Item Help IDE HDD Auto-Detection... - Page 68 VB7009 VB7009 VB7009 VB7009 User Manual User Manual User Manual User Manual The specifications of your drive must match with the drive table. The hard disk will not work properly if you enter incorrect information in this category. Select “Auto”...
-
Page 69: Advanced Bios Features
VB7009 VB7009 VB7009 VB7009 User Manual User Manual User Manual User Manual 6.8. Advanced BIOS Features Phoenix - AwardBIOS CMOS Setup Utility Advanced BIOS Features CPU Feature [Press Enter] Item Help Hard Disk Boot Priority [Press Enter] Quick Power On Self Test... -
Page 70: Boot Up Numlock Status
VB7009 VB7009 VB7009 VB7009 User Manual User Manual User Manual User Manual 6.8.4. Boot Up NumLock Status Set the NumLock status when the system is powered on. Settings Settings Description Description Settings Settings Description Description Forces keypad to behave as arrow keys Forces keypad to behave as 10-key 6.8.5. -
Page 71: Cpu Feature
VB7009 VB7009 VB7009 VB7009 User Manual User Manual User Manual User Manual 6.9. CPU Feature Phoenix - AwardBIOS CMOS Setup Utility CPU Features Item Help Thermal Management [Thermal Monitor 3] PMON support [Disabled] Menu Level Thermal Monitor 3 Dynamic Ratio & VID... -
Page 72: Hard Disk Boot Priority
VB7009 VB7009 VB7009 VB7009 User Manual User Manual User Manual User Manual 6.10. Hard Disk Boot Priority Phoenix - AwardBIOS CMOS Setup Utility Hard Disk Boot Priority Item Help 1. Bootable Add-in Cards Menu Level Use < > or <... -
Page 73: Advanced Chipset Features
VB7009 VB7009 VB7009 VB7009 User Manual User Manual User Manual User Manual 6.11. Advanced Chipset Features Phoenix - AwardBIOS CMOS Setup Utility Advanced Chipset Features Item Help PCIE Bus Control [Press Enter] UMA & P2P Bridge Control [Press Enter] CPU & PCI Bus Control... -
Page 74: Pcie Bus Control
VB7009 VB7009 VB7009 VB7009 User Manual User Manual User Manual User Manual 6.12. PCIE Bus Control Phoenix - AwardBIOS CMOS Setup Utility PCIE Bus Control PCIE Root Port [Enable] Item Help PCIE Target Link Speed [Auto] PCIE PE0 Control [Enable]... -
Page 75: Uma & P2P Bridge Control
VB7009 VB7009 VB7009 VB7009 User Manual User Manual User Manual User Manual 6.13. UMA & P2P Bridge Control Phoenix - AwardBIOS CMOS Setup Utility UMA & P2P Bridge Control UMA Enable [Enable] Item Help VGA Share Memory Size [256M] CPU Direct Access FB... -
Page 76: Cpu & Pci Bus Control
VB7009 VB7009 VB7009 VB7009 User Manual User Manual User Manual User Manual 6.14. CPU & PCI Bus Control Phoenix - AwardBIOS CMOS Setup Utility CPU & PCI Bus Control Item Help PCI Master 0 WS Write [Enabled] PCI Delay Transaction... -
Page 77: Integrated Peripherals
VB7009 VB7009 VB7009 VB7009 User Manual User Manual User Manual User Manual 6.15. Integrated Peripherals Phoenix - AwardBIOS CMOS Setup Utility Integrated Peripherals Item Help VIA OnChip IDE Device [Press Enter] VIA OnChip PCI Device [Press Enter] SuperIO Device [Press Enter]... -
Page 78: Via Onchip Ide Device
VB7009 VB7009 VB7009 VB7009 User Manual User Manual User Manual User Manual 6.16. VIA OnChip IDE Device Phoenix - AwardBIOS CMOS Setup Utility VIA OnChip IDE Device Item Help OnChip SATA [Enabled] Menu Level : Move Enter: Select +/-/PU/PD: Value... -
Page 79: Via Onchip Pci Device
VB7009 VB7009 VB7009 VB7009 User Manual User Manual User Manual User Manual 6.17. VIA OnChip PCI Device Phoenix - AwardBIOS CMOS Setup Utility VIA OnChip PCI Device Item Help Onboard PCIE LAN [Enabled] Hide D1F1 [Disabled] OnChip HDAC Device [Enabled]... -
Page 80: Superio Device
VB7009 VB7009 VB7009 VB7009 User Manual User Manual User Manual User Manual 6.18. SuperIO Device Phoenix - AwardBIOS CMOS Setup Utility SuperIO Device Item Help Onboard Serial Port 1 [3F8/IRQ4] Onboard Serial Port 2 [2F8/IRQ3] Onboard Serial Port 3 [3E8/IRQ4]... -
Page 81: Usb Device Setting
VB7009 VB7009 VB7009 VB7009 User Manual User Manual User Manual User Manual 6.19. USB Device Setting Phoenix - AwardBIOS CMOS Setup Utility USB Device Setting Item Help USB 1.0 Controller [Enabled] USB 2.0 Controller [Enabled] USB Operation Mode [High Speed]... -
Page 82: Power Management Setup
VB7009 VB7009 VB7009 VB7009 User Manual User Manual User Manual User Manual 6.20. Power Management Setup Phoenix - AwardBIOS CMOS Setup Utility Power Management Setup Item Help EuP/ErP Lot6 [Disabled] ACPI Suspend Type [S1&S3] Soft-Off by PWRBTN [Instant-Off] Menu Level... -
Page 83: Ac Loss Auto Restart
VB7009 VB7009 VB7009 VB7009 User Manual User Manual User Manual User Manual 6.20.5. AC Loss Auto Restart The field defines how the system will respond after an AC power loss during system operation. Settings Settings Description Description Settings Settings Description... -
Page 84: Wakeup Event Detect
VB7009 VB7009 VB7009 VB7009 User Manual User Manual User Manual User Manual 6.21. Wakeup Event Detect Phoenix - AwardBIOS CMOS Setup Utility Wakeup Event Detect Item Help PS2KB Wakeup Select [Hot Key] PS2KB Wakeup Key Select [Any Key] PS2MS Wakeup Key Select... -
Page 85: Resume Time (Hh:mm:ss)
VB7009 VB7009 VB7009 VB7009 User Manual User Manual User Manual User Manual 6.21.8. Resume Time (hh:mm:ss) This field can only be set if “RTC Alarm Resume” is enabled. The field specifies the time for “RTC Alarm Resume”. -
Page 86: Pnp/Pci Configurations
VB7009 VB7009 VB7009 VB7009 User Manual User Manual User Manual User Manual 6.22. PnP/PCI Configurations Phoenix - AwardBIOS CMOS Setup Utility PnP/PCI Configurations Item Help Init Display First [PCIEx] Resources Controlled By [Auto(ESCD)] Menu Level IRQ Resources Press Enter : Move... -
Page 87: Pc Health Status
VB7009 VB7009 VB7009 VB7009 User Manual User Manual User Manual User Manual 6.23 PC Health Status Phoenix - AwardBIOS CMOS Setup Utility PC Health Status VCore 1.000V Item Help +3.3V 3.200V 5.100V Menu Level +12V 11.880V SYSTEM Temp. 30°C CPU FAN... -
Page 88: Frequency/Voltage Control
VB7009 VB7009 VB7009 VB7009 User Manual User Manual User Manual User Manual 6.24 Frequency/Voltage Control Phoenix - AwardBIOS CMOS Setup Utility Frequency/Voltage Control Current FSB Frequency 100 MHz Item Help Current DRAM Frequency 533 MHz DRAM Clock [By SPD] Menu Level Spread Spectrum [+/-0.1%]... -
Page 89: Load Optimized Defaults
VB7009 VB7009 VB7009 VB7009 User Manual User Manual User Manual User Manual 6.25 Load Optimized Defaults Phoenix - AwardBIOS CMOS Setup Utility Standard CMOS Features Frequency/Voltage Control Advanced BIOS Features Load Optimized Defaults Advanced Chipset Features Set Supervisor Password Integrated Peripherals... -
Page 90: Set Supervisor/User Password
VB7009 VB7009 VB7009 VB7009 User Manual User Manual User Manual User Manual 6.26 Set Supervisor/User Password Phoenix - AwardBIOS CMOS Setup Utility Standard CMOS Features Frequency/Voltage Control Advanced BIOS Features Load Optimized Defaults Advanced Chipset Features Set Supervisor Password Integrated Peripherals... -
Page 91: Save & Exit Setup
VB7009 VB7009 VB7009 VB7009 User Manual User Manual User Manual User Manual 6.27 Save & Exit Setup Phoenix - AwardBIOS CMOS Setup Utility Standard CMOS Features Frequency/Voltage Control Advanced BIOS Features Load Optimized Defaults Advanced Chipset Features Set Supervisor Password... -
Page 92: Exit Without Saving
VB7009 VB7009 VB7009 VB7009 User Manual User Manual User Manual User Manual 6.28 Exit Without Saving Phoenix - AwardBIOS CMOS Setup Utility Standard CMOS Features Frequency/Voltage Control Advanced BIOS Features Load Optimized Defaults Advanced Chipset Features Set Supervisor Password Integrated Peripherals... -
Page 93: Main Menu (Bios For Vb7009-12Qce)
71: Illustration of the Main menu screen (for VB7009 : Illustration of the Main menu screen (for VB7009 : Illustration of the Main menu screen (for VB7009- - - - 12QCE) : Illustration of the Main menu screen (for VB7009... -
Page 94: Advanced Settings
VB7009 VB7009 VB7009 VB7009 User Manual User Manual User Manual User Manual 6.30 Advanced Settings The Advanced Settings screen shows a list of categories that can provide access to a sub-screen. Sub-screen links can be identified by the preceding right-facing arrowhead. -
Page 95: Cpu Configuration
VB7009 VB7009 VB7009 VB7009 User Manual User Manual User Manual User Manual 6.30.1 CPU Configuration The CPU Configuration screen shows detailed information about the built-in processor. In addition to the processor information, the thermal controls can be set. Figure Figure 73... -
Page 96: Ide Configuration
VB7009 VB7009 VB7009 VB7009 User Manual User Manual User Manual User Manual 6.30.2 IDE Configuration The IDE Configuration screen shows links to the primary master and slave IDE hard drive information screens. Figure Figure 74 74: Illustration of IDE Configuration screen... -
Page 97: Superio Configuration
VB7009 VB7009 VB7009 VB7009 User Manual User Manual User Manual User Manual 6.30.3 SuperIO Configuration The SuperIO Configuration screen shows the specific addresses and IRQs of the onboard serial ports. Figure Figure Figure Figure 75 75 75 75: Illustration of SuperIO Configura... -
Page 98: Hardware Health Configuration
VB7009 VB7009 VB7009 VB7009 User Manual User Manual User Manual User Manual 6.30.4 Hardware Health Configuration The Hardware Health Configuration screen has no editable fields. The system temperature is taken from an optional sensor that is connected to the J5 pin header. -
Page 99: Acpi Settings
VB7009 VB7009 VB7009 VB7009 User Manual User Manual User Manual User Manual 6.30.5 ACPI Settings ACPI grants the operating system direct control over system power management. The ACPI Configuration screen can be used to set a number of power management related functions. - Page 100 VB7009 VB7009 VB7009 VB7009 User Manual User Manual User Manual User Manual 6.30.5.3 6.30.5.3 6.30.5.3 6.30.5.3 USB S4 W USB S4 W USB S4 W USB S4 Wakeup akeup akeup akeup The USB S4 WakeUp enables the system to resume through the USB device port from S4 state.
-
Page 101: Apm Settings
VB7009 VB7009 VB7009 VB7009 User Manual User Manual User Manual User Manual 6.30.6 APM Settings APM enables the operating system to co-work with the BIOS to control the system power management. The APM Configuration screen can be used to set a number of power management functions. - Page 102 VB7009 VB7009 VB7009 VB7009 User Manual User Manual User Manual User Manual 6.30.6.3 6.30.6.3 6.30.6.3 6.30.6.3 Resume Resume Resume Resume on PS/2 KBC on PS/2 KBC on PS/2 KBC on PS/2 KBC Resume on PS/2 KBC wakes up a system that has been put into suspend or standby mode. When this...
- Page 103 VB7009 VB7009 VB7009 VB7009 User Manual User Manual User Manual User Manual 6.30.6.7 6.30.6.7 6.30.6.7 6.30.6.7 PCI Lan S5 Wakeup PCI Lan S5 Wakeup PCI Lan S5 Wakeup PCI Lan S5 Wakeup The PCI LAN S5 Wakeup feature enables the BIOS to allow remote wake-up from the S5 power off state through the PCI bus.
-
Page 104: Spread Spectrum Configuration
VB7009 VB7009 VB7009 VB7009 User Manual User Manual User Manual User Manual 6.30.7 Spread Spectrum Configuration The Spread Spectrum Configuration screen enables access to the Spread Spectrum Setting feature. Figure Figure Figure Figure 79 79 79 79: Illustration of Spread Spectrum Conf... -
Page 105: Usb Configuration
VB7009 VB7009 VB7009 VB7009 User Manual User Manual User Manual User Manual 6.30.8 USB Configuration The USB Configuration screen shows the number of connected USB devices. Figure Figure 80 80: Illustration of USB Configuration screen : Illustration of USB Configuration screen... -
Page 106: Crb Configuration
VB7009 VB7009 VB7009 VB7009 User Manual User Manual User Manual User Manual 6.30.9 CRB Configuration The CRB Configuration screen shows the available BIOS-controlled DRAM clock, graphics adapter, display device and LAN control features. Figure Figure 81 81: Illustration of CRB Configuration screen... -
Page 107: Boot Settings
VB7009 VB7009 VB7009 VB7009 User Manual User Manual User Manual User Manual 6.31 Boot Settings The Boot Settings screen has a single link that goes to the Boot Settings Configuration Boot Settings Configuration Boot Settings Configuration screen. Boot Settings Configuration... - Page 108 VB7009 VB7009 VB7009 VB7009 User Manual User Manual User Manual User Manual 6.31.1.3 6.31.1.3 6.31.1.3 6.31.1.3 Bootup Num Bootup Num Bootup Num Bootup Num- - - - Lock Lock Lock Lock The Bootup Num-Lock feature determines how the 10-key pad will behave. When the feature is enabled, the 10-key pad will behave as a number pad.
-
Page 109: Security Settings
VB7009 VB7009 VB7009 VB7009 User Manual User Manual User Manual User Manual 6.32 Security Settings The Security Settings screen provides a way to restrict access to the BIOS or even the entire system. Figure Figure Figure Figure 84 84 84... -
Page 110: Advanced Chipset Settings
VB7009 VB7009 VB7009 VB7009 User Manual User Manual User Manual User Manual 6.33 Advanced Chipset Settings The Advanced Chipset Settings screen has two links for accessing North and South bridge functions. Though the VX900 is a single chip solution, the North and South bridge categories are still for grouping features. - Page 111 VB7009 VB7009 VB7009 VB7009 User Manual User Manual User Manual User Manual 6.33.1.1 6.33.1.1 6.33.1.1 6.33.1.1 DRAM Clock/Timing Configuration DRAM Clock/Timing Configuration DRAM Clock/Timing Configuration DRAM Clock/Timing Configuration The DRAM Clock/Timing Configuration screen has one feature for controlling the system DRAM. All other DRAM features are automated and cannot be accessed.
- Page 112 VB7009 VB7009 VB7009 VB7009 User Manual User Manual User Manual User Manual 6.33.1.2.1 6.33.1.2.1 Select Display Device 1 and 2 Select Display Devi ce 1 and 2 6.33.1.2.1 6.33.1.2.1 Select Display Devi Select Display Devi ce 1 and 2 ce 1 and 2 The Select Display Device feature enables the user to choose a specific display interface.
-
Page 113: South Bridge Via Vx900 Configuration
VB7009 VB7009 VB7009 VB7009 User Manual User Manual User Manual User Manual 6.33.2 South Bridge VIA VX900 Configuration The South Bridge VIA VX900 Configuration screen has the following features. Figure Figure 89 89: Illustration of South Bridge VIA VX900 Configuration screen... -
Page 114: Exit Options
VB7009 VB7009 VB7009 VB7009 User Manual User Manual User Manual User Manual 6.34 Exit Options Figure Figure Figure Figure 90 90 90 90: Illustration of Exit Options screen : Illustration of Exit Options screen : Illustration of Exit Options screen : Illustration of Exit Options screen 6.34.1... -
Page 115: Driver Installation Driver Installation
Driver Installation 7.1 Microsoft Driver Support The VIA VB7009 mainboard is compatible with Microsoft operating systems. The latest Windows drivers can be downloaded from the VIA website at http://www.viatech.com/en/. For embedded operating systems, the related drivers can be found in the VIA website at http://www.viatech.com/en/. -
Page 116: Appendix A. Power Consumption Report Appendix A. Power Consumption Report
Power Consumption Report Power Consumption Report Power Consumption Report Power consumption tests were performed on the VIA VB7009. The following tables represent the breakdown of the voltage, amp and wattage values while running common system applications. A.1. VB7009-16 The tests were performed based on the following additional components: ®... -
Page 117: Mp3 Playback - Windows Media Player10
VB7009 VB7009 VB7009 VB7009 User Manual User Manual User Manual User Manual A.1.3. MP3 Playback – Windows Media Player10 Power Plane Power Plane Volts Volts Amperes Amperes Watts Watts Power Plane Power Plane Volts Volts Amperes Amperes Watts Watts +3.3V 3.192... -
Page 118: Network Access
VB7009 VB7009 VB7009 VB7009 User Manual User Manual User Manual User Manual A.1.7. Network Access <Single LAN> – Gigabit Ethernet File Transmitting Power Plane Power Plane Volts Volts Amperes Amperes Watts Watts Power Plane Power Plane Volts Volts Amperes Amperes...- Gigabit Ethernet File Transmitting -
Page 119: Vb7009-10E
VB7009 VB7009 VB7009 VB7009 User Manual User Manual User Manual User Manual A.2. VB7009-10E The tests were performed based on the following additional components: ® CPU: CPU: CPU: CPU: VIA C7 1.0 GHz Chipset: Chipset: Chipset: Chipset: VX900 Memory: Memory:... -
Page 120: Dvd Playback - Powerdvd 8.0
VB7009 VB7009 VB7009 VB7009 User Manual User Manual User Manual User Manual A.2.4. DVD Playback – PowerDVD 8.0 Power Plane Power Plane Volts Volts Amperes Amperes Watts Watts Power Plane Power Plane Volts Volts Amperes Amperes Watts Watts +3.3V 3.186 0.700... -
Page 121: Vb7009-12Xc
VB7009 VB7009 VB7009 VB7009 User Manual User Manual User Manual User Manual A.3. VB7009-12XC The tests were performed based on the following additional components: CPU: CPU: CPU: CPU: VIA NanoX2 1.2 GHz Chipset: Chipset: Chipset: Chipset: VX900 Memory: Memory: Memory:... -
Page 122: Dvd Playback - Windows Media Player10
VB7009 VB7009 VB7009 VB7009 User Manual User Manual User Manual User Manual A.3.4. DVD Playback – Windows Media Player10 Power Plane Power Plane Volts Volts Amperes Amperes Watts Watts Power Plane Power Plane Volts Volts Amperes Amperes Watts Watts +3.3V 2.990... -
Page 123: S5 Status - Windows 7 Shut Down
VB7009 VB7009 VB7009 VB7009 User Manual User Manual User Manual User Manual A.3.9. S5 Status – Windows 7 Shut down Power Plane Power Plane Power Plane Power Plane Volts Volts Volts Volts Amperes Amperes Amperes Amperes Watts Watts Watts Watts +3.3V... -
Page 124: Vb7009-12Qce
VB7009 VB7009 VB7009 VB7009 User Manual User Manual User Manual User Manual A.4. VB7009-12QCE The tests were performed based on the following additional components: CPU: CPU: CPU: CPU: CNR C4250 X4 1.2+ GHz DDR III: DDR III: Corsair 1600Mhz 4GB... -
Page 125: Mp3 Playback - Windows Media Player10
VB7009 VB7009 VB7009 VB7009 User Manual User Manual User Manual User Manual MEAN MEAN Volts Volts Amperes Amperes Watts Watts MEAN MEAN Volts Volts Amperes Amperes Watts Watts +3.3V -0.019 -0.018 0.000 -0.020 -0.036 0.000 +5VSB 5.157 0.413 2.130 +12V -0.017... -
Page 126: Graphics - Run 3Dmarks'06
VB7009 VB7009 VB7009 VB7009 User Manual User Manual User Manual User Manual A.4.5. Graphics – Run 3DMarks’06 Volts Volts Amperes Amperes Watts Watts Volts Volts Amperes Amperes Watts Watts +3.3V 3.145 0.735 2.312 4.939 3.225 15.928 +5VSB 5.061 0.221 1.118 +12V 12.384... -
Page 127: S5 Status - Windows 7 Shut Down (Eup Disable)
VB7009 VB7009 VB7009 VB7009 User Manual User Manual User Manual User Manual MEAN MEAN Volts Volts Amperes Amperes Watts Watts MEAN MEAN Volts Volts Amperes Amperes Watts Watts +3.3V 2.949 0.626 1.846 4.662 2.807 13.086 +5VSB 4.826 0.273 1.317 +12V 12.217... -
Page 128: Appendix B. Mating Connector Vendor Lists
Appendix B. Mating Connector Vendor Lists Mating Connector Vendor Lists Mating Connector Vendor Lists Mating Connector Vendor Lists The following tables listed the mating connector vendor lists of VB7009 mainboard. Connectors Connectors Part No. Part No. Mating Vendor & P/N Mating Vendor &... - Page 129 Japan TaiwanlHeadquarters China TsinghualSciencelParklBldgClj JBSlMissionlCourt kM7NMjlEbisulMTlBldgClDF 7F0lNk7lZhongMZhenglRoad NoCl7lZongguancunlEastlRoad Fremont0lCAllJBNkJ Higashi0lShibuyaMku Xindian0lTaipei0lPk7By HaidenlDistrict0lBeijing0ll7SSSyB Tokyol7NSMSS77 Taiwan China Japan TEL:l7CN7SCDykCkkSS TEL:lyyDCPCPP7yCNBNP TEL:lyDC7SCNJyNPPyy FAX:l7CN7SCDyjCBDNB TEL:ly7CkCNBDDC7Dkj FAX:lyyDCPCPP7yCNBNk FAX:lyDC7SCNJyNPPJJ Email:lembedded@viatechCcom FAX:ly7CkCNBDDC7Dky Email:lembedded@viaCcomCtw Email:lembedded@viatechCcomCcn Email:lembedded@viatechCcoCjp Europe Email:lembedded@viaMtechCeu...
Need help?
Do you have a question about the VB7009 and is the answer not in the manual?
Questions and answers