
Related Manuals for Qualstar Q48


Summary of Contents for Qualstar Q48
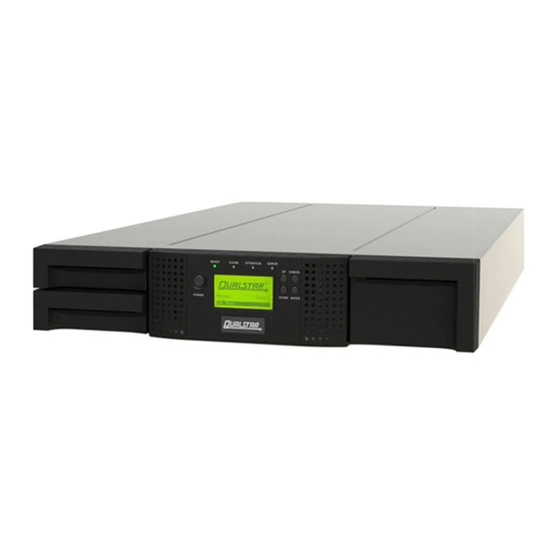
- Page 1 Q24™ and Q48™ Tape Library Installation and Operations Manual Document No. 511011 Rev 03...
-
Page 2: Revision History
© Copyright 2014-2015, QUALSTAR. All rights reserved. This document and the information Copyright contained herein are the property of QUALSTAR. No part of this document may be reproduced, transmitted, transcribed, stored in a retrieval system, or translated into any language or computer language in any form or by any means, electronic, mechanical, magnetic, optical, manual, or otherwise, without the express written permission of QUALSTAR. -
Page 3: Technical Support
The warranty for the tape library shall not apply to failures of any unit when: Any of the tape library components is repaired or modified by anyone other than Qualstar’s personnel or approved agent. Note: Certain components of the Q24/Q48 Tape Library, are •... -
Page 4: General Warnings
Do not remove cover (or back). No user-serviceable parts are inside. Refer servicing to qualified service personnel. WARNING Weight of Q24/Q48 Tape Library - Risk of personal injury Before lifting a library: Observe local health and safety requirements and guidelines for manual material handling. -
Page 5: Table Of Contents
Q48 Tape Library ..................2 Front Panel ........................ 3 1.2.1 Q24 Tape Library Front panel ..............3 1.2.2 Q48 Tape Library Front panel ..............3 Rear Panel ........................5 1.3.1 Q24 Power supply ..................6 1.3.2 Q48 Power supply ..................6 1.3.3... - Page 6 Q24 Single partition configuration ............61 Partitioning the library .................... 61 3.3.2 Q24 Dual partition configuration ............61 3.3.3 Q48 Single partition configuration ............61 3.3.4 Q48 Dual partition configuration ............62 3.3.5 Q48 Three partition configuration ............62 3.3.6 Q48 Four partition configuration ............
- Page 7 Q24/Q48 Tape Library Installation and Operations Manual Removing a tape drive ..................... 88 Replacing a tape drive ..................... 88 Removing the library controller ................89 Replacing the library controller ................89 Removing the power supply ..................90 Replacing the power supply ..................90 Servicing a magazine ....................
- Page 8 Q24/Q48 Tape Library Installation and Operations Manual Figures Figure 1 Q24 / Q48 front panel control, indicators and magazines ..............4 Figure 2 Q24/Q48 rear panel components ...................... 5 Figure 3 Q24 Power supply ..........................6 Figure 4 Q48 Power supply ..........................6 Figure 5 SAS half-height tape drive .........................
- Page 9 Table 9 Hardware specifications ........................96 Table 10 Operating environment ........................96 Table 11 Q24 Maximum storage capacity and data transfer rate ..............97 Table 12 Q48 Maximum storage capacity and data transfer rate ..............97 © Copyright QUALSTAR 2015...
-
Page 10: Product Overview And Features
The two libraries are similar, physically and functionally. The primary difference is the height of the Q48. The Q48 is twice the height of the Q24. The Q48’s added height increases the tape cartridge capacity to 48 slots, and the number of tape drives to a maximum of four. -
Page 11: Hardware Configuration
Q24/Q48 Tape Library Installation and Operations Manual Hardware Configuration Height: Tape drives: 1 or 2 half-height drives 1.1.1 Q24 Tape Library Number of magazines: 2 (12 slots each) Power supply: Number of mail slots: Library controller: Number of tape slots:... -
Page 12: Front Panel
Q24/Q48 Tape Library Installation and Operations Manual Front Panel The front panel of the Q24 and Q48 Tape Library is used to access the power button, operator control panel (OCP), left and right magazines, LED’s, and the mail slot. 1.2.1 Q24 Tape Library Front panel 1.2.2... -
Page 13: Figure 1 Q24 / Q48 Front Panel Control, Indicators And Magazines
Operator control panel (OCP) consisting of a 128 x 64 pixel screen. The OCP displays actions and status information, menu items or error messages relevant to the operational mode. Right magazine(s) Left magazine with mail slot(s) Figure 1 Q24 / Q48 front panel control, indicators and magazines © Copyright QUALSTAR 2015... -
Page 14: Rear Panel
Q24/Q48 Tape Library Installation and Operations Manual Rear Panel The rear panel of the Q24/Q48 Tape Library provides access to the drive interface connectors (either SAS or Fibre Channel), the power connector, Ethernet, serial and USB ports and the magazine release holes. -
Page 15: Q24 Power Supply
LED (amber) is illuminate when a fan failure occurs. The fan is running to slow or defective. LED (green) is illuminated when power is good. Figure 4 Q48 Power supply 1.3.3 Tape drives SAS connectors for both LTO Generations Ref. Description... -
Page 16: Library Controller
Right LED (green) is illuminated when the connection is ready or in use Serial port (Engineering Diagnostics) Controller LED blinking ok; if not, failure USB port (Firmware upgrades, key storage) Figure 7 Q24 / Q48 Library controller © Copyright QUALSTAR 2015... -
Page 17: Installation
Q24/Q48 Tape Library Installation and Operations Manual 2 Installation This section provides instructions for installing the Q24/Q48 Tape Library. Location Requirements Criteria Definition Rack requirements Standard 19-inch rack with vertical space of 2U available for the Q24 or vertical space of 4U available for the Q48. -
Page 18: Fibre Channel Requirements
Q24/Q48 Tape Library Installation and Operations Manual NOTE The library has a mini-SAS connector on each SAS tape drive. Mini-SAS connectors are keyed. A SAS tape drive is identified by a unique identifier called a World Wide Name (WWN) or World Wide Identifier (WWID). -
Page 19: Figure 9 Fibre Channel Topology (L Port)
Q24/Q48 Tape Library Installation and Operations Manual L Port – arbitrated loop • Figure 9 Fibre Channel topology (L Port) N Port – point to point protocol in a switched Fabric topology • Figure 10 Fibre Channel topology (N Port) The Fibre Channel tape drive can be connected directly to the server with a host bus adapter (HBA) or through a storage area network (SAN). -
Page 20: Installation Precautions
See Section 5.2, Electrostatic discharge WARNING Weight of Q24/Q48 Tape Library - Risk of personal injury Before lifting a library: Observe local health and safety requirements and guidelines for manual material handling. Remove all tape cartridges to reduce the weight. -
Page 21: Unpacking The Library
Identifying the product components 1. Q24/Q48 Tape Library, including power supply, 1 or more half-height tape drives (as ordered), Confirm that you received the following: library controller, and two tape magazines for the Q24, or four magazines for the Q48. -
Page 22: Removing The Shipping Lock
4. Replace the yellow label on the top of the library. Figure 11 Removing and Storing the Shipping Lock on a Q24 Figure 12 Removing and Storing the Shipping Lock on a Q48 © Copyright QUALSTAR 2015... -
Page 23: Rack Mounting The Library
Q24/Q48 Tape Library Installation and Operations Manual Rack mounting the library NOTE The rack rail components are optional accessories depending on the ordered configuration. Skip this section, when the rack rail components are not included. #3 Phillips screwdriver Required tools: T10 Torx screwdriver •... -
Page 24: Figure 13 Install The Mounting Brackets
Q24/Q48 Tape Library Installation and Operations Manual 6. Install mounting brackets for the library using the Torx screws included in the rack mount kit. 7. Slide the library onto the rack rails. Figure 14 Install the mounting brackets 8. Secure the library to the rack using a 3# Phillips screwdriver placed through the small holes in the mounting bracket to tighten the M5 screw(s) on each side of the library. -
Page 25: Installing A Tape Drive
Required tool: • 1. The Q24 has space for either 1 or 2 half-height tape drives. The Q48 has space for 1 to 4 half- To install tape drives: height tape drives. Always install the first tape drive in the bottom of the drive bay. A drive bay cover must be installed over any upper empty drive positions. -
Page 26: Installing The Library Controller
Q24/Q48 Tape Library Installation and Operations Manual 6. Push the tape drive into the drive bay until the tape drive seats itself against the back of the library. If extended, push the tab for the product ID label back into the library. -
Page 27: Connecting The Cables
1. Plug the female connector of the power cord into the power connector (AC connector) on the To connect the power cord to the library: rear panel of the power supply. For the Q24, refer to section 1.3.1 Q24 Power supply. For the Q48, refer to section 1.3.2 Q48 Power supply. © Copyright QUALSTAR 2015... -
Page 28: Connecting A Fibre Channel Cable
Q24/Q48 Tape Library Installation and Operations Manual 2. Plug the male connector into an appropriate electrical socket. 2.12.2 Connecting a Fibre Channel cable NOTE Use only cables specified for your LTO Fibre Channel tape drive. Each FC tape drive has two FC ports. -
Page 29: Connecting An Ethernet Cable And A Usb Device
Q24/Q48 Tape Library Installation and Operations Manual 2.12.4 Connecting an Ethernet cable and a USB device The connection to the Ethernet network is via an industry standard RJ45 copper interface on the rear To connect the Ethernet cable to the library: panel of the library. -
Page 30: Using And Maintaining Tape Cartridges
Q24/Q48 Tape Library Installation and Operations Manual LTO5 tape drive LTO6 tape drive LTO1 media Incompatible Incompatible LTO2 media Incompatible Incompatible LTO3 media Read only Incompatible LTO4 media Read / Write Read only LTO5 media Read / Write Read / Write... -
Page 31: Labeling Tape Cartridges
The misuse and misunderstanding of bar code technology can result in backup and restore failures. To ensure that your bar codes meet Qualstar’s quality standards, always purchase them from an approved supplier and never print bar code labels yourself. -
Page 32: Write-Protecting Tape Cartridges
Figure 22 Write-protecting a tape cartridge 2.16 Magazines The Q24/Q48 Tape Library makes use of removable magazines. Tape cartridges are stored in the magazines. Each magazine can be individually removed, or inserted. Each magazine inserted in the library, is locked into position, to prevent unauthorized removal. Access to unlock the magazines can be password protected. -
Page 33: Slot Usage
Q24/Q48 Tape Library Installation and Operations Manual In case the OCP or RMU initiated process fails or the library no longer has power, a manual emergency release is available, see Section 4.4, Emergency release. Each magazine contains 12 slots for tape cartridge storage. However, the lower front slot in the left 2.16.1... -
Page 34: Operating Procedures
Q24/Q48 Tape Library Installation and Operations Manual 3 Operating Procedures This section provides information about operating and configuring the Q24/Q48 Tape Library. Operator control panel (OCP) 3.1.1 Operating Modes 1. User interaction mode: This mode is employed when a user is pushing buttons on the operating The OCP operates in two basic modes: panel. -
Page 35: Power-Up Display
Q24/Q48 Tape Library Installation and Operations Manual When the library powers up or resets, it goes through several internally controlled processes that 3.1.3 Power-Up Display initialize and prepare the unit for normal operation. These processes are called Power-On-Self-Test (POST). While the POST is in process, the OCP will display appropriate information to keep the user informed. -
Page 36: Power-Down
Q24/Q48 Tape Library Installation and Operations Manual Toggle values are used to switch between two different states like ‘on’ and ‘off’. After navigating to the Toggle values menu item the display shows its current state. Pressing the <ENTER> button will select the item, whose value may then be toggled using the <UP>... -
Page 37: Menu Flow Charts (Ocp)
Q24/Q48 Tape Library Installation and Operations Manual 3.1.7 Menu flow charts (OCP) Startup Screen Home Screen Mainmenu Commands Service Information Menu Menu Menu Configuration Menu Figure 23 Main menu © Copyright QUALSTAR 2015... -
Page 38: Figure 23 Information Menu (1 Of 2)
Q24/Q48 Tape Library Installation and Operations Manual Information Menu Library Status Inventory View license key See Fig.65 Library Info Drive Info Library Identity Drive Identity Drive Status Library Network-General Library Error Log Library IPv4 Settings- example Figure 24 Information menu (1 of 2) -
Page 39: Figure 24 Information Menu (2 Of 2)
Q24/Q48 Tape Library Installation and Operations Manual Information Menu Library Info Drives See Fig 64 Inventory View License key Magazine Inventory Drive Inventory Figure 25 Information menu (2 of 2) © Copyright QUALSTAR 2015... -
Page 40: Figure 25 Commands Menu
Q24/Q48 Tape Library Installation and Operations Manual Commands Menu Open Mailslot Unlock Magazines Move Medium Reinventory Figure 26 Commands menu © Copyright QUALSTAR 2015... -
Page 41: Figure 26 Configuration Menu
Q24/Q48 Tape Library Installation and Operations Manual Configuration Menu Logical Library Restore Defaults Library Settings Set Date and Time Set Access PIN Network Save Library Config Drive Restore Library Config Add License Key Drive (example SCSI) Figure 27 Configuration menu... -
Page 42: Figure 27 Service Menu (1 Of 2)
Q24/Q48 Tape Library Installation and Operations Manual Service Menu Library Verify Service Menu-Library Run Tests Display Contrast Dump all USB Reboot Library FW Upgrade by USB Upload Skin file Figure 28 Service menu (1 of 2) © Copyright QUALSTAR 2015... -
Page 43: Figure 28 Service Menu (2 Of 2)
Q24/Q48 Tape Library Installation and Operations Manual Service Menu Clean Drive Service Menu-Drive Drive Test Drive Power Drive FW Upgrade by USB Figure 29 Service menu (2 of 2) © Copyright QUALSTAR 2015... -
Page 44: Remote Management Unit (Rmu)
Q24/Q48 Tape Library Installation and Operations Manual Remote management unit (RMU) Many of the same operations performed locally from the operator control panel (OCP) can also be 3.2.1 Overview performed remotely using the network connected Remote Management Unit (RMU). The RMU lets you monitor and control the library from any computer connected to your network or through the World Wide Web (WWW). -
Page 45: Login
Q24/Q48 Tape Library Installation and Operations Manual 4. Operations Move media within the library Rescanning the media inventory • Releasing magazines for removal • • 5. Service Performing a general diagnosis of the library Determining and updating firmware • Reboot of the library •... -
Page 46: Rmu Screen Layout
Q24/Q48 Tape Library Installation and Operations Manual Once logged in, the general layout of all RMU screens is similar: 3.2.4 RMU Screen Layout Model Name Details Object bar Action bar Figure 31 RMU Menu System Menu items in the Action bar and Object bar are selectable, and the currently selected item is displayed in bold italics. -
Page 47: Identity
Q24/Q48 Tape Library Installation and Operations Manual The status icons that may be displayed are as follows: Symbol Description for the status icons The green check mark for status <Ok> indicates that the library is fully operational and that no user intervention is required. - Page 48 Q24/Q48 Tape Library Installation and Operations Manual The following information is displayed: 1. Library information: • Serial Number • Product ID • Currently Installed Library Firmware • Boot code Firmware Revision • Barcode Reader • Library Mode • World Wide Node Name 2.
-
Page 49: Figure 33 Drive Identity
• Data Compression = Indicates if drive hardware data compression is enabled • Interface Type (SAS or FC) = Indicates drive’s physical interface connection type 2. Additional drive information (up to 4 half-height tape drives for the Q48) © Copyright QUALSTAR 2015... -
Page 50: Figure 34 Network Identity
Q24/Q48 Tape Library Installation and Operations Manual This page provides access to the network information about the connections of the library. No changes 3.2.5.3 Viewing the network identity can be made from this page. Figure 35 Network identity The following information is displayed: 1. -
Page 51: Status
Q24/Q48 Tape Library Installation and Operations Manual 3.2.6 Status This page displays the dynamic information about the library, such as the current status of the 3.2.6.1 Viewing the dynamic library status components. Figure 36 Library status The following information is displayed: 1. -
Page 52: Figure 36 Drive Status
• Drive Temperature • Cooling Fan Active • Drive Activity • Drive Port = Information relevant to the specific drive interface (FC or SAS) 2. Additional drive information (up to 4 half-height tape drives for a Q48) © Copyright QUALSTAR 2015... -
Page 53: Figure 37 Tape Cartridge Inventory (Summary)
Q24/Q48 Tape Library Installation and Operations Manual This page provides detailed information about the tape inventory in the library. A summary of each 3.2.6.3 Viewing the tape cartridge inventory magazine is shown. To get detailed information, click on the <> button. This will expand the display for the specified magazine and provide detailed cartridge information. -
Page 54: Configuration
Q24/Q48 Tape Library Installation and Operations Manual 3.2.7 Configuration This page allows the user to change the system configuration. 3.2.7.1 Changing the System Configuration Figure 40 System Configuration The following information is displayed: 1. Library Master Drive: The drive number that will host the library’s logical unit number (LUN) 2. -
Page 55: Figure 40 Logical Libraries
Q24/Q48 Tape Library Installation and Operations Manual Mailslot Enabled: Enabling the mail slot in the library reduces the total number of available storage slots to the library’s maximum slot count, less the number of mailbox slots. Auto Clean Enabled: When auto clean is enabled, the library automatically loads a cleaning cartridge when a tape drive needs to be cleaned. -
Page 56: Figure 41 License Key
Q24/Q48 Tape Library Installation and Operations Manual This page allows the user to add additional functionality to the unit by entering license key 3.2.7.3 Changing the License Key configuration information. Please contact your supplier to see if this functionality is applicable in your system. -
Page 57: Figure 43 Network Configuration
Q24/Q48 Tape Library Installation and Operations Manual Figure 44 Network configuration Changes that can be made are: Host Name: In this box enter the name you wish to use to address this library in the future. It is recommended that you use a name that is relevant to its location and/or its purpose. The Host •... - Page 58 Q24/Q48 Tape Library Installation and Operations Manual o Gateway address - Used to set the Gateway Address; contact your Network administrator to receive this address if required (used when an IP address does not match any other routes in the routing table) o IPv4 DNS Server 1 - This is the IP address of your name server (DNS server).
-
Page 59: Figure 44 Snmp Configuration
Q24/Q48 Tape Library Installation and Operations Manual Changes that can be made are: Figure 45 SNMP configuration SNMP Enabled/Disabled IPv4 SNMP Target Addresses • o IPv4 Target 1 • o IPv4 Target 2 o IPv4 Target 3 IPv6 SNMP Target Addresses o IPv6 Target 1 •... - Page 60 Q24/Q48 Tape Library Installation and Operations Manual This page allows the user to add and modify user accounts. 3.2.7.7 Changing the User settings Figure 46 User account settings Changes that can be made are: Access Level: Choose from 1 (Standard), 2 (Admin), or 3 (Service).
- Page 61 Q24/Q48 Tape Library Installation and Operations Manual This page allows the user to set the time and date, and how it will be displayed. 3.2.7.8 Setting Date/Time Figure 47 Date/time settings Changes that can be made are: Clock Configuration Time (24 hour format):...
- Page 62 Q24/Q48 Tape Library Installation and Operations Manual Selections available are: Figure 48 Error Log mode Error Log Mode Trace Level • Trace Filter • • This page allows the user to modify the event notification parameters. 3.2.7.10 Configuring event parameters for Email Notification...
- Page 63 Q24/Q48 Tape Library Installation and Operations Manual This page allows the user to reset the configuration to the factory defaults, and save or restore vital 3.2.7.11 Restoring factory Defaults product data. Figure 50 Factory defaults Selections available are: Configuration Reset <Restore>...
-
Page 64: Operations
Q24/Q48 Tape Library Installation and Operations Manual 3.2.8 Operations This page allows the user to move tape cartridges within the library. 3.2.8.1 Move Media within the library Figure 51 Move media Select the source and destination and then click the <Move> button to move a tape cartridge. -
Page 65: Service
Q24/Q48 Tape Library Installation and Operations Manual This page allows the user to release the right or left magazine from the library. 3.2.8.3 Releasing and replacing Magazines Figure 53 Release magazines Select the magazine in the pull down menu and then click the <Release> button. - Page 66 Q24/Q48 Tape Library Installation and Operations Manual This page provides the system administrator with general tests to verify the usability and reliability of 3.2.9.2 Performing Drive Diagnostics the drive(s). Figure 55 Drive diagnostics Selections available are: • Advance Diagnostic: Select Drive# and Select the Drive Test to be performed •...
- Page 67 Q24/Q48 Tape Library Installation and Operations Manual 3.2.9.4 Reboot of the library NOTE Ensure that the library is idle before attempting to perform any remote operations that will take it offline. Some options of the RMU take the library offline. This inactive mode can interfere with host-based application software, causing data loss.
- Page 68 Q24/Q48 Tape Library Installation and Operations Manual • Start Entry • Number Of Entries Per Page Changes will only be applied after the <Update> or <Clear Log> button is selected. <Dump log> creates the log and <Save Service Dump> allows the direct viewing or saving of the file.
- Page 69 Q24/Q48 Tape Library Installation and Operations Manual Provides details of the tapes stored in the library. 3.2.9.7 Cartridge Memory Figure 60 Cartridge Memory © Copyright QUALSTAR 2015...
-
Page 70: Q24 Single Partition Configuration
Installation and Operations Manual Partitioning the library The Q24/Q48 Tape Library may be addressed either as a single ‘logical library’, or it may be partitioned into logical libraries. In the case of the Q24, two half-height tape drives must be installed and the library may be set to a maximum of two partitions, because each drive is fully dedicated to a single partition. -
Page 71: Q48 Dual Partition Configuration
Q24/Q48 Tape Library Installation and Operations Manual 3.3.4 Q48 Dual partition configuration Partition 1 • Tape drive 1: half-height drive (default element address = 256) • Tape drive 2: half-height drive (default element address = 257) • Magazines: #1 and #2 Partition 2 •... -
Page 72: Removed Drives
Q24/Q48 Tape Library Installation and Operations Manual The mail slot (if configured as MAIL) will be shared between the logical libraries. NOTE The SCSI element addresses shown above are the default values which are valid in a new library or after a “Reset to Default”. -
Page 73: Default Settings
Q24/Q48 Tape Library Installation and Operations Manual Default settings Setting Default for the library Initial admin password adm001 FLX + last 6 characters of MAC address Host name e.g. MAC = 000E11801907, host name = FLX801907 localdomain.com Domain name IPv4... -
Page 74: Troubleshooting
If the host application software is not communicating with the library after installation, check the following: Check that all cables to the Q24/Q48, including power, SAS and/or Fibre Channel, as well as Ethernet 4.1.1... -
Page 75: Troubleshooting
Q24/Q48 Tape Library Installation and Operations Manual Troubleshooting PROBLEM SOLUTION Poor throughput performance Try a new tape. A marginal tape can cause performance problems due to bad spots on the tape requiring retries. Backing up data that compresses poorly or is already compressed ... - Page 76 Q24/Q48 Tape Library Installation and Operations Manual PROBLEM SOLUTION Media Cleaning or data tape Make sure you are using data and cleaning tapes that are incompatible with drive. compatible with the drive and model of your library. The library automatically unloads incompatible tapes, the <Media Attention>...
-
Page 77: Table 6 Troubleshooting
Q24/Q48 Tape Library Installation and Operations Manual PROBLEM SOLUTION <Media Attention> LED issues Contamination by loose Avoid contamination by ensuring that the library is installed in a clean, debris. contamination-free environment. Tapes should be stored vertically in their plastic cases. Clean the tape drive(s) as needed. -
Page 78: Removing Tape Cartridges From The Library
Q24/Q48 Tape Library Installation and Operations Manual Removing tape cartridges from the library WARNING Tape cartridges stuck in the Q24/Q48 Tape Library – Risk of damaging devices When the library is moved, any tape cartridge can become dislodged from the magazines and can damage other tape cartridges left in the library and the library media handler. -
Page 79: Emergency Release
While holding the pin or clip, have a second person attempt to pull the magazine out of the front of the unit. For the Q48, all magazines on a side are release and should be removed at the same time. Figure 63 Front panel (magazine removal) 5. -
Page 80: Upgrade The Library Firmware
Q24/Q48 Tape Library Installation and Operations Manual Upgrade the library firmware It is advisable to keep the library firmware updated to the latest version. To update the library firmware, navigate with the RMU or OCP to the appropriate screen: RMU screen: > Service > Firmware > Upgrade Library Firmware > Upload OCP screen: >... -
Page 81: Error Codes
Q24/Q48 Tape Library Installation and Operations Manual To run Library verify test, navigate with OCP to the appropriate screen: OCP screen: > Main Menu > Service > Service Library > Library Verify Operations during the Library Health Check (LHC): 1. The test requires user interaction and can only be run from the OCP. The administrator password is required. -
Page 82: Error Message Format
Q24/Q48 Tape Library Installation and Operations Manual 4.7.2 Error Message format The error message format is a fixed 4-byte length with the following content: • Error type • Error code • Sub error code • Internal code (active command code) 4.7.3... -
Page 83: Main Error Codes
Q24/Q48 Tape Library Installation and Operations Manual 4.7.5 Main error codes Error Description User Action Critical Component Status Code Barcode Reader Error, Retry operation; after Media changer probably defective. cannot initialize BCR several occurrences Flexi cable to BCR not properly contact technical support connected. - Page 84 Q24/Q48 Tape Library Installation and Operations Manual Error Description User Action Critical Component Status Code Gripper blocked Run ‘Library Verify Test’, Media changer probably defective. after several occurrences Gripper motor not connected or defect. contact technical support Gripper motor voltage to low.
- Page 85 Q24/Q48 Tape Library Installation and Operations Manual Error Description User Action Critical Component Status Code Cannot find slider block Run ‘Library Verify Test’, Media changer probably defective. within the expected after several occurrences Elevator distribution board defect. range contact technical support Cabling incorrect.
- Page 86 Q24/Q48 Tape Library Installation and Operations Manual Error Description User Action Critical Component Status Code Sled home sensor not Run ‘Library Verify Test’, Media changer probably defective. found after several occurrences Media changer controller defect. contact technical support Slider home sensor defect (mechanics, electronics).
- Page 87 Q24/Q48 Tape Library Installation and Operations Manual Error Description User Action Critical Component Status Code Sled range out of Run ‘Library Verify Test’, Media changer probably defective. specification after several occurrences Sled motor not connected or defect. contact technical support Media changer controller or distribution boards defect.
- Page 88 Q24/Q48 Tape Library Installation and Operations Manual Error Description User Action Critical Component Status Code Media changer Reset the unit and retry Media changer probably defective. controller response operation. After several No communication from library controller timeout. A command occurrences contact to media changer controller.
- Page 89 Q24/Q48 Tape Library Installation and Operations Manual Error Description User Action Critical Component Status Code Network initialization Check network cable and Library controller probably defective. failed network configuration. If Probably a hardware problem, check the error recurs, contact library controller...
- Page 90 Q24/Q48 Tape Library Installation and Operations Manual Error Description User Action Critical Component Status Code UART Error. Retry operation; after Check library and media changer Frame overrun or Parity several occurrences controller Error on serial contact technical support Interface. Display Error Retry operation;...
- Page 91 Q24/Q48 Tape Library Installation and Operations Manual Error Description User Action Critical Component Status Code Unsupported hardware Library Extender was (Library Extender) installed without detected – Library upgrading the library firmware upgrade firmware. Upgrade required library code to revision which supports this...
-
Page 92: Table 7 Error Codes
Q24/Q48 Tape Library Installation and Operations Manual Error Description User Action Critical Component Status Code Drive Load Timeout Retry operation; if not Drive probably defective. Drive has run in a successful contact Drive leader bent. timeout while loading a technical support Drive initialize repeatedly. -
Page 93: Sub Error Codes Related To The Media Changer
Q24/Q48 Tape Library Installation and Operations Manual Mechanical initialization failure 4.7.6 Sub error codes related to the media changer Connection to slave media changer failed Error motor initialization Error during gripper close Error slider home positioning Error elevator home movement... - Page 94 Q24/Q48 Tape Library Installation and Operations Manual Error during second slider movement Error during second gripper movement, get range failed Error during third slider movement, move home failed Error during set hold current to avoid torsion Preposition to drive failed...
-
Page 95: Sub Error Codes Related To The Library
Q24/Q48 Tape Library Installation and Operations Manual Tape drive wake up failed 4.7.7 Sub error codes related to the library Error accessing slot status Media changer load not reached tape present sensor No activity after <Load> command Timeout while loading tape No activity after <Load>... -
Page 96: Servicing
Q24/Q48 Tape Library Installation and Operations Manual 5 Servicing This section provides instructions for servicing the Q24/Q48 Library. Tools that may be needed Flat-blade screwdrivers (large and small) #2 and #3 Phillips screwdriver • Ground strap • • Electrostatic discharge... -
Page 97: Removing A Tape Drive
Q24/Q48 Tape Library Installation and Operations Manual Removing a tape drive NOTE A tape drive is hot pluggable. It is not mandatory to power down the library to replace a drive. 1. Unload the tape cartridge from the tape drive (if present) using: Adhere strictly to the following steps to remove a tape drive: OCP, see Section 3.1.7... -
Page 98: Removing The Library Controller
Q24/Q48 Tape Library Installation and Operations Manual Removing the library controller 1. Power down the library by pressing the power button on the front panel. Adhere strictly to the following steps to remove a power supply: 2. Remove the power cord from the rear panel of the library. -
Page 99: Removing The Power Supply
Q24/Q48 Tape Library Installation and Operations Manual Removing the power supply 1. Power down the library by pressing the power button on the front panel. Adhere strictly to the following steps to remove a power supply: 2. Remove the power cord on the rear panel of the library. -
Page 100: Removing The Base Chassis
7. Slide the magazine completely into the library. The magazine will lock into place once it is correctly installed. 5.10 Removing the base chassis WARNING Weight of Q24/Q48 Tape Library - Risk of personal injury Before lifting a library: Observe local health and safety requirements and guidelines for manual material handling. -
Page 101: Replacing The Base Chassis
Q24/Q48 Tape Library Installation and Operations Manual Figure 69 Re-installing Shipping Lock 4. To store or ship the removed base chassis, repackage it in its original packaging materials, see Section 6. 5.11 Replacing the base chassis 1. Remove the base chassis from the rack, as described above. -
Page 102: Packaging The Unit For Transportation
3. Package the appropriate library as shown in Figure 70 or Figure 71. Figure 70 Product ID label 4. If returning the unit to Qualstar for repair, please call the Technical Support department to request an RMA number (See: Contacting Qualstar) - Page 103 Q24/Q48 Tape Library Installation and Operations Manual Figure 71 Packaging the Q24 library Figure 72 Packaging the Q48 library © Copyright QUALSTAR 2015...
-
Page 104: Table 8 Packaging The Library
Q24/Q48 Tape Library Installation and Operations Manual Step Description Packaging box Bottom shell Library Middle shell ( Q48 only ) Top shell Table 8 Packaging the library © Copyright QUALSTAR 2015... -
Page 105: Technical Specifications
Q24/Q48 Tape Library Installation and Operations Manual 7 Technical specifications Hardware specifications Library Model Height Product alone: 3.5” / 8.9 cm Product alone: 6.93” / 17.6 cm Packaged: 9.8” / 24.8 cm Packaged: 13.0” / 33.0 cm Width Product alone: 17.6” / 44.8 cm Product alone: 17.6”... -
Page 106: Maximum Storage Capacity And Data Transfer Rate
(single drive) Compressed: 525 MB/sec (1.9 TB/hour) (assuming 2.5:1 compression) Interface 6 GB/sec (SAS) (drive dependent) 8 GB/sec (FC) Table 12 Q48 Maximum storage capacity and data transfer rate For additional information, see Section 2.15, Tape cartridges © Copyright QUALSTAR 2015... -
Page 107: Agency Certifications
Q24/Q48 Tape Library Installation and Operations Manual 8 Agency certifications NOTE To comply with the following regulations and standards, the library must be properly installed in an office or industrial environment with shielded cables and adequate grounding of the input power source. -
Page 108: Device Standards
Q24/Q48 Tape Library Installation and Operations Manual Device standards ANSI Small Computer System Interface-2 (SCSI-2), X3.131 – 1994 ANSI SCSI-3 Primary Commands, X3.301 - 1997 • ANSI Information and Technology, SCSI-3 Medium Changer Commands (SMC), NCITS.314:1998 • ANSI SCSI Parallel Interface-2 (SIP-2), X3.302:1998 •... -
Page 109: Gs Mark
Q24/Q48 Tape Library Installation and Operations Manual GS mark The Geprüfte Sicherheit ("Tested Safety") or GS mark is a voluntary certification mark for technical equipment. It indicates that the equipment meets German and, if available, European safety requirements for such devices. -
Page 110: Glossary
Q24/Q48 Tape Library Installation and Operations Manual 9 Glossary Fibre channel Full-height Host bus adapter Connects a host system to other network and storage devices Half-height Light Emitting Diode Linear Tape-Open Magnetic tape data storage technology Logical Unit Number Unique number assigned to each device attached on a SCSI bus. For example, disk and tape drives, media changer, etc. -
Page 111: Index
General warnings ............iv Rear panel ............... 5 Installing ..............8 Q24 Power supply ..........6 Cabling ..............18 Q48 Power supply ..........6 FC cable ............19 Ethernet cable ........... 20 Tape drive ............6 Servicing ..............87 Power cord ............18 Base chassis ............
Need help?
Do you have a question about the Q48 and is the answer not in the manual?
Questions and answers